BR714 - Roof box Inno - Free user manual and instructions
Find the device manual for free BR714 Inno in PDF.


| Product Type | Roof Box |
| Brand | Inno |
| Model | BR714 |
| Maximum Load Capacity | 110 lbs (50 kg) |
| Recommended Crossbar Distance | 31.5 inches (80 cm) |
| Minimum Crossbar Distance | 23.6 inches (60 cm) for most models; 19.7 inches (50 cm) for BR714 |
| Locking System | Key lock with push button mechanism |
| Opening Mechanism | Key turn and push button to raise cover |
| Installation Hardware | Includes U-bolts, plates, round knobs, belts, belt hooks, hole filler caps, mall |
| Tools Required | No tools specified (assembly by hand) |
| Material | Not specified in manual |
| Color | Not specified |
| Dimensions (L x W x H) | Not specified in manual |
| Weight | Not specified |
| Water Resistance | Not fully waterproof (may allow moisture in heavy rain) |
| Security Features | Key lock, belt system to secure cargo inside |
| Compatibility | Requires crossbars (factory or aftermarket) |
| Maintenance | Wash with water only; no detergents or wax; store away from direct sunlight |
| Included Accessories | 2 keys, 2 belts, 2 belt hooks, 4 U-bolts, 4 plates, 8 round knobs, hole filler caps, mall |
| Replacement Parts Available | Belts, belt hooks, installation sets (U-bolt, knob, plate, mall), hole filler caps, keys, manual |
| Warranty or Support | Contact CAR MATE USA at support@innoracks.com |
Frequently Asked Questions - BR714 Inno
User questions about BR714 Inno
0 question about this device. Answer the ones you know or ask your own.
Ask a new question about this device
Download the instructions for your Roof box in PDF format for free! Find your manual BR714 - Inno and take your electronic device back in hand. On this page are published all the documents necessary for the use of your device. BR714 by Inno.
USER MANUAL BR714 Inno
Thank you for purchasing the INNO Roof Box. Please read this instruction manual thoroughly before using your roof box. Store this manual in a safe place where anyone using the roof box can use it for reference. If for any reason you lend/sell this roof box to someone else, please make sure that you also give them this instruction manual. If any sections of this manual are unclear or difficult to understand, please contact the service center shown in this manual.
CAUTION
Note
Failing to observe these cautions may lead to accidents that may cause death or serious injury.
These notes explain points that you should know about when using the roof box.
ATTENTION
Failing to observe these attentions may lead to injuries, or damage to the roof box, vehicle, and surrounding objects.
Check the Product Contents
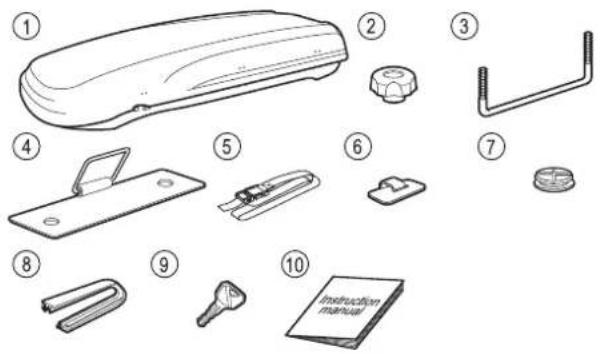
This roof box contains the following parts. Check to make sure you have all of the necessary parts. If for some reason you find that a part is missing, contact the service center listed in this manual.
| NO. | Part | Quantity | NO. | Part | Quantity |
| 1 | Roof box | 1 | 6 | Belt hook | 2 |
| 2 | Round knob | 8 | 7 | Hole filler cap | Noted separately |
| 3 | U Bolt | 4 | 8 | Mall | Noted separately |
| 4 | Plate | 4 | 9 | Key | 2 |
| 5 | Belt | 2 | 10 | Instruction manual (this manual) | 1 |
[Hole filler cap quantity]
| BRA220 | 6 | BRA220 | 2 |
| BRA714,BRA744 | 0 | BRA714,BRA744 | 0 |
| BRA764 | 0 | BRA764 | 0 |
Assembly Diagram

Opening and Closing
Opening the Cover
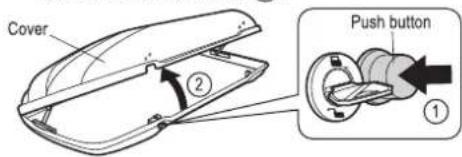
1 Insert the key into the key cylinder, and turn the key 90° in the "☐" direction.

2 While pressing and holding the push button ①, raise the roof box cover ②.
Note
If the cover catches against something or is difficult to open, do not force it open. Close the cover, then raise it again making sure that it remains level.
ATTENTION
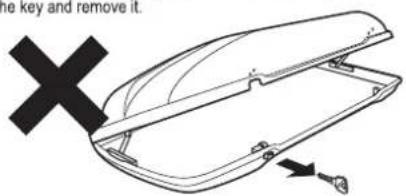
The key cannot be pulled out while the cover is open. If you want to pull the key out, first close the cover, then turn the key and remove it.
Closing the Cover
1 Check that the key is in the "☐" position, close the cover on a level so that the two key hooks on the front and rear of the cover fit into the hook holes at the same time, and close the cover firmly so that you hear a "click" sound. If you try to close the cover when the cover is slightly twisted, the key hooks will not fit into the holes correctly.

Installing the Carrier
Before Installing
1 Make sure you have crossbars (factory or 3rd party) to attach your cargo box. If you do have front and back cross bars please continue else go to our website: www.innoracks.com for a local dealer.
2 Please consult your vehicle manual for the load roof capacity of your vehicle.
Adjusting your Cross Bars
1 You need to adjust the distance between your front and rear cross bar before mounting you cargo box.
Recommended 31.5 inch (80 cm) Minimum 23.6 inch (60 cm) * or longer

*BRA 714 requires 19.7 inch (50cm)
ATTENTION
Make sure the distance between the front and back bars is more than 23.6 inch (60 cm).
If the distance between the front and back bars is too narrow, too much pressure will be exerted on the roof box, which may cause it to fall of the vehicle.
Note
If you can adjust the distance between the front and back bars, a distance of approximately 31.5 inch (80 cm) will provide stability for the box, and will also reduce the load concentration on the vehicle.
Deciding the Installation Position of the Roof Box
1 Temporarily place the roof box onto the bars.

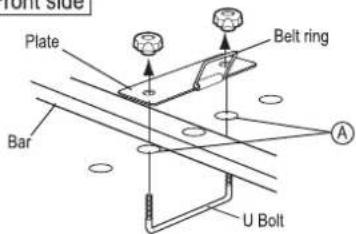
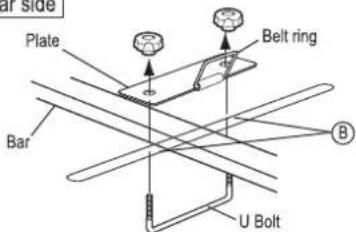
2 Open the roof box, and slide the roof box forwards and backwards to align the roof box installation holes A and B with the front and back bars to decide the installation position.

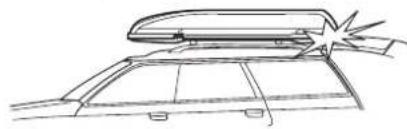
3 At this time, open the trunk (boot) of your vehicle to make sure it does not hit the roof box. If the trunk (boot) hits the roof box, either move the position of the roof box, or change the installation position of the cross bars.
Installing the Roof Box
1 ① Place the plate on the outside of the belt ring, lined up with installation holes ④ and ⑤.
② Pass the U bolt through the plate holes from underneath the bar.
Front side
Rear side
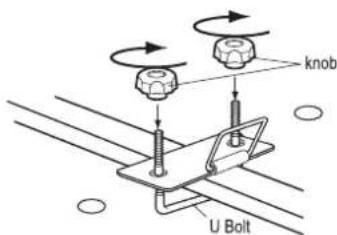
2 Tighten both the left and right U bolt knobs in alternation.
Note
When tightening, make sure you do not trap the belt rings with the knob.
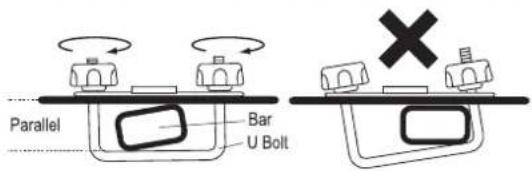
Depending on the make and model of vehicle, the bar may be slanted compared to the roof box base. Adjust the round knob, and ensure that the roof box and U-bolt are about parallel when installing the roof box.
CAUTION
Always make sure that the U-bolt is about parallel with the roof box.
Failing to do so may cause the knobs to loosen while driving causing the roof box to fall off the vehicle. This may cause an accident involving other vehicles on the road or passers by.
3 Front side
Insert hole filler caps from the top side into all of the other holes that you did not pass the U-bolt through.
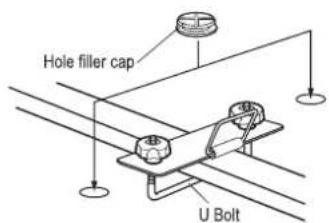
Rear side
Cut the mall to the same length as the long hole, and insert it firmly from the top side.

Installing the Carrier
Installing the Belt/Belt Hooks
1 Pass the belt through the belt rings, and then pass it through the buckle.
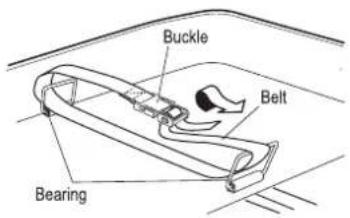
2 Stick the belt hooks onto the upper side of the belts, in a position so that the belt can be hooked easily onto the inner side of the cover.

Note
After sticking on the belt hooks, leave the hooks for 24 hours without hooking on the belts so that they attach securely.
Checking the Roof Box Installation
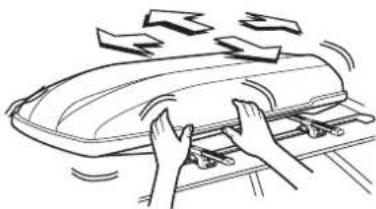
1 Shake the roof box forwards and backwards, and left and right to check whether there is any rattling due to loose knobs, and to check that the carrier is fixed securely on the vehicle. If you can hear or feel rattling, tighten all installation sections again.
Using the Roof Box
Loading the Roof Box
1 Remove the belt buckles, and hook the belts onto the belt hooks.

2 Unfasten the belts that you hooked onto the belt hooks, insert into the buckle and tighten the belt.

CAUTION
When driving with items loaded into the box, always fix the items in place with the belts.
Note
If the items are not fixed down enough, they may move around during transit, causing the cover to become difficult to open. If this occurs, press the button while pushing the cover down.
ATTENTION
If you over fill the box and try to force the cover closed, the cover may not close securely, or the box or contents inside may become damaged.

ATTENTION
When closing the cover, make sure that you do not trap loaded items in the hook section.

The maximum load weight is 110 lbs (50 kg). Also, load items so they are flat and distributed evenly within the box. In particular, do not load items that weigh more than 22 lbs (10 kg) at the front side of the box.
Note
- Loading more than 110 lbs (50 kg) of items into the box, or loading items into only the front or the back of the box may cause damage to the roof box, or it may cause the box to fall from the roof of the vehicle.
● There may be additional weight limits depending on the make and model of vehicle. Check for any additional limitations in the vehicle compatibility list in the store.
Calculating the maximum loading capacity
Maximum loading capacity (in the range that does not exceed 110 lbs (50 kg))
=
Maximum loading capacity in vehicle compatibility list
Weight of roof box
Weight of other attachments
Weight of objects loaded onto other attachments
(When using in combination with other attachments.)
Maximum 110 lbs (50 kg)

Do not exceed the posted speed limit
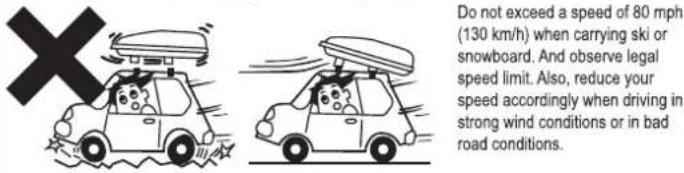
Checking for Looseness

Before driving, check the 4 installation locations for looseness. If any of the installation sections are loose, re-tighten them.
Alterations Prohibited

Hold loaded items with the belts

Always use the belts to hold loaded items in place. Failing to do so may cause damage to the loaded items or roof box, or may cause the loaded items to fall out if you brake sharply.
Items that cannot be loaded

- Any type of spray can that utilizes high pressure gas
- Flammable liquids including gasoline, paraffin etc.
- Precision mechanical equipment
- Living creatures (pets etc.)
- Raw items (vegetables etc.)
The inside of the roof box may become hot because it is exposed to direct sunlight. Loading the above listed items into the roof box may cause explosions or fire, death through dehydration, damage or deformation due to heat, or decomposition.
The items shown above cannot be loaded into the roof box.
Use of oils, thinners (including paints) etc. prohibited

Using any type of lubricating spray, oil, grease, thinner, or detergent may cause the roof box materials to deteriorate, which may cause damage to the roof box, or may cause the roof box to fall from the vehicle. Do not apply oil to the key or hinge sections.
Close the cover securely

Close the cover securely. Failing to do so may cause the cover to open while driving allowing the loaded items to fall out, or the roof box may become damaged or fall from the roof of the vehicle due to wind pressure.

ATTENTION
Trunk (Boot) Caution

Make sure that the rear door or trunk (boot) door does not hit the roof box when opening.
Not fully waterproof
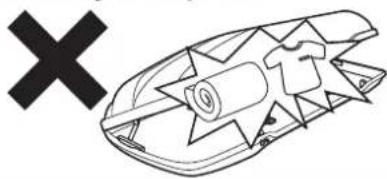
The roof box is not constructed to be complete waterproof. Therefore, loaded items may get wet due to strong rain etc..
Caution opening and closing during strong winds

Opening and closing the roof box in strong gusts or when it is particularly windy may cause damage to the roof box, or may cause you trap your hands etc. in the box causing injury.
Avoid sudden maneuvers

Avoid sudden starts, sudden turns, and sudden braking as much as possible. Performing such maneuvers may cause the installation sections of the carrier and roof box to slide out of place, which may cause damage to the vehicle or roof box.
Caution: Vehicle height

Always remember that the vehicle's height has increased when the carrier is installed.
Use of automatic car washes prohibited

Always remove the carrier before using an automatic car wash.
Daily Maintenance / Storage
If the roof box becomes dirty, wash it with water.
CAUTION
Use of detergents and wax prohibited
When washing the roof box, do not use detergents or wax. The roof box materials may deteriorate depending on the type of detergent or wax.

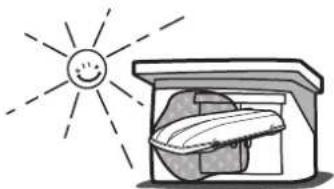
If you do not plan to use the roof box for a length of time, remove the roof box from the roof of the vehicle, inspect each part of it, and store it away from direct sunlight.
Note
Store in a cool place (caution — ultraviolet rays).
The roof box material will gradually deteriorate due to exposure to ultraviolet light. If you do not plan to use the roof box for a period of time, store it away from direct sunlight, high temperatures, and high humidity.
Inspecting the Roof Box
- Inspect the roof box for cracks or damage. If you find any cracks or damage, discontinue using the roof box immediately.
- Inspect the U-bolts and knobs for deformation or damage. If you find any deformation or damage, replace the part.
● Store small parts such as keys or installation brackets together in a plastic bag to ensure they are not lost.
Note
The specifications and external appearance of this carrier and genuine replacement parts are subject to change without prior notice in the interest of product improvement.
Genuine Replacement Parts
The following genuine INNO replacement parts are available. If you require replacement parts, make a note of the part number or part name, and order the parts from the dealer where you purchased this carrier.
Belt 2.5 m
(1 set contains 2 belts) ISP952

Belt hook
(1 set contains 2 hooks) ISP682

Installation set
U-Bolt (1)
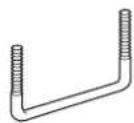
Knob (2)

Plate (1)
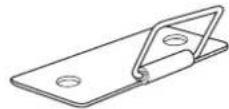
Mall
(1 set contains 2 belts) ISP193

Hole filler caps
(1 set contains 4 caps)

Key (1)
Please check the key No.

Instruction manual (this manual) (1)

Contact Information
For inquiries about this product or to order replacement parts, contact the service center shown below.
However, Car Mate shall not be held liable for any accidents or incidental losses arising from improper installation or use, from the customer making changes to the original configuration or specifications, or from natural disasters such as typhoons.


CAR MATE USA, Inc
383 Van Ness Ave. Suite 1603, Torrance, CA 90501 U.S.A support@innoracks.com www.innoracks.com
Distance recommandée 31.5 inch (80 cm) Distance minimale 23.6 inch (60 cm)*

AVERTISSEMENT
! AVERTISSEMENT
AVERTISSEMENT
383 Van Ness Ave. Suite 1603, Torrance, CA 90501 U.S.A support@innoracks.com www.innoracks.com
PRECAUCIÓN
PRECAUCIÓN
383 Van Ness Ave. Suite 1603, Torrance, CA 90501 U.S.A support@innoracks.com www.innoracks.com
- CAUTION
- NOTE
- ATTENTION
- OPENING AND CLOSING
- OPENING THE COVER
- CLOSING THE COVER
- INSTALLING THE CARRIER
- BEFORE INSTALLING
- ADJUSTING YOUR CROSS BARS
- DECIDING THE INSTALLATION POSITION OF THE ROOF BOX
- INSTALLING THE ROOF BOX
- 3 FRONT SIDE
- REAR SIDE
- INSTALLING THE BELT/BELT HOOKS
- CHECKING THE ROOF BOX INSTALLATION
- USING THE ROOF BOX
- LOADING THE ROOF BOX
- CALCULATING THE MAXIMUM LOADING CAPACITY
- DAILY MAINTENANCE / STORAGE
- INSPECTING THE ROOF BOX
- GENUINE REPLACEMENT PARTS
- CONTACT INFORMATION
- CAR MATE USA, INC
- AVERTISSEMENT
- PRECAUCIÓN
Brand : Inno
Model : BR714
Category : Roof box