Cargo Box BRA220R - Roof box Inno - Free user manual and instructions
Find the device manual for free Cargo Box BRA220R Inno in PDF.


| Product Type | Roof Box |
| Brand | Inno |
| Model | Cargo Box BRA220R |
| Material | ABS Plastic |
| Dimensions (L x W x H) | 180 cm x 85 cm x 45 cm (approx.) |
| Weight | 20 kg (approx.) |
| Internal Volume | 400 liters (approx.) |
| Maximum Load Capacity | 75 kg |
| Mounting Type | Crossbars (clamp or fixed point) |
| Lock Type | Central locking system with key |
| Opening | Dual side opening |
| Color | Black (common) or Silver |
| Aerodynamic Design | Yes, optimized for low wind noise |
| Weatherproof | Yes, with rubber seal |
| UV Resistant | Yes, material treated against UV |
| Installation | Requires two persons recommended |
| Compatibility | Most vehicles with roof bars (check load capacity) |
| Maintenance | Clean with mild soap and water; avoid abrasive cleaners |
| Safety | Always secure load and check tightness periodically |
| Warranty | Limited lifetime warranty (typical) |
| Country of Origin | Japan (Inno brand) |
Frequently Asked Questions - Cargo Box BRA220R Inno
User questions about Cargo Box BRA220R Inno
0 question about this device. Answer the ones you know or ask your own.
Ask a new question about this device
Download the instructions for your Roof box in PDF format for free! Find your manual Cargo Box BRA220R - Inno and take your electronic device back in hand. On this page are published all the documents necessary for the use of your device. Cargo Box BRA220R by Inno.
USER MANUAL Cargo Box BRA220R Inno
Cargo Box BRA220R Installation Instructions
These instructions are for the installation and use of the Inno carrier system attachment. After reading this manual, keep it in a safe place along with the installation instructions for the rest of your carrier system.
5411-71089G
inno. ADVANCED CAR BACKS





Contact Information
If you have any questions or comments, please contact us at the service center listed below. CarMate shall not be held liable for any accidents or incidental losses arising from improper installation or use, nor for those arising from installation or use after the customer has made any change to the system's original configuration or specifications.

Zinno.
ADVANCE
Car Mate USA
383 Van Ness Ave., Suite 1603
Torrance, CA
www.innoracks.com support@ry-inno.com
Important Notes on the Cargo Box
Read and understand this user's manual thoroughly before using your new cargo box and be sure to follow all usage instructions. Keep this manual in a safe place so that it's handy for reference anytime.
If you have any questions regarding the information in this manual, please contact the service center listed at the end of this manual.
Precautions

There should be a distance of at least 1.7 feet (50cm) between the front and rear crossbars.


While our box is designed to mount to a variety of crossbar types, we have no control over non-Inno rack quality. We cannot guarantee the performance of our carrier when mounted on a rack made by another manufacturer.
Do not attempt to modify the box in any way.

When loading, spread your cargo evenly throughout the box. Avoid loading more than 10 kg (22 lbs.) in the front area of the box.
Unbalanced loading may result in safety problems.

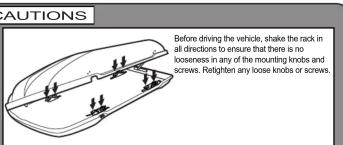
Make sure before driving that the box is securely closed and locked. If it is not securely closed or unlocked, it may open accidentally and you may lose your cargo or cause a serious accident.

Obey posted speed limits. Under high wind or poor road conditions, drive at a lower speed.
Do not expose the cargo box to hurricane or gale force wind conditions.

Avoid loading the following types of cargo 1. Highly pressurized spray cans
2.Flammable goods
3.Sensitive or delicate machines and electronics
4.Pet animals
5. Perishables
Direct sunlight on the box can elevate the temperature inside the box and damage or harm the above items.

Do not apply lubricants, oil or grease to damper, hinges or box surface as they may damage the box. A damaged box may be structurally weaker and may not perform safely.
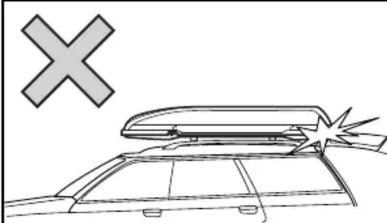
Make sure that the box does not interfere with opening of the rear-door.
If you cannot avoid interference, apply a protective pad to avoid damage to either the Box or car body.

Avoid loading gear that you do not want to get wer. While the box is water resistance, it is not waterproof. Cargo may get wet when the box is used in rainy conditions.

Pay close attention when opening and closing the box under high wind conditions.
The wind may cause the box to open or close more quickly than normal. Be careful with your fingers in these situations.

The installed box increases the height of your vehicle. Pay close attention to this new height so that you do not hit objects such as signs, trees or garage ceilings and doors. If you do hit an object with the rack, check to ensure that it is still securely attached.

Do not drive your cargo box through a car wash.
Always remove the carrier system before running your car through a car wash.
Care and Storage
1 Wash any mud off the carrier system. Use a damp towel to wipe away dust and dirt. Do not use any thinner or solvents to clean any part of the carrier system.
2 After cleaning carrier, check for any of the following:
1) Worn screw threads
2) Key deformation
3) Holder deformation
4) Cracks in any of the components of the carrier system.
3 Store all components of the carrier system together in one place to prevent any component from being lost. Avoid storage in areas subject to direct sunlight, high temperature or excessive humidity.
Brand : Inno
Model : Cargo Box BRA220R
Category : Roof box