
T32FHD506 - Television Ferguson - Free user manual and instructions
Find the device manual for free T32FHD506 Ferguson in PDF.


| Product Type | LED Television |
| Screen Size | 32 inches (81 cm) |
| Resolution | 1366 x 768 (HD Ready) |
| Dimensions (W x H x D) Without Stand | 730 x 430 x 80 mm |
| Weight (Without Stand) | 4.2 kg |
| Power Supply | 100-240V ~ 50/60Hz |
| Power Consumption (Typical) | 50 W |
| Standby Power Consumption | < 0.5 W |
| Video Inputs | HDMI (x2), VGA, Component, Composite |
| Other Inputs | USB, RF (Antenna), CI Slot |
| Audio Output | Optical, Headphone Jack, Stereo RCA |
| Remote Control | Infrared (IR) Remote Included |
| Key Features | HDMI CEC, USB Media Player, Dolby Digital Plus |
| Wall Mount Compatibility | VESA 100 x 100 mm |
| Cleaning Instructions | Use a soft dry cloth; avoid chemicals |
| Safety | Class II, do not open, keep ventilation slots clear |
| Spare Parts Availability | Remote control, stand, power cord available |
| Repairability | Modular design; replaceable power board, main board |
Frequently Asked Questions - T32FHD506 Ferguson
User questions about T32FHD506 Ferguson
0 question about this device. Answer the ones you know or ask your own.
Ask a new question about this device
Download the instructions for your Television in PDF format for free! Find your manual T32FHD506 - Ferguson and take your electronic device back in hand. On this page are published all the documents necessary for the use of your device. T32FHD506 by Ferguson.
USER MANUAL T32FHD506 Ferguson
natural_image
Front view of a flat-screen television displaying (no text or symbols visible)T32FHD506
OPERATING INSTRUCTIONS
NÁVOD K POUŽITÍ BEDIENUNGSANLEITUNG NÁVOD NA POUŽITIE INSTRUKCJA OBSŁUGI
Contents
01 Safety Warnings
Welcome....2
Important Information....2
Safety notice....3
Warning and cautions....4
02 Introduction
Control Panel 5
Rear/Side Sockets......6
Connecting to your TV 7
Common Interface 8
LOCK SYSTEM MENU 13
SETUP MENU 14
Guide Menu(Electronic Program Guide)...... 14
PVR File System(only for DTV)....15
Prepare to record the program....15
Record the program....16
Play the recording....16
Time shift....16
USB Player 17
03 Remote Control
Remote Control....9
04 Operation
Installation Guide....10
PICTURE MENU....10
Sound MENU 11
CHANNEL MENU....11
Auto Tuning (DVB-T)....11
Auto Tuning (DVB-C) 11
DTV Manual Tuning (DVB-T) 12
DTV Manual Tuning (DVB-C)....12
ATV Manual Tuning....13
Channel Edit 13
Favorite Manager 13
Common Interface....13
Signal Information....13
01 Safety warnings
WELCOME
Thanks for buying this 32" LED LCD TV. This guide will help you set up and begin using your TV.
First, check the contents of your box with the parts check list below:
32" FHD Ready Digital LED LCD TV
Remote control
AAA battery x2
Instruction Manual
Warranty Card
Screws
Stands
Now you can get started!
IMPORTANT INFORMATION
READ ALL INSTRUCTIONS BEFORE USE AND KEEP FOR FUTURE REFERENCE.

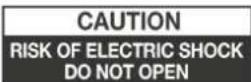

CAUTION
TO REDUCE THE RISK OF ELECTRIC SHOCK, DO NOT REMOVE COVER (OR BACK). NO USER SERVICEABLE PARTS INSIDE. FOR ANY PROBLEMS, REFER SERVICING TO THE CUSTOMER HELP LINE. THERE IS A LIGHTNING ARROW SYMBOL IN THE TRIANGLE: THIS SYMBOL INDICATES HIGH VOLTAGE IS PRESENT INSIDE. IT IS DANGEROUS TO MAKE ANY KIND OF CONTACT WITH ANYINSIDE PART OF THIS PRODUCT.
THERE IS A EXCLAMATION MARK IN THE TRIANGLE: THIS SYMBOL ALERTS YOU THAT IMPORTANT LITERATURE CONCERNING OPERATION AND MAINTENANCE HAS BEEN INCLUDED WITH THIS PRODUCT.

CAUTION: TO REDUCE THE RISK OF ELECTRIC SHOCK AND FIRE, DO NOT PUT THE TV SET NEAR SOURCES OF HUMIDITY. DO NOT USE ANY ABRASIVE CLEANERS WHICH MAY SCRATCH OR DAMAGE THE LCD SCREEN. AVOID CONTACT WITH OBJECTS THAT MAY SCRATCH THE LCD SCREEN.

NOTE: SERVICING THE UNIT YOURSELF IS UNAUTHORISED AND COULD LEAD TO INJURY OR PRODUCT DAMAGE. REFER ALL SERVICING TO THE CUSTOMER HELPLINE.
Safety notice
- Warning: To reduce the risk of electric shock, do not remove the cover or back. There are no user-serviceable parts inside. Refer servicing to qualified personnel.
- Warning: To prevent fire or electric shock hazard, do not expose the unit to rain or moisture.
- Do not expose the product to water (dripping or splashing) and no objects filled with liquids, such as vases, should be placed on the unit.
- Keep the product away from direct sunlight and heat source such as radiators or stoves.
- Do not block the ventilation openings. Slots and openings on the unit are provided for ventilation. The openings should never be blocked by placing your product on a cushion, sofa or other similar surface.
- Do not place the product on unstable cart, stand, tripod, bracket or table. The unit may fall, resulting in possible damage or injury.
- Never place heavy or sharp objects on the panel or frame.
- Unplug the Power from the outlet when the unit is not in use.
- Attention should be drawn to the environmental aspects of battery disposal.
- WARNING: The battery shall not be exposed to excessive heat such as sunshine, fire or the like.
• CAUTION: When the apparatus was in electrostatic circumstance, it maybe malfunction and need to reset by user.


This marking indicates that this product should not be disposed with other household wastes throughout the EU. To prevent possible harm to the environment or human health from uncontrolled waste disposal, recycle it responsibly to promote the sustainable reuse of material resources. To return your used device, please use the return and collection systems or contact the retailer where the product was purchased. They can take this product for environmental safe recycling.

This product incorporates HDMI technology. HDMI, the HDMI logo, and High-Definition Multimedia Interface are trademarks or registered trademarks of HDMI Licensing LLC.

Warning: The mains plug is used as disconnect device, the disconnect device shall remain readily operable.
Warning: To prevent the spread of fire, keep candles or other open flames away from this product at all times.
This equipment is a Class II or double insulated electrical appliance. It has been designed in such a way that it does not require a safety connection to electrical earth.
WARNING AND CAUTIONS
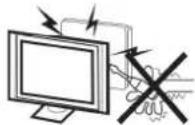
Warning

High voltages are used in the operation of this television receiver. Do not remove the cabinet back from your set. Refer servicing to qualified service personnel.
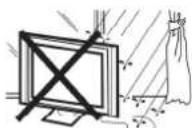
Warning

To prevent fire or electrical shock hazard, do not expose the television receiver to rain or moisture.
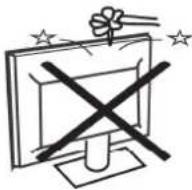
Warning

Do not drop or push objects into the television cabinet slots or openings. Never spill any kind of liquid on the television receiver.

Caution

Do not block the ventilation holes in the back cover. Adequate ventilation is essential to prevent failure of electrical components.

Caution

Do not trap the power supply cord under the television receiver.

Caution

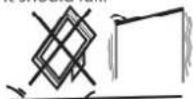
Never stand on, lean on, or suddenly push the television or its stand. You should pay special attention to children. Serious injury may result if it should fall.
Caution

Do not place your television on an unstable cart, stand, shelf or table. Serious injury to an individual, and damage to the television, may result if it should fall.

Caution

When the television receiver is not used for an extended period of time, it is advisable to disconnect the AC power cord from the AC outlet.

Caution

If the television is to be built into a compartment or similar enclosure, the minimum distances must be maintained. Heat build-up can reduce the service life of your television, and can also be dangerous.

02 Introduction
Control Panel

- VOL + VOL Adjust sound level.
In MENU, adjust the item that you selected.
2 CH+/CH- In TV mode, press CH+ or CH- to change the channel up and down.
In MENU, press CH+ or CH- to select items.
3 MENU Display main MENU.
4 INPUT Display the input source menu.
5 ☉ Turn the TV on.
Rear/Side Sockets(32")
⑧
9

10

⑪


1 HEADPHONE OUT output
2 SCART input/output
3 PC AUDIO input
4 VGA input
5 DIGITAL AUDIO OUTPUT(COAXIAL) digital audio output
6 RF input
7 HDMI1(ARC) input/output
8 HDMI2(MHL) input
9 HDMI3 input
10 USB input
11 COMMON INTERFACE(CI) input

③

④

⑤

6

⑦
Connecting to your TV
Connecting a DVD player / Cable set top box receiver / games console / PC or Laptop
There are several options to connecting a DVD player or Cable set top box receiver / games console / PC or Laptop to your TV.
Option 1 SCART
Connect a SCART cable (not supplied) from the SCART socket on the TV to the DVD player / Satellite or cable set top box receiver or games consol.
2 To select the device connected with the SCART cable press the SOURCE button on the remote and use the ▼▲keys to select SCART and press the OK button.
Note:- The TV will default to the SCART connection when the TV is switched on.
Option 2 HDMI1/HDMI2/HDMI3
If the device you want to connect to the TV is switched on, switch off the device first.
2 Connect a HDMI cable (not supplied) from the HDMI socket on the TV to the DVD player / Satellite or cable receiver or games consol.
3 Switch on the device you have just connected to the TV.
4 To select the device connected with the HDMI cable press the SOURCE button on the remote and use the ▼▲keys to select HDMI and press the OK button.
Option 3 EARPHONE OUTPUT
Insert the plug of the earphone into the earphone socket on the TV. The TV speakers are now muted. Alternatively you can also plug in external speakers if required.
Option 4 VGA (15pin Sub-D)
1 Connect a VGA cable (not supplied) from the VGA socket on the TV to the PC / Laptop.
To select the PC / Laptop connected with the VGA cable press the SOURCE button on the remote and use the ▼▲keys to select PC and press the OK button.
Note VGA is video only. For audio from your PC/Laptop you need to connect a separate cable from the PC Audio (3.5mm jack) to the headphone socket on you PC/Laptop (3.5mm jack)
Option 5 USB
Most USB sticks can be connected to your TV and some digital cameras may also work.
2 Connect USB stick (not supplied) or a USB cable (not supplied) to the TV.
8 To select the USB device connected to the TV, press the SOURCE button on the remote and use the ▼▲keys to select USB and press the OK button.
Note1: Only *.jpg, *.mp3, *.txt, *.avi, *.mp4, files will work, other file types are not guaranteed and may not.
Note 2. Apple iPhones and iPods are not compatible with your TV.
Note 3. When connecting any device to the USB connection, keep the USB cable length as short as possible.
Option 6 DIGITAL AUDIO OUT(COAXIAL)
COAXIAL is a digital audio connection used to connect audio equipment, for example home theatres and other digital HiFi systems over short distances. The signal is transmitted over either a coaxial cable with RCA connectors.
1 Make sure that both TV and the device are switched off before connecting.
Connect the AV cables (not supplied) from the COAXIAL socket on the TV to the Home Theater sound system or digital HiFi system etc.

COMMON INTERFACE
The common interface (CI) slot is designed to accept the conditional Access (CA) Module and Smart card in order to view the pay TV programmes and additional services. Contact your Common Interface service provider to get more information about the modules and subscription. Please noted that CA modules and smart cards are neither supplied nor optional accessories from us.
Warning
- Switch off your TV before any module is inserted in the Common Interface slot.
Insert the CAM correctly, then Smart Card to the CI slot that is located at the side of the TV.
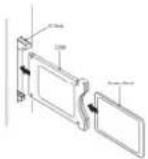
2 Turn on the TV and it will display the below message if the CI module is detected. Wait for few moments until the card is activated.
CAM Inserted
3 Press the MENU button then press ▲▼ button to select Common Interface option.
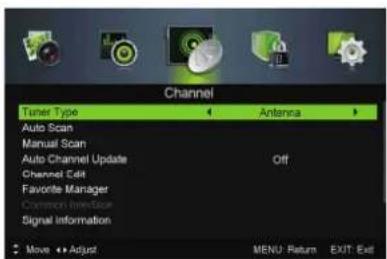
4 Detailed information on the CI card in use is displayed.
5 Press OK button to access the card menu. Refer to the module instruction manual for setting details.
6 When module is removed, the following message will appear on the screen.
CAM Removed
*NOTE: This TV set support "CI +" function.
03 Remote Control
Remote Control Functions

Most of your television's functions are available via the menus that appear on the screen. The remote control supplied with your set can be used to navigate through the menus and to configure all the general settings.
Mute (MUTE) Reduce the TV's volume to its minimum level. Press again to restore the volume.
(On/Off button) Turns the TV on or off.
0-9 (numeric buttons) Enters channel numbers.
Info Display the status information.
Return Return you to the previous channel in TV mode.
Source Press to select signal source.
Menu Bring up the menu system.
▲▼◀◀ (up, down, left and right direction buttons) Highlights different items in the menu system and adjusts the menu controls.
OK To open the corresponding submenu and activate a setting menus; to enter into the PVR Setting in digital TV mode.
List Press to select the Channel List.
Exit Exits the menu system.
VOL +/- Increase or decreases the TV's volume.
CH +/- Scan up or down through the current channel list.
Zoom +/- Press to select the desired screen format. (In USB mode, it is unavailable.)
TV In the other sources, presses to back TV.
Guide Display the information of digital program. (Only available in digital mode)
Text Teletext
Subtitle Press to display the Subtitle Language menu.
Rec Press to record the TV program you are watching in DTV mode.
TimeShift Press the Time Shift button to pause the program you are watching to activate Time Shift function.
Red button In corresponding mode, press it to enter the right function as hint.
Green button In corresponding mode, press it to enter the right function as hint.
Yellow button In corresponding mode, press it to enter the right function as hint.
Blue button(○ Lang) In corresponding mode, press it to enter the right function as hint.
NOTES 1. Do not mix old and new batteries or different types.
-
When the batteries are to be exhausted, the leakage may occur and cause the damage to the remote.
-
If the device is not to be used for a long period of time, remove the batteries to battery leakage.
4、WARNING: The batteries shall not be exposed to excessive heat such as sunshine, fire or the like.
04 OPERATION
Installation Guide
The First Time Setup screen will appear when the TV is first switched on or reset to the factory setting.

1). Press the ▼▲ buttons to navigate the menu and ◀▶ buttons to change the settings. Select your desired language, Home/Shop Mode to be displayed on the menu.
HOME or Store modes
- When the unit is turn on for the very first time, it will show Initialization set-up menu. After the OSD language is set, the user can choose between "store mode" and "home mode". When the screen shows the following setting menu and the cursor stays on the "home mode" choice, press ◀ to adjust, and "OK" to enter the menu.
Please select [Store mode] for store demo, press OK to proceed, otherkeys to cancel.
2). Press the ◀▶ buttons to select Antenna/Cable/ means DVB-T/DVB-C.
Note
In the UK to connect to cable TV you will require the appropriate cable TV's company's 'set top box' to be connected to the TV. Please refer to the cable TV's instructions manual for further details. If you select DVB-C, you will select Full /Quick/Advanced way to scan. Also you can select Auto Scan mode. DTV | ATV or DTV only, or ATV only. 3). Channel tuning will commence. This operation may take up to some minutes. The display will show the progress of the tuning and the number of channels found. 4). If you want to skip the DTV tuning, press the MENU button to interrupt the tuning half way. You will then go straight to ATV tuning.
5). After tuning is complete, the channels are arranged in a preset order. If you wish to skip channels, modify the preset order or rename channels, select ChannelEdit under the Channel menu.

Note
DTV Digital TV
ATV Analogue TV (not used in UK)
1. PICTURE MENU
The first item of the MENU is PICTURE MENU. You can adjust picture effect here, such as contrast, brightness, etc. Press ▼▲ to move, press ◀▶ to adjust.

Note
1). There are three colors temperature modes can be selected Standard, Cool, Warm. 2). PC Setting is available in PC mode only which can adjust Horizontal position, vertical position, phase and clock.
2.SOUND MENU
The second item of the MENU is the Sound Menu. You can adjust the sound effect here such as treble, bass, balance etc.
Press ▼▲ to move, press ◀▶ to adjust.

Note
- Auto volume(AVL): only available when the input signal volume is too large or distortion.
3.CHANNEL MENU
1.1) Auto Tuning (DVB-T)
1). Press the MENU button and then press the ◀▶ buttons to select the CHANNEL menu and then press the OK button or ▼button.
2). Press the ◀▶ buttons to select Tuner Type to Antenna means DVB-T.
3). Press the ▼▲ buttons to select Auto Scan and then press the OK button or Right button.


4). In Country mode, press the ◀▶ buttons to select the country where you will operate the TV.
5). In the Mode item, press the ◀▶ buttons to select tune mode: ATV / DTV / DTV + ATV. Press the ▼ button to select Start to start.
6). Channel tuning will commence. This operation may take up to some minutes. The display will show the progress of the tuning and the number of channels found.
7). If you want to skip the DTV tuning, press the MENU button to interrupt the tuning half way. You will then go straight to ATV tuning. You may repeat the above step if you also want to skip the ATV tuning. An installation reminder will appear the next time you turn on the TV, if no channel is found.
8). After tuning is complete, the channels are arranged in a preset order. If you wish to skip channels, modify the preset order or rename channels, select Channel Edit under the channel menu.
1.2) Auto Tuning (DVB-C)
1). Press the MENU button and then press the ◀▶ buttons to select the CHANNEL menu and then press the OK button or ▼button.
2). Press the ◀▶ buttons to select Tuner Type to Cable means DVB-C. Then press the ▼▲buttons to select Auto Scan and then press the OK button or Right button.
3). Press the ▼ button and then press the ◀▶ buttons to select the country you will operate the TV.
4). In the Mode menu, press the ◀▶ buttons to select ATV / DTV / DTV + ATV.
5). Channel tuning will commence. This operation may take up to some minutes. The display will show the progress of the tuning and the number of channels found.
6). If you want to skip the DTV tuning, press the MENU button to interrupt the tuning half way. You will then go straight to ATV tuning. You may repeat the above step if you also want to skip the ATV tuning. An installation reminder will appear the next time you turn on the TV, if no channel is found.
7). After tuning is complete, the channels are arranged in a preset order. If you wish to skip channels, modify the preset order or rename channels, select Channel Edit under the channel menu.

Note
All the channels including ATV, DTV and Radio can be tuning by one time, if the Tune Type is DTV+ATV.
All the stored channels will be disappear after auto tuning.
After auto tuning, the channel will skip to the first DTV channel.
2.1) DTV Manual Tuning (DVB-T)
1). Press the MENU button and then press the ◀▶ buttons to select the CHANNEL menu and then press the OK button.
2). Press the ▼▲ buttons to select Manual Scan and then press the OK or ▶ button, and press OK or ▶ button to select Digital Manual Scan, if you select Antenna in Tuner Type, you will enter DVB-T manual scan menu.


3). The DTV Manual Tuning screen will pop up.
Press the ◀▶ buttons to select the desired UHF channel or press the OK button then input channel number. Select Start to commence the search of that channel. When the signal has been tuned, the picture and signal strength will be displayed on the screen.
4). Press the MENU button to return back to the main menu.
5). Press the EXIT button to exit the menu.
2.2) DTV Manual Tuning (DVB-C)
1). Press the MENU button and then press the ◀▶ buttons to select the CHANNEL menu and then press the OK button. If you select Cable in Tuner Type, you will enter DVB-C manual scan menu.
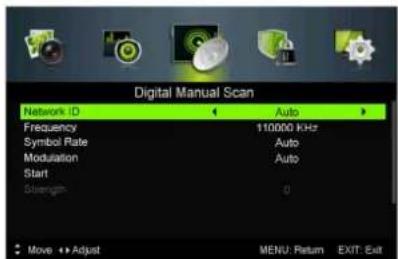
2). The DVB-C Manual Tuning screen will pop up. Press the ▼▲ buttons to select Frequency /Symbol (ks/s/QAM Type), press OK to input Frequency and symbol, Rate press ◀▶ to change QAM type, press Start to commence the search of that channel. When the signal has been tuned, the picture and signal strength will be displayed on the screen.
3). Press the MENU button to return back to the main menu.
4). Press the EXIT button to exit the menu.
3) ATV Manual tuning :
You can change the sound system, search the analog TV channels and fine tune the channels, then storage the channels you selected.
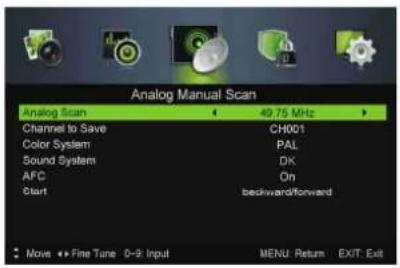
4). Channel Edit:
Press the ▲or▼ Buttons to select Channel Edit in the Channel Menu. Then press the OK Button to enter the sub-Menu. Then you will need to select the program you wish to edit.

Delete: Press the Red Button to delete the channel you highlighted.
MOVE: Press the Blue Button to highlight the select the channel you want to move. An icon will display ahead the channel number. Then press the ▼ / ▲ Buttons to a new position (Also empty position can be filled in DTV mode) and press the Blue Button to confirm.
SKIP: Press the Green button to select the Skip function and a SKIP icon will be displayed next to the program and it will be skipped when changing the channel.
Rename: (For ATV only) Press the Yellow Button for renaming the channel. Press the number key circularly to enter a new name and press the OK Button to confirm (the number key as the following table).

![Channel Edit D1 RRC1 -- A B C D E F G H I J K L M N O P Q R S T U V W X Y Z a b c d e f g h i j k l m n o p q r s t u v w x y z 1 2 3 4 5 6 7 8 9 0 , ( ) [ ] < > + - * / ? = Clear all Back Save Cancel Move -> Page MENU Return EXIT Exit](/content/2026/05/995395/images/ea39eff1cbacc804e10f408f3a2b629591d8ca1bba78d7961beed6c767da87b3.jpg)
OK: Press the OK Button to edit Programme Number in ATV, Press the number key to enter a new Programme number, and press the OK Button to confirm.
Press the ▲or▼ Buttons to select Favorite Manager to set the favourite channel.
6). Common Interface
This menu can display the CI card's information.
7). Signal Information (Only for DTV)
Press the ▼ / ▲ Buttons to select the Signal Information in the Channel Menu. Then press the OK Button to show the related information of the current channel.
4. LOCK SYSTEM MENU
The fourth item of the menu is the LOCK SYSTEM MENU. You can lock system, set password, block program and set parental guidance Once you set the lock system on you can not search the channels or change any programs.

The default pass word is 0000.
Channel Locks: Press ▼▲ to choose the program ,press OK button to block
the program. If you want unblock the program, pls enter the main menu, input the password, choose the program, then press OK button again.
Parental Rating: Press ◀▶ to choose rating.
5. SETUP MENU
The fifth item of the MENU is the SETUP MENU. You can adjust the OSD language, Audio language, Subtitle language etc.
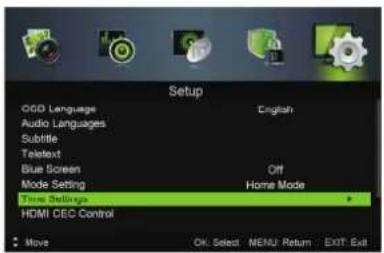

Mode setting: To set Store Mode or Home Mode.
Time settings: To adjust the OSD Timer, Sleep Timer, Auto Sleep, Time Zone and Time.
OSD Time: Press ◀ or ▶ to select the menu display time.
HDMI CEC Control: To set CEC function to on or off. First Time Setup
Press the ▼ or ▲ Buttons to select First Time Setup and press the OK Button to enter the first setup.

7. Guide Menu(Electronic Program Guide)
The EPG (Electronic Programme Guide) Menu provides you with detailed broadcast program information. Press the GUIDE Button and a pop-up Menu will be displayed with program information about the channel you are currently watching. You will be able to see up to seven days of program information. To view the next day or more use the ▲ or ▼ Buttons to highlight the date and then press the ◀ or ▶ Buttons to scroll through the available dates.
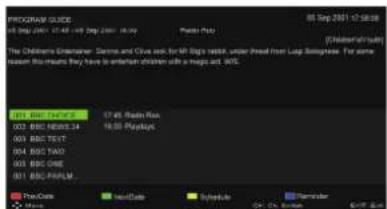
Schedule(Yellow Button)
To see what is going to be broadcast after the current program, press Yellow (Schedule) Button. To view a different channel, use the ▲ or ▼ Buttons to highlight the channel. To exit the EPG Menu, press the GUIDE or EXIT Button. Press Yellow Button again to return.
Note
Please refer to the bottom of the Guide screen for the basic remote control key functions.
Record
In the EPG Menu, press the REC Button on the remote control to select a program to be recorded. You will then enter Scheduled Record menu for record setting. (Refer to the section of PVR file system.)

Please ensure a compatible Hard Disc Drive or USB device is inserted into the USB input to schedule recordings. If your storage device is not compatible, you
will be asked to format it. In Setup menu, enter the PVR File System Menu Device List to format your device.
WARNING
When formatting the USB device it will delete all the files stored on the USB device.
If you have set a timed recording, your TV will automatically turn on when the program is set to record and will automatically turn off after the recording is complete. During a timed recording however the picture and volume will be mute (there will be no display), however the unit will be on. You can press the STANDBY Button to turn the picture and volume back on.
Reminder (Blue Button)
In the EPG Menu, press the BLUE Button to set a program reminder. The below Reminder Menu will then be displayed and you can use the ◀or ▶ Buttons to set the program reminder details. You will be able to set reminder to occur once, Daily, Weekly or Off.
NextDate(Green Button)
In the EPG Menu, press the GREEN Button to view next day's program.
PrevDate(Red Button)
In the EPG Menu, press the Red Button to view previous day's program.
8.PVR File System (only for DTV)
Press Menu Key, select setup submenu. Press the ▼ or ▲ Buttons to select PVR File System, then press the OK Button to enter sub-Menu and then use the ◀ or ▶ Buttons to scroll through the options.
Prepare to record the program:
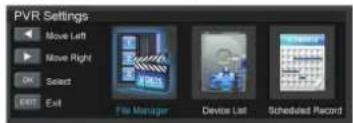
File Manager: You may view all the recorded programs here. Press blue key to play with full screen.

Device List: This sub menu will list the USB devices connected to the TV set. You can select the device and then press red button to format the USB device.

Scheduled Record: You may set the scheduled record List here. And you may also delete the scheduled records you have set.

Enter the sub menu you may set the recording frequency as Once, Daily, Weekly or off.

Record the program:
To record the program you are currently watching press the REC Button and a red REC icon will appear on the screen. The record time/ length and remaining record time will be displayed in the menu below.

To reveal the menu press the REC Button again.
To stop recording, press the Green Button.
You may also enter the Media Player Menu to view your recorded programs via Movie mode.
Play the recording:
The program recorded on the "USB" will be saved in the folder "PVR" on the device.
You can play it in PVR File System and in File manager submenu.
- The USB storage size can be between
128MB and 500GB in size, but for practical use 2GB to 500GB is recommended. -
Video may become pixelated when Video bit rate is too low. This can be caused by connecting a USB extension cable Instead of plugging the USB directly into the TV.
-
Not all USB devices are compatible.
Note
- Ensure the storage device used to record is inserted into the USB Input on the back of the unit and is compatible for recording. If your storage device is not compatible, you will be asked to format it. Enter the PVR File System menu and select Device List to format your device.
- There will be no record function, when the channel is Cl+ channel.

9.Time Shift
Press the Time Shift button to pause the program you are watching to activate Time Shift function. The below menu will be displayed. This Menu will auto disappear after several seconds.

Choose the ▶ option and press OK to resume playing, and a white play icon will appear at the right of the screen, which shows that time shift is being performed. When the menu disappeared, press the Time Shift button, the menu will appeae again. To stoptime shifting, press the Stop Button or move the cursor to select the Stop option when the menu is on, and then follow the pop-up guide.
Note
- Ensure the storage device used for recording is inserted into the MEDIA Input on the back of the unit and is compatible for recording. If your storage device is not compatible, you will be asked to format it. In Setup menu, enter the PVR File System submenu and select Device List to format your device.
- All the functions (Play, FB, FF, Prev, Next and Stop) in the menu can only be performed when the menu is on.
- There will be no Timeshift function when the channel is Cl+ channel.
Record file Playback
10.USB Player
Press source key, and select MEDIA in source list, press OK button to enter the USB menu.
Please make sure that the USB device have plugged in the slot. There are four type media item can be selected, such as photo, music, Movie, and text. Select the type media item by pressing ◀▶, press OK button to enter the disk selection menu.

natural_image
Four green icons with yellow and green shapes on a black background, no text or symbols present
Press the ◀/▶ to select the right disk and folder, press OK to enter the media files list. Press Exit button to back to the media type selection menu.
Select the media file by pressing ◀▶ or ▼▲, then the preview frame will pop up. Press the OK button to play the media file in full screen. When the movie file is playing, press the INFO button can display the control bar.

PHOTO
When photos are playing, press Info key on the remote control, a help bar will display under the screen.
Basic Function
| OK | Press"OK" key on the remote control to play or pause. |
| Previous | Press"Left"key on the remote control to read the previous photo. |
| Next | Press"Right"key on the remote control to read the next photo. |
| Rotate | Press "ok"key on the remote control to rotate the photo. |
| Exit | Press "Exit"key on the remote control to exit the photo . |
| Quick Meau | Press "Guide"key on the remote control to open the sub menu . |
Operation
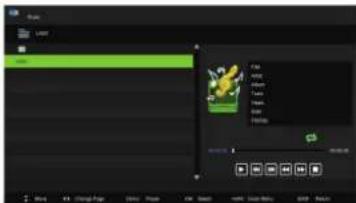
MUSIC
When music are playing, press "▶" key to select toolbar.
Basic Function
| Play/Pause:Press"OK"key on the remote control to play or pause. | |
| Previous:Press"Left/Right"key on the remote control to select this function, press"OK"key to play previous muisc. | |
| Next:Press"Left/Right"key on the remote control to select this function, press"OK"key to play next muisc. | |
| Fast rewind:Press"Left/Right"key on the remote control to select this function, press"ok" key to to fast back. Press"PLAY"key to play normally. | |
| Fast forward:Press"Left/Right"key on the remote control to select this function, press"ok" key to fast forward. Press"PLAY"key to play normally. | |
| Stop:Press"Left/Right"key on the remote control to select this function,Press"OK"key to stop playing. |
MOVIE
Press the OK or INFO button on the remote control to display the help bar when MOVIE is playing, and press INFO to hide it.
TEXT
Press◀/▶" to select previous / next page, Input the number key and OK to jump to the page you want.
Provide list of major file types that play from a USB device
Photo .jpg files
Music mp3
Movie .avi,.mp4
Text .txt
Szybka Pomoc
natural_image
Front view of a flat-screen television displaying (no text or symbols visible)T32FHD506
OPERATING INSTRUCTIONS
NÁVOD K POUŽITÍ BEDIENUNGSANLEITUNG NÁVOD NA POUŽITIE INSTRUKCJA OBSŁUGI
Spis treści
(Electronic Program Guide)
Nagraj program:
natural_image
Four green binoculars with icons showing waste sorting (no text or symbols)
ZDJĘCIA
MUZYKA
natural_image
Front view of a flat-screen television displaying (no text or symbols visible)T32FHD506
OPERATING INSTRUCTIONS
NÁVOD K POUŽITÍ BEDIENUNGSANLEITUNG NÁVOD NA POUŽITIE INSTRUKCJA OBSŁUGI
Verzeichnis
32" FHD Ready Digital LED LCD TV
Fernbedienung
AAA-Batterie x2
Bedienungsanleitung
Garantiekarte
Schrauben
Stände
m = 311
m = 311
[Non-Text]
[Non-Text]
[Non-Text]
[Non-Text]
[Non-Text]
[Non-Text]
[Non-Text]
[Non-Text]
[Non-Text]
[Non-Text]
[Non-Text]
[Non-Text]
[Non-Text]
[Non-Text]
[Non-Text]
[Non-Text]
[Non-Text]
[Non-Text]
[Non-Text]
FC-A
[Non-Text]
[Non-Text]
[Non-Text]
[Non-Text]
[Non-Text]
[Non-Text]
[Non-Text]
[Non-Text]
[Non-Text]
[Non-Text]
m = 311
m = 311
-
[Non-Text]
-
[Non-Text]
[Non-Text]
[Non-Text]
[Non-Text]
-
m = 311
m = 311
[Non-Text]
[Non-Text]
m = 311
PC-A
-
©
m = 311
[Non-Text]
[Non-Text]
[Non-Text]
[Non-Text]
[Non-Text]
[Non-Text]
[Non-Text]
[Non-Text]
[Non-Text]
[Non-Text]
[Non-Text]
[Non-Text]
[Non-Text]
[Non-Text]
[Non-Text]
[Non-Text]
[Non-Text]
[Non-Text]
[Non-Text]
[Non-Text]
[Non-Text]
[Non-Text]
[Non-Text]
[Non-Text]
[Non-Text]
[Non-Text]
[Non-Text]
[Non-Text]
[Non-Text]
[Non-Text]
[Non-Text]
[Non-Text]
[Non-Text]
[Non-Text]
[Non-Text]
[Non-Text]
[Non-Text]
[Non-Text]
[Non-Text]
[Non-Text]
1 + u1 - 1 = ( 1 + u) u1 < 1 = u
[Non-Text]
[Non-Text]
[Non-Text]
[Non-Text]
[Non-Text]
[Non-Text]
[Non-Text]
[Non-Text]
[Non-Text]
[Non-Text]
[Non-Text]
[Non-Text]
[Non-Text]
[Non-Text]
[Non-Text]
[Non-Text]
[Non-Text]
[Non-Text]
[Non-Text]
[Non-Text]
PC-A
[Non-Text]
[Non-Text]
[Non-Text]
[Non-Text]
[Non-Text]
[Non-Text]
[Non-Text]
[Non-Text]
[Non-Text]
[Non-Text]
1 + u1 - 1 = ( 1 + u) u1 < 1 = u
广力云智慧零售收银系统
-
[Non-Text]
1 + u1 - 1 = ( 1 + u) u1 < 1 = u
[Non-Text]
[Non-Text]
[Non-Text]
m = 311
1 + u1 - 1 = ( 1 + u) u1 < 1 = u
m = 311
m = 311
[Non-Text]
[Non-Text]
-
FC-A
-
©
广力云智慧零售收银系统
[Non-Text]
[Non-Text]
[Non-Text]
[Non-Text]
[Non-Text]
[Non-Text]
[Non-Text]
[Non-Text]
[Non-Text]
[Non-Text]
[Non-Text]
[Non-Text]
[Non-Text]
[Non-Text]
[Non-Text]
[Non-Text]
[Non-Text]
[Non-Text]
[Non-Text]
[Non-Text]
[Non-Text]
[Non-Text]
[Non-Text]
[Non-Text]
[Non-Text]
[Non-Text]
[Non-Text]
[Non-Text]
[Non-Text]
[Non-Text]
[Non-Text]
[Non-Text]
[Non-Text]
[Non-Text]
[Non-Text]
[Non-Text]
[Non-Text]
[Non-Text]
[Non-Text]
-
[Non-Text]
[Non-Text]
[Non-Text]
[Non-Text]
[Non-Text]
[Non-Text]
[Non-Text]
[Non-Text]
[Non-Text]
[Non-Text]
[Non-Text]
[Non-Text]
[Non-Text]
[Non-Text]
[Non-Text]
[Non-Text]
[Non-Text]
[Non-Text]
[Non-Text]
[Non-Text]
m = 311
1 + u1 - 1 = ( 1 + u) u1 < 1 = u
m = 311
m = 311
[Non-Text]
[Non-Text]
[Non-Text]
m = 311
1 + u1 - 1 = ( 1 + u) u1 < 1 = u
m = 311
[Non-Text]
[Non-Text]
[Non-Text]
BG A
1
1
©
natural_image
Four green and white icons with abstract shapes on black background, no text or symbols present
BILD
MUSIK
Press the OK or INFO button on the remote control to display the help bar when MOVIE is playing, and press INFO to hide it.
natural_image
Front view of a flat-screen television displaying (no text or symbols visible)T32FHD506
OPERATING INSTRUCTIONS
NÁVOD K POUŽITÍ BEDIENUNGSANLEITUNG NÁVOD NA POUŽITIE INSTRUKCJA OBSŁUGI
Obsah
natural_image
Four green trash bins with different leaf shapes, displayed against a black background (no text or symbols)
FOTO
Hudba
natural_image
Front view of a flat-screen television displaying (no text or symbols visible)T32FHD506
OPERATING INSTRUCTIONS
NÁVOD K POUŽITÍ BEDIENUNGSANLEITUNG NÁVOD NA POUŽITIE INSTRUKCJA OBSŁUGI
Obsah
01 Bezpečnostné upozornenia
Vitajte 2
USB extension cable instead of plugging the USB directly

Poznámka
natural_image
Four green binoculars with icons showing different object categories (no text or symbols visible)
FOTO
Hudba
natural_image
Front view of a flat-screen television displaying (no text or symbols visible)T32FHD506
OPERATING INSTRUCTIONS
NÁVOD K POUŽITÍ BEDIENUNGSANLEITUNG NÁVOD NA POUŽITIE INSTRUKCJA OBSŁUGI
Contenuto
8.PVR File System (only for DTV)
natural_image
Four green trash bins with icons, one blue and one white, against a black background (no text or symbols)Ita
Foto
Musica

- Contents
- Safety Warnings
- Introduction
- Remote Control
- Operation
- WELCOME
- IMPORTANT INFORMATION
- Safety notice
- WARNING AND CAUTIONS
- Rear/Side Sockets(32")
- Connecting to your TV
- Connecting a DVD player / Cable set top box receiver / games console / PC or Laptop
- Option 1 SCART
- Option 2 HDMI1/HDMI2/HDMI3
- Option 3 EARPHONE OUTPUT
- Option 4 VGA (15pin Sub-D)
- Option 5 USB
- Option 6 DIGITAL AUDIO OUT(COAXIAL)
- COMMON INTERFACE
- Warning
- Remote Control Functions
- Installation Guide
- Note
- PICTURE MENU
- 2.SOUND MENU
- 3.CHANNEL MENU
- 1.1) Auto Tuning (DVB-T)
- 1.2) Auto Tuning (DVB-C)
- 2.1) DTV Manual Tuning (DVB-T)
- 2.2) DTV Manual Tuning (DVB-C)
- 3) ATV Manual tuning :
- 4). Channel Edit:
- 6). Common Interface
- 7). Signal Information (Only for DTV)
- LOCK SYSTEM MENU
- SETUP MENU
- Guide Menu(Electronic Program Guide)
- Schedule(Yellow Button)
- Record
- Reminder (Blue Button)
- NextDate(Green Button)
- PrevDate(Red Button)
- 8.PVR File System (only for DTV)
- Prepare to record the program:
- Record the program:
- Play the recording:
- 9.Time Shift
- 10.USB Player
- PHOTO
- Operation
- MUSIC
- MOVIE
- TEXT
- Szybka Pomoc
- Spis treści
- (Electronic Program Guide)
- Nagraj program:
- ZDJĘCIA
- MUZYKA
- Verzeichnis
- BILD
- MUSIK
- Obsah
- FOTO
- Hudba
- Bezpečnostné upozornenia
- Poznámka
- Contenuto
- Musica
Brand : Ferguson
Model : T32FHD506
Category : Television