JA-60M - Security Camera Jablotron - Free user manual and instructions
Find the device manual for free JA-60M Jablotron in PDF.


| Product Type | Wireless Magnetic Door Detector (Security Camera) |
| Power Supply | 3 V (2 x AAA 1.5 V batteries) |
| Battery Life | Approximately 1 year |
| Working Range | Max 100 m (open area) |
| Built-in Sensor | Magnetic reed contact |
| External Sensor Inputs | INP & TAMP (balanced loops) |
| Compliance | EN 50131-1 class 2 |
| Operating Environment | Indoor, -10 to +40°C |
| Set Contents | Detector, magnet, 4 screws, 2 AAA batteries |
| Installation | Wall or frame mount; magnet on moving part; gap ≤5 mm |
| DIP Switch Settings | Switch 1: Instant (ON) or Delayed (1); Switch 2: Enable external sensor (ON) or disable (OFF) |
| Alarm Types | Instant, delayed, tamper |
| Supervision | Full supervision with auto testing and regular status reports |
| Testing Mode | 5-minute test mode after cover closure; LED indicates triggering |
| Battery Replacement Indication | LED flash on each triggering |
| Recommended Battery Type | High quality alkaline AAA |
| Security Features | Tamper detection, balanced loops for anti-sabotage |
| Dimensions | Not specified |
| Weight | Not specified |
Frequently Asked Questions - JA-60M Jablotron
User questions about JA-60M Jablotron
0 question about this device. Answer the ones you know or ask your own.
Ask a new question about this device
Download the instructions for your Security Camera in PDF format for free! Find your manual JA-60M - Jablotron and take your electronic device back in hand. On this page are published all the documents necessary for the use of your device. JA-60M by Jablotron.
USER MANUAL JA-60M Jablotron
JA-60M Wireless Magnetic Door Detector
JA-60M Magnetic door detector is equipped with a magnet. A movement of the magnet triggers the internal sensor in the detector. It can trigger an Instant or Delayed intruder alarm and it also has built in tamper sensors. There are inputs for external sensors available.
The JA-60M uses a sophisticated radio communication protocol with a high level of data safety. The detector makes regular auto testing and reports its conditions regularly to the system for full supervision. An automatic testing mode makes testing an ease.
Specifications
power 3 V - 2 x AAA battery 1.5V
battery life time about 1 year
working range max. 100 m (open area)
built in sensor magnetic reed contact
external sensor inputs INP & TAMP (balanced loops)
complies with EN 50131-1 class 2
working environment indoor use, -10 to +40°C
Contents of the set: detector, magnet, 4 screws, 2 AAA batteries
Installation
To detect the opening or closing of a door or window the detector is equipped with a magnet. Movement of the magnet triggers the internal sensor in the detector.
- Open the detector cover by pressing the internal tab.
- Attach the detector to the wall or the frame of the door or window using the 2 provided screws.
- Be sure that the antenna is vertical (pointing up or down).
- Attach the magnet with the provided screws to the moving part of the door or window, and put on its cover. The gap between the detector and magnet should not be wider than 5mm when the door is closed.
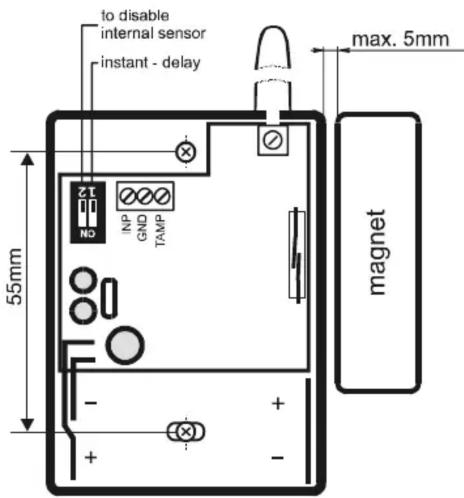
- Warning: neither the detector nor the magnet should be fixed directly to a metal surface. If there is no other choice, an insulating pad (plastic, wood etc.) 5mm thick or more should be used under the detector and the magnet.
- Use DIP switch no. 1 to select if the reaction of the system to the door opening should be instant (position ON) or delayed (position 1).
- If you do not use input terminals (TAMP & INP) they must be connected to the GND terminal with short connecting loops and DIP switch no. 2 must stay in the OFF position.
- Leave the JA-60M detector uncovered and without batteries installed.
Use of external sensors with JA-60M
The JA-60M detector can be used to connect external detectors which have contacts on their outputs. For example it can be used to protect multiple doors or windows. The built in magnetic sensor of the JA-60M can also be disabled (DIP switch number 2 to position ON) and then the JA-60M works only as an interface for external sensors. Two input loops (TAMP & INP terminals) are activated when disconnected from the GND terminal.
INP – when this input is triggered (disconnected from GND), the JA-60M will send the same information as if the built in magnetic sensor is triggered. Reaction of the system can be selected with DIP switch number 1 (ON= instant or 1= delayed).
TAMP – when this input is triggered (disconnected from GND), the unit will send the same information as if the built in tamper sensor is triggered.
Balanced loops – the inputs INP & TAMP can also be used as balanced loop inputs for higher security of connected cables. If you install an End Of Line resistor 10k in the end of the loop (INP or TAMP), the JA-60M automatically recognizes this situation and from this moment it will react to a change of the resistivity (changes ±30% or more will trigger the input).

Enrollment of the detector to the system
Study the installation manual of the receiver unit (control panel) to learn how to enter the enrolling mode to enroll the detector. Install the two provided AAA batteries into the detector (polarity is marked in the detector) and leave it uncovered. The detector will generate an enrollment signal after the batteries are installed.
Detector testing
Attach the detector's cover and from this moment the detector will be in a testing mode for 5 minutes and each triggering will be indicated by detector's LED. Five minutes after the cover was closed, the detector will automatically enter the normal mode and its LED indicator will be switched off (battery energy saving function). Open and close the detector's cover to reset the testing mode for an additional 5 minutes if needed.
Note: if you change DIP switch's setting, the system accepts the new setting after the detector cover is closed.
Normal operating mode of the detector
The detector, in normal operating mode, conserves battery energy. It will not indicate triggering with its LED. Information about each triggering is transmitted to the system. The detector performs self testing regularly and reports its condition to the system for full supervision.
Battery testing and replacement
The detector checks its batteries conditions automatically. If it is necessary to replace its batteries, the detector will inform the system about the need for new batteries. In this mode the detector works as normal, but each triggering is indicated with a flash of its LED. This way it is possible to recognize, that the replacement of the batteries is requested. If a low battery is indicated, it should be replaced as soon as possible (in a week).
Before the batteries are replaced, the receiver (control panel) must be put into the mode which allows the opening of the detector (User or Programming mode).
Use only high quality alkaline AAA batteries for replacement. After installation of the new batteries the detector will be in testing mode and each triggering will be indicated by detector's LED. Five minutes after the cover is closed, the detector will automatically enter the normal mode and its LED indicator will be switched off (battery energy saving function).

JABLOTRON
Pod Skalkou 33
466 01 Jablonec nad Nisou
Czech Republic
Brand : Jablotron
Model : JA-60M
Category : Security Camera