
NSX-A92 - CD Player AIWA - Free user manual and instructions
Find the device manual for free NSX-A92 AIWA in PDF.


| Product Type | Compact Disc Stereo System |
| Model | NSX-A92 (also covers NSX-330, NSX-332) |
| Dimensions (Center Unit) | 260 × 302.5 × 329.5 mm (10 1/4 × 12 × 13 in) |
| Dimensions (System) | 620 × 302.5 × 329.5 mm (24 1/2 × 12 × 13 in) |
| Weight (Center Unit) | 7.2 kg (15.8 lbs) |
| Weight (System) | 12.4 kg (27.3 lbs) |
| Power Supply | AC 120V/220V/240V switchable, 50/60 Hz (model dependent) |
| Power Consumption | 85 W (NSX-330LH/HE, NSX-A92); 80 W (NSX-330/332U); 210 W (NSX-330E/K); 100 W (NSX-330C) |
| CD Player | 3-disc tray (not specified, but single tray with 8cm CD support); Random, Program, Repeat play |
| Cassette Deck | Dual deck (Deck 1 playback, Deck 2 recording/playback); High speed dubbing, Auto reverse |
| Tuner | FM/AM (MW) synthesizer tuner; 29 preset stations (FM 24, AM 5); LW on E/K models |
| Amplifier Power Output | 40W + 40W (6 ohms, 10% THD, 1kHz) for NSX-330LH/HE/NSX-A92; 30W + 30W (6 ohms, 1% THD) for NSX-330E; varies per model |
| Sound Enhancement | BBE system (4 levels), T-BASS (4 levels), Graphic Equalizer (ROCK/POP/CLASSIC) |
| Timer Functions | On-timer, Sleep timer (10 min increments up to 120 min), Daily event timer |
| Inputs/Outputs | VIDEO/AUX input (adjustable level), MIC input (front), PHONES jack, Speaker terminals (6 ohms), Surround speaker terminals (16 ohms) |
| Accessories Included | Remote control, AM loop antenna, FM feeder antenna |
| Laser Class | Class 1 (semiconductor laser, λ=780 nm) |
| Safety Features | Voltage selector, overcurrent protection, interlock for laser |
| Maintenance | Clean disc from center outward; clean tape heads, pinch rollers, capstans every 10 hours; cabinet with mild detergent |
| Spare Parts & Repairability | Contact authorized AIWA dealer for replacement parts; servicing by qualified personnel only |
| General Information | Manufactured for UK market (blue/brown wire coding); FCC Class B compliant; Dolby NR licensed |
Frequently Asked Questions - NSX-A92 AIWA
User questions about NSX-A92 AIWA
0 question about this device. Answer the ones you know or ask your own.
Ask a new question about this device
Download the instructions for your CD Player in PDF format for free! Find your manual NSX-A92 - AIWA and take your electronic device back in hand. On this page are published all the documents necessary for the use of your device. NSX-A92 by AIWA.
USER MANUAL NSX-A92 AIWA
(FOR USE IN THE UNITED KINGDOM)
The wires in this mains lead are coloured in accordance with the following code.
Blue Neutral
Brown: Live
As the colours of the wires in the mains lead of this apparatus may not correspond with the coloured markings identifying the terminals in your plug proceed as follows.
The wire which is coloured blue must be connected to the terminal which is marked with the letter N or coloured black.
The wire which is coloured brown must be connected to the terminal which is marked with the letter L or coloured red. Do not connect either wire to the earth terminal of a 3-pin plug.
NSX-330 NSX-332 NSX-A92
COMPACT DISC STEREO SYSTEM SISTEMA ESTEREOFÓNICO DE DISCO COMPACTO
COMPACT DISC STEREO CASSETTE RECEIVER RADIOCASSETTE ESTEREO CON DISCO COMPACTO
CX-N330 LH,HE,U,C,E,K CX-N332 U CX-A92 HE
SPEAKER SYSTEM
SISTEMA DE ALTAVOCES
SX-N330
SX-N332
SX-A92
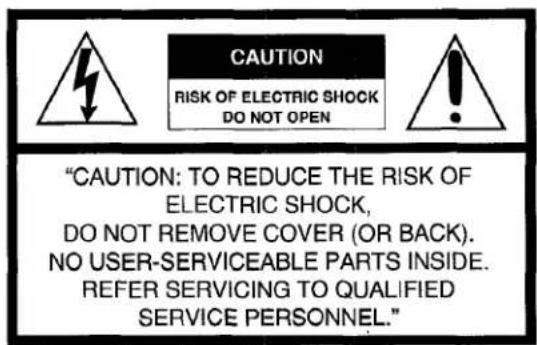
Explanation of Graphical Symbols:
The lightning flash with arrowhead symbol, within an equilateral triangle, is intended to alert the user to the presence of uninsulated "dangerous voltage" within the product's enclosure that may be of sufficient magnitude to constitute a risk of electric shock to persons.

The exclamation point within an equilateral triangle is intended to alert the user to the presence of important operating and maintenance (servicing) instructions in the literature accompanying the appliance.
WARNING
TO REDUCE THE RISK OF FIRE OR ELECTRIC SHOCK, DO NOT EXPOSE THIS APPLIANCE TO RAIN OR MOISTURE.
CAUTION
Use of controls or adjustments or performance of procedures other than those specified herein may result in hazardous radiation exposure.

CAUTION!

Invisible laser radiation when open and inter locks defeated. Avoid exposure to beam.
WARNING
This equipment has been certified to comply with the limits for a Class B computing device, pursuant to Subpart J of Part 15 of FCC Rules. Only peripherals certified to comply with the Class B limits may be attached to this equipment. Operation with noncertified peripherals is likely to result in interference to radio and TV reception.
This equipment generates and uses radio frequency energy and if not installed and used properly, that is, in strict accordance with the manufacturer's Instructions, may cause interference to radio and television reception. It has been type tested and found to comply with the limits for a Class B computing device in accordance with the specifications in Subpart J of Part 15 of FCC Rules, which are designed to provide reasonable protection against such interference in a residential installation. However, there is no guarantee that interference will not occur in a particular installation. If this equipment does cause interference to radio or television reception, which can be determined by turning the equipment off and on, the user is encouraged to try to correct the interference by one or more of the following measures:
-reorient the receiving antenna
-relocate the equipment with respect to the receiver
-move the equipment away from the receiver
-plug the equipment into a different outlet so that equipment and receiver are on different branch circuits.
If necessary, the user should consult the dealer or an experienced radio/television technician for additional suggestions. The user may find the following booklet prepared by the Federal Communications Commission helpful:
"How to Identify and Resolve Radio-TV Interference Problems" This booklet is available from the US Government Printing Office, Washington, D.C., 20402, Stock No. 004-000-00345-4.
THIS DIGITAL APPARATUS DOES NOT EXCEED THE CLASS B LIMITS FOR RADIO NOISE EMISSIONS FROM DIGITAL APPARATUS AS SET OUT IN THE RADIO INTERFERENCE REGULATIONS OF THE CANADIAN DEPARTMENT OF COMMUNICATIONS.
OWNER'S RECORD
For your convenience, record the model number and serial number (you will find them on the rear of your set) in the space provided below. Please refer to them when you contact your AIWA dealer in case of difficulty.
Model No.
| CX-N330 |
| CX-N332 |
| CX-A92 |
Serial No.
Model No.
| SX-N330 |
| SX-N332 |
| SX-A92 |
Serial No.
TABLE OF CONTENTS ÍNDICE
目錄
FEATURES 4
PRECAUTIONS 5
CONNECTIONS 6
CLOCK SETTING....12
SOUND ADJUSTMENT 14
LISTENING TO A COMPACT DISC.....16
PROGRAMMED PLAY 19
RANDOM PLAY 20
REPEAT PLAY 20
CONTINUOUS PLAY FROM DECK TO
DECK 24
TUNING IN TO A STATION
MANUALLY 25
PRESETTING STATIONS 26
TUNING IN TO A PRESET STATION ...27
RECORDING 28
TAPE DUBBING....32
RECORDING FROM COMPACT
DISCS 34
EDITING COMPACT DISCS ....36
Auto-edit recording 36
Programmed-edit recording .....38
TIMER SETTING 40
SLEEP TIMER SETTING 44
LISTENING TO OTHER SOURCES ..... 45
TROUBLESHOOTING GUIDE ....50
IDENTIFICATION OF PARTS .....55
CARACTERÍSTICAS 4
PRECAUCIONES 5
CONEXIONES 6
The illustrations in this manual show the HE model.
BBE is a technology developed for professional studio and live use. It gives astonishing definition and clarity to music reproduction. It makes high-frequency sound especially clear and brings out the special character of vocals and solo instruments.
AIWA is the world's first manufacturer to employ the BBE sound in consumer audio equipment.
CD edit functions
Two different CD edit functions are available, and you can easily make original tapes according to your preference.
Other features
Amplifier section
• T-BASS for realistic reproduction at low sound levels.
- The desired tone quality can be selected from among three different preset tones.
Tuner section
- Synthesizer tuner.
- Internal daily event/sleep timer.
Cassette deck section
• High speed tape duplication.
CD player section
• Repeated playback of tracks.
- Playback of tracks in random order.
Sistema BBE
Follow the advice below for safe and correct operation.
On AC voltage (LH, HE, U, C models)
Before use, check that the rated voltage of your system matches your local voltage.
| Model name | Rated voltage |
| NSX-330 LH, HE | 120/220/240 V AC |
| NSX-A92 HE | selectable, 50/60 Hz |
| NSX-330 U, C | 120/220-240 V AC |
| NSX-332 U | selectable, 50/60 Hz |
To adjust the operating voltage
The system should have been set for use on your local voltage. If not, change the AC VOLTAGE selector on the rear panel with a screwdriver or similar object.
On placement
- Do not use the system in places which are extremely hot, cold, dusty or humid.
- Place the system on a flat, even surface.
- Be careful not to obstruct the ventilation holes on the rear panel, as increased internal temperature may affect the electric parts. In particular, do not place the system in an airtight rack.
On safety
- When connecting and disconnecting the AC cord, grip the plug and not the cord itself. Pulling the cord may damage it and thus be hazardous.
- When you are not going to use the system for a long period of time, disconnect the AC cord. If the cord is plugged in, a small amount of current keeps on flowing to the system even if the power switch is not ON.
- If the AC cord is broken or damaged, or if the wires are exposed, contact your dealer or an AIWA service station and have it replaced or repaired immediately.
On condensation
When the room is heated, you sometimes see water drops on your windows; this is called condensation.
This can occur inside the CD player unit when:
- it is moved from a cold spot to a warm spot.
- it is used in a room where the heating system has just been turned on.
- it is used in a place with a lot of moisture.
- it is used where it has direct contact with cool air, such as near an air-conditioner.
When it has condensation inside, the unit may not function normally. Let it stand for 1 to 2 hours before turning the power on; or, gradually heat the room and dry the unit before use.
Should any trouble occur, disconnect the AC cord and refer servicing to qualified personnel only.
For customers purchasing the U or C models
When using the unit in the AC 220-240V position, be sure to attach a suitable adaptor plug to the plug end of the AC cord. Adaptor plugs may be obtained at nominal cost from an authorized AIWA dealer.
- Be sure to connect correctly, according to the figure.
- Turn on the power after verifying that the connection is correct.
Notes on speaker connections
• Use speakers with an impedance of 6 ohms.
- This speaker system is magnetically shielded. However, if the speaker should affect the color on the TV screen, turn off the TV, and turn it on again 15-30 minutes later. If the TV screen still has poor color, place the speaker system away from the TV.
- Do not leave magnets or objects generating magnetism near the speaker system.
To turn on the system
Power is supplied to the system when the POWER button is pressed.
The system can be turned off by pressing the same button again.
When the power is turned on
The indicator of the function button previously used flashes for 4 seconds, and the operation buttons usable in the function light up.
E. g.) When the CD function is selected
PAUSE
[DECK 2/CD]

SET
STOP

CLEAR
PLAY/DIRECTION
DOWN

TUNING/PRESET/
TIMER/SKIP/SEARCH/MS
ADDING OTHER EQUIPMENT TO YOUR SYSTEM
ADICION DE OTROS EQUIPOS A SU SISTEMA
連接其他装置
Connect the red plug to the R jack, and the white plug to the L jack.
Conecte la clavija roja a la toma R, y la clavija blanca a la toma L.
To connect an analog record player
Connect a player with an equalizer amplifier to the VIDEO/AUX jacks.
- The surround effect will not work with monaural sources.
- Connect only surround speakers to the SURROUND SPEAKERS jacks.
- Use surround speakers with an impedance of 16 ohms.
- Be sure to connect surround speakers to both right and left jacks.
Notas
Rear (LH, HE, U, C models)
Trasera (modelos LH, HE, U, C)
後面(LH,HE,U,C模型)

(E, K models)
(modelos E, K)
(E,K 機型)
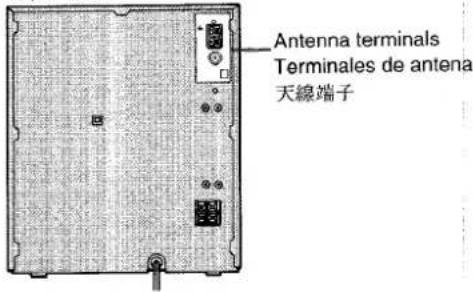
Position the supplied antennas after finding the best direction for radio reception.
For LH, HE, U, C models
To stand on a surface
natural_image
Diagram showing two connected devices: a square frame with a hanging weight and a computer monitor with a coiled cable (no text or symbols)To hang on a wall
For E and K models Para los modelos E y K E 和 K 機型用

Note on the FM feeder antenna
Do not bring the ends near metal objects or curtain rails.
Notes on the AM (MW/LW) loop antenna
- Do not unwind the looped antenna wire.
- Do not bring the loop antenna near the turntable system or CD player, or close to the AC cord or speaker cords, since noise will be picked up.
natural_image
Line drawing of a three-tier electronic device chassis with control panel, buttons, and display (no text or symbols)1 3,5
1

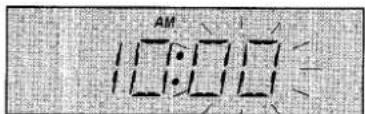
Within 4 seconds, go to step 2.
4

5
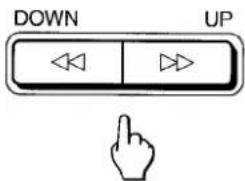
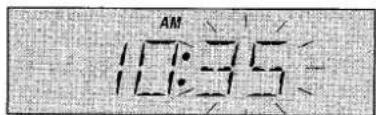
Set the minutes.
Ajuste los minutos.
設定分鐘。
6
Set the seconds.
Clock starts from 00 second.
To set the time exactly
Press the SET button in step 6 to start the clock at the desired point, as indicated by another clock or time signal from an external time source.
To display the clock while the power is on
Press the CLOCK button. The clock is displayed for 4 seconds.
During recording or dubbing, the clock is not displayed even if the button is pressed.
To switch the time display
The time display is factory-set to the 12-hour standard. When switching to the 24-hour standard, press the POWER button while pressing the CLOCK button. Repeat the same procedure to restore the 12-hour standard.
In case of power failure
- for less than about 24 hours, the clock stops during the failure.
Only the current time setting is needed. - for more than about 24 hours, setting of the current time, station presetting and timer setting are needed.
Note
- The current time cannot be set with the remote control.
- While setting the current time, the on-timer is not activated when the specified time is displayed.
To increase the volume, turn the VOLUME control clockwise.
To decrease the volume, turn the VOLUME control counterclockwise.

For louder deep bass
Press the T-BASS button repeatedly and select one of the four levels for louder deep bass, or off position to your preference. Normally set to the second level.

For clear and vivid high-definition sound – BBE system
The two main causes of sound distortion are the deterioration of the higher harmonics and improper phase characteristics. The BBE system compensates for these causes of distortion to produce clear, high-definition sound reproduction closer to that of the original source.
Press the BBE button repeatedly and select one of the four levels, or off position to your preference.

Selecting a factory-preset equalization curve
You can enjoy music with 3 different equalization curves preset at the factory.

Select an equalization mode.

To cancel the selected mode
Press the selected button twice.
To select with the remote control
Press it repeatedly.
About preset sound quality
ROCK: Powerful sound emphasizing treble and bass
POP: More presence of vocals and midrange CLASSIC: Sound enriched with heavy bass and fine treble
The VOLUME control, BBE button, GRAPHIC EQUALIZER buttons, and T-BASS button have no effect.
Headphone use
Connect headphones to the PHONES jack.
To mute the sound temporarily
Press the MUTE button of the remote control. The indicator of the function button blinks. To restore the sound, press the button again.
Cuando grabe
To resume play, press the II button again.
To play an 8cm CD
Load a disc onto the inner circle of the tray.
Note on the display window
If the disc includes more than 17 tracks, the track numbers after 17 are not displayed.
To check the remaining time
Press the DISPLAY button during playback. The amount of time remaining until all tracks finish playing is displayed.
To resume the play time display, press the DISPLAY button again.
If a dirty disc is used
The disc may not play normally. (It may stop, the search for a track may take longer, etc.)
In this case, press the ■ STOP button to stop play, and take out the disc. Then wipe it with a cleaning cloth.
A disc with a major flaw will not play normally either.
Notes
- Do not place more than one compact disc on the disc tray at the same time.
- If, during CD play, the video image of a nearby television is distorted, or if static is heard from a nearby radio, please move this unit further away from the affected television or radio.
To go back: Keep the ◀ button pressed. To go ahead: Keep the ▶ button pressed. Release the button when you reach the point in the track you are looking for.
To find a previous track
By pressing the ◀ button once during play, the CD will return to the beginning of the current track. If the button is pressed repeatedly before play starts, the CD will return to the previous track(s).
To skip tracks
By pressing the ▶ button once, the CD will move to the beginning of the next track.
If the button is pressed repeatedly, the CD will move in succession to the following tracks.
Note
During random play, the beginning of the previous track cannot be searched for by pressing the ◀ button.
The player has a memory function that allows programmed play of up to 24 tracks in any desired order.
To check the programmed tracks
Press the DOWN (◀◀) or UP (▶▶) button repeatedly during the stop mode. The track number and the program number are displayed in programmed order.
To cancel programmed play
Press the ■ STOP button during the stop mode, or press the OPEN/CLOSE button.
To change the program
After cancelling the programmed play, program the tracks again.
If the disc includes more than 17 tracks
Tracks after the 17th can be programmed, but their track numbers are not displayed in the music calendar.
Note
While the sleep function is activated, program operation is impossible.
All the tracks on the disc can be played in random order.
natural_image
Line drawing of a computer monitor with ports and buttons (no text or symbols)To cancel random play
Press the RANDOM button so that "RANDOM" in the display goes out.
The tracks on the disc can be played repeatedly.
natural_image
Line drawing of a computer monitor with ports and buttons (no text or symbols)Before or during playback
To cancel repeat play
Press the REPEAT button so that "REPEAT" in the display goes out.
Repeat play during programmed play
Press the REPEAT button during programmed play so that "REPEAT" is displayed. Repeat play will be performed.
2

natural_image
Line drawing showing two hand positions interacting with a device panel (no text or symbols)3
PLAY/DIRECTION

Forward side
Cara frontal
向前侧
◀ △
Reverse side
Cara posterior
换面側
To stop play
Press the ■ button.
To pause (deck 2 only)
Press the II button.
To resume play, press the II button again.
To change play direction
During play or pause, press the ◀▶ button.
Usable tapes
Normal (type I). CrO2 (Type II) or metal (type IV) tapes can be played.
The type of the tape is detected automatically when you insert the tape.
When listening to a tape recorded with DOLBY NR
Press the DOLBY NR button to turn on the "☐☐NR" indicator on the display window.
For Dolby NR processed tape:
Turn on the indicator.
For a tape recorded without Dolby NR system:
Turn off the indicator.
To select the reverse mode (deck 2 only)
Press the REV MODE button until the desired mode indicators are turned on.
| For playing one side only: | |
| For playing both sides one time only: | |
| For playing both sides repeatedly: |
On deck 1, it plays both sides once.
To fast wind
During stop mode, press the ◀◀ or ▶▶ button, and then press the ■ button to stop winding.
When playback starts from the reverse side
On deck 1, the tape always stops when the reverse side is played back once.
On deck 2, the tape stops when the reverse side is played back once if ☐ is selected.
Note
Noise may be heard if a television set is on. In this case, turn off the television or separate the television from this system.
To check the deck and playback side of the tape during stop mode
The display window shows the deck and the side which are selected to be played back.
Selected deck number
E.g.) The forward side of deck 2 will be played back when the PLAY button is pressed.
To select the deck to be played back when tapes are inserted in both decks
Each time it is pressed, the deck number changes. Otherwise, the deck which was closed last is selected.
If there is a 4-second or longer blank between tracks, you can search for the beginning of a track easily during playback. (Music Sensor; MS)
natural_image
Line drawing of a three-tier electronic device front panel with control buttons and indicator lights (no text or labels)
Press ▶▶ or ◀◀ during playback, referring to the following table.
| Indicator | Side of the cassette being played | Desired track | |
| Next track | Track being played | ||
| Front side | |||
| Reverse side | |||
Searching for the beginning of a track cannot be correctly carried out on with the following tapes:
• A tape with a blank of less than 4 seconds
• A tape with a noisy blank
• A tape with long low-level sections
• A tape of low recording level
Nota
To select the deck to be played back first
1
Select a band.
Seleccione la banda. 選擇波段。

2
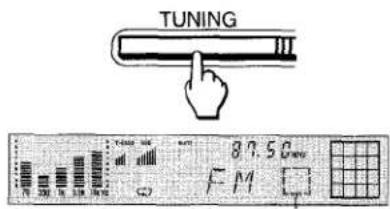
Extinguish the preset number. Borre el número prefijado. 消除預調數碼。
Preset number Número prefijado 預調數碼
3
To search for a station quickly (Auto search)
Press the DOWN (◀◀) or UP (▶▶) button for 1 to 2 seconds, and a station is searched for automatically. When a station is found, searching stops automatically. To stop it manually, press either the DOWN (◀◀) or UP (▶▶) button once.
The searching may not stop at a station with a very weak signal.
If the FM stereo broadcast signal is weak.
Press the FM MODE button to extinguish "AUTO" in the display. Background noise will be reduced although the broadcast becomes monaural.
To change the AM (MW) tuning interval
The AM (MW) tuning interval of the LH, U and C models is factory-set to 10kHz, and that of the HE, E and K models to 9kHz.
If you use this unit where the frequency allocation system is different from the preset one, press the POWER button to turn off the power. Then, while pressing the TUNER/BAND button press the POWER button. To reset the interval, repeat this procedure.
The remote control cannot be used for presetting.
Nota
1 Select a band. Seleccione la banda. 選擇波段。

2

When the DOWN (◀◀) or UP (▶▶) button is pressed repeatedly, you can search for the manually preset and factory-set* stations, only in the band which is selected in step 1. Example) When you preset three AM (MW) stations to numbers 1 to 3, the preset numbers are searched as following in the AM (MW) band.
→ 1 → 2 → 3 → 2 5 → 2 6 → 2 7 → 2 8 → 2 9
To receive a station of the other bands, first change the band by pressing the TUNER/BAND button.
*Factory-set stations
FM: Number 1 to 24
AM/MW: Number 25 to 29
LW (E, K models only): Number 30 to 32
When recording from a CD or a tape, see also the pages after 32.
To stop recording
Press the ■ button.
To pause recording
Press the II button.
To resume recording, press the II button again.
To start recording with the remote control
First press the REC button, and then press the
◀▶ (play) button within 2 seconds.
Monitoring
During recording, the output volume and tone of the speakers or headphones may be freely varied without affecting the level of the recording.
Usable tapes
Normal (type I) and CrO2 (type II) tapes can be recorded on.
The type of the tape is detected automatically when you insert it.
To erase a recording
It is possible to create a blank tape by erasing a recording.
1 Press the TAPE button.
2 Insert the tape you want to erase into deck 2.
3 Set the reverse mode and the recording direction.
4 Press the VIDEO/AUX button. (Turn off the power of the external equipment connected to the VIDEO/AUX jack.)
5 Press the RECORD button.
Note
When a tape without an erasure prevention tab is inserted, the dubbing operation will not begin.
flowchart
graph LR
    A["TAPE/DECK 1/2"] --> B["PLAY/DIRECTION"]
    B --> C["STOP"]
Press once or twice. Presione una o dos veces. 按 1 到 2 下。
Ⓐ To record with Dolby noise reduction system
The Dolby Noise Reduction system reduces tape hiss and noise.
Press the DOLBY NR button to turn on the "☐☐ NR" indicator on the display.
For recording with DOLBY NR:
Turn on the indicator.
For recording without DOLBY NR system:
Turn off the indicator.
⑧ To select the reverse mode
Press the REV MODE button until the desired mode indicators are turned on.
| For recording on one side only: | |
| For recording on both sides: |
Note
When you record on both sides, be sure to record on the front side first. Recording automatically stops after the reverse side recording is completed, even if the REV MODE button is set to (2).
To insert a 4-second blank space during recording
Press the RECORD/REC MUTE button during the recording or recording pause mode.
The red indicator blinks and incoming signals will not be recorded on the tape, then a 4-second blank space will be inserted.
4 seconds after the RECORD/REC MUTE button is pressed, the cassette deck will automatically enter the recording pause mode.
To resume recording, press the II button.
For a blank space of less than 4 seconds
After pressing the RECORD/REC MUTE button, quickly press it again while the red indicator is blinking and the recording will restart.
For a blank space of more than 4 seconds
After deck 2 enters the recording pause mode, press the RECORD/REC MUTE button again. Each time this button is pressed, a 4-second blank space is added.
Note
If squealing sounds (beating) occur when recording an AM(MW), LW broadcast, change the FM MODE button to a different position, so as to eliminate the beat noise.
By pressing the button repeatedly, the dot light is on and off in turn in the display window.
natural_image
Illustration of hands using a vintage cassette tape to adjust a button (no text or symbols visible)B

C

Check and tighten slack tape before use with a pencil or similar tool. Slack tape may possibly break or get jammed in the mechanism.
C-120 tape
C-120 tape is extremely thin and easily deformed or damaged. It is not recommended for use in this unit.
To prevent accidental erasure B
Use a screwdriver or other pointed tool to break off the plastic tabs.
Re-use [C]
Cover the tab openings with cellophane tape.
• Take care not to cover the CrO2 tape detection slot when covering the tab openings.
About same tape side dubbing (STSD)
This feature allows both sides of the dubbed tape to match those of the original tape.
The reverse side of both tapes will start at the same time as soon as the longer tape has been reversed.
Ⓐ To select dubbing speed
NORMAL: For dubbing at normal speed.
HIGH: For dubbing at high speed.
Notes on dubbing
- During dubbing, only the ■ button operates.
- The same Dolby NR system as used on the recorded tape is automatically used for the tape to be recorded on.
- During dubbing, noise may be recorded on the tape if a TV is on. If that happens, turn off the TV or move it away from the unit.
- If the leader segment of the tape to be recorded on is longer than that of the tape to be played back, recording on the reverse side may stop midway through the program. In that case, dub each side manually by following the next procedure.
To dub some part of the original tape manually
Press the RECORD button instead of one of the SYNCHRO DUBBING buttons. The tapes are not rewound, and dubbing starts immediately.
- Make sure that "TAPE 1" is displayed. If not, dubbing will not start.
- Before clubbing, set the tape direction, and set the reverse mode to the "Z" position.
Tone adjustment during dubbing
- The VOLUME, T-BASS, BBE and GRAPHIC EQUALIZER buttons do not affect the level of the recording.
- The output sound tone cannot be changed by the GRAPHIC EQUALIZER buttons in the middle of recording.
After play is completed
The compact disc stops, but Deck 2 is still in the recording mode. Press the STOP button to stop it.
To stop recording
Press the ■ button. The playback of the compact disc stops simultaneously.
By inputting the length of the tape, the tracks which can be recorded are selected in the same order as they are in the CD.
natural_image
Hand inserting a component into a device (no text or symbols visible)Put the side to be recorded on first facing you. Ponga la cara a grabarse primero enfrentada hacia usted.
先將需要錄音的一面朝向您。
2

3

To check the editing contents on side B
Press the DISPLAY button.
To cancel the editing contents
Press the ■ button or the OPEN/CLOSE button.
Note on CD edit function
Use a compact disc which includes up to 20 tracks. Up to 12 tracks can be programmed for recording each side.
When inputting the length of the tape, any extra tracks you desire can be dubbed after checking the remaining amount of time on the tape side.
natural_image
Hand inserting a component into a device (no text or symbols visible)Put the side to be recorded on first facing you.
Remaining time of side A
If the total time of the selected tracks exceeds the tape length
The "--" mark is displayed instead of the track number and the track is cancelled.
To check the program
In the stop mode, press the DISPLAY button. Each time it is pressed, the contents of each side are displayed in turn.
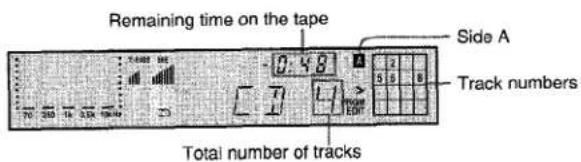
To change a program
First press the ■ STOP button to cancel the program, then reprogram the tracks.
Time on cassette tapes
Cassette tapes generally have a bit more tape than the time indicated on their labels. When you designate the nominal tape length in step 4, you should have a little unrecorded tape at the end.
7
Make sure the clock is set correctly. (See pages 12 and 13.)
Preparativos
Get ready for the source.
Prepare la fuente.
準備接通電源。

① To record from the radio, insert a cassette into deck 2. Set the Dolby NR and the reverse mode.
After setting the timer
Turn the system power off. If the power is on, the timer will not work at the preset time.
When the on-time is reached
"SLEEP" appears in the display and the sleep timer starts to work. The power is turned off automatically in 120 minutes.
To change the time
After setting has been completed, reset the time.
To check the timer-on time
Press the STANDBY button once.
Once the timer is set, it activates every day. To cancel it temporarily, press the STANDBY button so that the ⏻ (REC) indicator disappears. To restore the cancelled timer function, press the STANDBY button so that the ⏻ (REC) indicator is displayed.
Notes
- When the timer is worked, the FM mode, stereo or monaural, is selected according to the preset condition.
- The timer does not work if the ⏻ (REC) indicator is not displayed. If the on-time is reached while the power is turned on, the timer cannot work.
- The timer-on time cannot be set while the ⏻ (REC) indicator is displayed, or during recording.
When the sleep function is used, the power automatically turns off at the specified time between 120 and 10 minutes.
Press the SLEEP button repeatedly until the desired time is displayed.
To cancel the sleep-timer function
Press the SLEEP button repeatedly until the "SLEEP" indicator goes out.
When the SLEEP button is pressed while the power is off
The power is turned on and the sleep timer starts to work.
If the program source is changed while the sleep timer is working
The sleep timer is still in effect as long as the "SLEEP" indicator is displayed.
Refer to page 8 for connection.
natural_image
Line drawing of a three-tier electronic device front panel with control buttons and indicator lights (no text or labels)1
1

2
Play the external source. Funciona la fuente externa.
將外接音源放音。
To adjust the input level of the equipment connected to the VIDEO/AUX jacks
1 Press the VIDEO/AUX function button and play the equipment.
2 Turn the VIDEO/AUX INPUT LEVEL knob on the rear panel until the level of the sound being heard becomes the same as that of the other sound sources.
To record from the other sources
1 Insert a cassette into deck 2.
Set the reverse mode, tape direction and Dolby NR.
2 Press the VIDEO/AUX function button and play the equipment.
3 Press the RECORD button.
natural_image
Line drawing of a microphone with a small labeled connector (no text or symbols on the device itself)2
Select the source to be mixed and play it.
Adjust the volume and tone.
To enjoy karaoke with an ordinary compact disc
Press the VOCAL FADER button to make the singer's voice softer than the accompaniment.
This function does not work correctly with the following CDs:
• Those with a monaural recording
• Those recorded with strong echoes
- Those with the vocal part recorded on the right or left side of the sound width
To echo the sound (NSX-330HE and NSX-A92HE only)
Slide the ECHO LEVEL lever toward MAX to increase the echo.
Notes
If a microphone is set too near the speaker, a howling may be produced. In this case, keep the microphone away from the speaker, or decrease the sound level.
- When not using the microphone, set the MIXING PLAY control to MIN and remove the microphone from the MIC jack.
Do not set the microphone volume too high, by observing the spectrum analyzer indication.
- For microphone mixing, it is recommended to use a unidirectional type microphone to prevent howling.
" The mixed sound cannot be recorded.
B

natural_image
Illustration of a hand holding a triangular object with an arrow indicating direction (no text or symbols)To clean the cabinet
Use a soft cloth lightly moistened with mild detergent solution. Do not use strong solvents, such as alcohol, benzine or thinner.
Regular deck cleaning Ⓐ
Clean the (recording/) playback head ⓐ, erasure head Ⓑ (deck 2 only), pinch rollers Ⓒ, and capstans ⓑ regularly (every 10 hours of use) for optimum sound quality. Use a cotton swab Ⓓ lightly moistened with cleaning fluid or denatured alcohol.
To clean discs Ⓗ
Before playing, wipe the disc from the center out with the cleaning cloth. After playing, store the disc in its case.
| Frequency range | 87.5 MHz to 108 MHz | Disc | Compact disc |
| Usable sensitivity (IHF) | 1.3 μV (75 ohms) 13.2 dBf | Scanning method | Non contact optical scanner (semi-conductor laser application) |
| Alternate channel selectivity | 50 dB (±400 kHz) | ||
| Signal-to-noise ratio | 70 dB (STEREO), 76 dB (MONO) | Laser | Semiconductor laser ( λ = 780 nm) |
| Harmonic distortion | 0.3 % (MONO), 1 kHz | Rotation speed | Approx. 500 rpm – 200 rpm (CLV) |
| 0.5 % (STEREO, L-R), 1 kHz | Error correction | Cross Interleave, Reed Solomon code | |
| Frequency response | 30 Hz to 15 kHz (+0.5 dB, -3 dB) | ||
| Stereo separation | 33 dB at 1 kHz | No. of channels | 2 channels |
| Antenna | 75 ohms (unbalanced) | D-A conversion | 16-bit linear |
| Wow/flutter | Unmeasurable | ||
| Signal-to-noise ratio | 90 dB (1 kHz, 0 dB) | ||
| Frequency range | NSX-330HE, E, K, NSX-A92HE:AM 531 (530) kHz to 1,602 (1,710)kHz | Harmonic distortion | 0.05% (1 kHz, 0 dB) |
| NSX-330LH, U, C, NSX-332U:AM 530 (531) kHz to 1,710 (1,602)kHz | Cabinet type | 3 way, bass reflex (Magnetism sealed type) | |
| Speaker | 130 mm ( 51/8 in.) cone type woofer | ||
| Usable sensitivity | 350 μV/m | 50 mm (2 in.) cone type tweeter | |
| Selectivity | 22 dB (9 kHz) | 20 mm ( 13/16 in.) ceramic type super tweeter | |
| Signal-to-noise ratio | 53 dB (100 dB input) | ||
| Antenna | Loop antenna | Impedance | 6 ohms |
| Music power | 40 W | ||
| Output sound pressure level | 87 dB/W/m | ||
| (E and K models only) | Dimensions (W × H × D) | 180 × 302.5 × 200 mm( 71/8 × 12 × 77/8 in.) | |
| Frequency range | 144 kHz to 290 kHz | ||
| Sensitivity | 1,400 μV/m | ||
| Antenna | Loop antenna | Weight | 2.6 kg (5.7 lbs.) |
| Program timer | On-timer, capable of free setting | Power requirements | NSX-330LH, HE, NSX-A92HE:AC 120 V/220 V/240 V, switchable50/60 Hz |
| Sleep timer | Capable of setting in 10-minute increments, 120 minutes maximum | ||
| NSX-330U, C, NSX-332U:AC 120 V/220 V – 240 V, switchable50/60 Hz | |||
| Power output | NSX-330LH, HE, NSX-A92HE: 40W+ 40W (6 ohms, T.H.D. 10% 1 kHz)NSX-330E: 30W + 30W (6 ohms,T.H.D. 1% 1kHz)NSX-330K: 40W + 40W (6 ohms,T.H.D. 10% 1kHz)30W + 30W (6 ohms, T.H.D. 1% 1kHz)FTC RULE (NSX-330U, C,NSX-332U)30 watts per channel, Min.RMS at 6 ohms, from 65 Hz to 15kHz, with no more than 1%Total Harmonic Distortion | Power consumption | NSX-330E: AC 230 V, 50 HzNSX-330K: AC 240 V, 50 HzNSX-330LH, HE, NSX-A92: 85 WNSX-330/332U: 80WNSX-330E, K: 210WNSX-330C: 100WCenter unit: 260 × 302.5 × 329.5 mm( 101/4 × 12 × 13 in.)System: 620 × 302.5 × 329.5 mm( 241/2 × 12 × 13 in )Center unit: 7.2 kg (15.8 lbs.)System: 12.4 kg (27.3 lbs.) |
| Harmonic distortion | 0.05% (15 W, 1 kHz, 6 ohms) | Weight | FM feeder antenna (1) |
| Input sensitivity | VIDEO/AUX: 150 mV (adjustable) | Accessories | AM loop antenna (1)Remote control (1) |
| Track format | 4 tracks, 2 channels | ||
| Frequency response | CrO2tape: 50 – 16,000 HzNormal tape: 50 – 15,000 Hz | · Specifications and external appearance are subject to change without notice due to product improvement.· Dolby noise reduction manufactured under license from Dolby Laboratories Licensing Corporation.· The word "BBE" and the "BBE symbol" are trademarks of Dolby Laboratories Licensing Corporation.· The word "BBE" and the "BBE symbol" are trademarks of BBE Sound, Inc.Under license from BBE sound, Inc. | |
| Signal-to-noise ratio | 60 dB (DOLBY NR ON, CrO2tape peak level) | ||
| Tape speed | 4.8 cm/sec. ( 17/8 ips) | ||
| Recording system | AC bias | ||
| Erasure system | AC erase | ||
| Motor | DC servomotor × 1 | ||
| Heads | Playback head × 1 (deck 1)Recording/playback/erasure head × 1 (deck 2) | ||
| NotePlease check the laws on copyright relating to recordings from discs, radio or external tape for the appsets in which the machines have used. | |||
If the unit fails to perform as it is supposed to, by following this operation manual, please check it carefully in accordance with the chart below:
| Symptom | Causes | Solutions | |
| General | There is no sound. | The power cord is not connected properly.An incorrect function selector button is pressed.There is a bad connection between systems.Excessive voltage was applied to a speaker jack, which tripped the amplifier's voltage-protection breaker. | Correct the connection.Press the function selector button to select the correct input.Correct the connection.Disconnect the power cord, correct the condition, including speaker connections, and connect the power cord again. |
| There is no sound and no indicators are lit in the display window. | There is a short circuit in the speaker jack.The breaker tripped because of connection to a low- impedance speaker. | Disconnect the power cord, correct the condition, including speaker connections, and connect the power cord again. | |
| Sound comes from only one speaker. | One speaker is disconnected. | Correct the speaker connection. | |
| Radio | There is constant, wavelike static. | The antenna is not connected properly.The receiver is not correctly tuned.The signal is too weak. | Check the antenna connection.Correct the tuning.Install an outside antenna. |
| There is noise. | The system picks up outside noise. | Change the location or direction of the antenna.Turn the system to a different orientation.Move the system away from other electrical appliances, like a TV or fluorescent lights, or move the appliances. | |
| The sourid is distorted. | There is multipath distortion. | Change the orientation of the antenna.Replace the antenna with one that has the correct orientation. | |
| Cassette deck | The tape does not run. | Deck 2 is on pause. | PressIIand release pause. |
| The sound is off-balance. | The playback head is dirty. | Clean the head. | |
| High sounds are too loud. | The DOLBY NR mode is set differently from when the recording was done. | Reset DOLBY NR to the same setting as when the recording was made. | |
| There are no high sounds. | A non-Dolby NR tape is being played back in that mode. | Turn off DOLBY NR. | |
| The playback head is dirty. | Clean the head. | ||
| Recording is impossible. | The erasure-prevention tab on the tape has been broken.There is an incorrect connection.The recording head is dirty. | Cover the erasure-prevention hole well with tape.Correct the connection.Clean the head. | |
| Erasure is impossible. | The erasure head is dirty. | Clean the erasure head. | |
| CD player | It does not play. | The disc is incorrectly inserted. | Insert the disc with the label facing up. |
| The disc is dirty. | Clean the disc. | ||
| There is condensation on the disc. | Wait about an hour and try again. | ||
| The player is on pause. | PressIIPAUSEto release pause. | ||
| The output sound is not stereo. | The VOCAL FADER is turned on. | Turn off the VOCAL FADER. | |
Main unit
① PAUSE (Ⅱ)/SET button → ⑫ ⑳ ⑴
② Display window
③ REV MODE button → 22 24 30
④ DOLBY NR button → 22 30
⑤ Remote sensor → 59
⑥ TIMER buttons (STANDBY, SLEEP) → ④ ④
⑦ SYNCHRO DUBBING buttons (NORMAL, HIGH) → Ⓜ
⑧ RECORD/REC MUTE button → 29 30 33
⑨ Disc tray
⑬ STOP ( ■ )/CLEAR button → ⑰ ⑱
⑪ PLAY/DIRECTION button (◀▶) → ⑯ ⑳
⑫ TUNING/PRESET/TIMER/SKIP/SEARCH/MS buttons (◄◄ DOWN/ ►► UP) → 12 18 23 25 41
⑬ TUNER buttons (TUNING, PRESET) → ⑲ ⑳
⑭ FM MODE button → 25
⑮ CLOCK button → ⑫
⑬ OPEN/CLOSE button → ⑯
⑰ EDIT buttons (AUTO, PRGM) → ⑰ ⑳
⑬ REPEAT button → 20
⑬ DISPLAY button → ⑳
⑳ RANDOM button → ⑳
Unidad principal
① Botón PAUSE (Ⅱ)/SET → ⑫ ⑳ ⑴
⑰ Botones EDIT (AUTO, PRGM) → ⑲ ⑳
⑱ Botón REPEAT → ⑳
⑲ Botón DISPLAY → ⑳
⑳ Botón RANDOM → ⑳
主要部件
① PAUSE(Ⅲ)/SET(暫停(Ⅱ)/設定)按鈕→122841
② 顯示窗
⑥ TIMER(定時器)按鈕 (STANDBY,SLEEP) → 41 44
⑦ SYNCHRO DUBBING
(同步複錄)按鈕(普通,高速)→37
⑧ RECORD/REC MUTE (錄音/錄音靜音) 按鈕 → 29 30 43
⑨ 唱盤
⑩ STOP(■)/CLEAR(停止(■))/清除按鈕→⑰⑱
⑪ PLAY/DIRECTION(放音/方向)按钮 (◀▶) → ⑯ ⑰
⑫ TUNING/PRESET/TIMER/SKIP/SEARCH/MS
(調諧/預調/定時器/跳躍/尋找/主控開關)按鈕(◀◀DOWN/▶▶UP)→12 18 23 25 41
⑬ 調諧按鈕(TUNING, PRESET) → 25 27
⑭ FM/MODE(調頻/方式)按鈕→25
⑮ CLOCK(時鐘)按鈕→⑫
⑯ OPEN/CLOSE(打開/關閉)按鈕→
⑰ EDIT(編輯)按鈕(AUTO, PRGM)→⑲⑳
⑱ REPEAT(重複)按鈕→⑳
⑲ DISPLAY(顯示)按鈕→⑳
⑳ RANDOM(任意)按钮→⑳
Main unit
②1 VOCAL FADER button → 47
② POWER button → ⑦
②3 T-BASS button → 14
② PHONES jack → ⑮
② MIC jack → ④
②6 ECHO LEVEL lever
(NSX-330HE, NSX-A92 only)
⑳ Cassette compartment (deck 1)
⑳ MIXING PLAY knob → 45
⑲ BBE button → 14
③ GRAPHIC EQUALIZER buttons (ROCK, POP, CLASSIC) → 15
③ VOLUME control → ④
③2 Function buttons
(TAPE/DECK 1/2, TUNER/BAND, VIDEO/AUX, CD)
③ Cassette compartment (deck 2)
Unidad principal
② Botón VOCAL FADER → ④
② Botón POWER → ⑦
② Botón T-BASS → 14
⑳ Toma PHONES → ⑮
② Toma MIC → ④
⑳ Palanca ECHO LEVEL
(Sólo NSX-330HE, NSX-A92)
⑰ Compartimiento de casete (deck 1)
⑳ Perilla MIXING PLAY → ⑴
⑲ Botón BBE → ⑭
③ Botones GRAPHIC EQUALIZER (ROCK, POP, CLASSIC) → ⑮
③1 Control VOLUME → ⑭
② Botones de función
(TAPE/DECK 1/2, TUNER/BAND, VIDEO/AUX, CD)
③ Compartimiento de casete (deck 2)
主要部件
②1 VOCAL FADER(聲音柔和)按钮→⑰
② POWER(電源)按鈕→⑦
②3 T-BASS(高低音)按钮→⑭
②4 PHONES(唱機)插孔→⑬
②5 MIC(麥克風)插孔→46
②6 ECHO LEVEL(混響電平)桿(僅限於NSX-330HE,NSX-A92機型)
②7 帶盒座室(走帯機1)
②8 MIXING PLAY(混頻放音)按鈕→④6
⑳ BBE按钮 → ⑴
③ GRAPHIC EQUALIZER(圖型均衡器)按鈕(ROCK, POP, CLASSIC) → 15
③1 VOLUME(音量)控制 → 14
③2 功能按鈕
(TAPE/DECK 1/2, TUNER/
BAND, VIDEO/AUX, CD)
③3 帶盒座室(走帯機2)
Display window
Ventanilla visualizadora
顯示窗
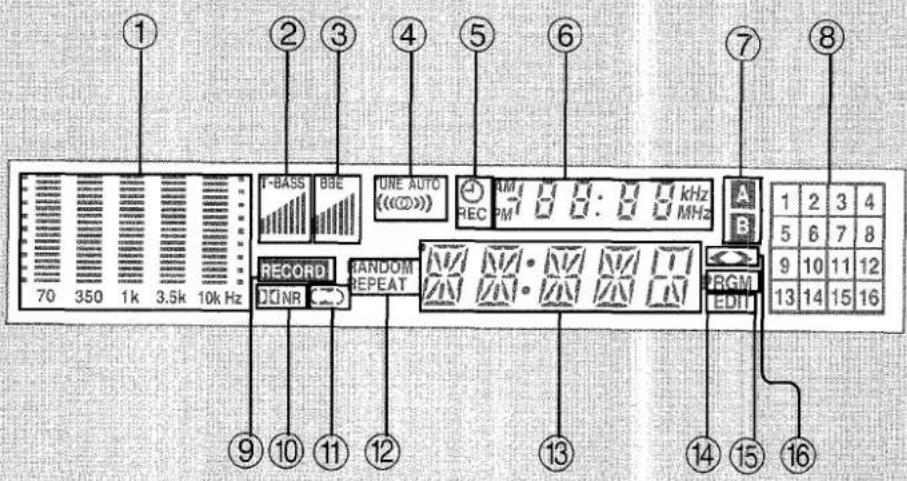
Display window
① Spectrum analyzer
② T-BASS indicator
③ BBE indicator
④ Stereo indicator
⑤ Timer standby indicator
⑥ Timer/frequency/CD time counter
⑦ Tape side indicator
⑧ Music calendar
⑨ RECORD indicator
⑩ Dolby NR indicator
⑪ Deck 2 reverse mode indicator
⑫ RANDOM/REPEAT indicator
⑬ Clock/function indicator
⑭ CD edit recording indicator
⑮ Program indicator
⑯ Tape direction indicator
Buttons with no explanations have the same function as the ones on the main unit with identical indications.
The II/SET button does not function to set the clock and to preset radio stations.
⑧ GEQ button
⑨ REC/REC MUTE (●/○) button
To start recording, first press this button and then press the ◀▶ button within 2 seconds.
⑩ POWER button
⑪ CLOCK button
⑫ FM MODE button
⑬ OPEN/CLOSE button
⑭ REPEAT button
⑮ Numeric buttons (1 - 0)
⑯ +10 button
⑰ Stop ( ■ )/CLEAR button
⑱ Play/DIRECTION (◀▶) button
⑲ T-BASS button
⑳ BBE button
②1 VOLUME buttons (^,√)
⑫ MUTE button
Control remoto
① Botón SLEEP
② Botón TIMER
③ Botón RANDOM
④ Botón DISPLAY
⑬ OPEN/CLOSE(打開/關閉)按鈕
⑭ REPEAT(重複)按钮
⑮ 數字按鈕(1\~0)
⑯ +10按钮
⑰ Stop(■)/CLEAR(停止(■)/清除)按钮
⑱ 放音/方向(◀▶)按钮
⑲ T-BASS(高低音)按钮
⑳ BBE按钮
② VOLUME(音量)按钮(∧,∨)
② MUTE(靜音)按鈕
Battery insertion
natural_image
Simple line drawing of a device with a handle and scroll, no text or symbols present2


natural_image
Technical line drawing of a battery pack with four batteries and an open casing (no text or symbols)(R6P, AA)
Battery replacement
When the maximum operation distance of the remote control decreases, replace the batteries with new ones.
Hints for correct operation
- For the remote control to operate, it should have an unobstructed line of sight with the REMOTE SENSOR. This is because the remote control uses infrared light rays.
- When there is a strong ambient light source, the performance of the infrared REMOTE SENSOR is degraded, which can cause unreliable operation.
- The recommended effective distance for wireless operation is 7 meters (23 feet). Operation can be performed at an angle of up to 30irc from either side, but the effective distance becomes somewhat shorter.
- Using televisions with the same type of infrared remote control, in the same direction, will cause the system to operate incorrectly. Do not use other kinds of wireless remote controls at the same time.
Notes on batteries
- Do not mix different types of batteries, or old batteries with new ones.
- When you are not going to use the unit for a long period of time, remove them to prevent possible electrolyte leakage.
Use of controls or adjustments or performance of procedures other than those specified herein may result in hazardous radiation exposure.
ATTENTION
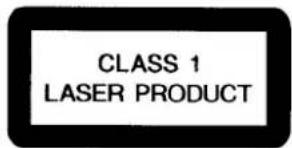
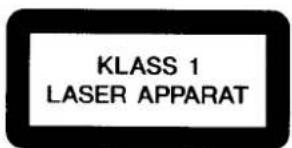
This compact disc player is classified as a CLASS 1 LASER product. The CLASS 1 LASER PRODUCT label is located on the rear exterior.
Note
This product is manufactured to comply with the radio interference requirements of EEC directive 82/499/ECC.
Nota
CAUTION: TO PREVENT ELECTRIC SHOCK DO NOT USE THIS (POLARIZED) PLUG WITH AN EXTENSION CORD, RECEPTACLE OR OTHER OUTLET UNLESS THE BLADES CAN BE FULLY INSERTED TO PREVENT BLADE EXPOSURE
CAUTION!

Invisible laser radiation when open and inter locks defeated. Avoid exposure to beam.
ADVARSEL!
- (FOR USE IN THE UNITED KINGDOM)
- NSX-330 NSX-332 NSX-A92
- Explanation of Graphical Symbols:
- WARNING
- CAUTION
- CAUTION!
- OWNER'S RECORD
- TABLE OF CONTENTS ÍNDICE
- 目錄
- CD edit functions
- Other features
- Sistema BBE
- On AC voltage (LH, HE, U, C models)
- To adjust the operating voltage
- On placement
- On safety
- On condensation
- For customers purchasing the U or C models
- Notes on speaker connections
- To turn on the system
- When the power is turned on
- ADDING OTHER EQUIPMENT TO YOUR SYSTEM
- ADICION DE OTROS EQUIPOS A SU SISTEMA
- 連接其他装置
- To connect an analog record player
- Notas
- Note on the FM feeder antenna
- Notes on the AM (MW/LW) loop antenna
- To set the time exactly
- To display the clock while the power is on
- To switch the time display
- In case of power failure
- Note
- For louder deep bass
- For clear and vivid high-definition sound – BBE system
- Selecting a factory-preset equalization curve
- About preset sound quality
- Headphone use
- To mute the sound temporarily
- Cuando grabe
- To play an 8cm CD
- Note on the display window
- To check the remaining time
- If a dirty disc is used
- Notes
- To find a previous track
- To skip tracks
- To check the programmed tracks
- To cancel programmed play
- To change the program
- If the disc includes more than 17 tracks
- To cancel random play
- Before or during playback
- To cancel repeat play
- Repeat play during programmed play
- To stop play
- To pause (deck 2 only)
- To change play direction
- Usable tapes
- When listening to a tape recorded with DOLBY NR
- To select the reverse mode (deck 2 only)
- To fast wind
- When playback starts from the reverse side
- To check the deck and playback side of the tape during stop mode
- To select the deck to be played back when tapes are inserted in both decks
- Nota
- 1
- 2
- 3
- To search for a station quickly (Auto search)
- If the FM stereo broadcast signal is weak.
- To change the AM (MW) tuning interval
- To stop recording
- To pause recording
- To start recording with the remote control
- Monitoring
- To erase a recording
- Ⓐ To record with Dolby noise reduction system
- ⑧ To select the reverse mode
- To insert a 4-second blank space during recording
- For a blank space of less than 4 seconds
- For a blank space of more than 4 seconds
- C-120 tape
- To prevent accidental erasure B
- Re-use [C]
- About same tape side dubbing (STSD)
- Ⓐ To select dubbing speed
- Notes on dubbing
- To dub some part of the original tape manually
- Tone adjustment during dubbing
- After play is completed
- To check the editing contents on side B
- To cancel the editing contents
- Note on CD edit function
- If the total time of the selected tracks exceeds the tape length
- To check the program
- To change a program
- Time on cassette tapes
- 7
- Preparativos
- Get ready for the source.
- Prepare la fuente.
- 準備接通電源。
- After setting the timer
- When the on-time is reached
- To change the time
- To check the timer-on time
- To cancel the sleep-timer function
- When the SLEEP button is pressed while the power is off
- If the program source is changed while the sleep timer is working
- To adjust the input level of the equipment connected to the VIDEO/AUX jacks
- To record from the other sources
- To echo the sound (NSX-330HE and NSX-A92HE only)
- To clean the cabinet
- Regular deck cleaning Ⓐ
- To clean discs Ⓗ
- Main unit
- Unidad principal
- 主要部件
- Display window
- Control remoto
- Battery replacement
- Hints for correct operation
- Notes on batteries
- ATTENTION
- ADVARSEL!
Brand : AIWA
Model : NSX-A92
Category : CD Player