
XP-V710C - CD Player AIWA - Free user manual and instructions
Find the device manual for free XP-V710C AIWA in PDF.


| Product Type | Portable CD Player |
| Brand | Aiwa |
| Model | XP-V710C |
| Dimensions (W x H x D) | 132 mm × 25 mm × 145.8 mm |
| Weight | Approx. 200 g (including batteries) |
| Power Source | DC 3 V (2× AA alkaline) or DC 2.4 V (2× Ni-Cd rechargeable) or AC adaptor (optional, DC 5-6 V, 250-300 mA) |
| Battery Life (alkaline) | Approx. 41 hours (E-A-S-S 4S) / 30 hours (E-A-S-S 12S) |
| Rechargeable Battery Type | AA Ni-Cd 1.2 V, 700 mAh (optional) |
| Charging Time | Approx. 6 hours for exhausted batteries |
| Frequency Response | 20 Hz – 20,000 Hz |
| Audio Output | PHONES/LINE OUT jack (stereo mini-jack), max output 12 mW + 12 mW |
| Laser Pickup | Semiconductor laser (3-beam) |
| D/A Conversion | 1-bit DAC with digital filter |
| Playback Modes | Normal, Single Repeat, All Repeat, Random, Program (up to 24 tracks) |
| Special Features | Resume, Timer On/Off, Jog Beat (40-200 bpm), DSL (Dynamic Sound), E-A-S-S (Anti-Shock with 12s or 45s memory) |
| Display | Track number, elapsed/remaining time, battery indicator |
| Accessories Included | Stereo headphones |
| Maintenance | Clean pickup lens with camera blower brush or lens cleaning solution; clean discs from center outward |
| Safety Certifications | FCC Class B, Canadian ICES-003 |
| Regulatory Notices | Recycle Ni-Cd batteries; modifications void warranty |
Frequently Asked Questions - XP-V710C AIWA
User questions about XP-V710C AIWA
0 question about this device. Answer the ones you know or ask your own.
Ask a new question about this device
Download the instructions for your CD Player in PDF format for free! Find your manual XP-V710C - AIWA and take your electronic device back in hand. On this page are published all the documents necessary for the use of your device. XP-V710C by AIWA.
USER MANUAL XP-V710C AIWA
011218BMK-U-A Printed in China
OWNER'S RECORD
For your convenience, record the model number and the serial number (you will find it inside the battery compartment of your set) in the space provided below. Please refer to them when you contact your Aiwa dealer in case of difficulty.
Model No.
Serial No
NOTE
This equipment has been tested and found to comply with the limits for a Class B digital device, pursuant to Part 15 of the FCC Rules. These limits are designed to provide reasonable protection against harmful interference in a residential installation.
This equipment generates, uses, and can radiate radio frequency energy and, if not installed and used in accordance with the instructions, may cause harmful interference to radio communications. However, there is no guarantee that interference will not occur in a particular installation. If this equipment does cause harmful interference to radio or television reception, which can be determined by turning the equipment off and on, the user is encouraged to try to correct the interference by one or more of the following measures:
– Reorient or relocate the receiving antenna.
- Increase the separation between the equipment and receiver. Connect the equipment into an outlet on circuit different from
- Connect the equipment into an outlet on circuit different from that to which the receiver is connected.
– Consult the dealer or an experienced radio/TV technician for help.
CAUTION
Modifications or adjustments to this product, which are not expressly approved by the manufacturer, may void the user's right or authority to operate this product.
This Class B digital apparatus complies with Canadian ICES-003.
PRECAUTIONS
To maintain good performance
- Do not use the unit in places which are extremely hot, cold, dusty or humid. In particular, do not use or keep the unit in following places.
• in a high humidity area such as a bathroom
- near a heater
- in an area exposed to direct sunlight (e.g., inside a parked car, where it can become extremely hot)
- near sources of strong magnetism, such as televisions, speakers, or magnets - where there is a lot of movement or vibration, such as on a car dashboard or an unstable shelf
Do not open the battery compartment with wet hands.
W ipe the unit thoroughly before inserting batteries and after use.
Do not soak the unit in water.
- Before connecting the AC adaptor or the headphones etc., be sure to confirm the power is off.
For safety
- Use only an AC adaptor whose rated output is DC 5-6 V, 250-300 mA.
- Do not attempt to disassemble the unit. Laser rays from the optical pickup are dangerous to the eyes.
Make sure that pins or other foreign object do not get inside the player
T. take care not to drop the unit or subject it to strong shocks.
- To keep dust from the pickup lens, keep the disc compartment lid closed after use. Never touch the lens.
- If you hear no sound when playing a disc, DO NOT turn the volume up high because music could suddenly start at high volume. Turn the volume control to the lowest level before starting playback and slowly turn it up to the desired level.
Notes on listening with the headphones
- Listen at moderate volumes to avoid hearing damage.
- Do not wear the headphones while driving or cycling. It may create a traffic hazard.
- Y ou should use extreme caution or temporarily discontinue use in potentially hazardous situations, such as walking, jogging, etc.
W ear them properly; L is left, R is right.
Note on condensation
If the unit is suddenly moved from a cold place to a warm place, it may result in condensation on the pickup lens and malfunction or playback difficulties. Should this occur, leave the unit for a few hours, then try playback again.


AA(LR6) × 2
Highlighted letters in the text of this manual correspond to the illustrations.
USING ON DRY CELL BATTERIES → A
Open the battery compartment and insert two size AA (LR6) alkaline batteries with the + and - marks correctly aligned.
Battery replacement
The battery indicator in the display changes first from 100 to 110 , then to 120 according to the remaining power of the batteries. Replace the batteries when 130 lights. If the unit remains in use after 140 lights, "Lo-bAtt" appears and operation stops.
Battery life (using alkaline batteries LR6)
The setting of the E•A•S•S switch Battery life
48 Approx. 41 hours
12 Approx. 30 hours
Battery life may vary depending on conditions of use.
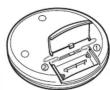
If the cover of the battery compartment comes off → B
Notes on dry cell batteries
- Make sure that the + and - marks are correctly aligned.
- Do not mix different types of batteries, or an old battery with a new one.
- To prevent the risk of electrolyte leakage or explosions, never recharge the batteries, apply heat to them, or take them apart.
- When not using the batteries, remove them to prevent needless battery wear.
- If liquid leaks from the batteries, wipe thoroughly to remove


USING ON RECHARGEABLE BATTERIES → C
- Be sure to use size AA Ni-Cd 1.2 V 700 mAh rechargeable batteries, which are commercially available.
- Be sure to read the instructions of the purchased rechargeable batteries before USD
- When using on rechargeable batteries for the first time, charge them until the battery shall be
- Before charging the batteries, close the disc compartment. You cannot charge the batteries while it is open.
1 Insert the optional rechargeable batteries with the ⊕ and ⊖ marks correctly aligned.
2 Connect the optional AC adaptor.
①to DC 5\~6 V jack
②to a wall outlet
3 Keep ■ STOP/OFF/CHARGE pressed for about 2 seconds to start charging.
"C-on" appears and the battery indicator blinks.
When charging is completed, "OFF" flashes a few times, and the battery indicates power out. Packaging subvaded batteries takes about 6 hours.
Indicator goes out: Recharging exhausted batteries takes about 6 hours. After charging, disconnect the AC adaptor.
Time to recharge the batteries
Recharge the batteries when lights. If the unit remains in use after lights, "I.e. battery" appears and the current operation steps
lights, Lo-BAtt appears and the current operation stops.
Force charging
When recharging stops after only few minutes or the batteries cannot be fully recharged, press ■ STOP/OFF/CHARGE while pressing PLAY MODE to force charging.
- Do not activate the force charging on the unit when there is no battery inserted or when dry cell batteries are inserted. Doing so may cause malfunction
To stop charging
Press ■ STOP/OFF/CHARGE during charging
Time to replace the batteries
Replace the batteries with new ones if they lost their capability to charge fully
ATTENTION:
The product you have purchased can be powered by nickel cadmium batteries which are recyclable. At the end of their useful life, under various state and local laws, it is illegal to dispose of these batteries into your municipal waste stream.
Please call 1-800-289-2492 for information on how to recycle these batteries.


USING ON AC HOUSE CURRENT
Connect the optional AC adaptor in the same way as when recharging the batteries.
During operation on AC house current, all of the battery indicators turn off.






BEFORE PLAYBACK
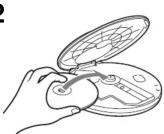
Inserting a disc → D
1 Slide the OPEN switch to open the disc compartment.
2 Place a disc in the center with the label side facing up.
3 Close the disc compartment.
To remove the disc
Hold the disc at its edge and pick it up while pressing the pivot gently.
Note
- The unit may not play a CD-R/RW disc that is recorded on personal computers or some kinds of CD-R/RW recorders because of difference in recording platforms.
- Do not attach any adhesive label to either side (the recordable side or the labeled side) of a CD-R/RW disc. It may cause malfunction.
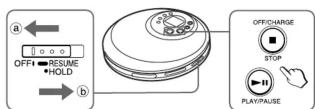
HOLD switch → E
Release HOLD. →
When not using the unit, set HOLD to the hold position. → ⓑ
Accidentally pressed buttons will not function.
If ▶ II PLAY/PAUSE is pressed when HOLD is set to the HOLD position, "HOLD" flashes in the display.
Turning the power on → E
Press ▶ IIPLAY/PAUSE.
Power is turned on and playback starts.
Note
"Err" appears on the display in the following cases:
—When you try to play the unit without a disc in the disc compartment. When you play a disc placed upside down or a defective disc.
Standby mode → E
When an operation finishes, the unit goes into standby mode until the auto power off function automatically turns off the power.
To enter standby mode press ▶ PLAY/PAUSE to start playback, then press
■ STOP/OFF/CHARGE
Turning the power off → E
Press ■ STOP/OFF/CHARGE in standby mode.
- If no new operations are done within 30 seconds from the end of last operation,
the power is turned on automatically. (Auto power on function)
Adjusting the sound → F
Connect the supplied headphones to the PHONES/LINE OUT jack.
An amplified speaker system can be connected instead to enjoy the CD sound.
Volume
Press VOLUME+ or - to adjust the volume level.
DSL
Hold down PHRASE/DSL for more powerful sound and deeper bass.
DSL lights up.
Hold down PHRASE/DSL again to return to normal playback

flowchart
graph TD
    A["PLAY/PAUSE"] --> B["2"]
    B --> C["OFF/CHARGE"]
    C --> D["1"]
    D --> E["EAS50"]
    E --> F["0:01"]
    F --> G["4"]
    G --> H["A"]
    G --> I["B"]
    style A fill:#f9f,stroke:#333
    style B fill:#ccf,stroke:#333
    style C fill:#cfc,stroke:#333
    style D fill:#fcc,stroke:#333
    style E fill:#ffc,stroke:#333
    style F fill:#cff,stroke:#333
    style G fill:#ffc,stroke:#333
    style H fill:#fff,stroke:#333
    style I fill:#fff,stroke:#333

flowchart
graph TD
    A["PLAYMODE"] --> B["Central Display"]
    C["PHRASEDISL"] --> B
    D["DISPLAYENTER"] --> B
    B --> E["OFF → RESUME + HOLD"]
PLAYBACK → G
1 Release HOLD.
2 Press ▶ IIPLAY/PAUSE
Playback starts from the first track
①track number
⑥ elapsed playing time
Basic operat
■ 2016 Operation
To stop Press ■ STOP/OFF/CHARGE.
Topause Press ▶IPLAY/PAUS
Toresume, press it again.
search for the beginning Press ◀◀◀ or ▶▶◀.
of a track
To locate a desired passage
Keep ◀◀◀ or ▶▶▶ pressed.
广力云智慧零售收银系统
Release the button at the start of desired passage.
Display during playback → H
Press DISPLAY/ENTER repeatedly during playback.
With each press, the display changes as follows.
①Track display and elapsed playing time (normal display)
②Track display and remaining playing time of the track in play
③Remaining number of tracks and remaining playing time
[Non-Text]
Note
- When the total remaining time of the programmed tracks is 100 minutes or over, the
time is not displayed.
- When timer-off is set, the remaining time of timer-off is displayed between ① and ②.
Resume function → H
Set HOLD to RESUME.
"RESUME" appears, and you can start playback from the point where you stopped.
RECOME appears, and you can start playback playback by pressing ■ STOP/OFF/CHARGE
When the resume function is on, all-track repeat is selected automatically.
To account for the following: UHOLD, 255
To cancel resume play, set HOLD to OFF.
Note
- Resume play may start at a point up to about 30 seconds behind or ahead of the stopped point. Resume play may not operate if you stopped within the last 30 seconds of the final track.
- Resume play will be canceled if you open the disc compartment. If the unit is turned off, resume play will not be canceled. In this case, be sure to set HOLD to OFF before changing discs.
Random/Repeat play → H
Press PLAY MODE repeatedly to change the play mode as follows.
①: one-track repeat
②: all-track repeat
③RNDM/ random repeat
④RNDM: random
⑤normal playback
Note
Note You cannot go back to the previous track by pressing ◀ during random play
Physics report play.
Phrase repeat play → 📄
Press PHRASE/DSL during playback.
With each press, playback returns to 5 seconds before.
Note
You cannot return to the previous track by pressing PHRASE/DSL
I

PROGRAM PLAY → 1
Up to 24 tracks can be selected for program play
Up to 2: trains can be selected for program play.
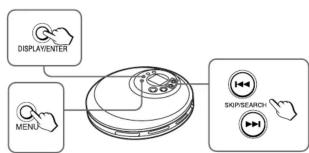
1 Press DISPLAY/ENTER in standby mode to display "P-01".
2 Select the desired track by pressing 🎯 and ▶
① track number
©program number 3 Press DISPLAY/EN
3) Less DISPEAT/ENTER within 8 seconds. If it is not pressed within 8 seconds, the track
in it is not pressed within 6 seconds, the track number changes to 00. Repeat from step 2 again
4 Repeat steps 2 a
5 Press ▶IPLAY/PAUSE to start program pla
To stop program play
Press ■ STOP/OFF/CHARGE
To add tracks to the program
to add tracks to the program
Repeat steps 1 through 3 in standby mode. You can add tracks to the end of the
program
To erase the program
Press ■ STOP/OFF/CHARGE in standby mode.
To check the programmed tracks
To check the programmed tracks Pass DISPLAY/ENTER repeatedly in standard mode
Press DISPLAY/ENTER repeatedly in standby mode. The number of each programmed track will be displayed in the order of playback.
The number of each programmed track will be displayed in the order of playback.
Note
• The program is also erased when the disc compartment is opened or the auto power
off function turns the power off.
- When 24 tracks are programmed, "P-FULL" appears, and no more tracks may be
added. - You cannot go back to the previous track by holding 📂 proceed during program
• you play
• Repeat play and random play can be performed during program play.
J
flowchart
graph TD
    A["DISPLAYENTER"] --> B["MENU"]
    B --> C["CELLS"]
    C --> D["DISPLAYSEARCH"]
    D --> E["Hand icon"]
OTHER FUNCTIONS → J
You can set on or off timers, Jog beat, or E•A•S•S (Electronic Anti-Shock System.)
Press MENU repeatedly to select the desired mode.
With each press, the display changes as follows
①②OFF (Timer-off)
②④ON (Timer-on)
③bEAt (Jog beat)
④E·A·S·S (Electronic Anti-Shock System)
For details of each operation, refer to the following.
Note
Timer-off and Timer-on settings are canceled, if the unit is turned off/on after setting is completed or when recharging the batteries.
OFF (Timer-off)
Timer-off function turns off the unit after a specified time
- Press ◀◀ or ▶▶ to set the hour and then press DISPLAY/ENTER.
2 Press ◀◀ or ▶▶I to set the minute and then press DISPLAY/ENTEF
The setting is completed.
When timer-off is set, all-track repeat is selected automatically and Auto power
off function is disabled.
Adjustable range: up to 12 hours 59 minutes
To cancel the timer-off, press MENU to display "gult" and then press DISPLAY/
ENTER.
ON (Timer-on)
Timer-on function turns on the unit after a specified time
-
Press 🖼️ or ➞️ to set the hour and then press DISPLAY/ENTER
-
Press ◀◀ or ▶▶ to set the minute and then press DISPLAY/ENTER
The setting is completed and the power is turned off automatically.
Adjustable range: up to 12 hours 59 minutes
bEAt (Jog beat)
-log beat function beeps at a regular pace
Press 🖼️ or ➕ to set the number of beeps in a minute and then press
DISPLAY/ENTER.
To cancel Jog beat, press MENU to display "gult" and then press DISPLAY/
ENTEE
Note
While, log beat function is set. Auto power off function is disabled.
F•A•S•S (Electronic Anti-Shock System)
The E-A-C-S-2 function reduces shipping or muting of the sound when the unit
The E-A-S-S 3× function reduces skipping of muting of the sound when the unit is subjected to check.
Press 🖼️ or ➕ to select "12" or "48" and then press DISPLAY/ENTER
Press 144 of 221 to select 12 of 46 and then press BIO FLAT/ENTER.
12 or 43 lights up and the player keeps about 48 seconds or 12 seconds of playback sound in its memory.
playba Note
Note
- Before jogging with this unit, allow sufficient time for the memory buffer to fill up completely (ideally about 30 seconds).
Completely (ideally about 20 seconds). Continuous shock or vibration may cause the sound to be interrupted even if the
Continuous shock of vibration may cause the bound to be interrupted even if the E-A-S-S 3x function is activated. This is normal and not a malfunction. Should you
experience an interruption in sound, stabilize the unit for a few seconds, then resume
your activity
- When the E·A·S·S 3× function is activated, motor noise is heard as the motor
periodically rotates at high speed during playback. This is not a malfunction.
- When you set the E·A·S·S to 12, quality of sound will be better than when you set it
to 48
K

CONNECTING TO AN EXTERNAL UNIT
To PHONES/LINE OUT jack → K
Use a commercially available connection cord which has a 3.5mm stereo miniplug at one end and two phono plugs at the other end.
Connect the stereo mini-plug to the PHONES/LINE OUT jack of the unit and connect the phono plugs to the analog input terminals of the external unit, such as the amplifier or the equipment with a built-in amplifier. The CD sound can be heard through the connected audio system.
Note
- T urn off the power of both units before connection.
- DO NOT connect to the PHONO inputs of an amplifier (with a built-in phonoequalizer-amplifier)
amplifier - Adjust th
- Adjust the volume and DSE on this unit.
MAINTENANCE
To clean the pickup lens
If the lens becomes dirty, the player will skip or not play. If this occurs, clean the lens in the following manner.
- T o remove dust or dry particles, first use a camera lens blower/brush to blow a few times to loosen particles, then gently brush the lens clean. Finish by blowing the lens again.
- To remove fingerprints, use a cotton swab dipped in lens cleaning solution. Wipe gently from the center to the edge. Lens cleaning solution is commercially available.
Note
Take care not to get too much solution on the swab, which could flow into the unit and cause damage.
Pressing too strongly with the swab could scratch or break the lens.
To clean the discs
Before playing, wipe the disc from the center out with a cleaning cloth. After playing, store the disc in its case.
SPECIFICATIONS
| Tracking system | 3-beam laser |
| Laser pickup | Semiconductor laser |
| D/A conversion | 8-times oversampling digital filter + 1-bit DAC |
| Frequency response 20 – 20,000 Hz | |
| Output | PHONES/LINE OUT (jack (stereo mini-jack)) |
| Maximum output | 12 mW + 12 mW (16 ohms at 1 kHz)500 mV (47 kHz ohms at 1 kHz) |
| Power supply | DC 3 V using two size AA (LR6) alkaline batteriesDC 2.4 V using two optional rechargeable batteries(Ni-CaI 1.2 V 700 mAħ)AC house current using the optional AC adaptor |
| Maximum outside dimensions | 132 (W) × 22 (H) × 145.8 (D) mm(5/4 × 1/8 × 5/4 in.) (excluding projecting parts and controls) |
| Weight | Approx. 200 g (7.1 oz.) excluding batteries |
| Accessories | Stereo headphones (1) |
Specifications and external appearance of this unit are subject to change without notice.
- OWNER'S RECORD
- NOTE
- CAUTION
- PRECAUTIONS
- To maintain good performance
- For safety
- Notes on listening with the headphones
- Note on condensation
- USING ON DRY CELL BATTERIES → A
- Battery replacement
- Battery life (using alkaline batteries LR6)
- If the cover of the battery compartment comes off → B
- Notes on dry cell batteries
- USING ON RECHARGEABLE BATTERIES → C
- Time to recharge the batteries
- Force charging
- To stop charging
- Time to replace the batteries
- ATTENTION:
- USING ON AC HOUSE CURRENT
- BEFORE PLAYBACK
- Inserting a disc → D
- To remove the disc
- HOLD switch → E
- Release HOLD. →
- Turning the power on → E
- Press ▶ IIPLAY/PAUSE.
- Standby mode → E
- ■ STOP/OFF/CHARGE
- Turning the power off → E
- Adjusting the sound → F
- Volume
- DSL
- DSL lights up.
- PLAYBACK → G
- Display during playback → H
- Resume function → H
- Random/Repeat play → H
- Physics report play.
- PROGRAM PLAY → 1
- OTHER FUNCTIONS → J
- CONNECTING TO AN EXTERNAL UNIT
- To PHONES/LINE OUT jack → K
- MAINTENANCE
- SPECIFICATIONS
Brand : AIWA
Model : XP-V710C
Category : CD Player