
XP-Z3C - CD Player AIWA - Free user manual and instructions
Find the device manual for free XP-Z3C AIWA in PDF.


| Product Type | Portable CD Player |
| Brand | Aiwa |
| Model | XP-Z3C |
| Disc Compatibility | CD, CD-R, CD-RW |
| Dimensions (approx) | 130 × 130 × 25 mm |
| Weight (approx) | 200 g (with batteries) |
| Power Supply | 2 × AA batteries or AC adapter (4.5 V) |
| Battery Life (approx) | Up to 8 hours (alkaline) |
| Anti-Skip Protection | 20 seconds (electronic) |
| Playback Modes | Normal, Repeat, Random, Program |
| Output | Headphones (3.5 mm stereo) |
| Controls | Play/Pause, Stop, Skip, Volume |
| Display | LCD screen (track number, time, battery) |
| Accessories Included | Headphones, AC adapter, carrying pouch |
| Maintenance | Clean lens with soft cloth; avoid moisture |
| Safety Warning | Do not disassemble; avoid exposure to heat |
| Spare Parts / Repairability | Refer to user manual for authorized service |
| Manual Language | English (32 pages) |
Frequently Asked Questions - XP-Z3C AIWA
User questions about XP-Z3C AIWA
0 question about this device. Answer the ones you know or ask your own.
Ask a new question about this device
Download the instructions for your CD Player in PDF format for free! Find your manual XP-Z3C - AIWA and take your electronic device back in hand. On this page are published all the documents necessary for the use of your device. XP-Z3C by AIWA.
USER MANUAL XP-Z3C AIWA
For your convenience, record the model number and the serial number (you will find it on the bottom of your set) in the space provided below. Please refer to them when you contact your Aiwa dealer in case of difficulty.
Model No. XP-Z3C Serial No.
WARNING: TO REDUCE THE RISK OF FIRE OR ELECTRIC SHOCK, DO NOT EXPOSE THIS APPLIANCE TO RAIN OR MOISTURE.
NOTE
This equipment has been tested and found to comply with the limits for a Class B digital device, pursuant to Part 15 of the FCC Rules. These limits are designed to provide reasonable protection against harmful interference in a residential installation.
This equipment generates, uses, and can radiate radio frequency energy and, if not installed and used in accordance with the instructions, may cause harmful interference to radio communications. However, there is no guarantee that interference will not occur in a particular installation. If this equipment does cause harmful interference to radio or television reception, which can be determined by turning the equipment off and on, the user is encouraged to try to correct the interference by one or more of the following measures:
– Reorient or relocate the receiving antenna.
– Increase the separation between the equipment and receiver.
- Connect the equipment into an outlet on circuit different from that to which the receiver is connected.
- Consult the dealer or an experienced radio/TV technician for help.
CAUTION
Modifications or adjustments to this product, which are not expressly approved by the manufacturer, may void the user's right or authority to operate this product.
This Class B digital apparatus complies with Canadian ICES-003.
TABLE OF CONTENTS
PRECAUTIONS 3
USING ON RECHARGEABLE BATTERIES 4
USING ON DRY CELL BATTERIES...... 6
BEFORE PLAYBACK 7
PLAYBACK OF AUDIO DISC 11
OTHER FUNCTIONS ...... 13
NOTES ON MP3 FILES.... 17
PLAYBACK OF MP3 DISCS.... 20
CONNECTING AN EXTERNAL UNIT ..... 27
CONNECTING TO A CAR STEREO SYSTEM 27
MAINTENANCE 28
TERMINOLOGY 29
SPECIFICATIONS 30
- An MP3 file stores audio data compressed using MPEG1/2/2.5, the audio layer-3 file-coding scheme.
- In this manual, CDs, CD-R discs and CD-RW discs are all referred to as "discs". We refer to what are called "folder" and "file" in PC terminology as "album" and "track".
To maintain good performance
- Do not use the unit in places which are extremely hot, cold, dusty or humid. In particular, do not use or keep the unit in following places.
• in a high humidity area such as a bathroom - near a heater
- in an area exposed to direct sunlight (e.g., inside a parked car, where it can become extremely hot)
- near sources of strong magnetism, such as televisions, speakers, or magnets
- where there is a lot of movement or vibration, such as on a car dashboard or an unstable shelf
For safety
- Do not attempt to disassemble the unit. Laser rays from the optical pickup are dangerous to the eyes.
- Make sure that pins or other foreign object do not get inside the player.
• Take care not to drop the unit or subject it to strong shocks. - To keep dust from the pickup lens, keep the disc compartment lid closed after use. Never touch the lens.
- If you hear no sound when playing a disc, DO NOT turn the volume up high because music could suddenly start at high volume. Turn the volume control to the lowest level before starting playback and slowly turn it up to the desired level.
Notes on listening with the headphones
- Listen at moderate volumes to avoid hearing damage.
- Do not wear the headphones while driving or cycling. It may create a traffic hazard.
- You should use extreme caution or temporarily discontinue use in potentially hazardous situations, such as walking, jogging, etc.
- Wear them properly; L is left, R is right.
- The in-ear type headphones should be worn with the longer cord behind your neck.
CAUTION
Listening to headphone stereo at full power for extended periods of time can result in hearing damage.
Note on condensation
If the unit is suddenly moved from a cold place to a warm one, it may result in condensation on the pickup lens and malfunction or playback difficulties.
Should this occur, leave the unit for a few hours, then try to playback again.
When using on the rechargeable batteries for the first time, charge them until the battery indicators go out.
1 Insert the supplied rechargeable batteries with the ⊕ and ● marks correctly aligned.

2 Place the unit on the charging stand, and then connect the AC adaptor.
Charging starts and the charging indicator lights in red.
to a wall outlet

When charging is completed, charging indicator goes out.
Recharging fully used batteries takes about 4 hours.
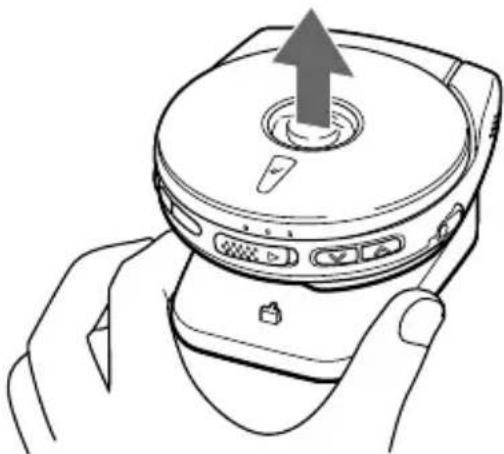
To detach the unit from the charging stand
Lift the unit upward while holding the charging stand.
natural_image
Line drawing of a hand holding a device with an upward arrow on top (no text or symbols)Time to recharge the batteries
The battery indicator in the display changes from according to the remaining power of the batteries. Recharge the batteries when lights and "Low-Batt" appears.
If the cover of the battery compartment comes off

Notes on recharging
- Use only the supplied AC adaptor and the charging stand to recharge the battery.
- Do not carry the battery in a pocket or handbag together with metal objects such as pendants or keyholders. Use the supplied battery carrying case when carrying the rechargeable battery.
- Do not short-circuit the terminals of the rechargeable battery or charging stand.
- Do not disassemble the battery, heat it or get it wet.
- The supplied rechargeable battery can be recharged approximately 300 times.
USING ON AC HOUSE CURRENT
Connect the supplied AC adaptor in the same way as recharging the batteries.
Use the supplied battery case.
1 Open the battery compartment of the supplied battery case, and insert two LR6 (size AA) alkaline batteries with the ⊕ and ● marks correctly aligned.

natural_image
Diagram of a battery pack with two batteries and an open casing, showing internal circuit connections (no text or symbols)2 Attach the battery case to the unit.

Battery replacement
The battery indicator in the display changes from ☐ to ☐ according to the remaining power of the batteries. Replace the batteries when lights and "Low-Batt" appears.
6 ENGLISH
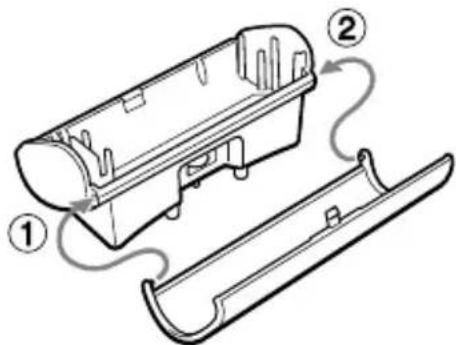
If the cover of the battery compartment comes off
Notes on dry cell batteries
- Make sure that the ⊕ and ⊖ marks are correctly aligned.
- Do not mix the different types of batteries, or an old battery with a new one.
• To prevent the risk of electrolyte leakage or explosions, never recharge the batteries, apply heat to them, or take them apart. - When not using the batteries, remove them to prevent needless battery drain.
- If liquid leaks from the batteries, wipe thoroughly to remove it.
For prolonged operation
Insert the fully charged rechargeable batteries in the unit and attach the battery case with two new LR6 (size AA) alkaline batteries inside.
For the maximum playback time, see "SPECIFICATIONS" on page 30.
Using with the headphones
Connect the supplied headphones, remote control, and main unit.
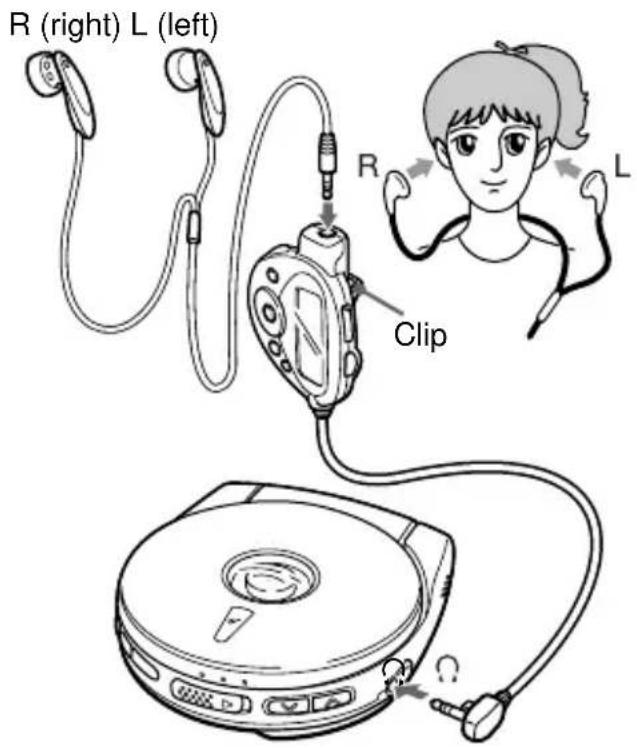
- Be sure to press ■ to stop operation before you connect/disconnect the headphone or the remote control to/from the main unit.
- When you put on the supplied headphones, be sure to route the right headphone's cord (the longer one) around the back of your neck.
- The remote control can be clipped onto your clothing, etc. with the clip on the back of the remote control.
HOLD switch

Release the HOLD switch before playback. → a
When not using the unit, set the HOLD switch to the HOLD position. → ⓑ
Accidentally pressed button will not function. If buttons on the unit are pressed when only the HOLD switch on the unit is set to HOLD position, "HOLD" flashes in the display.
Turning on and off

Turning the power on
Press ▶/□ on the unit or ▶/□ on the remote control. Power is turned on and playback starts.
Note
"ERROR" appears on the display when you play a disc placed upside-down or a defective disc.
Auto power off
If no operation is performed within 30 seconds on an audio disc or within 60 seconds on an MP3 disc, the power is turned off automatically. (Auto power off function)
- You can turn off the power by pressing ■ before it is automatically turned off.
Standby mode
When an operation finishes, the unit goes into standby mode until the auto power off function automatically turns off the power.
To enter standby mode, press ▶II to start playback, then press ■.
Adjusting the sound
Volume

Press VOLUME ∨/∧ on the unit or VOLUME -/+ on the remote control to adjust the volume.
DSL*
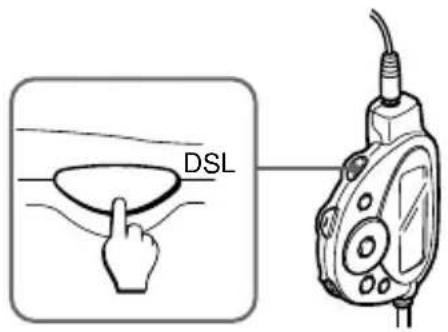
Press DSL on the remote control repeatedly for more powerful sound and deeper bass.
DSL ON: Deep bass is emphasized
DSL OFF: Normal sound
*DSL: Dynamic Super Linear Bass
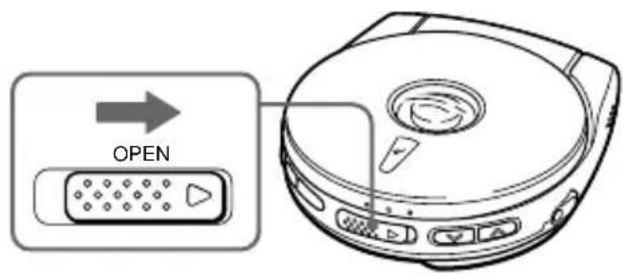
Loading a disc
1 Slide the OPEN switch to open the disc compartment.
2 Place a disc in the center with the label side facing up.

natural_image
Line drawing of a hand inserting a CD into a device (no text or symbols)3 Close the disc compartment.
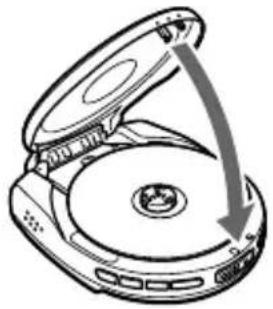
natural_image
Diagram of a CD or DVD disc with an open lid and arrow indicating rotation (no text or symbols)To remove the disc
Pick up the disc, holding its edge, while holding the pivot gently pressed.
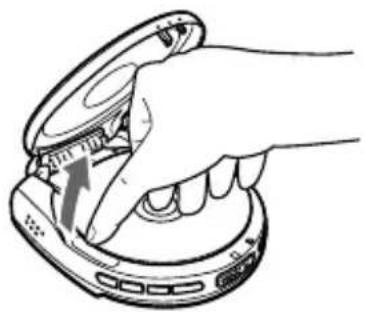
natural_image
Hand inserting a device into a circular device (no text or symbols visible)Note
• The unit is designed for 8 cm discs only.
- The unit can play a CD-R/RW disc recorded in MP3 or CD-DA format. However, some CD-R/RW discs recorded on some kinds of personal computers or CD-R/RW recorders may not be playable on this unit, owing to the differences in recording platforms.
- Do not attach any sticker or label to either side (the recordable side or the labeled side) of a CD-R/RW disc. It may cause malfunction.
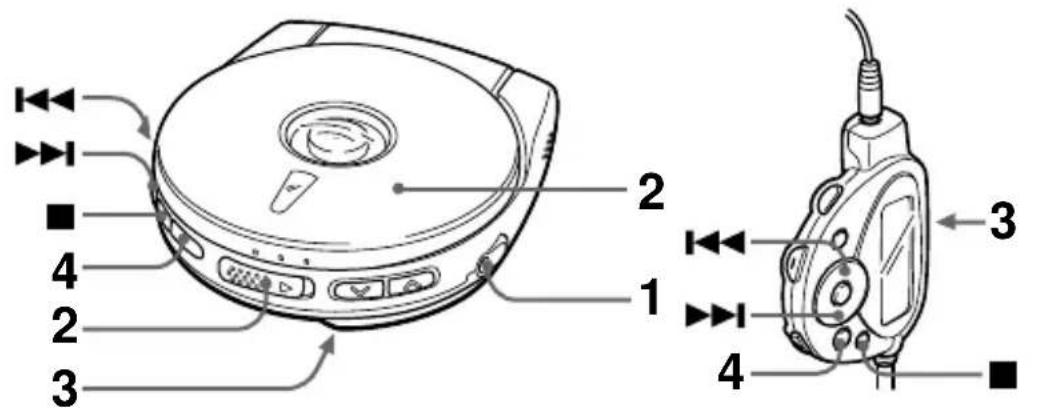
1 Connect the supplied headphones to the Ⓞ jack.

natural_image
Line drawing of a CD or DVD disc with attached cable and connector (no text or symbols)2 Load a disc.
3 Release the HOLD switch.
4 Press ▶II on the unit or ▶/II on the remote control.
Playback starts from the first track.

aTrack number
⑥ Elapsed playing time
Basic operation
| To stop | Press ■. |
| To pause | Press ▶▶▶ on the unit or ▶/▶ on the remote control.Toresume, press again. |
| To search for the beginning of a track | Press ◀◀◀ or ▶▶◀. |
| Tolocate a desired passage | Keep ◀◀◀ or ▶▶◀ pressed.Release the button at the start of desired passage. |
To locate the track 10 tracks ahead of the current track (+10 skip)
In Play or Standby mode, press +10 on the remote control.
Ex. 1: If you press +10 while the unit is playing the 4th track, the beginning of the 14th track is located.
Ex. 2: If you press +10 while the unit is playing the 10th track on a disc containing 15 tracks, the beginning of the 5th track is located.
Note
This does not function on the discs having 10 tracks or less.
Resume function
Set the HOLD/RESUME switch to RESUME.

You can start playback from the point where you stopped playback by pressing ■.
When the resume function is on, all-track repeat is selected automatically.
To cancel resume function, set the HOLD/RESUME switch to OFF.
Note
- Resume play will be canceled if you open the disc compartment while the unit is turned on.
Be sure to set the HOLD/RESUME switch to OFF before changing discs.
- Resume play cannot be functioned during random play.
You can set various functions by using P-MODE/ENT, ▲/▼, and ◀◀◀/▶▶ on the remote control.
Basic operating procedure
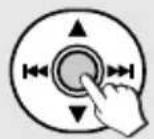
1 In play or standby mode, press P-MODE/ENT.
2 Press ▲ or ▼ repeatedly until your desired function appears on the display.
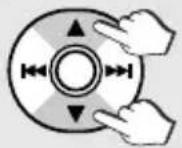
Pressing ▲/▼ alternate the display cyclically.

flowchart
graph TD
    A["EASS 40sec"] --> B["(E·A·S·S function)"]
    B --> C["REPEAT OFF"]
    C --> D["(Repeat play)"]
    D --> E["RANDOM OFF"]
    E --> F["(Random play)"]
    F --> G["PROGRAM"]
    G --> H["(Program play)"]
    H --> I["BEEP ON"]
    I --> J["(Beep)"]
3 Press ◀◀◀ or ▶▶◀I repeatedly to select your desired setting*.
* For details on the settings, see the following instructions respectively.

4 Press P-MODE/ENT to enter the selected setting.
If you set the other function, repeat steps 2 through 4.
5 Press P-MODE/ENT.
The unit returns to the state before step 1.
Note
- You cannot set program play during playback.
- If you leave the unit untouched for 5 seconds or more, the unit returns to the state before step 1.
E•A•S•S (Electronic Anti-Shock System)
The E•A•S•S function reduces skipping or muting of the sound when the unit is subjected to shocks.
1 Perform steps 1 and 2 in "Basic operating procedure" to select "EASS 40sec."
2 Press ◀◀◀ or ▶▶▶I repeatedly to select your desired setting.
EHS: 400
The unit keeps about 40 seconds of playback sound in its memory.
EASS 10sec
The unit keeps about 10 seconds of playback sound in its memory.
3 Perform steps 4 and 5 in "Basic operating procedure."
To cancel the E·A·S·S function
Select "EASS OFF" in step 2.
Note
- Continuous shock or vibration may cause the sound to be interrupted even if the E·A·S·S function is activated. This is normal and not a malfunction. Should you experience an interruption in sound, stabilize the unit for a few seconds, then resume your activity.
- When the setting of the E·A·S·S function is performed during playback, the unit will pause for about 2 seconds.
Repeat play
You can play a track or all the tracks on the disc repeatedly.
1 Perform steps 1 and 2 in "Basic operating procedure" to select "REPEAT OFF."
2 Press ◀◀◀ or ▶▶▶I repeatedly to select your desired setting.
REPEAT ALL.
The unit plays all the tracks on the disc repeatedly.
REPEAT 1.
The unit plays the current track repeatedly.
3 Perform steps 4 and 5 in "Basic operating procedure."


: All-track repeat

: One-track repeat
To cancel the REPEAT play
Select "REPEAT OFF" in step 2.
To play all the tracks on the disc repeatedly in random order
Select "REPEAT ALL" in REPEAT setting, and then select "RANDOM ON" in RANDOM setting (see "Random play").
Random play
You can play all the tracks on the disc in random order.
1 Perform steps 1 and 2 in "Basic operating procedure" to select "RANDOM OFF."
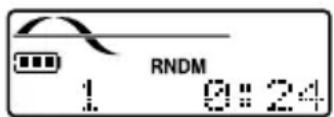
2 Press ◀◀◀ or ▶▶▶I repeatedly to select "RANDOM ON."
3 Perform steps 4 and 5 in "Basic operating procedure."
To cancel the RANDOM play
Select "RANDOM OFF" in step 2.
To play all the tracks on the disc repeatedly in random order
Select "RANDOM ON" in RANDOM setting, and then select "REPEAT ALL" in REPEAT setting (see "Repeat play").
Note
- You cannot go back to previous track by pressing ◀◀ during random play.
- You cannot select one-track repeat during random play.
Program Play
Up to 24 tracks can be chosen for program play.
Operate the unit while disc play is stopped.
1 Perform steps 1 and 2 in "Basic operating procedure" to select "PROGRAM."
2 Press P-MODE/ENT.
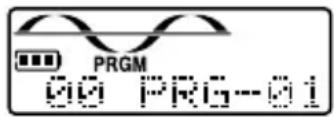
3 Press ◀◀◀ or ▶▶◀I repeatedly to select a track to be added to the program.

ⒶSelected track number (flashing)
bProgram order
4 Press P-MODE/ENT.
The selected track is stored in the program.
Repeat steps 3 and 4 to program more tracks.
5 Press ▶II on the unit or ▶/II on the remote control to start program play.
To check the programmed tracks
Press P-MODE/ENT repeatedly before you proceed to step 5. The number of each programmed track appears in order of playback.
To add tracks to the program
Repeat steps 1 to 4 when the PRGM is displayed while the unit is stopped. Tracks can be added to the end of the program.
When 24 tracks are programmed
"P-FULL" appears, and no more tracks can be added.
To cancel program play
Press ■ during programming or while program play is stopped.
Notes
- Program play is also canceled when the disc compartment is opened or the auto power off function turns the power off.
- You cannot go back to a previous track by holding ◀◀◀ pressed during program play.
- Repeat play can be performed during program play.
Turning off the confirmation beeps
1 Perform steps 1 and 2 in "Basic operating procedure" to select "BEEP ON."
2 Press ◀◀◀ or ▶▶▶I repeatedly to select "BEEP OFF."
3 Perform steps 4 and 5 in "Basic operating procedure."
To resume the confirmation beeps
Select "BEEP ON" in step 2.
- An MP3 file stores audio data compressed using MPEG1/2/2.5, the audio layer-3 file-coding scheme.
- In this manual, CDs, CD-R discs and CD-RW discs are all referred to as "discs". We refer to what are called "folder" and "file" in PC terminology as "album" and "track".
Notes on playing MP3 files
- An MP3 track must be recorded on a disc in the format compliant with ISO 9660. Note, however, that the unit may not play tracks in the order they were recorded.
- The maximum allowable number of tracks and albums in a disc are as follows:
– number of tracks : 512 (depending on the number of albums)
– number of albums : up to 255 (depending on the number of tracks) - The maximum allowable depth of nested albums is 8.
- E•A•S•S memory duration is approximately 100 seconds at the longest with tracks of 128 kbps bit rate.
-
It may take 30 seconds or more before the unit can start play of MP3 tracks, depending on the number of recorded tracks and the complexity of the album tree.
-
If a disc contains audio (CD-DA) tracks and MP3 tracks, the unit plays only the audio tracks.
- The unit may not play MP3 tracks recorded using a packet writing utility.
- The unit can play MP3 tracks having a file extension “.mp3”.
- If you play a non-MP3 track that has the “.mp3” file extension, you may hear some noise.
- This unit can play back MP3 files of the following bit rates:
MPEG1/Audio layer-3: 32k-320 kbps
MPEG2/Audio layer-3: 8k-160 kbps
MPEG2.5/Audio layer-3: 8k-32 kbps - This unit is best suited for playback of tracks with a bit rate of 128 kbps. The sound may be intermittent or distorted during playback of tracks encoded with a certain encoder or encoded with bit rate over 128 kbps.
- The elapsed playing time may not be displayed correctly when variable-bit-rate (VBR) files are played.
- Sound is muted for a moment with the disc that contains no silent portion between songs (tracks) such as a disc with a recording of a live performance, etc.
- When files encoded with the MP3 Pro format are played back, their sound quality may not be as high as they should be.
This unit can play back MP3 files of the following sampling frequencies:
MPEG 1: 32k, 44.1k, 48 kHz
MPEG 2: 16k, 22.05k, 24 kHz
MPEG 2.5: 8k, 11.025k, 12 kHz
Notes on display indications during play
- Up to 64 characters (including its extension) are displayed for the name of an album or a track. If ID3TAG version 1.X was applied to record additional informations for an MP3 track, up to 30 characters showing track title and artist's name are displayed.
- The following characters can be displayed: uppercase letters ("A" to "Z"), lowercase letters ("a" to "z"), numerals(0 to 9) space, and symbols such as ! " # \$ % & ' ( ) *+, - . / ; : <= > ? @ [ ¥ ] ^ _ ` { | }
- Characters other than those shown above may not be displayed correctly or * is displayed instead of the character.
- The elapsed playing time may not be displayed correctly for MP3 tracks.
Notes on creating MP3 discs When converting audio data to MP3
To enjoy high sound quality, we recommend storing MP3 files with a sampling frequency of 44.1 kHz and a fixed bit rate of 128 kbps.
To play tracks in the order they were recorded
1 Use a writing software capable of recording MP3 tracks (files) in numerical and alphabetical order.
For details on using the software, refer to the operating instructions supplied with the software.
2 Use only one album. (Do not create a sub-album within an album.)
3 Include a two- or three-digit number at the beginning of each album or track name so that the albums and tracks are played in order.
| 01XXXXX.mp3 |
| 02XXXXX.mp3 |
| 03XXXXX.mp3 |
| 04XXXXX.mp3 |
| 05XXXXX.mp3 |
| 1XXXXX.mp3 |
| 5XXXXX.mp3 |
| 10XXXXX.mp3 |
| 15XXXXX.mp3 |
| 20XXXXX.mp3 |
(Numbers at the beginning have different digit number. The tracks will not be played in this order but played in the order of "1", "10", "15", "20" and "5".)
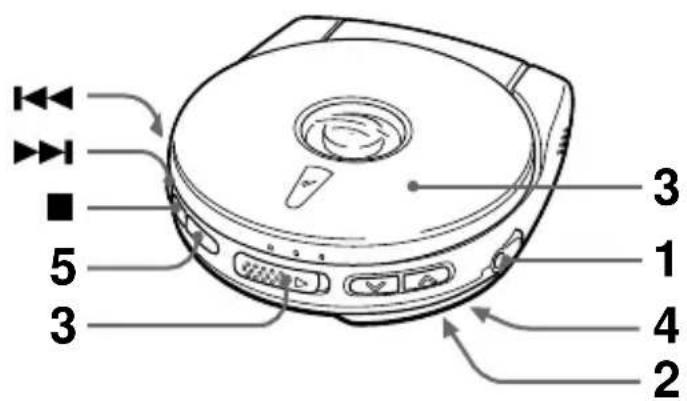
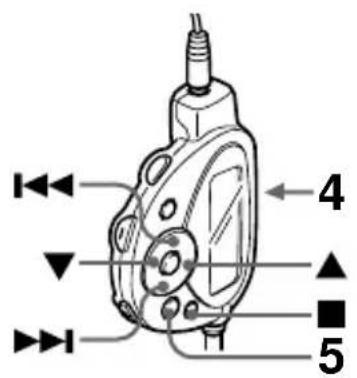
1 Connect the supplied headphones to the Ⓞ jack.

natural_image
Line drawing of a circular vacuum cleaner with attached cable and sensor port (no text or symbols)2 Set the QUICK/NORMAL switch to select the disc reading format.

See "Setting the QUICK/NORMAL switch" on the next page and set the switch to appropriate position.
3 Load an MP3 disc.
4 Release the HOLD switch.
5 Press ▶II on the unit or ▶/II on the remote control to start playback.
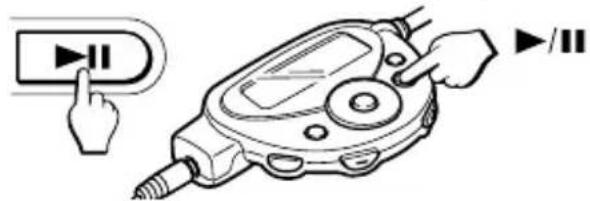
Power is turned on and "READING" flashes in the display.
After reading the disc, playback starts from the first track of the Album 1.
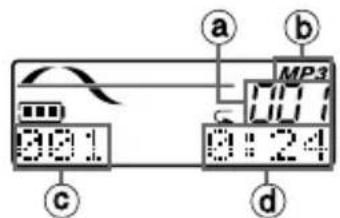
aAlbum number
⑥Appears when an MP3 disc is loaded
©Track number
⑭ Elapsed playing time
When you play an MP3 disc
The E·A·S·S function will be activated automatically.
Setting the QUICK/NORMAL switch
Set the switch to the appropriate position depending on the playback mode and type of disc.
QUICK
The unit reads only the number of the album before playback, then disc reading finishes earlier. However, program play, random play, resume play, and +10 skip cannot be operated.
The unit reads the track information during playback. When the unit detects an album that has no MP3 file, the number of album is decreased. This position is recommended when playing back a disc with many albums and tracks.
NORMAL
The unit reads the number of albums and tracks before playback, then it takes longer time for disc reading than when the switch is set to QUICK.
Note
If you slide the QUICK/NORMAL switch during playback, the disc reading format is not changed. Stop playback and press ■ to turn off the power, and slide the QUICK/NORMAL switch to change the disc reading format.
To stop playback
Press ■.
Playback stops and disc reading format (NORMAL or QUICK) is displayed.
To search for a beginning of a track
Press ◀◀◀ or ▶▶▶.
To locate a desired passage
Keep ◀◀◀ or ▶▶◀ pressed. Release the button at the start of desired passage.
- You cannot monitor the sound while the button is pressed during MP3 file playback.
To pause playback
Press ▶II. To resume, press it again.
To change the album
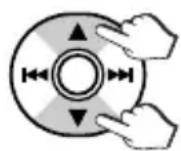
Press ▲/▼.
To skip to the first track of next album, press ▲.
To skip to the first track of previous album, press ▼.
To locate the track 10 tracks ahead of the current track (+10 skip)
In play or standby mode, press +10 on the remote.
ex. 1: If you press +10 while the unit is playing the 4th track, the beginning of the 14th track is located.
ex. 2: If you press +10 while the unit is playing the 45th track on a disc containing 50 tracks, the beginning of the 5th track is located.
ex. 3: If you press +10 while the unit is playing the 5th track in the album A that has 10 tracks, the beginning of the 5th track in the next album is located.
Note
- The +10 skip does not function if the disc has 10 tracks or less.
- Be sure to set the QUICK/NORMAL switch to the NORMAL position. Otherwise the +10 skip does not function.
To alternate the display on the remote control
In play mode, press DISPLAY on the remote control repeatedly until your desired one is selected.
Pressing DISPLAY alternates the display cyclically.

flowchart
graph TD
    A["Normal display"] --> B["a: Current album number"]
    A --> C["b: Elapsed playing time"]
    A --> D["c: Current track number on the album"]
    B --> E["Track name display"]
    C --> E
    D --> E
    E --> F["d: Album number"]
    E --> G["e: Track name"]
    F --> H["ID3 TAG information display"]
    G --> H
    H --> I["f: Album number"]
    H --> J["g: ID3 TAG information"]
    I --> K["h: Elapsed playing time"]
    J --> K
    K --> L["i: Current track number on the disc"]
Note
- If the disc has no ID3 TAG information, "NO TITLE" appears on the display.
- If you press ■, normal display resumes.
- When the disc is loaded in QUICK mode, the total-track-number display will not appear.
- Up to 64 characters are displayed as a track name, in the order of album (folder) names and track (file) names.
- Up to 30 characters are displayed as ID3 TAG information, in the order of music titles, artist names, and album names.
Resume function
Set the HOLD/RESUME switch to RESUME.

You can start playback from the point where you stopped playback by pressing ■.
When the resume function is on, all-track repeat is selected automatically.
To cancel resume function, set the HOLD/RESUME switch to OFF.
Note
- Resume play does not start if the disc is loaded in QUICK mode.
- Resume play will be canceled if you open the disc compartment while the unit is turned on.
Be sure to set the HOLD/RESUME switch to OFF before changing discs.
- Resume play cannot be functioned during random play.
Repeat Play
You can play a track or all the tracks on the disc repeatedly.
1 Perform steps 1 and 2 in "Basic operating procedure" to select "REPEAT OFF."
2 Press ◀◀◀ or ▶▶▶ repeatedly to select your desired setting.
REPEAT ALL
* The unit plays all the tracks on the disc repeatedly.
REPEAT ALB
The unit plays all the tracks in the album repeatedly.
REPEAT1.
G1* The unit plays the current track repeatedly.
* Each symbol appears on the display after step 3.
3 Perform steps 4 and 5 in "Basic operating procedure."
To cancel the REPEAT play
Select "REPEAT OFF" in step 2.
Random play
You can play all the tracks on the disc in random order.
Be sure to set the QUICK/NORMAL switch to its NORMAL position before random play.
1 Perform steps 1 and 2 in "Basic operating procedure" to select "RANDOM OFF."
2 Press ◀◀◀ or ▶▶▶I repeatedly to select "RANDOM ON."
3 Perform steps 4 and 5 in "Basic operating procedure."

To cancel the RANDOM play
Select "RANDOM OFF" in step 2.
To play all the tracks on the disc repeatedly in random order
Select "RANDOM ON" in RANDOM setting, and then select "REPEAT ALL" in REPEAT setting (see "Repeat play").
Note
- You cannot go back to a previous track by pressing ◀◀ during random play.
- You cannot select one-track repeat during random play.
Program play
You can select up to 24 tracks for program play.
Be sure to set the QUICK/NORMAL switch to its NORMAL position before program play.
Operate the unit while disc play is stopped.
1 Perform steps 1 and 2 in "Basic operating procedure" to select "PROGRAM."
2 Press P-MODE/ENT.
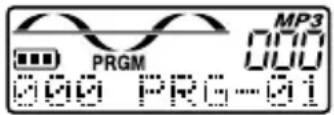
3 Press ▲/▼ (for album selection) and ◀◀◀/▶▶▶ (for track selection) repeatedly to select a track to be added to the program.

ⒶSelected album number (flashing)
⑥Selected track number (flashing)
©Program order
4 Press P-MODE/ENT.
The selected track is stored in the program.
Repeat steps 3 and 4 to program more tracks.
5 Press ▶II on the unit or ▶/II on the remote control to start program play.
To check the programmed tracks
Press P-MODE/ENT repeatedly before you proceed to step 5. The number of each programmed track appears in order of playback.
To add tracks to the program
Repeat steps 1 to 4 when the PRGM is appeared while the unit is stopped. Tracks can be added to the end of the program.
When the 24 tracks are programmed
"P-FULL" appears, and no more tracks can be added.
To cancel the program play
Press ■ during programming or while the program play is stopped.
Note
- Program play is also canceled when the disc compartment is opened or the auto power off function turns off the power.
- You cannot go back to a previous track by holding ◀◀◀ pressed during playback.
- Repeat play can be performed during program play.
CONNECTING AN EXTERNAL UNIT
Use a commercially available connection cord which has a 3.5 ø stereo mini-plug at one end and two phono plugs at the other end.
Connect the stereo mini-plug to the headphone jack of the remote control and connect the phono plugs to the analog input terminals of the external unit.
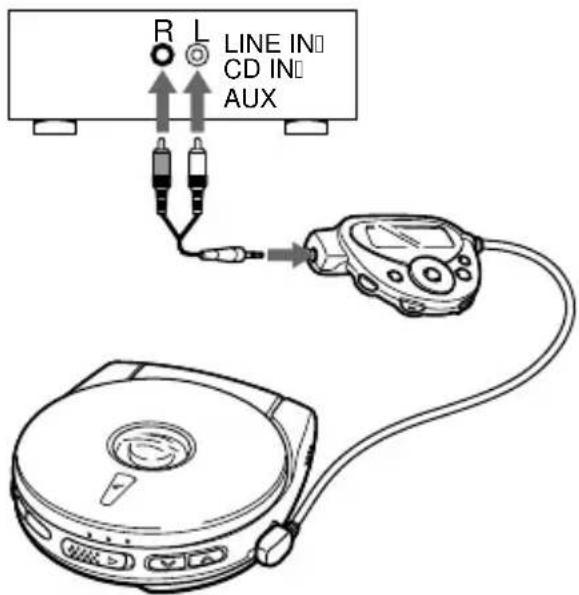
Note
- Turn off the power of both units before connection.
- DO NOT connect to the PHONO inputs of an amplifier (with a built-in phonoequalizer-amplifier).
- Adjust the volume and DSL on this unit.
CONNECTING TO A CAR STEREO SYSTEM
You can enjoy sound from the unit through your car stereo system.
Use the supplied car battery adaptor and car audio cassette adaptor.
For details on connecting the unit to your car stereo system and other information, see the separate operating instructions.
To clean the lens

If the lens becomes dirty, the player will skip or not play. If this occurs, clean the lens in the following manner.
To remove dust or dry particles, first use a camera lens blower/brush ⓑ to blow a few times to loosen particles, then gently brush the lens ⓐ clean. Finish by blowing the lens again.
To remove fingerprints, use a cotton swab dipped in lens cleaning solution. Wipe gently from the center to the edge. Lens cleaning solution is commercially available.
Note
Take care not to get too much solution on the swab, which could flow into the unit and cause damage.
Pressing too strongly with the swab could scratch or break the lens.
To clean the discs

natural_image
Illustration of hands holding a circular object with an arrow indicating direction (no text or symbols)Before playing, wipe the disc from the center outward with a cleaning cloth. After playing, store the disc in its case.
ISO 9660
ISO stands for the “International Organization for Standardization.” ISO 9660 determines the file structure for the CD-ROMs. This unit can play MP3 files recorded in the format compliant with ISO 9660.
Nesting of folders (albums)
To organize data files stored in a PC, you can store related files in a folder. A folder can contain other folders as well as files. For example, folder A can contain folder B, and folder B can contain folder C; this is called "nesting of folders." The maximum depth of nested folders, allowed by ISO 9660, is 8.
Writing utilities
There are 3 utilities used to record data on a disc.
1 DAO (Disc At Once) utility
All data to be written must be prepared in advance and written onto a disc from the beginning to the end in one operation. No data can be added to a disc on which data were already written with DAO utility.
2 TAO (Track At Once) utility
Data are written onto a disc track by track. Data can be added to a disc on which data were written with TAO utility.
3 Packet writing utility
Tracks are divided into smaller pieces while being recorded, depending on the size of available spaces on the disc. Data can be added to a disc on which data were written with packet writing utility.
This unit can play MP3 discs recorded using DAO and TAO utilities.
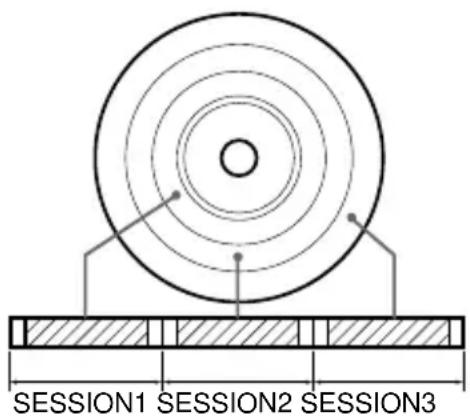
Multisession
A session is a collection of data, covering from the beginning to the end of recording made in one operation. With TAO (Track At Once) utility, data can be recorded with several operations. A session corresponds to the data recorded in one operation.
TERMINOLOGY
ID3 TAG
ID3 TAG determines the data format for the text to be added to an MP3 file, mainly used to indicate a track name or an artist's name, etc.
The unit supports the format of ID3 TAG ver. 1.x.
File extension
A 3-character string added to a file name under Windows or DOS environment is called "file extension." A file extension is used mainly to identify types of files. File extension for MP3 files is ".mp3."
SPECIFICATIONS
Tracking system 3-beam laser
Laser pickup Semiconductor laser
D/A conversion 1 bit DAC
Frequency response
20 - 20,000 Hz (47 k ohms)
Output ⌈ jack (stereo mini-jack)
Maximum output 10 mW + 10 mW
(16 ohms at 1 kHz)
450 mV (47 k ohms at
1 kHz)
Power supply DC 2.4 V using two supplied
Ni-MH rechargeable
batteries
DC 3 V using two size AA
(LR6) alkaline batteries
AC house current using the
supplied AC adaptor
Battery life (Approximate hours)
| Rechargeable batteries | Rechargeable batteries and LR6 alkaline batteries | |
| Audio disc | ||
| E•A•S•S 40 | 5 | 15 |
| E•A•S•S 10 | 4 | 14 |
| E•A•S•S OFF | 3 | 7 |
| MP3 disc | 8 | 26 |
E·A·S·S memory duration
| Bit rate Maximum duration (seconds) |
| 96 kbps 130 |
| 128 kbps 100 |
| 160 kbps 80 |
| 320 kbps 40 |
Maximum outside dimensions
90 (W) · 28 (H) ·
4 18 in.) (excluding
projecting parts and controls)
Weight Approx. 145 g (5 oz)
excluding batteries
Accessories AC adaptor AC-D401A (1)
Stereo headphones (1)
Remote control RC-Z3 (1)
Charging stand (1)
Rechargeable battery (2)
Battery case (1)
Rechargeable battery
carrying case (2)
Carrying pouch (1)
8 cm CD-R disc (5)
Car audio cassette adaptor CAP-6 (1)
Car battery adaptor DC-602 (1)
The specifications and external appearance of this unit are subject to change without notice.
About the supplied CD-R disc
The supplied CD-R disc contains no data on it. Store the MP3 files or audio files of CD-DA format using appropriate hardware and software. For details on writing the data to the CD-R disc, refer to the operating instructions of the hardware or software used.
Notes on the CD-R disc
- Check the copyright laws in the country where the unit is to be used, relevant to recordings from discs, radio, or tapes. The reproduction and recording of copyright-protected works requires the approval of the copyright owner as prescribed in the applicable copyright laws.
- Do not leave or store the disc in an area exposed to direct sunlight or high humidity.
- Do not touch the recordable side. Keep the disc clean.
- To remove dust or dry particles, wipe the disc gently with a soft cloth or a cleaning cloth. Do not use the strong solvents.
- Use the felt-tip pen to write the titles on the label side. Do not use the hard-tipped implements such as pencils or ballpoint pens.
- Do not paste the sticker or other adhesive objects on either side of the disc.
- NOTE
- CAUTION
- TABLE OF CONTENTS
- To maintain good performance
- For safety
- Notes on listening with the headphones
- Note on condensation
- To detach the unit from the charging stand
- Time to recharge the batteries
- If the cover of the battery compartment comes off
- Notes on recharging
- USING ON AC HOUSE CURRENT
- Battery replacement
- Notes on dry cell batteries
- For prolonged operation
- Using with the headphones
- Turning the power on
- Auto power off
- Standby mode
- Loading a disc
- To remove the disc
- To locate the track 10 tracks ahead of the current track (+10 skip)
- Resume function
- Basic operating procedure
- E•A•S•S (Electronic Anti-Shock System)
- Repeat play
- To cancel the REPEAT play
- To play all the tracks on the disc repeatedly in random order
- Random play
- To cancel the RANDOM play
- Program Play
- Operate the unit while disc play is stopped.
- Notes
- Turning off the confirmation beeps
- Notes on playing MP3 files
- Notes on display indications during play
- Notes on creating MP3 discs When converting audio data to MP3
- To play tracks in the order they were recorded
- Include a two- or three-digit number at the beginning of each album or track name so that the albums and tracks are played in order.
- When you play an MP3 disc
- Setting the QUICK/NORMAL switch
- QUICK
- NORMAL
- To stop playback
- To search for a beginning of a track
- To locate a desired passage
- To pause playback
- To change the album
- To alternate the display on the remote control
- Perform steps 4 and 5 in "Basic operating procedure."
- CONNECTING AN EXTERNAL UNIT
- CONNECTING TO A CAR STEREO SYSTEM
- ISO 9660
- Nesting of folders (albums)
- Writing utilities
- DAO (Disc At Once) utility
- TAO (Track At Once) utility
- Packet writing utility
- Multisession
- TERMINOLOGY
- ID3 TAG
- File extension
- SPECIFICATIONS
- Maximum outside dimensions
- About the supplied CD-R disc
- Notes on the CD-R disc
Brand : AIWA
Model : XP-Z3C
Category : CD Player