
ADC-EX108 - CD Player AIWA - Free user manual and instructions
Find the device manual for free ADC-EX108 AIWA in PDF.


| Product Type | CD Player |
| Brand | Aiwa |
| Model | ADC-EX108 |
| Dimensions (W x D x H) | 430 x 250 x 90 mm |
| Weight | Approx. 3.2 kg |
| Power Supply | AC 220-240V, 50/60 Hz |
| Power Consumption | 15 W |
| Disc Compatibility | CD, CD-R, CD-RW |
| Audio Outputs | Line Out (RCA), Headphone Jack |
| Playback Modes | Program, Repeat, Random |
| Display | Multifunction fluorescent display |
| Remote Control | Included (IR) |
| Disc Loading | Top-loading with lid |
| Cleaning | Use a soft, dry cloth. Do not use liquids. |
| Safety Precautions | Keep away from moisture and heat sources. |
| Spare Parts Availability | Contact authorized service centers. |
| Manual Languages | English, French, Spanish, German |
| Warranty | 1 year limited warranty |
Frequently Asked Questions - ADC-EX108 AIWA
User questions about ADC-EX108 AIWA
0 question about this device. Answer the ones you know or ask your own.
Ask a new question about this device
Download the instructions for your CD Player in PDF format for free! Find your manual ADC-EX108 - AIWA and take your electronic device back in hand. On this page are published all the documents necessary for the use of your device. ADC-EX108 by AIWA.
USER MANUAL ADC-EX108 AIWA
For your convenience, record the model number and serial number (you will find them on the rear of your set) in the space provided below. Please refer to them when you contact your AIWA dealer in case of difficulty.
Model No. ADC-EX108
Serial No.
Welcome
Thank you for your purchasing this AIWA product. To optimize the performance of this unit, please read through this manual carefully.
TABLE OF CONTENTS
FEATURES 1
PRECAUTIONS 2
UNPACKING 3
INSTALLATIONS 4
CONNECTIONS 8
HOW TO USE 9
SPECIFICATIONS 10
FEATURES
• Tracks from 10 CDs stored in the disc magazine can be selected and played.
- Horizontal, vertical, slanted or suspended installation can be made.
- The EASS (Electronic Anti-Shock System) function reduces skipping or muting of the sound when the unit is subjected to a shock.
- This unit continues to play with just a short break when changing discs, using playback sound data transferred to its memory.
- CD text information can be displayed in the display window of the car stereo.
This function may not be available, depending on the specifications of the car stereo.
- Through the window at the top of the unit, you can see a disc spinning as it plays.
- Since it is smaller in size, you will find it easier to install the unit.
In addition to ordinary CDs, CD-Rs or CD-RWs can be read by this unit. However, NEVER use a CD-R or CD-RW that contains no data or data in the wrong format, such as MP3 or other computer files.
When you insert a CD-R/CD-RW, it may take longer to start playing.
Depending on the conditions of the recording equipment, text data stored in a CD-R or CD-RW may not be displayed.
NOTE
This equipment has been tested and found to comply with the limits for a Class B digital device, pursuant to Part 15 of the FCC Rules. These limits are designed to provide reasonable protection against harmful interference in a residential installation.
This equipment generates, uses, and can radiate radio frequency energy and, if not installed and used in accordance with the instructions, may cause harmful interference to radio communications. However, there is no guarantee that interference will not occur in a particular installation. If this equipment does cause harmful interference to radio or television reception, which can be determined by turning the equipment off and on, the user is encouraged to try to correct the interference by one or more of the following measures:
— Reorient or relocate the receiving antenna.
—Increase the separation between the equipment and receiver.
— Connect the equipment into an outlet on circuit different from that to which the receiver is connected.
— Consult the dealer or an experienced radio/TV technician for help.
CAUTION
Modifications or adjustments to this product, which are not expressly approved by the manufacturer, may void the user's right or authority to operate this product.
PRECAUTIONS
- Do NOT install the unit in a location where it may be subjected to:
— Direct sunlight or other sources of excessive heat
— Fluid, rain or moisture
— Excessive dirt or dust
— Excessive vibration - This unit is designed to be operated on a 12-volt DC negative-ground electrical system only.
- Choose the mounting location carefully so that the unit will not interfere with normal driving functions.
- Before making connections, disconnect the terminal of the car battery to avoid short circuiting.
Notes on CDs
- A defective or soiled disc stored in the disc magazine can cause the sound to drop out during play.
• Always handle a disc by holding its inner and outer edges.

natural_image
Simple line drawing of a hand holding a circular object with concentric rings (no text or symbols)- Do NOT touch the surface of the unlabeled side of the disc.
- Do NOT attach paper or tape etc. to a disc.

- Do NOT expose the discs to direct sunlight or excessive heat.

natural_image
Simple line drawing of a CD, a stack of books, and a cross symbol (no text or labels)- Clean the discs before inserting them into the disc magazine. Always clean a disc from the center outward with a cleaning cloth.

natural_image
Hand holding a pen and eraser over a circular object with arrows indicating direction (no text or symbols)- There may be burrs left on the inner and outer edges of a brand-new disc. The burr may cause the malfunction of the unit or sound drop-out. To prevent these problems, if the burr is left on the disc, be sure to remove them with a ball-point pen, etc. as illustrated.
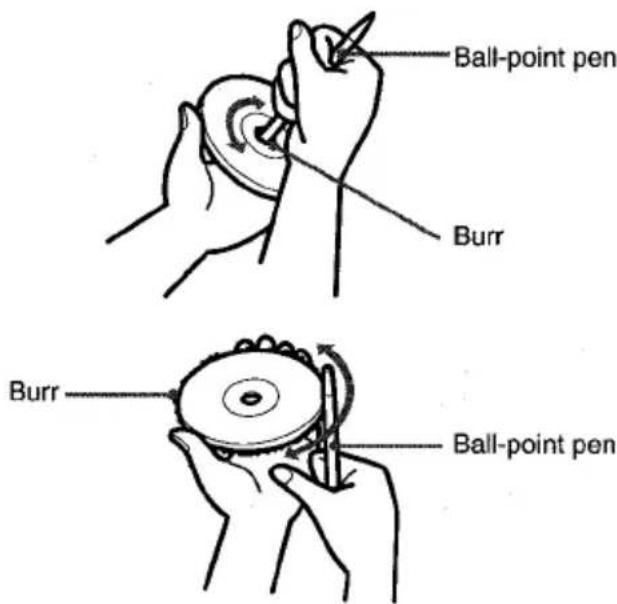
- NEVER use solvents such as benzine or alcohol to clean a disc.
- You cannot play an 8-cm (3-inch) CD — even with the specially designed adaptor.
- Do NOT use irregular shape CDs (example: heart-shaped, octagonal ones). It may result in malfunction.
Notes on the disc magazine
- Do NOT leave the disc magazine in a place subject to excessive temperature or humidity.
- Do NOT insert more than one disc per slot.
- Do NOT drop the disc magazine.
UNPACKING
Compact disc changer

natural_image
Line drawing of a rectangular electronic device with circular ports and a central knob, no text or symbols present.Compact disc magazine
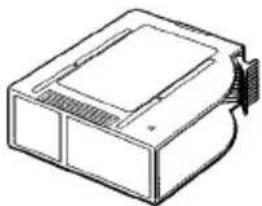
natural_image
Line drawing of a rectangular electronic device with a lid and internal components (no text or symbols)Connecting cable
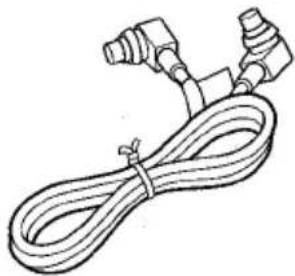
natural_image
Line drawing of a coiled cable with connectors (no text or symbols)Supplied mounting kit
for the compact disc changer
The letters are keyed to those in the instructions.
Use only the supplied mounting hardware for safe and secure installation.
① Brackets (1 pair)

natural_image
Technical line drawing of a mechanical bracket component (no text or symbols)b Washer screws (4 ea.)
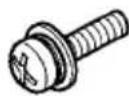
© Plate brackets (2 ea.)

natural_image
Isometric line drawing of a rectangular plate with three cylindrical pins and a connecting rod (no text or symbols)d Nuts (4 ea.)

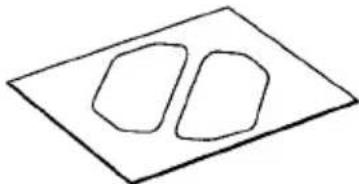
(e) Adhesive label (1 sheet)
natural_image
Simple line drawing of two overlapping ovals on a flat plane (no text or symbols)INSTALLATIONS
Precautions
Select the mounting location very carefully, referring to the following points.
- Make sure that there is no fuel tank, wiring or piping on the other side of the mounting surface.
- Make sure that the installation of the unit will not hinder the movement of the deck lid or interfere with the spare tire, etc.
- Use only the supplied mounting kit for safe and proper installation.
Removing the transport screws
Find the three transport screws at the bottom of the unit, which lock the unit's mechanism during transport. Remove these screws before installation.
Retain these screws and replace them in the original positions if the unit is transported for service or maintenance.

natural_image
Line drawing of a rectangular electronic device with three screw holes and a clip, no text or symbols presentMounting angle setting levers
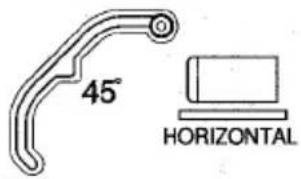
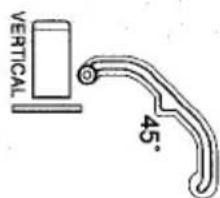
Be sure to change the position of both mounting angle setting levers according to the angle at which the unit is to be installed.

Insert a pointed object such as a screw driver or ball-point pen, etc. into the low spot of the lever and slide the lever to the position from among HORIZONTAL, 45°, and VERTICAL positions.
Notes
- Be sure to eject the disc magazine when you set the levers.
- Be sure to set both levers to the same position.
- Be sure to set the levers exactly at the position (notch). If the lever is deviate from the position, the sound may drop out.
- Care must be taken when you mount the unit at the angle of lower than level. The disc magazine may drop if you eject the magazine.
- Do NOT turn over the unit or slide the lever when the unit is activated. Doing so may damage the mechanism or the discs in the unit.
- The mounting angle setting levers on each side of the unit are factory-set to the HORIZONTAL position.
- When you complete the setting, attach the supplied adhesive labels ⓔ over the slots.

Horizontal installation
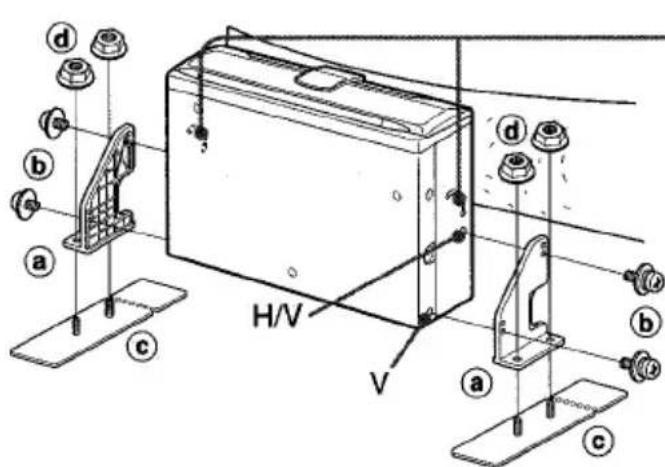
1 Construction
For details on ⓐb©..., see page 3.

The effective angle of the unit.

The position of the lever.
Note
If the mounting surface needs to be strengthened, secure the plate brackets © to the bottom surface of the car trunk, etc. with the tapping screws (not supplied).
2 Deciding the position

natural_image
Diagram showing a mechanical device with two fans and a base, before and after assembly (no text or symbols)4 Making holes in the carpet

3 Removing temporarily

natural_image
Technical line drawing of a portable air conditioner unit with mounting base and ventilation system (no text or symbols)5 Completion

natural_image
Technical line drawing of a mechanical device with three circular components and mounting features (no text or symbols)Vertical installation
1 Construction
For details on ⓐb©..., see page 3.
The effective angle of the unit.

The position of the lever.
Notes
- If the mounting surface needs to be strengthened, secure the plate brackets ⓒ to the bottom surface of the car trunk, etc. with the tapping screws (not supplied).
- If installation space is narrow, bend the plate bracket © back and forth along the perforated line to break off the end.
2 Deciding the position

4 Making holes in the carpet
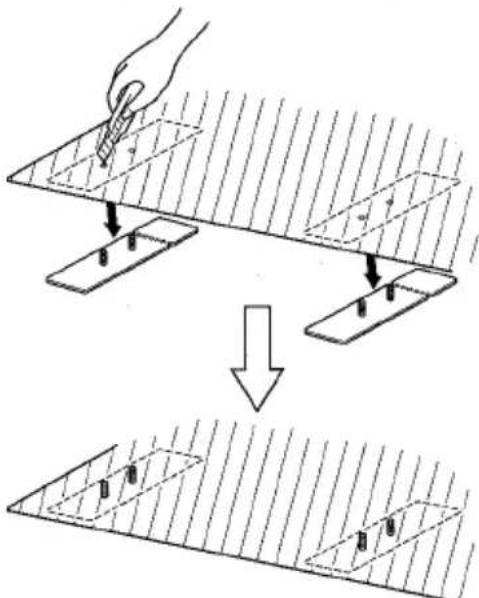
3 Removing temporarily

natural_image
Technical line drawing of a mechanical device with mounting base and three sensors (no text or symbols)5 Completion

natural_image
Technical line drawing of a rectangular electronic device with mounting flamps and a base, placed on a hatched ground surface (no text or symbols)INSTALLATIONS
Suspended installation
When installing the unit in the trunk below the package tray, observe the following.
- Select the mounting location carefully so that the unit does not hinder the movement of the torsion bars of the deck lid.
Caution
Before drilling the holes, make sure that there is nothing on the other side of the mounting surface.
1 Construction
For details on ⓐb©..., see page 3.
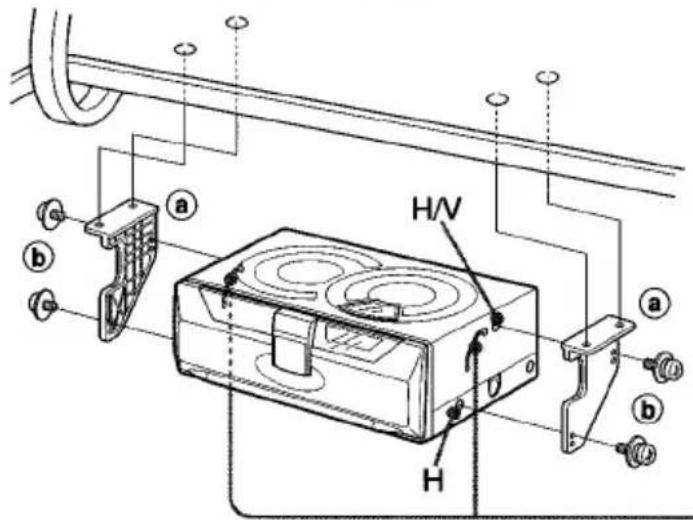
The effective angle of the unit.

The position of the lever.

2 Making holes
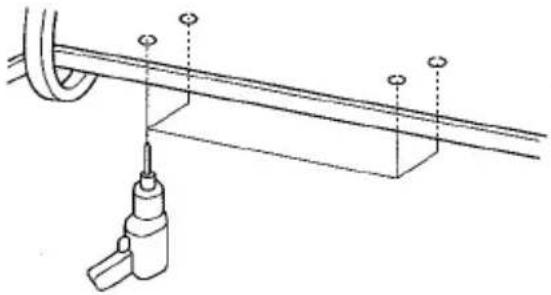
natural_image
Technical line drawing of a mechanical assembly with a tool inserted into a component (no text or symbols)3 Completion

natural_image
Technical line drawing of an electrical outlet box with screw base and wiring (no text or symbols)Tapping screws are not supplied.
Slanted installation

Be sure to set the mounting angle setting levers to the 45^ position.
Note on the brackets ①
To save installation space, you can place the brackets ① inside out, as illustrated below.

CONNECTIONS
This unit is designed only for AIWA brand car stereo. Therefore you cannot use the unit with other brand's equipment.

Caution
Be sure to disconnect the ground wire terminal of the car battery before making a connection in order to prevent short circuiting.
Note
Use only the supplied connecting cable. Using an unspecified connecting cable may cause background noise.

HOW TO USE
How to use a compact disc magazine
1
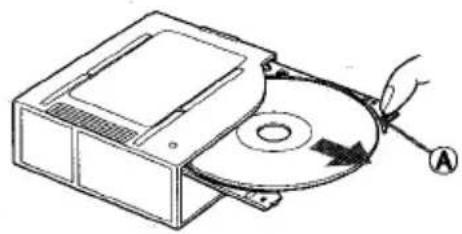
With the label side up, insert a disc all the way.
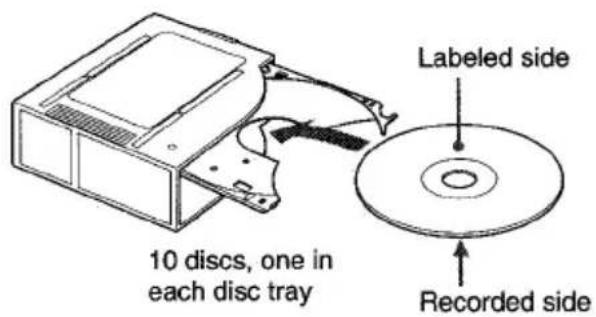
natural_image
Illustration of a CD or DVD disc being inserted into a case, with a hand holding the disc and an arrow indicating rotation (no text or symbols present)To remove a disc, pull part Ⓐ in the direction of the arrow as illustrated.
2

3

Insert the magazine (which has been taken out of the unit) firmly with the ▲ mark visible on the top side.
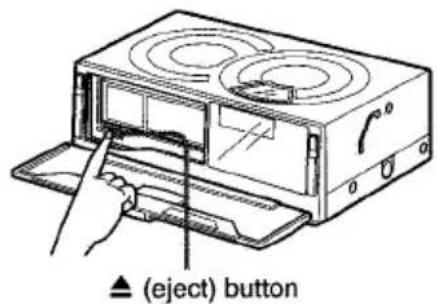
To remove the magazine, press the ▲ button and pull out the disc magazine.
4

SPECIFICATIONS
Notes on the disc magazine
- Be sure to place a disc on the disc tray with the label side up. If a disc is not set properly, it may cause damage to the unit.

- The disc tray may be taken off from the magazine if you pull the tray forcibly. If the tray is taken out, put it back into the magazine as illustrated. Be sure that both ends of the tray are aligned to the grooves of the magazine correctly.

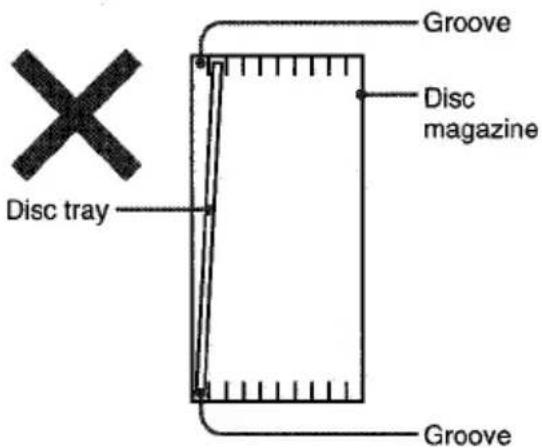
- Be sure all the trays are set in the magazine when using the unit.
Compact disc changer
| System | Compact disc digital audio system |
| Frequency response | 5 Hz - 20 kHz |
| Wow and flutter | Below measurable limit |
| Signal to noise ratio | 91 dB or more |
| Outputs | Line output (for changer connector only) |
| Operating temperature | |
| -10 °C to 55 °C | |
| Dimensions | 254 × 83 × 173 mm (w/h/d)(10 × 3 ^3/_8 × 6 ^7/_8 in.) |
| Weight | 2.1 kg(4.62 lbs.) |
| Power requirement | 12 V DC car battery(negative ground) |
| D/A converter | 1 bit DAC, 8 times over sampling |
| Sampling rate | 44.1 kHz |
| Disc size | 120 mm |
| Supplied accessories | Disc magazine (1)Mounting kit (1 set)Connecting cable (5 m)(16.4 ft.) (1) |
Design and specifications are subject to change without notice.
- Welcome
- TABLE OF CONTENTS
- FEATURES
- NOTE
- CAUTION
- PRECAUTIONS
- Notes on CDs
- Notes on the disc magazine
- UNPACKING
- Supplied mounting kit
- INSTALLATIONS
- Removing the transport screws
- Mounting angle setting levers
- Notes
- Horizontal installation
- Construction
- Deciding the position
- Making holes in the carpet
- Removing temporarily
- Completion
- Vertical installation
- Suspended installation
- Making holes
- Completion
- Note on the brackets ①
- CONNECTIONS
- HOW TO USE
- How to use a compact disc magazine
- 1
- 2
- 3
- 4
- SPECIFICATIONS
Brand : AIWA
Model : ADC-EX108
Category : CD Player