
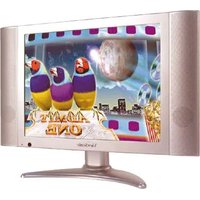
N3260W - Television VIEWSONIC - Free user manual and instructions
Find the device manual for free N3260W VIEWSONIC in PDF.


| Product Type | LCD Television |
| Screen Size | 32 inches (81 cm) |
| Display Resolution | 1366 x 768 (HD Ready) |
| Aspect Ratio | 16:9 |
| Brightness | 500 cd/m² |
| Contrast Ratio | 3000:1 (Dynamic) |
| Response Time | 8 ms |
| Viewing Angles (H/V) | 178°/178° |
| Connectivity | HDMI, VGA, Component, Composite, S-Video, PC Audio In, RF |
| Audio | Built-in stereo speakers, 2 x 10W |
| Power Supply | AC 100-240V, 50/60Hz |
| Power Consumption | 150W (Max), <1W (Standby) |
| Dimensions (with stand) | 800 x 580 x 240 mm |
| Dimensions (without stand) | 800 x 530 x 100 mm |
| Weight (with stand) | 18.5 kg |
| Weight (without stand) | 16.0 kg |
| VESA Mount Pattern | 200 x 200 mm |
| Remote Control | Included |
| Tuner | ATSC / NTSC (Analog & Digital) |
| Energy Class | E (EU) |
| Cleaning Instructions | Use a soft dry cloth; do not use harsh chemicals. |
| Safety Warning | Place on stable surface; ensure ventilation; avoid moisture. |
| Spare Parts Availability | Contact ViewSonic support for replacement parts. |
| Repairability Index | 5.5 / 10 (est.) |
Frequently Asked Questions - N3260W VIEWSONIC
User questions about N3260W VIEWSONIC
0 question about this device. Answer the ones you know or ask your own.
Ask a new question about this device
Download the instructions for your Television in PDF format for free! Find your manual N3260W - VIEWSONIC and take your electronic device back in hand. On this page are published all the documents necessary for the use of your device. N3260W by VIEWSONIC.
USER MANUAL N3260W VIEWSONIC
N3260w/N3760w/N4060w LCD TV
Contents
Compliance Information 1
Important Safety Instructions 2
Copyright Information 3
Product Registration 3
Antenna Installation Instructions 4
Cleaning the LCD Display 4
Getting Started
Package Contents 5
Front View of the Product 6
Rear View of the product 7
Remote Control 8
Notes on the Remote Control 10
Key "Default" 11
Basic Setup 12
AUX Key Setup 13
Preprogrammed Code Table 14
Remote Control Battery Installation 20
Cable Connection 21
OSD Functions
Picture Adjustment 23
Image Adjustment 24
Source Adjustment 25
Setup Adjustment 26
Audio Adjustment 28
Tuner Adjustment 29
V-Chip Adjustment 30
Appendix
Specification....32
Troubleshooting....34
Customer Support....35
Limited Warranty 36
Compliance Information
User Information for North America
Notice : Use the cables which are included with the unit or specified

HIGH-DEFINITION MULTIMEDIA INTERFACE
HDMI, the HDMI logo and High-Definition Multimedia Interface are registered trademarks of HDMI Licensing LLC.

is a trademark of SRS Labs, Inc.
TruSurround XT technology is incorporated under license from SRS Labs, Inc.



the Pixelworks DNK Technology ^TM LOGO is a trademark of Pixelworks, Inc.

Manufactured under license from Dolby Laboratories
"Dolby" and the double-D symbol are trademarks of Dolby Laboratories
Important Safety Instructions
- Read these instructions completely before using the equipment.
- Keep these instructions in a safe place.
- Heed all warnings.
- Follow all instructions.
- Do not use this equipment near water.
- Clean with a soft, dry cloth. If further cleaning is required, see “Cleaning the Display” in this guide for further instructions.
- Do not block any ventilation openings. Install the equipment in accordance with the manufacturer's instructions.
- Do not install near any heat sources such as radiators, heat registers, stoves, or other devices (including amplifiers) that produce heat.
- Do not attempt to circumvent the safety provisions of the polarized or grounding-type plug. A polarized plug has two blades with one wider than the other. A grounding type plug has two blades and a third grounding prong. The wide blade and the third prong are provided for your safety. If the plug does not fit into your outlet, consult an electrician for replacement of the outlet.
- Protect the power cord from being tread upon or pinched, particularly at the plug, and the point where if emerges from the equipment. Be sure that the power outlet is located near the equipment so that it is easily accessible.
- Only use attachments/accessories specified by the manufacturer.
- Use only with the cart, stand, tripod, bracket, or table specified by the manufacturer, or sold with the equipment. When a cart is used, use caution when moving the cart/equipment combination to avoid injury from tipping over.
- Unplug this equipment when it will be unused for long periods of time.
- Refer all servicing to qualified service personnel. Service is required when the unit has been damaged in any way, such as: if the power-supply cord or plug is damaged, if liquid is spilled onto or objects fall into the unit, if the unit is exposed to rain or moisture, or if the unit does not operate normally or has been dropped.
Copyright Information
Copyright © ViewSonic® Corporation, 2006. All rights reserved.
ViewSonic®, the three birds logo, OnView, ViewMatch, and ViewMeter are registered trademarks of ViewSonic Corporation.
Disclaimer:ViewSonic Corporation shall not be liable for technical or editorial errors or omissions contained herein; nor for incidental or consequential damages resulting from furnishing this material, or the performance or use of this product.
In the interest of continuing product improvement, ViewSonic Corporation reserves the right to change product specifications without notice. Information in this document may change without notice.
No part of this document may be copied, reproduced, or transmitted by any means, for any purpose without prior written permission from ViewSonic Corporation.
Product Registration
To meet your future needs, and to receive any additional product information as it becomes available, please register your product on the Internet at: www.viewsonic.com.
For Your Records
Product Name: N3260w / N3760w / N4060w
ViewSonic LCD TV
Model Number: VS11436-1M / VS11437-1M / VS11438-1M
Document Number: N3260w_N3760w_N4060w-2M_UG_ENG Rev. 1A 05-11-06
Serial Number:
Purchase Date: ____
Product disposal at end of product life
ViewSonic® is concerned about the preservation of our environment. Please dispose of this product properly at the end of its useful life. Your local waste disposal company may provide information about proper disposal.
The lamp in this product contains mercury. Please dispose of properly in accordance with environmental laws of your location.
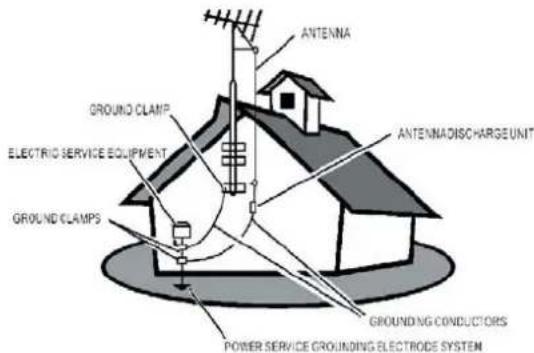
Antenna Installation Instructions
1 Outdoor Antenna Grounding
If an outside antenna or cable system is connected to the product be sure the antenna or cable system is grounded to avoid voltage surges and built-up static charges. Article 810 of the National Electrical Code, ANS/NFPA 70, provides information with regard to proper grounding of the mast and supporting structure, grounding of the lead-in wire to an antenna discharge unit, connection to grounding electrodes, and requirements for the grounding electrode.
2 Lightning
For added protection for this product during a lightning storm, or when it is left unattended and unused for long periods of time, unplug it from the wall outlet and disconnect the antenna or cable system. This will prevent damage to the product due to lightning and power-line surges. Do not disconnect the antenna or the power cord during a heavy storm as lightning may strike while you are holding the cable cord, causing serious injury. Turn off your LCD and wait for the weather to improve.
3 Power Lines
An outside antenna system should not be located in the vicinity of overhead power lines or other electric light or power circuits. When installing an outside antenna system, extreme care should be taken to keep from touching the power lines or circuits as contact with them may be fatal.
Cleaning the LCD Display
• Make sure the LCD Display is turned off.
• Never spray or pour any liquid directly onto the screen or case.
To clean the screen:
- Wipe the screen with a clean, soft, lint-free cloth. This removes dust and other particles.
- If still not clean, apply a small amount of non-ammonia, non-alcohol based glass cleaner onto a clean, soft, lint-free cloth, and wipe the screen.
To clean the case:
- Use a soft, dry cloth.
- If still not clean, apply a small amount of non-ammonia, non-alcohol based, mild non-abrasive detergent onto a clean, soft, lint-free cloth, then wipe the surface.
Disclaimer
ViewSonic does not recommend the use of any ammonia or alcohol-based cleaners on the LCD screen or case. Some chemical cleaners have been reported to damage the screen and/or LCD case. ViewSonic will not be liable for damage resulting from use of any ammonia or alcohol-based cleaners.
Getting Started
Congratulations on your purchasing of a ViewSonic LCD TV display. Important! Save the original box and all packaging material for future shipping needs.
Package Contents
Please confirm that the following accessories are present when you unpack the box:
LCD TV
• Remote Control (batteries included)
Power Cord(S)
AV Cable
User Guide
• Color Quick Start Guide
Front View of the Product
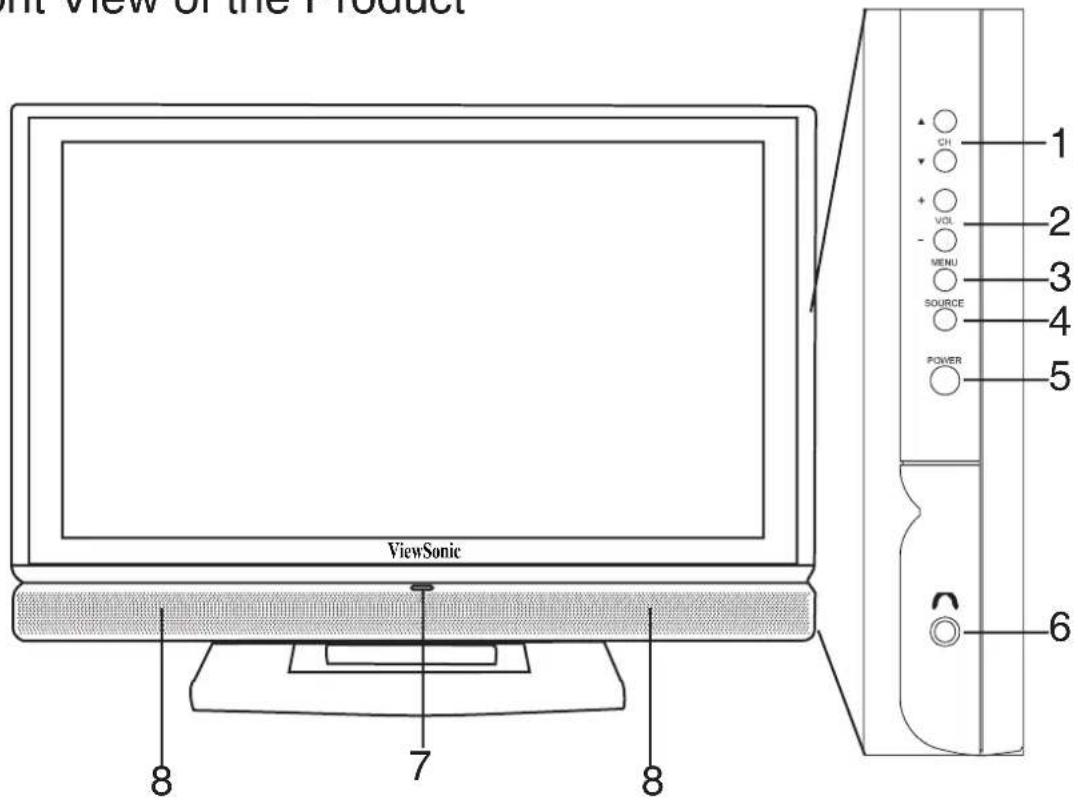
① CH▼ Changes the channel.
② VOL +/- Used for changing the volume.
③ MENU Display menu screen.
④ SOURCE Switch between display input sources.
⑤ POWER Turns the TV ON (green light) and OFF (red light).
⑥ EARPHONE Used for connecting headphones to the TV.
7 POWER INDICATOR LED Indicates if the power is turned on (green), or if the TV is in stand-by mode (red). DPMS state for RGB/HDMI(red)(DPMS state only in pc mode)
⑧ SPEAKERS Audio output.
Power Lock Press MENU and VOL + buttons at the same time can lock the function of POWER button. OSD Lock Press VOL -and VOL +button at the same time can lock the function of MENU button.
Rear View of the Product
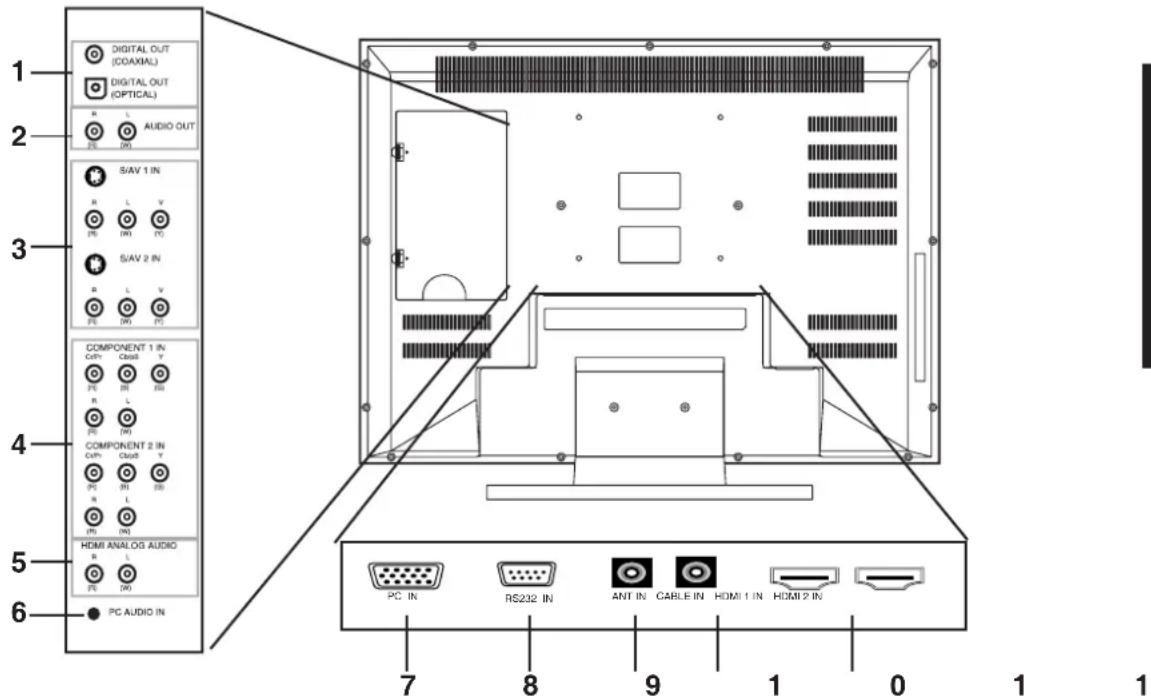
① DIGITAL OUT
Connects to audio device which with RCA jack by coaxial or optical audio cable. Sound track will be 5.1 channel in DTV system when channel support and in analogy TV system, sound track will be stereo output.
② AUDIO OUT
Connects to the A/V device audio input.
③ S/AV IN
Connects to the audio and S-Video or video output jack of your A/V device.
④ COMPONENT 1 /COMPONENT 2 IN
Connects to the audio and component video output jack of your A/V device.
⑤ HDMI ANALOG AUDIO - IN
Connects to the A/V device input.
⑥ PC Audio - IN
Connects to the audio output(earphone jack) of your PC or portable computer.
7 PC-IN
Connects to your VGA output of your PC or portable computer.
⑧ RS232-IN
For manufacturer use only. Incorrect use may damage the system.
⑨ ANT-IN
Connects to your ATSC antenna or cable from a local TV.
10 CABLE - IN
Connects to your coaxial cable from local TV.
11 HDMI 1/HDMI 2 IN
Connect to your HDMI output of A/V device.
Remote Control
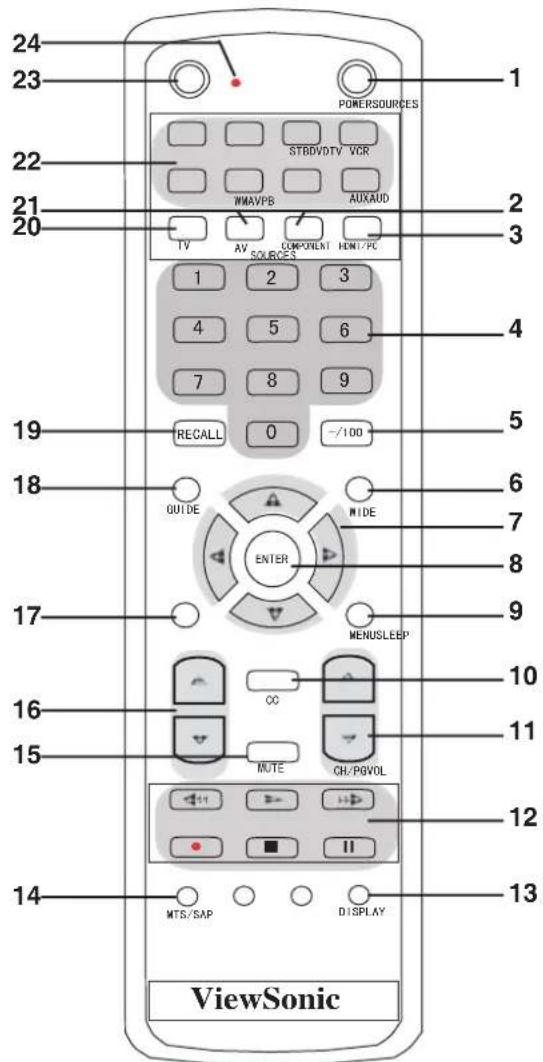
1 POWER
Turns power on or off.
2 COMPONENT
Switches the source to HD1/HD2 mode .
3 HDMI/PC
Switches the source to HDMI/PC mode.
NUMBER KEYS
4 Press the number keys to enter channel numbers.
- /100 (100)
Press the key to choose a channel number .In AIR mode, press this key as "-" For example ,you want to select channe 1-12,press 1 number key and press" -/100" key then press 1 and 2 .
In CABLE mode, press this key as "100".
6 WIDE
Switches the display mode between various wide modes.
7 ARROW KEYS
Press the ▲▼◀▶ keys to scroll through the OSD menu options.
8 ENTER
Press this button to execute the order you choose.
9 MENU
Displays the OSD menu. Press repeatedly to view the different menu pages or exit the OSD menu.
10 CC
Press to call the Closed Caption (CC) list.
11 CH▲▼
Increases▲ or decreases▼ the channel number.
12 (These function availsble on other devices).
13 DISPLAY
Press repeatedly to display channel number or name of input source.
14 MTS/SAP
Press to select from SAP, MONO or Stereo mode.
15 MUTE
Disables the audio output.
16 VOL ▲▼
Volume increases▲ or decreases▼.
17 SLEEP
Press repeatedly to set the off timer from 10 to 240 minutes. The TV enters stand-by mode after the specified time interval.
18 GUIDE
Press to display the program list of Digital TV.
19 RECALL
Switches to the previously viewed channel.
20 TV
Switches the source to TV mode.
21
AV
Switches the source to AV mode.
22
(These function available on other devices)
*If remote control unit does not operate, you may try press TV key to reset the setting of remote control.
23
SOURCES
Selects the TV,AV/S,HDTV,PC/HDMI inputs as the video source signal.
24
REMOTE INDICATOR LIGHT
When using remote control, the indicator light will be in red.
Notes on the Remote Control
- The remote control's effective range is 5 meters from the LCD screen at an angle of up to ± 30^ .
- Direct light may affect the remote controls effective range.
- Avoid subjecting the remote control to shocks or vibrations.
- Avoid placing the remote control in humid and hot environments such as direct sunlight.
- Remove the batteries when not using the remote control for long periods.
Key "Defaults"
The “default” out of box setting enables the Remote to control a predetermine TV, DVD, STB, VCR, WBA and AUD.
Depending on Device desire the following model will be active:
| Device Default Setting | |
| TV ViewSonic | |
| DVD Samsung | |
| STB RCA | |
| VCR Sony | |
| VPB Viewsonic | |
| WMA Viewsonic WMA-100 | |
| AUO Sony | |
Note :Multiple pre-progeammed codes are available for some devices;if default setting does not funtion,see pre-programmed table for additional codes.
Resetting Remote
To reset remote and access default settings press and hold desire device button for roughly six seconds and enter three digit reset code 000.
Replace batteries if remote control keys are not functioning properly, this is a normal behavior that indicates batteries are low.
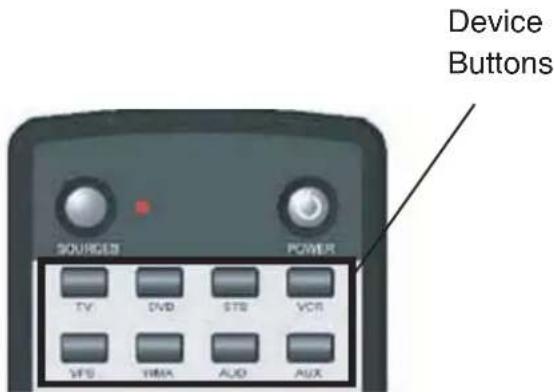
Basic Setup
- Power on the A/V component you wish to setup, so that you can test codes by sending power off commands.
- Refer to the Pre-programmed code tables and write down the code number listed.
- Press and hold the button for the desire device for approximately six seconds.
The top LED will turn on, enter pre-grammed code. LED will blink to indicate pre-programmed code was captured code was captured correctly.
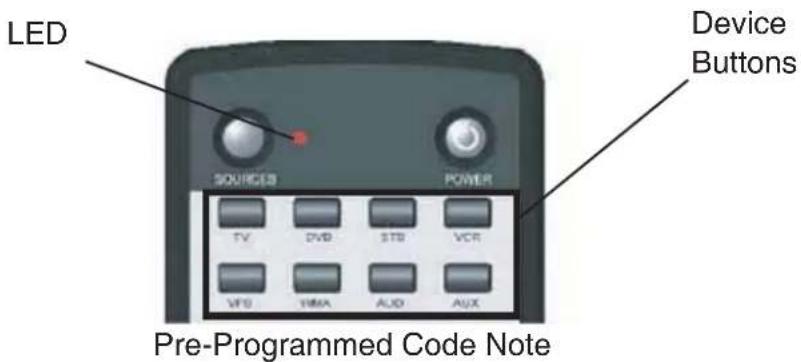
Record the three digital codes for your device here:
TV ____
VPB ____
DVD
WMA
STB
AUD
VCR ____
AUX ____
AUX Key Setup
The AUX key is used to operate a second TV, DVD, STB, VCR, VPB, WMA and AUD. A fourth digital is necessary to identify the type of device the key will control..
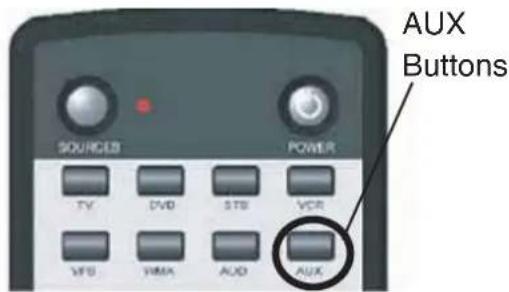
| TV=1 VPB=5 |
| DVD=2 WMA=6 |
| STB=3 AUD=7 |
| VCR=4 |
For example, to control a SONY DVD player with a code of 027 undet the AUXkey a 2 must be added in the beginning of the pre-programmed code making it 2027. If user wants to control a PHILIPS STB with a 006 code under the AUX key a 3 must be added in the beginning of the preprogrammed code making it 3006
To enter the pre-programmed code press and hold the AUX button for approximately six seconds. The top LED will turn on, enter the preprogrammed code with the first digital to indicate the type of device. LED will blink to indicate pre-programmed code was captured correctly.
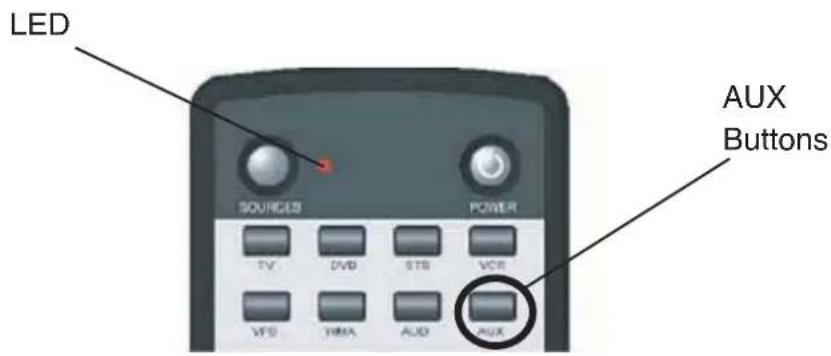
ViewSonic LCD TV's and Plasmas
BRAND CODE
Aiwa 001, 033, 051, 118
Aiba 002,037
Apex 046, 059, 060, 062, 063, 084, 085, 086
Audiovox 119
Blaupunkt 104, 123
Bose 113, 117
Broksonic 052
Bush 003
Clarion 097
Classic 098
CyberHome 004,005
Daewoo 006,124,125
Dansai 007
Denon 034, 120, 140, 141
Emerson 099,100
Fisher 101, 121
Funai 100,114
GE 064,102,146
Go Video 055,057
Goodmans 038
GPX 103
Vi sm DVD Players-1
BRAND CODE
N1700W 001
N1300 002
N1500 003
N1750W 004
N2010 005
N2010-E 006
N2700W 007
N2750W 008
N3020W 009
N3200W 010
N3200W-E 011
VPW4255 012
VPW5500 012
N2000 014
N3000W 015
DVD Players-2
Grundig 008,009
Harman Kardon 116
Hitachi 010, 054, 115
Irradio 137
JVC 011, 039, 066, 069, 070, 071, 072
Kenwood 031,142,145
Koss 138
LG 012,040,041
Magnavox 077,091
Marantz 130
Memorex 132
Mintek 104
Mitsubishi 133, 134, 135, 136
Mustek 013,035
NAD 012,099,126
Nakamichi 105
Norcet 106, 107
Onkyo 127,131
Oritron 108
Panasonic 014, 015, 016, 017, 032, 067, 092, 093
Phillips 018, 019, 061, 068, 078, 079, 080, 096
Pioneer 020, 083, 088
Proscan 064,144
Qwestar 108
RCA 064,081,094
Sampo 109
Samsung 000, 021, 042, 047, 049, 065, 089
Sansui 111
Sanyo 023, 036, 053, 110
Scott 024
SEG 025,043
Sharp 026,043
Sherwood 112
Sony 027, 028, 044, 074, 075, 090, 095
Sylvania 058,100,122
Techwood 128
Thomson 022
Toshiba 029, 045, 048, 050, 076, 082
Yamaha 030,092,129,143
Zenith 056,139
STB-Set Top Box
BRAND CODE
Akai 019
Alba 005, 006, 007
Allsat 019
Alphastar 057
Amstrad 001
Ankaro 012
Anttron 005
Apollo 005
Armastrong 010
Asat 019
Astra 010,013
Astro 007, 008, 012, 015
AudioTon 007
Best 012
Blaupunkt 015
Brain Wave 016
BSkyB 001
Bush 006,017
Chaparral 054
CityCom 006
Clatronic 016
Condor 012
Crown 010
Daeryung 014
Dish Network 038
DNT 014,019
Drake 056
Echostar 014, 021, 038, 055
Einhell 005,010
Elta 005,012
Emme Esse 012,017
Ep Sat 006
Eurosat 010
Eurosky 010,012
Eurostar 010
Express Vu 038
Ferguson 006, 017, 025
Finlandia 006
Finlux 006,013
Fuba 005, 012, 014, 015, 019
Fujitsu 052
Galaxis 012
GE 031,040,041
General Instruments 048, 049
GMI 010
Goodmans 006
Granada 013
Grundig 001, 006, 007, 015, 017, 024
Hanseatic 018
Hirschmann 015
Hisawa 016
Hitachi 006, 017, 053
Hughes 053
Huth 010,016
Intertronic 010
Janeil 052
Johansson 016
JVC 045
Kathrein 015, 019, 026
KR 007
Kreiselmeyer 015
Kyostar 005
Lasat 008
Lenco 005
Luxor 013
Macab 025
Manhattan 006,008,017
Marantz 019
Mascom 008
Maspro 006,017
Mediamarkt 010
Medion 012, 018, 021, 022
Metronic 005, 007, 008, 028
Metz 015
Minerva 015
Mitsubishi 006,015,030
Morgan's 010,019
Nikko 010
Nokia 006,013,017,020
Nordmende 005, 006, 008, 025
Novis 016
Octagon 005,007
Okano 010
Orbitech 005
Otto Versand 015
Pace 001,006,015,017
Palladium 010
Panasonic 001, 006, 017, 032, 034
Panda 006
Philips 006, 011, 017, 019, 023, 029, 058
Phonotrend 006
Predki 016
Proscan 040, 041
Provision 008
Quadral 012
Quelle 015
Radio Shack 048,049
Radiola 019
Radix 014
RCA 000,040,041
Realistic 044
RFT 019
Saba 008,017
Sabre 006
Sagem 025
Salora 013
Samsung 005, 035, 057
Satcom 016,018
SatPartner 005,007,008,016
Schneider 012, 021, 022
Seemann 010,014
SEG 005,009,012,016,018
Siemens 015
Skymaster 018, 021, 022, 027
Sony 043,059
Star Trak 051
Strong 005,007,012
STS 050
Sunstar 010
Tandberg 025
Tandy 007
Tantec 006,017
TechniSat 014
Teco 010
Telasat 018
Telefunken 005,017
Teleka 007,010,014
Telemaster 008
Telesat 018
Televes 006
Thomson 002, 003, 004, 006, 025
Thorn 006,017
Tonna 006
Toshiba 036,042
Triax 015
Uniden 046, 047
Unisat 010
Unitor 016
Universum 015
Visiosat 016
Vortec 005
Wewa 006
Womersat 016
Wisi 006, 014, 015
Zehnder 008,012,028
Zenith 033, 037, 052
Cable
BRAND CODE
ABC 006,067,069,105
Archer 072,073
Cabletime 060
Contec 078
Eastern 079
France Telecom 061
GE 066
Gemini 080, 081
General Instrument 066, 107
Grundig 062
Hamlin 082,083,084,089,106
Hitachi 066
Radio Shack/Realistic 119, 121, 122, 124, 125, 126, 133, 144
Radix 122
RCA 048, 051, 078, 079, 088, 114, 115, 121, 124, 128, 129, 136, 141, 148, 149, 150
Realistic 079, 090, 094, 097, 104, 119, 121, 122, 123, 124, 125, 126, 133, 144, 145
Ricoh 143, 147
Runco 135
Saba 038,039
Samsung 028, 029, 057, 060, 079, 095, 107, 109, 121, 123
Sansui 085,118,139,142
Sanyo 030, 052, 089, 097, 104, 119, 121, 151
Scott 090,120,123,132
Sears 077, 088, 089, 090, 097, 104, 119, 122, 124, 128, 129, 136
Sharp 041, 042, 049, 050, 091, 094, 101, 133, 144, 145
Shintom 085,116,129,130
Signature 144, 145
Signature 2000 097,101
Singer 085, 124, 130, 143, 147
Sony 000, 001, 002, 003, 004, 045, 075, 080, 082, 084, 098, 099, 116, 134
STS 124,136
Sylvania 061, 112, 124, 125, 126, 131, 132, 151
Symphonic 077, 095, 104, 126
Tandy 119
Tashiko 122
Tatung 139
Teac 126, 139, 148
Technics 124, 137
Teknika 090, 122, 124, 126
Thomson 031, 032, 035, 036, 038
Tivo 113
Toshiba 033, 034, 046, 047, 100, 102, 104, 106, 123, 128, 132, 140
Totevision 090, 121, 122
Unitec 095
Unitech 121
Vector Research 077, 117, 118, 123
Video Concepts 077, 117, 118, 123, 140
Wards 079, 090, 091, 094, 104, 121, 122, 123, 124, 126, 128, 129, 130, 133, 136, 144, 145, 149,
White Westinghouse 095
XR-1000 124, 126, 130
Yamaha 077, 117, 118, 119 139
Zenith 055, 064, 090, 093, 116, 135, 143, 147
VPB
| BRAND | CODE |
| Next Vision N4 | 001 |
| Next Vision N5 | 002 |
| Next Vision N5-2 | 006 |
| Next Vision N5-2E | 007 |
| Next Vision N6 | 003 |
| Next Vision HD10 | 004 |
| Next Vision HD12 | 005 |
WMA
| BRAND | CODE |
| WMA100 | 013 |
AUD
BRAND CODE
| Aiwa 024, 041, 063 | |
| Akai 013 | |
| Bose 039 | |
| Carver 075 | |
| Curtis Mathes 065 | |
| Denon 001, 053, 054, 059, 076 | |
| Fisher 005, 066, 068, 073 | |
| GE 030 | |
| Goodmans 013 | |
| Gradiente 086 | |
| Harman Kardon 002, 025, 052, 070 | |
| Hitachi 003, 083 | |
| JBL 025 | |
| Jensen 085 | |
| Jerrold 026, 028 | |
| JVC 004, 050, 057 | |
| Kenwood 005, 055, 058, 072, 080 | |
| Luxman 088 | |
| Marantz 042 | |
| McIntosh 082 | |
| NAD 064 | |
| Nakamichi 078 | |
| NEC 064 | |
| Nikko 087 | |
| Onkyo 006, 044, 048, 079 | |
| Optimus 065, 071 | |
| Panasonic 032, 033, 051, 056, 062, 074, 091 | |
| Philips 007, 037, 038, 040 | |
| Pioneer 008, 035, 045, 049, 065, 069 | |
| Proscan 030 | |
| Quasar 074 | |
| Radio Shack 071 | |
| RCA 029, 030, 031, 034 | |
| RCA & Dimensia 019, 020, 021, 022, 023 | |
| Roadstar 013 | |
| Saisho 013 | |
| Samsung 009 | |
| Sansui 013, 081 | |
| Sanyo 066, 068 | |
| Scientific Atlanta 027 | |
| Sharp 010, 084 | |
| Sherwood 011, 071 | |
| Sony 000, 012, 046, 060, 067 | |
| Starcom 026 | |
| Technics 014, 043, 047, 074 |
Thomson 015,016
Toshiba 036
Uher 013
Yamaha 017,018,061,072,077
Zenith 089
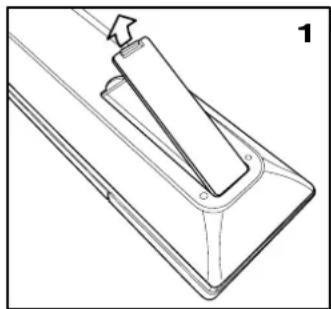
Remote Control Battery Installation
Follow the steps below to insert the batteries.
1 Open the remote control's rear battery compartment cover.
2 Insert two AAA batteries. Ensure that the positive and negative ends match as indicated on the bottom of the battery compartment.
3 Replace the battery compartment cover.
natural_image
Technical line drawing of a mechanical component with a bracket and mounting base (no text or symbols)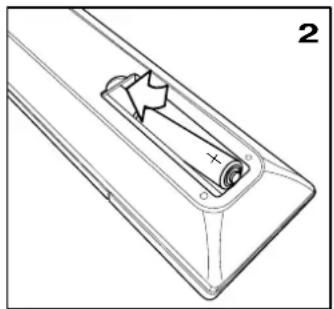
natural_image
Technical line drawing of a mechanical component with a star-shaped cutout and mounting bracket (no text or symbols)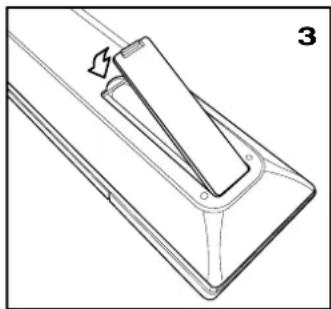
natural_image
Technical line drawing of a mechanical component with a triangular cutout and a directional arrow (no text or symbols)
CAUTION
- Only use the specified AAA batteries.
- Do not mix new and old batteries. This may result in cracking or leakage, which may pose a fire risk or lead to personal injury.
- Insert batteries according to the (+) and (-) markings. Inserting the batteries incorrectly may result in cracking or leakage, which may pose a fire risk or lead to personal injury.
- Dispose of batteries in accordance with local laws and regulations.
- Keep batteries away from children and pets.
- If the remote control will not be used for an extended period of time, remove the batteries.
Cable Connections
Attach video and audio cables according to the connections on your external devices such as DVDs, VCR's, stereo systems.
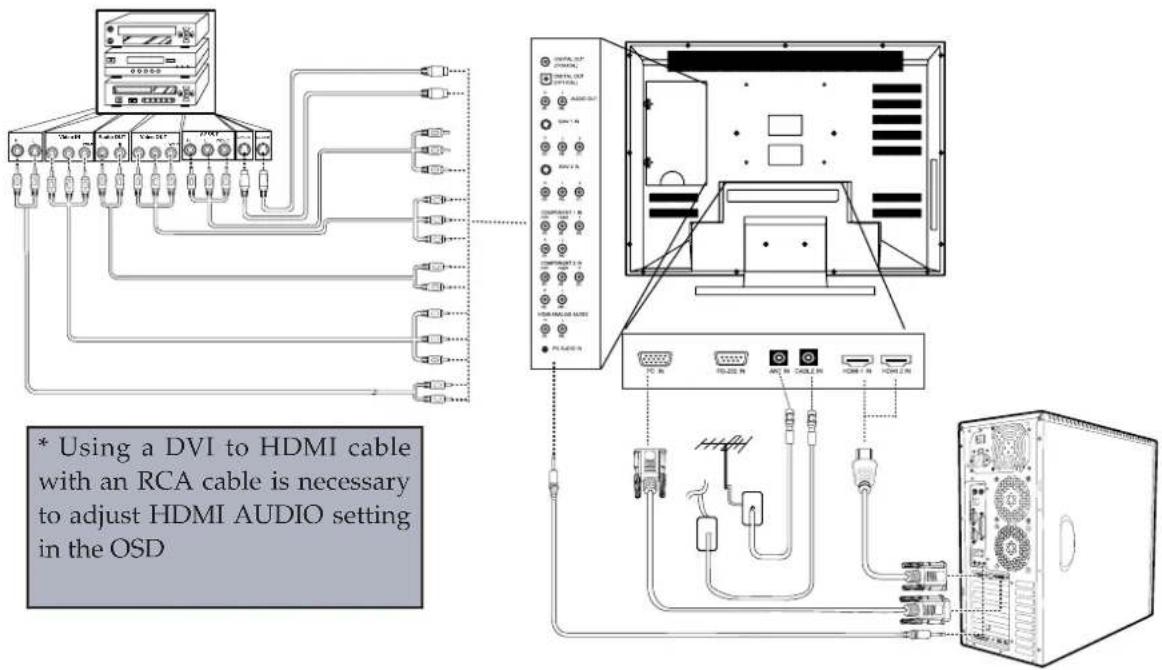
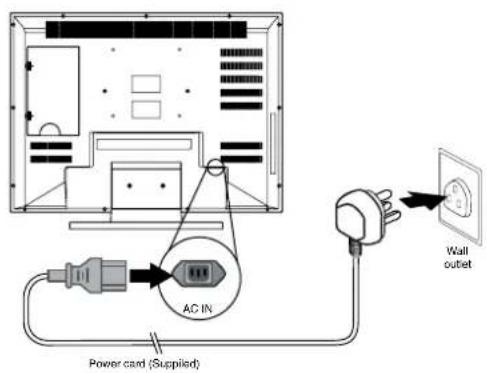
Power Cable Connection
1 Connect the power cable to a wall socket.
2 Connect the other end to the socket on the back of the LCD.
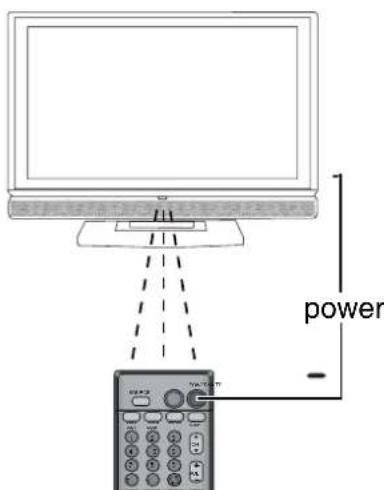
Turning the TV (Power) On
1 Press the power button. The power light will turn from red to green and the screen will appear after 5 seconds.
2 Press the power button again to turn it off.
OSD Functions
All the functions for the LCD TV are controlled either by the remote control or the control buttons on the front control panel at bottom of the TV. See “Front View of the Product” on page6.
Press the MENU button on the remote control or the front control panel to display the OSD main menu.
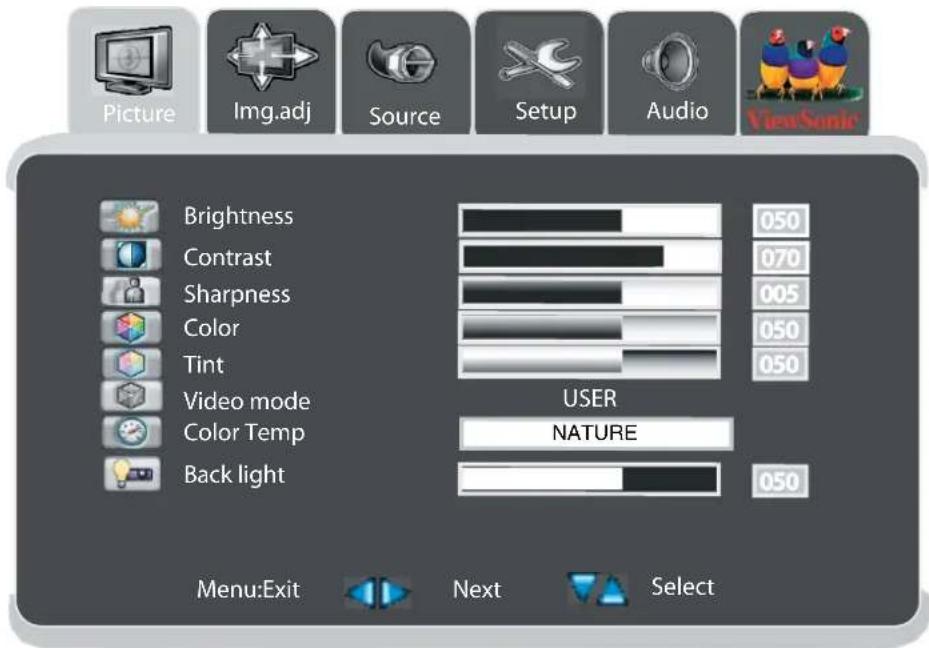
Press the MENU button to select the OSD menu you want.
Press the CH ▲/▼ or the ▲/▼ buttons to select an OSD menu item.
Press the VOL +/- or the ◀/▶ buttons to change the values of the selected menu
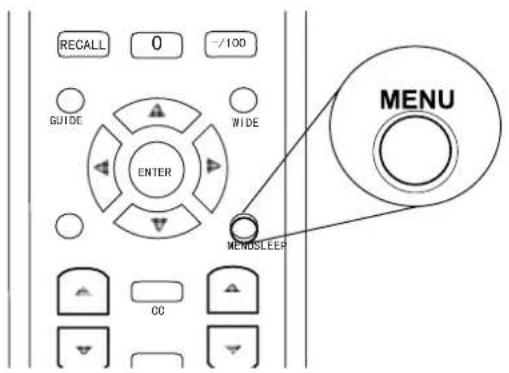
Press the MENU button to exit the OSD.
Picture Adjustment
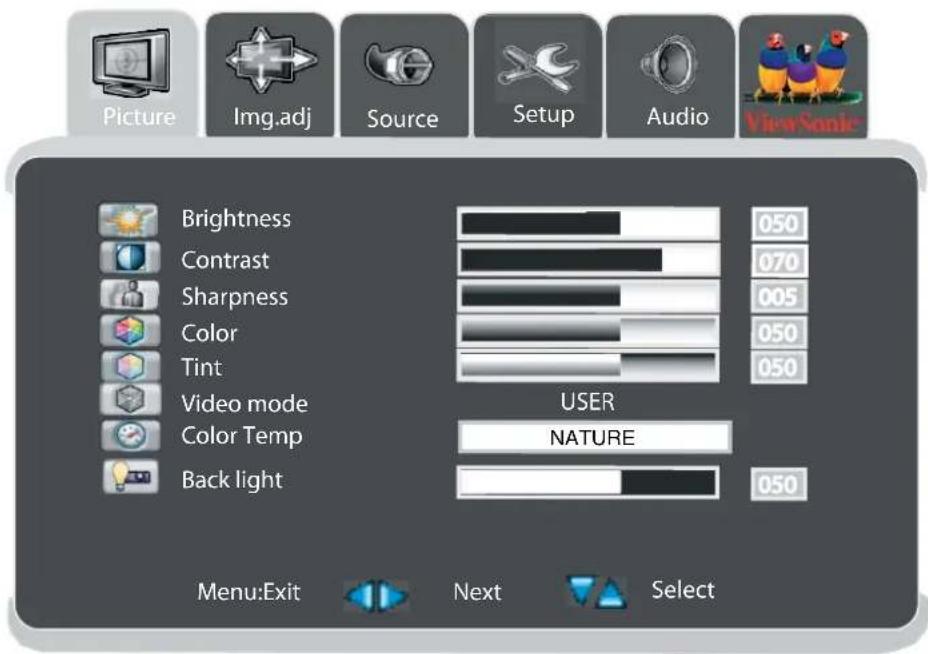
| Function Name | Explanation |
| Brightness Adjust the | the levels of light on your screen.It should be used in conjunction with the Contrast option. |
| Contrast Adjusts the | light levels on your display.It should be used in conjunction with the Brightness option. |
| Sharpness Adjusts | the sharpness levels on your screen. |
| Color Changes the | dominant color intensity on your screen.Adjust this setting until the colors on the screen(for example, flesh tones)look natural. |
| Tint(No support in PC mode) | Changes the color balance.Adjust this setting so that the colors(for example,flesh tones)on the screen are neither too green or too magenta. |
| Video Mode Stores | Picture settings. Following options are available:Soft : loads picture settings that result in softer colors and less sharp images.User : loads the most recent user defined settings.Preset : loads factory default settings. |
| Color Temp Adjusts | the image color intensity : nature,warm,cool,nomal. |
| Back Light Adjusts | the back light of OSD menu. |
| Phase(PC mode only) | Adjusts the phase of the display. |
| Frequency(PC mode only) | Adjust the frequency of your display . |
Image Adjustment
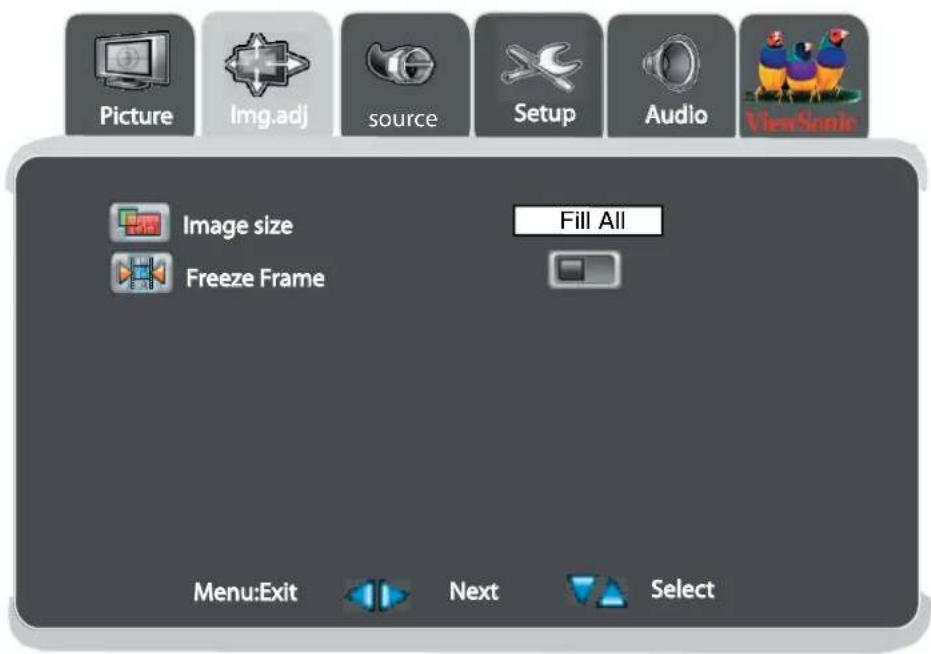
| Function Name | Explanation |
| Image Size Adjusts | the image size include:Fill All ,1 to 1 ,normal,wide,zo om,anamorphic,subtitle.In PC mode image size includes : Fill AI I, 1 to 1 ,Fill Aspect. |
| Freeze Frame Choose to freeze or un-freeze the frame on the screen.(Only support in PC mode). | |
| H Position Adjusts the horizontal position of display.(Only support in PC mode). | |
| V position Adjusts the vertical position of display.(Only support in PC mode). | |
| Auto Auto adjusts screen to the best position.(Only support in PC mode.) | |
Source Adjustment
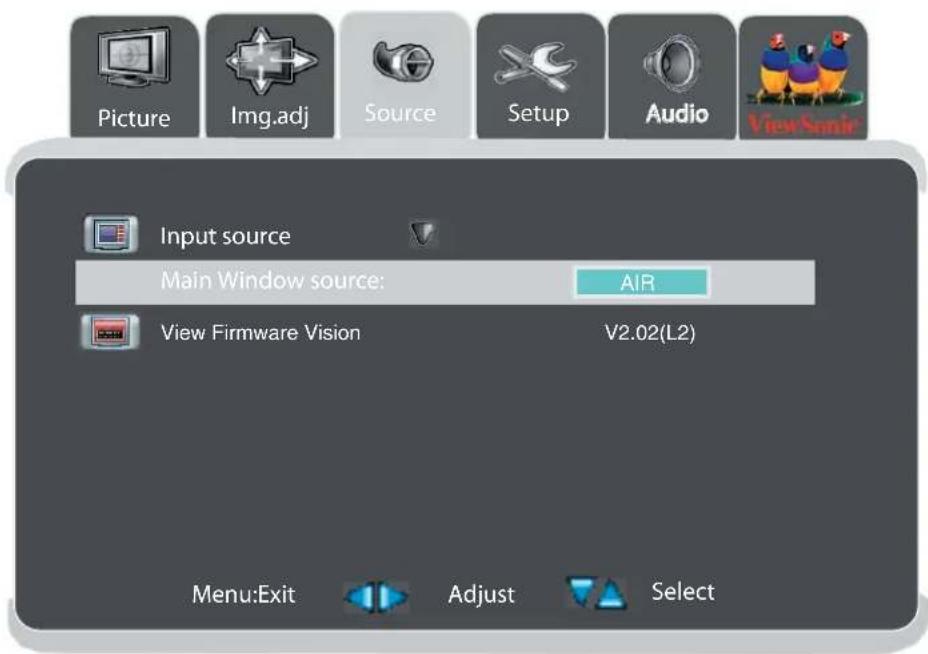
| Function Name Explanation | |
| Input Source Select the | source : Air,AV1,AV2,HD1,HD2,PC,HDMI 1,HDMI 2. |
| View Firmware Version | For manufacturer use.. |
Setup Adjustment
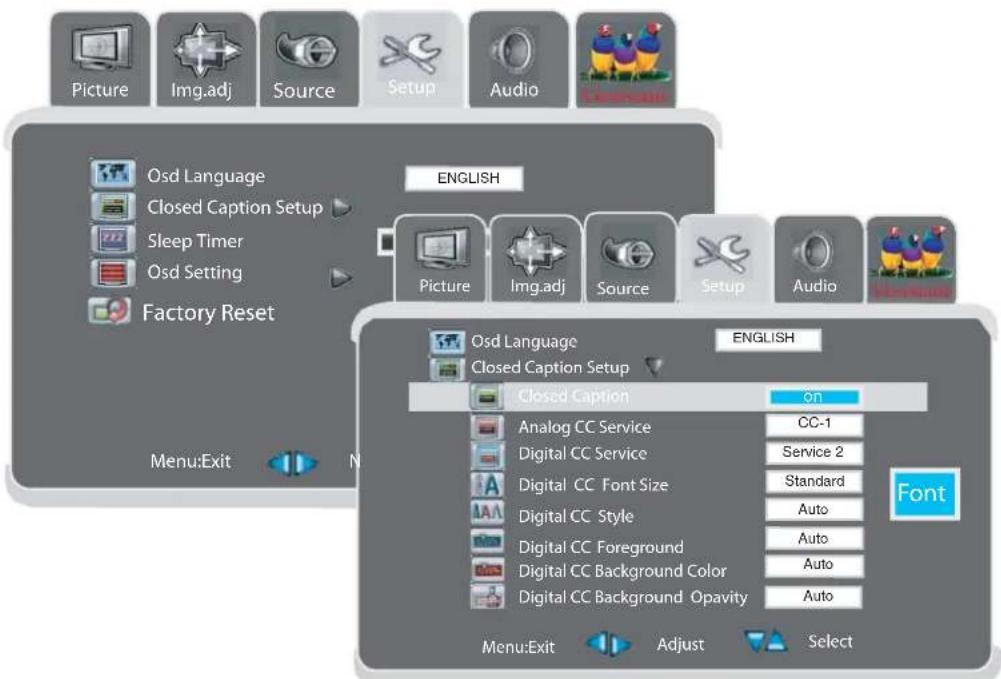
| Function Name | Explanation |
| OSD Language Adjust | the OSD language ENGLISH,SPANISH,FRENCH. |
| Closed Caption Setup | Adjusts the setting of closed caption |
| Closed Caption | Adjust CC ON,OFF or when mute. |
| Analog CC Service | Choose the analog CC service :cc1,cc2,cc3,cc4,Tx1,Tx2,Tx3,Tx4 |
| Digital CC Service | Choose the digital CC service : service 1-6 |
| Digital CC Font Size | Choose the CC font : standard,small,large,auto. |
| Digital CC Style | Choose the CC style mode. |
| Digital CC Foreground | Choose the CC foreground color : black ,white,red,green, blue,yellow,magenta,cyan and auto.You can see the color sample showing on a square |
| Digital Background Color | Choose the CC foreground color : black ,white,red,green, blue,yellow,magenta,cyan and auto.You can see the color sample showing on a square |
| Digital Background Opacity | Adjust CC background opacity mode : auto,opaque,transparent.(NO support in PC,HDMI,HD mode) |
| DVI Only Mode Adjust | the screen range : Graphic(zoom in) or video (zoom out)(only in HDMI mode). |
Note : When you select sources in OSD menu ,closed caption settings will be updated after exiting OSD menu.
Setup Adjustment
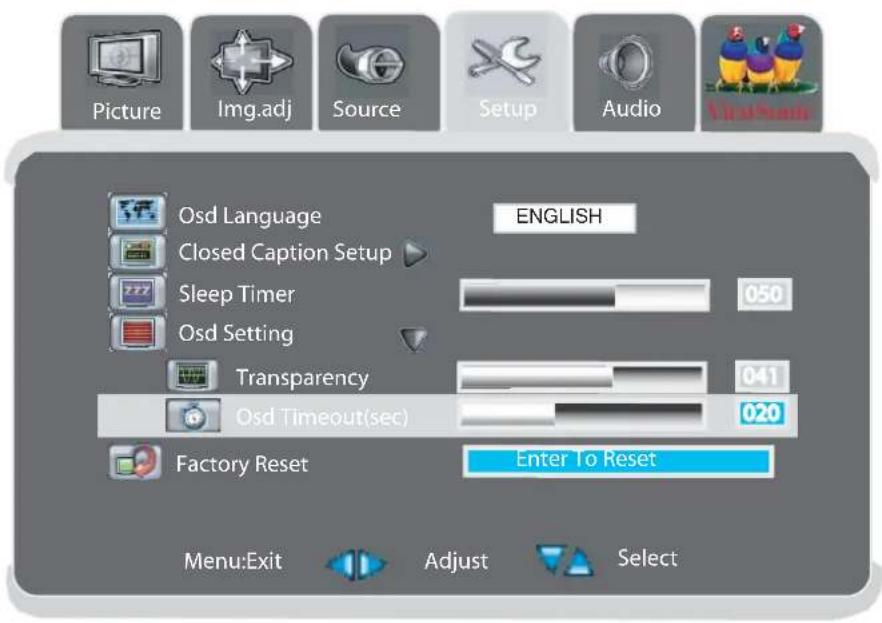
| Function Name | Explanation |
| Sleep Timer Enable | e you to set off timer to 10 through 240min.That will elapse before the TV turns off. |
| OSD Setting Transparency OSD Timeout | Adjust the transparency rate OSD background.Adjust the stay time that OSD picture stay on screen. |
| Factory Reset Back to the factory setting. | |
Audio Adjustment
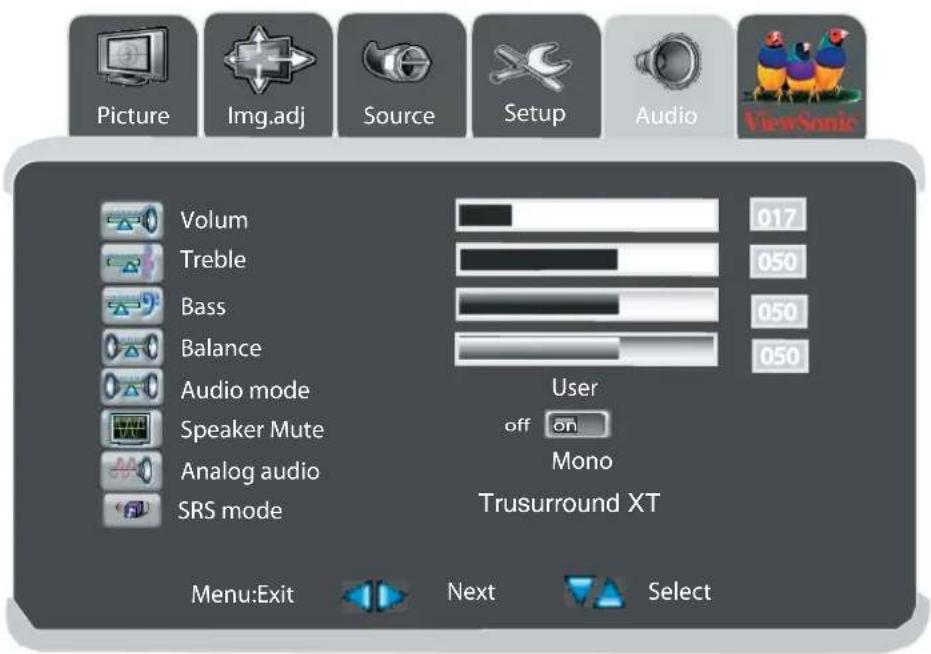
| Function Name | Explanation |
| Volume Adjusts the | overall volume of the speakers.. |
| Treble Adjusts the | high frequency content in the audio output. |
| Bass Adjusts the low frequency content in the audio output. | |
| Balance Balance the volume of the left and right speakers. | |
| Audio Mode Stores | Audio setting .The following options are available:Soft:loads audio settings that result in softer audio.User:loads the most recent user defined settings.Preset:loads factory default settings. |
| Speaker Mute Disable the audio output.(When connect outside AMP) | |
| Analog Audio Adjusts analog audio setting items: Stereo,Sap,Mono. | |
| SRS Mode Switches SRS function on “TruSurround XT” or OFF. | |
| HDMI Audio Source | Select the source in HDMI mode : HDMI,DVI and Auto.(HDMI mode only) |
Tuner Adjustment
- TV mode only
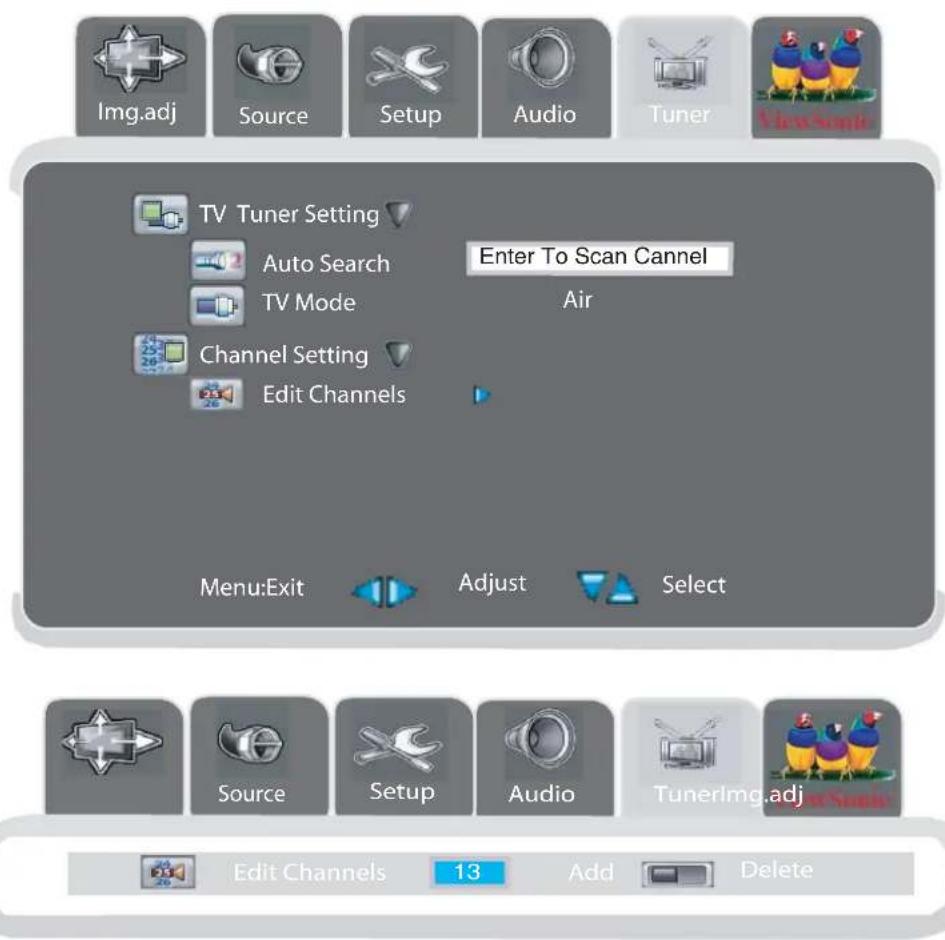
| Function Name | Explanation |
| TV Tuner SettingAuto SearchTV Mode | Auto scan and record the ANT or cable channelsSelect the tuner source : AIR,cable |
| Channel Setting You can add or delete the channel in your channel list.Choosing a channel by ▲▼key or CH button and press ◀▶key to add or delet channel.. | |
V-chip Adjustment
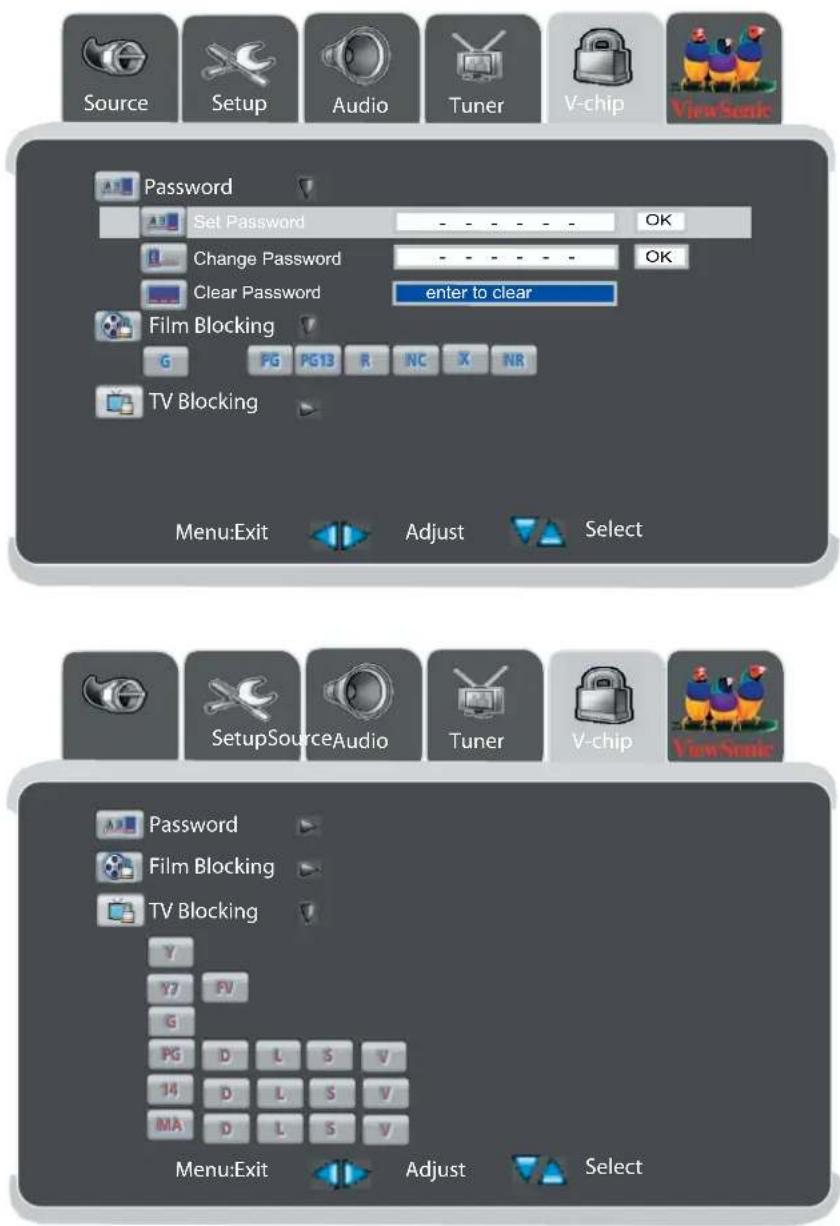
| Function Name | Explanation |
| Password Access | to parental control feature,you have to enter password.Factory default passwd is “000000”.You may change or clear password.Select channel you want to block and choose the rate by arrow keys then press enter to setting.Blocked channels will not be output on screen(No support in HDMI and PC mode) |
| MPAA Rating Explanation | |
| G(GENERALAUDIENCES) | Suitable for all ages. |
| PG(PARENTALGUIDANCE SUGGESTED) | Some material may not be suitable for children. |
| P G - 1 3 ( P A R E N T A L STRONGLY CAUTIONED) | Some material may be inappropriate for children under 13 |
| R(RESTRICTED) Children | under 17 are required to be accompanied by their parents or adult guardians. |
| NC-17 No-one 17 and under | admitted.. |
| X X is an older rating that is | unified with NC-17,but may beincluded in the date of older movies. |
| NR Movies unrating | |
| TV Guideline | Explanation | |
| TV-Y | ALL Children(This program is appropriate for all children) | |
| TV-Y7 | Directed at | older children(This program is designed for children aged 7 and above.Note : For those programs where fantasy violence may be more intense or more combative than other programs in this category,such programs will be designated TV-Y7-FV.). |
| TV-G | General Audience(this program is suitable for all ages) | |
| TV-PG | Parental Guidance Suggested.(This program contain material that maybe not suitable for younger children.)D)Some suggestive dialog L)Infrequent coarse languageS)Some sexual situations V)Moderate violence | |
| TV-14 | Parental Strongly Cautioned.(This program contain material that are not suitable for children under 14 years of age.)D)Intense suggestive dialog L)Strong coarse languageS)Intense sexual situations V)Intense violence | |
| TV-MA | Mature Audience only .(This program contains scenes that are not suitable for children under 17.)L)Graphic violence.Strong coarse language.S)Explicit sexual situationsV)Graphic violence | |
Appendix
Specifications
| Panel | Type 32" (full 31.5" viewable diagonal area) | |
| 37" (full 37.02" viewable diagonal area) | ||
| 40" (full 39.9" viewable diagonal area) | ||
| Active Matrix Wide-WXGA, 1366 x 768 | ||
| Color Anti-reflective coating + Anti-glare coating | ||
| Viewing angles | 32" 176° (H) / 176° (V) | |
| 37" 176° (H) / 176° (V) | ||
| 40" 178° (H) / 178° (V) | ||
| Connection Terminals TV | AIR IN VHF/UHF :2-69 (ATSC/NTSC) | |
| CATV : 1-125 (NTSC) | ||
| S/AV | Video IN x 2 | |
| S-Video IN x 2 | ||
| (S jack has priority when S-jack and Video-jack plug in the same time)Audio IN x 2 | ||
| COMPONENT | COMPONENT Video x 2 (YCbCr/YPbPr)(support 480i,480p720p,1080i)Audio x 2 | |
| PC | VGA IN x 1 | |
| Audio IN x 1(3.5mm Jack) | ||
| HDMI x 2 | ||
| Audio IN x 1 (For HDMI Analog Audio) | ||
| Audio Out | Ananlog Audio Out x 1 | |
| Digital Audio Out | Digital Out (coaxial) x 1 | |
| Digital Out (optical) x 1 | ||
| Compatibility Mode | Compatible Inputs | |
| 720 x 400 @ 70 Hz | PC,HDMI | |
| 640 x 480 @ 60/75 Hz | PC,HDMI | |
| 800 x 600 @ 60/75 Hz(VESA) | PC,HDMI | |
| 832 x 624 @ 75 Hz (Mac) | PC,HDMI | |
| 1024 x 768 @ 60/75 Hz (VESA) | PC,HDMI | |
| 1280 x 720 @ 60 Hz (VESA) | PC,HDMI | |
| 1280 x 768 @ 60 Hz | PC,HDMI | |
| 1280 x 1024 @ 60 Hz (VESA) | PC,HDMI | |
| 1360 x 768 @ 60 Hz | PC,HDMI | |
| 480 I 60Hz(NTSC) | AV/S,HD | |
| 480 P 60Hz(DVD) | HDMI | |
| 720 P 60Hz | HDMI | |
| 1080 I 60 Hz | HDMI | |
| Speaker Output 10 W + 10 W | ||
| Power Voltage 100-240 VAC, 50/60 Hz (auto switch), | ||
| 32":160W (MAXIMUN) | ||
| 37":220W (MAXIMUN) | ||
| 40":260W (MAXIMUN) | ||
| Operating Temperature 0°C to 40°C (32°F to 104°F) | ||
| conditions | Humidity | 10% to 90% (no condensation) |
| Altitude | To 3000 meters | |
| Storage conditions -20°C to Temperature (Feto 140°F) | ||
| Humidity | 10% to 90% (no condensation) | |
| Altitude | To 12,000 meters | |
| Dimensions Physical | 820 mm (W) x 650 mm2(H) x 230 mm (D) | |
| 32.3” (W) x 25.6” (H) x 9.1 “(D) | ||
| 37”: 960 mm (W) x 730 mm (H) x 280 mm (D) | ||
| 37.8” (W) x 28.7” (H) x 11” (D) | ||
| 40”: 1015 mm (W) x 755 mm (H) x 280 mm (D) | ||
| 40.0” (W) x 29.7” (H) x 11” (D) | ||
| Package 960 mm2(W) x 780 mm (H) x 320 mm (D) | ||
| 37.8” (W) x 30.7” (H) x 12.6 “(D) | ||
| 37”: 1130 mm (W) x 870 mm (H) x 370 mm (D) | ||
| 44.5” (W) x 34.3” (H) x 14.6” (D) | ||
| 40”: 1145 mm (W) x 910 mm (H) x 370 mm (D) | ||
| 45.1” (W) x 35.8” (H) x 14.6” (D) | ||
| Weight Net | 32”: 22 kg (48.5 lb.) | |
| 37”: 31 kg (68.3 lb.) | ||
| 40”: 33 kg (72.7 lb.) | ||
| Gross | 32”: 26.5 kg (58.4 lb.) | |
| 37”: 38.5 kg (84.9 lb.) | ||
| 40”: 40.0 kg (88.1 lb.) | ||
| Regulations FCC-B,c-UL,CB,NOM | |
| Power saving modes Active Off <1.5 W (Red LED) | |
| Preset Timing Mode (Pre-adjusted to VESA 1360 x 768 at 60 Hz) | |
| Warning : Do not set the graphics card in you computer to exceed these refresh rates. Doing so may result in permanent damage to the LCD. | |
| Note : Product specifications are subject to change without notice. |
Troubleshooting
No power
• Make sure the LCD is properly connected. (see also pages 12)
• Make sure the AC power cord is properly connected. (see also page 12)
• Make sure the AC power is ON, DC power button is ON (Green LED).
- Plug another electrical device (like a radio) to the power outlet to verify that the outlet is supplying the proper voltage.
Poor or no picture
• The TV station may be experiencing problems. Try another channel.
• The Cable TV signal may be scrambled or encoded. Please contact your local cable operator.
• Make sure that connection to other components are correct. (see also pages 12)
• Make sure that setup has been done correctly after connections. (see also pages 13-16)
• Make sure the correct input is selected and the input signal is compatible.
Strange color, light color, or color misalignment
- Ensure that the video cable is securely connected.
• The picture may appear dim in a brightly lit room. - Adjust brightness and contrast.
- Check the input signal setting.
No sound
• Check your audio connections
• The MUTE button may have been pressed, try pressing this button again.
- Check your audio settings, your TV audio may be set to minimum.
- Press the Volume + (Up) button on the remote control.
Remote control unit does not operate
• Make sure batteries are inserted correctly. (see also page 11)
• Batteries could be weak or dead. Replace batteries.
• Is a fluorescent light illuminated near the remote control sensor?
- The path of the remote control beam may be blocked. Make sure the path is clear and that the remote control is aimed at the remote control sensor on the TV.
- Press only one button at a time and it is the correct one for the operation you want to perform..
Unit cannot be operated
- External influences such as lightning or static electricity may cause improper operation. In this case, operate the unit after first turning on the power of the LCD and the AVC System, or unplug the AC cord for 1 to 2 minutes, then replug again.
Power is cut off suddenly
• Is the sleep timer set? (see also page 18)
- The internal temperature of the unit has increased. Remove any objects blocking the vent or clean as necessary.
No CATV reception (or no reception above CH13)
• Is the AIR/CABLE option set correctly? Please set the AIR/CABLE option to CABLE.
- CATV is connected improperly or not connected; please check all the CATV connections.
• The cable TV service is interrupted; please contact your cable operator.
Picture is cut off/with sidebar screen
• Is the image positioned correctly?
• Are screen mode adjustments such as picture size set correctly?
Customer Support
For technical support or product service, see the table below or contact your reseller.
Note: You will need the product serial number.
| Country/Region | Web Site | T=TelephoneF=Fax |
| United States www.viewsonic.com | 800 688 6688 | |
| Canada www.viewsonic.com | 866 4634775 | |
| Latin America www.viewsonic.com/la | 909 444 8800 | |
Limited Warranty
VIEWSONIC® LCD TV
What the warranty covers:
ViewSonic ^® warrants its products to be free from defects in material and workmanship, under normal use, during the warranty period. If a product proves to be defective in material or workmanship during the warranty period, ViewSonic ^® will at its sole option repair or replace the product with a like product. Replacement product or parts may include remanufactured or refurbished parts or components.
How long the warranty is effective:
ViewSonic® LCD TV's are warranted for one (1) year for all parts excluding the light source and one (1) year for labor from the date of the first customer purchase.
Who the warranty protects:
This warranty is valid only for the first consumer purchaser.
What the warranty does not cover:
- Any product on which the serial number has been defaced, modified or removed.
- Damage, deterioration or malfunction resulting from:
a. Accident, misuse, neglect, fire, water, lightning, or other acts of nature, unauthorized product modification, or failure to follow instructions supplied with the product.
b. Repair or attempted repair by anyone not authorized by ViewSonic®.
c. Any damage of the product due to shipment.
d. Removal or installation of the product.
e. Causes external to the product, such as electric power fluctuations or failure.
f. Use of supplies or parts not meeting ViewSonic's specifications.
g. Normal wear and tear.
h. Any other cause which does not relate to a product defect.
-
Any product exhibiting a condition commonly known as "image burn-in" which results when a static image is displayed on the product for an extended period of time.
-
Removal, installation, and set-up service charges.
How to get service:
- For information about receiving service under warranty, contact ViewSonic Customer Support at 800-888-8583. You will need to provide your product's serial number.
- To obtain warranted service, you will be required to provide (a) the original dated sales slip, (b) your name, (c) your address, (d) a description of the problem, and (e) the serial number of the product.
- Take or ship the product freight prepaid in the original container to an authorized ViewSonic® service center or ViewSonic®.
- For additional information or the name of the nearest ViewSon® service center, contact ViewSonic®.
Limitation of implied warranties:
There are no warranties, express or implied, which extend beyond the description contained herein including the implied warranty of merchantability and fitness for a particular purpose.
Exclusion of damages:
ViewSonic's liability is limited to the cost of repair or replacement of the product. ViewSonic® shall not be liable for:
- Damage to other property caused by any defects in the product, damages based upon inconvenience, loss of use of the product, loss of time, loss of profits, loss of business opportunity, loss of goodwill, interference with business relationships, or other commercial loss, even if advised of the possibility of such damages.
- Any other damages, whether incidental, consequential or otherwise.
- Any claim against the customer by any other party.
Effect of state law:
This warranty gives you specific legal rights, and you may also have other rights which vary from state to state. Some states do not allow limitations on implied warranties and/or do not allow the exclusion of incidental or consequential damages, so the above limitations and exclusions may not apply to you.
Sales outside the U.S.A. and Canada:
For warranty information and service on ViewSonic ^® products sold outside of the U.S.A. and Canada, contact ViewSonic ^® or your local ViewSonic ^® dealer.
Warranty_LCDTV 1 of 1
4.3: ViewSonic LCD TV Warranty Rev. 1a Release Date: 03-31-05
- N3260w/N3760w/N4060w LCD TV
- Contents
- Getting Started
- OSD Functions
- Appendix
- Compliance Information
- User Information for North America
- Important Safety Instructions
- Copyright Information
- Product Registration
- For Your Records
- Product disposal at end of product life
- Antenna Installation Instructions
- Outdoor Antenna Grounding
- Lightning
- Power Lines
- Cleaning the LCD Display
- To clean the screen:
- To clean the case:
- Disclaimer
- Package Contents
- Remote Control
- 21
- AV
- 22
- 23
- SOURCES
- 24
- Notes on the Remote Control
- Resetting Remote
- Basic Setup
- ViewSonic LCD TV's and Plasmas
- BRAND CODE
- Vi sm DVD Players-1
- DVD Players-2
- STB-Set Top Box
- Cable
- AUD
- Remote Control Battery Installation
- CAUTION
- Cable Connections
- Power Cable Connection
- Turning the TV (Power) On
- Picture Adjustment
- Source Adjustment
- Setup Adjustment
- Audio Adjustment
- Tuner Adjustment
- V-chip Adjustment
- Specifications
- Troubleshooting
- No power
- Poor or no picture
- Strange color, light color, or color misalignment
- No sound
- Remote control unit does not operate
- Unit cannot be operated
- Power is cut off suddenly
- No CATV reception (or no reception above CH13)
- Picture is cut off/with sidebar screen
- Customer Support
- Limited Warranty
- VIEWSONIC® LCD TV
Brand : VIEWSONIC
Model : N3260W
Category : Television