
CHEF 365 - Food processor Infiniton - Free user manual and instructions
Find the device manual for free CHEF 365 Infiniton in PDF.


| Product Type | Food Processor |
| Model | CHEF 365 |
| Brand | Infiniton |
| Dimensions (H x W x D) | 35 x 30 x 25 cm |
| Net Weight | 5 kg |
| Power Rating | 800 W |
| Bowl Capacity | 1.5 L |
| Main Functions | Chopping, slicing, shredding, mixing, kneading |
| Blade Material | Stainless steel |
| Speed Settings | 2 speeds + pulse |
| Feed Tube | Large feed tube for whole ingredients |
| Safety Features | Safety lock lid, non-slip feet, overload protection |
| Dishwasher Safe Parts | Bowl, lid, blades, discs |
| Cord Length | 1.2 m |
| Accessories Included | Chopping blade, slicing disc, shredding disc, kneading hook, spatula |
| Spare Parts Available | Yes (bowl, blades, discs, lid) |
| Color | White and silver |
| Manual Languages | English, Spanish, Portuguese |
Frequently Asked Questions - CHEF 365 Infiniton
User questions about CHEF 365 Infiniton
0 question about this device. Answer the ones you know or ask your own.
Ask a new question about this device
Download the instructions for your Food processor in PDF format for free! Find your manual CHEF 365 - Infiniton and take your electronic device back in hand. On this page are published all the documents necessary for the use of your device. CHEF 365 by Infiniton.
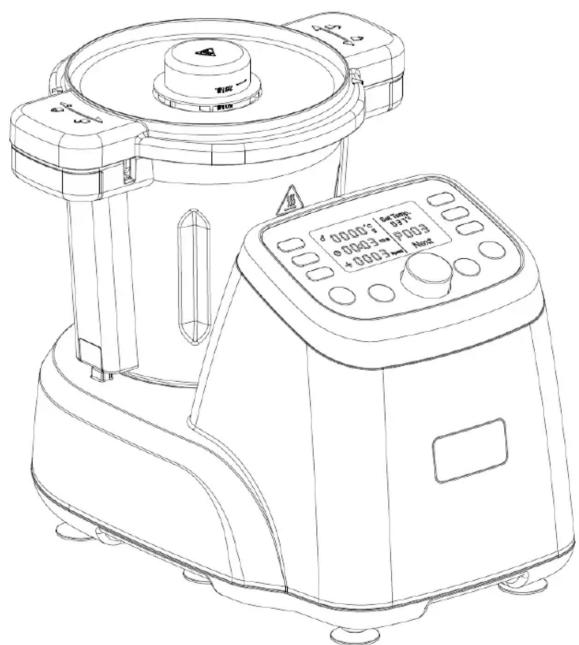
USER MANUAL CHEF 365 Infiniton
natural_image
Line drawing of a kitchen air fryer with control panel and side-mounted display (no text or symbols)Important:
- Before using the appliance, Read these instructions and illustrations carefully.
- Keep these instructions for use for future reference.
- Check if the voltage indicated on the appliance corresponds to the local mains voltage before you connect the appliance.
- Never use any accessories of parts from other manufactures. Your guarantee will become invalid if such accessories or parts have been used.
- Don't use the appliance if the mains cord, the plug or other parts is damaged.
- Thoroughly clean the parts that will come into contact with food before you use the appliance for the first time.
- Always put the main appliance on a flat, dry and clean surface.
- Don't touch the blade especially they are running. They are very sharp. Only hold the upper part of the blade while removing or re-inserting it.
- Don't use your attachment and/or appliance if it has been damaged. You should contact an approved service centre.
- This appliance shall not be used by children. Keep the appliance and its cord out of reach of children.
- Never let the appliance run unattended.
- Switch the appliance off before detaching and install any accessory.
- Wait until moving parts have stopped running before you remove the parts of the appliance.
- Never immerse the main appliance in water or any other liquid, nor rinse it under the tap. Use only a moist cloth to clean the appliance.
- Unplug the appliance immediately after use.
-
Switch off the appliance and disconnected from supply before changing accessories or approaching parts which move in use.
-
Appliances can be used by persons with reduced physical, sensory or mental capabilities or lack of experience and knowledge if they have been given supervision or instruction concerning use of the appliance in a safe way and if they understand the hazards involved.
- This appliance is intended to be used in household and similar applications as:
– staff kitchen areas in shops, offices and other working environments;
– farm houses;
– by clients in hotels, motels and other residential type environments;
– bed and breakfast type environments - Children shall not play with the appliance.
- Never abruptly increase the speed when the temperature or heating temperature is more than 60^ C.
- When processing hot food (for temperature above 60^ C) don’t touch the measuring cup or press the pulse button.
- Be sure to place the appliance on a clean, solid, even and non-heat able surface, particularly when using the steam tool.
- Dry boil protection.
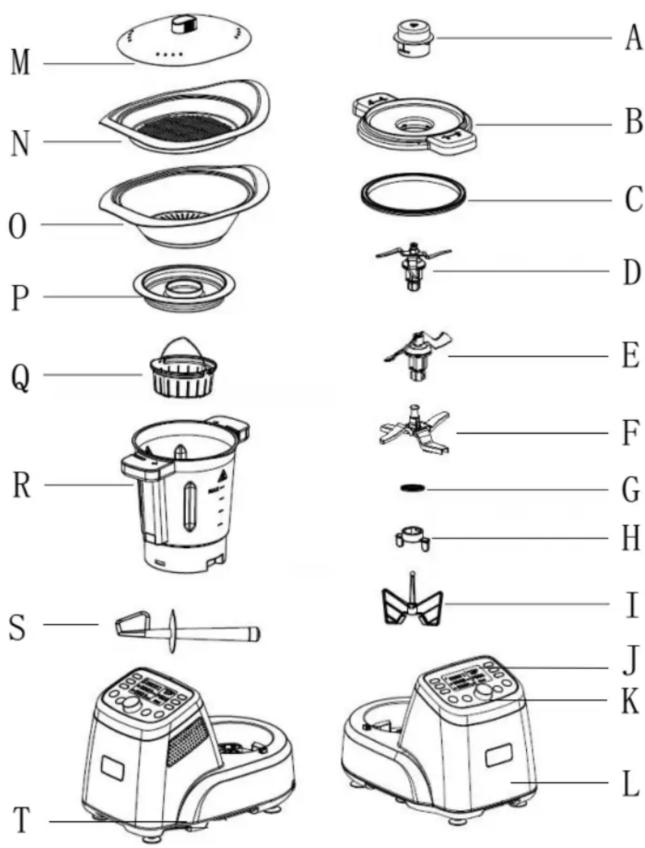
PARTS NAME:
A. Measuring cup N. Food steamer (Tray)
B. Bowl lid O. Steamer
C. Airproof ring 1 P. Soup storage lid
D. Blade 1 Q.Stainless steel inside steamer
E. Blade 2 R. Bowl
F. Blade cover S. Spatula
G. Airproof ring 2 T. Power switch
H. Spanner
I. Stirring attachment (Butterfly)
J. LCD
K. Control panel
L.Main appliance
M.lid
Control Panel
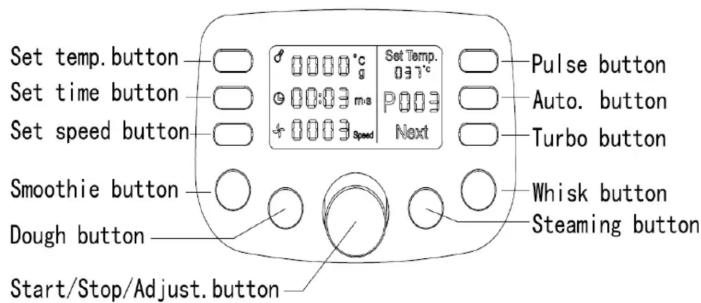
Temperature button
Press temperature button clockwise rotation is “+”, contra rotate is “−”. Temperature range: 20°C - 120°C. The temperature increases by 1°C.
Timer button
For the timer: (Timer range: 1 second-100minutes) Press timer button clockwise rotation is “+”, contra rotate is “−”. 1-60 seconds: the time increases or decreases interval is 1 second. 1-10 minutes: the time increases or decreases interval is 30 seconds. 10-100 minutes: the time increases or decreases interval is 1 minute. If setting time, the appliance timer is counting down (...5 4 3 2 1), until reach your set time appliance automatically stopped. If not setting time, the appliance timer is counting (1 2 3 4 5...), until reach 60
minutes appliance automatically stopped.
Speed button
Press speed button clockwise rotation is “+”, contra rotate is “−”.Speed range: 1-12.
Smoothie button
Under standby mode, press “Smoothie” button by hand, indicator will be light and appliance will work in the following way(in other work mode by pressing the button is invalid)
1) sounds "beep"3 times, 1 time 1 second
2) 12 speed crushing, 10 second
3) heated to 65^ C, at the same time heater off by mixing 1 speed
4) sounds "beep"3 times, 1 time 1 second
5) appliance will arrive the 12 speed slowly, crushing 10 second
6) heated to 80^ , at the same time heater off by mixing 1 speed
7) 1/2 output, heating 2 second ‘on’ than 2 second ‘off’, at the same time by mixing 1 speed, heated to 100^ C, continue 1/2 output, heating 2 second ‘on’ than 2 second ‘off’ for 5 minutes, at the same time by mixing 1 speed
8) waiting for 1 minutes
9) sounds "beep"3 times, 1 time 1 second
10) appliance will arrive the 12 speed slowly, crushing 20 second ‘on’ than 10 second ‘off’, repeated 4 times
11) sounds "beep" 30 second finish work, lights out.
12) Notes: the speed and actual temperature and set temperature will show on the LCD when the appliance working.
Dough button
Under standby mode, press "Dough" button by hand, indicator light, appliance
will work in the following way (in other work mode by pressing the button is invalid). If temperature ≥ 60°C, press the button is no working.
motor 400RMP/min, running 20 second, stop 2 second
2 speed, running 10 second, stop 2 second for 4 minutes
sounds “beep” 30 second finish work, lights out.
Notes: press “smoothie” button default time is 4 minutes and run will be countdown, press “smoothie” or “start/stop/reset” button the appliance will stop working when process of the program is running, than light out and exit the pattern (in other work mode by pressing the button is invalid)
Steaming button
Under standby mode, press “Steaming” button by hand, indicator light, appliance will work as following step (in other work mode by pressing the button is invalid)
The default time is 30 minutes (users can also change the time setting)
Continue heated to 120°C
Notes: the speed and actual temperature and set temperature will show on the LCD when the appliance working.
Whisk button
Under standby mode, press “Whisk” button by hand, indicator light, appliance will work as following step (in other work mode by pressing the button is invalid). If temperature ≥ 60°C, press the button is no working.
Mixing 3 minutes by 3 speed
Waiting 10 second
Mixing 20 second by 3 speed
sounds “beep” 30 second finish work, lights out.
Notes: press “Whisk” button default time is 4 minutes and countdown run by 3
speed ,press “Whisk” or “start/stop/reset” button the appliance will stop working when process of the program is running ,then light out and exit the pattern(in other work mode by pressing the button is invalid)
Pulse button
In standby mode, keep press “Pulse” button by hand and the appliance with 12 speeds for 10 seconds, stop for 2 seconds, have been circulation working until the release button. in other work mode by pressing the button is invalid. If temperature ≥ 60°C, press the button is no working.
Automatic program button
Press this button you can select the automatic program you want.
Six program:
①P01: detoxicate juice
②P02: blood purifier juice
③P03: healthy porridge
④P04: soybean milk
⑤P05: children porridge
⑥P06:chocolate mousse
Turbo button
Keep press “Turbo” button by hand, appliance can reach to maximum 12 speeds in seconds, until loosen exit working mode, recover former status. If temperature ≥slant60^ , press the button is no working.
Start/Stop/Reset button
After you set the working instruction press this button appliance will work, press it again appliance will stop or pause.
Press it for 2 seconds appliance will reset all of the data that you setting.
Safety protection under the high temperature
When then actual temperature ≥60^ and the speed >5 level, appliance will arrive the target speed slowly and the heating will be closed.
Prompt function:
When appliance automatically stopped “Beep” sound 30 seconds.
LCD Display
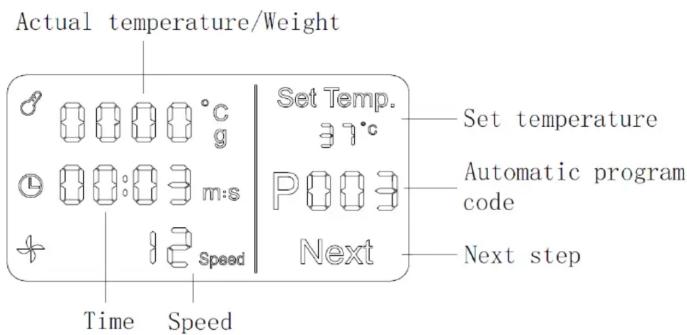
Time display:
If setting time, the LCD Time is down counting ( 5 4 3 2 1) display; If not setting time, the LCD Time is counting (1 2 3 4 5...) display.
Actual temperature display:
LCD will display the real temperature of bowl inner.
Set temperature display
LCD will display the set temperature
Speed display:
Speed range: 1-12
How to assemble the blade
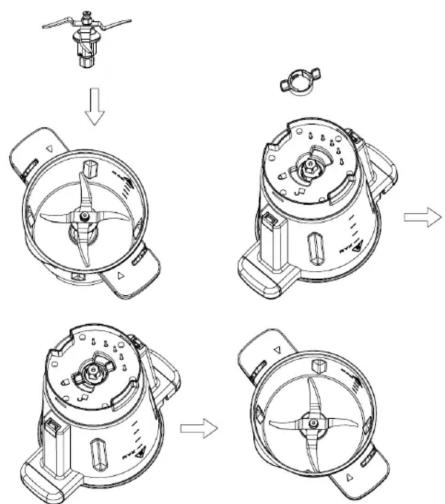
- Push the blade through the opening in the bottom of the bowl, ensure blade lock buckle in correct position.(See above figure)
- Put the spanner lock on blade base from the other side of bottom.
- Rotate the spanner clockwise slightly to ensure locked. (See above figure)
Caution:
- The blade is very sharp. Handle it with care. Only hold the upper part of the blade!
- The airproof ring must be fitted on the blade. If there is no airproof ring, the food to be chopped or cooked may leak out and damage the appliance.
While remove the blade from the bowl, please hold the upper part of the blade with one hand, and release the nut by spanner with the other hand. The blade is
very sharp. Please handle it with care!
Bowl
Caution:

“Hot surface” logo marked on the bowl
To indicate that the marked item can be hot and should not be touched without taking care!
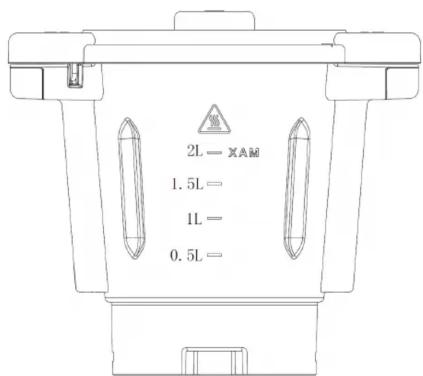
Maximum capacity: 3 liters
Using capacity: 2 liters.
Take care: Never exceed maximum capacity (2L) limit of the bowl to ensure safe usage.
How to assemble/remove the bowl
flowchart
graph TD
    A["Spout"] --> B["Preparation"]
    B --> C["Add to blender"]
    C --> D["Final Step"]
    D --> E["Close-up of blender with lid"]
    style A fill:#f9f,stroke:#333
    style B fill:#ccf,stroke:#333
    style C fill:#cfc,stroke:#333
    style D fill:#fcc,stroke:#333
    style E fill:#cff,stroke:#333
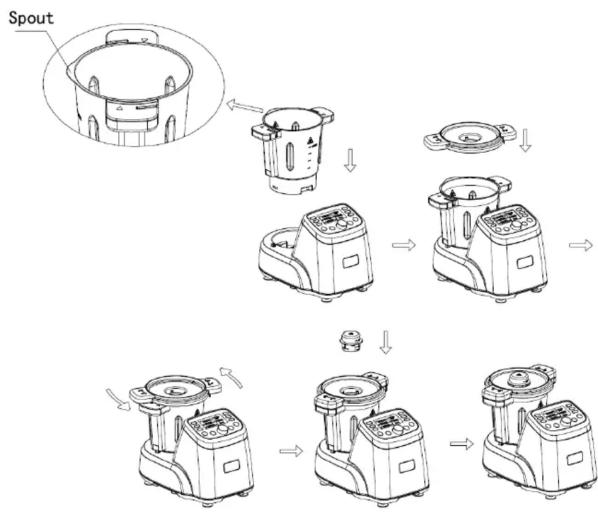
Place the bowl
Make sure that the blades have been placed inside the bowl.
- Place the bowl onto the bowl socket. Be sure to the spout of the bowl on the front.
- Rotate the bowl lid clockwise to lock bowl.
- Assembly the measure cup.
WARNING!
The appliance is fitted with a safety lock between the bowl and the main unit.
The appliance will not work unless the lid has been closed properly.
Danger of the burns from the projection of food, never try and force open the
lid of the bowl. Open the lid of the bowl only after the food prepared has stopped mixing.
Remove the bowl from the main appliance, please follow below steps:
- Stop the appliance
- Rotate the bowl lid anti-clockwise to release bowl.
- Draw the bowl out of the main appliance.
Working mode
Mode 1-Only mix food
The blade is perfectly suited for such as chopping food and making dough etc. Please follow the steps:
- assemble the blade to the bowl
- assemble the bowl to the main appliance.
- Then cover the bowl lid.
- Plug in and turn on the power switch.
- Set the time you need, select the speed. Press the Start/Stop/Reset button the appliance start working.
- Sound “Beep” will be heard 30 seconds when the working automatically stopped.
- After use, turn the main appliance off. Remove the bowl from the bowl socket; take off the chopping bowl lid.
- Take out the processed food from the bowl.
Caution:
- The blade is very sharp. Handle it with care!
- Only hold the upper part of the blade!
- For processing the hard food such as coffee beans and almond, don't chop it longer than 40 seconds. And rest the appliance at least 10 minutes before the next operation!
- The maximum of kneading dough is 500g. Don't make the dough more than 500g!
Mode 2-Only heating food
The appliance is perfectly suited for preparing some food, such as cooking baby food, risotto, marmalade, vegetable soup etc.
Please follow the steps:
- assemble the blade to the bowl
- assemble the bowl to the main appliance.
- Then cover the bowl lid.
- Plug in and turn on the power switch.
- Set the time you need. Set the temperature. Press the Start/Stop/Reset button, machine start heating; the heating indicator light is flashing.
- Sound “Beep” will be heard 30 seconds when the working automatically stopped.
- Turn the main appliance off. Remove the bowl lid.
- Take out the processed food from the bowl.
Caution:
- Don't touch the metal part of the bowl or blade while it is hot!
- Only hold the handle of the bowl to move the bowl!
- Never heat up the bowl when it is empty!
- Don't heating milk more than 500ml!
Mode 3-Heating+mixing
The appliance is perfectly suited for preparing some food, such as cooking baby food, risotto, marmalade, vegetable soup etc.
Please follow the steps:
- assemble the blade to the bowl
- assemble the bowl to the main appliance.
- Then cover the bowl lid.
- Plug in and turn on the power switch.
- Set the time you need. Set the temperature. Select the speed. Press the
Start/Stop/Reset button the appliance starts to working and the heating indicator light is flashing, appliance will keep warm in the set temperature
- Sound “Beep” will be heard 30 seconds when the working automatically stopped.
- Turn the main appliance off. Remove the bowl lid.
- Take out the processed food from the bowl.
Caution:
- Don't touch the metal part of the bowl or blade while it is hot!
- Only hold the handle of the bowl to move the bowl!
- Never heat up the bowl when it is empty!
- Don't heating milk more than 500ml!
- Safety protection under the high temperature: When then actual temperature ≥ 60^ and the speed >5 level, appliance will arrive the target speed slowly and the heating will be closed.
Mode 4- Steaming 1(outside steamer)
natural_image
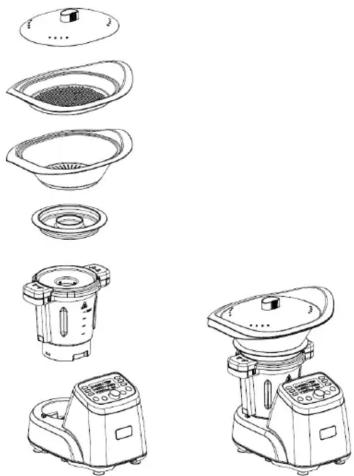
Exploded view diagram of kitchen appliances including a blender, fan, and microwave oven (no text or labels)The steamer is perfectly suited for preparing some food such as vegetables with meat, sausages, steamed bread, steamed fish etc.
You can use the steamers in either of the following two combinations:
Combination 1: Lid+ steamer (Tray) (M) + Steamer (N)
Use this combination for cooking different foods.
Combination 2: Lid + Steamer (N)
Use this combination for larger amount of the same food, e.g. vegetables, potatoes or large pieces of meat or sausages.
Please follow the steps:
- Assemble the blade to the bowl.
- Assemble the bowl to the main appliance.
- Add the water (0.5L≤water≤2L) in the bowl. (Caution: The water in the bowl should be more than 0.5 liter. 0.5L water can be used for
steaming food for 30 minutes.)
- Then cover the bowl lid and remove the measure cup.
- Assemble the outside steamer.
- Plug in and turn on the power switch.
- Choose working mode (only heating mode or heating+ mixing mode optional) to steaming.
Tips: Make sure airproof ring (C) install on the bowl lid, and then cover the bowl lid.
Steaming 2(inside steamer)
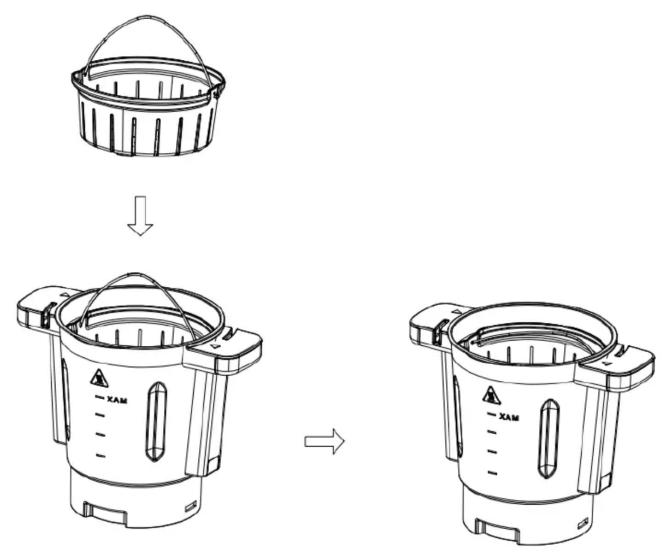
Install the inside steamer
- Assemble the blade to the bowl
- Assemble the bowl to the main unit
- Add the water (0.5L≤water≤2L) in the bowl. (Caution: The water in the bowl should be more than 0.5 liter. 0.5L water can be used for steaming food for 30 minutes.)
- Then cover the bowl lid.
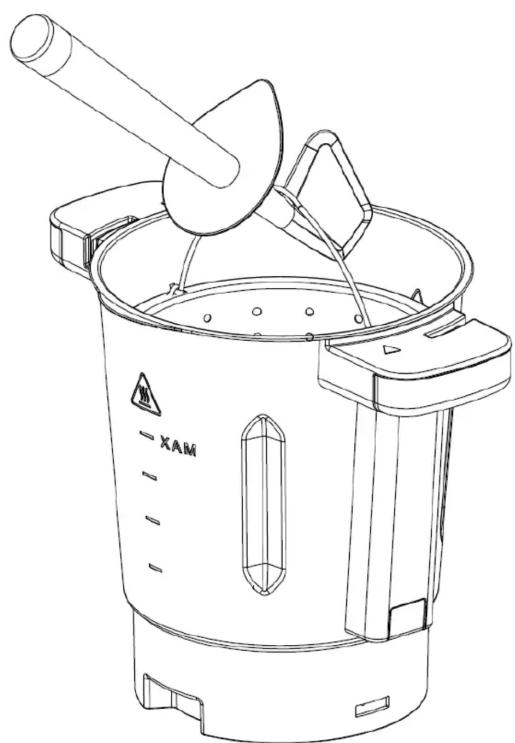
- Then install the inside steamer into the bowl.
-
Final select working mode (optional : heating mode or heating+ mixing mode) to steaming.
-
When steaming finished please use the spatula take out the inside steamer, please don't take it by hand in case of scalding.
Tips: Make sure airproof ring (C) install on the bowl lid, and then cover the bowl lid
Caution:
- Danger of scalding by hot steam and hot condensed water!
- Never use the steamer without lid!
- If the lid is not fitted properly, the steam will escape and food inside steamer will not cook properly!
- Never leave the measuring cup on the bowl lid when using the steamer!
- The hot steam and hot condensed water is dangerous. Please handle it carefully!
- 30 minutes steam cooking requires 0.5 liter (500ml) of water, you need add around 250ml of water for each additional 15 minutes!
- The spatula is used for take out of the inside steamer and moving the food out of the bowl. Don't use it while the blade is running!
natural_image
Line drawing of a portable XAM water heater with handle and control panel (no text or symbols)- Use the spatula take out the inside steamer.
Remove the inside steamer
How to use stirring attachment (Butterfly)
The butterfly will help you to achieve the best results while whisking cream, beating mayonnaise or egg white.
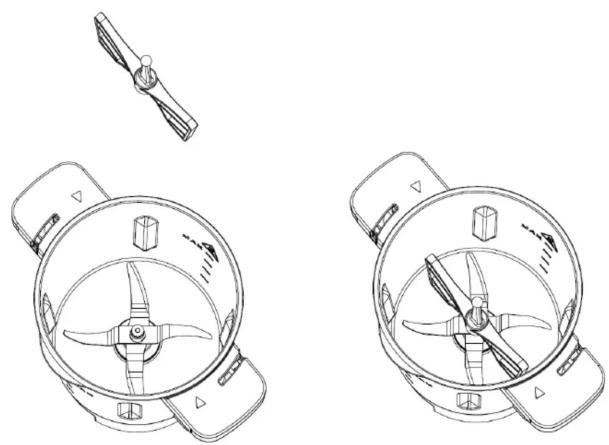
Install/remove the butterfly
natural_image
Technical line drawings of two identical mechanical components with internal blades and a separate handle (no text or symbols)- Hold the ball-shaped end of the butterfly.
- Insert the butterfly on the upper part of the blade. (See the above figure) If you want to remove the butterfly from the blade, just hold the ball-shaped end and pull it out with rotations in both directions.
- The speed is limited 1 to 5 speeds when use butterfly. Otherwise the butterfly easy breaks.
Use the butterfly
Please follow the steps:
- Install the blade and butterfly, put the food in to the bowl
- Assemble the bowl to the main unit.
- Install the bowl on the main appliance.
- Plug in and start the appliance.
- Set the time you need, select the speed (1-5).
- Sound “Beep” will be heard 30 seconds when the working time is automatic stop.
- After use, turn the main appliance off. Remove the chopping bowl lid.
- Take out the processed food from the bowl.
Caution:
- Only starts appliance after the butterfly has been positioned into place!
- Don't add too hard ingredients that might damage or block the butterfly when the blade is in motion and the butterfly is fitted!
How to use stirring attachment (blade cover)
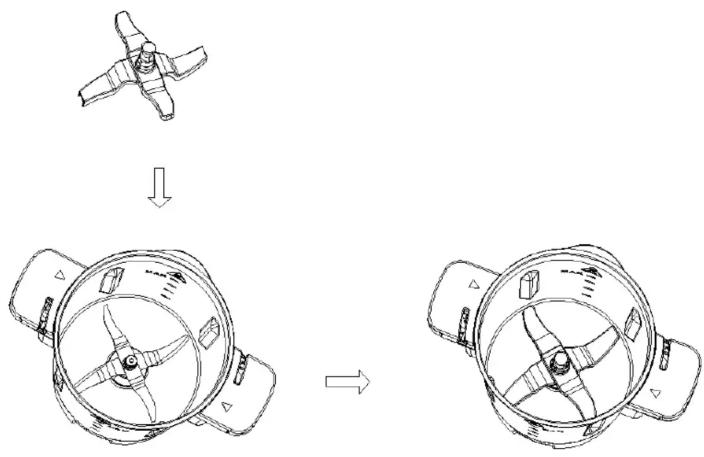
Install/remove the blade cover
natural_image
Technical line drawing of a mechanical component before and after assembly, showing a cross-section and internal structure (no text or symbols)- Hold the ball-shaped end of the blade cover.
- Insert the blade cover on the upper part of the blade and push downward. (See the above figure)
If you want to remove the cover blade from the blade, just hold the ball-shaped end and pull it out upward. - The speed is limited 1 to 5 speeds when use butterfly. Otherwise the blade cover is easy break.
Caution:
- The speed is limited 1 to 5 speeds when use blade cover. Otherwise the cover is easy break.
-
The temperature limited less than 100^ C.
-
Please don't use the blade cover if stirring the liquid foods.
Fault code:
| Code | Explanation Solution | |
| E01 | When machine heating the temperature detector open circuit, or meaning the NTC open circuit. | Maintenance department to repair |
| E02 | Machine failures | Return to seller and repair |
| E03 | 1. The bowl does not install on the unit. 2. bowl lid does not install 2. bowl lid does not install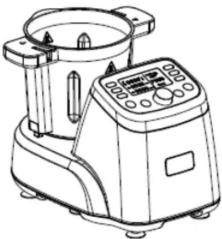 3. or bowl lid was installed incorrectly 3. or bowl lid was installed incorrectly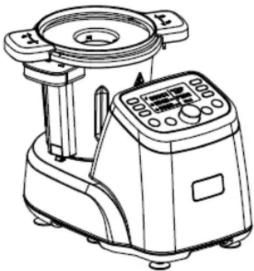 | Turn off the machine, install the bowl, or cover the lid, or take out the bowl lid and reinstall it correctly according to the IM, reset the machine. |
| E04 | 1. The ingredients is too more or the speed is too low lead to motor cannot running.2.The machine motor have high temperature protect, after the machine working long time cause motor's temperature too high lead to motor cannot running. | 1. Reduce some ingredients or set higher speed.2. Stop working few minutes. |
| E05 Dry | burning | Turn off the machine and let the appliance cool down then restart it. |
| E06 | Machine failures | Return to seller and repair |
| E07 | Machine failures | Return to seller and repair |
Noted: if all of solutions still not working, please return to seller and repair.
Cleaning
- Before you clean the appliance, switch the appliance off and remove the plug from the socket.
- While cleaning, don't immerse the bowl in water.
- After the bowl cool down, remove the blade from the bowl. Clean the inside and outside of the bowl. Always keep the contact pins at the bottom of the bowl clean and dry. Only Wipe the contact pins with a wet cloth!
- Unscrew the screw ring and remove all parts of the attachment. Don't clean the metal bowl and blade in the dishwasher!
- Never use pointed or sharp objects for cleaning as this may damage functional parts or affect the safety of the appliance.
- The blade is very sharp! Handle it with care!
- Wash all parts in hot soapy water. Clean them immediately after use. Rinse them with clear hot water and dry them immediately.
- We advise you to lubricate the blade with some vegetable oil.
- Only wipe the main appliance with a damp soft cloth!
- If the bowl and blade is hard to clean. You may add some hot soapy water in the bowl and run the appliance at speed 1 for few seconds.
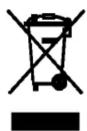
This marking indicates that this product should not be disposed with other household wastes throughout the EU. To prevent possible harm to the environment or human health from uncontrolled waste disposal, recycle it responsibly to promote the sustainable reuse of material resources. To return your used device, please use the return and collection systems or contact the retailer where the product was purchased. They can take this product for environmental safe recycling.
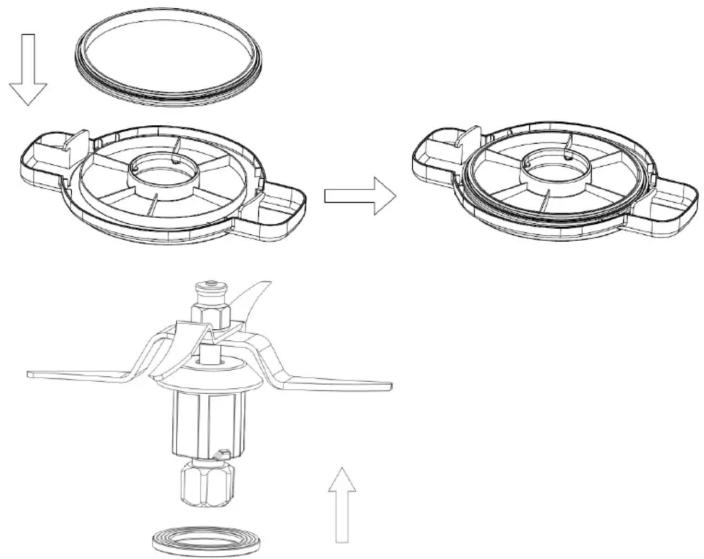
How to install the Airproof ring1/2
natural_image
Technical line drawing of a mechanical component assembly (no text or symbols)Please install "airproof ring" according to the above figure.
Recipes:
Auto program recipes (P01-P06)
P01: Detoxicate juice
| Ingredients : |
| 200g cabbage |
| 200g tomato |
| 100g broccoli |
| 100g carrot |
| 100g apple |
| 100g banana |
| 600ml water |
| 1. Place all ingredients(except apple and banana) into the bowl, turn on the appliance, then select P01. |
| 2. After the P01 procedure finished, turn off the appliance. Take out the bowl and cool it to room temperature. |
| 3. After cooling down, place apple and banana into the bowl. Turn on and select blending function for 5-20 seconds. |
| Notes: The LCD display shows total timer 28 minutes, counting down (...5, 4, 3, 2, 1). When time runs out but procedure not yet, the timer display shows “00:00” and the procedure goes on. When procedure runs out but time not yet, the timer reset automatically. |
P02: Blood purifier juice
| Ingredients : |
| 400g carrot |
| 200g apple |
| 100g orange |
| 10g onion |
| 10g ginger |
| 200ml yogurt or orange juice |
| Place all ingredients into the bowl, turn on the appliance, and then select P02. |
| Notes: The LCD display shows total timer 3 minutes, counting down (...5, 4, 3, 2, 1). When time runs out but procedure not yet, the timer display shows “00:00” and the procedure goes on. When procedure runs out but time not yet, the timer reset automatically. |
P03: Healthy porridge
| Ingredients : |
| 120g rice |
| 100g carrot |
| 100g potato |
| 100g pumpkin |
| 1 spun crushed garlic |
| 800ml water |
| Place all ingredients into the bowl, turn on the appliance, and then select P03. |
| Notes: The LCD display shows total timer 32 minutes, counting down (...5, 4, 3, 2, 1). When time runs out but procedure not yet, the timer display shows “00:00” and the procedure goes on. When procedure runs out but time not yet, the timer reset automatically. |
P04: Soybean milk
| Ingredients : |
| 80g soy bean(dried)1000ml water |
| Place all ingredients into the bowl, turn on the appliance, and then select P04. |
| Notes: The LCD display shows total timer 30 minutes, counting down (...5, 4, 3, 2, 1). When time runs out but procedure not yet, the timer display shows “00:00” and the procedure goes on. When procedure runs out but time not yet, the timer reset automatically. |
P05: Children porridge
| Ingredients : |
| 120g rice100g beef50g carrot50g mushroom800ml water |
| Place all ingredients into the bowl, turn on the appliance, and then select P05. |
| Notes: The LCD display shows total timer 25 minutes, counting down (...5, 4, 3, 2, 1). When time runs out but procedure not yet, the timer display shows “00:00” and the procedure goes on. When procedure runs out but time not yet, the timer reset automatically. |
P06: chocolate mousse
| Ingredients : | |
| 200g black chocolate3pcs egg2bag instant coffee20g butter200g cream | |
| Place all ingredients into the bowl, turn on the appliance, and then select P06. | |
| Notes: The LCD display shows total timer 10 minutes counting down (...5, 4,3, 2, 1). When time runs out but procedure not yet, the timer display shows “00:00” and the procedure goes on. When procedure runs out but time not yet, the timer reset automatically. |
For chopping food (mix blade):
1) Bady's food (install mixing blade)
| Ingredients : | ||||
| 145g carrots(cubed)145g potato(cubed)95g pork(cubed)450ml water | ||||
| Method: | Cup | Speed | Temp(°C) | Time |
| 1. Insert mixing blade. Put carrots, pork and water into bowl to blend. | install | 12 0 | 1min | |
| 2.Add potato to mix. install 1 100 20min | ||||
| 3.mix again install 5 0 3min | ||||
| Tip: If want more smooth, after cool down 60°C,then mixing1 minutes by speed 12. | ||||
2) Jam (install mixing blade)
| Ingredients : | ||||
| 145g pear( peeled and quartered)150g kiwi fruit, peeled and cubed150g sugar10g red wine | ||||
| Method: | Cup | Speed | Temp(°C) | Time |
| 1. Insert mixing blade. Put apple, kiwi and sugar into bowl to heating and mixing. Add red wine in the end of 1 minutes | install | 5 100 | 10min | |
For dough (mix blade):
1) Making biscuit paste (Install mixing blade)
| Ingredients : | ||||
| 4 egg4g yeast80g starch80g white sugar90g flour | ||||
| Method: | Cup | Speed | Temp(°C) | Time |
| 1. Insert mixing blade. Put egg whites and half white sugar into the bowl to mix. | install | 4 | 50 | 5min |
| 2.Then put other half white sugar and egg yolk to mix | install | 4 | 0 | 1min |
| 3.Final add flour, starch and yeast to mix | install | 4 | 0 | 3min |
| 4. After ferment 20 minutes, bake in a oven(180°C.) 25-30 minutes | Non-install | |||
2) Banana Smoothie (Install mixing blade)
| Ingredients : | ||||
| 500ml fresh milk200g very ripe banana(skin removed ,roughly cut)45g white sugar | ||||
| Method: | Cup | Speed | Temp( °C) | Time |
| 1. Insert mixing blade. Put all ingredients into bowl to blend. Serve immediately. | install | 12 | 0 | 30s |
For heating food
1) Vegetable cream soup (Install mixing blade)
| Ingredients : | ||||
| 50g Carrots30g Onions200g Potato120g Green Chinese onions2g Pepper1L Pure milk50g Cheese2g Salt200g Cream100g Celery | ||||
| Method: | Cup | Speed | Temp(°C) | Time |
| 1. Put all ingredients into bowl to mix. | install | 12 | 0 | 1min |
| 2. Then mixing and heating it. Less than 1minutes add cream and cheese into bowl .(note: this process must be open measuring cup) | Non-install | 2 | 100 | 20min |
| Tip: all the vegetable must be cubed before mix. | ||||
2) Special pork porridge with century egg) (Install mixing blade)
| Ingredients : | ||||
| 50g minced pork(chopped in bowl at speed 5 for a few seconds)2 century egg(cubed)120g rice1200ml water2 tsp pepper2 tsp saltSpring onions(for garnishing) | ||||
| Method: | Cup | Speed | Temp( °C ) | Time |
| 1. Pour water & rice into bowl to cook. | install | 1 | 100 | 20min |
| 2. Add porridge inside bowl for 8 minutes, pour onto a big bowl and garnish with some spring onions before serving. | install | 1 | 100 | 8min |
For stirring attachment (Butterfly)
1) Making mayonnaise (install butterfly)
| Ingredients : | ||||
| 1 egg5g salt10g white vinegar150g vegetable oil | ||||
| Method: | Cup | Speed | Temp( °C) | Time |
| 1. Put egg, salt and white vinegar into the bowl. Insert butterfly to mix. | install | 5 | 0 | 10s |
| 2.after finish place it for 1 minute | install | 0 | 0 | 1min |
| 3. In the process of mixing, gradually pour in vegetable oil through the slit between MC (measuring cup) and the lid until the mayonnaise is shaped. | Non-install | 5 | 0 | 0 |
| Tip: the bowl must be clean and dry. | ||||
Beating Egg Whites (install butterfly)
| Ingredients : | ||||
| Max :300g egg whitesMin: 60g egg whites | ||||
| Method: | Cup | Speed | Temp(°C) | Time |
| 1. Insert Butterfly. Place egg white into the bowl to beat until stiff. | install | 5 | 0 | 3min |
| Tip: the bowl must be clean and dry. | ||||
ROBOT DE COCINA
MULTIFUNCIÓN
Model No.: CHEF 365
220-240V 50/60Hz
1500W
INFINITION
Chef365
natural_image
Line drawing of a kitchen air fryer with control panel and digital display (no text or symbols)Importante:
flowchart
graph TD
    A["Spout"] --> B["Initial Plate"]
    B --> C["Adder"]
    C --> D["Transfer to Press"]
    D --> E["Product Packaging"]
    E --> F["Final Product"]
Colocar la jarra
natural_image
Exploded view diagram of kitchen appliances including a blender, fan, and blender (no text or labels)natural_image
Line drawing of a portable XAM water heater with handle and control panel (no text or symbols)natural_image
Technical line drawings of two identical mechanical components with internal blades and mounting brackets (no text or symbols)natural_image
Technical line drawing of a mechanical fan assembly process (no text or symbols)natural_image
Technical line drawing of a mechanical component assembly (no text or symbols)natural_image
Line drawing of a kitchen air fryer with control panel and side-mounted buttons (no text or symbols)Importante:
L. Aparelho principal
M. Tampa
N. steamer de alimentos (bandeja)
O. Steamer
P. Tampa de armazenamento de sopa
For the timer: (Timer range: 1 second-100minutes)
Exibição de tempo:
flowchart
graph TD
    A["Spout"] --> B["Initial fan with lid"]
    B --> C["Step 1: Initial fan with lid"]
    C --> D["Step 2: Initial fan with lid"]
    D --> E["Step 3: Initial fan with lid"]
    E --> F["Step 4: Final product package with lid"]
Coloque a taça
natural_image
Exploded view diagram of kitchen appliances including a blender, fan, and microwave oven (no text or labels)Combinação 2: Tampa + Steamer (N)
Instale o vaporizador interno
natural_image
Line drawing of a portable XAM water heater with handle and control panel (no text or symbols)- Use a espátula para retirar o vaporizador interno.
natural_image
Technical line drawings of two identical mechanical components with internal blades and a separate handle (no text or symbols)natural_image
Technical line drawing of a mechanical component before and after assembly (no text or symbols)natural_image
Technical line drawing of a mechanical component assembly (no text or symbols)2) Banana Smoothie (Install mixing blade)
natural_image
Empty white rectangle with black border (no text or symbols)- Important:
- PARTS NAME:
- Control Panel
- Temperature button
- Timer button
- Speed button
- Smoothie button
- Dough button
- Steaming button
- Whisk button
- Pulse button
- Automatic program button
- Turbo button
- Start/Stop/Reset button
- Safety protection under the high temperature
- Prompt function:
- LCD Display
- Time display:
- Actual temperature display:
- Set temperature display
- How to assemble the blade
- Caution:
- Bowl
- How to assemble/remove the bowl
- Place the bowl
- WARNING!
- Remove the bowl from the main appliance, please follow below steps:
- Working mode
- Mode 1-Only mix food
- Mode 2-Only heating food
- Mode 3-Heating+mixing
- Mode 4- Steaming 1(outside steamer)
- Combination 2: Lid + Steamer (N)
- steaming food for 30 minutes.)
- Steaming 2(inside steamer)
- Install the inside steamer
- Remove the inside steamer
- How to use stirring attachment (Butterfly)
- Install/remove the butterfly
- Use the butterfly
- How to use stirring attachment (blade cover)
- Install/remove the blade cover
- Cleaning
- How to install the Airproof ring1/2
- Recipes:
- Auto program recipes (P01-P06)
- For dough (mix blade):
- For heating food
- ROBOT DE COCINA
- MULTIFUNCIÓN
- INFINITION
- Chef365
- Importante:
- Colocar la jarra
- Exibição de tempo:
- Coloque a taça
- Combinação 2: Tampa + Steamer (N)
- Instale o vaporizador interno
Brand : Infiniton
Model : CHEF 365
Category : Food processor