
Wind Tower Platinum 2515 - Ventilateur domestique Lasko - Free user manual and instructions
Find the device manual for free Wind Tower Platinum 2515 Lasko in PDF.


| Brand | Lasko |
| Model | Wind Tower Platinum 2515 |
| Product Type | Space-Saver Tower Fan |
| Height | 40 inches |
| Power Supply | 120 V ~ 60 Hz |
| Speed Settings | 3 (Low, Medium, High) |
| Oscillation | Yes |
| Timer Range | 0.5 to 7.5 hours (0.5-hour increments) |
| Sleep Mode | 6 hours on Low speed |
| Remote Control | Yes (battery AAA not included) |
| Control Type | Manual controls on top + Remote |
| Plug Type | Polarized plug |
| Usage | Residential indoor use only |
| Assembly Required | Yes (base and column) |
| Maintenance | Vacuum with brush attachment; wipe with soft cloth; no alcohol or solvents |
| Warranty | 1-year limited warranty |
| Customer Service | 1-800-233-0268 (Mon-Fri, 8am-5pm ET) |
| Spare Parts | Remote control available for order |
Frequently Asked Questions - Wind Tower Platinum 2515 Lasko
User questions about Wind Tower Platinum 2515 Lasko
0 question about this device. Answer the ones you know or ask your own.
Ask a new question about this device
Download the instructions for your Ventilateur domestique in PDF format for free! Find your manual Wind Tower Platinum 2515 - Lasko and take your electronic device back in hand. On this page are published all the documents necessary for the use of your device. Wind Tower Platinum 2515 by Lasko.
USER MANUAL Wind Tower Platinum 2515 Lasko
Customer Service Dept., 620 Lincoln Ave., West Chester, PA 19350
Innovators in Home Comfort
WIND TOWER® PLATINUM 40"
SPACE-SAVER FAN
MODEL 2515
This Fan is for residential use only.
It is not intended to be used in commercial, industrial or agricultural settings.

READ AND SAVE THESE INSTRUCTIONS
READ CAREFULLY BEFORE ATTEMPTING TO ASSEMBLE, INSTALL, OPERATE OR MAINTAIN THE PRODUCT DESCRIBED. PROTECT YOURSELF AND OTHERS BY OBSERVING ALL SAFETY INFORMATION. FAILURE TO COMPLY WITH INSTRUCTIONS COULD RESULT IN PERSONAL INJURY AND/OR PROPERTY DAMAGE! KEEP INSTRUCTIONS FOR FUTURE REFERENCE.
SAVE THESE INSTRUCTIONS


WARNING


GENERAL SAFETY INFORMATION
When using electrical appliances, basic precautions should always be followed to reduce the risk of fire, electrical shock and injury to persons, including the following:

Read all instructions before using this Fan.

- Make certain the power source conforms to the electrical requirements of the Fan.
- Make certain that the room is equipped with a working smoke detector.
- Use this Fan only as described in this manual. Any other use not recommended by the manufacturer may cause fire, electrical shock, or injury to persons.
- To reduce the risk of personal injury and electric shock, the Fan should not be played with or placed where small children can reach it.
- Unplug power cord before installing, servicing, or moving the Fan.

⚠ WARNING

DO NOT DEPEND ON THE ON/OFF SWITCH AS THE SOLE MEANS OF DISCONNECTING POWER WHEN SERVICING OR MOVING THE FAN. ALWAYS UNPLUG THE POWER CORD. ALWAYS TURN OFF AND UNPLUG FAN BEFORE LEAVING THE AREA. NEVER LEAVE CHILDREN UNATTENDED WHEN THE FAN IS ON OR PLUGGED IN.
-
This Fan must NOT be used in potentially dangerous locations such as flammable, explosive, chemical-Haden or wet atmospheres where gasoline, paint or flammable liquids are used or stored.
-
DO NOT use Fan in or near a window. Rain may create an electrical hazard.
-
Completely assemble Fan, according to instructions, before connecting to power supply.
This appliance has a polarized plug (one blade is wider than the other). To reduce the risk of electric shock, this plug is intended to fit in a polarized outlet only one way. Match wide blade of plug to wide slot. Fully insert. If the plug does not fit fully in the outlet, reverse the plug. If it still does not fit, contact a qualified electrician. DO NOT attempt to defeat this safety feature.
This plug is a safety feature, to reduce the risk of fire, electric shock and personal injury. DO NOT remove, replace, repair or tamper with the originally supplied plug. If the Fan does not function properly, it may be due to the safety device incorporated in this plug. Return to an authorized service center or call 800-233-0268, Monday - Friday, between 8:00 a.m. and 5:00 p.m. Eastern. If the plug warning label is missing or damaged, call the toll free number for a replacement label.
-
Where possible, avoid the use of extension cords because the extension cord may overheat and cause a fire. If you must use an extension cord, minimize the risk of overheating by using the shortest cord possible and ensuring that it is UL listed. NEVER use a single extension cord to operate more than one Fan. Do not plug Fan into any other cord connected device, such as a power strip, cord reel, surge protector, multiple outlet adapters or outlet-type air fresheners. The use of such devices may create a fire hazard.
-
NEVER operate any Fan with a damaged cord or plug or after the Fan malfunctions, has been dropped or damaged in any manner. There are no user serviceable parts. Return Fan to an authorized service facility for examination, electrical or mechanical adjustment or repair.
-
NEVER insert or allow fingers or foreign objects to enter any ventilation or exhaust opening as it may cause an electric shock or fire, or damage the Fan. To reduce the risk of fire, DO NOT block or tamper with the Fan in any manner while it is in operation.
-
Always place the Fan on a stable, flat, level surface when operating, to avoid the chance of the Fan overturning. Locate the Power Cord so the Fan or other objects are not resting on it. DO NOT run Power Cord under carpeting. DO NOT cover Power Cord with throw rugs, runners or the like. Arrange Power Cord away from room traffic and where it will not be tripped over.
-
This Fan is not intended for use in wet or damp locations. NEVER locate a Fan where it may fall into a bathtub or other water container. NEVER use Fan where flammable liquids are used or stored.
-
NEVER use Fan outdoors
-
Remote controls for other appliances or electronic equipment can sometimes interfere with the operation of this Fan. If this occurs, move the Fan to another location.
-
Keep Fan remote control unit away from chairs and your bed where it may be sat or laid upon and inadvertently turn on the Fan.
-
This Fan is not suitable for use in agricultural facilities including areas where livestock, poultry or other animals are confined. Please refer to National Electric Code (NEC) Article 547-7 (2002), or applicable state or local codes or standards relating to electrical requirements for Agricultural Buildings. THIS FAN DOES NOT MEET THE REQUIREMENTS OF NEC ARTICLE 547-7 (2002).
-
This Fan is not suitable for use in hazardous locations. Please refer to National Electric Code (NEC) Article 500 or applicable state or local codes or standards relating to electrical requirements for Hazardous locations. THIS FAN DOES NOT MEET THE REQUIREMENTS OF NEC ARTICLE 500 (2002).
MODELO 2515
CONTROL REMOTO (Figura 6)
SAVE THESE INSTRUCTIONS
Rev. G 10/07
2
2515ES
Rev. G 10/07
11
2515ES
MODELO 2515
Rev. G 10/07
10
2515ES
MÔDEL 2515
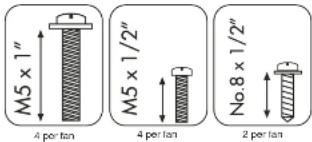
Actual Screw Size
ASSEMBLY
- For case of assembly, lay the Fan down so that the front grill and control panel are facing up.
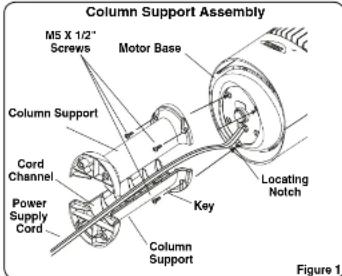
- Locate the Power Supply Cord at the bottom of the Fan. Place the Power Supply Cord in the Cord Channels of the Column Supports. Snap the Column Supports firmly together to form the Column Support Assembly. (Figure 1)
- Attach the Column Support Assembly to the Motor Base with (4) 1/2" Long M5 Screws. Make certain to align the Key on the Support Column Assembly with the Locating Notch on the Motor Base. (Figure 1)
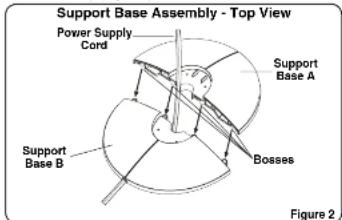
4. Assemble the Bases by interlocking the Bosses on Support Base A into the Boss Holes on Support Base B. Thread the Power Supply Cord through the large hole in the center of the Support Base Assembly. (Figure 2)
Rev. G 10/07
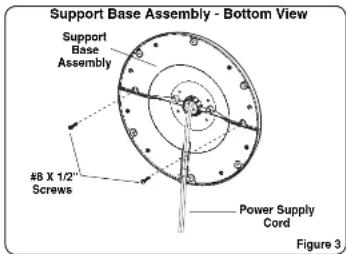
5. Secure the (2) #8 X 1/2" Screws into the two holes in the bottom of the base. (Figure 3)
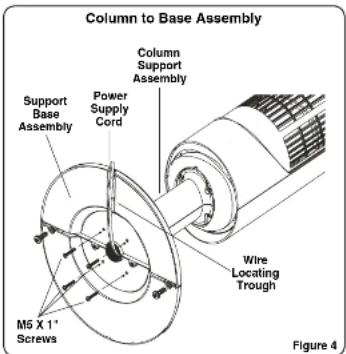
6. Align the Support Base Assembly with the Column Support Assembly, noting that the cord channel on the bottom of the support base should be towards the back of the Fan. Assemble the Support Base Assembly to the Column Support Assembly with (4) 1" Long M5 Screws. Gently pull any excess slack of the Power Supply Cord and place it in the Wire Locating Trough. (Figure 4)
2515ES
MODEL 2515
OPERATION (Figures 5 and 6)
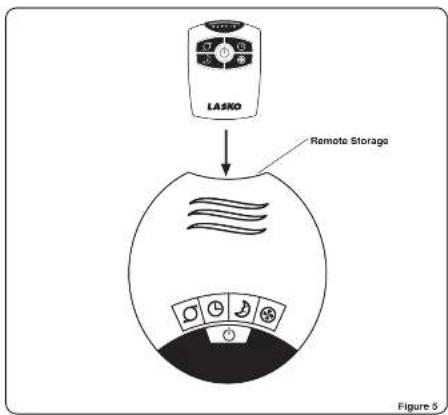
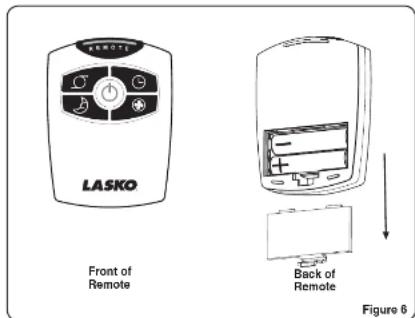
This Fan may be operated by the Manual Controls located on top of the unit (as shown in Figure 5) or by the Remote Control (shown in Figure 6).
- Place the Fan on a firm and level surface.
CAUTION: Plastic or rubber labs, like the feet on this unit, may stick to furniture surfaces and/or hardwood floors. The unit may leave a residue that could darken, stain or leave permanent blemishes on the finish of certain furniture surfaces, including wood surfaces, and/or hardwood floors.
- Plug the cord set into a 120 volt outlet.
△WARNING
Be sure that the plug fits tightly into outlet.

When plugs fit loosely into receptacles, they may slip partially or completely out of the receptacle with only the slight movement of the attached cord. Receptacles in this condition may overheat and pose a serious fire hazard; if covered by a curtain or drape, the fire hazard is even greater.
- Turn the Fan ON by pressing the Power Button (φ).
SPEEDS: Press the Fan Speed Button (\$) to desired speed setting. Each time the Fan Speed Button is pressed, the speed will change from Low (1), to Medium (2), to High (3). When initially plugged in, the Fan will be in Low Speed.
When the Fan is turned OFF and ON again, the unit will resume the speed at which it was turned OFF.
-
OSCILLATION: Press the Oscillation Button (p) to start and stop the oscillation function.
-
TIMER: The timer function allows the unit to be set to operate for a length of time from 1/2 hour to 7 1/2 hours, in increments of 1/2 hour. Press the Timer Button (☐) to set the length of time desired. Each time the timer button is pressed, the time is increased by 1/2 hour. After reaching 7 1/2 hours, pressing the timer button once more will reset the Fan to continuous running. The lights on the front of the unit will light up appropriately with the length of time that the Fan is set for.
-
SLEEP: This function allows the unit to be set in Sleep Mode. Pressing the Sleep Button (3) once will set the unit on Low for 6 continuous hours. The Oscillation Button (3) will function when the Fan is in Sleep Mode. Pressing any other button (Timer, Fan Speed or the Power Button) will shut off the Sleep Mode.
-
To turn the Fan OFF, press the Power Button (6) and unplug the unit from the electrical outlet.
Rev. G 10/07
4
2515E3
MODELO 2515
- Install batteries (not supplied) as shown in Figure 6. The battery is size "AAA".
- The Remote Control Power Button is labeled as (1).
- All the functions performed with the Remote Control work identically to the Manual Controls.
- Do not mix old and new batteries. Do not mix alkaline, standard (carbon-zinc) or rechargeable (nickel-cadmium) batteries.
- DO NOT DISPOSE OF BATTERIES IN FIRE. BATTERIES MAY EXPLODE OR LEAK.
If you lose your remote control, please call Customer Service to order a replacement at 1-800-233-0268, Monday through Friday, between the hours of 8:00 a.m. and 5:00 p.m. Eastern.
MODEL 2515
MAINTENANCE
⚠ WARNING To reduce the risk of electrical shock and fire please observe the following instructions:
- Always unplug the cord before moving, servicing or cleaning.
- NEVER place the Fan in or near water.
Clean the Fan only with a vacuum equipped with a brush attachment; the vacuum will remove the lint
and dirt from inside the Fan.
- NEVER attempt to take apart the Fan.
Clean the body of the Fan with a soft cloth only.
- NEVER use ALCOHOL or SOLVENTS such as gasoline, benzene, paint thinner, or other harsh cleaners.
SERVICING: All other servicing, with the exception of general user-maintenance, should be performed by an authorized service representative. Call 1-800-233-0268, Monday through Friday, between the hours of 8:00 a.m. and 5:00 p.m. Eastern for the location of your nearest service center.
STORAGE: Store the Fan with these instructions, in the original carton in a cool, dry place.
LASKO PRODUCTS, INC. LIMITED WARRANTY
(NOT VALID IN MEXICO)
WHAT THIS WARRANTY COVERS. This product is warranted against defects in workmanship and/or materials.
HOW LONG THIS WARRANTY LASTS: This warranty extends only to the original purchaser of the product and lasts for one (1) year from the date of original purchase or until the original purchaser of the product sells or transfers the product, whichever first occurs.
WHAT LASKO WILL DO: During the warranty period, Laske will, at its sole option, repair or replace any part or parts that prove to be defective or replace the whole product with the same or comparable model.
WHAT THIS WARRANTY DOES NOT COVER: This warranty does not apply if the product was damaged or failed because of accident, improper handling or operation, shipping damage, abuse, misuse, unauthorized repairs made or attempted, or the use of the product for commercial or nonresidential service. This warranty does not cover shipping costs for the return of products to Lasko for repair or replacement. Lasko will pay return shipping charges from Lasko following warranty repairs or replacement
ANY AND ALL WARRANTIES, EXPRESSED OR IMPLIED (INCLUDING, WITHOUT LIMITATION, ANY IMPLIED WARRANTY OF MERCHANTABILITY), LAST ONE YEAR FROM THE DATE OF ORIGINAL PURCHASE OR UNTIL THE ORIGINAL PURCHASER OF THE PRODUCT SELLS OR TRANSFERS THE PRODUCT, WHICHEVER FIRST OCCURS AND IN NO EVENT SHALL LASKO'S LIABILITY UNDER ANY EXPRESS OR IMPLIED WARRANTY INCLUDE (I) INCIDENTAL OR CONSEQUENTIAL DAMAGES FROM ANY CAUSE WHATSOEVER, OR (II) REPLACEMENT OR REPAIR OF ANY INFORMATION CONTINUING THE TAXES OF THIS CONDITION, ANY WITHOUT THOSTANDING ANYTHING TO THE CONTRARY, IN NO EVENT SHALL LASKO'S LIABILITY UNDER ANY EXPRESS OR IMPLIED WARRANTY EXCEED THE PURCHASE PRICE OF THE PRODUCT AND ANY SUCH LIABILITY SHALL TERMINATE UPON THE EXPIRATION OF THE WARRANTY PERIOD.
Some state and provinces do not allow limitations on how long an implied warranty lasts, or the exclusion of limitation or incidental or consequential damages, so these exclusions or limitations may not apply to you. This warranty gives you specific legal rights. You may also have other rights which vary from state to state and province to province. Front of purchase is required before a warranty claim will be accepted.
CUSTOMER SERVICE:
Toll-Free (800) 233-0268. Email: producthelp@laskoproducts.com
Our Customer Service team is available to assist you with product questions, service center locations, and replacement parts. They can be reached Monday through Friday, 8am-5pm Eastern. Please have your model number available, as well as the type and style (located on the underside of your product). Please do not return product to place of purchase.
Customer Service Dept., 620 Lincoln Ave., West Chester, PA 19360
(Please do not send product to this location)
www.laskoproducts.com
PARTS FOR DISCONTINUED, OBSOLETE AND CERTAIN OTHER PRODUCTS MAY NOT BE AVAILABLE. DUE TO SAFETY REASONS, MANY ELECTRONIC COMPONENTS AND MOST HEATER COMPONENTS ARE NOT AVAILABLE TO CONSUMERS FOR INSTALLATION OR REPLACEMENT.
Manual printed in China
Innovators in Home Comfort
- WIND TOWER® PLATINUM 40"
- SPACE-SAVER FAN
- READ AND SAVE THESE INSTRUCTIONS
- SAVE THESE INSTRUCTIONS
- WARNING
- GENERAL SAFETY INFORMATION
- ⚠ WARNING
- MODELO 2515
- CONTROL REMOTO (Figura 6)
- MÔDEL 2515
- ASSEMBLY
- MODEL 2515
- OPERATION (Figures 5 and 6)
- Be sure that the plug fits tightly into outlet.
- MAINTENANCE
- LASKO PRODUCTS, INC. LIMITED WARRANTY
- (NOT VALID IN MEXICO)
- CUSTOMER SERVICE:
- Toll-Free (800) 233-0268. Email: producthelp@laskoproducts.com
- www.laskoproducts.com
Brand : Lasko
Model : Wind Tower Platinum 2515
Category : Ventilateur domestique