
EB-65 - Network card CANON - Free user manual and instructions
Find the device manual for free EB-65 CANON in PDF.

| Product Type | Network card for Canon printer |
| Brand | Canon |
| Model | EB-65 |
| Dimensions | 10 x 5 x 1 cm |
| Weight | 50 g |
| Power supply | Via host port (PCI Express or USB) |
| Interface | Ethernet 10/100/1000 Mbps |
| Connectivity | Wired RJ45 network |
| Main functions | Connect a Canon printer to a local network for shared printing |
| Compatibility | Canon laser and inkjet printers with expansion port |
| Safety | Avoid electrostatic discharges during installation; use in a dry environment |
| Maintenance and cleaning | Clean with a soft, dry cloth; do not use liquid or abrasive products |
| Spare parts and repairability | No removable parts; in case of failure, contact Canon customer service |
| Warranty | 2 years |
| Operating temperature | 5°C to 35°C |
| Operating humidity | 20% to 80% (non-condensing) |
| Protection rating | IP20 |
Frequently Asked Questions - EB-65 CANON
User questions about EB-65 CANON
0 question about this device. Answer the ones you know or ask your own.
Ask a new question about this device
Download the instructions for your Network card in PDF format for free! Find your manual EB-65 - CANON and take your electronic device back in hand. On this page are published all the documents necessary for the use of your device. EB-65 by CANON.
USER MANUAL EB-65 CANON
Ethernet Board EB-65
Network Guide
Ethernet Board EB-65 Network Guide

About the Manuals for the Printer
The manuals for this printer are divided as follows. Please refer to them for detailed information.
Installing and setting up the printer.. Connecting the printer to a PC.. Installing options.
Using the printer.
Printer settings.
Maintenance and troubleshooting..
Installing the printer driver.. Printing from a PC.
Controlling the printer via a web browser
Connecting to and setting up a network.
Setup Guide
User's Guide
PCL Driver Guide
Remote UI Guide
Network Guide (This Document)


The manuals supplied with optional equipment are included in the list above. Depending on the system configuration and product purchased, some manuals may be unnecessary for use with this printer.

How the Network Guide Is Organized
Chap 1
Before You Start
Chap 2
Using a TCP/IP Network (Windows/UNIX)
Chap 3
Using a NetWare Network (Windows)
Chap 4
Using a NetBIOS Network (Windows 95/98/Me)
Chap 5
Using an AppleTalk Network (Macintosh)
Chap 6
Appendix
Describes troubleshooting procedures and methods for checking the machine's network settings, provides lists of network menus accessed from the control panel, and lists the principal network specifications of the machine.
Table of Contents
How to Use This Manual
Symbols Used in This Guide .
Abbreviations Used in This Guide .
Trademarks. vi
Chapter1 Before You Start
System Environment Requirements 1-2
System Environment Requirements for Printing 1-2
Checking Your Network Environment 1-4
Sample Windows 95/98/Me/NT/2000 Network 1-4
With a NetWare Server 1-4
Without a NetWare Server 1-5
Sample Macintosh Network 1-6
Sample UNIX Network. 1-6
Using a Network with Various Types of Computers 1-7
Chapter2 Using a TCP/IP Network (Windows/UNIX)
TCP/IP Network Setup Operating Procedures 2-2
Preparation for Protocol Settings 2-3
Settings Using NetSpot 2-3
Settings Using ARP/PING Commands 2-4
Settings from the Control Panel 2-5
Protocol Settings. 2-6
Settings Using NetSpot 2-6
Settings Using a Web Browser (Remote UI) 2-6
Settings Using the FTP Client 2-13
Setting Up a Computer for Printing 2-15
Printer Connection Method (LPD/Raw) 2-16
Windows 95/98/Me. 2-16
Windows 2000 2-19
Windows NT 4.0 2-21
UNIX. 2-23
Printer Connection Method (IPP) 2-26
Windows 95/98/Me. 2-26
Windows 2000 2-27
Print Server Settings 2-29
Printer Management 2-31
Printer Management Using NetSpot 2-31
Printer Management Using Web Browser (Remote UI) 2-31
Printer Management Using the FTP Client 2-31
Receiving E-mail Reports about Printer Status 2-33
Setting the E-mail Report Function 2-34
Chapter3 Using a NetWare Network (Windows)
NetWare Network Setup Operating Procedures 3-2
NetWare Print Service Settings 3-3
Types of Print Service 3-3
Settings Using NetSpot 3-4
Setup Using NetWare Administrator or PCONSOLE. 3-4
Using NetWare Administrator in NDS Queue Server
Mode or Remote Printer Mode (NetWare 4.x or Later) 3-4
UsingPCONSOLEwiththeBinderyModein theQueue
Server Mode or Remote Printer Mode (NetWare 3.x) 3-5
Protocol Settings. 3-8
Printer Protocol Settings 3-8
Setting Up a Computer for Printing 3-9
Connecting to a NetWare Network 3-9
Installing Printer Drivers 3-9
Setting the Printer Destination. 3-9
Chapter4 Using a NetBIOS Network (Windows 95/98/Me)
NetBIOS Network Setup Operating Procedures 4-2
Setting Up a Computer for Printing 4-3
NetBIOS Network Connection Method 4-3
Installing the Printer Driver 4-4
Setting the Printer Destination. 4-4
Chapter5 Using an AppleTalk Network (Macintosh)
AppleTalk Network Setup Operating Procedures. 5-2
Macintosh Network Settings 5-3
Protocol Settings. 5-4
Settings Using NetSpot 5-4
Settings Using a Web Browser (Remote UI) 5-4
Installing Printer Drivers. 5-9
Chapter6 Appendix
Troubleshooting. 6-2
How to Delete Software. 6-6
LPR Port Utility Deletion 6-6
NetBIOS/NetBEUI Port Monitor Utility Deletion 6-7
Network Setting Items 6-8
The Available Software for Network Settings 6-12
Index 6-13
Symbols Used in This Guide

IMPORTANT
Indicates important items or prohibited actions that should always be observed when operating the machine. These should always be read to avoid damage to the machine or improper operation.

NOTE
Indicates items for reference or supplementary information that should be noted by users.
Key and button names are shown in this manual as follows:
Keys on the printer control panel.[Go]
Tool buttons on the tool bar

(Print)
Abbreviations Used in This Guide
In this guide:
Microsoft® Windows® 95 is referred to as Windows 95.
Microsoft® Windows® 98 is referred to as Windows 98.
Microsoft® Windows® Millennium Edition is referred to as Windows Me.
Microsoft® Windows NT® is referred to as Windows NT.
Microsoft® Windows® 2000 is referred to as Windows 2000.
Microsoft® Windows® Operating System is referred to as Windows.
PostScript® 3 emulation is referred to as PS.
Novell NetWare® is referred to as NetWare.
Canon, the Canon logo and NetSpot are trademarks of Canon Inc.
Adobe, Acrobat, PostScript, and PostScript 3 are trademarks of Adobe Systems Incorporated.
Apple, AppleTalk, Macintosh, and Mac OS are trademarks of Apple Computer, Inc.
PCL, HP, and HP-UX are trademarks of Hewlett-Packard Company.
IBM is a trademark of International Business Machines Corporation.
Linux is a trademark of Linus Torvalds.
Microsoft, MS-DOS, the Windows logo, Windows, and Windows NT are registered trademarks of Microsoft Corporation in the United States and/or other countries.
Netscape is a trademark of Netscape Communications Corp.
NetWare® and Novell are registered trademarks of Novell, Inc.
IPX/SPX, NDS, NDPS, and Novell Client are trademarks of Novell Inc.
©1996 Novell, Inc., all rights reserved.
Red Hat is a trademark of Red Hat Software, Inc.
Solaris, Sun, SunOS, and Sun Microsystems are trademarks of Sun Microsystems in the United States and/or other countries.
Turbolinux and its logo are trademarks of Turbolinux, Inc.
UNIX is a registered trademark exclusively licensed to X/Open Company, Ltd. in the United States and/or other countries.
Ethernet is a trademark of Xerox Corporation.
Other product and company names herein may be the trademarks of their respective owners.
Copyright 2001 by Canon, Inc. All rights reserved.
No part of this publication may be reproduced or transmitted in any form or by any means, electronic or mechanical, including photocopying and recording, or by any information storage or retrieval system without the prior written permission of Canon, Inc.
Before You Start
1
CHAPTER
This chapter describes what you need to know before you start using the printer, including the network environments with which the printer is compatible, and how to check the network environment you are using.
System Environment Requirements 1-2
System Environment Requirements for Printing 1-2
Checking Your Network Environment 1-4
Sample Windows 95/98/Me/NT/2000 Network 1-4
Sample Macintosh Network 1-6
Sample UNIX Network 1-6
Using a Network with Various Types of Computers 1-7
System Environment Requirements
This section describes the system environments with which the printer is compatible.
System Environment Requirements for Printing
The following network and system environments are compatible when printing with the machine.
■ Printing with a TCP/IP Network:
| Compatible OS: | Microsoft Windows 95/98/Me |
| Microsoft Windows NT Server 4.0 | |
| Microsoft Windows NT Workstation 4.0 | |
| Microsoft Windows 2000 Server | |
| Microsoft Windows 2000 Professional | |
| Solaris Version 1.1x (SunOS Version 4.1x) or later | |
| Solaris Version 2.5x (SunOS Version 5.5x) or later | |
| HP-UX Version 10.x or later | |
| IBM-AIX Version 4.x or later | |
| Red Hat Linux 6.1 or later | |
| Turbolinux 4.0 or later | |
| Compatible Computers: | Windows 95/98/Me/NT/2000; IBM PC/compatible |
■ Printing with a NetWare Network:
Compatible Servers: Novell NetWare Version 3.2/4.1/4.11/4.2/5.0/5.1
Compatible Clients: Microsoft Windows 95/98/Me
Microsoft Windows NT Server 4.0
Microsoft Windows NT Workstation 4.0
Microsoft Windows 2000 Server
Microsoft Windows 2000 Professional
Compatible Computers: IBM PC/compatible
■ Printing with a NetBIOS Network:
Compatible OS: Microsoft Windows 95/98/Me
Compatible Computers: IBM PC/compatibles
Required Memory for Computers: More than 16MB
■ Printing with an AppleTalk Network:
Compatible OS: Mac OS 7.5 or later
Compatible AppleTalk: EtherTalk Phase 2
- If you are using Windows NT 4.0, install Service Pack 5 or later.
Checking Your Network Environment
Refer to the following diagram example to confirm the network environment that is connected to the printer, and then perform the necessary operations.
Sample Windows 95/98/Me/NT/2000 Network
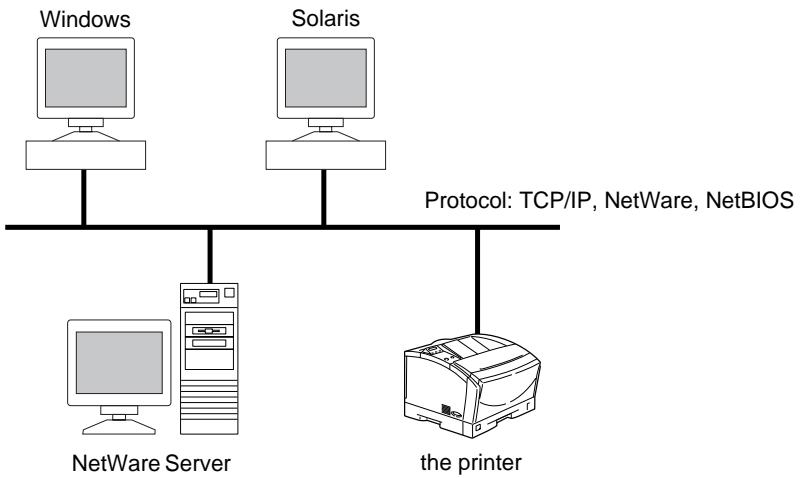
With a NetWare Server
In a network environment like the one below, a NetWare, TCP/IP, or NetBIOS protocol can be used for printing. Multiple protocols can also be used at the same time. NetBIOS is available only for Windows 95/98/Me.
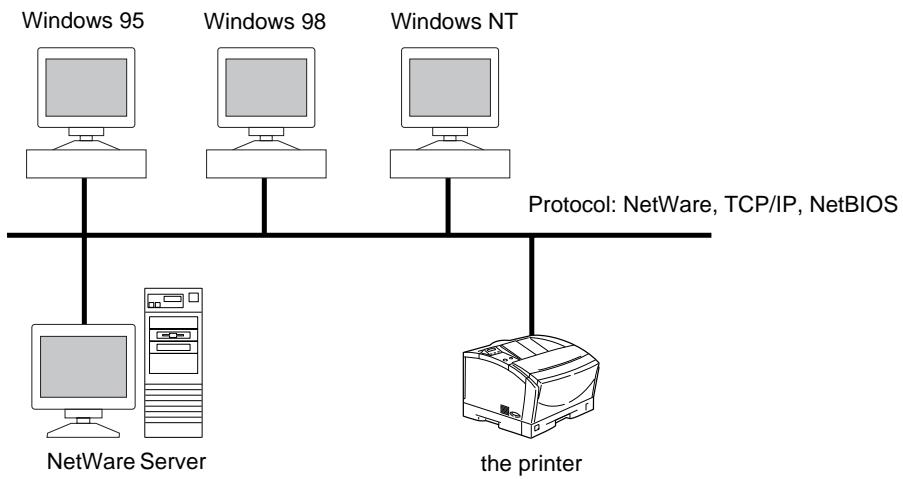
Depending on the protocol, see the following:
Chapter 2 Using a TCP/IP Network (Windows/UNIX)
Chapter 3 Using a NetWare Network (Windows)
Chapter 4 Using a NetBIOS Network (Windows 95/98/Me)
Without a NetWare Server
In a network environment like the one below, either TCP/IP or NetBIOS protocol can be used. Multiple protocols can also be used at the same time. NetBIOS is available only for Windows 95/98/Me.
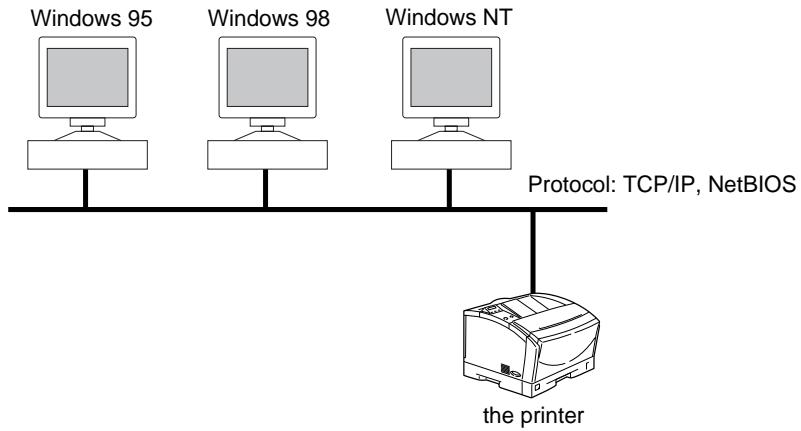
Depending on the protocol, see the following:
Chapter 2 Using a TCP/IP Network (Windows/UNIX)
Chapter 4 Using a NetBIOS Network (Windows 95/98/Me)

NOTE
- Once you set up a network printer, each computer can output directly to it. Using TCP/IP protocol with Windows 2000 or Windows NT as a print server provides efficient management of your network printer. For the detailed procedure, see "Print Server Settings," on p.2-29.
- In a network comprising only Windows 95/98/Me that does not use the TCP/IP protocol, you can only use NetBIOS protocol to specify basic settings.
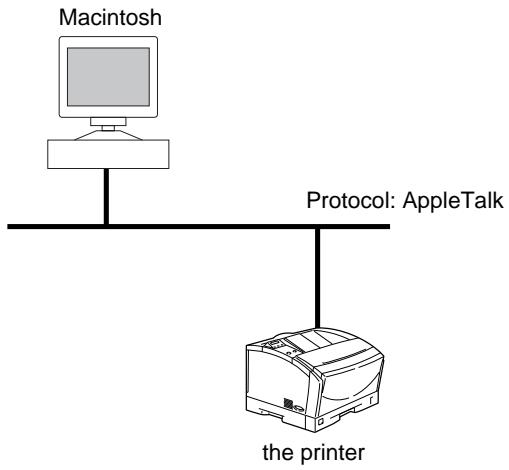
Sample Macintosh Network
With Macintosh computers, the AppleTalk (EtherTalk) protocol is used for printing. (See "Chapter 5 Using an AppleTalk Network (Macintosh).")
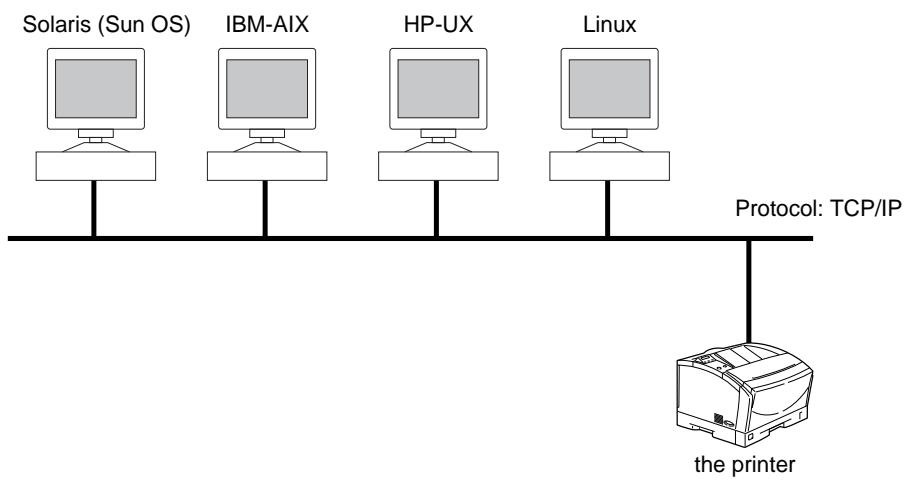
Sample UNIX Network
With UNIX computers, the TCP/IP protocol is used. (See "Chapter 2 Using a TCP/IP Network (Windows/UNIX).")
Using a Network with Various Types of Computers
When there are various types of computers on the network, network operations depend on the type of computer being used.
For example, if you are using Windows 98 and UNIX computers, specify the settings described in both "Sample Windows 95/98/Me/NT/2000 Network," on p.1-4 and "Sample UNIX Network," on p.1-6.
Depending on the protocol, see the following:
Chapter 2 Using a TCP/IP Network (Windows/UNIX)
Chapter 3 Using a NetWare Network (Windows)
Chapter 4 Using a NetBIOS Network (Windows 95/98/Me)
Using a TCP/IP Network (Windows/UNIX)
This chapter describes the settings and procedures necessary to connect and use the printer with a TCP/IP network.
TCP/IP Network Setup Operating Procedures 2-2
Preparation for Protocol Settings 2-3
Settings Using NetSpot 2-3
Settings Using ARP/PING Commands 2-4
Settings from the Control Panel 2-5
Protocol Settings. 2-6
Settings Using NetSpot 2-6
Settings Using a Web Browser (Remote UI) 2-6
Settings Using the FTP Client. 2-13
Setting Up a Computer for Printing. 2-15
Printer Connection Method (LPD/Raw) 2-16
Printer Connection Method (IPP) 2-26
Print Server Settings 2-29
Printer Management 2-31
Printer Management Using NetSpot. 2-31
Printer Management Using Web Browser (Remote UI) 2-31
Printer Management Using the FTP Client 2-31
Receiving E-mail Reports about Printer Status 2-33
Setting the E-mail Report Function. 2-34
To use a TCP/IP network, it is necessary to perform the following procedure.
1 Network Board Installation and Cable Connection (See the EB-65 Setup Guide)
Install the network board to the printer, and then connect the network cables in accordance with the EB-65 Setup Guide.

2 Preparation for Protocol Settings (See Preparation for Protocol Settings, on p.2-3)
Specify the printer protocol settings for communication between the printer and computers using the printer. Any of the following can be used to specify the settings.
- NetSpot (Canon software provided with the EB-65 Network Board package)
- ARP/PING commands
- Printer control panel (only in the Administrator Mode)

3 Protocol Settings (See "Protocol Settings," on p.2-6)
Specify the printer protocol settings. Use any of the following software to specify the settings on the computer.
- NetSpot
Web browser (Remote UI) - FTP client

4 Computer Settings for Printing (See Setting up a Computer for Printing, on p.2-15)
Specify the settings for each computer you use for printing.

IMPORTANT
- It is recommended that the network manager perform steps 1, 2, and 3 above.
-
If you are printing using a TCP/IP network, you can use the following print applications.
-
LPD
- FTP
- Raw (Windows 2000 only)
- IPP (Windows 95/98/Me/2000 only)
- This printer does not come with printer driver software that can be used for each UNIX platform.
Before you specify the printer protocol settings, it is necessary to specify the printer IP address to enable communication between the printer and your computers. You can use either of the following to specify the settings. Specify the settings using the easiest method.
- NetSpot (Canon software provided with the EB-65 Network Board package)
- ARP/PING commands
- Printer control panel (only in the Administrator Mode)

IMPORTANT
-
In the following operations in this section, the printer MAC address is necessary. For checking the MAC address, from the printer control panel, follow the procedure below to make a test print.
-
Press [Go] on the printer control panel; the ONLINE LED goes off.
- Press [Menu] several times until
appears. - Press [Item] several times until
appears in the second line in the display. -
Press [Enter].
-
Before you perform the following operations in this section, check that the printer is on and connected to the network.
- If you are using NetSpot or ARP/PING commands, the following steps directly allocate the IP address to the printer. For this printer, in addition to direct allocation of the IP address to the printer, you can use DHCP, BOOTP, or RARP to specify the IP address. When the printer is started or reset, it checks whether DHCP, BOOTP, or RARP is being used, and then allocates the IP address using the first available setting method. Because the printer IP address is automatically allocated at this time, it is not necessary for you to perform the following operations in this section. However if you are reallocating the IP address, or if DHCP, BOOTP, or RARP cannot be used, perform the following operations in this section.
Settings Using NetSpot
You can use NetSpot on the CD-ROM provided with the EB-65 Network Board package to specify the protocol settings on the computer you are using.
See the NetSpot Quick Start Guide for how to install NetSpot and specify the protocol settings using NetSpot.
- The NetSpot Quick Start Guide is an on-line manual, included on the CD-ROM provided with the EB-65 Network Board package. You can use Adobe Acrobat Reader to display and print out the guide.
Settings Using ARP/PING Commands
1 Start up the MS-DOS prompt or the Command prompt.
If you are using UNIX, display the console screen, and then log in as a superuser.
2 Execute the following command to add a static entry to the arp table.
arp -s
IP Address: Specify the IP Address you want to allocate to the printer. The IP address consists of 4 numbers ranging from 0 to 255 with ".” as the breakpoint.
MAC Address: Specify the MAC Address of the printer. Every second digit is separated by “-” (“.” for UNIX).
Input Example (Windows): arp -s 172.20.88.125 00-00-85-05-70-31
Input Example (UNIX): arp -s 172.20.88.125 00:00:85:05:70:31
NOTE
- If you are using IBM-AIX, enter "arp -s ether
."
3 Execute the applicable command below to set the IP address to the network board.
ping
ping -s
ping
ping
ping -s 479
ping -s 480
IP Address: Specify the same address as the IP address as you specified in step 2 above.
Input Example (Windows): ping 172.20.88.125 -1 479

NOTE
The character in "I" is the alphabet letter "I."
- The Subnet Mask and Gateway Address are set as <0.0.0.0> .
The preparation for printer protocol settings are completed.
Settings from the Control Panel
1 Press [Go] on the control panel.
The ONLINE LED goes off.
2 Press [Menu] several times until appears in the display, and then press [Enter].
NOTE
-
Specify the IP address, subnet mask, and gateway address as follows:
-
Press [Item] several times until you see the item in the display, and then press [Enter].
- Enter the address with [Value], and then press [Enter].
3 Press [Go] to bring the printer back online.
You can specify the printer protocol settings on the computer using any of the following software. Specify the settings using the easiest method.
- NetSpot (Canon software provided with the EB-65 Network Board package)
Web browser (Remote UI) - FTP client
Settings Using NetSpot
You can use NetSpot on the CD-ROM provided with the EB-65 Network Board package to specify the protocol settings on the computer you are using.
See the NetSpot Quick Start Guide for how to install NetSpot and specify the protocol settings using NetSpot.

NOTE
- The NetSpot Quick Start Guide is an on-line manual, included on the CD-ROM provided with the EB-65 Network Board package. You can use Adobe Acrobat Reader to display and print out the guide.
Settings Using a Web Browser (Remote UI)

Start the web browser, enter the URL below in Location or Address, and then press the Enter key.
http://
Input Example: http://172.20.88.125/

IMPORTANT
- For your web browser, use Netscape Navigator/Communicator 4.04 or later, or Internet Explorer 4.01SP1 or later.
- If you are using Turbolinux 4.0, you cannot set this printer's protocol settings through Netscape Communicator 4.08. Use a different version web browser.
- If you are using a connection via a proxy server, use the following settings. (The settings differ depending on the network environment.)
- When configuring your web browser to use the proxy server, add the IP address of the printer to Exception (the address not using the proxy server).
-
Set up the web browser to accept cookies.
-
If you are starting more than one Remote UI at the same time, only the last setting specified will be valid. It is recommended that you start only one Remote UI.
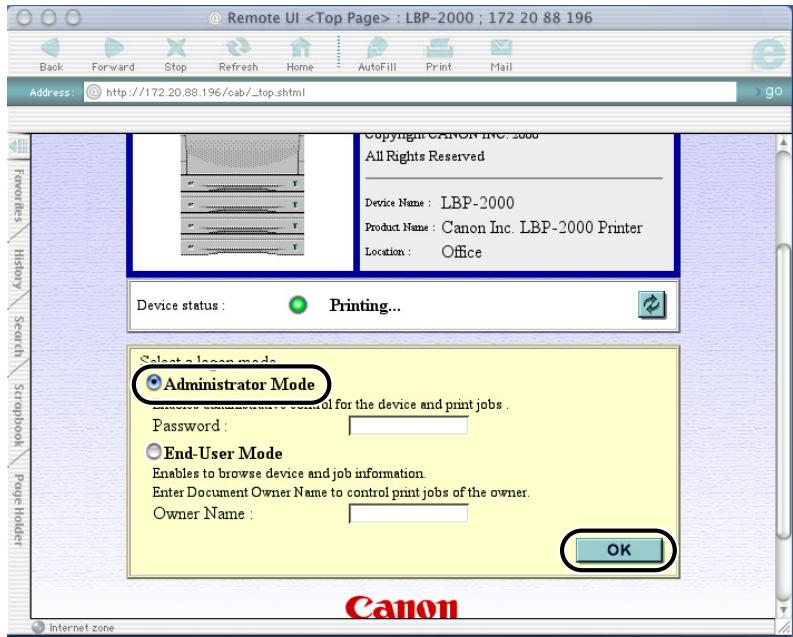
2 Select Administrator Mode, and then click the OK button.
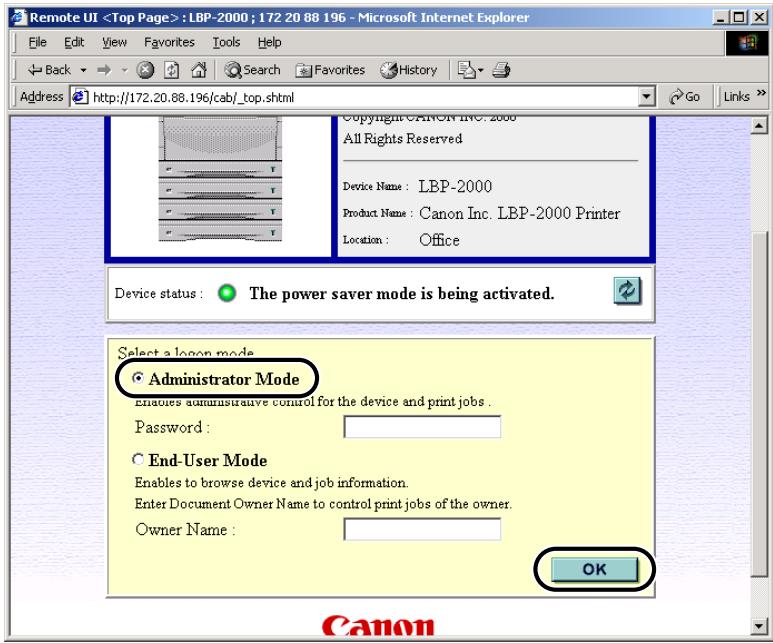
The Remote UI starts.

NOTE
- If a password has been set for the printer, enter the password, and then click the OK button. If no password has been set, it is not necessary to enter a password.
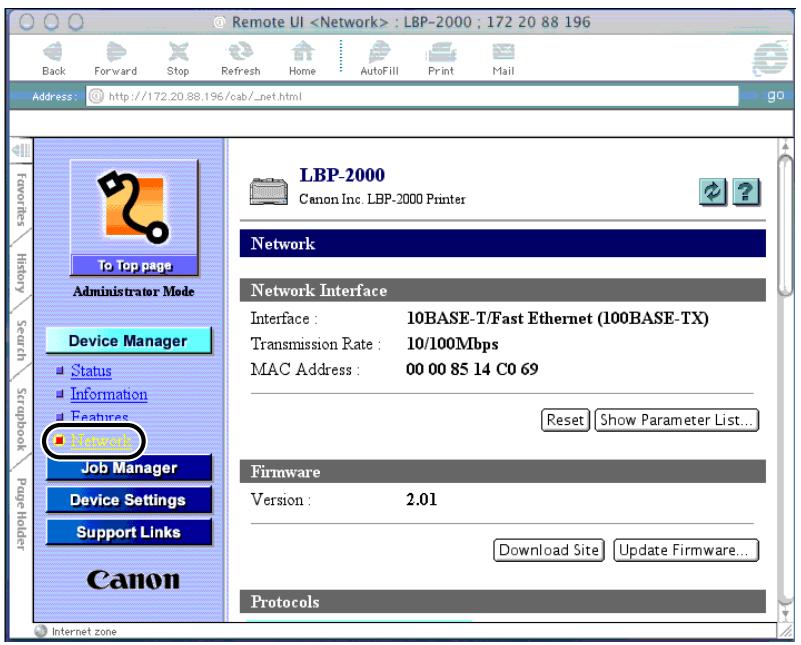
3 Under Device Manager on the left side of the screen, click Network.
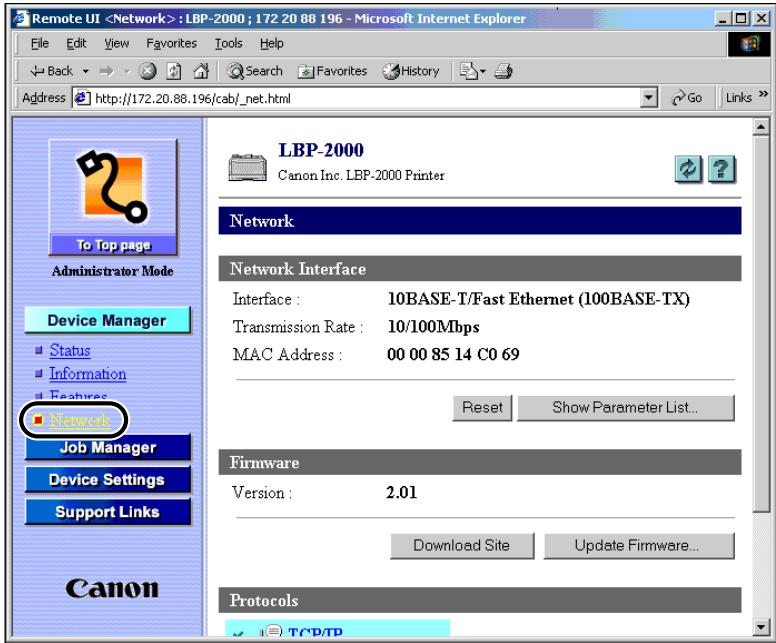
The Network page is displayed.

Click the Edit... button at the right of TCP/IP.
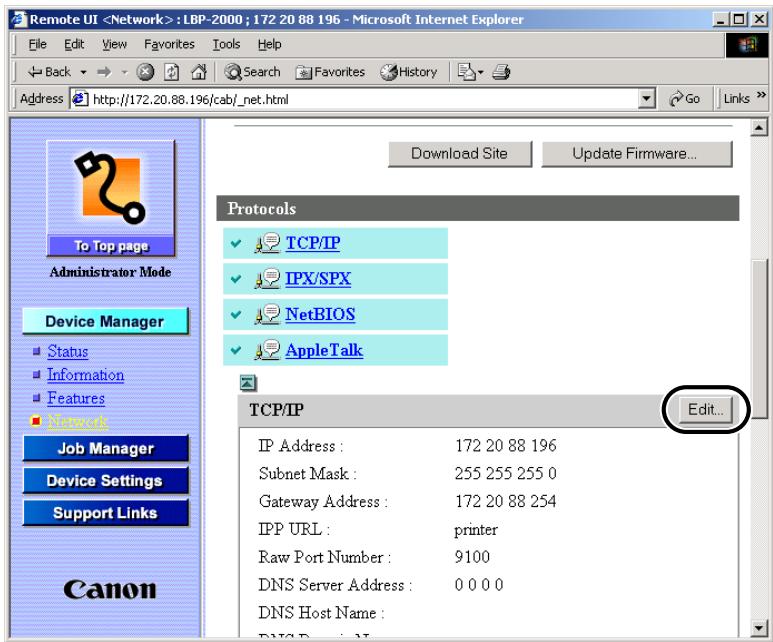
The Edit TCP/IP Protocol Settings page is displayed.
5 From Frame Type, select Ethernet II.
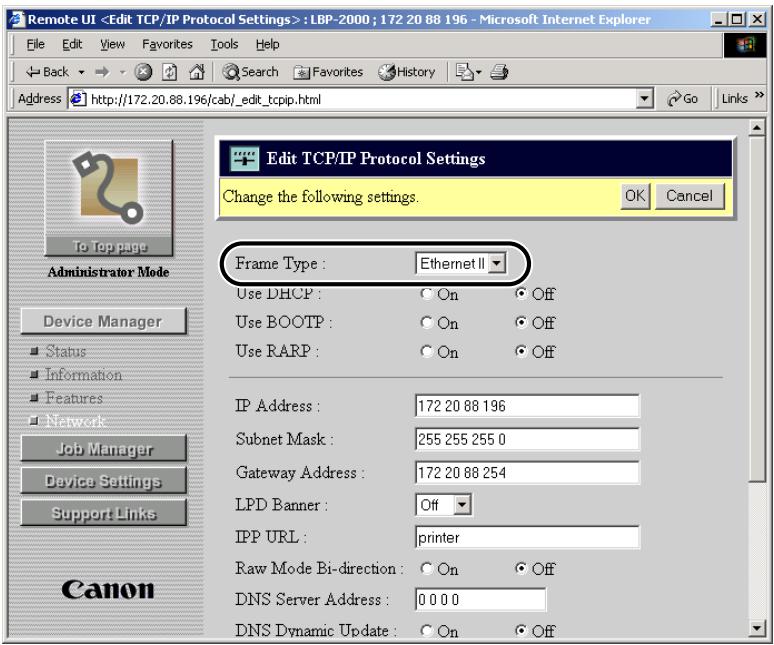
NOTE
- If you select Disabled, the network board is not recognized by the TCP/IP network.
- To use a printer set as Off, see "Preparation for Protocol Settings," on p.2-3.
6 Specify the setting method for the printer IP address.
Under Use DHCP, Use BOOTP, and Use RARP, select On to use for the IP address setting.
When selecting Off for Use DHCP, Use BOOTP, and Use RARP, the printer does not check the protocols.
If neither DHCP, BOOTP, nor RARP can be used, the IP address specified in IP Address is allocated.
IMPORTANT
- For this printer, in addition to direct allocation of the IP address to the printer, you can use DHCP, BOOTP, or RARP to specify the IP address. When the printer is started or reset, it checks whether DHCP, BOOTP, or RARP is being used, and then allocates the IP address using the first available setting method.
NOTE
- Checking whether DHCP, BOOTP or RARP can be used takes about 1 to 2 minutes; it is recommended you set unused protocols to
. - Depending on whether you use DHCP, BOOTP, or RARP to allocate the IP address, you need to start the DHCP server, BOOTP daemon, or RARP daemon.
7 Specify the "IP Address," "Subnet Mask," and "Gateway Address" settings.
In IP Address, enter the printer IP address. In Subnet Mask and Gateway Address, enter the subnet mask and gateway address used by the TCP/IP network.
NOTE
- If you are using DHCP, BOOTP, or RARP, some of the items above are not used. The values obtained from DHCP, BOOTP, or RARP are used.
8 From LPD Banner, select the type of output for the banner page (the separator page of each print job).
- Auto: The banner page is enabled only for print jobs set to output a banner page, and disabled for print jobs not set to output a banner page.
- On (final insertion): The banner page is always enabled, regardless of the banner page output settings. The banner page is output on the last page.
- Off: The banner page is always disabled, regardless of the banner page output settings.
NOTE
- Depending on the OS or LPR being used, it may not be possible to specify the banner page output settings. If this occurs, you can specify the settings for banner page output by selecting items other than Auto.
9 In IPP URL and Raw Mode Bi-direction, specify the IPP and Raw settings.
Normally, there is no need to make changes.
10 If you are using DNS, specify the DNS settings.
Enter the IP address of the DNS server in DNS Server Address.
Enter the domain name belonging to the printer in DNS Domain Name.
Input Example: sales_dept.xyz_company.co.jp
NOTE
-
The printer uses DNS in the following cases.
-
When the DNS dynamic update function is used (when DNS Dynamic Update is set to <On> in step 11).
- When the SMTP server name is specified (when the SMTP server is specified by name in step 12).
11 To use the DNS dynamic update function, select On from DNS Dynamic Update, and then specify the following item settings.
In DNS Host Name, enter the host name of this printer.
Input example: salesPrinter
In DNS Domain Name, enter the domain name of this printer.
Input example: sales_dpt.xyz_company.co.jp
NOTE
- The DNS dynamic update function automatically registers to the DNS server the names specified in DNS Host Name and DNS Domain Name for the printer IP address.
- When using this function, specify the DNS settings in step 10.
- You can use this function in an environment including a DNS server that can perform dynamic registration (dynamic DNS server).
- With this function, by using LPR to specify the "DNS Host Name" and "DNS Domain Name" settings, you can use the printer without specifying the IP address of the printer.
12 To use the E-mail Report function, specify the mail server settings.
- When you do not specify the DNS settings in step 10
Enter the IP address of the mail server in SMTP Server Address.
Enter the domain name of this printer in DNS Domain Name.
Input Example: sales_dept.xyz_company.co.jp
- When you specify the DNS settings in step 10
Enter the server name of the mail server in SMTP Server Address.
Input Example: mail_server.sales_dept.xyz_company.co.jp
Enter the domain name of this printer in DNS Domain Name.
Input Example: sales_dept.xyz_company.co.jp
NOTE
- The printer offers the E-mail Report function whereby printer status information such as a paper jam are transmitted by e-mail. To use this function, you need to specify more detailed settings. (See "Receiving E-mail Reports about Printer Status," on p.2-33.)
13 Click the OK button.
The settings become valid after you reset the print server or restart the printer. To reset the print server, under Device Manager, select Network, and then click the Reset button.
The protocol settings are completed.
Settings Using the FTP Client
1 Start up the MS-DOS prompt or the Command prompt.
If you are using UNIX, display the console screen.
2 Execute the following command.
ftp
3 Enter root as the user name.
- If a password is set for the printer
Enter the password set for the printer.
- If no password is set
Press the Enter key without entering a password.
NOTE
- You can log in using a user name other than "root" (blank, etc.). However, you cannot specify settings; you can only perform operations.
- You cannot log in as Anonymous.
4 Execute the following command to download the config file.
get config
5 Edit the downloaded config file using Notepad, etc.
For an explanation of each item, see "Network Setting Items," on p.6-8.
6 Execute the following command to upload the config file.
7 To confirm the settings, execute the following command to reset the print server.
You can also confirm the settings valid by restarting the printer.
get reset
The protocol settings are completed.
After you have completed the protocol settings of the printer, you are ready to set up each of the computers for printing.
Connecting to a TCP/IP Network
All computers that use the printer must have TCP/IP client software installed and must be enabled for TCP/IP network use. For details, see the manuals provided with the operating system.
■ Installing the Printer Driver and Specifying the Printer Destination Setting
NetSpot is software for specifying printer and network settings. To print from a computer, you must install a printer driver and specify a setting for the printer destination. The printer destination setting differs depending on the print application used for printing. Use the following information as a guide to determine the print application you are using, and then perform the necessary operations.
LPD
This is the print application generally used with TCP/IP. See the following to install the printer driver and to specify the printer destination setting. "Printer Connection Method (LPD/Raw)," on p.2-16
- Raw
This is a print application used with Windows 2000. It can print at higher speeds than LPD. See the following to install the printer driver and to specify the printer destination setting. "Printer Connection Method (LPD/Raw)," on p.2-16
- IPP
This is a print application that can be used with Windows 95/98/Me/2000. It uses the http protocol to print using internet/intranet connections. See the following to install the printer driver and specify the printer destination setting. "Printer Connection Method (IPP)," on p.2-26
- FTP
This is a print application that prints files by copying them to the printer using FTP client software. See the following.
"Printer Management," on p.2-31

NOTE
- Configuration of Windows 2000 or Windows NT as a print server provides efficient management of your network printer. For the detailed procedure, see "Print Server Settings," on p.2-29.
Windows 95/98/Me
1 Install the printer driver. (See the PCL Driver Guide.)
When the dialog box for selecting the printer destination appears, select Local printer. Do not select a Network printer.
The port selection can be changed after installation. You can select any port, such as LPT1.
2 Install the LPR Port Utility from the CD-ROM supplied with the EB-65 Network Board package.
Insert the CD-ROM supplied with the EB-65 Network Board package into the CD-ROM drive.
Double-click the My Computer icon.
Right-click the CD-ROM drive icon, and then click Open on the pop-up menu.
Double-click the LPRPORT folder.
Double-click the Setup icon. In some environments this icon appears as Setup.exe. The Install program starts.
Follow the instructions to install the LPR Port Utility.

IMPORTANT
- Depending on your environment, the CD-ROM menu is displayed when you insert the CD-ROM into the CD-ROM drive. In this case, click the Finish button, and then perform step 2.
3 Open the Printer Properties dialog box.
On the Start menu, point to Settings, and then click Printers.
Right-click the printer icon you installed in step 1.
On the pop-up menu, click Properties.
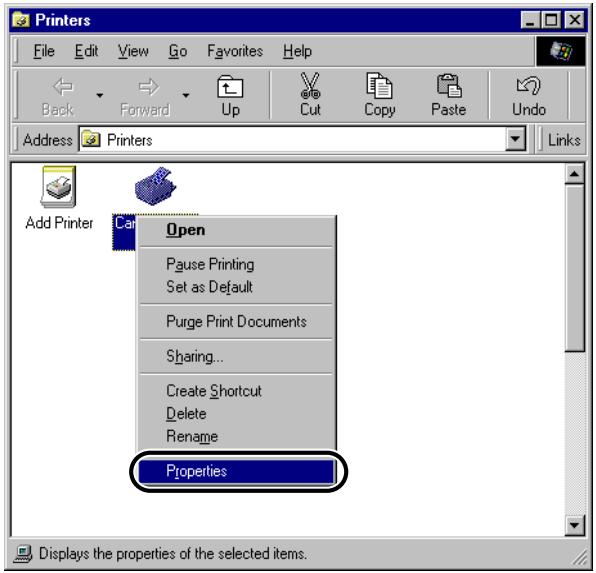
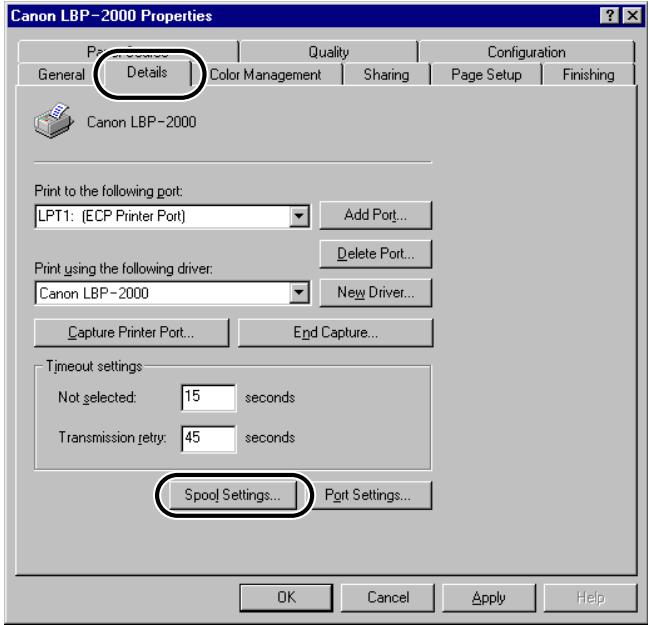
4 Specify the Spool settings.
Click the Details tab to display the Details sheet.
Click the Spool Settings... button to open the Spool Settings dialog box.

▼ Select Spool print jobs so program finishes printing faster.
Click the OK button.
5 Specify the Port settings.
Click the Add Port... button to open the Add Port dialog box.
Select Other.
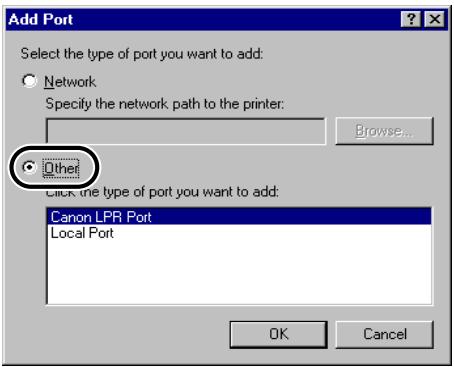
Under Click type of port you want to add, select CANON LPR Port, and then click the OK button.
The Add LPR Port dialog box opens.
Enter the printer host name or IP address in Host Name or IP Address.
Enter "Ip" in Printer Name, and then click the OK button.

IMPORTANT
- Before setting the port, check that the printer is connected to the network, and that the printer is turned on.
6 Click the OK button to enable the settings.
The printer destination settings are completed.
Windows 2000
1 Install the printer driver. (See the PCL Driver Guide.)
When the dialog box for selecting the printer connection method appears, select Local printer, and then deselect Automatically detect and install Plug and Play printer. Do not select a Network printer.
The port selection can be changed after installation. You can select any port, such as LPT1.
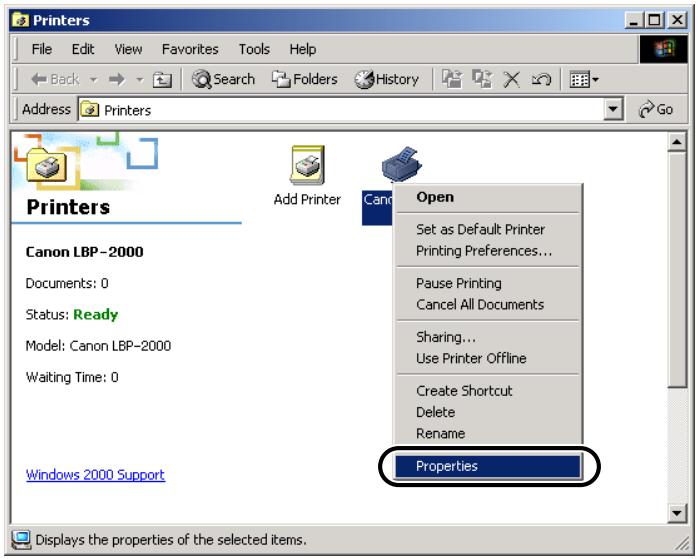
2 Open the Printer Properties dialog box.
On the Start menu, point to Settings, and then click Printers.
Right-click the icon of the printer you want to use for printing.
On the pop-up menu, click Properties.
3 Set up the printing destination.
Click the Ports tab to display the Ports sheet.
Click the Add Port... button to open the Printer Ports dialog box.

▼ From Available Printer Ports Types, select Standard TCP/IP Port, and then click the New Port... button.
The Add Standard TCP/IP Printer Port Wizard starts.
Click the Next button.
In Printer Name or IP Address, enter the printer IP address or printer host name, and then click the Next button.
After the computer has confirmed that there is a printer at the IP address you entered, the Completing the Add Standard TCP/IP Printer Port Wizard window appears. If the dialog box displays
Click the Finish button.
Click the Close button to close the Printer Port dialog box.
4 If you are using LPD, change the port configuration information.
Click the Configure Port... button.
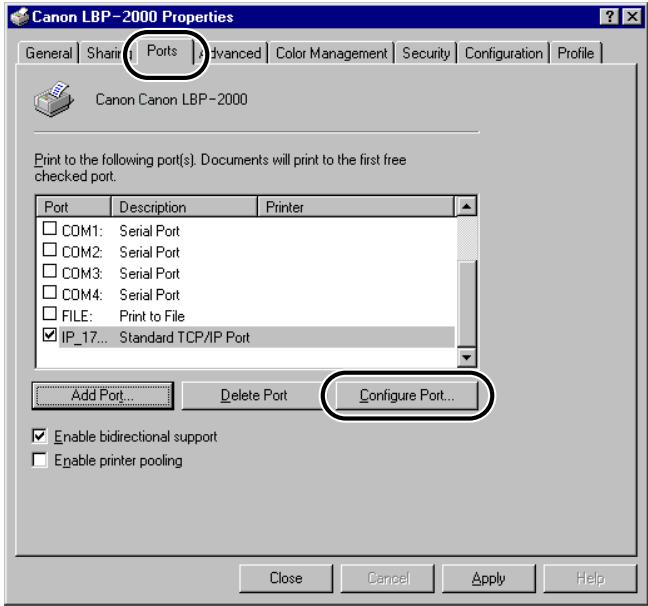
▼ Select LPR under Protocol, enter "lp" in Queue Name under LPR Settings, and then click the OK button.

NOTE
- If you are using Raw, this step is not required.
5 Click the OK button to enable the settings.
The printer destination settings are completed.
Windows NT 4.0
1 Check that Microsoft Windows TCP/IP Printing is installed.
Right-click the Network Neighborhood icon on the screen, and then click Properties.
Click the Services tab to display the Services sheet.

NOTE
- If Microsoft TCP/IP Printing is not included in Network Services, proceed to step 2; otherwise skip to step 3.
2 If Microsoft TCP/IP Printing is not installed, install it.
Click the Add... button.
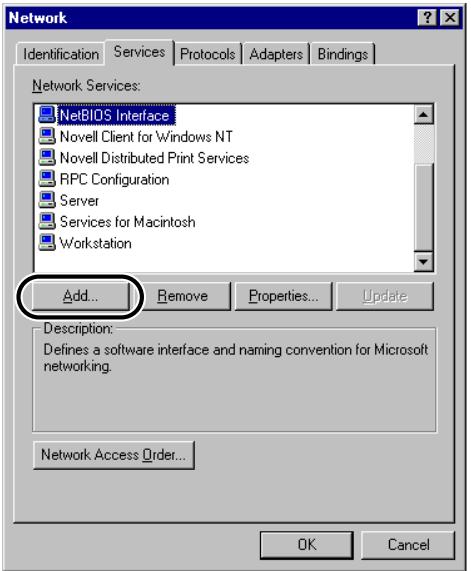
▼ Select Microsoft TCP/IP Printing from Network Services, and then click the OK button.
▼ When asked to insert the Windows NT setup disk, insert the disk, and then continue.
After the files have been copied, the Network dialog box opens.
Click the OK button.
Click the Restart button to restart Windows NT.
3 Install the printer driver. (See the PCL Driver Guide.)
When the dialog box for selecting the printer management appears, select My Computer. Do not select a Network printer server.
The Port selection can be changed after installation. You can select any port, such as LPT1.
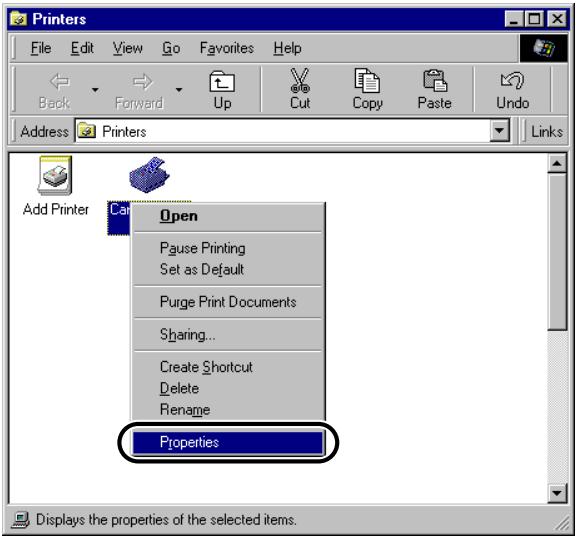
4 Open the Printer Properties dialog box.
On the Start menu, point to Settings, and then click Printers.
Right-click the printer icon you want to use for printing.
On the pop-up menu, click Properties.

5 Set up the printing destination.
Click the Ports tab to display the Ports sheet.
Click the Add Port... button to open the Printer Port dialog box.
▼ From Available Printer Ports, select LPR Port, and then click the New Port... button.
The Add LPR compatible printer dialog box opens.
Enter the IP address or printer host name in Name or address of server providing lpd.
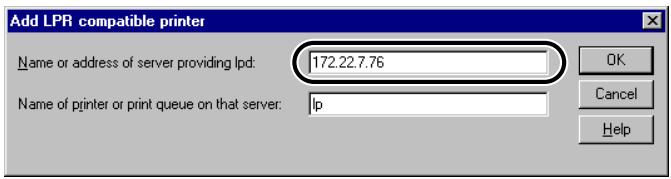
Enter "lp" in Name of printer or print queue on that server, and then click the OK button.
6 Click the OK button to enable the settings.
The printer destination settings are completed.
UNIX
NOTE
- Printing using LPD is explained below. For an explanation of the printing procedure using FTP, see "Printer Management," on p.2-31.
1 Log in to a workstation as a superuser.
2 Set up the spooling system.
Example using Solaris 1.x
Add the following to the /etc/printcap file:
<Print queue name>l</comment>:\
:lp=<device special file>\
:sd=<spool directory>\
:rm=<printer IP address or host name>:
Input example:
print_queue_namelcomments:\
:lp=/var/spool/print_queue_name/.null:\
:sd=/var/spool/print_queue_name:\
:rm=printer_host_name:
Example using Solaris 2.x
Start the admintool utility.
▼ Select Browse → Printers.
▼ Select Edit → Add. Select Access to Printer...
In Printer Name, enter the desired print queue name.
In Print Server, enter the printer host name or IP address.
Click the OK button.
- Example using Red Hat Linux
Start the Printer Configuration utility on the Control Panel.
▼ Select Add → Other Unix (Ipd) Queue, and then press the OK button.
In Printer Name, Remote Host, and Remote Queue, enter the desired print queue name, Print IP address or name, and "lp."
To use a filter, select the filter. If there is no appropriate filter for your printer, temporarily select a filter, exit the Printer Configuration utility, and then change the postscript.cfg file in the spool directory to match your printer. For details, see the ghostscript manual.
- Example using Turbolinux
Execute the turboprintcfg command.
▼ Select Add → Remote LPD Queue, and then click the OK button.
Enter the desired print queue name, and then select Continue.
▼ Select Configure... from LPD Settings, then enter the printer host name or IP address in Remote Host name, and "lp" in Remote Queue.
Return to the initial screen, and then select Save and Exit.
▼ When you do not use a filter, open the /etc/printcap file, and then delete one line starting with “:if=” in the added print queue's section.
▼ When you use a filter, change the postscript.cfg file in the spool directory to match your printer. For details, see the ghostscript manual.
Example using HP-UX
Start the SAM utility.
▼ Select Printers and Plotters → Printers/Plotters from the menu.
▼ Select Add Remote Printer/Plotter... from the Actions menu.
Enter the desired Print queue name in Printer Name, and printer host name or IP address in Remote System Name.
Enter "Ip" in Remote Printer Name.
▼ Select Remote Printer is on a BSD System.
Click the OK button.
- Example using IBM-AIX
Start the SMIT utility.
▼ Select Print Spooling → Print Queue Addition, and then select Remote.
▼ Select Standard Process Addition.
Enter the desired additional Print queue name in Queue Name, and printer host name or IP address in Remote Server Host Name.
Enter "Ip" in Remote Server Queue Name.
Enter "BSD" in Remote Server Print Spooler Type.
NOTE
- The admintool utility, SAM utility, and SMIT utility are utilities provided with the OS. For details or their use, see the User's Guide of each OS.
- The above procedures are only examples. The setup procedures for your environment may differ.
The host computer settings are completed.
Windows 95/98/Me
1 Install the IPP Client software for Windows 95/98/Me provided by Microsoft, and then restart your computer.
2 Install the printer driver. (See the PCL Driver Guide.)
When the dialog box for selecting the printer destination appears, select Local printer.
The port selection can be changed after installation. You can select any port, such as LPT1.
3 Open the Printer Driver Properties dialog box.
On the Start menu, point to Settings, and then click Printers.
Right-click the icon of the printer you want to use for printing.
On the pop-up menu, click Properties.
4 Specify the Port settings.
Click the Details tab to open the Details sheet.
Click the Add Port... button to open the Add Port dialog box.
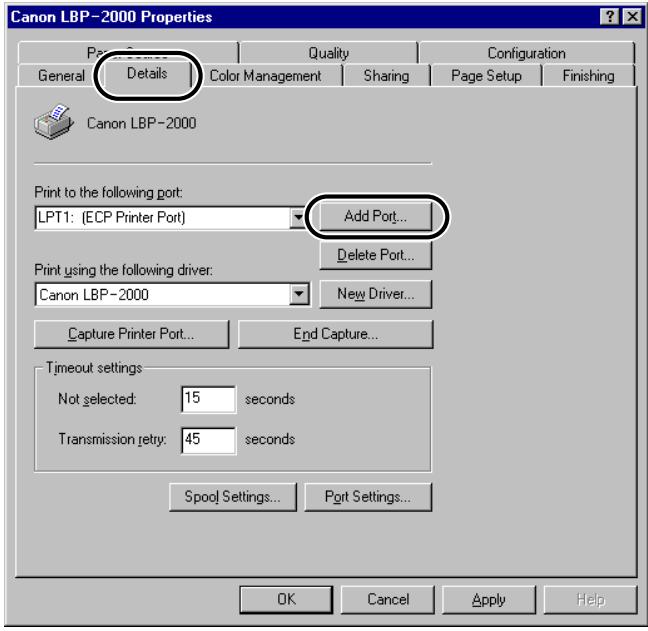
▼ Select Network.
In Specify the Network Path to the Printer, enter the following URL, and then click the OK button.
If you have changed the URL when setting up the printer, enter the new URL. http://
5 Click the OK button to enable the settings.
The printer destination settings are completed.
Windows 2000
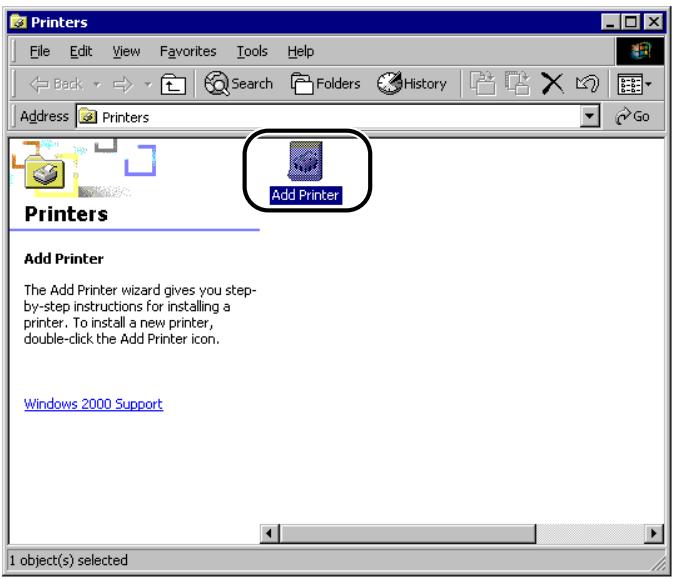
1 Start the Add Printer Wizard.
On the Start menu, point to Settings, and then click Printers.
Double-click the Add Printer icon.
2 Enter the URL of your printer.
Click the Next button.
A dialog box for selecting the printer connection method appears.
▼ Select Network Printer, and then click the Next button.
A dialog box for locating your printer appears.
Select Connect to a printer on the Internet or on your intranet, enter the following URL in URL, and then click the Next button.
http://
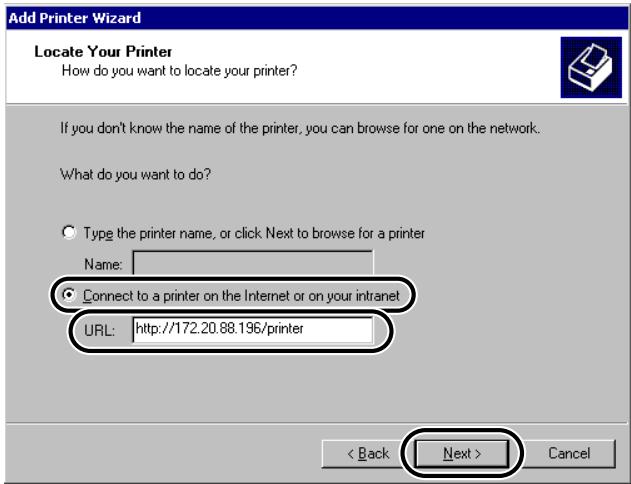
A dialog box for selecting the printer manufacturer and printer name appears.
Click the Have Disk... button, and then specify the folder on the CD-ROM that contains the printer driver.
3 Follow the instructions on the screen to complete the installation.
The printer destination settings are completed.
Print Server Settings
When Windows NT or Windows 2000 is on your network, the following procedure enables you to set up the print server for more efficient management of network printers. Once the print server is set up, print jobs can be managed by the print server. Also, by setting up an alternate driver for the print server, printer drivers can be installed in each computer via the network.
1 In the Printer Driver Properties dialog box, display the Sharing sheet.
On the Start menu, point to Settings, and then click Printers.
Right-click the icon of the printer you want to use for printing.
On the pop-up menu, click Sharing...
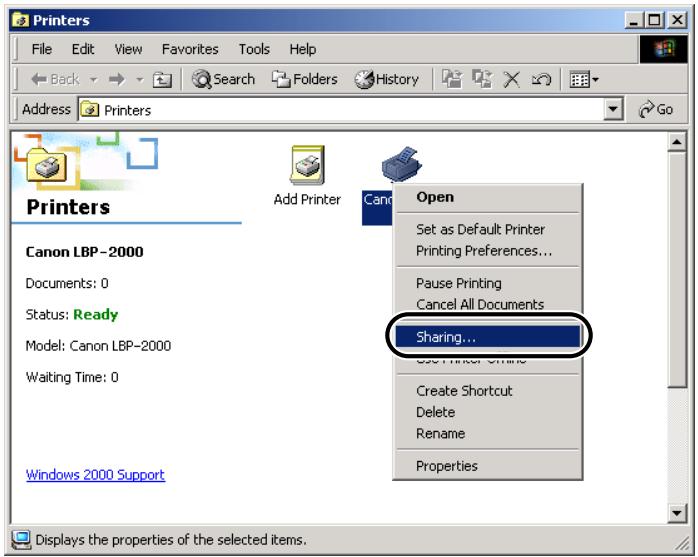
2 Specify the Sharing settings.
Select Shared as, and then enter a share name.
If you are using Windows NT, select the printer driver you want to install from Alternate Drivers. If you are using Windows 2000, click the Additional Drivers... button, and then select the printer driver you want to install.
Click the OK button.
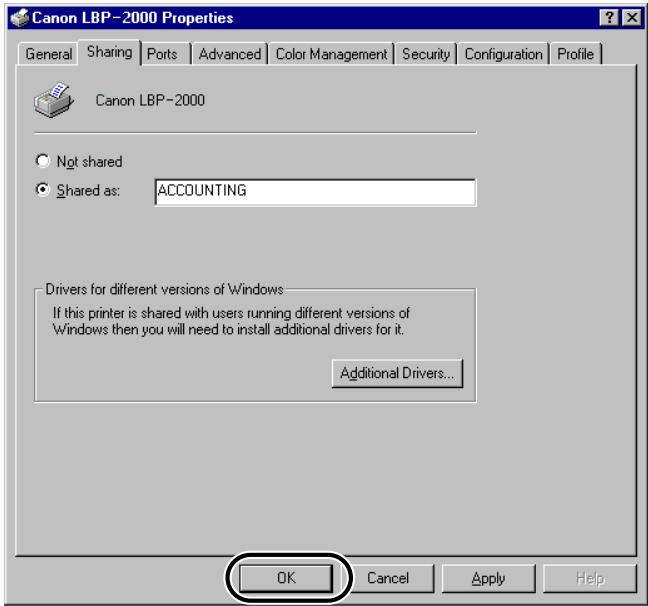
When the alternate driver is installed, a window will open to enter the location of the file containing the printer driver. Insert the CD-ROM supplied with the printer and then select the folder containing the printer driver.

IMPORTANT
- When using Windows NT 4.0, the use of the alternate driver function requires the installation of the Windows NT Service Pack 5 or later.

NOTE
- To install the printer driver on another computer, use the Printer Wizard window for selecting the printer destination, select Network printer, and then select the shared printer for the computer selected in the print server.
The shared printer settings are completed.
The printer enables you to use any of the following software to check printer status and to specify printer settings on your computer.
-NetSpot
Web browser (Remote UI)
- FTP client
Printer Management Using NetSpot
You can use NetSpot to manage various network printers on your computer. (See the NetSpot Quick Start Guide.)
Printer Management Using Web Browser (Remote UI)
You can use Remote UI installed in the printer to manage the printer on a web browser.
For starting Remote UI, see step 1 of "Settings Using a Web Browser (Remote UI)," on p.2-6. For using Remote UI, see "Chapter 2 Functions of the Remote UI" in the Remote UI Guide.

NOTE
- The Remote UI Guide is an on-line manual included on the CD-ROM provided with the EB-65 Network Board package, you can use Adobe Acrobat Reader to display and print out the guide.
Printer Management Using the FTP Client
To manage the printer with the FTP client, follow the procedure below. With the FTP client, you can print files from the printer, and upgrade the firmware of the printer network module.
1 Start up the MS-DOS prompt or the Command prompt.
If you are using UNIX, display the console screen.
2 Execute the following command.
ftp
3 Enter "root" as the user name.
If a password is set for the printer, enter your password. If no password is set, press the Enter key without entering a password.
You can perform the following operations:
- Printing a file: put
PRINTER - Resetting the printer network module: get reset
- Acquiring the current setting values: get config
- Acquiring the default setting values: get defaults
- Setting the printer to file values: put
CONFIG - Upgrading firmware: put
FLASH
IMPORTANT
- Use binary mode for printing of binary files created with a Windows printer driver.
NOTE
- You can log in using a user name other than "root" (blank, etc.). However, you cannot specify settings; you can only perform operations.
- You cannot log in as Anonymous.
This printer can send e-mail reports about printer status (for example, when a paper jam occurs or when the printer runs out of toner). You can set the printer to send notifications about printer status only for the items you specify.
You can set the machine to send e-mail notifications for the following:
- Logs are transmitted at the time of completing the number of jobs you specified.
- At the time of device error occurrence.
- When consumable items, such as toner, require replacement.
For example, you can specify the printer to send the following e-mail if the printer's top cover is open.
From: “LBP-2000”<00:00:85:18:06:89>
To: prt-admin@foo.canon.co.jp
Subject: [Operator Call] (40021)
Replay-to: net-admin@bar.canon.co.jp
MIME-Version: 1.0
Content-Type: text/plain; charset=US-ASCII
Error Message:
The printer body cover is open.
Action:
Close the printer body cover, and then press the Go button on the printer.
Device name is LBP-2000.
Page count:xxxxxx
Location: xxxxxx
Managed by xxxxxx
(Ext. xxxxx)

IMPORTANT
- You cannot send e-mail notifications for some errors.
- You can save up to 15 e-mails. If the number of e-mails to be sent exceeds 15 for reasons such as an e-mail transmission failure, they are deleted in the order in which they were saved.
-
To receive e-mails about printer status, you need to set the E-mail Report function using the web browser (Remote UI). (See "Setting the E-mail Report Function," on p.2-34.)
-
You can set the printer to send notifications about printer status only for the items you specify.
Setting the E-mail Report Function
1 Start the Web browser, enter the following URL in Location or Address, and then press the Enter key.
http://
Input Example: http://172.20.88.125/

IMPORTANT
- For your web browser, use Netscape Navigator/Communicator 4.04 or later, or Internet Explorer 4.01SP1 or later.
- If you are using Turbolinux 4.0, you cannot set the printer using Netscape Communicator 4.08. Use a different version of web browser.
2 Select Administrator Mode, and then click the OK button.
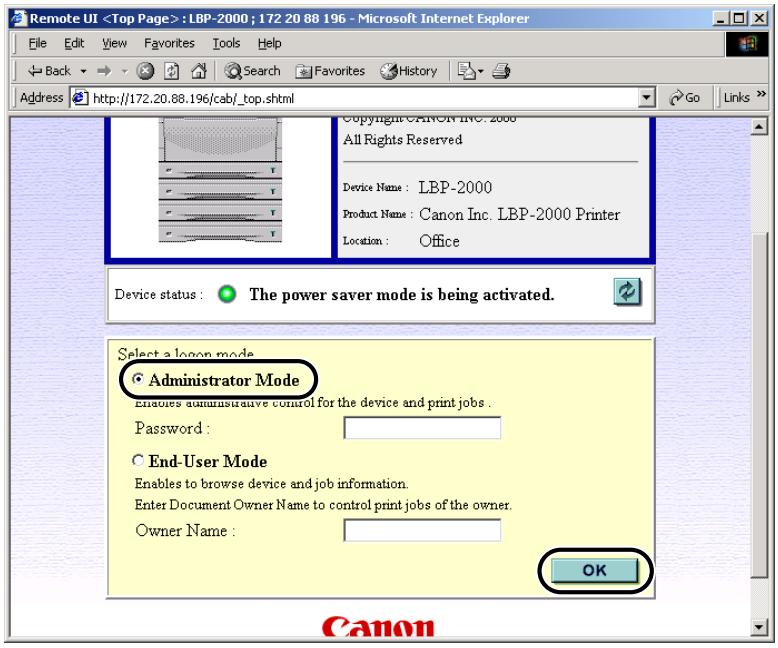

NOTE
- If a password is set for the printer, enter the password, and then click the OK button. If no password is set, it is not necessary to enter a password.
3 Under Device Manager at the left side of the window, select Network.
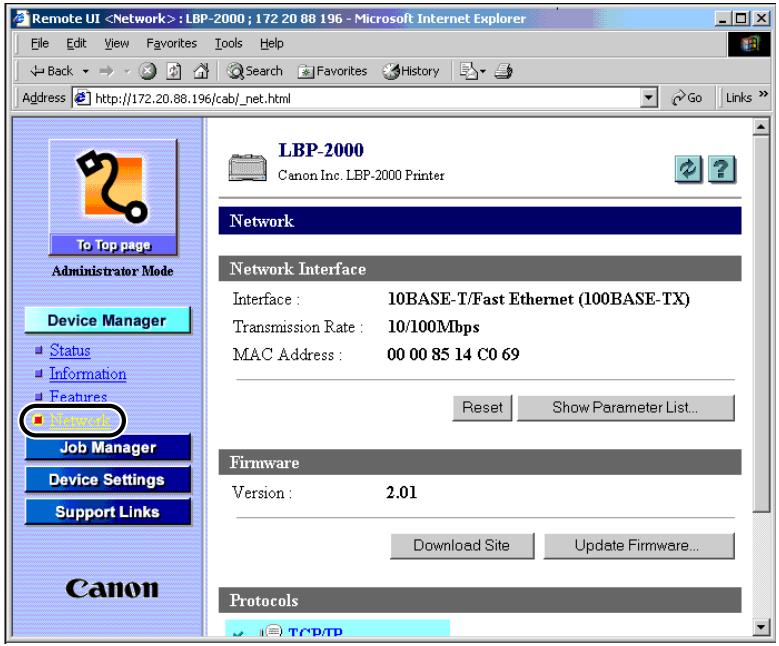
The Network page is displayed.
4 Check that the appropriate mail server address is set in SMTP Server Address, and that the appropriate printer domain name is set in DNS Domain Name.
If the appropriate mail server address and printer domain name are not set, set the mail server address and printer domain name. (See "Settings Using a Web Browser (Remote UI)," on p.2-6.)
5 Under Device Manager at the left side of the window, select Information.
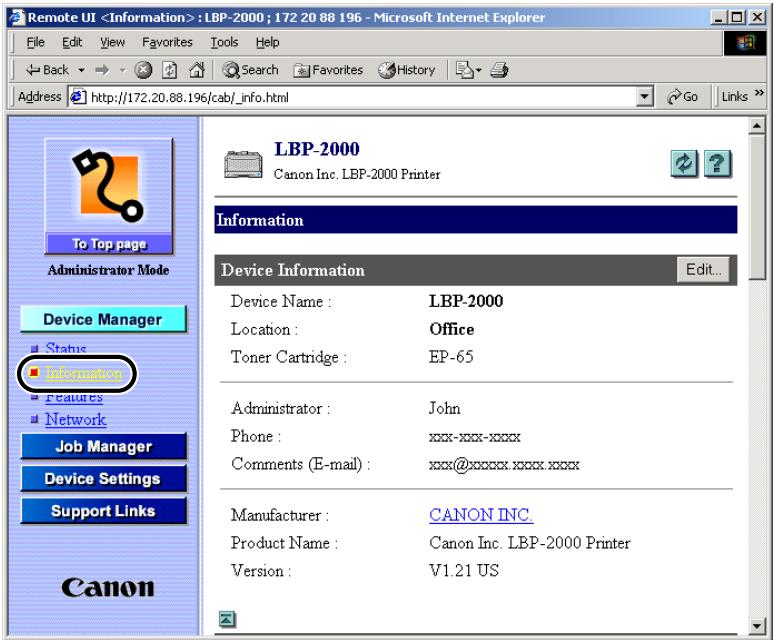
The Information page is displayed.

Click the Edit... button at the right of the item E-mail Notification.
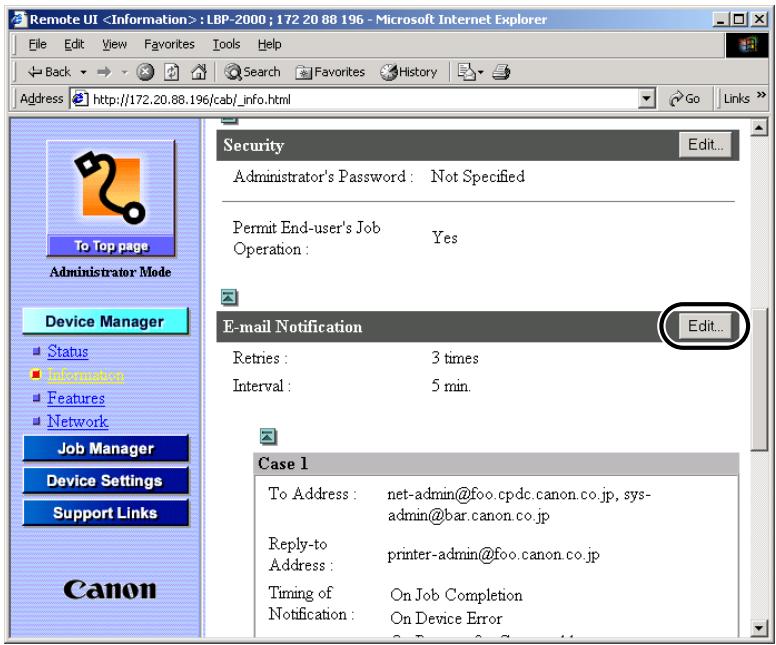
The Edit E-mail Notification page is displayed.
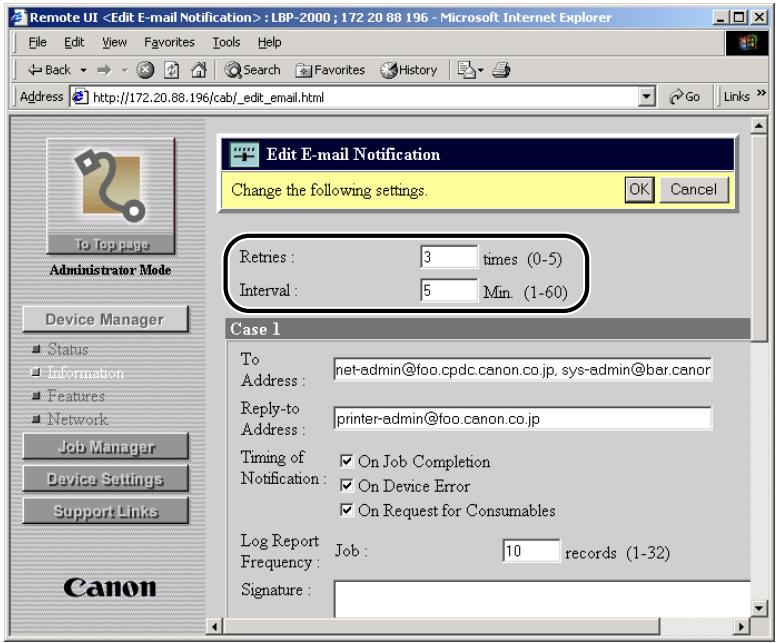
7
In Retries and Interval, specify the number of retries and the retry interval for re-sending an e-mail notification when a transmission error occurs.
8
Specify each item in Case 1.
- To Address: specify the mail address of the person who will receive the e-mail notification about printer status. When specifying multiple e-mail addresses, separate them with a comma, as shown.
- Reply-to Address: specify the reply address. It is recommended that the printer administrator be specified.
- Timing of Notification: specify the conditions for sending an e-mail report.
- Signature: specify the final sentences to be displayed at the end of each e-mail.
- Log Report Frequency: specify the number of job logs to be reported at one time. A maximum of 30 can be specified.
9
To send e-mail notifications under conditions different from Case 1 (for example, another To Address or Timing of Notification), specify them in Case 2.
10 Click the OK button.
The settings become valid when the print server is reset or the printer is restarted.
To reset the print server, select Network from Device Manager at the left side, and then click the Reset button.
The E-mail Report function settings are completed.
Using a NetWare Network (Windows)
This chapter describes settings and procedures for using the printer with a NetWare network.
NetWare Network Setup Operating Procedures 3-2
NetWare Print Service Settings 3-3
Types of Print Service 3-3
Settings Using NetSpot 3-4
Setup Using NetWare Administrator or PCONSOLE 3-4
Protocol Settings. 3-8
Printer Protocol Settings. 3-8
Setting Up a Computer for Printing 3-9
Connecting to a NetWare Network 3-9
Installing Printer Drivers 3-9
Setting the Printer Destination 3-9
NetWare Network Setup Operating Procedures
To use a NetWare network, it is necessary to perform the following procedure.
1
Network Board Installation and Cable Connection (See the EB-65 Setup Guide)
Install the network board to the printer, and then connect the network cables in accordance with the EB-65 Setup Guide.

2
NetWare Print Service Settings (See "NetWare Print Service Settings," on p.3-3)
Specify the settings for the NetWare print service. Use any of the following software to specify the settings from the computer.
- NetSpot (Canon software provided with the EB-65 Network Board package)
- NWADMIN or PCONSOLE (Novell software provided with NetWare)

3
Protocol Settings (See "Protocol Settings," on p.3-8)
Specify the printer protocol settings. Use any of the following software to specify the settings from the computer.
- NetSpot
Web browser (Remote UI) - FTP client

4
Computer Settings for Printing (See "Setting Up a Computer for Printing," on p.3-9)
Specify the settings for each computer you use for printing.

IMPORTANT
- It is recommended that the network manager perform steps 1, 2, and 3 above.
- When printing in a NetWare network, disable the banner page.
To print using a NetWare network, you need to specify print service settings including print server and queue settings. You can use any of the software below to specify the print service settings from your computer. Specify the settings using the easiest method.
- NetSpot (Canon software provided with the EB-65 Network Board package)
- NWADMIN or PCONSOLE (Novell software provided with NetWare)

IMPORTANT
- To specify the print service settings from NetSpot or NWADMIN, the computer must have Novell Client (NetWare Client by Novell) installed.
- The following procedures explain a sample NetWare setup procedure. Depending on your environment, the actual setup procedure may differ.
Types of Print Service
Before specifying print service settings, refer to the following descriptions to determine the type of print service you are using.

NOTE
- Normally with NetWare 4.x or later, it is recommended that you use NDS print service. With NetWare 3.x, it is recommended that you use Binderry print service. This manual describes procedures for these two combinations only.
- With NetWare 5.x, you can use NDPS (Novell Distributed Print Services). When using NDPS, the gateway should be the Novell printer gateway provided with NetWare. This manual does not describe NDPS settings. For NDPS settings, see the NetWare manual. NDPS settings are not available for NetSpot; use NWADMIN to specify the settings.
NDS (Novell Directory Service) and Bindery Mode
This printer supports both NDS and Bindery mode.
Determine the appropriate mode according to the network environment you are using. (If you are using NetWare 3.x, only the Bindery mode is available.)
■ Queue Server Mode and Remote Printer Mode
This printer supports both queue server mode and remote printer mode.
- Queue Server Mode
When the printer is used in the queue server mode, all print server functions are provided by the printer itself; no other print server hardware or software is required. In NDS queue server mode (NDS PServer), the NDS print server is used for printing. In Bindery queue
server mode (Bindery PServer), the Bindery print server is used for printing. In queue server mode, a separate NetWare user operating licence is required for each printer.
- Remote Printer Mode
In the remote printer mode, NetWare print server is required to control the printer. The printer prints using the NDS print server in NDS remote printer mode (NPrinter), and the Bindery print server in Bindery remote printer mode (RPrinter).
Settings Using NetSpot
You can use NetSpot on the CD-ROM provided with the EB-65 Network Board package to specify the protocol settings on the computer you are using.
See the NetSpot Quick Start Guide for how to install NetSpot and how to specify the protocol settings using NetSpot.

NOTE
- The NetSpot Quick Start Guide is an on-line manual, included on the CD-ROM provided with the EB-65 Network Board package. You can use Adobe Acrobat Reader to display and print out the guide.
Setup Using NetWare Administrator or PCONSOLE
Using NetWare Administrator in NDS Queue Server Mode or Remote Printer Mode (NetWare 4.x or Later)
1 Log on to NetWare as Administrator or equivalent access, and then start NetWare Administrator.

Execute Quick Setup.
Select the container object for the printer object you want to create, and then click Print Services Quick Setup on the Tools menu.

Specify the "Print Server name," "Printer," and "Queue" settings.
Enter the print server name in Print Server name.
To use an existing print server, click the button to the right of Print Server name, and then select a print server from the list box.
Under Printer, enter the printer name in Name.
▼ From Type select the printer connection method.
If you are using the queue server mode, select Other/Unknown.
If you are using the remote printer mode, select Parallel, click the Communication
button to open the Parallel Communication dialog box, and then select LPT1 from Port, and Manual load under Connection type. Under Interrupts, specify the appropriate setting for your environment. Click the OK button to close the Parallel Communication window.
Under Print Queue, enter the queue name in Name. In Volume, enter the volume in which the queue is placed.
To use an existing print server, click the button to the right of Volume, and then select a print server from the list box.
Click the Create button, and then exit NetWare Administrator.

NOTE
- Be sure to remember the name of the print server. You need it to specify the machine's protocol settings.
- If you perform Quick Setup, the printer is allocated printer number zero. If you are using the queue server mode, do not change the printer number from zero.
4 If you are using the remote printer mode, start the print server.
If you are using the NetWare file server as a print server, enter "Load PSERVER.NLM" in the file server, and then press the Enter key.

NOTE
- If you are using the queue server mode, this step is not required.
NetWare print service settings are completed. Proceed to "Protocol Settings," on p.3-8.
Using PCONSOLE with the Bindery Mode in the Queue Server Mode or Remote Printer Mode (NetWare 3.x)
1 Log on to NetWare as the Supervisor, and then start PCONSOLE.
2 If you have not set up a print server yet, set up the print server.
On the Available Options menu, click Print Server Information, and then press the Enter key.
Press the Insert key.
Enter the name of the print server you are setting up, and then press the Enter key.
▼ Press the Esc key to return to the Available Options menu.

NOTE
- Be sure to remember the name of the print server. You need it to specify the printer's protocol settings.
- To use the printer in queue server mode in a multiple NetWare server environment, use the same print server name for each NetWare server.
3
Set up a Queue, and then assign the print server to the queue.
On the Available Options menu, click Print Queue Information, and then press the Enter key.
Press the Insert key.
Enter the name of the queue you are setting up, and then press the Enter key.
Select the name of the queue you specified, and then press the Enter key.
▼ Select Queue Servers, and then press the Enter key.
Press the Insert key.
▼ Select the print server you set up in step 2, and then press the Enter key.
Press the Esc key until you return to the Available Options menu.
4
Assign the printer to the print server.
On the Available Option menu, select Print Server Information, and then press the Enter key.
▼ Select the print server you set up in step 2, and then press the Enter key.
Select Print Server Configuration, and then press the Enter key.
▼ Select Printer Configuration, and then press the Enter key.
▼ From Configured Printers, select the number of the printer you want to use, and then press the Enter key.
To use queue server mode, select printer number "0." For remote printer mode, you can select your desired printer number.
5
Specify the printer name, type, etc.
In Name, enter the name you want to use for the printer, and then press the Enter key.
If you are using queue server mode, select Defined elsewhere from Type. If you are using remote printer mode, select Remote Parallel, LPT 1 from Type.
Specify the remaining items, and then press the Esc key.
In the confirmation box that opens, select Yes, and then press the Enter key.
Press the Esc key to return to the Print Server Configuration menu.
6
Assign a queue to the printer.
▼ Select Queues Serviced by Printer, and then press the Enter key.
Select the name of the printer you set up in step 5, and then press the Enter key.
Press the Insert key.
▼ Select the queue you set up in step 3, and then press the Enter key.
7 Press the Esc key until you return to the Exit PCONSOLE window, and then select Yes to quit PCONSOLE.
8 If you are using remote printer mode, start the print server.
▼ If you are using a NetWare file server as a print server, enter "LOAD PSERVER.NLM
If you are using a dedicated print server, enter "PSERVER.EXE," enter the print server name on the file server, and then press the Enter key.
NOTE
- This step is not required if you are using the queue server mode.
NetWare print service settings are completed. Proceed to "Protocol Settings," on p.3-8.
The printer protocol settings can be specified on the computer using any of the following software. Specify the settings using the easiest method.
- NetSpot (Canon software provided with the EB-65 Network Board package)
Web browser (Remote UI) - FTP client
Printer Protocol Settings
You can use NetSpot on the CD-ROM provided with the EB-65 Network Board package to specify the protocol settings on the computer you are using.
See the NetSpot Quick Start Guide for how to install NetSpot and how to specify the protocol settings using NetSpot.

IMPORTANT
- The printer MAC address is necessary. For checking the MAC address, from the printer control panel, follow the procedure below to perform a test print.
- Press [Go] on the printer control panel; the ONLINE LED goes off.
- Press [Menu] several times until
appears. - Press [Item] several times until
appears in the second line in the display. - Press [Enter].
- Check that the printer is connected to the network and that the printer power is turned on.

NOTE
- The NetSpot Quick Start Guide is an online manual included on the CD-ROM provided with the EB-65 Network Board package. You can use Adobe Acrobat Reader to display and print out the guide.
- To specify settings using software other than NetSpot, see Chapter 2 "Using a TCP/IP Network (Windows/UNIX)."
Setting Up a Computer for Printing
After you have completed NetWare print service settings and printer protocol settings, you are ready to set up each of the computers for printing.
Connecting to a NetWare Network
In order to use the NetWare network, all computers that will perform printing need to have NetWare client software installed. For details, see your NetWare and operating system manuals.
Installing Printer Drivers
NetSpot is software for specifying printer and network settings.
Printing from a computer requires the installation of a printer driver. (See the PCL Driver Guide.) In the installation procedure, select the network printer as the printer destination, and then select the print queue that you created in "NetWare Print Service Settings," on p.3-3.
Setting the Printer Destination
On the Start menu, point to Settings, click Printers, right-click the icon of the printer you will use for printing, and then click Properties.
Click the Details tab or Port tab to display the Details sheet or the Port sheet, and then set the printer destination port to the print queue you created in "NetWare Print Service Settings," on p.3-3. Click the OK button to enable the settings.

NOTE
- If you set up the printer destination when you installed the printer driver, this step is not necessary.
Using a NetBIOS Network (Windows 95/98/Me)
This chapter describes settings and procedures for using the printer with a NetBIOS network.
NetBIOS Network Setup Operating Procedures 4-2
Setting Up a Computer for Printing. 4-3
NetBIOS Network Connection Method. 4-3
Installing the Printer Driver 4-4
Setting the Printer Destination 4-4
NetBIOS Network Setup Operating Procedures
To use a NetBIOS network, it is necessary to perform the following procedure.
1
Network Board Installation and Cable Connection (See the EB-65 Setup Guide)
Install the network board to the printer, and then connect the network cables in accordance with the EB-65 Setup Guide.

2
Computer Settings for Printing (See "Setting Up a Computer for Printing," on p.4-3)
Specify the settings for each computer you use for printing.

IMPORTANT
- The printer does not support NetBIOS over TCP/IP (NetBT). If you are using a TCP/IP in your environment, use the TCP/IP protocol for printing. (See Chapter 2 "Using a TCP/IP Network (Windows/UNIX).")
To set up each of the computers for printing, follow the procedure below.
NetBIOS Network Connection Method
Each computer used for printing must have NetBEUI client software installed. To check whether NetBEUI client software is installed, follow the procedure below.
1 Right-click the Network Computer icon on the screen, and then click Properties.
2 Check that NetBEUI is in The following network components are installed.
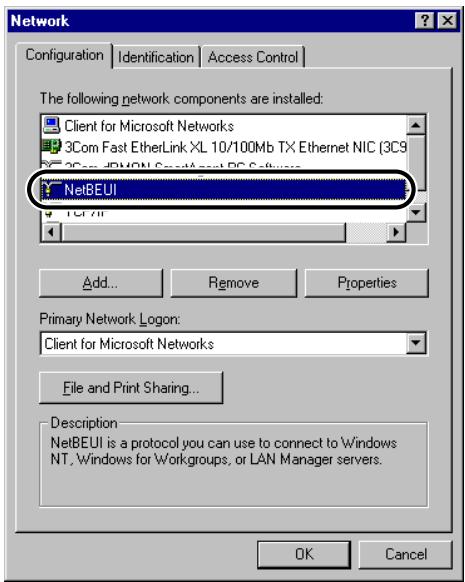
If NetBEUI is not installed, click the Add... button to install NetBEUI.
Installing the Printer Driver
In order to print, it is necessary to install the printer driver. (See the PCL Driver Guide.)
When the screen for selecting printer destination is displayed during printer driver installation, select Local Printer. Do not select Network Printer.
The port selection can be changed after installation. You can select any port, such as LPT1.
Setting the Printer Destination
To set the printer destination, follow the procedure below.
1 Install the NetBIOS/NetBEUI Port Monitor utility on the CD-ROM provided with the EB-65 Network Board package.
Insert the CD-ROM supplied with the EB-65 Network Board package into the CD-ROM drive.
Double-click the My Computer icon on the screen.
Right-click the CD-ROM drive icon, and then click Open on the pop-up menu.
Double-click the Portmon folder.
Double-click the Setup icon. In some environments, this icon appears as Setup.exe. The install program starts.
Follow the instructions on the screen to complete the installation.

NOTE
- Depending on the environment you are using, the CD-ROM menu is displayed when you insert the CD-ROM into the CD-ROM drive. In this case, click the End button, and then perform the procedures in this step.
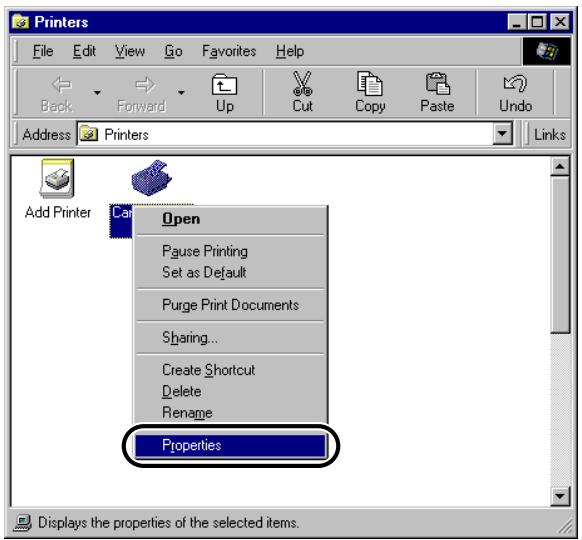
2 Open the Printer Driver Property dialog box.
On the Start menu, point to Settings, and then click Printer.
Right-click the printer icon you want to use for printing, and then click Properties.
3 Specify the Spool settings.
Click the Details tab to display the Details sheet.
Click the Spool Setting... button to open the Printer Spool Setting dialog box.
▼ Select Spool print jobs so the program finishes printing faster.
Click the OK button.
4 Select CANONxxxxxx (CANON Port) from Print to the following port.
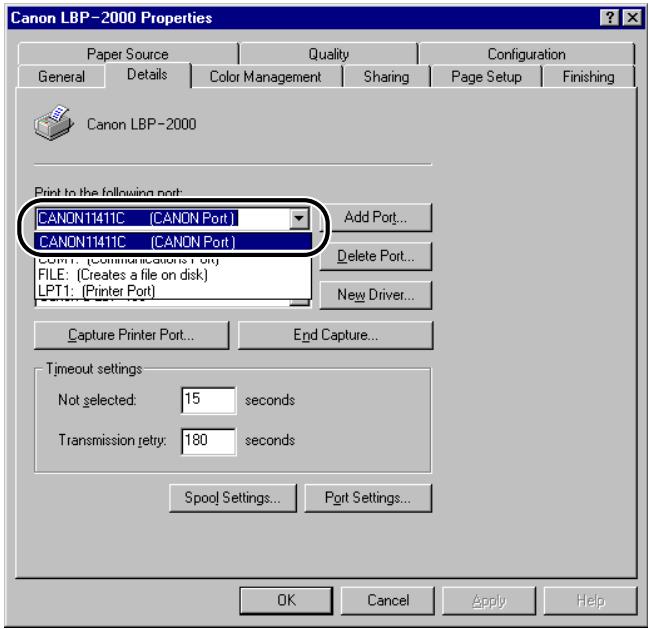

NOTE
-
xxxxxx is the last 6 digits of the MAC address of the printer. For checking the MAC address, follow the procedure below on the printer control panel to perform a test print.
-
Press [Go] on the printer control panel; the ONLINE LED goes off.
- Press [Menu] several times until
appears. - Press [Item] several times until
appears in the second line in the display. - Press [Enter].
- If CANONxxxxxx (CANON Port) is not displayed in Print to the following port, see "Troubleshooting," on p.6-2.
5 Click the OK button to enable the settings.
The computer settings for printing are completed.
Using an AppleTalk Network (Macintosh)
This chapter describes settings and procedures for using the printer on an AppleTalk network.
AppleTalk Network Setup Operating Procedures 5-2
Macintosh Network Settings 5-3
Protocol Settings. 5-4
Settings Using NetSpot 5-4
Settings Using a Web Browser (Remote UI) 5-4
Installing Printer Drivers 5-9
AppleTalk Network Setup Operating Procedures
To use an AppleTalk network, it is necessary to perform the following procedure.
1 Network Board Cable Connection (See the EB-65 Setup Guide)
Install the network board to the printer, and then connect the network cables in accordance with the EB-65 Setup Guide. However, if the printer is already network-compatible, there is no need to install a network board; you only have to connect the network cables.

2 Macintosh Network Settings (See "Macintosh Network Settings," on p.5-3)
Set up the Macintosh for connection to an Ethernet network.

3 Protocol Settings (See "Settings Using a Web Browser (Remote UI)," on p.5-4)
Specify the printer protocol settings. Use any of the following software to specify the settings on the computer.
- NetSpot
Web browser (Remote UI) - FTP client

4 Installation of the Printer Driver (See "Installing Printer Drivers," on p.5-9)
Install the printer driver on your computer.

IMPORTANT
- It is recommended that the network manager perform steps 1 and 3 above.
Verify the Macintosh network settings.
1 Check that AppleTalk is active.
Click Chooser on the Apple menu.
Check that Active is selected under AppleTalk. If Inactive is selected, select Active.
2 Check that the AppleTalk connection method is Ethernet.
▼ On the Apple menu, point to the control panels, and then click AppleTalk.
▼ Select Ethernet.
Close the AppleTalk dialog to save the setting.
IMPORTANT
- In an environment that connects to Ethernet through LocalTalk, select Printer Port.
The Macintosh network settings are completed.
You can specify the printer protocol settings on the computer using any of the following software. Specify the settings using the easiest method. This section describes sample settings using the Remote UI.
- NetSpot (Canon software provided with the EB-65 Network Board package)
Web browser (Remote UI) - FTP client
Settings Using NetSpot
You can use NetSpot on the CD-ROM provided with the EB-65 Network Board package to specify the protocol settings on the computer you are using.
See the NetSpot Quick Start Guide for how to install NetSpot and specify the protocol settings using NetSpot.

NOTE
- The NetSpot Quick Start Guide is an on-line manual, included on the CD-ROM provided with the EB-65 Network Board package. You can use Adobe Acrobat Reader to display and print out the guide.
Settings Using a Web Browser (Remote UI)
1 Start the web browser, enter the URL below in Location or Address, and then press the Enter key.
http://
Input Example: http://172.20.88.125/

IMPORTANT
- For your web browser, use Netscape Navigator/Communicator 4.04 or later, or Internet Explorer 4.01SP1 or later.
-
If you are using a connection via a proxy server, use the following settings. (The settings differ depending on the network environment.)
-
When configuring your web browser to use the proxy server, add the IP address of the printer to Exception (the address not using the proxy server).
-
Set up the web browser to accept cookies.
-
If you are starting more than one Remote UI at the same time, only the last setting specified will be valid. It is recommended that you start only one Remote UI.
2 Select Administrator Mode, and then click the OK button.
The Remote UI starts.
NOTE
- If a password has been set for the printer, enter the password, and then click the OK button. If no password has been set, it is not necessary to enter a password.
3 Under Device Manager on the left side of the screen, click Network.
The Network page is displayed.

Click the Edit... button at the right of AppleTalk.
The Edit AppleTalk Protocol Settings page is displayed.
5 From Phase Type, select Phase_2.
NOTE
- If you select Disabled, the network board is not recognized by the AppleTalk network.
6 Enter the object name for AppleTalk.
You can enter a string up to 32 characters long. If the string contains spacing, it cannot end with a dot.
7 Enter the zone name for AppleTalk.
You can enter a string up to 32 characters long.
8 Click the OK button.
The protocol settings are completed.
Installing Printer Drivers
After you have completed the printer protocol settings, install the printer driver on the Macintosh that will do the printing, and then make the settings for the print destination.
NetSpot is software for specifying printer and network settings.
In order to print, it is necessary to install the printer driver. Install the printer driver. (See the PCL Driver Guide.)
After installing the printer driver according to the PCL Driver Guide and selecting the printer in Chooser, the settings for the Macintosh are completed.
Appendix
This chapter describes how to resolve printing problems and other useful information.
Troubleshooting 6-2
How to Delete Software 6-6
LPR Port Utility Deletion 6-6
NetBIOS/NetBEUI Port Monitor Utility Deletion .6-7
Network Setting Items. 6-8
The Available Software for Network Settings 6-12
Index. 6-13
This section describes how to resolve basic printing problems.
Unable to Print from a TCP/IP Network
Cause 1 : The printer and cable are not properly connected.
Remedy : After checking the following connections, restart the printer. Check that the machine is connected to the network using the proper cable. (See the EB-65 Setup Guide.)
Cause 2 : TCP/IP network is not properly set up.
Remedy : Confirm that the IP addresses are properly set up. If the IP addresses were set using DHCP, BOOTP, or RARP, and then confirm that they are operating.
Cause 3 : The computer that is printing is not properly set up.
Remedy : Check the following:
- Confirm that the proper printer driver is installed. If you are printing from Windows 95/98/Me, each computer must have a printer driver installed. For instructions on installing printer drivers, see the PCL Driver Guide.
- Confirm that the correct printer is set as the output destination for the computer that is printing. Check the output destination in Printer in Control Panel or Print Manager.
- If you are using Windows 95/98/Me, confirm that the spooling settings are made correctly. (See steps 3 to 5 in "Windows 95/98/Me" on p.2-16.)
Cause 4 : The name of the file being printed is too long.
Remedy : Normally LPR (or the Microsoft TCP/IP Printer, if you are using Windows NT/ 2000) sends jobs either under the name of the application software used for printing, or the file name. However, a job name longer than 255 bytes cannot be sent to the printer. To correct this problem, rename the file with a shorter name.
Cause 1 : The printer and cable are not properly connected.
Remedy : After checking the following connections, restart the printer.
- Check that the printer is connected to the network using the proper cable. (See the EB-65 Setup Guide.)
Cause 2 : The NetWare network is not properly set up.
Remedy : Check the following:
- Confirm that the NetWare file server is running.
- Confirm that there is sufficient disk space on the NetWare file server. Large files cannot be printed if there is insufficient disk space.
- Start NetSpot, NWADMIN, or PCONSOLE, and then confirm that the print queue is set up properly and is active.
- Confirm that the network settings of the printer are correctly set.(See "Printer Protocol Settings," on p.3-8.) Check the following in particular.
-A valid frame type is selected from Frame Type.
-Print Server Name and Printer Number are correctly specified.
Cause 3 : The computer that is printing is not properly set up.
Remedy : Check the following:
- Confirm that the proper print driver is installed. If you are printing from Windows 95/98/Me, each computer must have a printer driver. (See the PCL Driver Guide.)
- Confirm that the correct printer is set as the output destination for the computer that is printing. Check the output destination with Printer in Control Panel or with Print Manager.
Cause 4 : Data transmission is not possible from the NetWare server to the printer on another subnet.
Remedy : When the NetWare server transmits data to the printer, NCP Burst Mode is used. But depending on the network environment, the NetWare server fails to transmit data to a printer on another subnet. In this case, set the NCP Burst Mode of the printer protocol to OFF. NCP Burst Mode cannot be set with NetSpot; use a web browser or FTP client to set it. (See “Printer Protocol Settings,” on p.3-8.)
Unable to Print from a NetBIOS Network or the Printer Port Name is not Displayed in Print to the following port.
Cause 1 : The printer and cable are not properly connected.
Remedy : After checking the following connections, restart the printer. Check that the printer is connected to the network using the proper cable. (See the EB-65 Setup Guide.)
Cause 2 : The computer that is printing is on a different subnet to the printer.
Remedy : The printer uses NetBEUI protocol for printing, so printing cannot be performed in a network environment with a router between the computer that is printing and the printer. Use a different protocol for printing, or print from the printer without going through the router.
Cause 3 : The computer that is printing is not properly set up.
Remedy : Check the following:
- Confirm that the proper print driver is installed in each computer. For installing the printer driver, see the PCL Driver Guide.
- Confirm that the correct printer is set as the output destination for the computer which is printing, and that the spool is properly set. (See "Setting the Printer Destination," on p.3-9.)
Unable to Print from an AppleTalk Network
Cause 1 : The computer sending the print jobs to the printer is not properly set up.
Remedy : Check the following:
-In Chooser, confirm that the proper printer driver is installed.
- In Chooser, confirm that the proper printer has been selected as the destination.
-In Chooser, confirm that AppleTalk is active.
- In the Network or AppleTalk control panel, confirm that the AppleTalk connection method is EtherTalk or Ethernet.
Cause 2 : The AppleTalk network is not properly set up.
Remedy : Confirm the AppleTalk settings.
In particular, check the following:
Set the "Phase" to a valid phase type.
Set the "Zone" to the zone to which the printer belongs.
Cause 3 : The network board and cable are not properly connected.
Remedy : After checking the following connections, restart the printer.
- Check that the network board is properly installed. (See the EB-65 Setup Guide.)
- Check that the printer is connected to the network using the proper cable. (See the EB-65 Setup Guide.)
To delete the LPR Port utility or NetBIOS/NetBEUI Port Monitor utility installed in Windows 95/98/Me, follow the procedure below.

NOTE
- To delete NetSpot, see the NetSpotREADME file for details.
LPR Port Utility Deletion
1 Set Print Destination Port of the printer driver to a port other than Canon LPR Port.
The print destination port can be set using the Details sheet in the printer Properties dialog box.
The Canon LPR Port is displayed on the screen as <172.20.88.125@LP (Canon LPR Port)>.
2 Insert the CD-ROM supplied with the EB-65 Network Board package into the CD-ROM drive.
3 Start Uninstlp in the Lprport folder on the CD-ROM.
4 Follow the instructions on the screen to delete the LPR Port Utility.
NetBIOS/NetBEUI Port Monitor Utility Deletion
1 On the Start menu, point to Settings, and then click Control Panel.
2 Double-click the Application Add/Delete icon.
3 Select the software you want to delete from the software list, then click the Add/Delete... button.
A confirmation message is displayed.
4 Click the Yes button.
The software is deleted.
With NetSpot, a web browser (Remote UI), or FTP client, you can change the settings of the printer.
The setting items you can change are shown below.

NOTE
- The information in brackets in the table below is specific to the FTP client. (Example: Device Name (DEVICE_NAME) is displayed as Device Name for NetSpot and the web browser, and displayed as DEVICE_NAME for the config file of the FTP client.)
- Items with an asterisk cannot be set using NetSpot. Set them using a web browser (Remote UI) or FTP client.
Common Settings
| Items | Descriptions | Initial Values |
| Device Name (DEVICE_NAME) | Device name (0 to 32 characters) | (NULL) |
| Location (SYS_LOC) | Device installation location (0 to 32 characters) | (NULL) |
| Administrator (SYS_contact) | Device administrator name (0 to 32 characters) | (NULL) |
| Password (ROOT_PWD) | Device password (0 to 15 characters) | (NULL) |
| Permit End User's Job Operation (USER_JOB_CONT)* | Whether or not to permit operating print job in general user mode | (Off) |
| Retries (EMAIL_RETRY)* | Maximum number of retries for mail transmission by e-mail notification function when error has occurred | 0 |
| Interval (EMAIL_DELAY)* | Interval until retry for mail transmission by e-mail notification function when error has occurred | 5 |
| To Address (EMAIL_ADDR1)* | Address to which e-mail is transmitted by e-mail report function | (NULL) |
| Reply-to Address (EMAIL_REPLY1)* | Reply address for e-mail transmitted by e-mail report function | (NULL) |
| Timing of Notification (EMAIL_NOTIFY1)* | Conditions for e-mail transmitted by e-mail report function | (All Off) |
| Signature (EMAIL_SIGN1)* | Signature on e-mail transmitted by e-mail notification function | (NULL) |
| Display Language (DISP(Language) | Default language configuration for web browsing | English |
| Preferred Language (EMAIL(Language1) | E-mail notice language | English |
| Log Report Frequency (EMAIL_LOG_CNT) | E-mail notification job log count | 5 |
| Link (LINK_NAME)* | Link name displayed on support link page of Remote UI | (NULL) |
| URL (LINK_URL)* | URL displayed on support link page of Remote UI | (NULL) |
| Comments (LINK_COMMENT)* | Comments displayed on support link page of Remote UI | (NULL) |
TCP/IP Settings
| Items | Descriptions | Initial Values |
| Frame Type(TCP_FRAME_TYPE) | Frame type used with TCP/IP | Ethernet II |
| Use DHCP (DHCP_ENB) | Whether DHCP is used in setting the IP address | (Off) |
| Use BOOTP (BOOTP_ENB) | Whether BOOTP is used in setting the IP address | (Off) |
| Use RARP (RARP_ENB) | Whether RARP is used in setting the IP address | (Off) |
| IP address (INT_ADDR) | IP address of printer | 192.168.0.215 |
| Subnet Mask (NET_MASK) | Subnet Mask | 0.0.0.0 |
| Gateway Address (DEF_ROUT) | Gateway Address | 0.0.0.0 |
| LPD Banner (LPD_BANN) | Banner page output method when printing using LPD | (Off) |
| IPP URL (IPP_PRT_URI) | URL (1 to 255 characters) when printing using IPP | Printer |
| Raw Mode Bi-directional (RAW_BIDIR_ENB) | Whether bi-directional transmission is supported when printing using Raw | (On) |
| DNS Server Address (DNS_ADDR) | IP address of the DNS server | 0.0.0.0 |
| DNS Dynamic Update (DDNS_ENB) | Whether this device is dynamically updated to DNS | (Off) |
| DNS Host Name (HOST_NAME) | Host name of this device | (NULL) |
| DNS Domain Name (DOMAIN_NAME) | Domain name for this device | (NULL) |
| SMTP Server Address (SMTP_ADDR) | IP address or name of the mail server | (NULL) |
NetWare Settings
| Items | Descriptions | Initial Values |
| Frame Type(NW_FRAME_TYPE) | Frame type used for NetWare | 802.2 |
| NCP Burst Mode(NCP_BURST_MODE)* | Whether NCP burst mode is used (Leave it ON normally) | (On) |
| Bindery PServer | ||
| Print Server Name(PSERVER_BINDERY_NAME) | Name of NetWare print server being used | (NULL) |
| NetWare Server Name(PSERVER_BINDERY) | Name of NetWare file server that has NetWare print server | (NULL) |
| Polling Interval(BINDERY_JOB_CHECK_DELAY) | Interval for checking job (1 to 15 sec) | 5 |
| NDS PServer | ||
| Print Server Name(PSERVER_NDS_NAME) | Name of NetWare print server being used | (NULL) |
| NDS Tree(PSERVER_NDS_tree) | Name of NDS tree that has NetWare print server | (NULL) |
| Context Name(PSERVER_NDS CONTEXT) | Context Name (1 to 255 characters) that has NetWare print server | (NULL) |
| Polling Interval(NDS_JOB_CHECK_DELAY) | Interval for checking job (1to 255 sec) | 5 |
| RPrinter | ||
| Print Server Name (RPRINTER_PS_NAME) | Name of NetWare print server being used | (NULL) |
| Printer Number (RPRINTER_NO) | Number of printer (0 to 15) connected to NetWare print server | 0 |
| NPrinter | ||
| Print Server Name (NPRINTER_PS_NAME) | Name of NetWare print server being used | (NULL) |
| Printer Number (NPRINTER_NO) | Number of printer (0 to 254) connected to NetWare print server | 0 |
NetBIOS Settings
| Items | Descriptions | Initial Values |
| Base Protocol (LSLM_ENB) | Protocol used for communication (Whether NetBIOS is used or not) | NetBEUI (On) |
AppleTalk Settings
| Items | Descriptions | Initial Values |
| Phase (ATLK_ENB) | Phase type being used (Whether AppleTalk is used or not) | Phase_2 (On) |
| Name (APRINT_1) | Object name displayed in Chooser (1 to 31 characters) | from device |
| Zone (ATK-zone) | Zone name of the printer | * |
The Available Software for Network Settings
You can specify the network settings of the printer using the following software.
| Types of Settings | NetSpot | Web Browser (Remote UI) | FTP Client | ARP/PING Commands | Printer Control Panel |
| NetWare Protocol Settings (See p.3-8) | ✓ | ✓ | ✓ | × | × |
| TCP/IP Preparation for Protocol Settings (See p.2-3) | ✓ | × | × | ✓ | ✓ |
| TCP/IP Protocol Settings (See p.2-7) | ✓ | ✓ | ✓ | × | × |
| NetBIOS Protocol Settings | ✓ | ✓ | ✓ | × | × |
| AppleTalk Protocol Settings (See p.5-5) | ✓ | ✓ | ✓ | × | × |
| E-mail Report Function Settings (See p.2-34) | × | ✓ | ✓ | × | × |
Index
B
3-3
Bindery PServer 3-4
C
Checking Your Network Environment 1-4
E
Ethernet 5-3
F
FTP 2-15
1
IPP 2-15, 2-26
L
LPD 2-15, 2-20, 2-23
LPR 2-16, 2-18, 2-21, 2-23
LPR Port Utility 2-16
LPT1 2-22
M
Macintosh 5-2
Macintosh Network 1-6
Macintosh Network Settings 5-3
Microsoft Windows 2000 2-27
Microsoft Windows 2000 Professional 1-2
Microsoft Windows 2000 Server 1-2
Microsoft Windows 95/98/Me 1-2, 2-26
Microsoft Windows NT 2-21
Microsoft Windows NT Server 1-2
Microsoft Windows NT Workstation 1-2
Microsoft Windows TCP/IP Printing 2-21
N
NDS PServer 3-3
NetBIOS Nework 1-2
NetWare 3-4
Administrator 3-4
File Server 3-5
Network 1-2,3-3,3-9
Print Server 3-4
NetWare 3.x 3-3, 3-5
NetWare 4.x 3-3
NetWare 4.x or later 3-4
NetWare 5.x 3-3
NetWare Print Service Settings 3-3
Novell NetWare 1-2
NPrinter 3-4
P
Printing with a NetBIOS Network 1-2
a NetWare Network 1-2
a TCP/IP Network 1-2
an AppleTalk Network 1-2
Protocol Settings 2-6,3-8,5-4
Q
Queue Server Mode 3-3
R
Raw 2-15
Remote Printer Mode 3-3, 3-4
Requirements for Printing 1-2
RPrinter 3-4
s
Sample
Macintosh Network 1-6
UNIX Network 1-6
Windows 95/98/Me/NT/2000 Network 1-4
Service Pack 5 1-3,2-30
Setting Up a Computer for Printing 2-15,3-9,4-3
Solaris 1-2, 2-24
Supervisor 3-5
T
TCP/IP Protocol 1-4
Types of Print Service 3-3
U
UNIX 1-6
URL 2-27
Using a Network With Various Types of Computers 1-7
W
Windows 2-15
Windows 95/98/Me 2-16
Canon
CANON INC.
30-2, Shimomaruco 3-chome, Ohta-ku, Tokyo 146-8501, Japan
CANON U.S.A., INC.
One Canon Plaza, Lake Success, NY 11042, U.S.A.
CANON CANADA INC.
6390 Dixie Road Mississauga, Ontario L5T 1P7, Canada
CANON EUROPA N.V.
Bovenkerkerweg 59-61 P.O. Box 2262, 1180 EG Amstelveen, The Netherlands
CANON FRANCE S.A.
Woodhatch, Reigate, Surrey, RH2 8BF, United Kingdom
CANON AUSTRALIA PTY. LTD
1 Thomas Holt Drive, North Ryde, Sydney, N.S.W. 2113, Australia
CANON SINGAPORE PTE. LTD.
79 Anson Road #09-01/06, Singapore 079906
CANON HONGKONG CO., LTD
9/F, The Hong Kong Club Building, 3A Chater Road, Central, Hong Kong