
PLRD146 - Car LCD Screen Pyle - Free user manual and instructions
Find the device manual for free PLRD146 Pyle in PDF.


| Product Type | Car LCD Monitor |
| Brand | Pyle |
| Model | PLRD146 |
| Screen Size | 7 inches |
| Resolution | 800 x 480 pixels |
| Display Type | LED-backlit TFT LCD |
| Brightness | 400 cd/m² |
| Contrast Ratio | 300:1 |
| Viewing Angle | 120° (H) / 100° (V) |
| Video Input | Composite (RCA) x 2 |
| Audio Input | RCA L/R stereo |
| Power Supply | 12V DC (cigarette lighter adapter included) |
| Power Consumption | 12W |
| Mounting Type | Dashboard or headrest mount (brackets included) |
| Additional Functions | Rearview camera input, auto-dimming, built-in speaker |
| Dimensions (W x H x D) | 7.5 x 4.5 x 1.2 inches |
| Weight | 1.5 lbs |
| Cleaning Instructions | Wipe gently with a soft dry cloth; do not use chemical cleaners |
| Safety | Do not install in airbag deployment zones; keep away from heat sources |
Frequently Asked Questions - PLRD146 Pyle
User questions about PLRD146 Pyle
0 question about this device. Answer the ones you know or ask your own.
Ask a new question about this device
Download the instructions for your Car LCD Screen in PDF format for free! Find your manual PLRD146 - Pyle and take your electronic device back in hand. On this page are published all the documents necessary for the use of your device. PLRD146 by Pyle.
USER MANUAL PLRD146 Pyle
Need service or repair?
Want to leave a comment?
PyleUSA.com/ContactUs
PYLE
PYLE
PyleUSA.com
natural_image
Top-down view of a BYD PYLE car with a red sports car displayed on its screen (no visible text or symbols on the car itself)

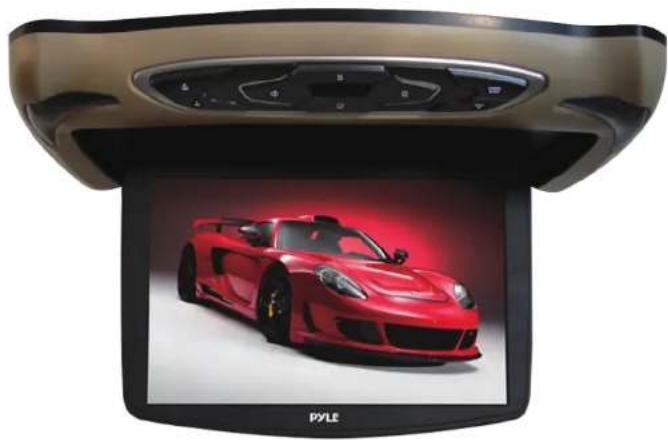
13.3" Roof Mount TFT LCD Monitor Built In Multimedia Disc/USB/SD Player with Wireless FM/IR Transmitter
USER MANUAL
Contents
Caution 1 Check Point 2
Name and Function of Each Part
Unit 3 Remote Control 4
Picture Control
Playing a Disc 6
Basic Operation 6
DVD System 7-8
Installation 9
Connection Diagram 9
Disc Information 10
Cautions of Use 11
Troubleshooting 12
Specifications 13
Caution
Please read and observe all warnings and instructions in this owner's manual and those marked on the unit. Retain this booklet for future reference.
The Two kinds of alarm symbols are as follows:

WARNING
The lightning flash with arrowhead symbol within an equilateral triangle is intended to alert the user to the presence of "dangerous voltage" within the product's enclosure that may be of sufficient magnitude to constitute a risk of electric shock to persons.

CAUTION
The exclamation point within an equilateral triangle is intended to alert the user to the presence of important operating and maintenance (servicing) instructions in the literature accompanying the product.
WARNING
The driver should never operate these products while the vehicle is in motion! Installation of all TV monitors must be out of the driver's field of vision! Do not try and service these products yourself, seek only a qualified service center or factory service center.
Be careful not to drop or apply undue pressure to the front panel of your video monitor. If the screen cracks due to misuse your warranty will be void!
Make sure to keep products away from healer duels or vents and out of direct sunlight. Do not mount forward of the driver's shoulders.
Be careful not to overload your cigarette lighter plug by adding more than one device at a time.
Be careful with any liquids in your car. If you or your child spills any liquid on these products, park your vehicle at the roadside, turn the key off to disconnect the power and then wipe the products with a towel. Do not operate the equipment until all liquids have evaporated or you have had the monitor inspected by a qualified Technician. Severe harm or death can occur!
Just use a wet cloth to clean the screen, only use purified water on the cloth, wring out all excess water before wiping the screen. Do not use any cleaners or chemicals to clean the screen. In most cases a dry cloth will do!
Do not mount the product where it will obstruct the deployment of the airbag or in an area where it would affect the vehicular control. Also be careful to avoid mounting the product where it can become hazardous during sudden stops or in the event of an accident.
Caution
Quality installations are performed by qualified and certified installers.
Watching the monitor for an extended period of time without the engine running may deplete the vehicle's battery charge.
This product is designed for operation with a 12 Volt DC, negative ground vehicle. It is not suitable for operation under other conditions or voltages.
Check Point
-
The operating temperature of this product is limited to -4^ +176^ . Your vehicle can reach temperatures up to 22^ in the summertime.
-
If your vehicle is extremely hot or cold you must allow time for your air conditioner or heater to cool or heat the vehicle until operating temperatures have returned to the normal operating ranges.
-
Optimum picture quality will be achieved when viewed from directly in front of the monitor (+/-30 degrees).
-
Do not open the housing and attempt to make any repair yourself. Refer servicing to qualified personnel.
-
DVD Players use an invisible laser beam which can cause hazardous radiation exposure. Be sure to operate the unit correctly as instructed.
-
Do not cut the car power supply off while a disc is playing. It can cause damage to the DVD Player.
| TYPE | Content | Size |
| DVD | Video & Audio (dynamic image) | 12cm/8cm |
| VCD | Video & Audio (dynamic image) | 12cm/8cm |
| CD | AUDIO | 12cm/8cm |
| MP3 | AUDIO | 12cm/8cm |
| MP4 | Video & Audio (dynamic image) | 12cm/8cm |
Disc-related terms
- Tille (DVD Only)
- The main film content or accompanying feature content or additional feature content, or music album. Each title is assigned a title reference number enabling you to locate it easily. - Chapter (DVD Only)
Name and Function of Each Part
Sections of a picture or a musical piece that are smaller than titles.
A title is composed of one or several chapters. Each chapter has an assigned chapter number, enabling you to locate the chapter you want. Depending on the disc, no chapters may be recorded.
Track (Video CD and audio CD only)
Sections of a picture or a musical piece on a video CD or an audio CD.
Each track has an assigned track number, enabling you to locate the track you want.
Diagram of DVD disc Diagram of VCD/CD


UNIT
-
This little key is for the unit Screen Savers
-
Vol-/Rewind Forward Skip: Press and hold to reduce volume, short press to enter rewind forward
-
Vol+/Fast Forward Skip: Press and hold to increase volume, short press to enter fast forward.
-
This key controls Dome Light Key 7. If pressing this key after pressing Key 7, and Key 7 doesn't work, press this key again, then Key 7 works.
-
Menu Key (Press this key to enter MENU setup, hold it for one second to select)
-
Power ON/OFF: Press and hold or short press to turn ON/OFF the unit
-
Dome Light Key
-
Pause/Open: Press and hold for Disc IN/OUT. Short press for pause display.
-
SD/USB/DVD/AV Switch Key: Press and hold to select DVD/SD/SUB; Short press to switch DVD/AV1/AV2 mode
-
Dome light and IR Receive for remote control
11. DVD Loader
-
USB
-
HDMI
-
SD
-
AV

Name and Function of Each Part Remote Control Unit

Attention:
- Direct the control to window of infrared receiver of the machine.
- Do not press, drop and disassemble the remote control.
- Continually press the keys on control with least two-seconds pause.
- Please put out the battery when not using the control for a long time.
Method of Operating DVD System
Playing a disc (DVD/VCD/CD)
• Turn ON the player insert the DVD disc
• Make sure that the disc's label is facing up
- Sliding into the slot, the disc is automatically played
• To stop press the button STOP
• To stop temporarily press the button PLAY/PAUSE
Playing a MP3/MP4 file
- Turn on the player insert the SD/SUB
-
Sliding into the slot, the SD/USB is automatically played
• To stop press the button STOP
• To stop temporarily press the button PLAY/PAUSE
• To resume again press the button PLAY/PAUSE
• To replay a song you want -
Press the button after choosing a song (track) you want by using Arrow button
-
You can replay the song directly by entering the number of the song.
Disc Menu
- You can select the following menu when are recorded in discs.
• To display recorded menu on disc DVD/VCD 2.0 - Press the DVD Menu key
• The menu recorded in disc appears. (Scene Selection, Special Features, etc) - Menu appears differently depending on discs.
• CD, VCD1.1 does not have disc menu function - Press the arrow keys to remove to item you want, and press the ENTER key.
MENU FUNCTION
- Press MENU key on the unit panel or press TFT/MENU key on remote control
• To enter into main menu:
PICTURE - VOLUME - OPTION - SYSTEM - CLOCK
Press ▲/▼ to select submenu and take the corresponding setup.
Picture Control
AV Picture Selections:
Use the unit (remote control) to achieve the desired settings.
-
Press the MENU (remote TFT MENU) button on the unit to bring up the on-screen picture control menu.
-
Select the desired menu by pressing MENU button on the unit to choose main: PICTURE, VOLUME, OPTION, SYSTEM or CLOCK. Press the ▲/▼ (remote ▲/▼) button to enter main menu.
-
Press the ◀/▶ (remote ◀/▶) button to adjust the sub-menu setting. In the menu controlled process, press the MENU button to return to the upper level of menus.
Playing a Disc
Playing DVD player
Turn ON the power, and place the disc in.
- Press the power button to turn ON (Power indicator is OFF). display is ON and the player will start loading the disc.
- Press the Open button to eject the disc tray out, then insert the disc, press the open button again to close. The player will recognize the different formats of the discs, and disc mark will be displayed on the top left side of the screen.
- While playing DVD discs, please select one item in DVD menu or title menu. while playing VCD2.0 or CD, this player plays one by one.
- Press the Direction Buttons or the Number Buttons to select the desired item, then press Enter or Play to start.
- The player will play automatically. Press Pause to stop temporarily, press pause again Pause or Play to cancel pause. While playing a DVD disc, press stop for memory stop, press Play for memory play, press Stop twice to stop playing. Note: To stop playing DVD press Stop twice.
Basic Operation
FM channel: This unit has multiple frequencies
Unit Control
Press the menu button on the unit, press the AV/DVD button, then press +/- to select the SOUND CONTROL item. Press AV/DVD button, select the press +/- to display the FM menu, press unit AV/DVD button, then press +/- to select the FM channel. In the menu controlled process, press the MENU button to return to the upper level of menus.
Remote Control
press the menu button on the remote control, press the ▲/▼ button, then press ◀/▶ to select the SOUND CONTROL item. Press the ▲/▼ button, then press ◀/▶ to display the FM menu, press ▲/▼ button, then press ◀/▶ to select the FM channel. In the menu controlled process, press the TFT MENU button to return to the upper level of menus.
Video System Interface
Use the included remote control or buttons on the monitor panel to control your media.
Hold in the MENU button to access settings, hold the MENU button to exit the settings screen interface.

Main Menu Option Settings:
Settings and Configuration - System Setup
Use the included remote control or buttons on the monitor panel to control system setup configuration.
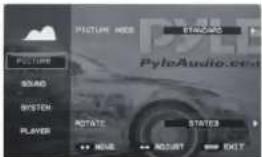
Mode standard, vivid, soft, optimal, user (custom)
Rotate state 1, state 2, state 3, state 4
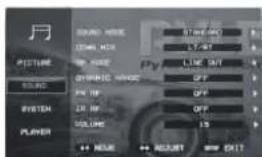
Sound
Sound Mode standard, music, speech, movie
Down Mix LT/RT, stereo, VSS
OP Mode Line out, RF remod
Dynamic Range OFF, 1/8 - 7/8, full
FM RF Frequency selection
IR RF A, B, OFF
Volume 0 - 15 (Max)
Settings and Configuration
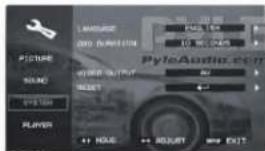
SYSTEM
Language ...... English, French, Chinese, Italian, Spanish, Portuguese, Deutsch
OSD Duration Never, 5, 10, 30 & 60 seconds
Video Output AV, OFF
Reset Rest System & Settings
PLAYER
TV System PAL, NTSC, AUTO
Screen Save ON/OFF
Aspect Ratio 4:3LB, 4:3PS, 16:9
Password (Default 0000)
Resume ON/OFF
Audio Language Selectable
Subtitle Language Selectable
Menu Language Selectable
*Please note: state1, state2, state3 and state4 allow the monitor's display screen to rotate and flip. To accommodate for rear view and backup camera system compatibility, the settings menu also rotates and flips -- this may result in difficulty of reading the menu settings text. To assist in reading the menu settings text, revert the ROTATE setting selection back to 'state3' and resume configuring your settings.
*Change the TV System settings to adjust the DVD output format of your media disc.
Power ON/OFF
Press and hold the Power button to turn ON/OFF the unit
Monitor Source Selection
Press the Power button to switch between the (4) source input selection modes.
• Disc, AV1, AV2, HDMI
CD/DVD System Operation
Insert a CD/DVD -- with the label facing the back of the PLRD146. The contents will automatically play upon insertion.
MP3 Playback
Insert a USB Flash or SD Memory Card and your media will automatically play.
Installation (Professional Installation Recommended)
Product Installation & Housing Changing Operation
- Turn over the machine, and take down the metal support bracket carefully.
- Tighten the metal support bracket to the ceiling of vehicle as showed in the second picture, and leave a certain space to let the connecting wire pass through. (Take extra care to avoid damage)
- To install the unit to the metal support bracket, connecting with the unit and the wires passing through the space remained. (Take care to tidy up the wires to avoid pressing Multimedia chipset. And install special screws to avoid loose.)
NOTICE: If you need to change the housing, please do it before installing the machine in the car.
Chip installed inside products is composed by mechanism and electronic sub-assembly, be careful when installing and pay attention to be pressured.


4. Installing and changing Interchangeable skin
You can change different colors of the interchangeable housings easily by opening the original housings with a small release key provided in the package.

natural_image
Simple line drawing of a device with no text, numbers, or symbolsConnection Diagram

Without audio & video input or audio & video output, the wire of input & output does not need to be connected.
DISC INFORMATION
DVD features
DVD discs provide high-resolution images with high-quality sound and surround sound effects. This DVD player can play not only DVD discs of various versions, but also S-VCD, VCD, audio CD and MP3 discs. Each disc only plays the information saved in it, and some functions cannot be utilized.
Discs that cannot be played
DVD-RW, DVD-REM, CD-ROM, CD-EXTRA discs cannot be played on this unit. Also, a CD or a CD-RW which was recorded on special software cannot be played.
Region code
Your DVD player is designed and manufactured to region management information that is recorded on a DVD disc. The region number of this DVD Player is 1. This DVD player plays free code also.
Copyright protection.
This product incorporates copyright protection technology that is protected by methods claims of certain US. patents and other intellectual property rights owned by the Macrovision Corporation and other rights. Owner's use of this copyright protection technology must be authorized by the Macrovision Corporation, and is intended for home and other limited viewing uses only unless otherwise authorized by the Macrovision Corporation.
How to handle the disc
Don't touch the shiny side of the disc (the side with the embedded information). Don't stick a label or a glue-based note on either side of the disc. Don't use discs that have glue or a damaged gluey label- it might result in damage to your DVD player. Don't put discs in the sunshine. Park your car in the shade.
Caution
Wipe softly with a wet cloth and then with a dry one. Before playback, wipe the disc outward from the center with a clean cloth. Do not use any type of solvent such as thinner, benzene, commercially - available cleaners or antistatic spray. To avoid damaging your DVD player, don't use a scratched disc.
CAUTIONS ON USE
Handing
When holding with both hands

- Do not use damaged (cracked or warped) discs.
- Do not scratch the signal surface or let it become dirty.
- Do not stick a label or a glue-based note on either side of the disc.
- Do not use discs that have glue or a damaged label with exposed adhesive residue, it might result in damage to your DVD player.
- Do not put discs in the sunshine. Park your car in the shade.

natural_image
Simple line drawings of a CD/DVD, a cross symbol, and an oval shape with internal markings (no text or labels)Storing discs
Always put discs in their place and store them vertically. Do not put discs in a hot or humid place, places exposed to direct sunlight and places in which the temperature is extremely low or high.
- Read any cautions included with the disc carefully.
Cleaning discs
Fingerprints or dust on discs may reduce sound or picture quality. Remove them by wiping the disc with a soft cloth from the center toward the edges gently.

- For tough dirt, wipe softly with a wet cloth and then with a dry one.
- Do not use any type of solvent such as thinner, benzene.
- Do not use antistatic spray.
Irregularly shaped disc
Irregularly shaped discs (heart-shaped discs, hexagonal discs, etc.) cannot be played on this player. - May cause damage to the player. - Only use round discs.

natural_image
Simple geometric shapes: an oval with concentric circles, a pentagon, and a cross (no text or symbols)Troubleshooting
| TROUBLE | ACTION |
| No power | Check and see if the power cable is properly connected. |
| No picture | Make sure that the equipment is properly connected. Check and see if the connected monitor is turned on |
| Stopped picture | Check and see if the video cable is properly connected and if the monitor is turned on. |
| Poor playback picture Clean the disc | |
| No color The color system of this unit does not match the color system of the monitor. Check the color system of the unit. | |
| Distorted sound Adjust the video system by pressing the TV system button. (PAL, NTSC) | |
| The remote control doesnt work properly | Remove any obstacles between the remote control unit and the remote control sensor. Operate the remote control at a shorter distance. |
| DISC ERROR is displayed on the screen | Set the power button to OFF and then back to ON alternatively. Turn OFF the power, disconnect the power plug and then reconnect it. |
CHECK POINT
When a disc is brought from a cold environment to a warm one, there may be moisture on the disc, or condensation will appear on the pickup lens. It will affect the disc playback.
- Remove the disc from the Multimedia player.
- Turn ON the power and leave it ON for an hour to vaporize the condensation.
- You can now operate the Multimedia player without any problem.
PLRD146
Roof Mount LCD Monitor
13.3" Roof Mount TFT LCD Monitor Built In Multimedia Disc/USB/SD Player with Wireless FM/IR Transmitter & Included 3 Color Skins (Gry/Blk/Tan)
Features:
• 13.3" Wide Screen Hi Resolution TFT-LCD Monitor
• Overhead Console with Dual LED Dome Lights
• On Screen Menu Control
• Full Function wireless remote control
• IR Transmitter Ready for Wireless Headphone
• Overhead Console with Dual LED Dome Lights
- TouchButton Dual Function Front Mounted Controls
• Side Mount Slot-Load DVD Player
• DVD CD/CD/CD-R/CDRW/MP3 Compatible
• Built in Speaker's and audible button indicators
• Built in Anti-Skip Mechanism & Last position memory
- Wireless FM Transmitter to broadcast to a existing FM stereo (Portable/Car/Etc.)
• 3 sets of interchangeable 2pc snap-on color skins.
Choose from Grey, Black, or Tan
Whats' in the Box:
- LCD Monitor
• One wireless remote control - User of manual
• One small release key
• 2 sets of interchangeable housings
• Fix Screws x 4 pcs
Technical Specifications:
• Resolution: 1280 x 800
• Brightness: 450 Cd/Sq.M
- Contrast Ratio: 500:1
• Power Source: DC 12 Volt
• Multi System: NTSC/PAL Auto Switch
- Dimensions (LxWxH): 16.2" x 13.0" x 2.15" Closed (9.75" Open)
- PYLE
- Contents
- Name and Function of Each Part
- Picture Control
- Caution
- WARNING
- Check Point
- Disc-related terms
- UNIT
- DVD Loader
- Attention:
- Method of Operating DVD System
- Playing a disc (DVD/VCD/CD)
- Playing a MP3/MP4 file
- Disc Menu
- MENU FUNCTION
- PICTURE - VOLUME - OPTION - SYSTEM - CLOCK
- AV Picture Selections:
- Playing a Disc
- Playing DVD player
- Basic Operation
- Unit Control
- Remote Control
- Video System Interface
- Settings and Configuration - System Setup
- Sound
- Settings and Configuration
- SYSTEM
- PLAYER
- Power ON/OFF
- Monitor Source Selection
- CD/DVD System Operation
- MP3 Playback
- Installation (Professional Installation Recommended)
- Product Installation & Housing Changing Operation
- Installing and changing Interchangeable skin
- Connection Diagram
- DISC INFORMATION
- DVD features
- Discs that cannot be played
- Region code
- Copyright protection.
- How to handle the disc
- CAUTIONS ON USE
- Handing
- Storing discs
- Cleaning discs
- Irregularly shaped disc
- PLRD146
- Roof Mount LCD Monitor
- Features:
- Whats' in the Box:
- Technical Specifications:
Brand : Pyle
Model : PLRD146
Category : Car LCD Screen