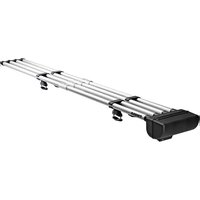
RodVault 4 870004 - Roof rack THULE - Free user manual and instructions
Find the device manual for free RodVault 4 870004 THULE in PDF.


| Product Type | Roof-mounted fishing rod carrier |
| Model Number | 870004 |
| Brand | Thule |
| Dimensions (L x W x H) | 182.9 x 30.5 x 15.2 cm |
| Weight | 11.3 kg |
| Material | UV-resistant ABS plastic |
| Color | Black |
| Rod Capacity | Up to 4 fishing rods |
| Max Rod Length | 2.3 m (7.5 ft) |
| Locking System | Key lockable |
| Installation | Requires roof crossbars (sold separately) |
| Security | Lockable lid and rod retention straps |
| Maintenance | Clean with mild soap and water; dry thoroughly |
| Spare Parts | Replacement keys, locks, and straps available |
| Warranty | Limited lifetime warranty |
| Compliance | TÜV approved, meets safety standards |
Frequently Asked Questions - RodVault 4 870004 THULE
User questions about RodVault 4 870004 THULE
0 question about this device. Answer the ones you know or ask your own.
Ask a new question about this device
Download the instructions for your Roof rack in PDF format for free! Find your manual RodVault 4 870004 - THULE and take your electronic device back in hand. On this page are published all the documents necessary for the use of your device. RodVault 4 870004 by THULE.
USER MANUAL RodVault 4 870004 THULE
> Installation instructions
EN
PROVIDED
• (2) keys
• (2 or 4) mounting clamps & (2 or 4) clamp covers
- (2 or 4) feet
• (2 or 4) 2.5" king bolts - partially threaded
• (2 or 4) lock washers & (2 or 4) flat washers
• (2 or 4) couplers with a total of 12 or 24 screws
- (4 or 8) 2" bolts fully threaded with washers (2 or 4 of these are located in the tube clamps during shipping, you will need to remove them before assembly)
- (2 or 4) tube clamp sets composed of one threaded piece and one not threaded piece
- 14 inch allen wrench (for 2.5" partially threaded bolts & 2" fully threaded bolts)
- 4mm allen wrench (for the coupler screws)
- Thule Xsporter Adapter (4 or 8 2.5" king bolts)
PREPARATION
Step 1:
- Unpackage Thule Rod Vault and place both sections on a scratch free surface with the reel housing facing up, and the nose cone with the rivets facing up
- Remove the parts from the internal packaging box and lay them out. Cross reference with "provided" list from above
- Before you begin to assemble: remove the 2" bolts from the tube clamps (FIGURE #1)
Step 2:
- Place the threaded tube clamps underneath the tubes, then place the non-threaded piece directly on top
- Slide a lock washer, then a flat washer onto the partially threaded 2.5" (2 or 4) king bolts
- Insert king bolt up through the mounting clamp & clamp cover (x2 or x4) using a ¼ inch allen wrench, screw king bolts into the tube clamps and leave them loose enough so that the tube clamps can still slide back and forth (FIGURE #2)
Step 3:
- Loosen coupler screws with 4mm allen wrench
- Connect the nose cone & reel house sections, making sure tubes are flush and meet at the center the couplers, then tighten
MEASURE & SET
- Gently set the Thule Rod Vault on top of your vehicle and adjust the (2 or 4) tube clamps to sit on your crossbars (ideally, one tube clamp on each side of the couplers, but not mandatory)
- Make sure the reel housing is far enough forward so that you can open your rear window or hatch on your vehicle (some vehicles like Toyota 4runners, may need a "lift kit" [available separately] so that the reel housing clears the roof)
- Once adjusted, remove the rod vault and tighten down the king bolts into place
INSTALL ON YOUR VEHICLE
- Note: If mounting to Thule Xsporter use 2.5" king bolts instead of 2" bolts on mounting clamp assemblies
- Place Thule Rod Vault on top of vehicle ensuring that it is straight, twist the clamp cover on the mounting clamp to expose the bolt holes
- Place one mounting clamp foot under each mounting clamp and insert (2) 2" bolts with washers and tighten (FIGURE #3). DO NOT OVERTIGHTEN, as feet may break
- Rotate top clamp cover so that the "lock holes" are aligned (this provides an option to padlock your rod vault to your vehicle)
- Always check tightness of all bolts before each trip to ensure the rod vault is secure. Do not overtighten
Thule RodVault
870002 2 fly rods
870004 4 fly rods
FIGURE #1
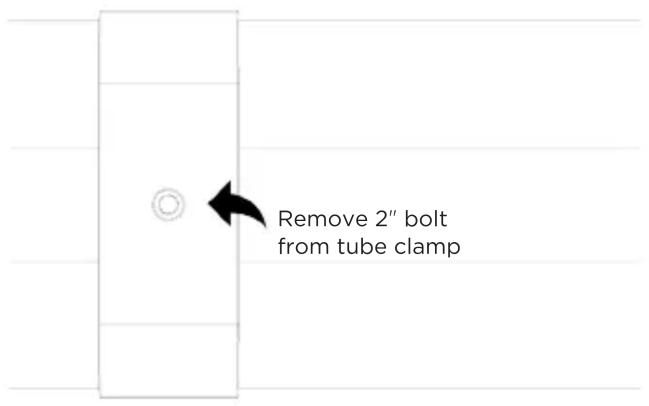
FIGURE #2

FIGURE #3
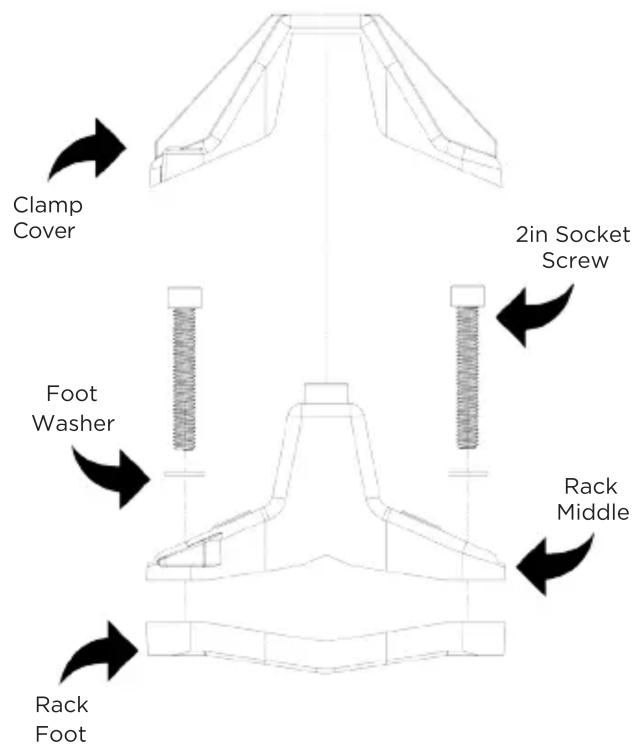
flowchart
graph TD
    A["Clamp Cover"] --> B["Foot Washer"]
    B --> C["Rack Middle"]
    C --> D["Rack Foot"]
    D --> E["2in Socket Screw"]
FIGURE #4

natural_image
Technical line drawing of a mechanical clamp or bracket assembly (no text or symbols)THULE® SWEDEN
Congratulations and thank you
for buying a high quality product from Thule. In order to keep you informed about relevant product news and important warranty and product safety information, please go in and register your product at our website:
www.thule.com/register
Note down Production Date/Serial Number
THULE
GUARANTEE

THULE.COM


Brand : THULE
Model : RodVault 4 870004
Category : Roof rack