
SLM332 - Projector Mount Chief - Free user manual and instructions
Find the device manual for free SLM332 Chief in PDF.


| Product Type | Flat Panel Wall Mount |
| Model | SLM332 |
| Brand | Chief |
| VESA Compatibility | 75x75mm and 100x100mm |
| Maximum Screen Size | 32 inches |
| Weight Capacity | 50 lbs (22.7 kg) |
| Tilt Range | 0° to 15° |
| Profile | Low profile, 1.2 inches from wall |
| Material | Steel with powder coat finish |
| Dimensions (W x H x D) | 6.5 x 4.3 x 1.2 inches |
| Weight | 2.1 lbs (0.95 kg) |
| Mounting Pattern | Universal, fits most flat panels |
| Wall Plate Size | 5.2 x 3.5 inches |
| Hardware Included | Mount, screws, spacers, level, and drill template |
| Installation | Easy DIY, requires stud finding |
| Safety Features | Security screws and lockable design |
| Maintenance | Wipe with dry cloth; no solvents |
| Parts Availability | Spare hardware kit available from Chief |
| Certifications | UL listed |
| Warranty | 10 years limited |
Frequently Asked Questions - SLM332 Chief
User questions about SLM332 Chief
0 question about this device. Answer the ones you know or ask your own.
Ask a new question about this device
Download the instructions for your Projector Mount in PDF format for free! Find your manual SLM332 - Chief and take your electronic device back in hand. On this page are published all the documents necessary for the use of your device. SLM332 by Chief.
USER MANUAL SLM332 Chief
INSTALLATION INSTRUCTIONS
SSB-332, SSM-332, SLB-332 and SLM-332 Interface Brackets
SSB-332, SSM-332, SLB-332 and SLM-332 Interface Brackets are designed for use with Chief® Series Projector Mounts. See the specific installation instructions provided with the mount for additional installation information.
Unpack carton and verify kit contents. If any listed parts are missing, immediately contact a Chief Customer Service representative.

WARNING: IMPROPER INSTALLATION CAN LEAD TO EQUIPMENT FALLING CAUSING SERIOUS PERSONAL INJURY AND DAMAGE TO EQUIPMENT! DO NOT substitute hardware. Use only hardware supplied by manufacturer!
(1) Interface Bracket (4) Screw, Phillips Flat Head, Machine, M4 x 16mm
(4) 10-24 Thumb Nuts ** (4) Spacer, Nylon .500 x .194 x .375"
(1) All-Points Security Kit (1) 5/32" Security Hex Key

SLB-332
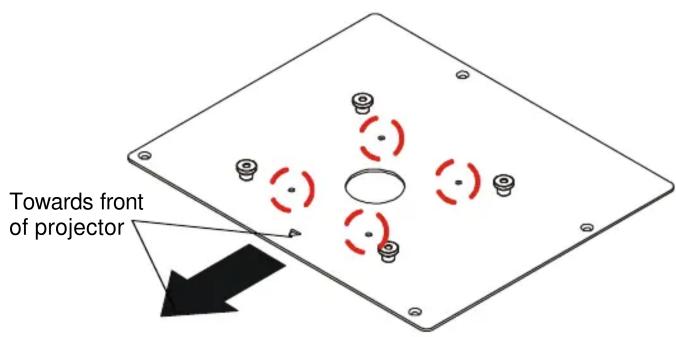
Note: SSB-style interface bracket connections are circled.
SLM-332
Note: SSM-style interface bracket connections are circled.
**Only used when installing SLB/SSB interface brackets.
NOTE: Specific to SSB-style and SSM-style interface bracket installation: All appropriate screws come pre-installed in the circled locations above. DO NOT attempt to substitute and USE ONLY this pre-installed hardware for SSB-style and SSM-style interface bracket installation.
Installation Instructions

WARNING: OVER TIGHTENING OF SCREWS CAN DAMAGE PARTS AND CAN LEAD TO SERIOUS PERSONAL INJURY AND DAMAGE TO EQUIPMENT! DO NOT over tighten screws when installing interface brackets.
NOTE: Step 1 is only required when installing an SLB/SSB interface bracket. If an SLM/SSM bracket is being installed, proceed to step 2.
- Screw thumb screws onto 10-24 x 5/8" Phillips pan head screws. DO NOT fully tighten thumb screws at this time.
- Turn projector upside down on a flat surface.
- Place the nylon spacers onto bottom of the projector, aligning them with the threaded inserts in the bottom of the projector.
- Place the interface bracket onto the spacers, aligning the mounting holes in the bracket with the nylon spacers and threaded inserts in the bottom of the projector, and ensuring that triangle in bracket points towards front of projector.
- Position M4 x 16mm mounting screws into the interface bracket, spacers and threaded inserts. Tighten all fasteners at this time, securing the bracket to the projector.
NOTE: Security screws can be substituted when mounting Interface bracket to projector by using the parts and installation instructions in the All-Points Security Kit.
Chief® is a registered trademark of Milestone AV Technologies. All rights reserved.

Milestone AV Technologies, and its affiliated corporations and subsidiaries (collectively, "Milestone"), intend to make this manual accurate and complete. However, Milestone makes no claim that the information contained herein covers all details, conditions or variations, nor does it provide for every possible contingency in connection with the installation or use of this product. The information contained in this document is subject to change without notice or obligation of any kind. Milestone makes no representation of warranty, expressed or implied, regarding the information contained herein. Milestone assumes no responsibility for accuracy, completeness or sufficiency of the information contained in this document.

CHIEF®
Our Mounts. Your Vision.
Chief, a products division of Milestone AV Technologies
6436 City West Parkway, Eden Prairie, MN 55344
• P: 800.582.6480 / 952.225.6000 • F:877.894.6918 / 952.894.6918
8800-002685 Rev00
©2014 Milestone AV Technologies
12/14


Brand : Chief
Model : SLM332
Category : Projector Mount