
NS-4V24 - Media player INSIGNIA - Free user manual and instructions
Find the device manual for free NS-4V24 INSIGNIA in PDF.


| Product Type | Media Player |
| Brand | Insignia |
| Model | NS-4V24 |
| Dimensions (W x D x H) | 4.5 x 2.5 x 1.0 inches |
| Weight | 0.5 lb (227 g) |
| Power Supply | USB 5V DC, 1A |
| Video Output | HDMI, Composite AV |
| Audio Output | HDMI, Stereo RCA |
| Supported Video Formats | MPEG-4, H.264, AVI, MKV, MOV, WMV |
| Supported Audio Formats | MP3, WMA, WAV, AAC, FLAC |
| Supported Image Formats | JPEG, BMP, PNG, GIF |
| Storage Interfaces | USB 2.0, SD Card Slot |
| Remote Control | Included (IR) |
| File System Support | FAT32, NTFS, exFAT |
| Media Playback | USB drive, SD card |
| Maintenance | Wipe with a soft, dry cloth |
| Safety Precautions | Do not expose to liquids or extreme temperatures |
| Spare Parts Available | Remote control (model NS-RC4V24) |
| General Information | Compatible with most TVs, plug-and-play setup |
Frequently Asked Questions - NS-4V24 INSIGNIA
User questions about NS-4V24 INSIGNIA
0 question about this device. Answer the ones you know or ask your own.
Ask a new question about this device
Download the instructions for your Media player in PDF format for free! Find your manual NS-4V24 - INSIGNIA and take your electronic device back in hand. On this page are published all the documents necessary for the use of your device. NS-4V24 by INSIGNIA.
USER MANUAL NS-4V24 INSIGNIA
System requirements 5
Controls and connections....5
Setting up your MP3 player 8
Charging the battery....8
Connecting headphones 9
Installing the included software 9
Using your MP3 player....10
Turning your player on and off 10
Navigating the on-screen menus 10
Changing the volume 11
Locking the buttons 11
Getting more music 11
Transferring music files to your player 14
Playing music files 17
Viewing photos....20
Watching videos....22
Browsing folders....23
Deleting all files 24
Disconnecting the player 24
Listening to FM radio 25
Recording....26
Connecting to Bluetooth headphones 27
Changing settings. 30
Maintaining your MP3 player 32
Care and cleaning 32
Updating the firmware 32
Buying a new battery 32
FAQ 32
Getting help 33
Learn more....33
Specifications....33
Legal notices 34
Warranty....35
Español....36
Introduction
Congratulations on your purchase of a high-quality Insignia product. Your NS-4V24 or NS-8V24 represents the state of the art in digital media players and is designed for reliable and trouble-free performance. You can use your MP3 player to play digital video and music files, play audiobooks from Audible.com, and listen to FM radio. And the best part is that you can carry it with you anywhere.


For The Perfect Sync!
Your new player works with most subscription services and is optimized for use with the Best Buy Digital Music Store. For more details, see the Quick Start Guide. Your new player also features Bluetooth technology which allows you to listen to music wirelessly. See the Bluetooth section for information about using optional headphones.
Safety information
- Read, keep, and follow all instructions. Heed all warnings.
- Only use attachments and accessories for Insignia products or universal accessories.
-
Turn down the volume before turning on your MP3 player and avoid using it at a high volume. Permanent hearing loss may occur if earphones or headphones are used at high volume. Reducing the volume also extends battery life.
-
Do not use headphones or earphones while driving, cycling, or operating any motorized vehicle. This may create a traffic hazard and may be illegal in your area.
- To reduce the chance of electrical shock, do not use or operate this device near moist environments.
- Unplug the player during lightning storms or when unused for long periods of time.
- Risk of explosion, damage, or battery leakage if the battery is replaced incorrectly or replaced by an incorrect type. Dispose of used batteries according to local regulations.
- Clean only with a dry cloth.
- Do not disassemble the player to access internal components (except for the battery) under any circumstances.
Features
- Plays MP3, OGG, WMA, secure WMA, WMALossless, WMAPro, WAV, and Audible audio file formats.
- Plays WMV and MPEG-4 video file format.
- Displays JPEG photos.
- Displays text files with .txt extension.
• Supports TV out with optional cable.
• Supports .PLA and .M3U playlists. - Backlit LCD supports several languages and displays album art and song information.
- Digital FM radio tuner allows you to access local radio stations. The radio also memorizes up to 20 of your favorite radio stations.
- FM tuner features RDS technology which allows you to see the name and artist of the song being broadcast.
Note
Not all radio stations elect to transmit RDS.
- Five preset equalizer settings to optimize playback for normal, rock, jazz, classical, and pop music. You can also set a custom equalizer setting for a total of six to choose from.
- Sophisticated music library sorting lets you browse the music in your player by artist, album, song title, genre, and playlist.
- A-B Repeat lets you select any start and end points during playback, so you can repeatedly play that segment. This feature is especially helpful while learning languages and words to songs.
• High-speed mini USB 2.0 port for fast and easy file transfers.
• Supports Microsoft WMDRM 10 technology. - Fully compatible with the Best Buy Digital Music Store (BBDMS), and other Microsoft PlaysforSure music services like Napster and Yahoo.
- Easy-to-use menus.
- Mechanical wheel controls with Select, Menu, and Power buttons.
• Audio headphone jack.
• Secondary headphone jack which also can be used for line-in recording. - Records from either line-in or the Radio.
- Support for external memory (SD Card).
- Upgradeable firmware to keep your MP3 player up to date.
- Replaceable and rechargeable lithium ion battery for up to 25 hours of music playback time and a 3-hour recharge time.
- Ratings button to mark your music tastes. These ratings are automatically synchronized to BDDMS and other Microsoft PlaysforSure music services.
• Supports Rhapsody Channels for endless hours of new music customized to your tastes. - License information feature tells you when your player requires synchronizing.
- Bluetooth A2DP support allows use of any stereo Bluetooth headphones.
Package contents
- Insignia MP3 player
- Earbuds (Bluetooth headphones sold separately)
- Mini USB 2.0 cable
- Quick Start Guide
• CD (contains Best Buy Digital Music Store software and this online user guide) - Audible offer card
System requirements
To transfer music from your computer to your MP3 player, your computer must have the following minimum system requirements:
• Windows 98 or later
• Mac OS8.6 (requires software update) or later
• One available USB port
- CD Rom Drive
Note
Windows 98 users: Visit the Insignia website at www.insignia-products.com/t-nusb24.aspx for the Windows 98 driver. This driver makes the player appear to your computer like a mass storage device. You can drag and drop files to the player. This driver will not allow you to use subscription-based services with your player.
Controls and connections
Front
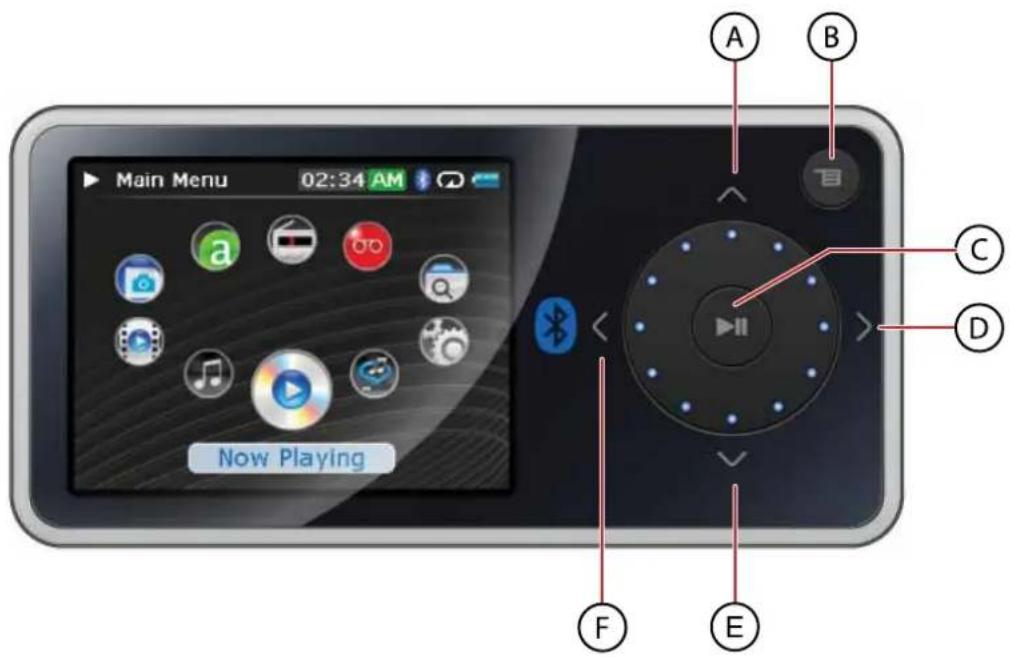
| ItemIconFunction | ||
| A | ^ | UpPress to go back up through menus or change radio frequency presets.Press and hold to increase the volume level when using an armband. |
| B | ¬ | M e n uPress to open the on-screen menu for selecting songs and changing settings.Press to go back to the Now Playing screen. |
| C Play/Pause/Select/Record | ||
| D Fast Forward/Skip/Next | ||
| E | √ | D o w nPress to go down through menus or change radio frequency presets.Press and hold to decrease the volume level when using an armband. |
| F Rewind/Skip | Back/PreviousPress to restart the current track.Press repeatedly to skip to previous tracks.Press and hold to rewind.In FM radio mode, press to change frequencies.In Menu mode, press to scroll backwards through the menu headings. | |
| Scroll wheelRotate to adjust the volume in Now Playing mode.Rotate to move up and down in Menu mode. | ||
Right side
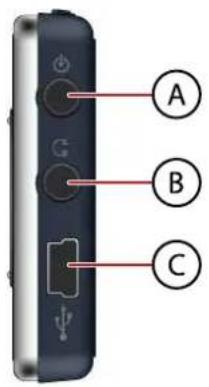
| ItemIconFunction | ||
| A Second auxiliary jack | Connect a second headphone to this jack to listen to sound from the player.Connect a device you want to record from using line-in input. | |
| B Earphone jack | Connect headphones to this jack to listen to sound from the player.Supports video out with the optional Dynex Model DX-IPAVC. | |
| C Mini USB 2.0 port | Connect the USB cable to this port and your computer to manage content with your computer and charge the player's battery. | |
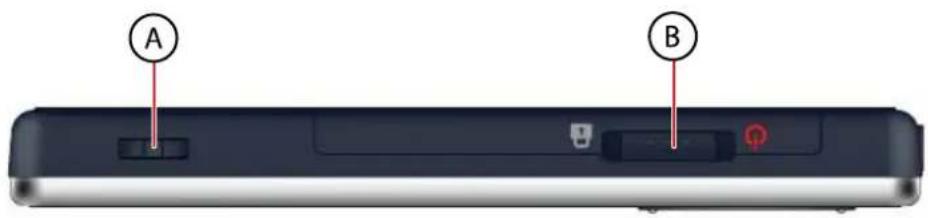
| ItemFunction |
| A Rating buttonSlide to the left or right to rate music.Press to bring up context menus. |
| B Power/HOLD switchSlide to the right and hold for five seconds to turn on or turn off the player.Slide to the right and hold for ten seconds to reset the player.Slide to the left to disable all buttons. See "Manually changing the USB mode" on page 30. |
Bottom
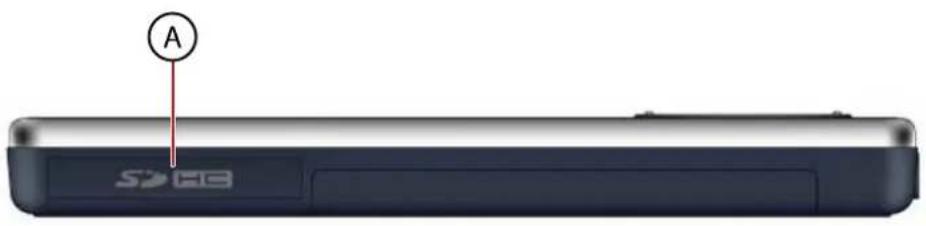
| ItemFunction | |
| A | S D C a r d s l o tInsert a SD card into this slot to increase the memory capacity of your player. |
Back
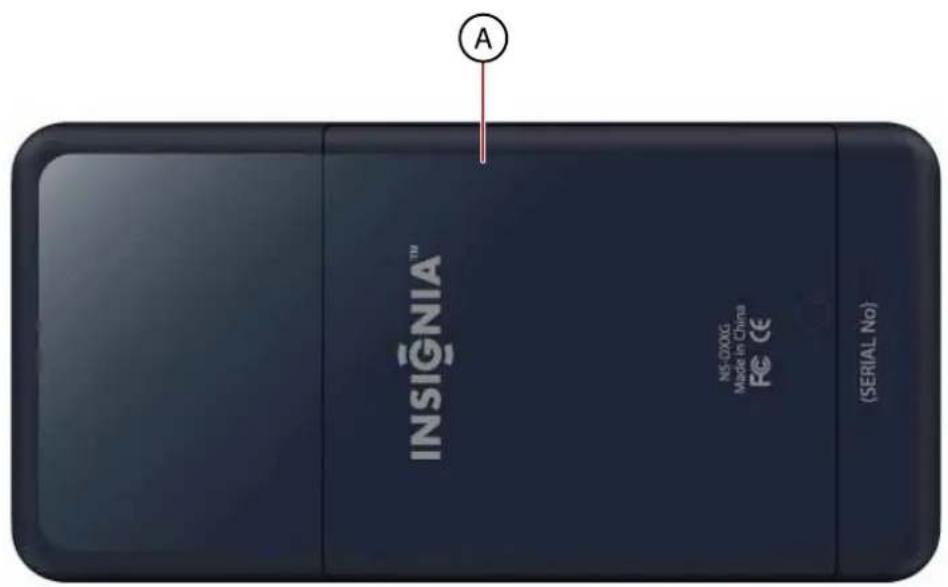
| ItemFunction |
| A Battery coverRemove the battery cover to change the battery. |
Display
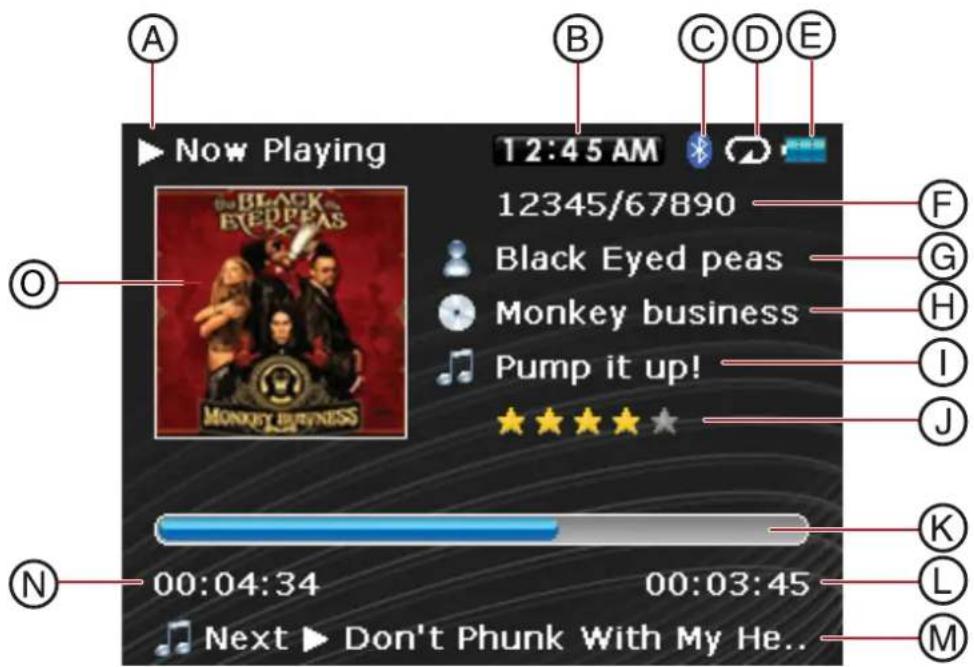
| ItemFunction |
| A Mode Icon—Displays whether a track is playing or paused. |
| B Current time—Displays the current time. |
| C Bluetooth status—Shows the current Bluetooth status. |
| D Repeat/Shuffle icon—Indicates the current Repeat setting. |
| E Battery icon—Indicates the battery's power level. |
| F Track number/Total Number—Lists the track number currently playing and the number of tracks in the queue. |
| G Artist name—Displays the artist name of the current track. |
| H Album name—Displays the album name of the current track. |
| I Track name—Displays the track title of the current track. |
| J Rating—Displays the track rating. |
| K Progress bar—Displays the progress of the song. |
| L Total time—Displays the length of the current track. |
| M Next track—Displays the next track. |
| N Play time—Displays the elapsed time of the current track. |
| O Album Art—Shows the album art for the track, if available. |
Setting up your MP3 player
Charging the battery
Charge the battery whenever you aren't using the player to make sure it's always fully charged. The battery charges in about three hours. A fully charged battery provides up to 25 hours of continuous music playback, depending on the brightness and display time of the backlight, and the volume levels.
Note
The player ships from the factory partially charged. However, we recommend you fully charge it prior to using it.
Tip
To maximize your battery life, in the Settings menu select Display, On Standby, then select Off. If you use this setting, the LCD turns off when the player detects that the user is not pressing any controls.
To charge the battery:
1 Turn on your computer.
2 Connect the supplied mini USB 2.0 cable to the mini USB jack on the player and a standard USB jack on your computer. When the cable is connected correctly, the player begins recharging its battery using the USB connection, and the message OK to disconnect appears on the player.
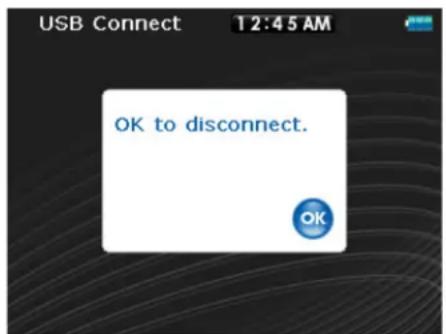
As the battery charges, the blue battery icon shows an animation of being filled from right to left, to illustrate that the battery is charging.


After the player is fully charged, the battery icon turns green, indicating a full charge.

Note
Most AC USB chargers will charge the player as long as they output 5 V and can provide at least 500 mA of current.
Connecting headphones
You can use any headphones with a standard 3.5mm stereo audio plug.
Note
To use Bluetooth headphones instead of standard wired headphones, see "Connecting to Bluetooth headphones" on page 27.
To connect headphones:
- Plug headphones or the provided earphones into the earphone/headphone jacks on the player.
Note
To use the FM radio, you must have the provided earphones connected, because they act as the FM antenna. You can use any headphones with unshielded wires. For best reception and especially to receive RDS text, make sure that your headphone cable is not coiled and is extended to maximize its length.
Installing the included software
The instructions in this guide require installation of both the Best Buy Digital Music Store Media Manager Software and the ArcSoft Media Converter.
Note
Attention Apple Users (OS 8.6 and higher):
- Do not install the software.
- Connect your player to your computer.
To install the software:
1 Insert the Insignia software CD into your computer's CD drive. The software installation program starts. -OR-
If the installation program doesn't start automatically, double-click My Computer on your desktop, double-click the CD drive that contains the Insignia CD, then double-click the file Setup.exe. The software installation program starts.
2 Follow the on-screen instructions to finish the installation.
Tip
For iTunes Drag and Drop support, File & Folder (MSC) USB mode is automatically enabled when you connect the player. Your Insignia MP3 player will only play iTunes MP3 files that you drag and drop from iTunes. For information on changing USB modes, see "Manually changing the USB mode" on page 30.
Using your MP3 player
Turning your player on and off
To turn your player on or off:
- Press/slide and hold towards the (Power).
Navigating the on-screen menus
Use the on-screen menu to play music and change settings.
To navigate the on-screen menu:
1 Press ☐ (Menu). The main menu opens.
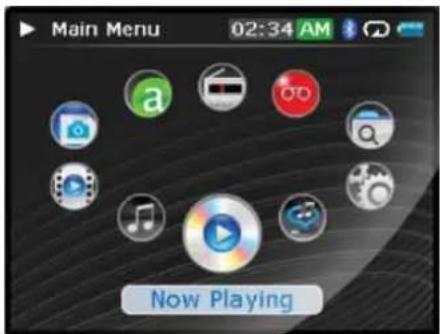
2 Use the scroll wheel to highlight one of the following menu items:
- Now Playing—display the track currently playing.
• Music Library—access your stored tracks.
• Audible Books—access your stored Audible files.
• Video—access your stored video files.
• Photo—access your stored photo files.
• FM Radio—access the built-in FM radio.
• Rhapsody Channel—access your Rhapsody channels. - File browser—allows you to navigate to files by browsing through the directory structure of your device.
- Recording—allows you to record from the line-in jack
- Settings—access your MP3 player settings.
3 Press (Play/Pause) to select an item.
In the Music Library and Settings menus press the < (Previous) and >(Next) buttons to select a heading, then use the scroll wheel to highlight an item.
In the Music Library, press the ∨ (Down) button to open the submenu and the ∧ (Up) button to return up from a submenu.
You can press ▶(Play/Pause) to show the playing options in the Music Library.
In the Settings menu, press ▶ (Play/Pause) to select an item.
To return to the Now Playing screen press the Menu button. When in the Now Playing mode you can open a contextual menu by pressing the Rating button.
Changing the volume
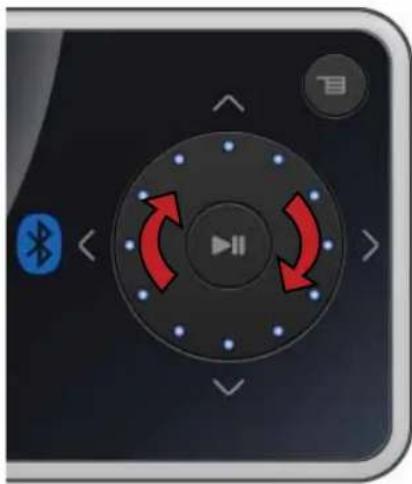
To change the volume:
- Turn the wheel to the right or left to change the volume.
natural_image
Close-up of a black circular play button with red and blue arrows indicating playback control (no text or symbols)Locking the buttons
You can prevent accidental button operation by locking the buttons.
To lock the buttons:
1 Slide the HOLD switch in the direction of the arrow. An image of the lock symbol in the HOLD position appears on the screen.
2 To unlock the buttons, slide the HOLD switch away from the arrow.
Note
To use File & Folder (MSC) USB mode (UMS), see "Manually changing the USB mode" on page 30.
Getting more music
Your MP3 player already contains some music files, but you can get more music from your own music CDs and from the Internet.
Getting music from CDs and the Internet to your MP3 player involves two steps:
1 Rip a CD (create files of the music on the CD) or download music files from the Internet.
2 Select the files to copy and copy them to your player.
Getting music from CDs
To rip a CD:
1 Click Start, All Programs, Best Buy Digital Music Store, Best Buy Digital Music Store. Best Buy Digital Music Store opens.
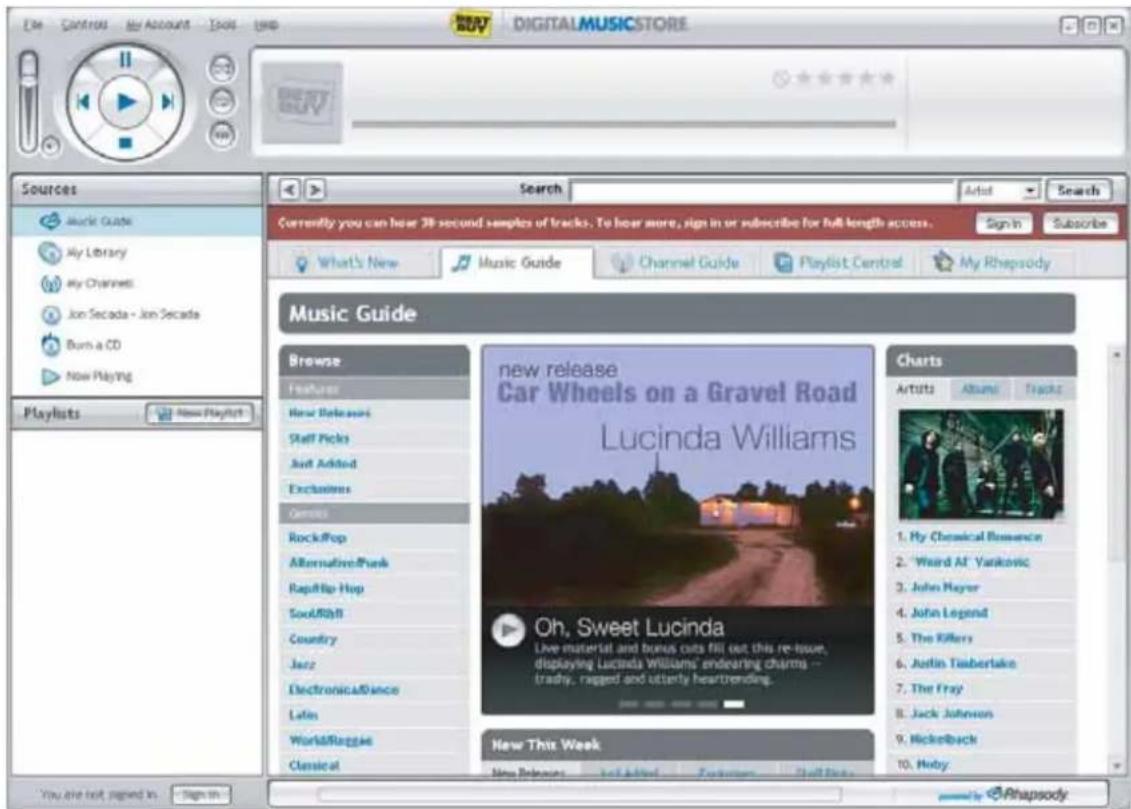
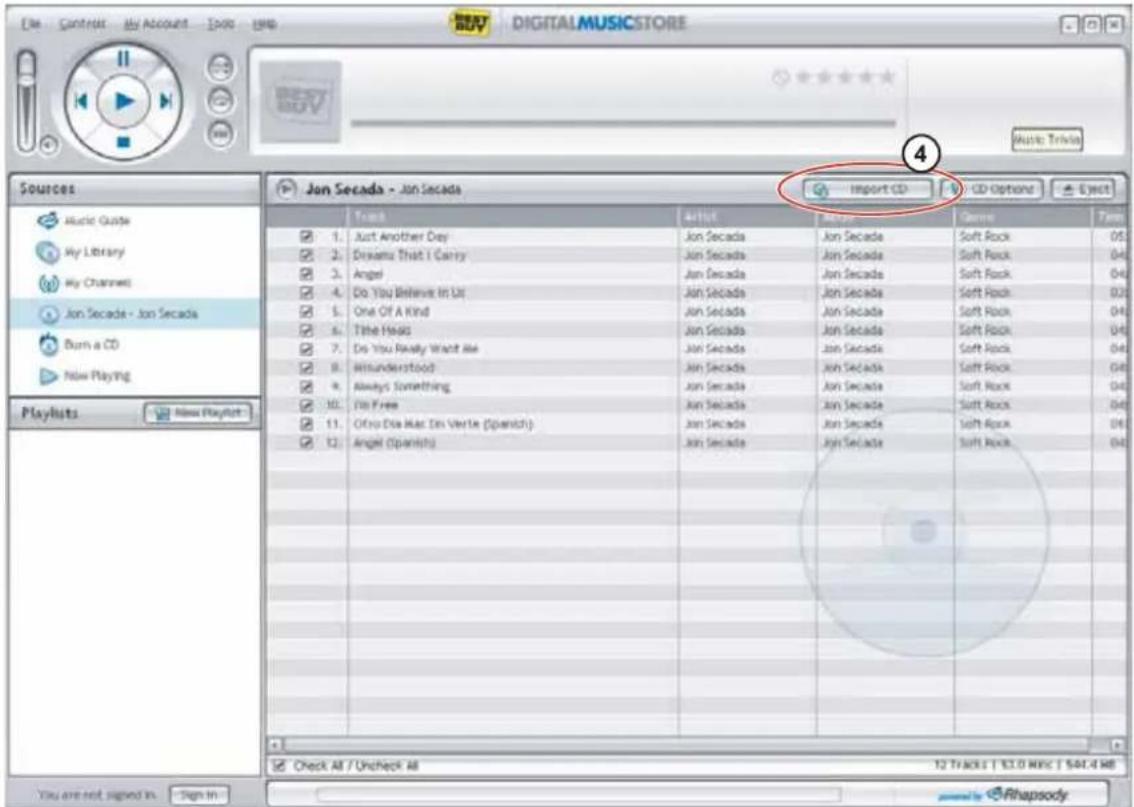
2 Put a music CD in the CD drive, then close any dialog boxes that may open. Best Buy Digital Music Store lists the tracks on the right side of the screen. If you are connected to the Internet, the list shows the track names.
3 Click the check boxes in front of the songs you want to copy.
4 Click Import CD. Best Buy Digital Music Store creates MP3 files from the music tracks on the CD and lists them under the My Library folder. This process will take a few minutes depending on your system speed.
For information on transferring your music files to your MP3 player, see "Transferring music files to your player" on page 14.
Getting music from Digital Music Store
To buy and download music files from the Internet:
1 Click Start, All Programs, Best Buy Digital Music Store, Best Buy Digital Music Store. Best Buy Digital Music Store opens.
2 In the Search box, type the name of the artist or album you want to download music for, then click Go. Any matches that Digital Music Store finds are displayed on the screen.
3 Decide which tracks or albums you want to buy, then click BUY next to the music you want.
4 Follow the on-screen directions to finish the purchase. The music files are added to your Digital Music Store music library.
Tips
You can also use other digital music management programs to get music files from CDs and the Internet. See the program's online help for more information. For iTunes Drag and Drop support, File & Folder (MSC) USB mode is automatically enabled when you connect the player. Your Insignia MP3 player will only play iTunes MP3 files that you drag and drop from iTunes. For information on changing USB modes, see "Manually changing the USB mode" on page 30.
Transferring music files to your player
Copying files using Best Buy Digital Music Store
To copy files from your computer to the MP3 player using Best Buy Digital Music Store:
1 Connect the USB cable to a USB port on your computer and the mini USB port on your player. The message Searching for PC appears on the player.
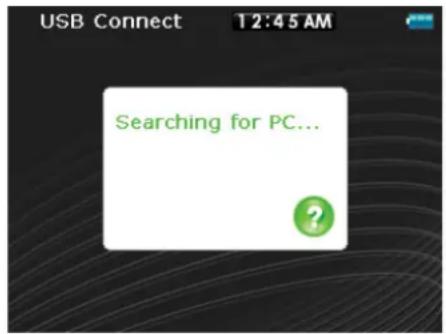
Your computer detects the player, then adds the player as a new device called Insignia Pilot in the Portable Devices section of My Computer.
Note
If you change the USB mode to File and Folder (MSC mode), the device appears in the Removable Drive section of My Computer.
2 Click Start, All Programs, Best Buy Digital Music Store, Best Buy Digital Music Store. Best Buy Digital Music Store opens.
3 Close any popup windows that open.
4 Click My Library in the list of content types. Your entire library of digital music appears in the right side of the screen.
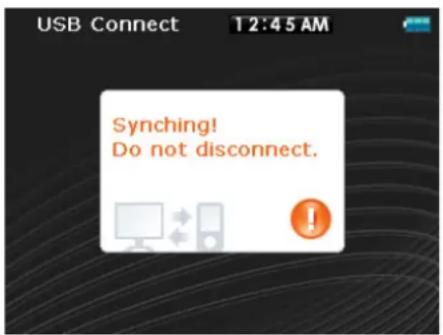
5 Click and drag the music files from your library list to the Insignia Pilot item in the Sources list. As the songs are copied to your player, the message Syncing: Do not disconnect device appears on the player.
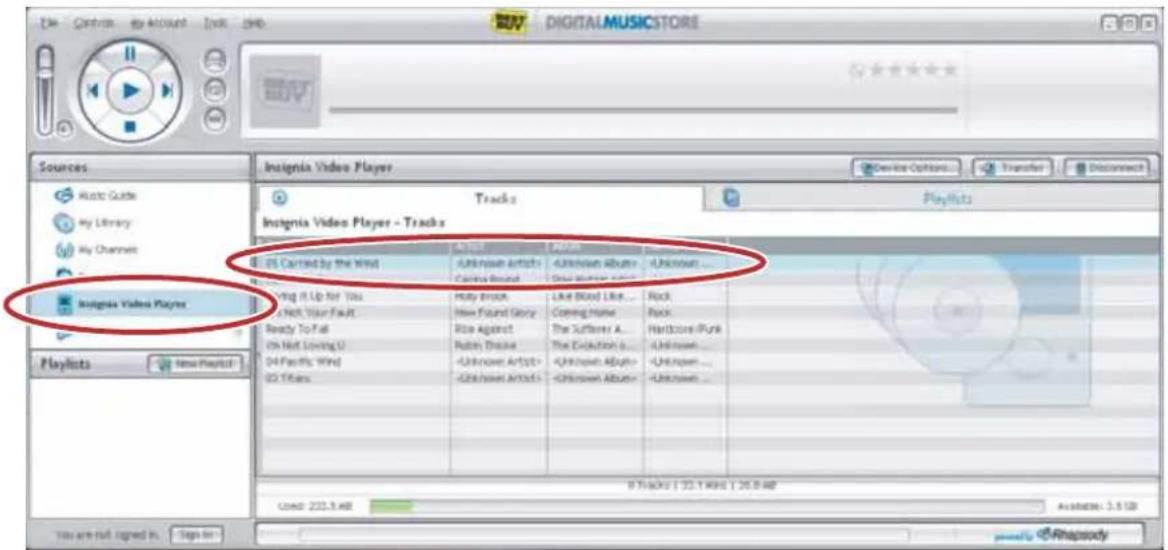
6 When you have finished transferring all of the files you want to copy to your Insignia Pilot, you can click Insignia Pilot in the list of sources to view the updated list of tracks on your player.
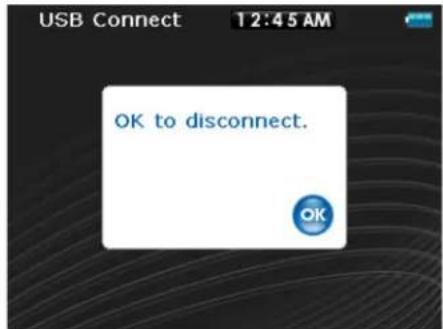
When the transferring is complete, the message OK to disconnect appears on the player.
7 Unplug the USB cable from your computer and your player.
Adding Rhapsody channels to your player
You can add Rhapsody channels to your player by selecting the Rhapsody channel and dragging it to your player inside the Best Buy Digital Music Store client. The channel is automatically loaded to the player and is available in the Rhapsody Channel section of the main menu.
When Insignia Pilot is selected in the Sources list, you can view tracks, playlists, and Rhapsody channels by clicking on the tabs. The Rhapsody channel shows the action. When a channel shows update as the action, click Update to force the channel to update. See the help function in the client software for more information on channels.
Transferring files using Windows Explorer
For Windows Vista, Windows XP, and Windows 2000 users, the player automatically connects in Media Manager (MTP) mode to copy WMA and MP3 files to the Media folder, and any other file formats to the Data folder (you cannot see the Data folder using the player's display).
Depending on which media manager software (such as BBDMS and Windows Media Player) you use, the names of the subfolders may be different than Media and Data.
For all other operating system users, the player automatically connects in File &Folder (MSC) mode to copy folders and any format of files to the player's root folder. The player only plays MP3, Vorbis, and WMA files.
Note
Vorbis and .M3U playlists files can only be transferred in MSC mode.
To copy music files from your computer to your player using Windows Explorer:
1 Connect your player to the computer using the provided USB cable. The message Searching for PC appears on the player.
2 On your computer, click Start, My Computer, then double-click the folder where your music files are.
3 Open My Computer again to open another window, then open the Insignia Pilot drive. (When your computer detects the player, it adds the player as a new device called Insignia Pilot in the My Computer list of drives in Windows.)
4 Double-click the device and the internal storage icon until you see a list of files and folders.
5 Click and drag the music files from your computer to the player:
• If your player is in Media Manager (MTP) mode, copy them to the Media folder on the player.
Note
Windows may display a warning message. In general, you can close this message and transfer the files and they will play correctly. For video files, the formats are more specific. We recommend you use the included conversion software.
- If your player is in File & Folder (MSC) mode, copy them to the root folder on the player.
Tip
To select multiple files, press and hold Ctrl on your keyboard while clicking the files with your mouse. To select an entire range of files, click the file at the top of the range, press and hold Shift on your keyboard, then click the file at the bottom of the range.
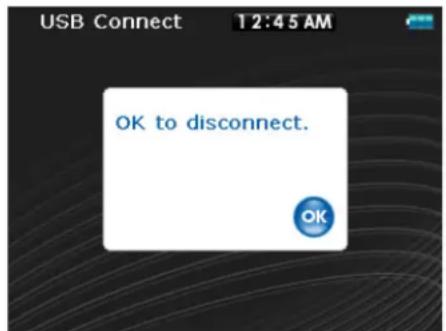
When the transferring is complete, the message OK to disconnect appears on the player.
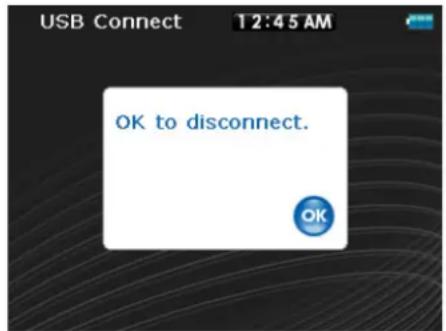
6 Unplug the USB cable from your computer and your player.
Tip
Vorbis and M3U files will only be recognized in File and Folder (MSC) mode. See "Manually changing the USB mode" on page 30.
Playing music files
To play music:
1 Press ☐ (Menu). The main menu opens.
2 Use the scroll wheel to highlight Music Library, then press ▶ (Play/Pause). The music library opens.
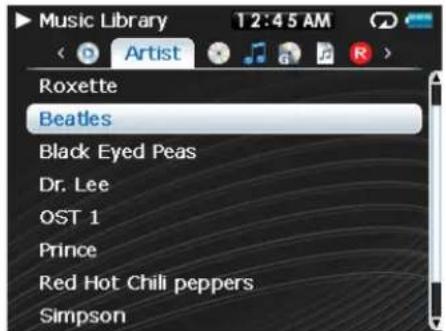
3 Highlight one of the following tabs across the top of the screen using the < (Previous) and >(Next) buttons:
- Play all—Plays all tracks.
• Artists—Lists all artists transferred to the player. - Albums—Lists all albums transferred to the player. Even if you copied only one track from an album to your player, that album name will appear in this list.
• Tracks—Lists all tracks arranged alphabetically by track title. - Genres—Lists all music genres transferred to the player.
- Playlists—Lists all playlists transferred to the player.
• Rhapsody—Lists all Rhapsody channels. - Recording—List all recordings made on the player.
- Bookmark—Lists all bookmarks.
Tip
To navigate backwards from a submenu, press ↗
4 Use the scroll wheel to highlight an item in the list. To go down to a submenu, use the √ (Down) button. To return up from a submenu, use the ↗Up) button.
As an example, when in the Album menu and you select a particular album, press ∨ (Down) to see the tracks on that album. To go back up and scroll through other items, press ∧ (Up).
5 Select the content to play by pressing the ▼ (Down) button on a particular track or the ▶ (Play/Pause) button to bring up the Play Option menu.
A pop-up menu shows the options you have for playing the music. Play and Play All start playing the music immediately. Add and Add All queues the music behind the tracks that are currently playing. Select Play All to play all the tracks. The player switches to the Now Playing view, which displays information on the track currently playing.
The album art appears on the left of the display. Press ∧ (Up) to view full-screen album art. Press (Up) again to see the list of songs selected for playback. Pressing ∧ (Up) toggles through the various screens.
When using BBDMS you may also see artist information on one of these screens. Use the scroll wheel to scroll through the information.
6 If your selection does not begin to play, press ▶ (Play/Pause).
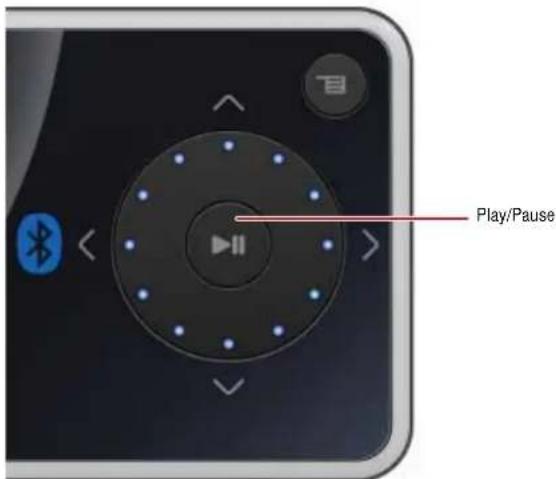
The track begins playing, and the play status icon (▶ appears in the upper left corner of the display.
- To pause playback, press ▶ (Play/Pause). The pause status icon (Ⅱ) appears in the upper left corner of the screen.
- To skip to the next track, press > (Next) (2). To skip to a previous track, press <(Previous) (3) repeatedly.
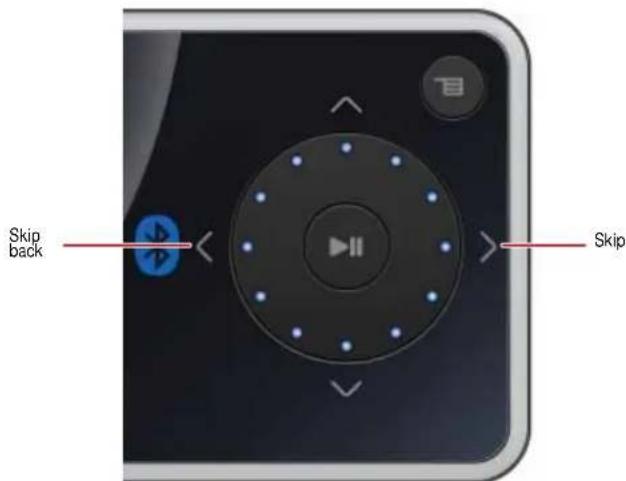
- To fast forward the current track, press and hold > (Next). To rewind the current track, press and hold < (Previous).
• To restart the current track, press (Previous) once.
Tip
If you are using a subscription music service, your player will play a short tone between tracks when your content's subscription is about to expire. A message appears on the screen telling you how many days are left before your content expires.
If you are using the Best Buy Digital Music Store, your subscription status is also displayed in the Information section of the Settings menu. The icon in the bottom left hand corner shows your current subscription status when using BBDMS. Green indicates the subscription is valid. Red indicates the subscription is not current.
Rating songs
Using your player, you can rate songs you like and build improved playlists from your Music Manager software, which can save the ratings into your library. BBDMS includes this feature, and it can build channels which are optimized for your personal listening pleasure.
To use ratings:
• To add a star to the current rating of a song on the screen, slide the rating button to the right.
• To remove a star from the current rating of a song on the screen, slide the rating button to the left.
- The red circle with a line through it means never play this song again. BBDMS will never include this selection in a channel again.
Repeating and shuffling playback
You can set the player to repeat or shuffle tracks using the Repeat/Shuffle menu.
To shuffle the playback order:
1 In the Settings menu, select Audio, then press ▶ (Play/Pause).
2 In the Audio menu, select Repeat/Shuffle Playback, then press ▶ (Play/Pause).
3 Use the scroll wheel to select the repeat mode, then press ▶(Play/Pause). The shuffle icon appears in the Now Playing screen when you select a mode other than Off.
You can select from the following modes:
- Repeat single track
- Shuffle tracks/No repeat
- Repeat all tracks
- Repeat all tracks with shuffle
Repeating segments of a track
You can use A-B repeat to repeatedly play a segment of a track. You must first enable A-B repeat.
To enable A-B repeat:
1 Press ☑ (Menu). The main menu opens.
2 Use the scroll wheel to highlight Settings, then press ▶ (Play/Pause).
3 Use the scroll wheel to highlight Audio, then press ▶ (Play/Pause).
4 Use the scroll wheel to highlight A-B repeat, then press ▶ (Play/Pause).
5 Use the scroll wheel to highlight On or Off, then press ▶ (Play/Pause) to select. The message Use the down √ button to activate A-B appears, then the Audio Setting menu opens again.
6. Press ☑ (Menu) to return to the Now Playing screen.
To repeat an audio segment:
1 During playback, press √ (Down) to mark the start of the playback loop. The Repeat icon on the display shows an A.
2 Press ▼ (Down) again to mark the end of the playback loop. The Repeat icon on the display shows an AB and the player repeats that audio segment indefinitely.
3 Press (Down) again to cancel the repeating loop.
Using the equalizer
Six equalizer settings are available, and five are preprogrammed: Normal, Rock, Jazz, Classic, and Pop. The User setting lets you customize the equalizer to your preference.
To select a pre-programmed equalizer setting:
1 In the Settings menu, select Audio, then press ▶ (Play/Pause).
2 In the Audio menu, select Equalizer, then press ▶ (Play/Pause).
3 Use the scroll wheel to select the equalizer setting you want.
4 Press (Play/Pause) to save your new settings.
Note
As you scroll through the equalizer settings, the setting will be applied to your currently playing music in real time. If you like the setting, press ▶(Play/Pause) to keep the setting. If you press (Menu) without pressing ▶(Play/Pause), you exit out of the menu and the newly selected effect is cancelled.
To change the equalizer's custom setting:
1 In the Settings menu, select Audio, then press ▶ (Play/Pause).
2 In the Audio menu, select Equalizer, then press ▶ (Play/Pause).
3 Use the scroll wheel to select the Custom setting.
4 Press ▶(Play/Pause) to move the cursor to the first equalizer setting slider.
5 Press ∧(Up) or ∨(Down) or use the scroll wheel to adjust the setting. Repeat this step to adjust each remaining slider by pressing ➞(Next) to advance to the next band.
6 Press ▶ (Play/Pause) to save your new settings.
Playing Rhapsody Channels
Your Insignia player supports Rhapsody Channels downloaded from the Best Buy Digital Music Store.
To play Rhapsody channels:
1 Select Rhapsody Channels from the main menu.
2 Use the scroll wheel to select your Rhapsody channel.
3 Press play to play the channel on your player.
For information on channels, see the help information in the Best Buy Digital Music Store.
Playing Audible files
You can listen to Audible audio books on your player.
To play Audible files:
1 Press ☐ (Menu).
2 Use the scroll wheel to highlight Audible, then press ▶ (Play/Pause).
3 Use the scroll wheel to select the Audible file, then press (Play/Pause).
4 Press (Previous) or > (Next) to play the previous or next Audible file.
Moving between chapters in an Audible audio book
To move between chapters in Audible files:
1 Press ∧ (Up) while playing an Audible file to turn on the chapter feature.
2 Press (Previous) or > (Next) to move to the previous or next Audible chapter.
3 Press ∧ (Up) to turn off the chapter feature. Press ∧ (Up) one more time to see the book cover artwork. Press ∧ (Up) one more time to return to the Now Playing screen.
Tip
For more information about Audible, visit the Audible website at www.audible.com.
Bookmarking
Audio files can be marked so you can start listening from where you left off during your previous session.
To activate the bookmark feature:
1 Press the Rating button (see "Right side" on page 6). The quick menu opens.
2 Select Save Bookmark to mark your position.
To retrieve the bookmark:
1 Press the Rating button. The quick menu opens.
2 Select Load Bookmark.
3 Select the bookmark you want to start from.
4 Press (Play/Pause). Your selection starts from the saved bookmark.
Tip
You can also open an audio file at a bookmark in the Music Library by selecting the heading Bookmarks.
Automatically bookmarking MP3 books
Your Insignia MP3 player also features a special advanced feature for using MP3 audio books. This feature enables automatic bookmarking of the books when you turn off the player.
To automatically bookmark MP3 books:
1 Download your MP3 book file.
2 Connect your player and open the internal storage (or the drive if you are in File and Folder mode) and locate the Audible folder.
3 Copy your MP3 file to the audible folder.
4 Disconnect your device from the computer.
5 Select your book by going into the Audible section of the main menu and locate your book. Press ▶ (Play/Pause) and the file is automatically bookmarked if you turn the player off.
Viewing photos
Your player can display JPG and JPEG photos. No other photo formats are supported. To display non-JPG/JPEG photos, you must first convert them to JPG or JPEG using the Media Converter software found on the enclosed CD or another program that can create JPEGs. We recommend that you compress the JPEGs to a 320×240 resolution to maximize your memory space on the player. Using the included Media Converter significantly reduces the file size and allows you to store many more photos on the player.
To view photos:
1 Press ☐ (Menu). The main menu opens.
2 Select Photo, then press ▶ (Play/Pause). A list of available photos appears.
3 Use the scroll wheel to select the photo to display, then press ▶ (Play/Pause). The photo displays full screen.
- Press (Down) to rotate the image.
- Press (Up) to go back to the photo list.
- To zoom in on a photo, press (Play/Pause). Repeatedly pressing (Play/Pause) zooms in further. To pan use the arrow keys to move. To go back to the original image press and hold ▶(Play/Pause).
Transferring photos to your player
The method you use to copy photos from your computer to your player depends on the USB mode your player is set to. When you connect your player to your computer, the player automatically selects the mode that is best suited to your operating system. The player shows the mode in the bottom of the display.
Tip
You can also use the ArcSoft Media Converter software to convert and transfer all images to your player.
To copy photos from your computer to your player using File & Folder (MSC) USB mode:
1 Connect your player to the computer using the provided USB cable. The message Searching for PC appears on the player.
2 On your computer, click Start, My Computer, then double-click the folder where your photo files are.
3 Open My Computer again to open another window, then open the Insignia Pilot drive.
4 Click and drag the photo files from your computer to the player's root folder.
Tip
To select multiple files, press and hold Ctrl on your keyboard while clicking the files with your mouse. To select an entire range of files, click the file at the top of the range, press and hold Shift on your keyboard, then click the file at the bottom of the range.
When transferring is complete, the message OK to disconnect appears on the player.
5 Unplug the USB cable from your computer and your player.
To copy photos from your computer to your player using Media Manager (MTP) USB mode:
1 Connect your player to the computer using the provided USB cable. The message Searching for PC appears on the player.
2 On your computer, click Start, My Computer, then double-click the folder where your photo files are.
3 Open My Computer again to open another window, then open the Insignia Pilot drive.
4 Click and drag the photo files from their current location to the Media folder or the root folder on your Insignia Pilot drive.
Note
Different media player software applications create different file structures. You can place your photos in any folder and they will be found automatically.
Tip
To select multiple files, press and hold Ctrl on your keyboard while clicking the files with your mouse. To select an entire range of files, click the file at the top of the range, press and hold Shift on your keyboard, then click the file at the bottom of the range.
When transferring is complete, the message OK to disconnect appears on the player.
5 Unplug the USB cable from your computer and your player.
Tip
You can also use the ArcSoft Media Converter software to convert and transfer all images to your player.
Deleting photos
To delete photos, see "Deleting all files" on page 24.
Watching videos
Converting and transferring videos or pictures to your player
To copy videos from your computer to your player using ArcSoft Media Converter:
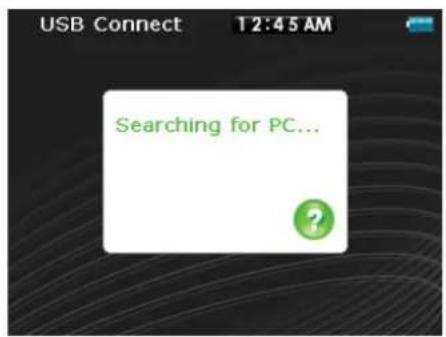
1 Connect your player to the computer using the provided USB cable. The message Searching for PC appears on the player.
2 Open the ArcSoft Media Converter on your computer.
Note
If your player is connected to the USB port, the application automatically selects the correct format and you should see your model number pop-up in the Select Device screen. If you are converting to a file then you must manually select the correct model number for the conversion.
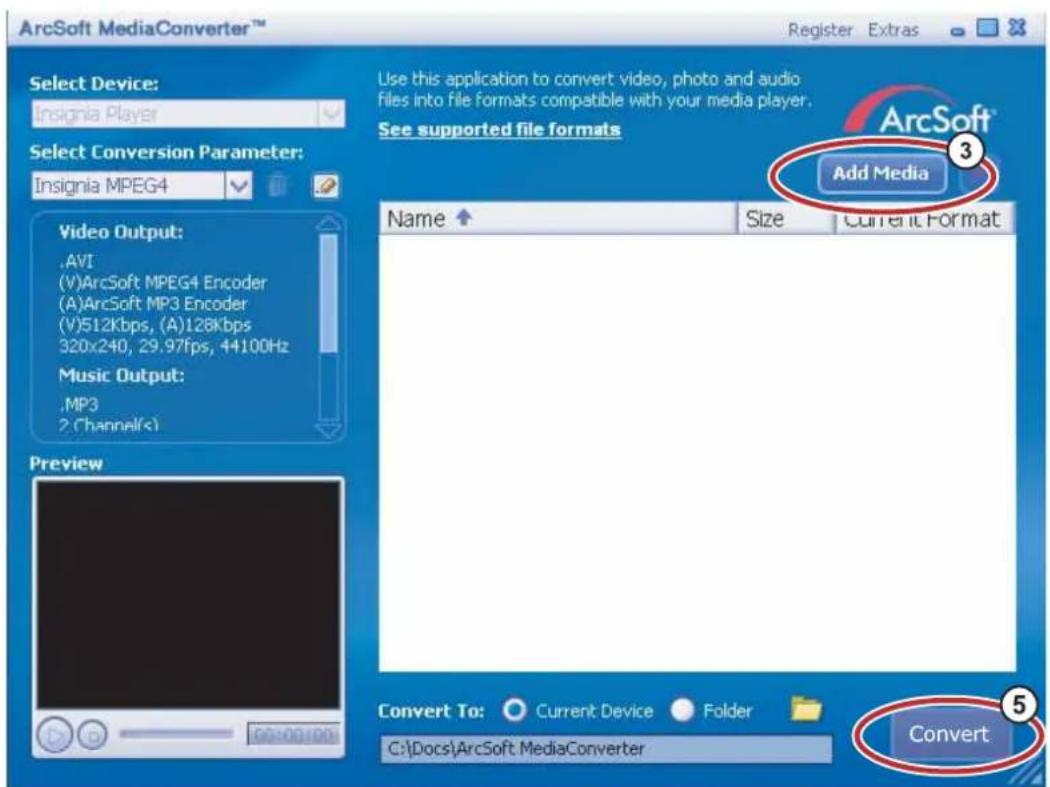
3 Click Add Media.
4 Click the file you want to convert, then click Open.
5 Select the file, then click Convert. The file is automatically transferred to your player.
Tip
You can also create the file in any folder you choose by using the Convert to Folder option. Enter the location you want to place the file, then click Convert. You can then place this file directly on the player by dragging and dropping the file or by using Windows Media Player. Windows Media Player can also be used to convert most files. It will automatically transcode them when you move them to the player.
Watching videos
Your player can show MPEG-4 videos. No other video formats are supported. To watch videos in other format, you must first convert them to either MPEG-4 using ArcSoft Media Converter that is included on the enclosed CD.
To watch videos:
1 Press ☐ (Menu). The main menu opens.
2 Select Video, then press ▶ (Play/Pause). A list of available videos appears.
3 Use the scroll wheel to select the video to watch, then press ▶ (Play/Pause). The video plays.
- Press < (Previous) or >(Next) to select a different video to watch.
Muting audio during video playback
To mute audio during video playback:
1 In the Settings menu, select Audio, then press ▶ (Play/Pause),
2 Select Video Scan Mute, then press ▶ (Play/Pause).
3 Select on or off to mute while fast forwarding or rewinding the video.
Navigating through videos
Your player can move throughout the video quickly and has two features for this purpose:
- To move forward or backward in the video, press and hold down either the < (Previous) or >(Next) buttons. The player starts fast forwarding or rewinding through the video.
Note
In the Audio Settings menu you can set the Video Scan mode to either mute the sound or allow you to hear it as you move through a video.
- The player also supports an advanced seek option. Use this option by pressing and holding ▶ (Play/Pause). A counter appears showing you the elapsed time in the video. Use the scroll wheel to advance or rewind to the appropriate time indicator in the counter. Press ▶ (Play/Pause) to resume playback at that point.
Using video-out
To turn on video-out:
1 Connect the optional Dynex Cable (DX-IPAVC) to your MP3 player.
2 Connect the other end of the cable to the TV's composite video and left and right audio jacks.
3 Turn on the player.
4 Go to the Settings menu, then select TV-out.
5 Select enable, then press ▶ (Play/Pause).
6 Select on, then press ▶ (Play/Pause). You player's display appears on the TV screen.
To turn off video-out:
- Disconnect the cable or go into the Settings menu and reverse the previous process.
Note
The TV-out menu also contains other settings for different television systems, such as aspect ratios and quality of image.
Deleting videos
To delete videos, see "Deleting all files" on page 24.
Browsing folders
The Insignia player also allows you to navigate through your content using folder browsing.
To select folder browsing:
1 Press ☐ (Menu). The main menu opens.
2 Select Folder Browsing, then press ▶ (Play/Pause).
3 Open the top level item, scroll the folder you want to open, then press ▶ (Play/Pause).
4 Traverse the file structure until you find the file you wish to play.
5 Press (Play/Pause) and the file is played.
Deleting all files
To delete specific files:
1 Use the Music Library to navigate to the file or files you want to delete.
2 Press (Play/Pause) on the selection you want to delete. A pop-up appears.
3 Select Delete.
4 Select Yes in the confirmation pop-up. The file is deleted.
To delete all files from your player using the on-screen menu:
1 Press ☐ (Menu). The main menu opens.
2 Select Settings, then press ▶ (Play/Pause).
3 Select System, then press ▶ (Play/Pause).
4 Select Internal Memory (remove All), then press > (Next).
5 Select Yes, then press ▶ (Play/Pause). All media files are deleted.
To delete files from your player using your computer:
1 Connect the USB cable to a USB port on your computer and the mini USB port on your player. The message Searching for PC appears on the player.
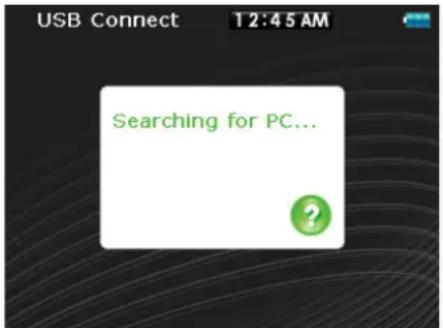
Your computer detects the player, and adds the player as a new device (Insignia Pilot) in the My Computer list of drives in Windows.
2 Click Start, then click My Computer.
3 Double-click the Insignia Pilot device, then open the Media folder.
4 Find the files you want to delete, click to select them, then press Delete on your keyboard. The files are deleted.
Tip
To select multiple files, press and hold Ctrl on your keyboard while clicking the files with your mouse. To select an entire range of files, click the file at the top of the range, press and hold Shift on your keyboard, then click the file at the bottom of the range.
Disconnecting the player
After you have connected the player to a computer for recharging or music transfer, you need to safely disconnect the player.
To safely disconnect the player from your computer:
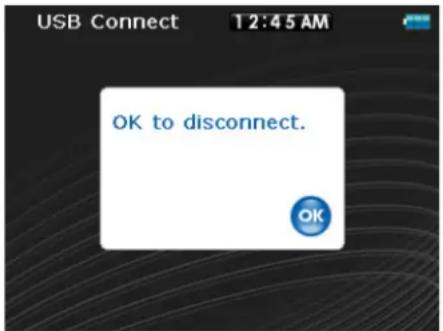
- When the player displays the message OK to disconnect, unplug the USB cable from the player and the computer.
Listening to FM radio
You can listen to FM radio broadcasts on your player.
Note
To use the FM radio, you must have the provided earphones connected, because they act as the FM antenna. To substitute for the earphones, you can use any headphones with unshielded wires.
Tuning the radio
To tune to an FM radio station:
1 Plug your earphones into the earphone jack.
2 Press ☑ (Menu). The main menu opens.
3 Select FM Radio, then press ▶ (Play/Pause).
4 Press < (Previous) or >(Next) to scan to the next station.
5 Press the Rating button to open the FM option menu. This menu allows you to:
- FM Settings—go to the FM settings menu
- Save RBDS information
Tip
Mono mode can help reduce static when listening to stations that have a weak signal. You can change to Mono mode using the Settings, FM Radio, Stereo menu.
Setting station presets
Station presets let you quickly access your favorite frequencies.
To set station presets manually:
1 Tune to an FM radio station frequency.
2 Press and release ▶ (Play/Pause). The Preset Add menu opens.
3 Scroll down the list until you find the preset you want to save with the currently tuned station, then press ▶ (Play/Pause).
To set station presets automatically:
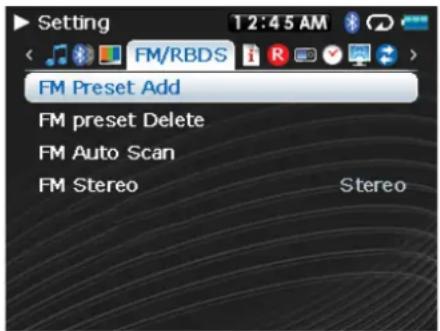
1 Press ☐ (Menu). The main menu opens.
2 Select FM Settings, then press ▶ (Play/Pause).
3 Select Auto Scanning, then press ▶ (Play/Pause). The player scans the radio range and flashes the message Auto Scanning.
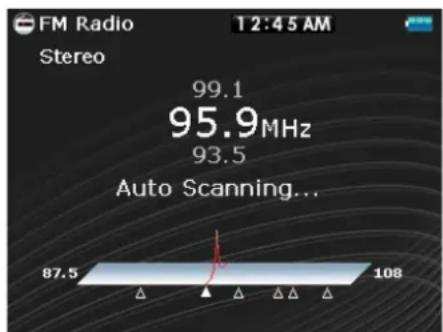
While scanning, the player automatically adds a preset for any local strong stations until all 20 preset channels have been set.
To delete station presets:
1 Press ☐ (Menu). The main menu opens.
2 Select FM Settings, then press ▶ (Play/Pause).
3 Select Preset Delete, then press ▶ (Play/Pause). Press ∧ (Up) or √(Down) or use the scroll wheel to select the preset to delete, then press ▶ (Play/Pause). The preset is deleted.
Accessing station presets
To access station presets:
1 Press ☑ (Menu). The main menu opens.
2 Select FM Radio, then press ▶ (Play/Pause).
3 Press ∧ (Up) to access the previous preset channel, or press ∨ (Down) to access the next preset channel.
Saving and retrieving RDS data
Your player allows you to save the RDS information so that you can look up songs and artists at a later time.
To save RDS data:
- When in FM mode and you see the Artist/Song information on the screen, press the Rating button to save the RDS information.
To retrieve the RDS data:
1 Connect your MP3 player to your computer.
2 Locate the file called RDSinfo.txt in the \service\Rhapsody directory on the player.
3 Open this file in any text editor.
Tip
We recommend you use Wordpad because Notepad does not show line breaks.
Recording
You can record sound on your MP3 player either from an attached device, such as a CD or MP3 player, or from the built-in FM radio.
Recording from a device
To record from an attached device:
1 Connect your MP3 player to the device using a standard 3.5 mm stereo cable. One end of the cable plugs into the line out jack on your device and the other end plugs into the line in jack on the MP3 player.
2 (Optional) If you would like to change the recording quality or size then select Settings from the main menu, Record, then select Encoder. Choose either WMA or PCM (PCM provides the highest quality but the file size will be larger), then select the quality level of the recording. In addition you can select the Recording Level by selecting Line-in Volume, select the value between 1 and 20. You will see on the Recording screen a realtime monitor of the audio signal coming in which allows you to check the level before making the recording.
3 Press ☑ (Menu). The main menu opens.
4 Use the scroll wheel to select Recording, then press ▶ (Play/Pause).
5 Press and hold (Play/Pause) to start recording, then release the button.
6 Press (Play/Pause) to stop recording.
Recording a radio broadcast
To record an FM radio broadcast:
1 Press ☐ (Menu). The main menu opens.
2 Use the scroll wheel to select FM Radio, then press ▶ (Play/Pause).
3 Tune to the broadcast you want to record.
4 Press and hold (Play/Pause) to start recording, then release the button.
5 Press and hold (Play/Pause) to stop recording, then release the button.
Listening to a recording
To listen to a recording:
1 Press ☐ (Menu). The main menu opens.
2 Use the scroll wheel to select Music Library, then press ▶ (Play/Pause).
3 Use the < (Previous) or > (Next) keys to select Recordings, then press ▶ (Play/Pause).
4 Use the scroll wheel to select the select the recording to listen to, then press ▶ (Play/Pause). The play pop-up opens.
5 Use the scroll wheel to select Play, then press ▶ (Play/Pause). The recording plays.
Connecting to Bluetooth headphones
Your Insignia player supports stereo headsets for listening to your player. Your headset must support Advanced Audio Distribution Profile (A2DP) and optionally Audio/Video Remote Control Profile (AVRCP) which allows you to skip between tracks and adjust the volume.
Note
If your Bluetooth headphones support AVRCP (Audio/Video Remote Control Profile), your headphones can control Play/Pause, Skip Forward, Skip Backward, and frequency Up/Down. The volume control on the headphones adjusts the volume on your headphones but does not adjust the volume on the player.
Your player contains a Bluetooth radio which must be turned on to connect to your stereo Bluetooth headphones. If you are not using the Bluetooth feature, you should turn off your Bluetooth radio to maximize battery life when listening through the wired headphones.
Your headphones must be paired with your player. This is done by entering a PIN code (just like an ATM machine) into your player. The pin code is contained in the instruction manual for your Bluetooth headphones (many manufacturers use '0000'). Once paired, your headphones automatically connect with your player if you have them turned on before turning on the player.
To connect your headphones to your player:
1 Turn on the Bluetooth radio.
2 Search for a headset.
3 Connect to the headset.
4 Pair with a headset using a PIN.
Note
Bluetooth headphones will not work when using line-in recording.
Turning Bluetooth on or off
To turn Bluetooth on or off:
1 Press (Menu). The main menu opens.
2 Select Settings, then press ▶ (Play/Pause).
3 Select Bluetooth, then press ▶ (Play/Pause). The Bluetooth menu opens.
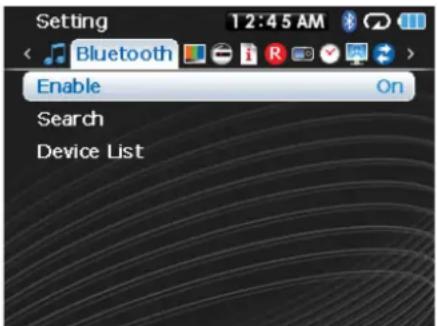
4 Select Enable, then press ▶ (Play/Pause).
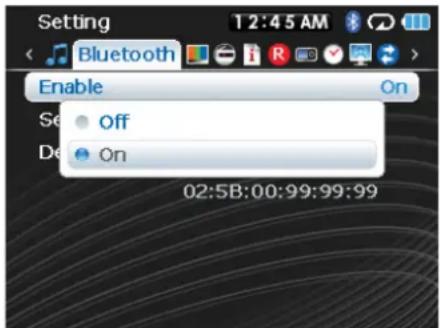
5 Select one of the following:
- Disable to turn off the Bluetooth feature.
- Enable to turn off the Bluetooth feature.
Searching for new Bluetooth headphones
If the set of headphones you want to connect to are not listed in the Device List, you must search for the new headphones.
To search for new headphones:
1 Press (Menu). The main menu opens.
2 Select Settings, then press ▶ (Play/Pause).
3 Select Bluetooth, then press ▶ (Play/Pause). The Bluetooth menu opens.
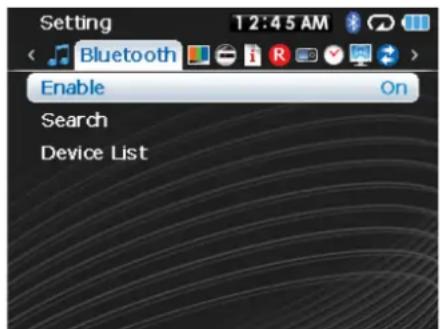
4 Select Search, then press ▶ (Play/Pause). The message Searching bluetooth device. Please wait appears on the screen.
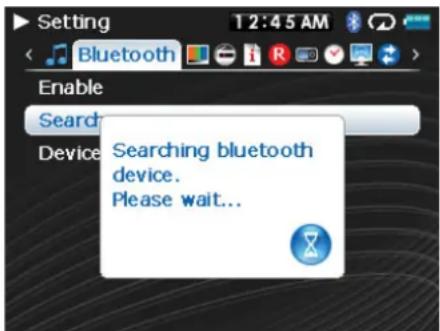
Any new headphones are added to the Bluetooth Device list.
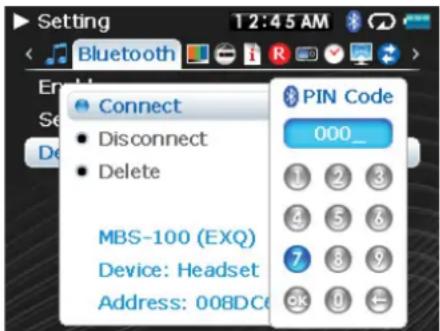
5 Select the device you want to connect with, then press (Play/Pause).
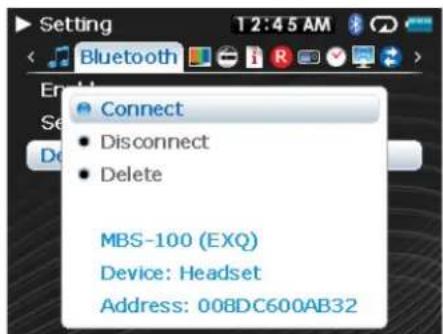
6 Select one of the following:
- Connect to connect to the headphones. If you select Connect and this is the first time connecting to these headphones, go to step 7.
- Disconnect to disconnect from the headphones
- Delete to delete the headphones from the list.
7 Enter the PIN code for the headphones. Headphones must be paired with the player. Each set of headphones have a four digit PIN code (often headphone suppliers use '0000'). Refer to your headphone instruction manual for more information. Enter the pin code by scrolling through the numbers with the scroll wheel, the pressing ▶(Play/Pause) to select each number. When complete, scroll to the OK button, then press ▶(Play/Pause). The player then attempts to pair to the headphones and you see a status message with the result of the pairing function. If the pairing is successful, you will hear audio through your headphones after you press ▶(Play/Pause) on the Now Playing screen.
Using the Bluetooth status icons
| IconDescription | |
| Bluetooth Disabled—Bluetooth is turned off. | |
| Bluetooth Disconnected—Bluetooth is turned on, but not connected to headphones. | |
| Bluetooth Connected—Bluetooth is turned on and connected to headphones. | |
Viewing your Bluetooth headphones
Note
You must put your headphones into pairing mode before you start the search using the Insignia player. This is typically done by holding the power button on your headset after turning it on. The LED on your headset will start flashing a sequence indicating that it is in pairing mode. See the instruction manual for your headset for the exact procedure to put it in pairing mode.
To view a list of Bluetooth headphones:
1 Press (Menu). The main menu opens.
2 Select Settings, then press ▶ (Play/Pause).
3 Select Bluetooth, then press ▶ (Play/Pause). The Bluetooth menu opens.
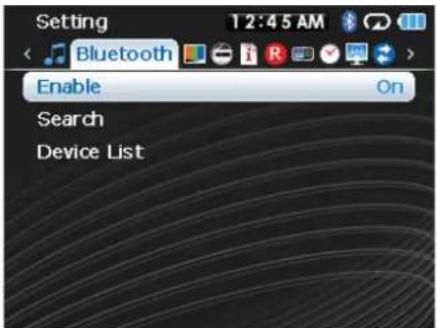
4 Select Device List, then press ▶ (Play/Pause).
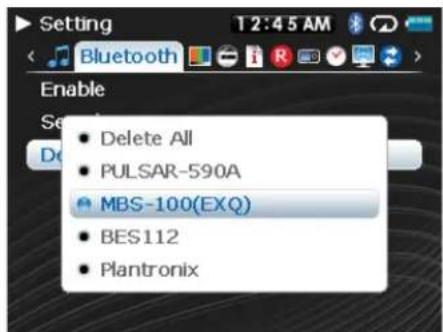
5 Select the device you want to manage, then press (Play/Pause).
Changing settings
Changing brightness, rotation, LCD, and backlight settings
To change the brightness, rotation, and backlight settings:
1 Press ☑ (Menu). The main menu opens.
2 Select Settings, then press ▶(Play/Pause).
3 Select Display, then press ▶ (Play/Pause). The Display menu opens.
4 Change any of the following settings:
- Menu style—Select the type of menu. Options include Circle or Matrix.
- Background—Select the background color.
- Brightness—Changes the brightness of the backlit screen.
- Rotation—Rotates the screen and flips the button functions to make left-handed use of the player easier. Default is Right Handed.
- Backlight—Changes the length of time that the backlight stays on after you press a button. The backlight may noticeably decrease battery life if it is left on for long periods of time.
- On Standby (LCD mode)—Determines if the LCD completely turns off when the device goes into idle mode (playing, but you haven't press a key). If this selection is Dim, then the LCD is dimly lit.
Changing power off and sleep settings
To change the power off and sleep settings:
1 Press ☑ (Menu). The main menu opens.
2 Select Settings, then press ▶ (Play/Pause).
3 Select Time, then press ▶ (Play/Pause). The Time menu opens.
4 Change any of the following settings:
- Auto Power Off—Adjusts the length of time without any button presses that the player waits before automatically turning off. You can select Off or a time up to ten minutes.
- Sleep—Changes the length of time the player waits before automatically turning off, regardless of button presses or other activity. You can select 30-minute time increments up to 120 minutes.
- Set Time—Sets the correct time. This is viewable on the Main Menu screen.
- Slideshow—Sets the duration of each image on the display.
Erasing all files and restoring factory defaults
To erase all files and change all settings to factory defaults:
1 Press ☐ (Menu). The main menu opens.
2 Select Settings, then press ▶ (Play/Pause).
3 Select System, then press ▶ (Play/Pause). The System menu opens.
4 Change any of the following settings:
- Erase Internal Memory—Erases music files from Internal storage.
- Erase External Memory—Erases music files from External storage.
- Reset Settings—Resets all player settings to the factory defaults.
Manually changing the USB mode
The MP3 player can use two USB modes, Media Manager (MTP, the default) mode and File & Folder (MSC) mode. The player automatically detects which mode is best suited for your computer. During normal operation, you are not required to change modes manually. If you want to override the automatic setting and make the player start in File and Folder (MSC) mode, complete the following procedure.
To temporarily change the USB mode:
1 Turn off the player.
2 Move the Hold switch to the Hold position.
3 Connect the USB cable to the player. The player turns on in File and Folder (MSC) mode.
After you disconnect the player, slide the Hold button to the off position for normal operation.
• Media Manager (MTP)—Optimum setting for using the player as a MP3 player on Windows Vista, Windows XP, and Windows 2000.
- File & Folder (MSC)—Optimum setting for using the player as a file storage device, and required for using iTunes Drag and Drop Support.
To change the mode permanently to file and folder (MSC) mode:
1 Select Settings, then press ▶ (Play/Pause).
2 Select USB Mode, then press ▶ (Play/Pause).
3 Select the USB connection type.
4 Select the File and Folder mode and select ▶ (Play/Pause) to make it permanent. You can revert back to Automatic mode by following the same steps above, but selecting Automatic instead of File and Folder.
USB charging option
Your Insignia player has several options that control how the player operates when connected to a charger. There are three modes of operation selectable in the USB Mode in the Settings menu.
The Charger option the following options:
- Play/Pause—the player plays when connected to a charger and pauses on disconnection. This mode is useful when the player is used in a car.
• Always Play—the player always plays. - Ignore—this mode uses the last state to determine the behavior.
Viewing system information
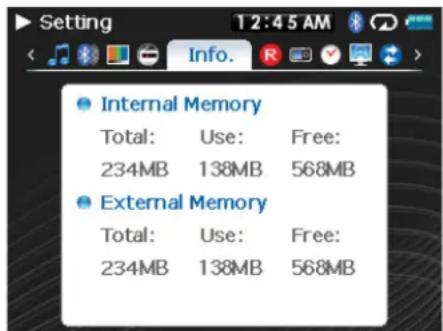
Your player can tell you its total memory, used memory, available memory, and other system information.
To view system information:
1 Press ☑ (Menu). The main menu opens.
2 Select Settings, then press ▶ (Play/Pause).
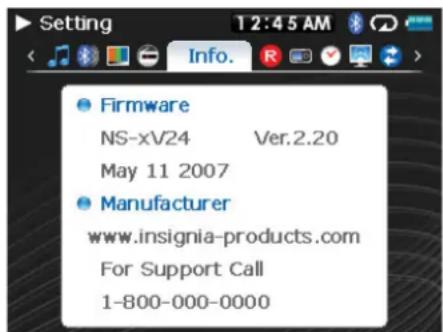
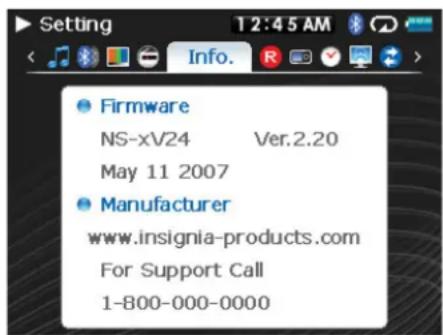
3 Select Information, then press ▶ (Play/Pause). The Information screen opens, displaying memory use, firmware version, and date. Use the scroll wheel to access additional information screens.
Note
An additional screen contains account status information and is only relevant when using the Best Buy Digital Music Store.
Increasing capacity with a SD flash card
If you are using a SD card you will see a second device appear in either MTP mode or File & Folder (MSC) USB mode. You can use this second device in the same way as your primary device. You can copy, delete, and synchronize files to it. In addition, if you insert a card with preloaded files, the files will be added to your device's database (labeled as External storage) if the content is clear from any DRM restrictions.
Maintaining your MP3 player
Care and cleaning
- Periodically clean your player by using a damp washcloth dampened with only water, or lens cleaning papers dampened with water or isopropyl (rubbing) alcohol.
• Make sure that you don't get the player wet. - Keep your player away from hot environments, such as on top of a vehicle dashboard, a window sill, or a heat register.
- Avoid carrying your player in a pocket that contains metallic items, which can scratch and damage the player.
- Avoid carrying your player in a pocket or compartment that is dirty. Dirt, dust, and lint can damage the player.
- As much as possible, keep your player in its protective carrying case.
- Update the firmware occasionally to make sure that you have the latest version and product features.
Updating the firmware
To update the firmware:
1 On the Internet, connect your Web browser to www.insignia-products.com, then search for the MP3 player firmware update.
2 Follow the online instructions to download the updated firmware files. Make sure that you take note of where the file is saved to.
3 Double click the file you saved in step 2, then follow the on-screen instructions.
Warning
Installing new firmware will automatically delete all content from the device. Insignia recommends that you make sure you have a backup of your music before upgrading Firmware.
Buying a new battery
To order batteries or other accessories, visit the PartSearch website: http://bestbuy.partsearch.com.
FAQ
How do I copy files to the player?
In File & Folder (MSC) mode, you can copy files to the player the same way you copy files to a hard drive or flash memory drive. In Media Manager (MTP) mode, you can use BBDMS, Windows Media Player, or other digital music managers to transfer files to your player. For more information, see "Transferring music files to your player" on page 14 and "Manually changing the USB mode" on page 30.
How do I use my player with a Mac OS?
Set the player in File and Folder mode and then connect it to your Macintosh. For systems using OS 8.6, see the Apple support site for instructions on downloading the necessary software to add USB support to your system.
How do I use my player with iTunes?
Once the player is in File and Folder mode, all music ripped in MP3 format can be dragged and dropped from iTunes directly onto the player.
Where can I buy a new battery?
Go to bestbuy.partsearch.com and follow the instructions to find the correct part for your player. Full instructions on changing the battery are included with the spare battery.
What is MSC?
MSC stands for Mass Storage Compliant. The USB mass storage device class is a set of computing communications protocols, defined by the USB Implementers Forum, that run on the Universal Serial Bus. The standard provides an interface to a variety of storage devices. Vorbis files will only be recognized in File and Folder (MSC) mode.
Do I have to fully charge my battery before using it?
No, you can partially charge it, but it is recommended you charge it fully within the first week of purchase.
Which file formats does the player support?
This player supports MP3, WMA, WMAPro, WMAlossless, Vorbis, Audible, secure WMA audio formats, JPG and JPEG photo formats, and TXT text files. Any other formats must be converted to a supported format before being copied to your player.
What is MTP?
Media Transfer Protocol (MTP, or Media Manager mode) is a protocol for connecting portable devices to a Windows XP computer and synchronizing digital media content between those devices.
When I copy files to the player using Windows Explorer, what folder should I copy them to?
In Media Manager (MTP) mode, copy them to the Media folder or root directory on the player. In File & Folder (MSC) mode, you can copy them to the root directory. On some operating systems, you may see separate folders for video and photos. Copy your files into the appropriate folder.
Some of my music files are on my player, but cannot be played. When I select them, a different song begins to play. What is wrong?
You may not have purchased the rights to play the song on an additional device. To test this, try to play a song that you have copied from an older CD and converted to MP3 format. If you can play that song but not the song that doesn't play, then you need to purchase the rights to play the song.
Why should I update the firmware?
You should always update the player to the latest firmware to make sure that it works correctly and has the latest features. For more information, see "Updating the firmware" on page 32.
How do I copy a CD to my player?
First you must rip the CD using a digital music manager like Best Buy Digital Music Store or Windows Media Player. After the songs are on your computer, copy the songs to the player using Windows Explorer or a digital music manager. For more information, see "Transferring music files to your player" on page 14.
Why does my player display a message that says "Unknown artist/album"?
This message usually appears when the music file doesn't contain artist or album information (incomplete ID3 tags). See the documentation or online help of your digital music manager for instructions on adding that information to your music files.
Getting help
Contacting technical support
Before you contact technical support, review the Troubleshooting and FAQ section to see if your question is already answered there.
If you have questions about the use or features of your player, call Technical Support at 1-800-699-9218 or (877) 467-4289, or fill out an online support request at:
www.bestbuy.com/support.asp
Get additional online help at:
www.insignia-products.com
www.bestbuy.com/mp3help
www.geeksquad.com
Learn more
For more information on using your Insignia player, visit: www.insignia-products.com/mp3info
On the Internet, you can use a Web search site to find information on the following topics*:
- Ripping CDs
- Downloading music
- Downloading MP3s
• M P 3 m u s i c
- MP3 copyright law
*Best Buy Enterprise Services, Inc. does not maintain and is not responsible for the content of Web pages you find using these search terms.
Specifications
Specifications and features are subject to change without notice or obligation.
| Ports and connections | Mini USB 2.02 Earphones/Headphones shared with 1 Line-inSD slot |
| Bluetooth Supports Bluetooth with A2DP profile | |
| Display LCD | 262,000 colors320x240 QVGA |
| Battery Replaceable, rechargeable lithium ion | |
| Supported formats | Audio: MP3, WMA, WMAPro, WMAlossless, Secure WMA, Audible, OGG (tracks will only be recognized in File and Folder (MSC) mode)Photo: JPG/JPEGVideo: MPEG-4, WMVTest: TXT |
| Radio FM tuner | with RDS support (works only with FM broadcasts which support RDS) |
| Line in recording formats | WMA (all sampling rates are 44.1KHz)Highest 128kbpsHigh 96kbpsMedium 80kbpsLow 64kbpsPCMHighest 1536kbps (48KHz)High 1411kbps (44.1KHz)Medium 1024kbps (32KHz) |
| Dimensions 0.46 x 1.96 x 3.9 inches (11.9 x 49.8 x 100.8 mm) | |
| Weight 2.1 oz. (62g) | |
Legal notices
FCC Part 15
This device complies with Part 15 of the FCC Rules. Operation of this product is subject to the following two conditions: (1) this device may not cause harmful interference, and (2) this device must accept any interference received, including interference that may cause undesired operation.
This equipment has been tested and found to comply within the limits for a class B digital device, pursuant to Part 15 of the FCC Rules. These limits are designed to provide reasonable protection against harmful interference in a residential installation. This equipment generates, uses, and can radiate radio frequency energy and, if not installed and used in accordance with the instructions, may cause harmful interference to radio communications. However, there is no guarantee that interference will not occur in a particular installation. If this equipment does cause harmful interference to radio or television reception, which can be determined by turning the equipment off and on, the user is encouraged to try to correct the interference by one or more of the following measures:
- Reorient or relocate the receiving antenna.
- Increase the separation between the equipment and receiver.
- Connect the equipment into an outlet on a circuit different from that to which the receiver is connected.
- Consult the dealer or an experienced technician for help.
FCC warning
Changes or modifications not expressly approved by the party responsible for compliance with the FCC Rules could void the user's authority to operate this equipment.
DHHS and FDA safety certification
This product is made and tested to meet safety standards of the FCC, requirements and compliance with safety performance of the U.S. Department of Health and Human Services, and also with FDA Radiation Performance Standards 21 CFR Subchapter J.
Canada ICES-003 statement
This Class B digital apparatus complies with Canadian ICES-003.
RSS 310 statement
To reduce potential radio interference to other users, the antenna type and its gain should be so chosen that the equivalent isotropically radiated power (e.i.r.p.) is not more than that permitted for successful communication.
Copyright
© 2006 Insignia. Insignia and the Insignia logo are trademarks of Best Buy Enterprise Services, Inc. Other brands and product names are trademarks or registered trademarks of their respective holders. Specifications and features are subject to change without notice or obligation.
For service and support call (877) 467-4289.
Warranty
1-year limited warranty
Insignia Products ("Insignia") warrants to you, the original purchaser of this new NS-4V24/NS-8V24 ("Product"), that the Product shall be free of defects in the original manufacture of the material or workmanship for a period of one (1) year from the date of your purchase of the Product ("Warranty Period"). This Product must be purchased from an authorized dealer of Insignia brand products and packaged with this warranty statement. This warranty does not cover refurbished Product. If you notify Insignia during the Warranty Period of a defect covered by this warranty that requires service, terms of this warranty apply.
How long does the coverage last?
The Warranty Period lasts for 1 year (365 days) from the date you purchased the Product. The purchase date is printed on the receipt you received with the Product.
What does this warranty cover?
During the Warranty Period, if the original manufacture of the material or workmanship of the Product is determined to be defective by an authorized Insignia repair center or store personnel, Insignia will (at its sole option): (1) repair the Product with new or rebuilt parts; or (2) replace the Product at no charge with new or rebuilt comparable products or parts. Products and parts replaced under this warranty become the property of Insignia and are not returned to you. If service of Products or parts are required after the Warranty Period expires, you must pay all labor and parts charges. This warranty lasts as long as you own your Insignia Product during the Warranty Period. Warranty coverage terminates if you sell or otherwise transfer the Product.
How to obtain warranty service?
If you purchased the Product at a retail store location, take your original receipt and the Product to the store you purchased it from. Make sure that you place the Product in its original packaging or packaging that provides the same amount of protection as the original packaging. If you purchased the Product from an online web site, mail your original receipt and the Product to the address listed on the web site. Make sure that you put the Product in its original packaging or packaging that provides the same amount of protection as the original packaging.
Where is the warranty valid?
This warranty is valid only to the original purchaser of the product in the United States and Canada.
What does the warranty not cover?
This warranty does not cover:
- Customer instruction
- Installation
- Set up adjustments
- Cosmetic damage
• Damage due to acts of God, such as lightning strikes
- Accident
- Misuse
- A b u s e
- Negligence
- Commercial use
- Modification of any part of the Product, including the antenna
This warranty also does not cover:
- Damage due to incorrect operation or maintenance
- Connection to an incorrect voltage supply
- Attempted repair by anyone other than a facility authorized by Insignia to service the Product
- Products sold as is or with all faults
- Consumables, such as fuses or batteries
- Products where the factory applied serial number has been altered or removed
REPAIR REPLACEMENT AS PROVIDED UNDER THIS WARRANTY IS YOUR EXCLUSIVE REMEDY. INSIGNIA SHALL NOT BE LIABLE FOR ANY INCIDENTAL OR CONSEQUENTIAL DAMAGES FOR THE BREACH OF ANY EXPRESS OR IMPLIED WARRANTY ON THIS PRODUCT, INCLUDING, BUT NOT LIMITED TO, LOST DATA, LOSS OF USE OF YOUR PRODUCT, LOST BUSINESS OR LOST PROFITS. INSIGNIA PRODUCTS MAKES NO OTHER EXPRESS WARRANTIES WITH RESPECT TO THE PRODUCT, ALL EXPRESS AND IMPLIED WARRANTIES FOR THE PRODUCT, INCLUDING, BUT NOT LIMITED TO, ANY IMPLIED WARRANTIES OF AND CONDITIONS OF MERCHANTABILITY AND FITNESS FOR A PARTICULAR PURPOSE, ARE LIMITED IN DURATION TO THE WARRANTY PERIOD SET FORTH ABOVE AND NO WARRANTIES, WHETHER EXPRESS OR IMPLIED, WILL APPLY AFTER THE WARRANTY PERIOD. SOME STATES, PROVINCES AND JURISDICTIONS DO NOT ALLOW LIMITATIONS ON HOW LONG AN IMPLIED WARRANTY LASTS, SO THE ABOVE LIMITATION MAY NOT APPLY TO YOU. THIS WARRANTY GIVES YOU SPECIFIC LEGAL RIGHTS, AND YOU MAY ALSO HAVE OTHER RIGHTS, WHICH VARY FROM STATE TO STATE OR PROVINCE TO PROVINCE.
Reproductores de MP3 Pilot Insignia NS-4V24/NS-8V24
Contenido
Introducción 36
ElementoFunción
natural_image
Close-up of a mobile control interface with playback controls and a red circular speedometer (no text or symbols visible)Para configurar automáticamente emisoras predefinidas:
Nota
www.bestbuy.com/support.asp
www.bestbuy.com/mp3help
www.geeksquad.com
Aprenda más
www.insignia-products.com/mp3info
Distributed by Best Buy Purchasing, LLC
7601 Penn Avenue South, Richfield, MN USA 55423-3645
© 2007 Best Buy Enterprise Services, Inc.
All rights reserved. INSIGNIA is a registered trademark of Best Buy Enterprise Services, Inc.
All other products and brand names are trademarks of their respective owners.
7601 Penn Avenue South, Richfield, MN USA 55423-3645
© 2007 Best Buy Enterprise Services, Inc.
7601 Penn Avenue South, Richfield, MN USA 55423-3645
© 2007 Best Buy Enterprise Services, Inc.
- Introduction
- Safety information
- Features
- Note
- Package contents
- System requirements
- Controls and connections
- Front
- Bottom
- Back
- Display
- Setting up your MP3 player
- Charging the battery
- To charge the battery:
- Connecting headphones
- To connect headphones:
- Installing the included software
- To install the software:
- Tip
- Using your MP3 player
- Turning your player on and off
- Navigating the on-screen menus
- Changing the volume
- To change the volume:
- Locking the buttons
- To lock the buttons:
- Getting more music
- Getting music from CDs
- To rip a CD:
- Getting music from Digital Music Store
- Transferring music files to your player
- Copying files using Best Buy Digital Music Store
- Adding Rhapsody channels to your player
- Transferring files using Windows Explorer
- To copy music files from your computer to your player using Windows Explorer:
- Playing music files
- To play music:
- Rating songs
- To use ratings:
- Repeating and shuffling playback
- To shuffle the playback order:
- Repeating segments of a track
- To enable A-B repeat:
- To repeat an audio segment:
- Using the equalizer
- To select a pre-programmed equalizer setting:
- To change the equalizer's custom setting:
- Playing Rhapsody Channels
- To play Rhapsody channels:
- Playing Audible files
- To play Audible files:
- Moving between chapters in an Audible audio book
- To move between chapters in Audible files:
- Bookmarking
- To activate the bookmark feature:
- To retrieve the bookmark:
- Automatically bookmarking MP3 books
- To automatically bookmark MP3 books:
- Viewing photos
- To view photos:
- Transferring photos to your player
- To copy photos from your computer to your player using File & Folder (MSC) USB mode:
- To copy photos from your computer to your player using Media Manager (MTP) USB mode:
- Deleting photos
- Watching videos
- To watch videos:
- Muting audio during video playback
- To mute audio during video playback:
- Navigating through videos
- Using video-out
- To turn on video-out:
- To turn off video-out:
- Deleting videos
- Browsing folders
- To select folder browsing:
- Deleting all files
- To delete specific files:
- To delete all files from your player using the on-screen menu:
- To delete files from your player using your computer:
- Disconnecting the player
- To safely disconnect the player from your computer:
- Listening to FM radio
- Tuning the radio
- To tune to an FM radio station:
- Setting station presets
- To set station presets manually:
- To set station presets automatically:
- To delete station presets:
- Accessing station presets
- To access station presets:
- Saving and retrieving RDS data
- To save RDS data:
- To retrieve the RDS data:
- Recording
- Recording from a device
- To record from an attached device:
- Recording a radio broadcast
- To record an FM radio broadcast:
- Listening to a recording
- To listen to a recording:
- Connecting to Bluetooth headphones
- To connect your headphones to your player:
- Turning Bluetooth on or off
- To turn Bluetooth on or off:
- Searching for new Bluetooth headphones
- To search for new headphones:
- Using the Bluetooth status icons
- Viewing your Bluetooth headphones
- To view a list of Bluetooth headphones:
- Changing settings
- Changing power off and sleep settings
- Erasing all files and restoring factory defaults
- Manually changing the USB mode
- To temporarily change the USB mode:
- To change the mode permanently to file and folder (MSC) mode:
- USB charging option
- Viewing system information
- To view system information:
- Increasing capacity with a SD flash card
- Maintaining your MP3 player
- Care and cleaning
- Updating the firmware
- To update the firmware:
- Buying a new battery
- FAQ
- How do I copy files to the player?
- How do I use my player with a Mac OS?
- How do I use my player with iTunes?
- Where can I buy a new battery?
- What is MSC?
- Do I have to fully charge my battery before using it?
- Which file formats does the player support?
- What is MTP?
- When I copy files to the player using Windows Explorer, what folder should I copy them to?
- Some of my music files are on my player, but cannot be played. When I select them, a different song begins to play. What is wrong?
- Why should I update the firmware?
- How do I copy a CD to my player?
- Why does my player display a message that says "Unknown artist/album"?
- Getting help
- Contacting technical support
- Learn more
- Specifications
- Legal notices
- FCC Part 15
- FCC warning
- DHHS and FDA safety certification
- Canada ICES-003 statement
- RSS 310 statement
- Copyright
- Warranty
- 1-year limited warranty
- How long does the coverage last?
- What does this warranty cover?
- How to obtain warranty service?
- Where is the warranty valid?
- What does the warranty not cover?
- Reproductores de MP3 Pilot Insignia NS-4V24/NS-8V24
- Contenido
- ElementoFunción
- Para configurar automáticamente emisoras predefinidas:
- Nota
- Aprenda más
Brand : INSIGNIA
Model : NS-4V24
Category : Media player