
SA1000 - Audio Receiver Revel - Free user manual and instructions
Find the device manual for free SA1000 Revel in PDF.


| Product Type | Audio Receiver |
| Brand | Revel |
| Model | SA1000 |
| Dimensions (W x H x D) | 430 mm x 100 mm x 350 mm |
| Weight | 8 kg |
| Power Supply | AC 230V, 50 Hz |
| Power Consumption | 150 W (max) |
| Amplifier Output | 2 x 100 W (8 ohms) |
| Frequency Response | 20 Hz - 20 kHz |
| Inputs | Phono, AUX, CD, Tape, Tuner |
| Outputs | Speakers (A/B), Headphone, Pre-out |
| Tuner | AM/FM with presets |
| Remote Control | Included |
| Material | Metal chassis, plastic front panel |
| Color | Black |
| Maintenance | Clean with a soft, dry cloth. Avoid liquids. |
| Safety | Do not expose to moisture or extreme temperatures. |
| Spare Parts Availability | Contact the manufacturer or authorized dealers. |
| Repairability | Serviceable by qualified technicians only. |
| General Information | High-quality audio receiver designed for home entertainment systems. |
Frequently Asked Questions - SA1000 Revel
User questions about SA1000 Revel
0 question about this device. Answer the ones you know or ask your own.
Ask a new question about this device
Download the instructions for your Audio Receiver in PDF format for free! Find your manual SA1000 - Revel and take your electronic device back in hand. On this page are published all the documents necessary for the use of your device. SA1000 by Revel.
USER MANUAL SA1000 Revel
IMPORTANT SAFETY INSTRUCTIONS
- Read these instructions.
- Keep these instructions.
- Heed all warnings.
- Follow all instructions.
- Do not use this apparatus near water.
- Clean only with a dry cloth.
- Do not block any ventilation openings. Install in accordance with the manufacturer's instructions.
- Do not install near any heat sources such as radiators, heat registers, stoves or other apparatus (including amplifiers) that produce heat.
- Do not defeat the safety purpose of the polarized or grounding-type plug. A polarized plug has two blades with one wider than the other. A grounding-type plug has two blades and a third grounding prong. The wide blade or the third prong is provided for your safety. If the provided plug does not fit into your outlet, consult an electrician for replacement of the obsolete outlet.
- Protect the power cord from being walked on or pinched, particularly at plugs, convenience receptacles and the point where they exit from the apparatus.
- Only use attachments/accessories specified by the manufacturer.
- Use only with the cart, stand, tripod, bracket or table specified by the manufacturer or sold with the apparatus. When a cart is used, use caution when moving the cart/apparatus combination to avoid injury from tip-over.
- Unplug this apparatus during lightning storms or when unused for long periods of time.
-
Refer all servicing to qualified service personnel. Servicing is required when the apparatus has been damaged in any way, such as power supply cord or plug is damaged, liquid has been spilled or objects have fallen into the apparatus, or the apparatus has been exposed to rain or moisture, does not operate normally or has been dropped.
-
Do not expose this apparatus to dripping or splashing and ensure that no objects filled with liquids, such as vases, are placed on the apparatus.
- The mains plug is used as disconnect device, the disconnect device shall remain readily operable.
- WARNING: Apparatus shall be connected to a MAINS socket outlet with a protective earthing connection.


The lightning flash with arrowhead symbol, within an equilateral triangle, is intended to alert the user to the presence of uninsulated "dangerous voltage" within the product's enclosure that may be of sufficient magnitude to constitute a risk of electric shock to persons.
Warning: To reduce the risk of electric shock, do not remove cover (or back) as there are no user-serviceable parts inside. Refer servicing to qualified personnel.

The exclamation point within an equilateral triangle is intended to alert the user to the presence of important operating and maintenance (servicing) instructions in the literature accompanying the product.
WARNING: To reduce the risk of fire or electric shock, do not expose this apparatus to rain or moisture. Operating Temperature 35^ C.
TABLE OF CONTENTS
About Revel ^® 2
About Your Revel® SA1000 Subwoofer Amplifier .... 3
Product Highlights 3
What's In The Box 3
Unpacking.... 3
Front Panel Layout.... 3
Rear Panel Layout 4
Connections 4
Equalization 4
Installation 5
Cooling Requirements 5
Connections/Amplifier 5
Configurations/Wiring....6
Troubleshooting....7
Specifications....7
Warranty 8
Congratulations and Thank You for purchasing your new REVEL® SA1000 Subwoofer Amplifier.
Please take the time to read the following installation and setup information in order to optimize your the performance of your amplifier and architectural subwoofer system.
ABOUT REVEL®
Since 1996, REVEL ^® has stood at the forefront of loudspeaker design and performance. Backed by Harman International's world leading research and design facilities, REVEL ^® loudspeakers benefit from cutting-edge resources such as:
- Multiple large anechoic chambers which allow for precise testing and measurements.
- A multi-channel listening lab for double-blind, position independent listening tests.
- A laser interferometer that enables detailed driver and cabinet analysis.
- Finite element analysis, utilized for advanced loudspeaker modeling.
- A stereo lithography apparatus, which rapidly "builds" tooled parts.
ABOUT YOUR REVEL® SA1000 SUBWOOFER AMPLIFIER
The SA1000 subwoofer amplifier is a high efficiency Class D amplifier specifically designed to be used in conjunction with REVEL® Architectural subwoofers. It is optimized to give the best dynamics and frequency response of REVEL® Architectural subwoofers, and is specifically designed to drive their highly reactive load impedances.
NOTE: The EQ and headroom management have been specifically designed for REVEL® Architectural subwoofers! Use of the SA1000 with any other subwoofers could lead to damage of the subwoofer or the SA1000 amplifier. Contact your dealer or visit www.revelspeakers.com for the latest list of models that can be safely used with your SA1000 amplifier.
PRODUCT HIGHLIGHTS
- Wide dynamic range
- Low distortion and low noise
• 2 EQ modes (Customized for in-wall and in-ceiling subwoofers) - User-adjustable Single-band PEQ (Room Equalization)
- Automatic Turn-On (detecting signal presence) and Turn-Off after 10 minutes with no signal
- Short-circuit and over-current protection
• Over-temperature compensation - Two dual-banana output connectors for easy installation and connection to REVEL® Architectural in-wall or in-ceiling subwoofers (Maximum of 2 subwoofer modules per amplifier)
WHAT'S IN THE BOX
• 1 x SA1000 Subwoofer Amplifier
- 2 x Rack Mount brackets
- 4 x Screws for installing rack mount brackets
• 1 x SA1000 Owner's Manual
- 1 x Power Cord
UNPACKING
Carefully unpack the amplifier and accessories. If you suspect damage from transit, report it immediately to your dealer and/or delivery service. Keep the shipping carton and packing materials for future use.
WARNING: Before you start to set up your amplifier, make sure you read and observe the Important Safety Instructions found at the beginning of this manual.
FRONT PANEL LAYOUT

Figure 1: Front-panel controls and indicators
1. Power LED
The Power Indicator LED identifies the current state of the SA1000 amplifier. The amplifier has three different powered states:
- Red: Standby – the SA1000 automatically enters Standby if no signal is detected from the system for 10 minutes.
- Green: On – the SA1000 turns on to the "On" state, or when a signal is detected.
- No Light: Off - the AC mains power switch is in the off position or the SA1000 is unplugged.
2. Volume Control
Adjusts the volume level of the amplifier.
REAR PANEL LAYOUT
Numbers in Figure 2 correspond with the numbered items in this section

Figure 2: Rear-panel controls and connectors
The rear panel of the SA1000 amplifier, shown in Figure 2, contains the following connectors and controls:
CONNECTIONS
1. Input
Input is made through RCA line level input jacks. Connect the outputs of the preamplifier, receiver or surround processor to these connectors. If you are connecting to a single LFE output, you can connect it to either jack. If you need more sensitivity from the subwoofer/amplifier system, then connect the LFE signal lead to a Y-adapter cable and connect one output into each jack.
2. Output(s)
Two output connections with 5-way binding post terminals are provided. Each binding post accepts standard 4mm banana connectors, crimp-on lugs, pins or twisted bare wire through the post hole under the post nut covers, and twisted bare wire around the metal post. Each output has a minimum impedance of 8 Ohms (one B28W or B28C).
IMPORTANT NOTE: The SA1000 is not designed for use in Bridged configuration.
3. Low Pass Crossover
The variable 50Hz – 150Hz low-pass crossover determines the frequency at which the SA1000 blends to the main speakers.
NOTE: This control does not limit the frequency range of the main speakers in the system. Adjust the Low-Pass Crossover control to properly blend to the satellite speakers. When the blend is correct, notes of instruments and voice in the crossover region should sound correct in level; not too loud relative to the subwoofer frequencies or satellite frequencies, but also not too soft. When the control is turned to "LFE" the crossover is by-passed and all crossover settings are now set in the Processor or AVR menu.
EQUALIZATION
The equalization controls tailor the amplifier's response for your listening position in your specific listening room. The parametric equalizer includes variable controls to adjust Frequency, Bandwidth (or "Q") and EQ Level of one band of eq, as shown in Figure 3. To use these controls, you first must set the EQ switch to "ON".
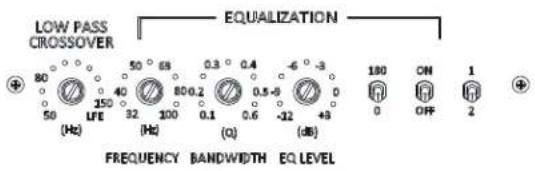
Figure 3: Rear-panel equalization controls
NOTE: Specific measurement equipment is required to properly adjust the Equalization controls. Your authorized REVEL® dealer can make the appropriate measurements, using suitable equipment to ensure optimal results.
4. EQ Frequency Control
This adjustment allows you to select the center frequency of the particular problem area. The range is from 32Hz to 100Hz.
5. EQ Bandwidth Control
Sets the range of frequencies over which the equalizer will have an effect. The range is from 0.1 octaves to 0.6 octaves.
6. EQ Level Control
Allows you to adjust how much boost or cut is applied to the selected frequency by the EQ Frequency Control. This control adjusts from -12dB to a maximum of +3dB.
7. Phase Switch
Adjusts the phase of the subwoofer's output to the front speakers. Proper phase adjustment can also depend on variables such as the in-wall subwoofer placement and listener position. Set this switch for maximum mid-bass output at the primary listening position.
8. EQ On/Off Switch
Enables/Disables the parametric EQ controls (Frequency, Bandwidth, and EQ Level, but not Phase).
9. "1 2", or Subwoofer Type Switch
Selects the factory pre-programmed subwoofer type settings:
- Select the Type 1 setting for use with the Revel® B28C
- Select the Type 2 setting for use with the Revel® B28W
10. AC Mains Power Switch
Connects and disconnects power from the AC input cord. During periods of intermittent use, the power switch can be left On. It is recommended to turn off the power switch for extended periods of non-use.
11. Power Cord Connector
Plug the supplied power cord into this connector and into a wall-mounted AC outlet. Due to the current draw of the SA1000, accessory outlets on the back of any audio/video components should NEVER be used to power this product.
The power cord connector includes the fuse tray, located at the lower side of the receptacle. If you need to gain access to the fuse, always disconnect the unit from the AC source/outlet. Replace the fuse with the same type, voltage and current rating specified.
100-120VAC Model: 10AH,250V
CAUTION: Before you begin, make sure your amplifier is disconnected from the power source and all level controls turned completely down (counterclockwise).
Make sure the power source is adequate to supply the correct AC mains voltage and current for the Revel® SA1000 amplifier. Be sure that your amplifier operating voltage matches your available AC mains voltage.
To install the SA1000 in your cabinet/rack system, follow the steps below:
- If applicable and or required by the installation, attach the rack mount brackets to each side of the front of the amplifier using the screws provided. Refer to Figure 4
- Install the assembly into the cabinet using the mounting screws for your rack through the rack mount brackets. For details of installation into the cabinet, refer to the user guide of your cabinet.

natural_image
Technical line drawing of a rectangular electronic device with ventilation grilles and a rotary knob (no text or symbols)Figure 4
COOLING REQUIREMENTS
With proper installation, your new Revel ^® SA1000 amplifier is designed for continuous operation of your Revel ^® Architectural subwoofer, either the B28W In-wall subwoofer or the B28C In-ceiling subwoofer.
Your Revel® SA1000 amplifier is equipped with a thermal protection circuit, which will shut the amplifier off when it gets too hot. If you experience thermal issues, several factors may be contributing to the problem, including load impedance, air flow and ambient temperature.
To avoid impedance related heating, DO NOT USE any subwoofer other than the recommended REVEL® Architectural subwoofers.
Air flow restrictions could be another factor. Always install the amplifier allowing sufficient air flow around the unit, favoring natural convection. The SA1000 works fine in a rack-mounted environment of conventional design. You may have to experiment with positioning, as hotter equipment below it will raise its ambient temperature. If you experience it thermally cycling, then you may need to move it lower in your rack.
Ambient temperature can also be a factor as a higher room temperature will start the SA1000 closer to its thermal limit than a lower room temperature. If the room is excessively hot, either cool the room or use the amplifier/subwoofer system at a cooler time.
CONNECTIONS/AMPLIFIER
CAUTION: NEVER make or break connections unless all system components are powered off.
2 CHANNEL APPLICATION –
CONNECTING TO THE MAIN OUTPUTS

Figure 5
CONNECTION TO MAIN OUTPUTS
- Connect a dual-channel RCA patch cable between Left & Right main outputs of the receiver/preamplifier and to the respective INPUT connectors on the SA1000 rear panel, as shown in Figure 5.
NOTE: This configuration applies to receivers with preamplifier outputs or to preamplifier/subwoofer amplifier configurations in which there are two sets of Main outputs. If the receiver has jumpers from the Pre- or Main-Out to the Amp-in connectors or if the preamplifier has only one set of Main-Out connectors, a Y-adapter should be used to send the same signal to both the main power amplifier and the subwoofer(s). Tape Out or Record Out connectors cannot be used.
CONFIGURATIONS/WIRING
SINGLE SUB CONNECTIVITY (B28W SHOWN)
CAUTION: NEVER make or break connections unless all system components are powered off.
Line level connection options to SA1000:
- Connect a pair of RCA cables to left and right main outputs of your receiver/processor to L and R inputs of the SA1000 amplifier
- Connect receiver/processor subwoofer output to either of the L or R inputs
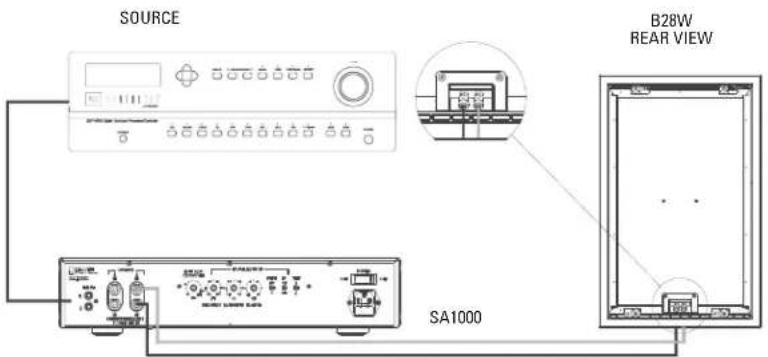
Figure 6
IMPORTANT: For B28W in-wall sub select EQ2. For B28C in-ceiling select EQ1.
DUAL SUB CONNECTIVITY (B28W SHOWN)
CAUTION: NEVER make or break connections unless all system components are powered off.

Figure 7
IMPORTANT: For B28W in-wall sub select EQ2. For B28C in-ceiling select EQ1.
TROUBLESHOOTING
CONDITION POSSIBLE REASON
| Front LED is not On | No power to the amplifier: The amplifier is not plugged into the power receptacle. Make sure power cord is plugged into a properly working AC power outlet.No power to the amplifier: AC Mains power switch is set to Off. Make sure Mains power switch is set to On.No power to the amplifier: Main fuse is blown.IMPORTANT!Always disconnect unit from the AC Mains before checking AC mains fuse section. The AC Mains fuse, should not generally blow unless a malfunction has occurred. The fuse must be replaced only with the exact type and rating of the fuse originally supplied and specified. If the fuse has been replaced but blows again within a short time, disconnect all power immediately and contact your dealer for support. |
| Green LED but no sound or low output sound level | Input signal is not present or is at a very low input level; Check subwoofer level settings at the preamp or processor.Volume control is turned down: turn the SA1000 front-mounted volume control clock-wise.Crossover control is set too low: Raise the crossover frequency by rotating the crossover control clock-wise. |
| Intermittent operation (front panel led transitioning from green to red) | Output connections are shorted: Check for shorts in the loudspeaker cables.Amplifier is in thermal protection: Refer to the “Cooling Requirements” section of this manual. Look for ventilation restrictions and/or high ambient temperature. |
SPECIFICATIONS
DESCRIPTION SPECIFICATION
| Rated Output Power (RMS) into the minimum impedance of 4 Ohms | 700 Watts |
| Peak power 1500 W | |
| Rated impedance 8 Ohms per speaker output | |
| Minimum load impedance 4 Ohms | |
| Model-Specific EQ 1: Only for Revel B28C; 2: Only for Revel B28W | |
| Input Sensitivity to 1W @ 50Hz 16.3mVrms +/- 1dB (Single input driven) Gain=41.7dB | |
| Input Overload (Both inputs driven) ≥ 2.0Vrms | |
| Input Impedance > 10K Ohms | |
| Low Pass Crossover range 50-150Hz | |
| Auto Turn On Input Sensitivity @ 50Hz Typical 10mV | |
| THD+N at 1W <0.3% | |
| THD+N at Rated Output Power | <1% |
| Signal-to-Noise ratio to 1W | >65dBA |
| Minimum AC Mains power requirements | 100-120VAC-50-60Hz Model: 700W, 5A230VAC-50-60Hz Model: 700W, 3A |
| Power consumption (Standby) | 0.5W |
| Height | 3.50 in (88.90mm) |
| Width | 17in (431.8 mm) |
| Depth | 11.04in (280.3mm) |
| Weight | 14 Lb (6.35Kg) |
| Features, specifications and appearance are subject to change without notice. | |
LIMITED WARRANTY
Revel loudspeakers are warranted against defects. The duration of a warranty depends on the laws in the country in which it was purchased. Your local Revel retailer can help you determine the duration and coverage of your warranty.
For more information please visit: REVELSPEAKERS.COM
Please visit REVELSPEAKERS.COM for additional language support on the user manual.
HARMAN International, Incorporated
8500 Balboa Boulevard, Northridge, CA 91329 USA
© 2016 HARMAN International, Incorporated. All rights reserved.
Revel and the Revel logo are trademarks of HARMAN International Industries, Incorporated, registered in the United States and/or other countries.
Features, specifications and appearance are subject to change without notice.
For questions, assistance or additional information concerning any of our products,
call us at: (516) 594-0300 or (888) 691-4171. For technical support, submit your detailed inquiry
- IMPORTANT SAFETY INSTRUCTIONS
- TABLE OF CONTENTS
- ABOUT REVEL®
- ABOUT YOUR REVEL® SA1000 SUBWOOFER AMPLIFIER
- PRODUCT HIGHLIGHTS
- WHAT'S IN THE BOX
- UNPACKING
- FRONT PANEL LAYOUT
- Power LED
- Volume Control
- REAR PANEL LAYOUT
- CONNECTIONS
- Input
- Output(s)
- Low Pass Crossover
- EQUALIZATION
- EQ Frequency Control
- EQ Bandwidth Control
- EQ Level Control
- Phase Switch
- EQ On/Off Switch
- "1 2", or Subwoofer Type Switch
- AC Mains Power Switch
- Power Cord Connector
- COOLING REQUIREMENTS
- CONNECTIONS/AMPLIFIER
- CHANNEL APPLICATION –
- CONNECTING TO THE MAIN OUTPUTS
- CONNECTION TO MAIN OUTPUTS
- CONFIGURATIONS/WIRING
- SINGLE SUB CONNECTIVITY (B28W SHOWN)
- CAUTION: NEVER make or break connections unless all system components are powered off.
- DUAL SUB CONNECTIVITY (B28W SHOWN)
- TROUBLESHOOTING
- SPECIFICATIONS
- LIMITED WARRANTY
Brand : Revel
Model : SA1000
Category : Audio Receiver