
ES-LC50 - Razor PANASONIC - Free user manual and instructions
Find the device manual for free ES-LC50 PANASONIC in PDF.


| Product Type | Electric Shaver |
| Brand | Panasonic |
| Model | ES-LC50 |
| Dimensions (approx.) | 160 x 70 x 50 mm |
| Weight (approx.) | 150 g |
| Power Supply | Rechargeable (100-240V AC) |
| Charging Time | ~8 hours for full charge |
| Operating Time | ~20 minutes after full charge |
| Battery Type | Ni-MH (Nickel-Metal Hydride) |
| Cutting System | Two stainless steel blades with 30° sharp edge |
| Wet/Dry Use | Yes; can be used with foam/gel or dry |
| Pop-up Trimmer | Yes, for sideburns or mustache |
| Waterproof | IPX7 (waterproof up to 1 m for 30 min) |
| Cleaning | Rinse under running water; replaceable blade set |
| Maintenance | Oil the blades periodically; replace foil and blade unit |
| Safety Features | Hypoallergenic; integrated overheat protection |
| Replace Parts | Replacement foil and blade set (model WES0907) |
| Included Accessories | Charging stand, cleaning brush, protective cap, AC adapter |
| Country of Origin | Japan |
Frequently Asked Questions - ES-LC50 PANASONIC
User questions about ES-LC50 PANASONIC
0 question about this device. Answer the ones you know or ask your own.
Ask a new question about this device
Download the instructions for your Razor in PDF format for free! Find your manual ES-LC50 - PANASONIC and take your electronic device back in hand. On this page are published all the documents necessary for the use of your device. ES-LC50 by PANASONIC.
USER MANUAL ES-LC50 PANASONIC
Operating Instructions
( 家用 电动剃须刀
(Household) AC/Rechargeable Shaver
型号
Model No. ES-LC50
中文 2
English 10

natural_image
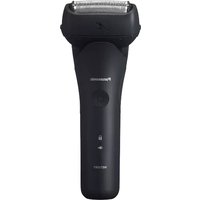
Plastic handless device with brand logo and model number 8/1, no visible text or symbols on bodyBefore operating this unit, please read these instructions completely and save them for future use.
A 保护盖
B 外刀部
环境保护与资源回收
此剃须刀使用锂电池。
Thank you for choosing a Panasonic shaver. Please read all instructions before use.
Important
This shaver has a built-in rechargeable battery. Do not throw into fire, apply heat, or charge, use, or leave in a high temperature environment.
▶ Using the shaver
Caution
The outer foil is very thin and can be damaged if not used correctly. Check that the foil is not damaged before using the shaver. Do not use the shaver if the foil etc. is damaged as you will cut your skin.
- Terminate the usage when there is abnormality or failure.
- Do not shave with soap or clean it with water when operating with the adaptor.
- Do not share with your family or other people.
- Adequate ambient temperature for using is 5-35 °C. If you use the appliance in temperature outside of the recommended range, it may stop functioning.
- This appliance is not intended for use by persons (including children) with reduced physical, sensory or mental capabilities, or lack of experience and knowledge, unless they have been given supervision or instruction concerning use of the appliance by a person responsible for their safety.
Children should be supervised to ensure that they do not play with the appliance.
▶ Charging the shaver
- Never use the adaptor in the bathroom or shower room.
- Do not use any power cord or adaptor other than this adaptor (RE7-51).
- Plug in the adaptor into a household outlet where there is no moisture and handle it with dry hands.
- Hold the adaptor when disconnecting it from the household outlet. If you tug on the power cord, you may damage it.
- The supply cord cannot be replaced. If the cord is damaged, the adaptor should be scrapped.
- Adequate ambient temperature for charging is 5-35 °C.
▶ Cleaning the shaver
Warning
Disconnect the power cord from the shaver before cleaning it in water to prevent electric shock.
- Keep both the inner blades inserted. If only one of the inner blades is inserted, the shaver may be damaged.
- If you clean the shaver with water, do not use salt water or hot water. Do not soak the shaver in water for a long period of time.
- Clean the housing only with a soft cloth slightly dampened with tap water or soapy tap water. Do not use thinner, benzine, alcohol or other chemicals.
- Do not wash the charging stand with water.
▶ Storing the shaver
- Store the shaver in a place with low humidity after use.
- Do not store the shaver where it will be exposed to direct sunlight or other heat sources.
- Disconnect the power cord when storing the shaver.
- Do not bend the power cord or wrap it around the shaver.
- Please properly store or dispose the plastic bag of the appliance to avoid any accidents, such as infants suffocation, etc. Keep the plastic bag away from infants. Keep the oil away from children.
Parts identification
A
B

©
[NO TEXT]
D

E

F
H

1
A Protective cap
B Outer foil section
① Foil frame
② System outer foil
③ System outer foil release buttons
© Inner blades
D Main body
④ Foil frame release buttons
⑤ Power switch [0/1]
⑥ Battery capacity lamp
⑦ Charge status lamp
⑧ Appliance socket
E Adaptor (RE7-51)
⑨ Power cord
⑩ Appliance plug
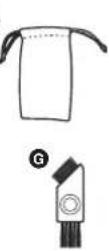
F Travel pouch
G Cleaning brush
H Oil
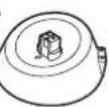
① Charging stand
Charge
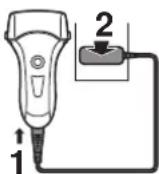
Charging the shaver
1 Insert the appliance plug into the shaver.
2 Plug in the adaptor into a household outlet.
- Turn the shaver off before attaching.
- Charging is completed after approx. 1 hour.
Charging with the charging stand
- Insert the appliance plug into the charging stand.
- Place the shaver on the charging stand and plug in the adaptor into a household outlet.

Cord shaving
If you insert the appliance plug to the shaver and plug in the adaptor into a household outlet, you can use it even if the battery capacity is low.
- If the shaver does not work, continue charging it for approx. 1 minute.
Reading lamps when charging
While charging
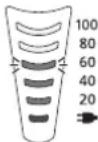
The charge status lamp (▶glows.
The number of the battery capacity lamp will increase as charging progresses.
After charging is completed

All the battery capacity lamps will light up and then turn off after 5 seconds.
- Recommended ambient temperature for charging is 5-35 °C. The battery may degrade the performance or may not charge under extreme low or high temperatures. The charge status lamp (▶) will blink when there is a problem with charging.
- When charging the shaver for the first time or when it has not been in use for more than 6 months, the charge status lamp (→) may not glow. It will eventually glow if kept connected.
Shave
Using the shaver

1 Press the power switch. 2 Hold the shaver as illustrated above and shave.
Start out shaving by applying gentle pressure to your face. Stretch your skin with your free hand and move the shaver back and forth in the direction of your beard. You may gently increase the amount of pressure as your skin becomes accustomed to this shaver. Applying excessive pressure does not provide a closer shave.
Caution
- If you press the power switch for more than 2 seconds, the sonic vibration cleaning mode is activated. Page 14
You cannot shave in this mode.
- Do not place your fingers on the power switch while using the shaver. This may cause the shaver to turn off or enter the sonic vibration cleaning mode.
Reading lamps when using
While using

Approximate amount of battery charge is displayed as 20 - 100 (%).
- The charge status lamp (▶) glows when using cord shaving.
- It will turn off approximately 5 seconds after operating the switch.
When the battery capacity is low
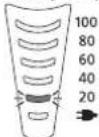
"20%" blinks when operating the shaver.
- You can shave 2 to 3 times after "20%" appears. (This will differ depending on usage.)
- A full charge will supply enough power for approx. 14 shaves of 3 minutes each.
Clean
Cleaning the shaver
- Disconnect the power cord from the shaver.
- Apply some hand soap and some water to the outer foil.
- Press the power switch for more than 2 seconds to activate the sonic vibration cleaning mode.
• The battery capacity lamps blink in order.
• After about 20 seconds, it will be automatically turned off, or you can turn it off by pressing the power switch.

- Remove the outer foil section and press the power switch for more than 2 seconds to activate the sonic vibration cleaning mode and clean it with running water.
- Wipe off any drops of water with a dry cloth.
- Dry the outer foil section and the shaver completely.
- Attach the outer foil section to the shaver.
- Lubricate the shaver.


The mark on the left means suitable for cleaning under an open water tap.
Warning
Disconnect the power cord from the shaver before cleaning it in water to prevent electric shock.
Lubrication
To maintain shaving comfort for a long time, it is recommended that the oil provided with the shaver is used.
- Switch off the shaver.
- Apply one drop of oil to each of the outer foils.
- Switch the shaver on, and run it for approximately five seconds.
- Switch off the shaver, and wipe off any excess oil from the outer foils with a soft cloth.

Cleaning with the brush
Clean the inner blades using the short brush by moving it in direction (A). Clean the system outer foil, the shaver body using the long brush.
- Do not move the short brush in direction (B) as it will damage the inner blades and affect their sharpness.
- Do not use the short brush to clean the outer foils.


Replacing the system outer foil and the inner blades
system outer foil once every year inner blades once every two years
▶ Replacing the system outer foil
-
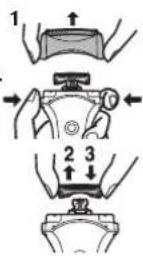
Press the foil frame release buttons and lift the outer foil section upwards.
-
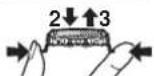
Press the system outer foil release buttons and pull down the system outer foil.
- Align the side of the foil frame that has a protrusion and the system outer foil mark ( ) and securely attach together.
• The system outer foil cannot be reversely attached.
• Always insert the system outer foil to the foil frame when attaching to the shaver.
- After turning the side of the foil frame that has a protrusion to the front, securely attach the outer foil section to the shaver until it clicks.

▶ Replacing the inner blades
- Press the foil frame release buttons and lift the outer foil section upwards.
- Remove the inner blades one at a time.
- Do not touch the edges (metal parts) of the inner blades to prevent injury to your hand.
- Insert the inner blades one at a time until they click.
▶ Replacement parts
Replacement parts are available at your dealer or Service Center.
| Replacement parts for ES-LC50 | System outer foil WES | 9087 |
| Inner blades WES | 9068 |
Removing the built-in rechargeable battery
Remove the built-in rechargeable battery before disposing of the shaver. Please make sure that the battery is disposed of at an officially designated location if there is one. Do not dismantle or replace the battery so that you can use the shaver again. This could cause fire or an electric shock. Replace it at an authorized service center.
- Disconnect the power cord from the shaver when removing the battery.
- Perform steps ① to ⑤ and lift the battery, and then remove it.

For environmental protection and recycling of materials
This shaver contains a Lithium-ion battery. Please make sure that the battery is disposed of at an officially assigned location, if there is one in your country.
Specifications
| Product name AC/Rechargeable Shaver | |
| Product model ES-LC50 | |
| Rated input | 100-240V~50-60Hz 180mA |
| Rated output | 5.4V---1.2A |
| Motor voltage | 3.6V--- |
| Charging time Approx. | 1 hour |
| Place of origin | Main body: Japan Adaptor: China Charging stand: China |
| Date of production | See engraving on the commodity. |
| Execution standard | Chinese standard GB4706.1 appendix B GB4706.9 |
This product is intended for household use only.
MEMO
Panasonic
保修证
保修条款
- 环境保护与资源回收
- Important
- ▶ Using the shaver
- Caution
- ▶ Charging the shaver
- ▶ Cleaning the shaver
- Warning
- ▶ Storing the shaver
- Parts identification
- Charge
- Charging the shaver
- Charging with the charging stand
- Cord shaving
- Reading lamps when charging
- Shave
- Using the shaver
- Reading lamps when using
- Clean
- Cleaning the shaver
- Lubrication
- Cleaning with the brush
- Replacing the system outer foil and the inner blades
- ▶ Replacing the system outer foil
- ▶ Replacing the inner blades
- ▶ Replacement parts
- Removing the built-in rechargeable battery
- For environmental protection and recycling of materials
- Panasonic
- 保修证
Brand : PANASONIC
Model : ES-LC50
Category : Razor