ST-CC0229 - Iron Saturn - Free user manual and instructions
Find the device manual for free ST-CC0229 Saturn in PDF.


| Product Type | Steam Iron |
| Brand | Saturn |
| Model | ST-CC0229 |
| Dimensions (L x W x H) | 28 x 12 x 15 cm |
| Weight | 1.2 kg |
| Power Supply | 220-240 V ~ 50/60 Hz |
| Power Consumption | 2000 W |
| Water Tank Capacity | 300 ml |
| Soleplate Material | Stainless Steel |
| Cord Length | 2 m |
| Steam Output | Up to 40 g/min |
| Spray Function | Yes |
| Auto Shut-Off | Yes, after 30 seconds horizontal / 8 minutes vertical |
| Anti-Drip System | Yes |
| Self-Clean Function | Yes |
| Variable Temperature Control | Yes, with dial |
Frequently Asked Questions - ST-CC0229 Saturn
User questions about ST-CC0229 Saturn
0 question about this device. Answer the ones you know or ask your own.
Ask a new question about this device
Download the instructions for your Iron in PDF format for free! Find your manual ST-CC0229 - Saturn and take your electronic device back in hand. On this page are published all the documents necessary for the use of your device. ST-CC0229 by Saturn.
USER MANUAL ST-CC0229 Saturn
natural_image
Red and black vacuum cleaner with adjustable arm and head (no visible text or symbols)
STEAM IRON
Dear Buyer!
We congratulate you on having bought the device under trade name "Saturn". We are sure that our devices will become faithful and reliable assistance in your housekeeping.
Avoid extreme temperature
changes. Rapid temperature change (e.g. when the unit is moved from freezing temperature to a warm room) may cause condensation inside the unit and a malfunction when it is switched on. In this case leave the unit at room temperature for at least 1.5 hours before switching it on. If the unit has been in transit, leave it indoors for at least 1.5 hours before starting operation.
Please carefully read this
instruction before use and keep it well for your future reference.
Table of Contents
Product Introduction.... 3 Safety Instructions.... 4 Steamer Parts Diagram.... 5 Installation & Operation.... 7 Damaged Checking & Reason.... 9 Cleaning and Maintenance.... 10
Product Introduction
Brief Introduction
This appliance is a new garments steamer combined with humidifier. It is applied to household, hotel, restroom, etc. Handsome figure and transparent water tank design add attraction to the exquisite unit.
Checking before using
Before usage check if the power cord is defective. If you find the power cord was defected, be sure not to disassemble the unit by yourself. Replace it at the authorized service center.
Safety protector
I. Power indicator
Press the switch and the indicator lights up.
II. Thermostat
Thermostat, which is fixed on heater, can control the heater working in limited range of temperature, which can avoid of danger cause of temperature over-high.
III. Fuse
When temperature of heater goes over-high, the fuse would be cut out to avoid of danger coming.
Warning!
- If the safety protector was broken, be sure not to use the unit. And take it to service site to repair. If the supply cord is damaged, it must be replaced by the manufacturer, its service agent or similarly qualified persons in order to avoid a hazard.
- When you water in unit or clean it up, be sure power off.
Safety Instructions
-
Do not use this unit before read the instruction manuals carefully.
-
To reduce the risk of contact with
hot water emitting from steam vents, check appliance before each use by holding it away from body and operating.
-
Do not put hot water into the water tank in order to avoid water tank transformation.
-
Use appliance only for its intended use. Steam only in an up and down vertical motion. Never use a horizontal position or tilt into a backward position, this may result in water discharge.
-
To reduce the risk of electric shock, do not immerse the appliance in water or other liquids.
-
Use distilled water.
-
Close supervision is necessary for any appliance being used by or near children. Do not leave appliance unattended while connected to power source.
-
Never tug cord to disconnect from outlets, instead grasp plug and pull to disconnect.
-
Do not allow cord to touch hot surface. Let appliance cool completely before putting away. Loop cord loosely around the appliance when storing.
-
Do not operate the appliance with
-
Do not operate the appliance with a damaged cord, or if the appliance has been dropped or damaged. To reduce the risk of electric shock, do not disassemble or attempt to repair the appliance, take it to a qualified service person for examination and
3 repair. Incorrect reassembly or repair
could cause a risk of fire, electric shock or injury to persons, when the appliance is used.
-
Indoor use only.
-
The appliance only can be connected with sockets with earth wire.
-
Water should be put into water tank before setting power.
-
Burns could occur from touching hot parts, hot water or steam use cars when you empty a steam appliance there may be hot water in the reservoir.
-
After using, wait for unit natural cooling.
-
After using, pull out the power plug from socket.
-
Do not pull out steam pipe during use.
-
The power plug shall be pulled out from socket, when filling water and cleaning.
-
There's no heating device in the steam spray board. So do not take the brush down during using.
-
This appliance is not intended for use by persons (including children) with reduced physical, sensory or mental capabilities, or lack of experience and knowledge, unless they have been given supervision or instruction concerning use of the appliance by a person responsible for their safety.
-
Children should be supervised to ensure that they do not play with the appliance.
-
Don't put the appliance on the desk or chair. The appliance only can be put on the ground.
-
Be careful of the hot little water coming out from the brush before using.
-
Do not pull out the steam pipe during use.
-
Do not let the water flow into the body from water outlet in order to avoid damaging the inner parts.
- Do not remove the water tank, when humidifier working.
WARNING:
Do not clean the appliance under tap water.
Be careful of the hot steam from steam pipe.
Do not bend the brush head. Do not pull out the power cord from outlet by wet hand.
Steamer Parts Diagram

| DRA WIN G NO. | NAME OF PARTS |
| 1 | Fixed sheath for rod-set |
| 2 | Fixed knob for rod-set |
| 3 | Panel |
| 4 | Fixed rack for copper tube |
| 5 | Fixed shelves for copper tube |
| 6 | Indicator |
| 7 | Power switch |
| 8 | Indicator |
| 9 | Upper of body |
| 10 | Bottom of body |
| 11 | Water drain pipe nut |
| 12 | Water inlet pipe |
| 13 | Increase weight |
| 14 | Water tank |
| 15 | Water tank cover |
| 16 | 360° truckle |
| 17 | Wheel |
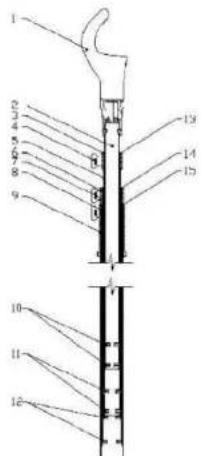
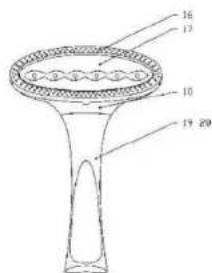
| DRAWING NO. | NAME OF PARTS |
| 1 | Against slide hose hanger |
| 2 | Highest section of rod |
| 3 | Fixed sets of upper rod |
| 4 | Lock button |
| 5 | Upper section of rod |
| 6 | Fixed sets of middle rod |
| 7 | Middle section of rod |
| 8 | Lower section of rod |
| 9 | Bracket |
| 10 | Antiskid of top rod |
| 11 | Antiskid of upper rod |
| 12 | Antiskid of middle rod |
| 13 | Antiskid lining of upper rod |
| 14 | Antiskid lining of middle rod |
| 15 | Antiskid lining of lower rod |
| 16 | Brush |
| 17 | Al-plate of brush |
| 18 | Brush head |
| 19 | Top cover of brush |
| 20 | Bottom cover of brush |
Installation & Operation

- Take out rod set and against slide hose hanger. Install the hanger.

- Cut rod-set in Fixed Sheath of Rod-set. Screw the knob for fixing rod.

3. Switch out Cage Knob. Lift the rod to proper height and then close Cage Knob.

4. Cut Fixed Tube of Steam Hose into Fixed Stopper of Steam Hose, and then fix it. Re. fig.
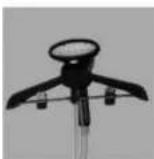
5. Place the hose head on hanger.

6. Twist off the cap of the water tank, then put water into the water tank.

7. Screw the cap, then put the water tank into the unit.

8. Plug in and turn the switch to the "1" gear, then the indicator lights up and small steam will throw out; turn the switch to the "2" gear and big steam will throw out. When you finish using, turn the switch to the "0" gear, remove the plug and store the unit.
Damaged Checking & Reason
| PHENOMENA | CAUSE RESOLUTION | |
| No working | Electro-circuitbreakdown;Plugdisconnection;No light of switch;Fuse burned | Take it to a qualified service person for examination and repair. |
| Big noise from the hose and low steam | Steaming in low position | Straighten hose up and left condensation is free to flow back into steamer. |
| The water drips from the steam head | The steam head damaged;Steaming not in an upright position | Exchange a new steam headStraighten hose up. |
| Water and steam drips from hose connecting position | Seal-ring damaged;No tight of hose connecting position | Exchange a new seal-ringScrew tightly of connecting position |
| Water flow out from the water tank | Water tank broken or has hole | Exchange a new water tank |
| Water in water tank became hot | Copper water pipe was stopped up | Clean up the deposits |
| Low steam than usual | Low pressure voltage;Water tube had been shut-up | Set up manostatRemove water deposits with fresh water or liquid cleaner |
| Water tank deformed | Infuse over-hot water or some chemical agent | Maintain using the tankExchange new water tank |
| No steam but lamp is light | Steam generator is broken;Some electronic component is broken | Take it to a qualified service person for examination and repair |
| No steam | Steam condensed in steam pipe | Lift the brush head and steam pipe, so that condensed water can come into the water tank |
| Irregular Steam | Steam condensed in steam pipe and brush head | Lift the brush head and steam pipe, so that condensed water can come into the water tank |
| Water drop from brush head | Steam condensed in steam pipe | Lift the brush head and steam pipe, so that condensed water can come into the water tank |
| Indicator light off | Not plug in or power switch is in off position | Put the plug in or press switch |
| Indicator light keeps on | No water in water tankAuto constant temperature knob is offThe cap of water tank not pressed tightly | Fill water into the water tankAdjust auto constant temperature knob clockwiseTighten the cap of water tank |
| Smelled steam | New machineDirty inside of water tank | Remove the cap of water tank and put the water tank in shadow 12 hoursClean the water tank by clean water |
| Indicator light on, but no wind no fog | Water too much than water level | Pour some water out |
| Humidifier steam lower than usual | Transducer scalingDirty water or water stored too long | Clean the transducerChange the water in water tank |
| Humidifier steam | Check if the appliance | Change the machine |
| control knob doesn't work | has humidifier function | with humidifier and turn on the knob |
| Not turn on the regulator | Put the cap of humidifier in correct position | |
| The indicator of knob on, but not working |
Cleaning and Maintenance
Pull the plug from the socket before cleaning
After using the appliance, please empty remainder water in unit. And then place it to some dry and dust free location.
Do not use water to clean the machine directly and use cloth to wipe the dirty with neutral detergent instead of petrol oil or etc.
Keep the appliance clean and dry if do not use for long time.
Technical Data:
Power: 1600 W
Rated voltage: 220-230 V Rated Frequency: 50
Rated Frequency: 50 Hz Rated Current: 7.3 A
Rated Currer Continuous
Continuous Intensive Steam Rate (up to 90°+10")
Water Tank Capacity: 2.1
Automatic Water Supply
Set
STEAM IRON 1
INSTRUCTION MANUAL WITH
WARRANTY BOOK 1 PACKAGE 1
PACKAGE 1
ENVIRONMENT FRIENDLY

You can help protect
the environment!
Please remember to
respect the local
regulations: hand in the non working electrical
non-working electrical
equipments to an appropriate waste
appropriate waste disposal center
The manufacturer reserves the right to change the specification and design of goods.
RU
ПАРОВОЙ УТЮГ
The Warranty is provided for the period of 2 years or more if the Law on User Right of the country where the appliance was bought provides for a greater minimum warranty period.
All terms of warranty comply with to the Law on Protection of the Consumer Rights and are governed by the legislation of the country where the product was bought.
The warranty and free of charge repair are provided in any country where the product is delivered to by Saturn Home Appliances or authorized representative thereof, and where no restriction of import or other legal provisions interfere with rendering of warranty services and free of charge repair.
Cases uncovered by the warranty and free of charge repair:
-
Guarantee coupon is filled in improperly.
-
The product has become inoperable because of the Buyer's non-observance of the service regulations indicated in the Instruction.
-
The product was used for professional, commercial or industrial purposes (except for the models, specially intended for this purpose that is indicated in the instruction).
-
The product has external mechanical damage or damage caused by penetration of the liquid inside, dust, insects and other foreign objects.
-
The product has damages caused by non-observance of the rules of power supply from batteries, mains or accumulators.
-
The product was exposed to opening, repair or modification of design by the persons, unauthorized to repair; independent cleaning of internal mechanisms etc. was made.
-
The product has natural wear of parts with limited service life, expendables etc.
-
The product has deposits of scale inside or outside of fire-bar elements, irrespective of used water quality.
-
The product has damages caused by effect of high (low) temperatures or fire on non-heat resistant parts of the product.
-
The product has damages of accessories and nozzles which are included into the complete set of product shipment (filters, grids, bags, flasks, cups, covers, knives, sealing rings, graters, disks, plates, tubes, hoses, brushes, and also power cords, headphone cords etc.).
On the warranty service and repair, please contact the authorized service centers of Saturn Home Appliances.
CZ
MEZINÁRODNÍ ZÁRUKA
When purchasing the product,
please require its checking before you;
BE SURE
that the goods sold to you, are functional and complete
and that the warranty coupon is filled in correctly.
This warranty coupon confirms the absence of any defects in the product you purchased and provides for free of charge repair of the product failed through the fault of the manufacturer throughout the period of warranty service and free of charge repair.
Failing the presentation of this coupon, in case of its improper filling in, infringement of factory seals (if any), and also in cases indicated in the warranty obligations, the claims are not accepted, and no warranty service and free of charge repair is made!
The warranty coupon is valid only in the original copy with the stamp of trading organization, signature of the seller, date of sale and signature of the buyer.

ZÁRUČNÍ LIST
Při koupi výrobku
- STEAM IRON
- Dear Buyer!
- Avoid extreme temperature
- Please carefully read this
- Table of Contents
- Product Introduction
- Brief Introduction
- Checking before using
- Safety protector
- Thermostat
- Fuse
- Warning!
- Safety Instructions
- WARNING:
- Cleaning and Maintenance
- Technical Data:
- Set
- ENVIRONMENT FRIENDLY
- You can help protect
- RU
- ПАРОВОЙ УТЮГ
- Cases uncovered by the warranty and free of charge repair:
- On the warranty service and repair, please contact the authorized service centers of Saturn Home Appliances.
- MEZINÁRODNÍ ZÁRUKA
Brand : Saturn
Model : ST-CC0229
Category : Iron