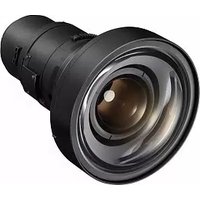
ET-ELW30 - Projector accessory PANASONIC - Free user manual and instructions
Find the device manual for free ET-ELW30 PANASONIC in PDF.


| Product Type | Projector accessory (lens/filter) |
| Brand | Panasonic |
| Model | ET-ELW30 |
| Dimensions (approx.) | 100 x 100 x 80 mm |
| Weight (approx.) | 0.5 kg |
| Power Supply | None (passive component) |
| Main Function | Enhances projection quality and widens lens range |
| Compatible Projectors | Select Panasonic projector models (check user manual) |
| Installation | Mounts onto projector lens; simple bayonet or screw fitting |
| Maintenance & Cleaning | Wipe with soft, dry cloth; avoid liquids |
| Safety Precautions | Handle with care; do not drop; keep away from heat |
| Spare Parts & Repairability | Contact Panasonic service center for replacement |
| Storage | Store in a cool, dry place |
| General Information | Part of Panasonic's professional projector accessories |
Frequently Asked Questions - ET-ELW30 PANASONIC
User questions about ET-ELW30 PANASONIC
0 question about this device. Answer the ones you know or ask your own.
Ask a new question about this device
Download the instructions for your Projector accessory in PDF format for free! Find your manual ET-ELW30 - PANASONIC and take your electronic device back in hand. On this page are published all the documents necessary for the use of your device. ET-ELW30 by PANASONIC.
USER MANUAL ET-ELW30 PANASONIC
Operating Instructions
Zoom Lens
Commercial Use
natural_image
Technical line drawing of a mechanical connector or fitting (no text or symbols)ET-ELT30

natural_image
Technical line drawing of a mechanical connector or fitting (no text or symbols)ET-ELT31

natural_image
Technical line drawing of a mechanical component with no visible text or symbolsET-ELW30
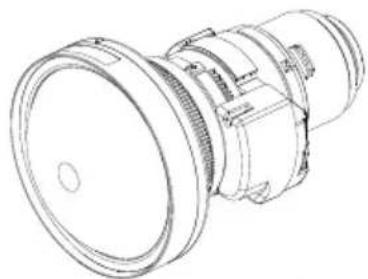
natural_image
Technical line drawing of a mechanical component with flanged ends and threaded end (no text or symbols)ET-ELW31
ENGLISH
Thank you for purchasing this Panasonic Product.
Before operating this product, please read the instructions carefully, and save this manual for future use.
Before using your projector, be sure to read "Read this first!" (→ page 3).
■ Please save this manual for future use.

Contents
Read this first! ....3
Before Use. 4
Detaching the lens / Attaching the lens ....4
Before replacing the projection lens 4
Detaching the lens. 5
Attaching the lens 5
Making adjustments. 6
Adjusting the Focal Balance (Only for ET-ELW30, ET-ELW31). . . . . . . . 6
Specifications....6
Dimensions 7
WARNING:
Before replacing the projection lens, be sure to turn the power off and disconnect the power plug from the wall outlet.
Unexpected projection of light may cause injury to eyes.
Replacing without removing the power plug may result in electrical shock.
CAUTION:
When moving or holding up the projector, be careful not to hold the projection lens or the openings beside the projection lens.
Doing so may damage the projector.
Do not touch or remove any parts except for the specified parts in this Installation Instructions.
Doing so may result in malfunctions, electrical shock, or accidents.
Do not place objects in front of the lens while the projector is being used.
Doing so can cause fire or damage to the object and can cause the projector to malfunction.
Extremely strong light is emitted from the projector's lens.
Do not open the desiccant bag. Do not eat the contents.
Inadvertently ingesting desiccant could be harmful.
- If the desiccant gets into your eyes or mouth, immediately rinse with plenty of water and seek medical attention.
- Keep desiccant out of the reach of children.
Before Use
■ Supported projectors
PT-EZ590, PT-EW650, PT-EW550, PT-EX620, PT-EX520
Note
Models other than the above may also be supported. Refer to the operating instructions of the projector you are using.
In this document, the alphabet letters at the end of the projector part numbers are omitted.
■ Supplied Accessories
Make sure that the following has been provided.
| Part name Appearance (quantity) | ||
| Lens cap |  | The product is delivered with a lens cap attached.The shape and size of the lens caps are different for each product.(1 each for front and rear) |
Note
The illustrations in this manual may differ from the actual product.
Detaching the lens / Attaching the lens
Before replacing the projection lens
Return the projection lens to the home position before replacing or removing it.
For details on how to return the lens to the home position, refer to the operating instructions of the projector.
Attention
Make sure that the projector power supply is switched off before attaching or detaching the projection lens.
After removing the projection lens, store it safely away from vibration or impacts.
Before attaching the projection lens, be sure to remove the lens caps (1 each for front and rear) attached to the projection lens.
Do not touch the electric contact points of the projection lens with your fingers. Dust and dirt on the contacts may cause contact malfunctions.
Do not touch the surface of the lens with bare hands. Finger prints and dirt on the surface of the lens will be magnified by the lens and lower the quality of the projected image. Place the supplied lens cap on the zoom lens when the projector is not in use.
The lens is made of glass. The lens could be damaged if brought into contact with or rubbed against hard objects. Handle the lens carefully.
Use a clean, soft and dry cloth to wipe away dust and dirt from the lens.
Do not use fluffy cloths containing oil, water or dust for cleaning. The material in the lens is easily damaged, so do not apply excessive pressure when wiping it.
4 - ENGLISH
Detaching the lens / Attaching the lens (continued)
* The illustration for the next procedure uses PT-EZ590 as an example.
Detaching the lens

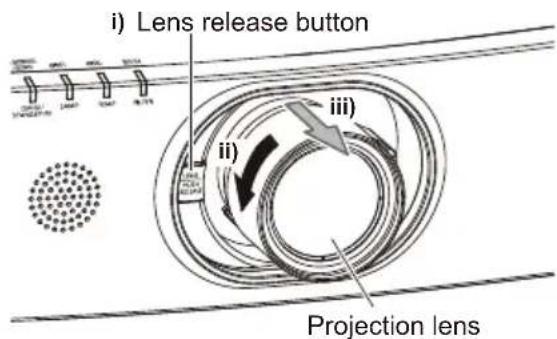
Before removing the projection lens, if the lens release button cannot be released the lock even if you press it, proceed the step 1) and 2).
1) Place the projector upside down on a soft cloth.
2) Use a Phillips screwdriver, remove the lens release button fixing screw by turning it in the lens release button fixing screw hole in the counterclockwise direction.
3) Turn the projection lens completely in the counterclockwise direction while pressing the lens release button to detach the lens.
Attention
Attach the supplied lens caps before storing the lens.
Attaching the lens
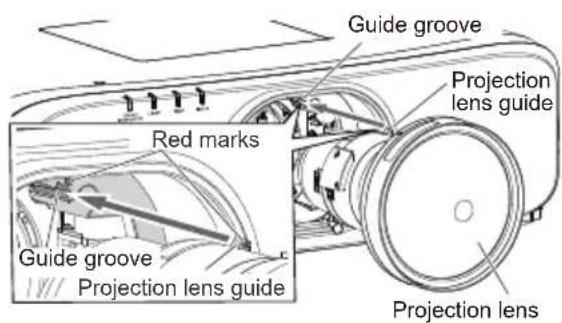

natural_image
Technical line drawing of a mechanical component with no visible text or symbols1) Align the red mark on the projection lens with the red mark on the projector, and insert the projection lens to the end.
2) Turn the projection lens clockwise until it clicks.
Attention
Turn the projection lens counterclockwise to confirm that it does not come out.
■ Lens release button fixing screw
The lens release button is held down by using the lens release button fixing screw (supplied in the accessories of the projector), and the projection lens cannot be removed. When mounting it to the projector, refer to the steps 1) to 2) of "Detaching the lens".
Making adjustments
Adjusting the Focal Balance (Only for ET-ELW30, ET-ELW31)
The focal balance between the center and periphery of the projected image changes depending on the size of the projected image.
The lens is equipped with a focal balance adjustment function for the screen periphery.
■ Procedure for adjusting the focal balance

1) Turn the periphery focus adjustment ring (the laurette ring in the middle of the lens) to adjust the index line to the projected image size (between 40" and 400").
- For example, when the projected image size is 250", adjust the index line to between 100" and 400".
2) Adjust the projected image size to match the screen by operating the projector.
3) Adjust the focus by operating the projector.
Specifications
Please check the projection lens specifications and use the appropriate projection lens depending on the usage condition.
| Model No. ET-ELW31 ET-ELW30 ET-ELT30 ET-ELT31 | |||||
| Lens Type | Short focus zoom lens | Short focus zoom lens | Long focus zoom lens | Ultra long focus zoom lens | |
| F value F 1.7 to 2.0 F 1.7 to 1.99 F 1.7 to 2.24 F 1.7 to 2.3 | |||||
| Focal Length (f) | 10.46 to 13.61 mm | 13.09 to 17.03 mm | 31.34 to 56.79 mm | 56.41 to 101.66 mm | |
| Dimensions | Width | 127.4 mm (5") 127.4 mm (5") | 110 mm (4-11/32") (excluding protrusion) | 110 mm (4-11/32") (excluding protrusion) | |
| Height | 127.4 mm (5") (excluding protrusion) | 127.4 mm (5") (excluding protrusion) | 110 mm (4-11/32") | 110 mm (4-11/32") | |
| Depth | 194.5 mm (7-21/32") | 194 mm (7-5/8") | 205.1 mm (8-1/16") | 214.5 mm (8-7/16") | |
| Net Weight | Approx. 1.2 kg (2.6 lb) | Approx. 1.2 kg (2.6 lb) | Approx. 1.52 kg (3.4 lb) | Approx. 1.55 kg (3.4 lb) | |
Note
- For about the projection distance, see “Setting up” in the operating instructions for the projector you are using.
6 - ENGLISH
Dimensions
Unit: mm
| Model No. Dimensions | |
| ET-ELT30 | 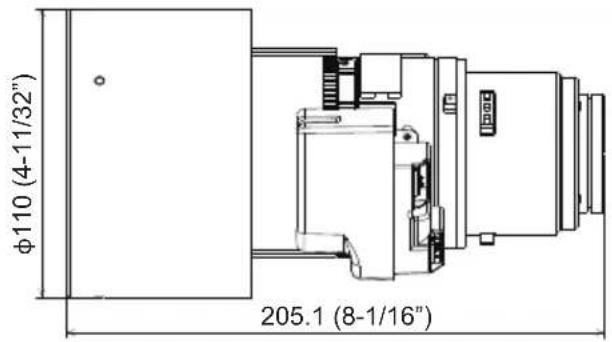 |
| ET-ELT31 |  |
| ET-ELW30 | 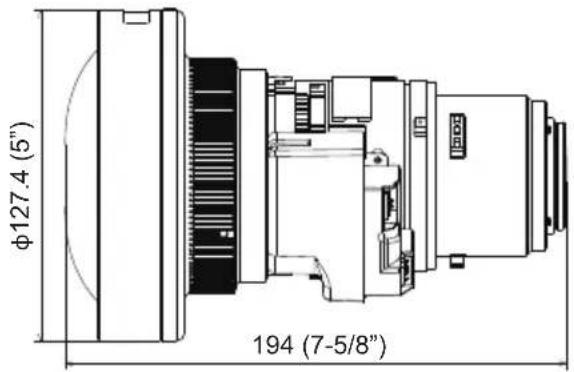 |
| ET-ELW31 |  |
Information on Disposal for Users of Waste Electrical & Electronic Equipment (private households)
This symbol on the products and/or accompanying documents means that used electrical and electronic products should not be mixed with general household waste. For proper treatment, recovery and recycling, please take these products to designated collection points, where they will be accepted on a free of charge basis.
Alternatively, in some countries you may be able to return your products to your local retailer upon the purchase of an equivalent new product.
Disposing of this product correctly will help to save valuable resources and prevent any potential negative effects on human health and the environment which could otherwise arise from inappropriate waste handling. Please contact your local authority for further details of your nearest designated collection point.
Penalties may be applicable for incorrect disposal of this waste, in accordance with national legislation.
For business users in the European Union
If you wish to discard electrical and electronic equipment, please contact your dealer or supplier for further information.
Information on Disposal in other Countries outside the European Union
This symbol is only valid in the European Union.
If you wish to discard this product, please contact your local authorities or dealer and ask for the correct method of disposal.
Information for users in the European Union

Importer's name and address within the European Union
Panasonic Marketing Europe GmbH
Panasonic Testing Centre
Winsbergring 11, 22525 Hamburg, Germany
Product information (for Turkey only)


- Operating Instructions
- Contents
- WARNING:
- CAUTION:
- Before Use
- ■ Supported projectors
- Note
- ■ Supplied Accessories
- Detaching the lens / Attaching the lens
- Before replacing the projection lens
- Attention
- - ENGLISH
- Detaching the lens / Attaching the lens (continued)
- Detaching the lens
- Attaching the lens
- ■ Lens release button fixing screw
- Making adjustments
- Adjusting the Focal Balance (Only for ET-ELW30, ET-ELW31)
- ■ Procedure for adjusting the focal balance
- Specifications
- - ENGLISH
- Dimensions
- Information on Disposal for Users of Waste Electrical & Electronic Equipment (private households)
- For business users in the European Union
- Information on Disposal in other Countries outside the European Union
- Information for users in the European Union
- Product information (for Turkey only)
Brand : PANASONIC
Model : ET-ELW30
Category : Projector accessory