
ET-D3LEW50 - Projector accessory PANASONIC - Free user manual and instructions
Find the device manual for free ET-D3LEW50 PANASONIC in PDF.

| Product Type | Projection Lens (Fixed Focus) |
| Model Number | ET-D3LEW50 |
| F Value | 2.5 |
| Focal Length | 14.8 mm |
| Dimensions (Width x Height) | 160 mm x 160 mm |
| Supplied Accessories | Lens cover (1 each) |
| Compatible Projectors | PT-RQ32K, PT-RZ31K, PT-RS30K, PT-RZ21K, PT-RS20K, PT-RQ13K, PT-RZ12K, PT-RS11K, PT-DZ21K2, PT-DS20K2, PT-DW17K2, PT-DZ16K2, PT-DZ13K, PT-DS12K, PT-DW11K, PT-DZ10K |
| Peripheral Focus Adjustment | Yes (for ET-D3LEW60 and ET-D3LEW50) |
| Lens Calibration Required | Yes, after attachment |
| Lens Shift Range | Standard projection position only; lens shift not recommended |
| Safety Warnings | Do not look into light; turn off power before replacement; keep desiccant away from children |
| Cleaning Instructions | Use clean, soft, dry cloth; avoid fluffy cloths with oil, water, or dust |
| Storage | Store safely away from vibration or impacts; attach lens cover when not in use |
| Desiccant Warning | Do not open bag; do not ingest; if contact occurs, rinse with water and seek medical attention |
| Documentation | Operating instructions available for download |
Frequently Asked Questions - ET-D3LEW50 PANASONIC
User questions about ET-D3LEW50 PANASONIC
0 question about this device. Answer the ones you know or ask your own.
Ask a new question about this device
Download the instructions for your Projector accessory in PDF format for free! Find your manual ET-D3LEW50 - PANASONIC and take your electronic device back in hand. On this page are published all the documents necessary for the use of your device. ET-D3LEW50 by PANASONIC.
USER MANUAL ET-D3LEW50 PANASONIC
Operating Instructions
Projection Lens
Commercial Use
Model No.
ET-D3LEW60
ET-D3LES20
ET-D3LET80
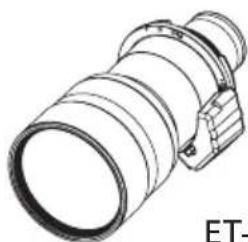
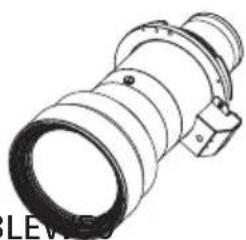
ET-D3LEW50
natural_image
Technical line drawing of a cylindrical mechanical component (no text or symbols)ET-D3LEW60 ET-D3LES20

natural_image
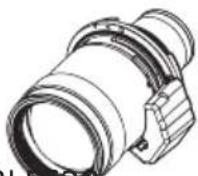
Technical line drawing of a cylindrical mechanical component with a flanged end (no text or symbols)ET-D3LET80 ET-D3LEV
natural_image
Technical line drawing of a mechanical component with no visible text or symbolsENGLISH
Read before use
This document is intended for the various projection lenses that can be attached to and used in conjunction with Panasonic projectors.
For Model No. and model names, refer to the product list ( Page 4).
Thank you for purchasing this Panasonic product.
■o ensure correct use of this lens, please read the operating instructions supplied with the lens and the projector carefully.
■before using this product, be sure to read "Read this first!" (→Page 3).
■lease save this manual for future use.

Contents
Read this first! ....3
Before Use....4
Attaching the Lens / Detaching the Lens....5
Before replacing the projection lens 5
Attaching the Lens....5
Peripheral focus adjustment function 7
Lens calibration 8
Removing the Lens 11
Projection relationships....12
Lens shift ranges....14
Specifications ....16
Dimensions....16
Projected image size and Projection distance......Appendix / Annexe / 付録 1
The "Appendix" can be found after the Japanese language section (日本語).
WARNING:
Do not look at or place your skin into the light emitted from the lens while the projector is being used.
Doing so can cause burns or loss of sight.
- Strong light is emitted from the projector's lens. Do not look at or place your hands directly into this light.
● Turn off the power when moving away from the projection lens or projector.
Do not project an image with the lens cover attached.
- Doing so can cause fire.
CAUTION:
Before replacing the projection lens, be sure to turn off the power and disconnect the power plug from the wall outlet.
● Unexpected projection of light may cause injury to eyes.
● Replacing the projection lens without removing the power plug may result in electric shock.
Do not stand in front of the lens while the projector is being used.
Doing so can cause damage and burns to clothing.
- Strong light is emitted from the projector's lens.
Do not place objects in front of the lens while the projector is being used.
Doing so can cause fire, damage to the object, or malfunction of the lens and projector.
- Strong light is emitted from the projector's lens.
Do not open the desiccant bag. Do not eat the contents.
Inadvertently ingesting desiccant could be harmful.
- If the desiccant gets into your eyes or mouth, immediately rinse with plenty of water and seek medical attention.
- Keep desiccant out of the reach of children.
Before Use
Product list
The product names and model numbers of the projection lenses covered by this manual are as follows.
| Product name M | Model number Description | |
| Zoom lens ET-D3 | LEW60 / ET-D3LES20ET-D3LET80 | Projection lens equipped with an EEPROM*1and stepping motor. |
| Fixed focus lens | ET-D3LEW50 Projection lens equipped with an EEPROM *1. | |
*1 EEPROM: Electrically erasable programmable read-only memory
■ Projectors supported by each projection lens
ET-D3LEW60 / ET-D3LES20 / ET-D3LET80
PT-RQ32K / PT-RZ31K / PT-RS30K / PT-RZ21K / PT-RS20K
ET-D3LEW50
PT-RQ32K / PT-RZ31K / PT-RS30K / PT-RZ21K / PT-RS20K / PT-RQ13K / PT-RZ12K / PT-RS11K / PT-DZ21K2 / PT-DS20K2 / PT-DW17K2 / PT-DZ16K2 / PT-DZ13K / PT-DS12K / PT-DW11K / PT-DZ10K
Note
- Some of the alphabet letters at the end of projector model numbers may be omitted in this manual.
- Models other than the above may also be supported. Refer to the operating instructions for your projector or the Panasonic website (https://panasonic.net/cns/projector/).
- If the projector you are using is PT-RQ32K / PT-RZ31K / PT-RS30K / PT-RZ21K / PT-RS20K, you may not be able to use the ET-D3LEW60 / ET-D3LES20 / ET-D3LET80 / ET-D3LEW50 projection lens depending on main version of the firmware. If main version of the firmware is the version number shown below, update to the latest firmware before use.
- PT-RQ32K / PT-RZ31K / PT-RS30K: Earlier than 3.00
- PT-RZ21K / PT-RS20K: Earlier than 2.00
For details on the update procedure, refer to the latest firmware information on the Panasonic website (https://panasonic.net/cns/projector/pass/).
● The main version of the firmware can be checked in the [STATUS] screen.
■ Supplied Accessories
Make sure that the following has been provided.
| Part name Appearance (quantity) | ||
| Lens cover |  | (The product is delivered with a lens cover attached.)1 each |
Attaching the Lens / Detaching the Lens
Before replacing the projection lens
Return the projection lens to the home position before replacing or removing it.
For details on how to return the lens to the home position, refer to the operating instructions of the projector.
Attention
● Make sure that the projector power supply is switched off before attaching or detaching the projection lens.
● After removing the projection lens, store it safely away from vibration or impacts.
- Do not touch the electrical contacts of the projection lens with your fingers. Dust and dirt on the contacts may cause contact malfunctions, while static electricity may damage the unit.
- Do not touch the surface of the lens with bare hands. Finger prints and dirt on the surface of the lens will be magnified by the lens and lower the quality of the projected image. Place the supplied lens cover on the zoom lens when the projector is not in use.
● The lens is made of glass. The lens could be damaged if brought into contact with or rubbed against hard objects. Handle the lens carefully.
- Use a clean, soft and dry cloth to wipe away dust and dirt from the projection lens. Do not use fl uffy cloths containing oil, water or dust for cleaning. The lens is easily damaged, so do not apply excessive pressure when wiping it.
Attaching the Lens
Note
- If the lens hole cover is already removed, start from step 3.
The illustrations in this procedure depict attachment of the ET-D3LEW50 onto the PT-RZ21K.
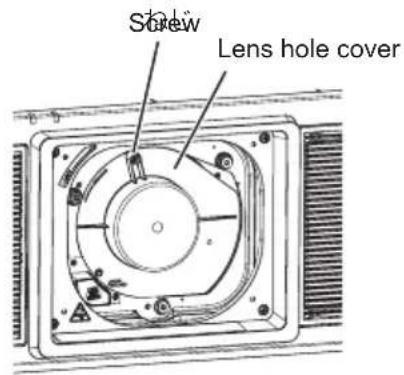
1) Loosen the lens hole cover screw.
- Use a Phillips screwdriver to turn the lens hole cover screw counterclockwise until it is in its loosened state.

2) Remove the lens hole cover.
(i) While pressing the lens release button, turn the lens hole cover counterclockwise until its marker (O) aligns with the marker on the projector (O to the left of "LOCK"). (ii) Then remove the lens hole cover.
Attaching the Lens / Detaching the Lens (continued)
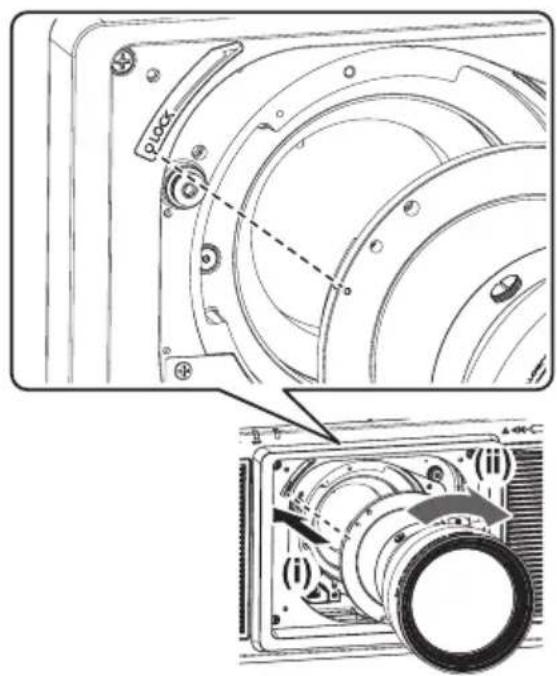
3) (i) Insert the projection lens while aligning its marker (orange) with the marker on the projector (○ to the left of “LOCK”), and (ii) turn it clockwise until it clicks into place.
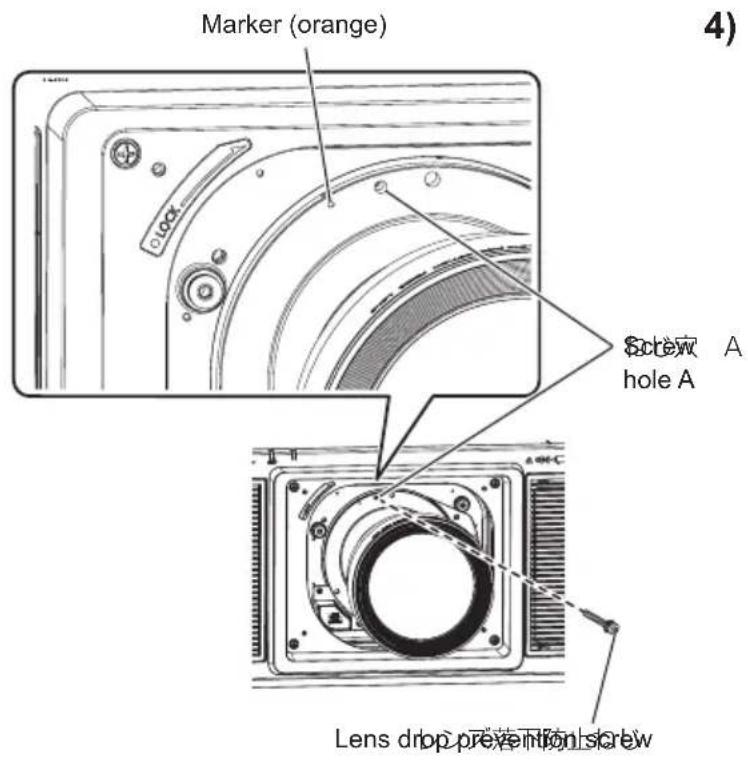
4) Use the lens drop prevention screw supplied with the projector to secure the projection lens.
- Use a Phillips screwdriver to secure the screw in hole A to the right of the marker (orange) on the projection lens.
Attention
● Turn the projection lens counterclockwise, and verify that it is secure.
- Store the removed lens hole cover safely for future use.
● After attaching the projection lens, turn on the projector and perform lens calibration.
(→page 8)
6-ENGLISH
Attaching the Lens / Detaching the Lens (continued)
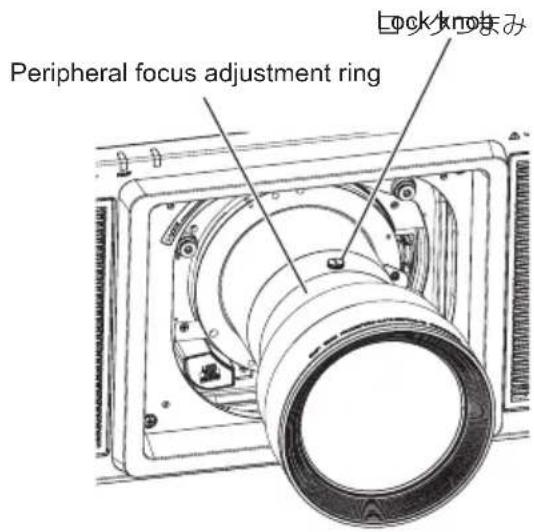
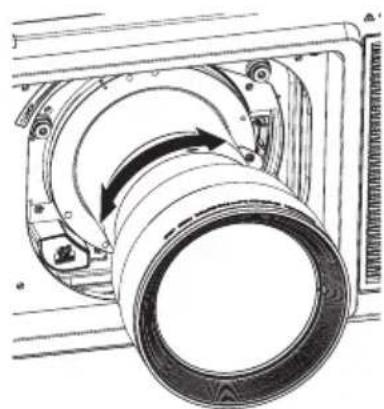
Peripheral focus adjustment function
When using the ET-D3LEW60 or ET-D3LEW50, the focus balance between the center of the projected image and the peripheral areas differs depending on the size of the image.
The ET-D3LEW60 and ET-D3LEW50 are equipped with a function for adjusting the peripheral focus.
The illustrations in this procedure depict attachment of the ET-D3LEW50 onto the PT-RZ21K.
■ Adjusting the focus

1) Operate the projector to align the focus of the center of the projected image.
2) Loosen the lock knob by turning it counterclockwise.
natural_image
Technical line drawing of a mechanical assembly with a rotating component (no text or symbols)3) Turn the peripheral focus adjustment ring in the directions of the arrows to align the focus of the peripheral areas of the image.
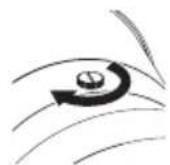
4) Tighten the lock knob by turning it clockwise.
Note
● The screen sizes displayed on the lens are approximate guides.
Attaching the Lens / Detaching the Lens (continued)
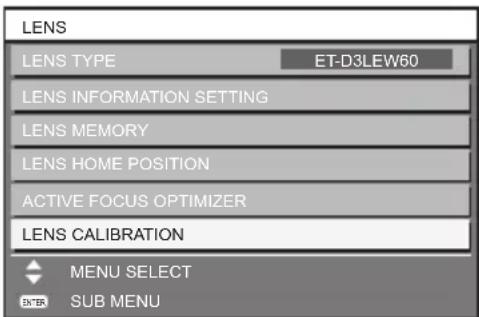
Lens calibration
Perform lens calibration after attaching the lens.
The lens calibration procedure differs depending on the projector you are using and the main version of the firmware.
● PT-RQ32K / PT-RZ31K / PT-RS30K: Main version is 3.00 or later
Refer to "Case 1" ( page 8).
● PT-RZ21K / PT-RS20K: Main version is 2.00 or later
Refer to "Case 1" (→ page 8).
● PT-RQ13K / PT-RZ12K / PT-RS11K / PT-DZ21K2 / PT-DS20K2 / PT-DW17K2 /
PT-DZ16K2 / PT-DZ13K / PT-DS12K / PT-DW11K / PT-DZ10K
Refer to "Case 2" (→ page 10). (Only ET-D3LEW50 is supported)
Case 1
● PT-RQ32K / PT-RZ31K / PT-RS30K (main version of the firmware is 3.00 or later)
● PT-RZ21K / PT-RS20K (main version of the firmware is 2.00 or later)
1) Press the
- Operating Instructions
- Projection Lens
- Commercial Use
- Read before use
- Contents
- Read this first! ....3
- Before Use....4
- Attaching the Lens / Detaching the Lens....5
- Projection relationships....12
- Lens shift ranges....14
- Specifications ....16
- Dimensions....16
- Projected image size and Projection distance......Appendix / Annexe / 付録 1
- WARNING:
- CAUTION:
- Before Use
- Product list
- ■ Projectors supported by each projection lens
- Note
- ■ Supplied Accessories
- Attaching the Lens / Detaching the Lens
- Before replacing the projection lens
- Attention
- Attaching the Lens
- 1) Loosen the lens hole cover screw.
- 2) Remove the lens hole cover.
- Attaching the Lens / Detaching the Lens (continued)
- 6-ENGLISH
- Peripheral focus adjustment function
- ■ Adjusting the focus
- Lens calibration
- Case 1
- Case 2
- Removing the Lens
- 1) Remove the lens drop prevention screw.
- 2) (i) While pressing the lens release button, (ii) turn the projection lens counterclockwise, and (iii) remove it.
- 3) Attach the lens hole cover supplied with the projector.
- 4) Secure the lens hole cover.
- Projection relationships
- ■ Dimensional relationship diagram
- 12-ENGLISH
- Projection relationships (continued)
- ■ Dimensional relationship
- Lens shift ranges
- Lens shift ranges (continued)
- Specifications
- Dimensions
- Dimensions(continued)
- Information for users in the European Union
- Disposal of Old Equipment
- Only for European Union and countries with recycling systems
- Information on Disposal in other Countries outside the European Union
- Product Information (for Turkey only)
- Panasonic Corporation
- Panasonic System Communications Company of North America
- Panasonic Canada Inc.
Brand : PANASONIC
Model : ET-D3LEW50
Category : Projector accessory