
MPC-3030 - CD Player Hamilton Buhl - Free user manual and instructions
Find the device manual for free MPC-3030 Hamilton Buhl in PDF.


| Product Type | CD Boombox with AM/FM Radio |
| Brand | Hamilton Buhl |
| Model | MPC-3030 |
| Power Supply (AC) | 120V~60Hz |
| Power Supply (DC) | 9V (6 x UM-2 "C" batteries) |
| Radio Bands | AM: 530-1720 kHz; FM: 88-108 MHz |
| CD Playback | CD, CD-R, CD-RW (assumed) |
| CD Functions | Play/Pause, Stop, Skip Next/Previous, Program (20 tracks), Repeat (1/All) |
| Audio Input | 3.5mm AUX-In jack |
| Headphone Output | 3.5mm stereo headphone jack |
| Display | LED track display |
| Speaker | Built-in (mono or stereo not specified) |
| FM Antenna | Extendable wire |
| AM Antenna | Built-in (rotating unit for best reception) |
| Controls | Volume control, Band selector, Function selector, Turning control |
| Battery Compartment | 6 x UM-2 ("C") batteries |
| AC Cord | Detachable |
| Safety Features | Double insulation, polarized plug, auto disconnect via mains plug |
| Cleaning | Soft cloth with lukewarm water; no chemical cleaners |
| Warranty | 1 year from original date of shipment |
| Weight | Not exceeding 7 kg (per safety label) |
Frequently Asked Questions - MPC-3030 Hamilton Buhl
User questions about MPC-3030 Hamilton Buhl
0 question about this device. Answer the ones you know or ask your own.
Ask a new question about this device
Download the instructions for your CD Player in PDF format for free! Find your manual MPC-3030 - Hamilton Buhl and take your electronic device back in hand. On this page are published all the documents necessary for the use of your device. MPC-3030 by Hamilton Buhl.
USER MANUAL MPC-3030 Hamilton Buhl
CD Boombox with AM/FM Radio

natural_image
Silver portable electronic device with analog clock and control knobs (no visible text or symbols)Contents
Safety Instructions ....3
Important Safety Instructions ....4
FCC Notice 6
Warning 7
Location of Controls ....7
AC Operation 8
Battery Operation 8
Radio Operation 8
MP3/AUX-In Connection 8
Stereo Headphone Jack 9
Antenna 9
CD Function 9
Care and Maintenance 10
Specifications 11
Warranty 12
Note: Please read and follow these instructions before using your unit.
Safety Instructions
Warning:
• TO REDUCE THE RISK OF FIRE OR ELECTRIC SHOCK, DO NOT EXPOSE THIS APPARATUS TO RAIN OR MOISTURE.
Caution:
- USE OF CONTROLS OR ADJUSTMENTS OR PERFORMANCE OF PROCEDURES OTHER THAN THOSE SPECIFIED MAY RESULT IN HAZARDOUS RADIATION EXPOSURE.
* Caution marking and rating plate was located at bottom enclosure of the apparatus.

natural_image
Black triangular warning symbol with exclamation mark (no text or numbers)CAUTION
RISK OF ELECTRIC SHOCK DO NOT OPEN

natural_image
Black triangular warning symbol with a white lightning bolt and downward arrow (no text)
natural_image
Black triangular warning symbol with white lightning bolt symbol (no text)The lightning flash with arrowhead symbol, within an equilateral triangle, is intended to alert the user to the presence of uninsulated “dangerous voltage” within the product’s enclosure that maybe of sufficient magnitude to constitute a risk of electric shock to persons.

natural_image
Black triangular warning symbol with exclamation mark (no text or numbers)The exclamation point within an equilateral triangle is intended to alert the user to the presence of important operating and maintenance (servicing) instructions in the literature accompanying the appliance.
- The apparatus shall not be exposed to dripping or splashing and that no objects filled with liquids, such as vases, shall be places on apparatus.
- Mains plug is used as disconnect device and it should remain readily operable during intended use. In order to disconnect the apparatus from the mains completely. The mains plug should be disconnected form the mains socket outlet completely.
- Battery shall not be exposed to excessive heat such as sunshine, fire or the like.
- Location of label on the apparatus if that label was affixed under a lid or on the bottom of the apparatus with a mass not exceeding 7 kg.
Important Safety Instructions
- Read these instructions.
- Keep these instructions.
- Heed all warnings.
- Follow all instructions.
- Do not use this apparatus near water.
-
Clean only with dry cloth.
-
Do not block any ventilation openings. Install in accordance with the manufacturer's instructions.
-
Do not install near any heat sources such as radiators, heat registers, stoves, or other apparatus (including amplifiers) that produce heat.
-
Do not defeat the safety purpose of the polarized or grounding-type. A polarized plug has two blades with one wider than the other. A grounding type has two blades and a third grounding prong. The wide blade or the third prong are provided for your safety. If the provided plug does not fit into your outlet, consult an electrician for replacement of the obsolete outlet.
-
Protect the power cord from being walked on or pinched particularly at plugs, convenience receptacles, and the point where they exit from the apparatus.
- Only use attachments/accessories specified by the manufacturer.
- Use only with the cart, stand, tripod, bracket, or table specified by the manufacturer, or sold with the apparatus. When a cart is used, use caution when moving the cart/apparatus combination to avoid injury from tip-over.
- Unplug this apparatus during lightning storms or when unused for long periods of time.
- Refer all servicing to qualified service personnel. Servicing is required when the apparatus has been damaged in any way, such as power-supply cord or plug is damaged, liquid has been spilled or objects have fallen into the apparatus, the apparatus has been exposed to rain or moisture, does not operate normally, or has been dropped.
- Grounding or Polarization – This product may be equipped with a polarized alternating-current line plug (a plug having one blade wider than the other). This plug will fit into the power outlet only one way. This is a safety feature. If you are unable to insert the plug fully into the outlet, try reversing the plug. If the plug should still fail to fit, contact your electrician to replace your obsolete outlet. Do not defeat the safety purpose of the polarized plug. Alternate Warnings - This product is equipped with a three-wire grounding-type plug, a plug having a third (grounding) pin. This plug will only fit into a grounding-type power outlet. This is a safety feature. If you are unable to insert the plug into the outlet, contact your electrician to replace your obsolete outlet. Do not defeat the safety purpose of the grounding-type plug.
-
Ventilation – Slots and openings in the cabinet are provided for ventilation and to ensure reliable operation of the product and to protect it from over heating, and these openings must not be blocked or covered. The openings should never be blocked by placing the product on a bed, sofa, rug, or other similar surface. This product should not be placed in a built-in installation such as a bookcase or rack unless proper ventilation is provided or the manufacturer's instructions have been adhered to.
-
The MAINS plug or an appliance coupler is used as the disconnect device, the disconnect device shall remain readily operable.
- CLASS II apparatus with double insulation, and no protective earth provided.
Note:
- Important safety instructions shall be provided with each appliance. These safety instructions may be in the form of a separate booklet, separate sheet, or part of the instruction manual.
- If being included in the instruction manual, the safety instructions shall be located before any operating instructions.
- These instructions shall be entitled "IMPORTANT SAFETY INSTRUCTIONS"
- The safety instructions shall include, as applicable to the particular apparatus, the information and warnings listed before. The wording is capable of being supplements, although not replaced, by drawing or cartoons.
- The symbol shall be shown adjacent to the text of Important Safety Instructions.
FCC Notice
This equipment has been tested and found to comply with the limits for a Class B digital device, pursuant to Part 15 of the FCC Rules. These limits are designed to provide reasonable protection against harmful interference in a residential installation. This equipment generates, uses and can radiate radio frequency energy and, if not installed and used in accordance with the instructions, may cause harmful interference to radio communications. However, there is no guarantee that interference will not occur in a particular installation. If this equipment does cause harmful interference to radio or television reception, which can be determined by turning the equipment off and on, the user is encouraged to try to correct the interference by one or more of the following measures:
- Reorient or relocate the receiving antenna.
- Increase the separation between the equipment and receiver.
- Connect the equipment into an outlet on a circuit different from that to which the receiver is needed.
- Consult the dealer or an experienced radio/TV technician for help.
Warning
Changes or modifications to this unit not expressly approved by the party responsible for compliance could void the user's authority to operate the equipment.
Note:
- Under the influence of electrostatic phenomenon, the product may malfunction and require user to reset.
- Under the environment with surge, the product may malfunction and require user to reset.
Location of Controls
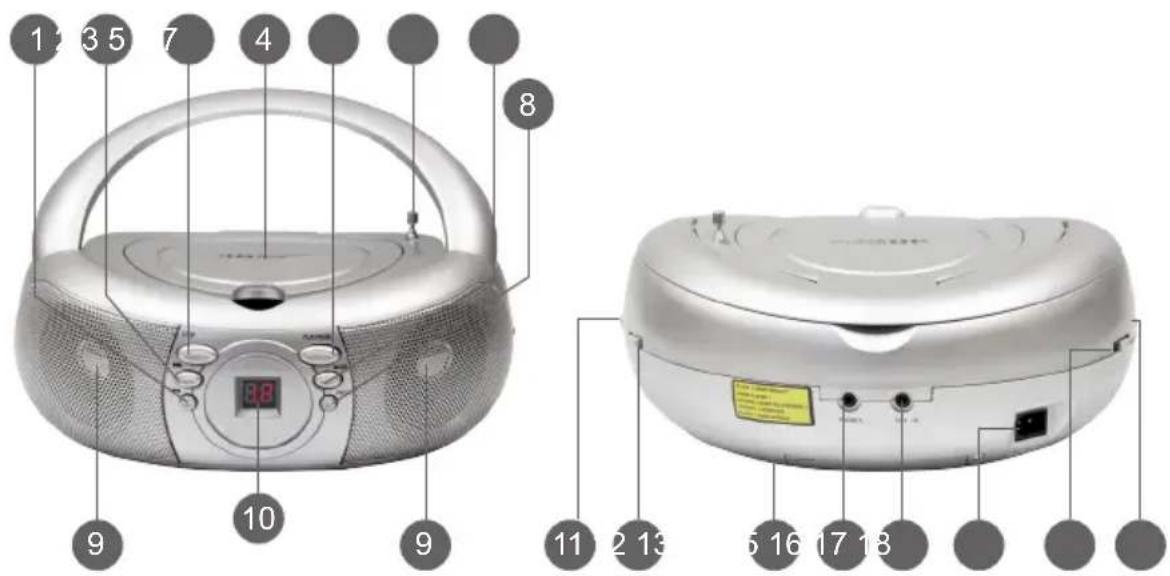
- CD skip previous button 10. LED track display
- CD skip next button 11. Turning control
- CD stop button 12. Band selector
- CD compartment 13. Battery terminal
- CD play/pause button 14. Headphone jack
- Antenna 15. AUX-In jack
- CD repeat button 16. AC socket
- CD program button 17. Function selector
- Speaker 18. Volume control
AC Operation
Connect the plug to the AC socket of the unit and the other end to a standard AC outlet.
Attention:
- Do not plug or unplug the power cable while you have we hands.
- When planning not to use this unit for a long time, disconnect the power cable from the wall outlet. When disconnecting the power cord from the wall outlet, do not pull on the cord in order to avoid shock risks caused by damaged cable.
Battery Operation
Disconnect the AC cord set completely. Open the battery compartment door and insert 6 pieces UM-2 "C" size batteries into the battery compartment with battery polarity as shown inside the battery compartment.
Radio Operation
- Insert one side of the audio cable (requires 3.5mm stereo plug, not supplied) into the line-out jack or headphone jacks on your MP3 player and the other side to the AUX-In jack on the unit.
- Turn on the unit and slide the function selector to AUX/OFF position.
- Turn on your MP3 player and follow the playback instruction.
- To stop this function, simply turned off your MP3 player.
MP3/AUX-In Connection
- Insert one side of the audio cable (requires 3.5mm stereo plug, not supplied) into the line-out jack or phones jack on your MP3 player and the other side to the aux-in jack on the unit.
- Turn on the unit and slide the function selector to AUX/OFF position.
- Turn on your MP3 player and follow the playback instruction.
- To stop this function, simply turned off your MP3 player.
Stereo Headphone Jack
For private listening, insert the plug of a stereo headphone into the phones jack and adjust the volume control accordingly. During the use of a headphone, the speakers are automatically disconnected.
Antenna
For best reception, fully extend the FM Antenna to receive FM stations. For AM reception, the unit has a built-in antenna, turn the whole unit for best reception.
CD Function
To play a CD, please follow the steps below:
- Set the function selector to the CD position.
- Insert the CD with the printed side facing up and close the CD door.
- The total number of tracks in the entire CD will appear on the LED display.
- To start playing the CD, press the PLAY/PAUSE button.
- Adjust the volume control to the desired volume level.
- To stop playing the CD, press the STOP button.
Skip Mode:
- During play or pause mode, press the SKIP NEXT button will go to the next track.
- During play or pause mode, press the SKIP PREVIOUS button will go back to the beginning of the track.
- After step 2, press the SKIP PREVIOUS button again will go back to the previous track.
Programming the CD Player:
The programming of the CD player should be done during STOP mode.
- Press the PROGRAM button, the LED display will show '01' and flash continuously.
- Press the SKIP NEXT or SKIP PREVIOUS buttons to select the desired track.
- Press the PROGRAM button again to store the track in memory, the LED will show '02' and flash continuously.
- Repeat steps from 2 to 3 to store more track in memory. You can store up to 20 tracks in the memory.
- Press the PLAY/PAUSE button to play the disc in the programmed order.
- To stop playing, press the STOP button.
- To cancel the programming list, press the STOP button and open the CD door or select a different function (AUX/OFF or RADIO).
Repeat Mode:
- Repeat 1: Press the REPEAT button once, the repeat LED indicator will light and flash continuously. This single track will be replaced.
- Repeat All: Press the REPEAT button twice, the repeat LED indicator will stay lighted. The whole disc will be played continuously.
- To Cancel Repeat Function: Press the REPEAT button until the lighted repeat LED indicator turned off.
Care and Maintenance
• Always turn off the unit after use.
- Keep the unit away from magnetic objects, water or heat sources.
- Use a clean soft cloth moistened with lukewarm water to clean the cabinet. Never use chemical cleaners that could damage the finish of the unit.
- Never touch the CD pickup and lens. If fingerprints get on the pickup lens, clean it gently with a commercial lens cleaner.
- Disconnect the unit from any power sources before cleaning.
- To remove a disc from its storage case, press down on the center of the case and lift the disc out, holding it carefully by the edges.
- Fingerprints and dust should be carefully wiped off the disc's recorded surface with a soft cloth. Unlike conventional records, compact discs have no groove to collect dust and microscopic debris so gently wiping with a soft cloth should remove most particles. Wipe in a straight line from the inside to the outside of the disc. Small dust particles and light stains will have absolutely no effect on reproduction quality. Never use chemicals such as record sprays, anti-static sprays, benzene or thinners to clean compact discs.
- These chemicals can irreparably damage the disc's surface.
- Discs should be returned to their cases after use. This avoids serious scratches that could cause the Laser pickup to skip.
- Do not expose discs to direct sunlight, high humidity, or high temperature for extended periods. Long exposure to high temperatures can warp the disc.
- Do not stick paper or write anything with a ballpoint pen on the label side of the disc.
Specifications
• Frequency range: AM 530-1720 KHz, FM 88-108 MHz
• Power supply: AC 120V \~ 60Hz, DC9V - (UM-2x6)
*Specifications are subject to change without further notice.
Product Registration Instructions

Visit: www.HamiltonBuhl.com
- Click on Customer Care
- Click on Product Registration Icon
- Please fill out all fields marked with * to register
Warranty:
Warranty begins the date item ships from our warehouse. All products, except for metal carts, have a one year warranty from original date of shipment, unless otherwise noted. Metal carts have a limited lifetime warranty on all housing components; however, carts have a one year warranty on any electrical / mechanical components.
Our Mission:
Since our founding in 1933, HamiltonBuhl continues to evolve as a leader in technology products for education and industry. Our products are embraced by educators, corporate trainers, presenters, government agencies, and hospitals for their daily presentation, from the classroom to the boardroom, HamiltonBuhl has the presentation product for you.

Never-Ending Learning Innovation
80 Little Falls Road
Fairfield, NJ 07004
1-800-631-0868
www.HamiltonBuhl.com


- Contents
- Safety Instructions
- Warning:
- Caution:
- CAUTION
- RISK OF ELECTRIC SHOCK DO NOT OPEN
- Important Safety Instructions
- Note:
- FCC Notice
- Warning
- Location of Controls
- AC Operation
- Attention:
- Battery Operation
- Radio Operation
- MP3/AUX-In Connection
- Stereo Headphone Jack
- Antenna
- CD Function
- Skip Mode:
- Programming the CD Player:
- Repeat Mode:
- Care and Maintenance
- Specifications
- Product Registration Instructions
- Warranty:
- Our Mission:
Brand : Hamilton Buhl
Model : MPC-3030
Category : CD Player