
Audio Star - CD Player Hamilton Buhl - Free user manual and instructions
Find the device manual for free Audio Star Hamilton Buhl in PDF.


| Product Type | Portable CD Player |
| Brand | Hamilton Buhl |
| Model | Audio Star |
| Dimensions (approx.) | 14.0 x 14.0 x 3.0 cm (5.5 x 5.5 x 1.2 in) |
| Weight (approx.) | 300 g (0.66 lb) |
| Power Supply | 2 x AA batteries or AC adapter (not included) |
| Disc Compatibility | CD, CD-R, CD-RW |
| Playback Functions | Play, Pause, Stop, Skip, Search, Repeat (1/All/Off), Random |
| Audio Output | 3.5 mm headphone jack, built-in speaker |
| Anti-Skip Protection | Yes (e.g., 45 seconds) |
| Display | LCD screen with track number, time, and status icons |
| Controls | Button interface on top panel |
| Battery Life (approx.) | 8 hours with alkaline batteries |
| Recommended Use | Personal listening, educational, low-volume audio playback |
| Safety Warnings | Not for children under 3 years; avoid exposure to moisture; do not disassemble |
| Cleaning Instructions | Wipe exterior with dry cloth; clean lens with soft brush |
| Spare Parts Availability | Contact Hamilton Buhl support for replacement parts |
| Repairability | Limited; user-replaceable batteries; service by authorized technicians |
Frequently Asked Questions - Audio Star Hamilton Buhl
User questions about Audio Star Hamilton Buhl
0 question about this device. Answer the ones you know or ask your own.
Ask a new question about this device
Download the instructions for your CD Player in PDF format for free! Find your manual Audio Star - Hamilton Buhl and take your electronic device back in hand. On this page are published all the documents necessary for the use of your device. Audio Star by Hamilton Buhl.
USER MANUAL Audio Star Hamilton Buhl
natural_image
Abstract colorful star-like logo with no text or symbolsAudio Star™
Portable CD/Cassette Player with USB Recording/Playback
Model #: 5050ULTRA

natural_image
Blue and white CD-ROM portable radio with a CD-ROM logo, shown alongside a small electronic device (no visible text or symbols on the device body beyond branding)Please read this manual completely before operating this unit and retain for future reference.
13 Hamilton Buhl
Never-Ending Learning Innovation
Warnings and Precautions
- CAUTION: TO PREVENT ELECTRIC SHOCK, MATCH WIDE BLADE OF PLUG TO WIDE SLOT, FULLY INSERT.
- WARNING: To reduce the risk of fire or electric shock, do not expose this apparatus to rain or moisture.
- CAUTION: Use of any controls or adjustments or performance of procedures other than those herein specified may result in hazardous radiation exposure.
- WARNING: Changes or modifications to this unit not expressly approved by the party responsible for compliance could void the user's authority to operate the equipment.
- WARNING: Do not place the unit on top of any soft, porous, or sensitive surfaces to avoid damaging the surface. Use a protective barrier between the unit and surface to protect the surface.
- WARNING: Use of this unit near fluorescent lighting may cause interference regarding use of the remote. If the unit is displaying erratic behavior move away from any fluorescent lighting, as it may be the cause.
- CAUTION: Danger of explosion if battery is incorrectly replaced. Replace only with the same or equivalent type.
- WARNING: There is a danger of explosion if you attempt to charge standard Alkaline batteries in the unit. Only use rechargeable NiMH batteries.
-
WARNING: The remote control's button cell battery contains mercury. Do not put in the trash, instead recycle or dispose of as hazardous waste
-
WARNING: Lithium batteries, like all rechargeable batteries are recyclable and should be recycled or disposed of in normal household waste. Contact your local government for disposal or recycling practices in your area. They should never be incinerated since they might explode.
- WARNING: Shock hazard - Do Not Open.
Mains plug is used as disconnect device and it should remain readily operable during intended use. In order to disconnect the apparatus from the mains completely, the mains plug should be disconnected from the mains
Do not mix old and new batteries.
Do not mix alkaline, standard (carbon-zinc), or rechargeable (ni-cad, ni-mh, etc) batteries.

WARNING: TO REDUCE THE RISK OF ELECTRIC SHOCK, DO NOT REMOVE COVER (OR BACK). NO USER-

The lightning flash with arrowhead symbol, within an equilateral triangle, is intended to alert the user to the presence of uninsulated "dangerous voltage" within the product's enclosure that may be of sufficient magnitude to constitute a risk of electric shock to persons.
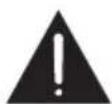
The exclamation point within an equilateral triangle is intended to alert the user to the presence of important operating and maintenance (servicing) instructions in the literature accompanying the appliance.
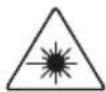
This product utilizes a Class 1 laser to read Compact Discs. This laser Compact Disc Player is equipped with safety switches to avoid exposure when the CD door is open and the safety interlocks are defeated. Invisible laser radiation is present when the CD Player's lid is open and the system's interlock has failed or been defeated. It is very important that you avoid direct exposure to the laser beam at all times. Please do not attempt to defeat or bypass the safety switches.
Important Safety Instructions
-
Read these Instructions.
-
Keep these Instructions.
-
Heed all Warnings.
-
Follow all instructions.
-
Do not use this apparatus near water.
-
Clean only with a dry cloth.
-
Do not block any ventilation openings. Install in accordance with the manufacture r's instructions.
-
Do not install near any heat sources such as radiators, heat registers, stoves, or other apparatus (including amplifiers) that produce heat.
-
Do not defeat the safety purpose of the polarized or grounding - type plug. A polarized plug has two blades with one wider than the other. A grounding type plug has two blades and a third grounding prong. The wide blade or the third prong are provided for your safety. When the provided plug does not fit into your outlet, consult an electrician for replacement of the obsolete outlet.
-
Protect the power cord from being walked on or pinched particularly at plugs, convenience receptacles, and the point where they exit from the apparatus.
-
Only use attachments/accessories specified by the manufacturer.
12.

Use only with a cart, stand, tripod, bracket, or table specified by the manufacturer, or sold with the apparatus. When a cart is used, use caution when moving the cart/ apparatus combination to avoid injury from tip-over.
-
Unplug this apparatus during lightning storms or when unused for long periods of time.
-
Refer all servicing to qualified service personnel. Servicing is required when the apparatus has been damaged in any way, such as power-supply cord or plug is damaged, liquid has been spilled or objects have fallen into the apparatus, the apparatus has been exposed to rain or moisture, does not operate normally, or has been dropped.
FCC Warnings
NOTE: This equipment has been tested and found to comply with the limits for a Class B digital device, pursuant to Part 15 of the FCC Rules. These limits are designed to provide reasonable protection against harmful interference in a residential installation. This equipment generates, uses, and can radiate radio frequency energy and, if not installed and used in accordance with the instructions, may cause harmful interference to radio communications. However, there is no guarantee that interference will not occur in a particular installation. If this equipment does cause harmful interference to radio or television reception, which can be determined by turning the equipment off and on, the user is encouraged to try to correct the interference by one or more of the following measures:
• Reorient or relocate the receiving antenna.
- Increase the separation between the equipment and receiver.
- Connect the equipment into an outlet on a circuit different from that to which the receiver is connected.
- Consult the dealer or an experienced radio/TV technician for help.
Additional Warnings
- The apparatus shall not be exposed to dripping or splashing and that no objects filled with liquids, such as vases, shall be placed on apparatus.
- Mains plug is used as disconnect device and it should remain readily operable during intended use. In order to disconnect the apparatus from the mains completely, the mains plug should be disconnected form the mains socket outlet completely.
- Battery shall not be exposed to excessive heat such as sunshine, fire or the like.
- Caution marking is located at the rear or back of the apparatus.
- The marking information is located at the rear or back of apparatus.

This symbol indicates that this product incorporates double insulation between hazardous mains voltage and user accessible parts.
Connecting the Power
AC POWER OPERATION
Before connecting the unit to an AC outlet, check that the operating VOLTAGE of the unit is identical with the VOLTAGE of your local power supply.
Connect the supplied AC Power Cord to the AC Socket at the back of unit.
When the AC power cord is plugged in, the batteries are automatically disconnected.
BATTERY OPERATION
The unit cannot be operated by battery when the AC power cord is connected.
Open the battery cover and put the batteries as indicated inside the battery compartment.
BATTERY PRECAUTIONS
Follow these precautions when using batteries in this device:
- Use only the size and type of batteries specified.
- Be sure to follow the correct polarity when installing the batteries as indicated in the batteries compartment.
- Do not mix different types of batteries together (e.g. Alkaline and Carbon-zinc) or old batteries with fresh ones.
- If the device is not to be used for a long period of time, remove the batteries to prevent damage or injury from possible battery leakage.
- Do not try to recharge batteries that are not intended to be recharged; they can overheat and rupture (Follow battery manufacturer's directions).
INSTALLING THE REMOTE CONTROL BATTERY
-
Remove the battery compartment cover on the back of the remote control by pushing the tab to the right while removing the cover.
-
Insert a 3V lithium battery (CR2025 or equivalent) following the polarity (+) as shown on the diagram inside the compartment.
-
Replace the battery compartment cover.
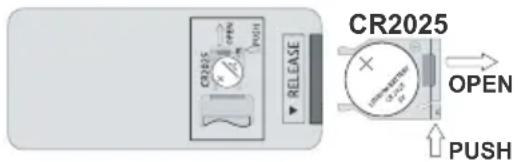
Note: The remote control battery normally lasts for about one year, although it depends on how often the remote control is used.
If the remote control is not working properly, replace the battery.
PRECAUTIONS WHEN USING BATTERIES
- CAUTION: Danger of explosion if battery is not inserted correctly. Replace only with the same or equivalent type.
- Do not mix different types of batteries together (e.g. alkaline, rechargeable and standard (carbon zinc) or old batteries with fresh ones.)
- Exhausted batteries must be removed to prevent possible leakage.
- Dispose batteries properly in accordance with environmental regulations in your region.
Location of Controls


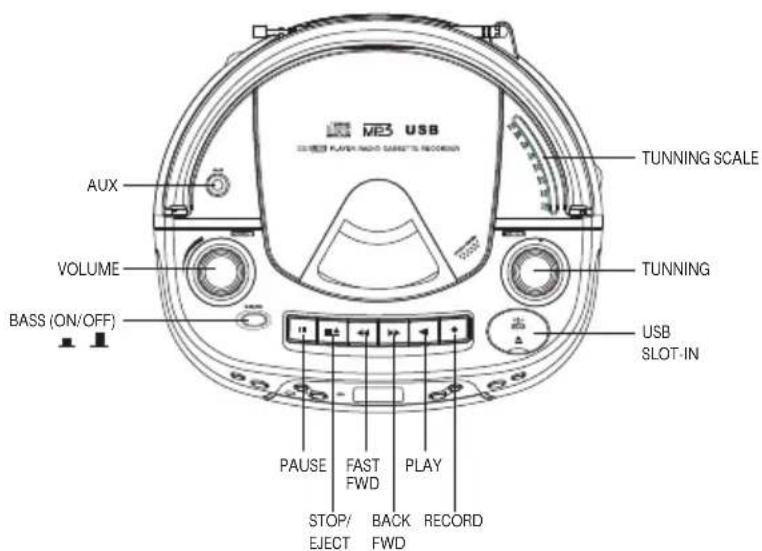
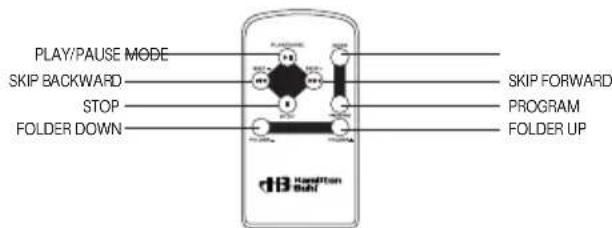
Radio and Disc Operation
Listening to Radio
- Insert the main plug into a main supply power outlet.
- Select the FUNCTION switch to RADIO position.
- Slide the BAND switch to select AM / FM ST band.
- Rotate the TUNING control knob to search for the desire station.
- Rotate the VOLUME control knob to the desire volume sound.
- To turn off the unit power, select the FUNCTION switch to OFF position.
NOTES:
To have the best AM reception, slightly rotate the unit or move the unit to a different area of the room until the best reception is obtained.
To obtain the best FM reception, fully extend the FM antenna. Avoid close proximity to the speaker and other electrical appliance.
Listening to Music CD or MP3 Disc
- Insert the main plug into a main supply power outlet.
- Open the CD door by pressing the OPEN button near the CD door. Insert disc into the disc compartment with the title side upwards.
- Close the CD door, select the FUNCTION switch to CD position, “---” is displayed for few seconds, and total number of tracks will show on the LCD display.
- Press the PLAY/PAUSE button to play the CD.
- Press SKIP FORWARD ▶/ SKIP BACKWARD ▶◀◀ buttons to jump to next or previous track.
- Press and hold SKIP FORWARD▶▶/SKIP BACKWARD◀◀ buttons to search rapidly within a track to locate a specific passage.
- During CD play, press the PLAY/PAUSE button to pause CD playing and press again to resume.
- During MP3 playback, press and hold the FOLDER UP/DOWN buttons to search for the previous/next folder.
- Press the STOP button to stop the CD playing.
- After all tracks have been played, the CD player will stop automatically.
NOTES:
Do not open the CD compartment while the disc is playing. To open the compartment, press the stop button first.
This unit plays music CDs and MP3 disc formats.
USB Operation
- Insert the mains plug into a power supply outlet.
- Slide up the USB cover. Plug the mass storage USB into the USB socket. Slide the FUNCTION switch to CD/USB/AUX position; hold the PLAY/PAUSE button “---” will display for a few seconds. Total number of tracks and USB indicator will then show on the LCD display.
- Press PLAY/PAUSE button to play the track on the USB.
- Press SKIP FORWARD ▶▶ or SKIP BACKWARD ◀◀ button to search rapidly within a track to locate a specific passage.
- During USB play, press the PLAY/PAUSE ▶II button to pause USB play and press again to resume.
- During playback, press the FOLDER+ button to skip to next folder.
- During playback, press the FOLDER-button to skip to previous folder.
- Press the STOP button to stop the USB play.
- After all tracks have been played, the USB player will stop automatically.
Notes:
a) This unit can play disc of MP3 format.
b) When unit in CD Mode.
Hold PLAY/PAUSE button 2 seconds
select USB Mode.
Recording from CD DiscsListening to music on USB (MP3 format)
- Select the FUNCTION switch to "CD/MP3/USB/AUX" position.
- Press the PUSH OPEN area to open the CD door.
- Load a CD with label side facing upward and close the CD door
- Once the CD is ready to be played, select the desire track to record and press the pause button
- Insert the mass storage USB into the USB socket.
-
Press the REC button, "one" appeared on LCD display and flash.
-
Press the SKIP FORWARD ▶▶ button to select "one" / "Fod" (folder) / "All" tracks of disc for recording. If you select "ALL" for recording, it will record the whole CD from the first track.
-
Press the REC button again to start recording.
-
Adjust the VOLUME, if necessary.
-
To stop recording, press STOP button. When the CD operate to the end recording will be stop automatically.
Recording from Tape
- Set the FUNCTION switch to "TAPE" position.
- Insert the cassette into the cassette compartment and insert the mass storage USB into the USB socket.
- Press the PLAY button on the cassette function to play a tape.
- Press the REC button on the left front (not the record button from the cassette function).
- Press the STOP button on the left front (not the STOP button on the cassette function) to stop recording or press the STOP/EJECT button to turn off the cassette function completely.
Recording from AUX
- Select the FUNCTION switch to "CD/MP3/USB/AUX" position.
- Connect external player to the AUX IN jack.
- Press the REC button to start recording.
- Press the STOP button to stop recording.
- To playback the recorded contents from the USB, the external player must be removed.
Note:
USB recording only from CD, Cassette and AUX mode.
Repeat and Program Operation
To Repeat One Track on Music CD or MP3 Disc or USB
- During CD/MP3 disc or USB playback, press SKIP FORWARD ▶ / SKIP BACKWARD ▶ buttons to select a track you wish to repeat.
- Press the PROG/MODE button until the "REP" indicator shows on LCD display. The unit will play the desired track repeatedly.
- To cancel the setting, press the PROG/MODE button continuously until the "REP" "REP ALL" "RANDOM" "ALBUM" indicators disappear.
To Repeat the Entire Disc or USB
- During CD/MP3 disc or USB playback, press the PROG/MODE button continuously until the "REP ALL" indicator shows on the LCD display. The unit will play all tracks on the disc repeatedly.
- To cancel the setting, press the PROG/MODE button continuously until the "REP" "REP ALL" "RANDOM" "ALBUM" indicators disappear.
To Play Music CD or MP3 Disc or USB Randomly
- During CD/MP3 disc or USB playback, press the PROG/MODE button continuously until the "RANDOM" indicator shows on LCD display. The unit will play all tracks randomly.
- To cancel the setting, press the PROG/MODE button continuously until the "REP" "REP ALL" "RANDOM" "ALBUM" indicators disappear.
To Repeat Album (Folder) for MP3 Disc or USB
-
During MP3 disc or USB playback, press the PROG/MODE button continuously until the "ALBUM" indicator shows display. The unit will play all content on Disc or USB folder (album) repeatedly.
-
To cancel the setting, press the PROG/MODE button continuously until the "REP" "REP ALL" "RANDOM" "ALBUM" indicators disappear.
NOTES: Repeat album (folder) function cannot support normal music CD. This function is for MP3 disc format only.
To Program Specific Tracks (CDs = 20 tracks, MP3 = 99 tracks)
- Load the CD or USB you wish to program.
- Make sure the CD or USB is in stop mode.
- Press the PROG/MODE button once, "P01" will display on the LCD and "PROG" indicator will blink.
- Press the SKIP FORWARD ▶▶/SKIP BACKWARD◀◀ buttons until the desired track number is reached.
- Press the PROG/MODE button to store the selection.
- Repeat the (4) & (5) steps until you have entered all the tracks.
- To play the stored sequence, press the PLAY/PAUSE button.
- After all memory tracks have been played, the CD player will stop automatically.
Note: When 20 tracks of CD (or 99 tracks for MP3 disc or USB) have been programmed, the memory is full and "FUL" will appear on the display. If you want to cancel the program memory, press the STOP button once. "REP" "REP ALL" also applies to CD, MP3 disc or USB program playback.
To Repeat Programmed Tracks
- During program play, press PROG/MODE button once will repeat the specifically programmed track.
- Press PROG/MODE button again will repeat all the programmed track.
- Press Stop button to cancel repeat play on programmed tracks.
Cassette Operation
PLAYBACK
- Select the FUNCTION switch to the "TAPE" position.
- Insert the cassette into the cassette compartment.
- Press the PLAY button to play a tape loaded.
- Adjust the VOLUME, if necessary.
- Press the STOP/EJECT button to stop tape play.
- The PAUSE button is used for temporarily stopping the tape during recording or playback.
- Press the EJECT button to open cassette door when cassette function is no longer in operation.
FAST FORWARDING OR REWINDING
- To fast forward or rewind, press the Fast Forward or Rewind button.
- Press the STOP/EJECT button to stop fast forwarding at the end of the tape in order to prevent damage to the cassette tape.
When recording, no volume adjustment is necessary, recording level is automatically set.
CASSETTE TAPE SELECTION
The quality and condition of the cassette tapes used will have a direct effect on the performance of this unit. Low quality tapes tend to break and stretch, and a broken tape can easily become entangled in the drive mechanism, causing major damage. Stretched tapes run at uneven speeds and will distort anything recorded on them.
• Use only reputable tape brands.
- Use of C-120 (120 minutes) cassettes is not recommended. The extreme thinness of this tape may result in breakage or other problems.
- Check to ensure there are no loose layers of tape visible through the cassette center windows. Tighten these loose layers with a pencil or ball-point pen before inserting the cassette into the unit.
RECORDING FROM THE BUILT-IN RADIO
- Select the FUNCTION switch to "Radio" position.
- Set the Band switch to the desired band position.
- Tune in desired radio station.
- Insert the cassette into the cassette compartment.
- Press the PAUSE button.
- Press the RECORD button.
- Release the PAUSE button to begin recording.
- Adjust the volume, if necessary.
- To stop recording, press STOP/EJECT button. When the tape reaches the end, it will stop recording automatically.
Cassette Operation
- Select the FUNCTION switch to "CD/MP3/USB/AUX" position.
- Press the PUSH OPEN area to open the CD door.
- Load a CD, with the label side upward, into the CD compartment, close the door, and the player will play all the tracks once (continuous play).
- Press the STOP ( ■ ) button to stop playing the CD.
- Insert the cassette into the cassette compartment.
- Press the PAUSE button.
- Press the RECORD button.
- Press the PLAY/PAUSE button (▶) to start playing.
- Release the PAUSE button to begin recording. You can also record audio signal from external microphone.
- Adjust the volume, if necessary.
- To stop recording, press STOP/EJECT button. When the tape reaches the end, it will stop recording automatically.
RECORDING FROM AUX
- Select the FUNCTION switch to "CD/MP3/USB/AUX" position.
- Connect external player to the AUX IN jack.
- Press the Record button.
- To stop recording, press the STOP/EJECT button. When the tape reaches the end, it will stop recording automatically.
RECORDING FROM THE BUILT IN RECORDING MICROPHONE
- Select the FUNCTION switch to Tape (Radio off) position.
- Insert a cassette tape into the cassette compartment.
- To avoid feedback between the speaker and the built in recording microphone, set the Volume Control in the minimum position.
- Press the Record button.
- Recording can be achieved via built in microphone.
- To stop recording, press Stop/Eject button. When the tape reaches the end, it will stop recording automatically.
AUX Operation
Requires a 3.5mm audio cable (not included)
- Connect a the 3.5mm audio cable to the AUX In on the unit and an audio output on an MP3 player or other audio source.
- Select the FUNCTION switch to "CD/MP3/USB/AUX" position.
- Use the native controls on the connected MP3 player or other audio source to play and control audio played through the unit.
Connect the Headphones (up to 6 pcs)
Connect up to 6 stereo headphone/earphones (not included) into any of the 6 headphone jacks located on the back of the unit.
Specifications
General
| Power supply: | AC 120V / 60Hz |
| DC 9V (Uses 6 pcs of “UM-1” size battery) | |
| Output Power: | 1.0 watts x 2 (RMS) |
| Speaker: | 90mm Cone type |
| AUX/MP3 in: | 3.5mm jack |
| Dimensions: | 9.45” x 8.27” x 5.12” (L x D x H) |
| Weight: | 5.28 lbs |
| Operation Temperature: | +41°F - +95°F |
General
| Frequency: | AM: 530 – 1710 KHzFM: 88 – 108 MHz |
| Antenna: | AM: Built-in Ferrite BarFM: Antenna Rod |
CD
Optical pick-up lens: 3 beam semiconductor laser
Product Registration Instructions

Visit: www.HamiltonBuhl.com
- Click on Customer Support
- Click on Product Registration Form
- Please fill out all fields marked with * to register
Warranty:
Warranty begins the date item ships from our warehouse. All products have a one year warranty from original date of shipment, unless otherwise noted.

80 Little Falls Road
Fairfield, NJ 07004
1-800-631-0868
www.HamiltonBuhl.com


- Audio Star™
- Warnings and Precautions
- Important Safety Instructions
- FCC Warnings
- Additional Warnings
- Connecting the Power
- AC POWER OPERATION
- BATTERY OPERATION
- BATTERY PRECAUTIONS
- INSTALLING THE REMOTE CONTROL BATTERY
- PRECAUTIONS WHEN USING BATTERIES
- Location of Controls
- Radio and Disc Operation
- Listening to Radio
- NOTES:
- Listening to Music CD or MP3 Disc
- USB Operation
- Recording from CD DiscsListening to music on USB (MP3 format)
- Recording from Tape
- Recording from AUX
- Note:
- Repeat and Program Operation
- To Repeat One Track on Music CD or MP3 Disc or USB
- To Repeat the Entire Disc or USB
- To Play Music CD or MP3 Disc or USB Randomly
- To Repeat Album (Folder) for MP3 Disc or USB
- NOTES: Repeat album (folder) function cannot support normal music CD. This function is for MP3 disc format only.
- To Program Specific Tracks (CDs = 20 tracks, MP3 = 99 tracks)
- Note: When 20 tracks of CD (or 99 tracks for MP3 disc or USB) have been programmed, the memory is full and "FUL" will appear on the display. If you want to cancel the program memory, press the STOP button once. "REP" "REP ALL" also applies to CD, MP3 disc or USB program playback.
- To Repeat Programmed Tracks
- Cassette Operation
- PLAYBACK
- FAST FORWARDING OR REWINDING
- CASSETTE TAPE SELECTION
- RECORDING FROM THE BUILT-IN RADIO
- RECORDING FROM THE BUILT IN RECORDING MICROPHONE
- AUX Operation
- Connect the Headphones (up to 6 pcs)
- Specifications
- General
- CD
- Product Registration Instructions
- Visit: www.HamiltonBuhl.com
- Warranty:
Brand : Hamilton Buhl
Model : Audio Star
Category : CD Player