
SA6500 - Network Equipment Juniper - Free user manual and instructions
Find the device manual for free SA6500 Juniper in PDF.


| Product Type | Network Switch |
| Model | SA6500 |
| Brand | Juniper Networks |
| Form Factor | Rack-mountable (1U) |
| Dimensions | 17.5 x 16.0 x 1.7 inches |
| Weight | Approximately 15 lbs (6.8 kg) |
| Power Supply | Dual hot-swappable AC power supplies |
| Power Consumption | 150W typical |
| Port Configuration | 48 x 10/100/1000BASE-T Gigabit Ethernet ports |
| Uplink Ports | 4 x SFP+ 10 Gigabit Ethernet ports |
| Switching Capacity | 176 Gbps |
| Forwarding Rate | 130 Mpps |
| OS / Management | Junos OS, CLI, Web UI, SNMP |
| VLAN Support | Up to 4,096 VLANs |
| Routing Features | Static, RIP, OSPF, BGP |
| Security Features | ACLs, MACsec, 802.1X, DHCP snooping |
| Cooling | Front-to-back airflow with redundant fans |
| Operating Temperature | 32°F to 104°F (0°C to 40°C) |
| Certifications | UL, CE, FCC Class A, RoHS |
| Warranty | Limited lifetime hardware warranty |
Frequently Asked Questions - SA6500 Juniper
request system zeroize.https://. Default credentials are root with no password.request system software add command, or via the web interface under Maintenance.show interfaces and monitor interface.show interface to check status. Also inspect the port LED: green means link, amber means activity.User questions about SA6500 Juniper
0 question about this device. Answer the ones you know or ask your own.
Ask a new question about this device
Download the instructions for your Network Equipment in PDF format for free! Find your manual SA6500 - Juniper and take your electronic device back in hand. On this page are published all the documents necessary for the use of your device. SA6500 by Juniper.
USER MANUAL SA6500 Juniper
VMWARE VIEW WITH JUNIPER NETWORKS SA SERIES SSL VPN APPLIANCES
Configuring Secure SSL VPN Access in a VMware Virtual Desktop Environment
vmware®
Table of Contents
Introduction....3
Scope 3
Design Considerations....3
Hardware Requirements....3
Software Requirements ....3
Description and Deployment Scenario 4
VMware View Connection Server Configuration 4
Configure the SA Series for View Connection Server 9
Virtual Desktops Resource Profile (Recommended Method) 9
Configure the Web Resource Profile and Access Method (Alternate Method)....11
Network Connect....13
WSAM....13
PCoIP (PC-over-IP) Support 14
Troubleshooting/Logging 14
Summary 15
About Juniper Networks....16
Table of Figures
Figure 1: SA Series in VMware View environment ....3
Introduction
Customers running a VMware View environment don't just want secure access for virtual desktop sessions, they want convenience as well. With this in mind, Juniper Networks ^ SA Series SSL VPN Appliances extend the security deployment by brokering connections to virtual machines and providing single sign-on (SSO) when users access their assigned virtual desktops. This solution saves precious time and greatly improves the end user experience. Furthermore, SA Series SSL VPN Appliances offer this functionality to any and all internal VMware View deployments and other popular intranet applications.
VMware View 4.5 and PC-over-IP are fully supported and optimized using a standard Network Connect profile. If the intention is to run this particular configuration, simply refer to the current Admin Guide for detailed instructions on configuring Network Connect.
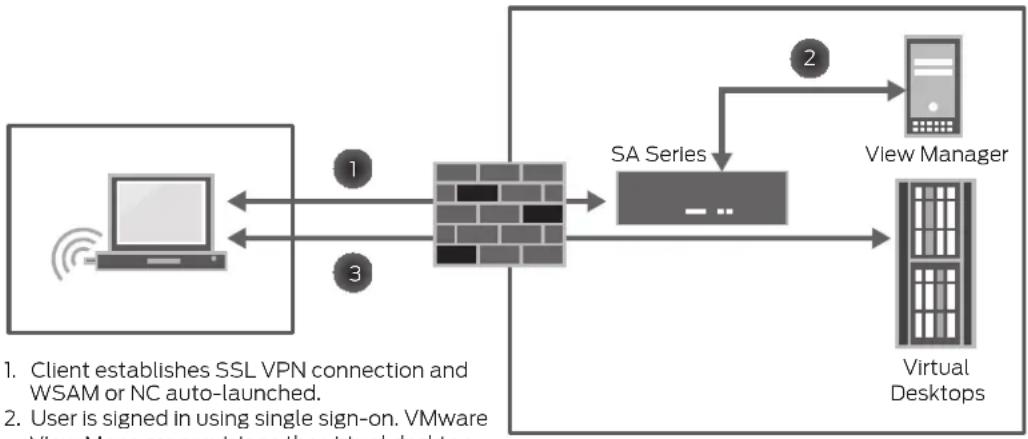
flowchart
graph LR
    A["Client"] -->|1| B["SA Series"]
    C["User"] -->|2| D["View Manager"]
    B --> E["Virtual Desktops"]
    F["Client"] -->|3| B
    style A fill:#f9f,stroke:#333
    style C fill:#f9f,stroke:#333
    style B fill:#ccf,stroke:#333
    style D fill:#cff,stroke:#333
    style E fill:#ffc,stroke:#333
    style F fill:#cfc,stroke:#333
Figure 1: SA Series in VMware View environment
Scope
This document will illustrate the specific steps required to configure this setup, as well as steps to provide SSO so that users no longer have to first log into the SSL VPN and then immediately log into their VMware View client whenever they need to access their virtual desktop.
Design Considerations
An operational VMware View environment and the SA Series are all that are needed to configure secure and convenient virtual desktop access. Note that some of the features supported in thin client configurations, such as clientless access and seamless Java client fallback, are not currently supported in this scenario.
Hardware Requirements
• Juniper Networks SA Series SSL VPN Appliances
Software Requirements
• Network Connect (NC) or Windows Secure Application Manager (WSAM) for use on the client workstation
- VMware View client
- VMware View environment
Description and Deployment Scenario
Administrators should follow each of the following steps to successfully configure SSO from the VMware View client to the backend VMware View environment.
VMware View Connection Server Configuration
• Install VMware View Connection Server.
- Once installed, configure View Server as per the business needs.

- Configure global services to connect to your Virtual Center/VMware ESX server(s) in order to load virtual machines from your existing environment. Note: A security server acts as an SSL offload and is not needed when View is used in conjunction with an SSL VPN.

![Desktops and Pools - Windows Internet Explorer https://172.20.1.199/admin/desktop/alDesktops.js/?page=desktopsTab File Edit View Favorites Tools Help Desktops and Pools vmware View Administrator About Help Logout Edit Desktop Desktops Type Desktop Persistence Source Virtual Center Server Unique ID Desktop/Pool Settings Ready to Complete Ready to Complete Review the options and click Finish Type: Manual Desktop Pool Desktop persistence: Non-persistent Desktop pool source: VirtualCenter virtual machines VirtualCenter server: 172.20.3.10 Unique ID: VCS-Pool Display name: Desktop pool state: Enabled When VII is not in use: Do nothing Allow users to reset their desktop: True Allow multiple sessions per user: False Automatic logoff after disconnect: Immediately Default display protocol: Microsoft RDP Allow users to override the default protocol: False Adobe Flash quality: Low Adobe Flash throttling: Moderate Description: < Back Finish Cancel Page 1 of 1 Previous Next [object] Internet 100%](/content/2026/05/991091/images/882e47692f5c52ed8e14a1a90fb8eacb29327a44cfaab54616ca44bae18e2721.jpg)
- Configure the desktop pool(s).

- Set up entitlements.
- Configure desktop sources.
![Desktops and Pools - Windows Internet Explorer https://.72.20.1.199/admin/desktop/allDesktops.js?page=desktopsTab Certificate Error Google File Edit View Favorites Tools Help Desktops and Pools vmware View Administrator About Help Logout Desktops and Pools Users and Groups Configuration Events Logged in as administrator Inventory Search Global desktop and pool view VCS-Pool1 VCS-Pool1 Summary Users and Groups Desktop Sources Active Sessions Policies Add... Remove Reset Virtual Machine Name contains: Find Cle Virtual Machine Name DNS Name User Status XP Pro - VM1 VM1.ecmegizmo.com Ready XP Pro - VM2 VM2.ecmegizmo.com Ready Page 1 of 1 Previous Next [object] Internet 100%](/content/2026/05/991091/images/ce467f495377473cc9d7a547daae94f22fb84b1b79aa305f3424181450f1434f.jpg)
Virtual Desktops Resource Profiles >
New Virtual Desktops Resource Profile
Type:
Name: *
Description:
VMware View Manager
vcs-connection.acmegizmo.com

natural_image
Blank white image with no visible content, text, or symbolsServer IP and Port: *
use ipaddr:port format
Examples:10,10.1,10;80
xml.example.com:80
vcs-
connection.acmegizmo.com:443
Use SSL for connecting to the Server

Name or IP address and port
Credentials:
Username:*

Variable Password:

Password:
Domain:*

ACMEGIZMO
Username for logging into Server or
Save changes?
Save and Continue >
* indicates required field
- Install the VMware View Agent on respective virtual or physical machines to be used as desktop sources. They will then automatically be discovered and enabled by View server.
Configure the SA Series for View Connection Server
There are two options for configuring VMware View access via the SA Series:
- Recommended: Use the virtual desktops resource profiles.
-SSO, client invoked on the fly.
- Configure a Web resource profile and either WSAM or NC to tunnel the connection.
-SSO, VMware view portal presented.
Virtual Desktops Resource Profile (Recommended Method)
This best practice approach simplifies configuration and deployment of VMware View Connection Server with the SSL VPN. Furthermore, SSO and seamless delivery are included here.
- Login to the SA Series appliance as an administrator.
- Navigate to "Resource profile-Virtual Desktops."
- Select type -> "VMware View Manager."
- Enter the configuration for the VMware view target server:
- Continue: Choose the roles you'd like, and save the bookmark.
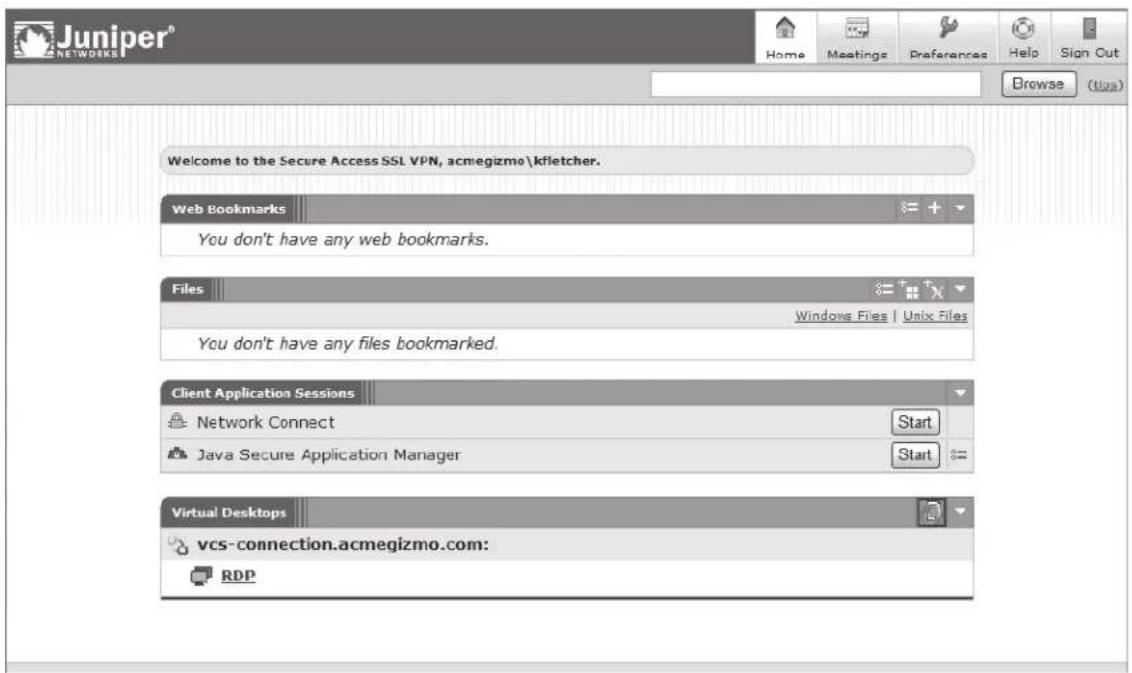
With this configuration, when users log into the SA Series appliance, their portal page will now include the VMware virtual desktop as configured:
Configure the Web Resource Profile and Access Method (Alternate Method)
- Log into the SA Series as an administrator.
- Navigate to "Resource profile-Web."
- Select type -> "Custom."
- Enter the configuration for the VMware View target server:

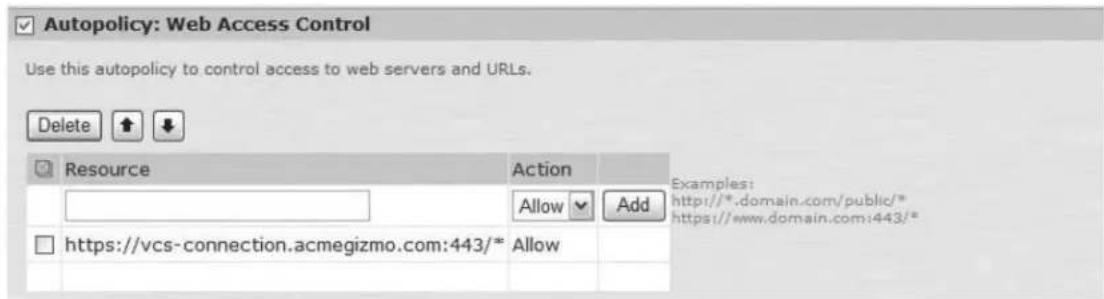
- Select "Show ALL Autopolicy types."
- Enter the URL for the View Connection Server in the "Base URL" input field.
• The Web Access Control policy should fill automatically after doing this.
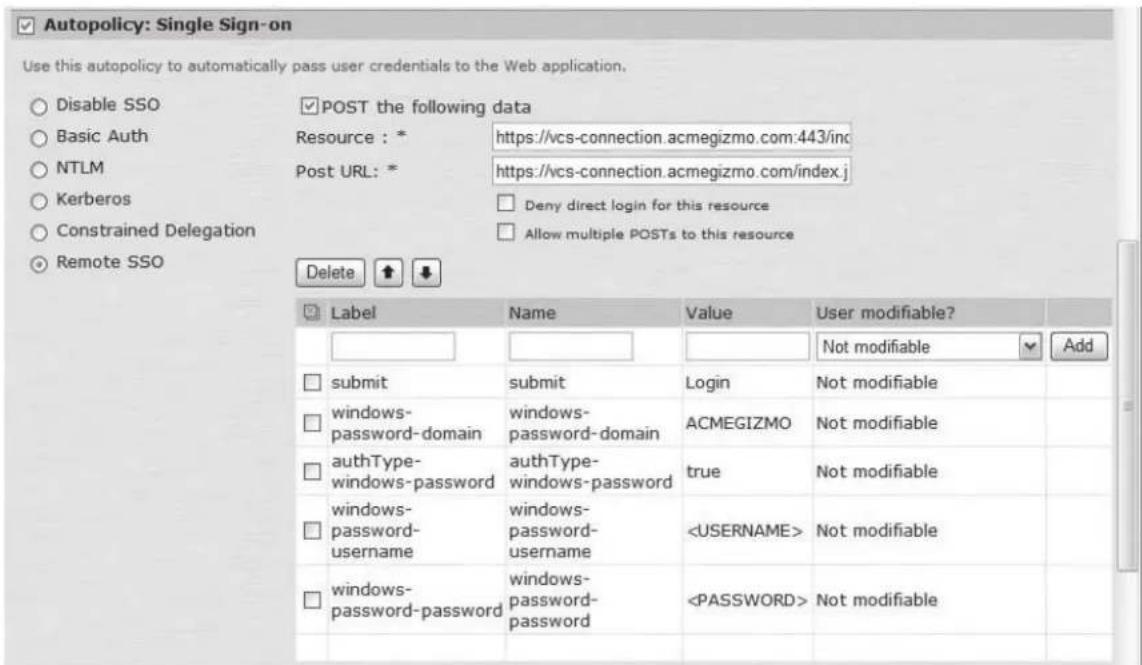
- Select the check box "Autopolicy: Single Sign-on."
- Select the radio button "Remote SSO."
- Select the check box "POST the following data."
- Enter the resource, e.g. http://
. - Enter the Post URL which is http://
:80/index.jsp (or https). - If the authentication server to the SSL VPN is Active Directory, then add the following data including the angle brackets:
Note: If 2-factor authentication is being used, then it will be necessary to configure a secondary authentication server for Active Directory, using the options
Important: When WSAM is used, a caching override policy must be utilized, as the SA Series marks all content as non-cacheable by default. This causes some conflicts with compressed .cab files. To do this, create a "caching" policy with the proper VMware URL path with /*.cab at the end, and with the setting "Unchanged."
Once the VMware View client is launched, it needs a way to forward the Remote Desktop Protocol (RDP) traffic to the backend virtual desktop instance. To facilitate this, either the NC or WSAM feature may be used, either of which is probably already in use by the remote access users. If users do not have either of these access methods assigned to them, the administrator will have to decide which one is most appropriate for a given role and then assign that feature accordingly.
Network Connect
For NC configurations, the following elements are required:
- Enable Network Connect at the user's role level.
- Configure desired NC split tunneling role options.
- Configure the NC connection profile and IP pool to use.
- Configure NC access control lists (ACLs) in order to allow access to the View Server and optionally the backend virtual machines (If Direct Connect is enabled).
WSAM
WSAM can work in application mode if View Connection Server is configured with either tunnel or non-tunnel mode. WSAM in server mode will work only if VMware View is configured in non-tunnel mode. Only one WSAM mode is required, although both may be used.

PColP (PC-over-IP) Support
PCoIP is a high performance display protocol purpose-built to deliver virtual desktops and to provide end users with the best, total rich desktop experience regardless of task or location. With PCoIP, the entire computing experience is compressed, encrypted and encoded in the datacenter before being transmitted across a standard IP network to PCoIP-enabled endpoint devices.
Using VMware View with PCoIP display protocol end-users benefit from a rich desktop experience on the LAN as well as across the WAN. In conjunction with the SA Series SSL VPN Appliance using IPsec Encapsulation Security Payload (ESP), an end-user is able to connect with PCoIP from a remote location across an encrypted connection back to the datacenter where their desktop resides.
All that is required to configure PCoIP is a Network Connect profile allowing the View client running on the workstation to access the View servers. As PCoIP requires both TCP and UDP, a layer 3 VPN tunnel (NC) is required. To fully optimize any PCoIP session, the Network Connect UDP/ESP transport method needs to be implemented.
Note that the user experience with PCoIP will be different from accessing with RDP only. RDP users can access their virtual desktops using the SSL VPN bookmarks, whereas PCoIP users will simply access the View desktop by first establishing the Network Connect session and then launching the View client as if they were on the LAN. With this configuration, there is no dependency on any particular version of VMware View, so even newer and emerging distributions by VMware are immediately supported.
Troubleshooting/Logging
SA Series SSL VPN Appliances log virtually all transactions/interactions with the VMware View server. Below is an example of some of the granular logging and also custom formats/filters which could be applied.
Summary
With Juniper Networks SA Series SSL VPN Appliances, customers running a VMware View environment can now enjoy the benefit of single sign-on to their virtual desktops as well as any other Web, thin client, or network resources that administrators may have configured. This solution saves administrators time and greatly improves the end user experience.
![Events User Access Admin Access Sensors Client Logs SNMP Statistics Log Settings Filters View by filter: Standard:Standard (default) Show 2000 items Edit Query: Update Reset Query Save Query... Save Log As... Clear Log Save All Logs Filter: Standard (default) Date: Oldest to Newest Query: Export Format: Standard Severity ID Message Info AUT22673 2009-07-29 12:09:57 - ive - [70.113.208.37] Root::ACMEGIZMO\kfletcher(VMware)[VMware] - Logout from 70.113.208.37 Info JAV20023 2009-07-29 12:09:54 - ive - [70.113.208.37] Root::ACMEGIZMO\kfletcher(VMware)[VMware] - Closed connection to 172.20.1.188 port 32111 after 9 seconds, with 2315 bytes read (in 14 chunks) and 4080 bytes written (in 7 chunks) Info JAV20023 2009-07-29 12:09:54 - ive - [70.113.208.37] Root::ACMEGIZMO\kfletcher(VMware)[VMware] - Closed connection to 172.20.1.188 port 3389 after 11 seconds, with 98218 bytes read (in 172 chunks) and 30058 bytes written (in 41 chunks) Info JAV20021 2009-07-29 12:09:46 - ive - [70.113.208.37] Root::ACMEGIZMO\kfletcher(VMware)[VMware] - Connected to 172.20.1.188 port 32111 Info JAV20021 2009-07-29 12:09:43 - ive - [70.113.208.37] Root::ACMEGIZMO\kfletcher(VMware)[VMware] - Connected to 172.20.1.188 port 3389 Info WEB20174 2009-07-29 12:09:42 - ive - [70.113.208.37] Root::ACMEGIZMO\kfletcher(VMware)[VMware] - WebRequest completed, POST to https://vcs-connection.acmegizmo.com:443//broker/xml from 172.20.1.199 result=200 sent=183 received=805 in 1 seconds Info WEB20169 2009-07-29 12:09:41 - ive - [70.113.208.37] Root::ACMEGIZMO\kfletcher(VMware)[VMware] - WebRequest ok : Host: vcs-connection.acmegizmo.com, Request: POST /broker/xml HTTP/1.1 Info WEB20174 2009-07-29 12:09:38 - ive - [70.113.208.37] Root::ACMEGIZMO\kfletcher(VMware)[VMware] - WebRequest completed, GET to https://vcs-connection.acmegizmo.com:443//styles/default/desktop-icons/desktop_remote32x.gif from 172.20.1.199 result=200 sent=64 received=1441 in 1 seconds Info WEB20169 2009-07-29 12:09:37 - ive - [70.113.208.37] Root::ACMEGIZMO\kfletcher(VMware)[VMware] - WebRequest ok : Host: vcs-connection.acmegizmo.com, Request: GET /styles/default/desktop-icons/desktop_remote32x.gif HTTP/1.1 Info WEB20174 2009-07-29 12:09:36 - ive - [70.113.208.37] Root::ACMEGIZMO\kfletcher(VMware)[VMware] - WebRequest completed, GET to https://vcs-connection.acmegizmo.com:443//styles/default/cookieFunctions.js from 172.20.1.199 result=200 sent=47 received=751 in 1 seconds Info WEB20169 2009-07-29 12:09:36 - ive - [70.113.208.37] Root::ACMEGIZMO\kfletcher(VMware)[VMware] - WebRequest ok : Host: vcs-connection.acmegizmo.com, Request: GET /styles/default/cookieFunctions.js HTTP/1.1](/content/2026/05/991091/images/7403f7de3dd856cbf47f1891d79e7c9eb558369b1db6bb754e6de48306387d90.jpg)
The Juniper Networks SA Series SSL VPN Appliances provide the following benefits for VMware View environments:
- A hardened security appliance, including Federal Information Processing Standards (FIPS) and Common Criteria solutions
• A single platform for all access methods - A complete range of authentication methods: tokens, certificates, LDAP, etc.
- SSO capability
• Support for PCoIP protocol and RDP - Wide range of supported platforms
- Endpoint security scanning and validation
• Detailed administrative and user logging
• Integrated high availability
About Juniper Networks
Juniper Networks, Inc. is the leader in high-performance networking. Juniper offers a high-performance network infrastructure that creates a responsive and trusted environment for accelerating the deployment of services and applications over a single network. This fuels high-performance businesses. Additional information can be found at www.juniper.net.
Corporate and Sales Headquarters
Juniper Networks, Inc.
1194 North Mathilda Avenue
Sunnyvale, CA 94089 USA
Phone: 888.JUNIPER (888.586.4737)
or 408.745.2000
Fax: 408.745.2100
www.juniper.net
APAC Headquarters
Juniper Networks (Hong Kong)
26/F, Cityplaza One
1111 King's Road
Taikoo Shing, Hong Kong
Phone: 852.2332.3636
Fax: 852.2574.7803
EMEA Headquarters
Juniper Networks Ireland
Airside Business Park
Swords, County Dublin, Ireland
Phone: 35.31.8903.600
EMEA Sales: 00800.4586.4737
Fax: 35.31.8903.601
To purchase Juniper Networks solutions, please contact your Juniper Networks representative at 1-866-298-6428 or authorized reseller.
Copyright 2011 Juniper Networks, Inc. All rights reserved. Juniper Networks, the Juniper Networks logo, Junos, NetScreen, and ScreenOS are registered trademarks of Juniper Networks, Inc. in the United States and other countries. All other trademarks, service marks, registered marks, or registered service marks are the property of their respective owners. Juniper Networks assumes no responsibility for any inaccuracies in this document. Juniper Networks reserves the right to change, modify, transfer, or otherwise revise this publication without notice.
3500148-007-EN Nov 2011
Printed on recycled paper


- VMWARE VIEW WITH JUNIPER NETWORKS SA SERIES SSL VPN APPLIANCES
- Table of Contents
- Table of Figures
- Introduction
- Scope
- Design Considerations
- Hardware Requirements
- Software Requirements
- Description and Deployment Scenario
- VMware View Connection Server Configuration
- New Virtual Desktops Resource Profile
- Credentials:
- Save changes?
- Configure the SA Series for View Connection Server
- Virtual Desktops Resource Profile (Recommended Method)
- Configure the Web Resource Profile and Access Method (Alternate Method)
- Network Connect
- WSAM
- PColP (PC-over-IP) Support
- Troubleshooting/Logging
- Summary
- About Juniper Networks
- Corporate and Sales Headquarters
- APAC Headquarters
- EMEA Headquarters
Brand : Juniper
Model : SA6500
Category : Network Equipment