
PLMT15 - Luxmeter Pyle - Free user manual and instructions
Find the device manual for free PLMT15 Pyle in PDF.


| Product Type | Digital Luxmeter |
| Brand | Pyle |
| Model | PLMT15 |
| Measuring Range | 0.1 – 50,000 Lux (0.01 – 5,000 FC) |
| Accuracy | ±3% (standard light source) |
| Resolution | 0.1 Lux (up to 200 Lux), 1 Lux (above) |
| Display | Large LCD with backlight |
| Data Hold | Yes |
| Peak Hold | Yes |
| Low Battery Indication | Yes |
| Auto Power Off | Yes (configurable) |
| Sampling Rate | 2.5 times/second |
| Power Supply | 9V battery (included) |
| Dimensions | 5.4 x 2.4 x 1.1 inches (138 x 62 x 28 mm) |
| Weight | 4.9 oz (140 g) including battery |
| Operating Temperature | 0°C to 50°C (32°F to 122°F) |
| Storage Temperature | -10°C to 60°C (14°F to 140°F) |
| Cable Length | Not applicable (integrated sensor) |
| Maintenance | Clean with soft dry cloth; keep in dry place |
| Safety | Do not expose to extreme temperatures or liquids |
| Spare Parts | Replacement battery (9V) |
Frequently Asked Questions - PLMT15 Pyle
User questions about PLMT15 Pyle
0 question about this device. Answer the ones you know or ask your own.
Ask a new question about this device
Download the instructions for your Luxmeter in PDF format for free! Find your manual PLMT15 - Pyle and take your electronic device back in hand. On this page are published all the documents necessary for the use of your device. PLMT15 by Pyle.
USER MANUAL PLMT15 Pyle
Digital Illumination Meter Instruction Manual
1. Specifications
● Display: 3 1/2 digits
● Max reading: 1999
● Range: 20; 200; 2,000; 20,000 lux (PLMT12)
200; 2,000; 20,000; 200,000 lux (PLMT15)
At 20,000 lux range, measured value = reading X10
● Spectrum characterization: meet CIE photopic standard
● Spectra accuracy: f_1^ ≤ 6%
Cos reaction: f_2 ≤ 2%
- Accuracy: ± 3% reading + 0.5% f.s
± 4%reading ± 10digits, for the range of 20,000 lux
● Repeatability: ±2
● Temperature coefficient: ±0.1%/°C
● Sampling rate: 2 samples/sec
● Working temperature: 32^ F-104°F ( 0^ C-40°C)
● Working humility: 0-80%RH
● Storage temperature: 14°F-122°F (-10°C-50°C)
● Storage humility: 0-70%RH
● Over flow display: when only the first digit shows 1
(3) Take off photo sensor cover and put the sensor facing the light source.
(4) Get reading from display.
(5) If only the first digit shows 1, it means overflow, select higher range.
(6) When using the 20,000 Lux range, the measured value is equal to the reading X10.
(7) You can push "HOLD" key to stop the measurement and read the data, pushing the "HOLD" function and meter is back to measuring mode.
(8) After the measurement is done, turn off the power and put the photo sensor cover back.
4. Battery replacement
- when battery runs out of power, the display shows “☐” sign, you should change battery now.
- open the cover of battery chamber at the back of meter, take out the old battery and put a new 9V battery in.
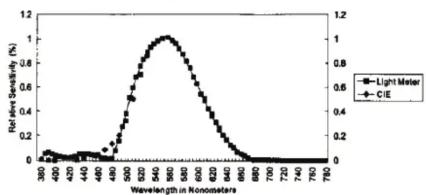
5. Meter sensitivity vs wavelength
line
| Wavelength in Nromometers | Relative Sensitivity (%) | | ------------------------- | ------------------------ | | 380 | 0.0 | | 400 | 0.0 | | 420 | 0.0 | | 440 | 0.0 | | 460 | 0.0 | | 480 | 0.0 | | 500 | 0.6 | | 520 | 1.0 | | 540 | 1.0 | | 560 | 1.0 | | 580 | 1.0 | | 600 | 1.0 | | 620 | 1.0 | | 640 | 1.0 | | 660 | 1.0 | | 680 | 1.0 | | 700 | 1.0 | | 720 | 1.0 | | 740 | 1.0 | | 760 | 1.0 | | 780 | 1.0 |6. Application tips
- Do not use meter in environment where temperature and humidity are outside the specified range.
- Handle the photo sensor carefully and maintain its cleanliness.
- Optical reference source should be put at exactly the top of the
● Power: 9V battery
● Battery life: 200 hours (Alkaline battery)
● Length of photo sensor test lead: 4.92 inch
● Photo sensor size: 0.285 (L) x 0.197 (W) x 0.095 (H) inch
● Meter size: 0.433 (L) x 0.223 (W) x 0.085 (H) inch
● Weight: 0.445 lbs
● Accessories: Instruction manual, battery
2. Parts and function keys
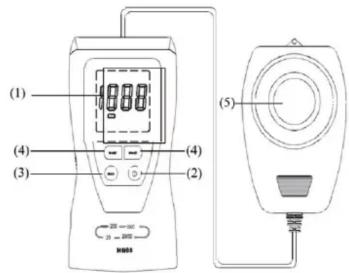
(1) Display
(2) Power switch
(3) Hold reading key – Push "HOLD"key once, "H" sign is shown, displayed reading is locked but no measurement continues, push"HOLD"key again, HOLD function is cancelled, measurement continues.
(4) Range switch
(5) Photo sensor
3. Measurement
(1) Turn power on.
(2) Select range.
photo sensor sphere.
- Photo sensor's sensitivity and accuracy may drift as environmental conditions change. To maintain normal meter functions, periodic calibration is recommended.
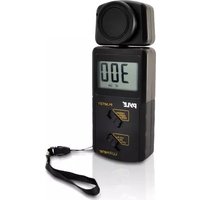

Brand : Pyle
Model : PLMT15
Category : Luxmeter