DB75524FM - Snow blower Cotech - Free user manual and instructions
Find the device manual for free DB75524FM Cotech in PDF.


| Product Type | Snow Blower |
| Brand | Cotech |
| Model | DB75524FM |
| Power Source | Electric |
| Voltage | 230 V |
| Power Rating | 1500 W |
| Motor Speed | 3600 RPM |
| Clearing Width | 45 cm |
| Intake Height | 25 cm |
| Throwing Distance | 10 m |
| Weight | 20 kg |
| Dimensions (LxWxH) | 50 x 50 x 50 cm |
| Wheel Size | 10 inches |
| Features | Electric start, headlight, adjustable chute, safety switch |
| Maintenance | Clean after each use, check bolts, lubricate chute |
| Safety | Safety key, automatic shut-off when released |
| Spare Parts | Auger blades, belts, shear pins |
| Repairability | User-replaceable components with basic tools |
| Warranty | 2 years |
| General Information | Suitable for light to moderate snow; not for heavy or wet snow |
Frequently Asked Questions - DB75524FM Cotech
User questions about DB75524FM Cotech
0 question about this device. Answer the ones you know or ask your own.
Ask a new question about this device
Download the instructions for your Snow blower in PDF format for free! Find your manual DB75524FM - Cotech and take your electronic device back in hand. On this page are published all the documents necessary for the use of your device. DB75524FM by Cotech.
USER MANUAL DB75524FM Cotech
Read the entire instruction manual carefully and make sure that you fully understand it before you use the equipment. Keep the manual for future reference.
Viktig information:
natural_image
Technical line drawing of a snowman tiller with visible blades and control arms (no text or symbols)ART.NO
31-5052
MODEL
DB75524FM
Ver. 20140428
Original instructions
Bruksanvisning i original
3.5 kW Two-Stage Snow Blower
ART.NO 31-5052 MODEL DB75524FM
Please read the entire instruction manual before using the product and save it for future reference. We reserve the right for any errors in text or images and any necessary changes made to technical data. If you have any questions regarding technical problems please contact our Customer Services.
Safety

Read the entire instruction manual before use.
Use hearing protection.
Wear eye protection.
Danger – rotating auger.
Beware of flying objects. Make sure onlookers are kept at a safe distance.
Never touch any of the machine's moving parts until they have stopped completely, the machine has been turned off and the ignition key has been removed.
Never insert your hands into the discharge chute.
Keep unauthorised persons a safe distance away from the machine.
Danger - Petrol is highly flammable. Let the machine cool for at least 2 minutes before refuelling.
Never start the machine indoors or in a poorly ventilated area. The engine's exhaust contains deadly carbon monoxide.
Danger – risk of electric shock (machines with electric start). Never start the machine from the mains (230V) under rainy conditions.
General safety precautions
- Read carefully through the instructions and inform yourself about all the controls and functions and how to correctly use the snow blower.
- Never let children or people who do not have adequate knowledge of these instructions use the snow blower. Local authorities might have restrictions regarding the age of the user.
- Never use the machine in the vicinity of others, especially children or animals.
- Remember that the user/driver is always ultimately responsible for accidents caused by use of the product.
- Be careful of falling or slipping, especially while the snow blower is in reverse.
- Never use the snow blower when you are tired or sick or whilst under the influence of drugs, alcohol or medicine.
- This product may only be repaired by qualified staff and only using original parts.
- Never use accessories not approved for use by the manufacturer or the retailer where the product was purchased.
Safety precautions during use
- Make sure to keep hands and feet away from rotating parts. Never stand in front of the discharge chute.
- Certain engine parts will become very hot during use and could cause burn injuries.
- The snow blower must not be used for any other purpose than for removing snow.
- Be careful when using the snow blower on gravel paths, pavement and roads. Watch out for traffic and possible hazards. Avoid steep inclines.
- Never point the discharge chute towards public roads or traffic.
- Stop the engine immediately if you have struck a foreign object. Inspect the machine carefully after such an incident. Do not reuse the snow blower until any possible damage has been repaired.
- If the snow blower begins to vibrate abnormally, turn off the engine immediately and find the cause. Vibrations are normally a sign of problems.
- Existing safety features must not be disconnected or made inoperative.
- Never use the snow blower in the vicinity of fences, cars, windows, inclines, etc. without properly adjusting the discharge chute.
• Always keep children out of the area to be cleared of snow. - Never overload the blower by driving it too fast.
- Be very careful when reversing. Always look behind you for possible obstacles.
- Never point the chute towards onlookers. Never let anyone stand in front of the snow blower.
- Never use the snow blower in conditions of inadequate visibility or lighting.
- Make sure you are steadily balanced and have a firm grip on the handles while using the snow blower.
- Use only the included cleaning tool to clean out the chute and impeller housing. Never use your hands.
- Never use the snow blower on the roof.
Contents
- Snow blower
- Chute
- Spark plug spanner
- 2 ignition/safety keys
• 4 shear pins with locking nuts - Instruction manual
- Funnel
- Engine oil
Controls and functions

- Drive clutch lever
- Chute deflector angle control
- Gear lever (4 forward gears and 2 reverse gears)
- Auger clutch lever
- Discharge chute with deflector
- Oil filler cap/dipstick
- Fuel cap
- Chute rotation crank
- Star knob
- Chute support column
- Cleaning tool
- Auger housing
- Scraper blade
- Auger
- Skid shoes (one on each side)
- Throttle
- Chute deflector control wire
-
Starter handle
-
Ignition key
- Choke
- Oil drain screw
- Chute rotation control linkage
- Primer
Assembly
Upper and lower handle assemblies
- Unscrew the 4 large plastic star knobs, washers and bolts from the lower handle.
- Raise the upper handle assembly and align it with the lower handle assembly.
- Join the two handle assemblies together using the bolts, washers and star knobs.
- Make sure that all the control wires are free and accessible.
A) Upper handle
B) Bolt
C) Star knob
D) Lower handle
A) Upper handle
B) Bolt
C) Star knob
D) Lower handle

Mounting the discharge chute

natural_image
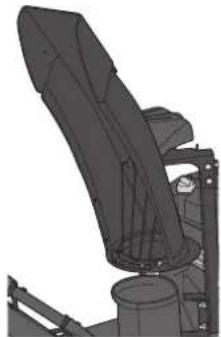
Mechanical assembly diagram showing a cylindrical component mounted on a frame with a curved blade-like structure (no text or symbols visible)- Place the discharge chute over the outlet from the auger housing.

natural_image
Mechanical assembly diagram showing a bracket with mounting holes and internal components (no text or symbols)- Fasten the discharge chute support column in place using two bolts at the bottom of the column.
Discharge chute crank linkage
The crank comes in two parts and is bolted together in the middle.
-
Slide the crank handle into the sleeve on the end of the link rod.
-
Pass a bolt through the hole in both the sleeve and the crank handle and join them with a dome nut.
-
Slide the crank handle into the sleeve on the end of the link rod.
- Pass a bolt through the hole in both the sleeve and the crank handle and join them with a dome nut.

natural_image
Mechanical assembly diagram showing a lever mechanism with no visible text or symbolsOperation
Oil level checks and refills
Note: The snow blower comes without oil in the engine. The engine oil must be filled before the snow blower is started. Engine oil capacity is 0.6 l.
Note: The engine has a combined dipstick/oil filler cap.
- Use SAE 5W-30 grade 4-stroke petrol engine oil, service classification SG, SF.
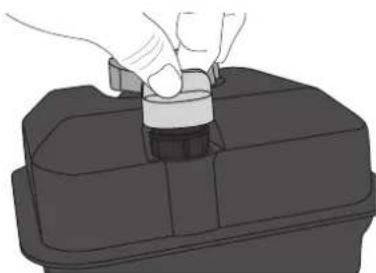
- Remove the oil filler cap and pour in the recommended amount of oil. Check the oil level using the dipstick – it should be between the marks on the dipstick. Do not overfill!
- Use SAE 5W-30 grade 4-stroke petrol engine oil, service classification SG, SF. - Remove the oil filler cap and pour in the recommended amount of oil. Check the oil level using the dipstick – it should be between the marks on the dipstick. Do not overfill!

natural_image
Illustration of a hand holding a tool over a device component (no text or symbols visible)Note: When checking the oil level, do not screw the cap on; just dip the stick until the cap is flush against the opening for measuring the correct level.
Note: This engine is used for a variety of machines and has an additional filler plug which should NEVER be used for this machine. Only use the filler cap that is on top.
IMPORTANT: The oil should be changed after the first 5 hours of use.
Preparations
- Make sure that the area being cleared is free from loose stones and foreign objects.
• Make sure that the controls are easily manoeuvrable and that they return to their original position when released.
• Disengage all controls before starting the engine. - Plan ahead and think about where the cleared snow will be ejected in order to avoid personal injury or property damage caused by flying objects.
- Never use the snow blower without wearing suitable clothing. Use appropriate footwear with solid traction, especially in slippery conditions.
- Under no circumstances may maintenance and service be performed when the engine is on (unless otherwise directed in the instruction manual).
• Always use safety glasses or a visor when operating or carrying out maintenance on the snow blower. - Adjust the height of the auger housing so that there is enough free clearance when driving over gravel or similar.
- Let the snow blower adjust to outdoor temperatures before use.
Before use
Before switching the snow blower on, always make sure that the inner impeller can move freely and is not jammed by any obstruction. Small stones can accumulate between the inner impeller (the impeller behind the auger) and the drum and prevent the impeller from rotating; the impeller might also have frozen to the drum. If the inner impeller cannot rotate, the drive belt will soon wear out.
After use
Store the the snow blower tilted forwards a little so that snow and water run out and don't collect inside the housing causing the impeller to freeze solid.
Refuelling precautions
Note: Petrol is highly flammable.
- Use only 95 or 98 octane unleaded petrol.
- Never mix in more than 10% ethanol in the fuel.
- Store the fuel in a container that is suitable for petrol.
• Always refuel outdoors and never smoke whilst refuelling. - Do not overfill! The fuel should come up to the fuel level mark under the cap (see fig.).
- Fill with fuel before starting the engine. Never open the fuel cap for filling when the engine is running or when warm.
- Replace the fuel cap securely and wipe off any spilt fuel.
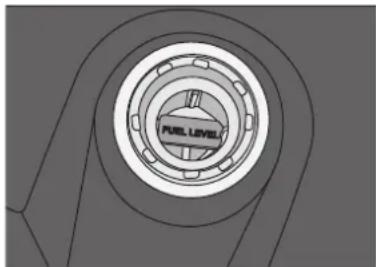
natural_image
Technical diagram of a mechanical component with concentric rings and a central 'FUEL LEVEL' label (no other text or symbols)Starting
Note: Check the oil and fuel levels before starting. Make sure that both the drive and auger clutch levers are released.
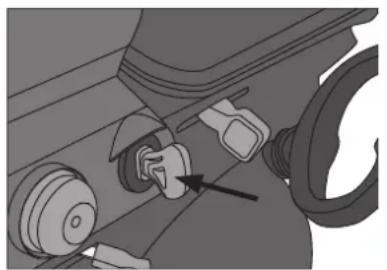
natural_image
Mechanical component diagram showing a valve and gear assembly (no text or symbols)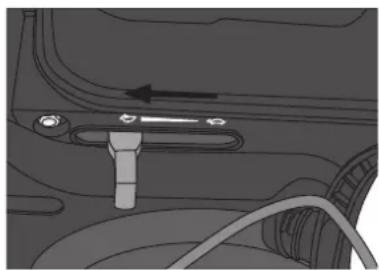
natural_image
Mechanical component diagram showing a lever and adjustment knob (no text or symbols)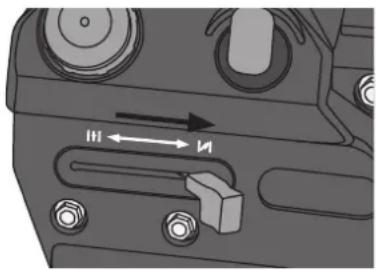
natural_image
Mechanical component diagram showing directional arrows and a handle mechanism (no text or symbols)- Insert the ignition key completely into the ignition. Do not turn the key, but make sure it is fully inserted.
- Set the throttle to maximum (all the way toward the picture of the hare on the left).
- Set the choke to the cold start position (to the right). If the engine is warm, set the choke to the opposite position.
-
Press the primer 3–5 times. Cover the vent hole in the centre of the primer bladder when pressing it in. In cold weather conditions the engine may need to be primed again. If the engine is warm, press the primer once only.
-
Pull the starter handle slowly at first until you feel some resistance, and then give it a sharp tug to start the engine. Do not release the handle but keep it in position and then slowly return it to its original position.
- Once the engine has been started and is warm, slowly move the choke to its starting position (to the left).
- If the engine should stall, restart it with the choke set in the middle position for a short time. Once the engine is running smoothly, slowly return the choke to its original position.
Safety checks
Note: Check that the auger is working properly the first time you use the snow blower and also before every new season. Always allow for some amount of free play in the wire controlling the auger clutch.
- Start the snow blower and depress the clutch lever. Let the auger run for about 10 seconds. Repeat this procedure several times.
- Release the clutch lever and inspect the auger from the front. Make sure that the auger is completely motionless and shows no tendency of rotating.
- If the auger is rotating or showing a tendency to rotate once the clutch lever is released, turn off the engine and adjust the clutch control wire.
Adjust the auger drive control wire before using the snow blower for the first time Checking and adjusting the auger drive clutch wire
The auger clutch wire is set at the factory, but it might need checking/adjusting once the handle assemblies have been fitted to the snow blower.
Checking the operation of the clutch:
- Start the engine. Note: The snow blower comes without oil in the engine; the oil is supplied in a separate bottle.
- Depress the clutch lever, the auger should rotate. Switch the engine off.
- If the auger did not rotate when the engine was on, the clutch wire needs adjusting. An incorrectly set clutch wire will cause the drive belt to wear out quickly.
Adjust the clutch wire as follows:
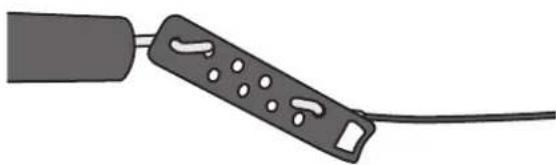
- Remove the bolts on the left hand side which hold the upper and lower handle assemblies together, so that the clutch wire is less taut.
- Pull up the dust boot over the wire connector plate.
- Pull up on the bottom wire to increase wire slack in the upper wire enabling you to remove the hook.
natural_image
Illustration of a handheld device with a cable extending from its tip (no text or symbols)- Turn the plate over and begin working the lower s-hook loose from the plate.

-
Pull the wire taut and insert the hook down a notch on the plate.
-
Bolt the handle assemblies together again so that the clutch wire is taut.
Skid shoe adjustment
- Normal use: Set the skid shoes to about 12 to 1 cm below the scraper blade.
- Hard packed snow: Set the skid shoes slightly higher (in order to lower the scraper blade).
- Gravel or uneven surfaces: Set the skid shoes somewhat lower (in order to raise the scraper blade).

natural_image
Mechanical component diagram showing a clamping mechanism with arrows indicating direction (no text or symbols)Operation
- Plan the area of operation and where the snow is to be removed before starting.
- Start the engine and set the throttle to full.
- Let the engine warm up for a few minutes to reach full power before beginning snow removal.
- Set the gear lever to a suitable gear setting. The second forward drive gear is appropriate for most snow removal situations.
- Depress the auger clutch lever to begin snow removal.
- Depress the drive clutch to engage the drive wheels and propel the snow blower forwards. Note: Never move the gear lever while the snow blower is in motion and always release the drive clutch before changing gears.
- After work has been completed: Let the engine idle a few minutes before stopping it. Let the snow blower and auger stand still in order to let most of the moisture and snow dry off.
Shutting off the engine
- Pull the throttle back completely.
- Remove the ignition key.
- Carefully clean the entire snow blower and move the controls back and forth to prevent them freezing into position.
Care and maintenance
Note: Turn off the engine, remove the ignition key and remove the spark plug cable from the spark plug before servicing, cleaning or maintenance.
Lubrication
- Regularly lubricate the gear lever and other moving parts with a few drops of motor oil and/or spray (e.g. 5–56, WD-40). Do not over-lubricate!
- Use a type of universal grease suitable for cars and machinery on the screw end of the chute directional crank. Do not over-lubricate!
Servicing and lubricating the auger
- The auger is equipped with shear pins that are meant to shear if the auger strikes hard compacted ice or other foreign objects. The snow blower is supplied with extra shear pins so that they can be replaced when needed. Note: Never substitute the shear pins with ordinary bolts. This can seriously damage the snow blower gears if the auger jams on an obstruction.
- Unscrew the shear pins once per season and spray inside the shaft with lubricant. Also lubricate the plastic bearings on the auger drive shaft.
Transmission, auger and clutch control adjustments
Checking the gear controls
Follow these procedures:
- With the engine off, move the gear lever to the highest gear (4th). Release the drive clutch lever. The blower should now be in neutral and free to move in both directions.
- Depress the drive clutch lever. The blower should now be unable to be moved forwards or backwards.
- Release the drive clutch – you should now be able to move the blower back and forwards freely again.
- Move the gear lever to one end (reverse 2nd gear) and then to the other (4th gear). You should feel no resistance in the lever and the blower should be freely movable regardless of which gear it is in.
Adjusting the gear lever wire
The gear lever has two wires, one for each direction. Make sure that all the gears work and that the gear lever can be easily moved to its end points (4th forward gear and 2nd reverse gear). If adjustment is necessary, undo the lock nut and turn the adjusting screw on one of the wires. When one wire is lengthened the other one should be shortened by the same amount to compensate.
Auger drive control
Adjusting the auger drive clutch wire:
- Pull up the dust boot over the wire connector plate.
- Pull up on the bottom wire to increase wire slack in the upper wire enabling you to remove the hook.
- Turn the plate over and begin working the s-hook loose from the plate.
- Pull the wire taut and insert the hook down a notch on the plate.
- Start the engine, check performance and adjust if necessary.
Note: If the auger does not turn when engaged then the amount of free play in the wire is too great. Move the s-hook to a hole further down the plate if needed.

natural_image
Mechanical assembly diagram showing a lever mechanism with a close-up inset (no text or symbols)
natural_image
Technical illustration of a mechanical assembly with two clamps and a separate cable (no text or symbols)Drive wheel clutch
Adjusting the drive wheel clutch wire:
- If the blower has a tendency to move forward even though the clutch lever is not depressed, then the wire is too taut. Adjust the wire so that there is some free play in it using the same procedure used for adjusting the auger control wire described above.
- If the blower does not move forward when the clutch lever is depressed, then the wire is too loose. Tighten the wire by moving the s-hook down a notch on the plate as described above.
- Test the clutch and adjust accordingly.
Cleaning and inspection
- Use the cleaning tool to remove any snow or ice clogged in the chute or around the auger. Never use your hands!
- Inspect regularly to make sure that all bolts, nuts and screws are tight and that there is no visible damage.
- The scraper blade and skid shoes will become worn with time and will need to be replaced. Use only original parts or parts approved by the retailer.
- Regularly check the fuel system for any visible signs of leakage at the tank, fuel cap or fuel lines.
- Never attempt to tamper with or modify the product in any way.
Engine service intervals
| After the first 5 hours. | At every use or after every 5 hours. | At every season or after every 25 hours. | At every season or after every 50 hours. | |
| Check the oil level. • | ||||
| Change oil. • • | ||||
| Check spark plug. • | ||||
| Clear area around muffler. | • |
Changing oil
Note: Check the oil level every time the snow blower is used.
Note: The blower needs to be tilted backwards to drain out all the oil. If the tank is completely full the fuel can run out at the fuel cap.*
- Start the engine and run it for a few minutes to warm the oil so that it runs out easier.
- Place an appropriate container under the drain hole to collect the oil when the drain plug (20) is removed.
- Unscrew the plug, tip the blower backwards and empty of all oil. Bear in mind that the oil might be hot.
- Refit the drain plug and fill with new oil. Refer to the earlier section Oil level checks and refills.
*Empty the fuel tank if it is full. The engine should be cold when the fuel tank is emptied. Do the work outside and collect the fuel in an appropriate container. If the fuel is not to be reused, deposit it at the most appropriate recycling centre.
Spark plug
Note: Let the engine cool before unscrewing and removing the spark plug. Both the spark plug and muffler become very hot after use. Check the spark plug before every season and replace it if necessary.
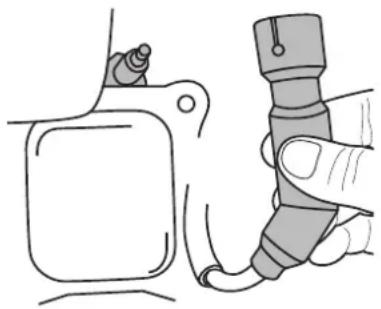
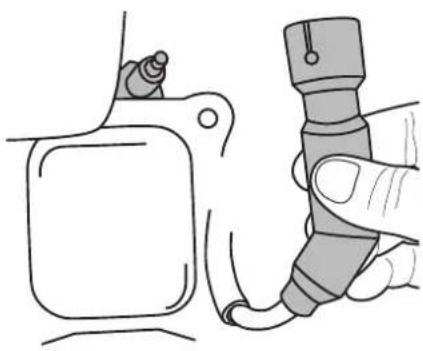
- Remove the spark plug cable from the spark plug. Do not pull the cable but rather grip the spark plug cap and wiggle it back and forth to loosen it.
- Use a spark plug spanner to remove it from its socket.
- Check the electrodes for any visible damage and clean with a steel brush when necessary.
- Make sure that the electrode gap is 0.6–0.8 mm. Special tools for gapping (feeler gauges) are available for purchase separately.
- Try to screw the spark plug partway in by hand to make sure the threads catch correctly. Tighten using a spark plug spanner.
- Washers on the new spark plug must be compressed during installation. Tighten a 12 turn extra after the spark plug is securely in place to compress the washer and create a proper seal.
- Turn a 14 turn extra if you are using the existing spark plug.
Handy hint: Thread a small piece of PVC hose to the spark plug wire end to make it easier to access when it is time to manually thread it in the socket.
natural_image
Illustration of a hand holding a tool interacting with a mechanical component (no text or symbols visible)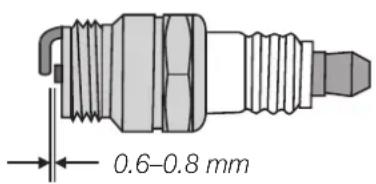
Replacing the scraper blade
- Undo the 3 bolts holding the scraper blade and remove the blade.
- Attach the new blade. Make sure that all the bolt heads are on top, inside the auger housing.
- Use only original parts or parts approved by the retailer.

natural_image
Technical line drawing of a mechanical assembly with labeled components (no text or symbols)Changing the skid shoes
- Remove the skid shoes by undoing the 2 bolts in each.
- Mount the new shoes. Make sure that all the bolt heads are on the inside of the auger housing.
- Use only original parts or parts approved by the retailer.
Long-term storage procedures (over a month)
- Empty the fuel tank when the engine is cold. Do the work outside and collect the fuel in an appropriate container. If the fuel is not to be reused, deposit it at the most appropriate recycling centre.
- Start the engine and let it run until it is out of fuel.
- Store the snow blower in a well-ventilated area, never in an enclosed storage facility subject to naked flames or sparks.
Changing the drive belt
Note: Before changing the drive belt, make sure that the 2nd stage of the snow feed (the impeller behind the auger) moves freely and has not jammed.
natural_image
Line drawing of a hand holding a cable with a small object attached (no text or symbols)- Note: Remove the spark plug cap from the spark plug and remove the ignition key.

natural_image
Mechanical assembly diagram showing gear and shaft components with motion arrows (no text or labels)- Then make sure that the inner impeller (the impeller behind the auger) can move freely and is not jammed by any obstruction. Small stones can accumulate between the inner impeller and the drum and prevent the impeller from rotating, the impeller might also have frozen to the drum.
- Make sure that the inner impeller is free to move before starting the engine again, otherwise the new drive belt will soon wear out.
Changing the drive belt

natural_image
Mechanical assembly diagram showing a wrench inserted into a component with attached springs (no text or symbols)- Remove the two bolts holding the plastic cover (10 mm spanner).

natural_image
Mechanical assembly diagram showing a motor with a wrench inserted, no text or symbols present-
Tilt the snow blower so that it stands on the auger housing. Note: Make sure that no petrol runs out of the petrol tank when you stand the snow blower on its end. Make sure that the tank is only half-full.
-
Remove the six bolts holding the protective plate (10 mm spanner).
natural_image
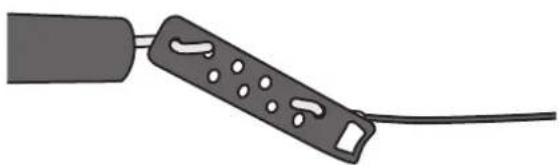
Illustration of a black cable with a connector and two circular slots, no text or symbols present- Slacken the auger drive clutch wire connected to the left handle. Remove the s-hook from the connector plate.
natural_image
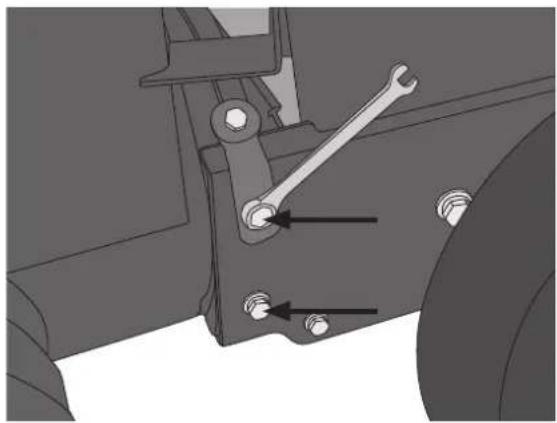
Mechanical assembly diagram showing a lever mechanism with two arrows indicating specific components (no text or labels present)- To access the drive belt the snow blower needs to be opened up in the middle. Return the snow blower to its normal upright position and remove the uppermost of the two bolts just behind the impeller housing on both sides. The two lower bolts do not need to be removed, just loosened (13 mm spanner).
natural_image
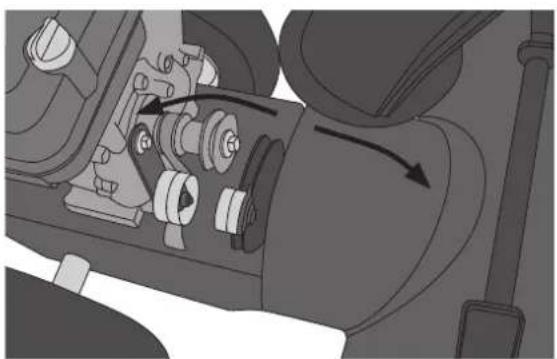
Mechanical assembly diagram showing gear and valve components with directional arrows (no text or labels)- Tilt down the front and rear parts of the snow blower, pivoting on the two loosened bolts to create room for you to work on the now exposed drive belt pulleys.

natural_image
Illustration of a mechanical tool with a saw and handle (no text or symbols)- Squeeze the clutch lever on the right handle and tie it down with a cable tie or similar. This moves the drive wheel away from the belt pulley giving you more room to work.

natural_image
Mechanical assembly diagram showing gear and housing components (no text or labels)-
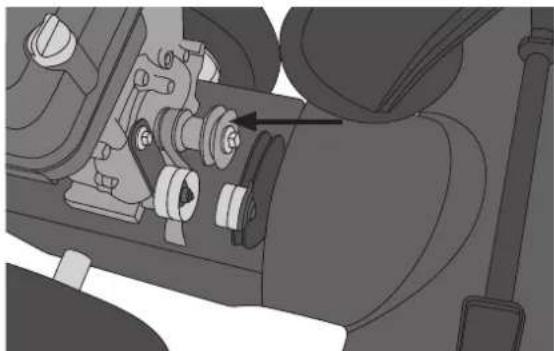
Remove the damaged drive belt and insert a new belt from above. Press in the belt tensioner to allow room for the drive belt to pass over the guide wheel/brake assembly.
-
Pass thereafter the drive belt over the upper pulley (see fig).
-
Untie the clutch lever on the right handle and refit the wire connected to the left handle.
-
Refit all the disassembled parts in reverse order.
-
Check the operation of the drive belt (Transmission, auger and clutch control adjustments in the instruction manual).
natural_image
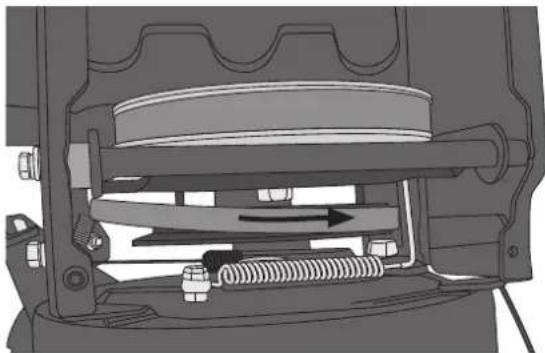
Mechanical assembly diagram showing a piston and spring mechanism (no text or labels)- Pass the drive belt over the lower pulley once the guide wheel/brake has been moved. Note: This view is from below the snow blower.
natural_image
Mechanical assembly diagram showing a motor and gear assembly with no visible text or symbolsLubrication of the auger and replacement of the shear pins
The auger is equipped with shear pins (24) that are meant to shear if the auger strikes hard compacted ice or other foreign objects. The snow blower is supplied with extra shear pins so that they can be replaced when needed.
Note: Never substitute the shear pins with ordinary bolts. This can seriously damage the snow blower gears if the auger jams on an obstruction.
Unscrew the shear pins once per year and spray the auger drive shaft and hole with oil. Also lubricate the auger drive shaft's plastic bearings (25).

natural_image
Mechanical assembly diagram showing a gear and shaft assembly (no text or labels)24
Troubleshooting guide
| Problem Possible cause Solution | ||
| The engine does not start. | 1. No fuel or the fuel is too old.2. Clogged fuel lines.3. Ignition key not fully inserted.4. Spark plug cable not properly connected.5. Defective spark plug.6. Engine not adequately primed.7. Engine is flooded (over-priming).8. Throttle set to idle. | 1. Empty the tank and refill with new fuel.2. Clean or replace the fuel lines.3. Insert the key completely.4. Securely attach the spark plug wire.5. Clean the plug and check the electrode gap or change plugs.6. Press the primer about 3–5 times.7. Wait at least 10 min. before a restart attempt.8. Set the throttle control to full throttle. |
| The engine runs irregularly. | 1. The engine runs on choke even when warm.2. Blocked fuel lines or old petrol.3. Sediment and/or water in the fuel system.4. The carburettor is maladjusted. | 1. Reset the choke back into place.2. Clean or replace the fuel lines. Empty the tank and refill with new fuel.3. Empty the tank and carburettor and refill with new fuel.4. Contact an authorised service centre. |
| The engine is underpowered. | 1. Spark plug cable loose.2. Fuel cap's vents blocked. | 1. Fasten the spark plug cable securely to the plug.2. Clean the fuel cap and make sure ventilation openings are free. |
| The engine is overheated. | The carburettor is maladjusted. Contact an authorised service centre. | |
| Abnormal vibrations occur. | Loose parts or damaged auger. Turn off the engine and disconnect the spark plug wire. Tighten all bolts. Check the auger and replace any damaged parts. If the problem persists, contact your authorised service centre. | |
| The blower's transmission doesn't work. | 1. The wire is maladjusted.2. The drive belt is loose or damaged. | 1. Adjust the wire according to the instructions listed under the sectionAdjusting the drive control wire and shift leverdescribed above.2. Contact your authorised service centre to have the drive belt checked. |
| The auger continues to rotate despite being disengaged. | The wire is maladjusted. Adjust the wire according to the instructions listed under the sectionAdjusting the auger control wire described above. | |
| No snow exits the chute. | 1. The chute is clogged and/ or there is a foreign object obstructing the auger's rotation.2. The shear pins have sheared off.3. The auger control wire is maladjusted or the drive belt needs changing. | 1. Turn off the engine and disconnect the spark plug wire. Clean the chute and the area around the auger.2. Replace the shear bolts with new ones.3. Adjust the wire according to the instructions listed under theAdjusting the auger control wiresection above. Contact your authorised service centre to have the drive belt checked. |
Disposal
This product should be disposed of in accordance with local regulations. If you are unsure how to proceed, contact your local authority.
Specifications
Type Two-stage snow blower
Working width 600 mm
Max snow depth 400 mm
Discharge range Up to 8 m
Engine single-cylinder, 4-stroke petrol engine 3.5 kW
Fuel tank capacity 2 litres
Oil tank capacity 0.6 litres
Gears 4 forward, 2 reverse
Discharge chute Rotatable 180 degrees
Chute deflector Tiltable 25 degrees
Drive Self-propelled
Wheels Pneumatic rubber tyres, diam: 330 mm (13")
Weight 68.5 kg
LpA 86 dB(A), K=3.0 dB(A)
LwA 101 dB(A), K=3.0 dB(A)
Vibration 7.95 m/s ^2 , K=1.5 m/s ^2
Montera utkastet
natural_image
Mechanical assembly diagram showing a cylindrical component mounted on a frame with a curved blade-like structure (no text or symbols visible)
natural_image
Mechanical assembly diagram showing a rotating component with mounting holes and directional arrows (no text or symbols)natural_image
Mechanical assembly diagram showing a lever mechanism with no visible text or symbolsAnvändning
natural_image
Illustration of a hand pressing down on a mechanical component with a tool, next to a stylus symbol (no text or labels present)natural_image
Close-up of a mechanical component with concentric rings and a central circular feature labeled 'PURE LLEVEL' (no other text or symbols)Start
natural_image
Mechanical assembly diagram showing a gear and wheel assembly (no text or symbols)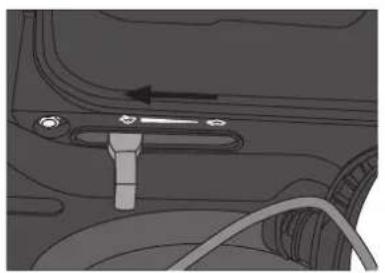
natural_image
Mechanical component diagram showing a lever and cable assembly (no text or symbols)
natural_image
Mechanical component diagram showing a lever mechanism with no visible text or symbolsnatural_image
Illustration of a handheld device with a cable extending from its tip (no text or symbols)natural_image
Mechanical component diagram showing a bracket with bolts and arrows indicating force or movement (no text or symbols)Körning
natural_image
Mechanical assembly diagram showing a lever mechanism with a magnified inset view (no text or labels)
natural_image
Technical illustration of a mechanical assembly with two clamps and a hanging component (no text or symbols)Hjulens drivning
natural_image
Line drawing of a hand holding a tool interacting with a mechanical component (no text or symbols)
Byte av skrapskär
natural_image
Technical line drawing of a mechanical assembly with labeled components (no text or symbols)Byte av släpskor
natural_image
Line drawing of a hand holding a tool interacting with a mechanical component (no text or symbols)natural_image
Mechanical assembly diagram showing internal components and motion arrows (no text or labels)natural_image
Mechanical assembly diagram showing a wrench inserted into a component with attached springs and tubing (no text or symbols)natural_image
Mechanical component diagram showing a wheel with a wrench inserted, mounted on a base (no text or symbols visible)natural_image
Illustration of a black electrical plug with a cable, showing internal components (no text or symbols)natural_image
Mechanical assembly diagram showing a lever mechanism with two arrows indicating specific components (no text or labels present)natural_image
Mechanical assembly diagram showing gear and housing components with directional arrows (no text or labels)natural_image
Illustration of a mechanical tool with a saw and handle (no text or symbols)natural_image
Mechanical assembly diagram showing gear and housing components (no text or labels)natural_image
Mechanical assembly diagram showing a piston and spring mechanism (no text or labels)natural_image
Mechanical assembly diagram showing a component with springs and housing (no text or labels)natural_image
Mechanical assembly diagram showing internal components and mounting brackets (no text or labels)Felsökningsschema
LpA 86 dB(A), K=3,0 dB(A)
LwA 101 dB(A), K=3,0 dB(A)
Vibration 7,95 m/s ^2 , K=1,5 m/s ^2
natural_image
Diagram of a mechanical linkage or bracket with three circular components and connecting rods (no text or symbols)Montere utkastet

natural_image
3D mechanical assembly diagram showing a curved component mounted on a frame (no text or symbols visible)
natural_image
Mechanical assembly diagram showing a clamping mechanism with mounting holes and a central rotating component (no text or symbols)natural_image
Mechanical assembly diagram showing a lever mechanism with no visible text or symbols
natural_image
Illustration of hands pressing a button onto a mechanical component (no text or symbols visible)natural_image
Technical diagram of a mechanical component with concentric rings and a central label 'FUEL LEVEL' (no other text or symbols)Start
natural_image
Mechanical assembly diagram showing components like gears and a valve (no text or labels)
natural_image
Mechanical component diagram showing a lever and adjustment knob (no text or symbols)
natural_image
Mechanical component diagram showing directional arrows and a sliding mechanism (no text or symbols)natural_image
Simple line drawing of a plug with a cable, no text or symbols presentnatural_image
Illustration of two mechanical components with bolts and a rod, no text or symbols present
natural_image
Illustration of a plug with a cable, showing internal components (no text or symbols)natural_image
Mechanical component diagram showing a bracket with bolts and arrows indicating force or movement (no text or symbols)Kjøring
natural_image
Mechanical assembly diagram showing a lever mechanism with labeled parts and a close-up view of the lever (no text or symbols present)
natural_image
Technical illustration of a mechanical assembly with two clamps and a separate cable (no text or symbols)Driving av hjulene
natural_image
Illustration of a hand holding a tool interacting with a mechanical component (no text or symbols visible)
natural_image
Technical line drawing of a mechanical assembly with labeled components (no text or symbols)Skifte av meier
natural_image
Line drawing of a hand holding a tool near a vehicle component (no text or symbols)natural_image
Mechanical assembly diagram showing internal components and motion arrows (no text or labels)natural_image
Mechanical assembly diagram showing a wrench inserted into a component (no text or symbols visible)natural_image
Mechanical component diagram showing a wheel assembly with a wrench inserted (no text or symbols)natural_image
Simple line drawing of a plug with a cable, no text or symbols present- Løsne på vaieren til innmatingen ved det venstre håndtaket. Trekk ut vaieren og fjern S-kroken fra hullplaten.

natural_image
Mechanical assembly diagram showing a lever mechanism with two screws and a wrench (no text or labels)natural_image
Mechanical assembly diagram showing gear and housing components with directional arrows (no text or labels)natural_image
Illustration of a mechanical tool with a saw and handle (no text or symbols)natural_image
Mechanical assembly diagram showing gear and housing components (no text or labels)natural_image
Mechanical assembly diagram showing a piston and spring mechanism (no text or labels)natural_image
Mechanical assembly diagram showing components like gears and springs (no text or labels)natural_image
Mechanical assembly diagram showing a gear and shaft assembly (no text or labels)Feilsøking
LpA 86 dB(A), K=3,0 dB(A)
LwA 101 dB(A), K=3,0 dB(A)
Vibration 7,95 m/s ^2 , K=1,5 m/s ^2
Lumilinko, 3,5 kW
TUOTENRO 31-5052 MALLI DB75524FM
natural_image
Mechanical assembly diagram showing a curved mechanical component with no visible text or symbolsnatural_image
Mechanical assembly diagram showing a bracket with mounting holes and directional arrows (no text or symbols)natural_image
Mechanical assembly diagram showing a lever mechanism with no visible text or symbolsKäyttö
natural_image
Illustration of hands pressing a button onto a black rectangular object (no text or symbols visible)natural_image
Technical diagram of a mechanical component with concentric rings and a central label (no readable text or symbols beyond the label)Käynnistys
natural_image
Mechanical assembly diagram showing a gear and wheel assembly (no text or symbols)
natural_image
Mechanical component diagram showing a lever mechanism with an arrow indicating direction (no text or symbols present)
natural_image
Mechanical component diagram showing directional arrows and a switch mechanism (no text or symbols)natural_image
Illustration of a handheld device with a cable extending from its tip (no text or symbols)natural_image
Mechanical component diagram showing a bracket with bolts and arrows indicating force or movement (no text or symbols)Ajaminen
natural_image
Mechanical assembly diagram showing a lever mechanism with a magnified detail view (no text or symbols)
natural_image
Technical illustration of a mechanical assembly with two clamps and a separate vertical component (no text or symbols)Pyörien veto
natural_image
Illustration of a hand holding a tool interacting with a mechanical component (no text or symbols visible)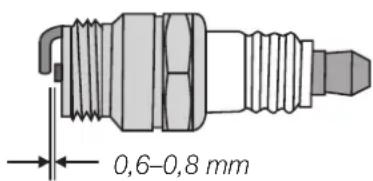
natural_image
Technical line drawing of a mechanical assembly with no visible text or symbolsnatural_image
Line drawing of a hand holding a tool interacting with a mechanical component (no text or symbols)natural_image
Mechanical assembly diagram showing internal components and motion arrows (no text or labels)natural_image
Mechanical assembly diagram showing a wrench inserted into a component with attached springs (no text or symbols)natural_image
Mechanical component diagram showing a motor with a wrench and two wheels (no text or symbols)natural_image
Illustration of a black cable with a plug and connector (no text or symbols)natural_image
Mechanical assembly diagram showing a wrench and screw mechanism (no text or labels)natural_image
Mechanical assembly diagram showing gear and shaft components with directional arrows indicating motion (no text or labels)natural_image
Illustration of a saw cutting tool with metal clamps and a handle (no text or symbols)natural_image
Mechanical assembly diagram showing gear and housing components (no text or labels)natural_image
Mechanical assembly diagram showing a piston and spring mechanism (no text or labels)natural_image
Mechanical assembly diagram showing components like gears and springs (no text or labels)natural_image
Mechanical assembly diagram showing a gear and shaft components (no text or labels)24
Vianhaku
LpA 86 dB(A), K=3,0 dB(A)
LwA 101 dB(A), K=3,0 dB(A)
Tärinäarvo
7,95 m/s ^2 , K=1,5 m/s ^2
Declaration of Conformity
Machinery directive 2006/42/EC
EMC directive 2004/108/EC
ISO/DIS 8437:2008 EN ISO 14982:2009
EC type approval no. E13*97/68SN3G1*2010/26*0338*02
Klas Balkow President
Insjön, Sweden, 2012–06-27
SVERIGE
KUNDTJÄNST
Tel:
0247/445 00
Fax:
0247/445 09
E-post: kundservice@clasohlson.se
INTERNET
www.clasohlson.se
BREV Clas Ohlson AB, 793 85 INSJÖN
NORGE
KUNDESENTER
Tlf.:
23 21 40 00
Faks:
23 21 40 80
E-post: kundesenter@clasohlson.no
INTERNETT
www.clasohlson.no
POST
Clas Ohlson AS, Postboks 485 Sentrum, 0105 OSLO
SUOMI
ASIAKASPALVELU
Puh.: 020 111 2222
10 – 13 Market Place
Kingston Upon Thames
Surrey
KT1 1|Z

- kW Two-Stage Snow Blower
- Safety
- General safety precautions
- Safety precautions during use
- Contents
- Controls and functions
- Assembly
- Upper and lower handle assemblies
- Mounting the discharge chute
- Discharge chute crank linkage
- Operation
- Oil level checks and refills
- Preparations
- Before use
- After use
- Refuelling precautions
- Starting
- Safety checks
- Adjust the auger drive control wire before using the snow blower for the first time Checking and adjusting the auger drive clutch wire
- Skid shoe adjustment
- Shutting off the engine
- Care and maintenance
- Lubrication
- Servicing and lubricating the auger
- Transmission, auger and clutch control adjustments
- Checking the gear controls
- Follow these procedures:
- Adjusting the gear lever wire
- Auger drive control
- Drive wheel clutch
- Cleaning and inspection
- Engine service intervals
- Changing oil
- Spark plug
- Replacing the scraper blade
- Changing the skid shoes
- Long-term storage procedures (over a month)
- Changing the drive belt
- Lubrication of the auger and replacement of the shear pins
- Disposal
- Specifications
- Montera utkastet
- Användning
- Start
- Körning
- Hjulens drivning
- Byte av skrapskär
- Byte av släpskor
- Montere utkastet
- Kjøring
- Driving av hjulene
- Skifte av meier
- Lumilinko, 3,5 kW
- TUOTENRO 31-5052 MALLI DB75524FM
- Käyttö
- Käynnistys
- Ajaminen
- Pyörien veto
- Declaration of Conformity
- SVERIGE
- NORGE
- SUOMI
Brand : Cotech
Model : DB75524FM
Category : Snow blower