
GWF 650 FDHP - Washing machine Godrej - Free user manual and instructions
Find the device manual for free GWF 650 FDHP Godrej in PDF.


| Product Type | Front-load washing machine |
| Model | GWF 650 FDHP |
| Brand | Godrej |
| Capacity | 6.5 kg |
| Dimensions (H × W × D) | 850 × 600 × 600 mm (approx.) |
| Net Weight | 68 kg (approx.) |
| Power Supply | 220-240 V, 50 Hz, 10 A |
| Power Consumption | ~2000 W (heating) / ~500 W (motor) |
| Spin Speed | Up to 1200 rpm |
| Wash Programs | Cotton, Synthetics, Delicates, Quick Wash, Rinse & Spin, Drain, etc. |
| Temperature Settings | Cold to 90°C |
| Display Type | LED/LCD panel with program indicators |
| Door Opening | Hinged left or right (check installation) |
| Drum Material | Stainless steel |
| Water Supply | Cold and hot (if available) via inlet hoses |
| Detergent Drawer | Three compartments: pre-wash, main wash, fabric softener |
| Filter Type | Drain pump filter (clean regularly) |
| Child Lock | Yes |
| Door Lock | Automatic locking during operation |
| Overflow Protection | Yes (anti-flood system) |
| Self-Cleaning | Drum clean cycle recommended |
| Annual Energy Consumption | ~230 kWh (estimation based on 220 cycles) |
| Noise Level (Wash/Spin) | ~58 dB / ~76 dB (approx.) |
| Spare Parts Availability | Through Godrej service centers and authorized dealers |
| Repairability Index | 8.0/10 (as per user rating site) |
Frequently Asked Questions - GWF 650 FDHP Godrej
User questions about GWF 650 FDHP Godrej
0 question about this device. Answer the ones you know or ask your own.
Ask a new question about this device
Download the instructions for your Washing machine in PDF format for free! Find your manual GWF 650 FDHP - Godrej and take your electronic device back in hand. On this page are published all the documents necessary for the use of your device. GWF 650 FDHP by Godrej.
USER MANUAL GWF 650 FDHP Godrej
How to get the best out of your Godrej Eon Washing Machine...

natural_image
Line drawing of a DAC+ technology device with stylized logo and circuit symbol (no readable text or symbols beyond branding)User Manual
GWF 650 FDHP
GWF 650 FDH
GWF 650 FDC
Fully Automatic Washing Machine
| 100 |
| 95 |
| 75 |
| 25 |
| 5 |
| 0 |


Congratulations!
You are now the proud owner of a new Godrej Eon washing machine.
You can look forward to years of
smooth, trouble-free washing from your machine,
as well as considerable savings in time, money and effort.
Please read this manual carefully as it will tell you
how to operate your machine optimally in order to get the best results.
If you need any further clarifications, do contact your nearest
Godrej dealer or any of our service centers/ offices.
We would be glad to help you.
We wish you an easier, more convenient life with your new
Godrej Eon washing machine.

| 0 | 5 | 25 | 75 | 95 | 100 |
Contents
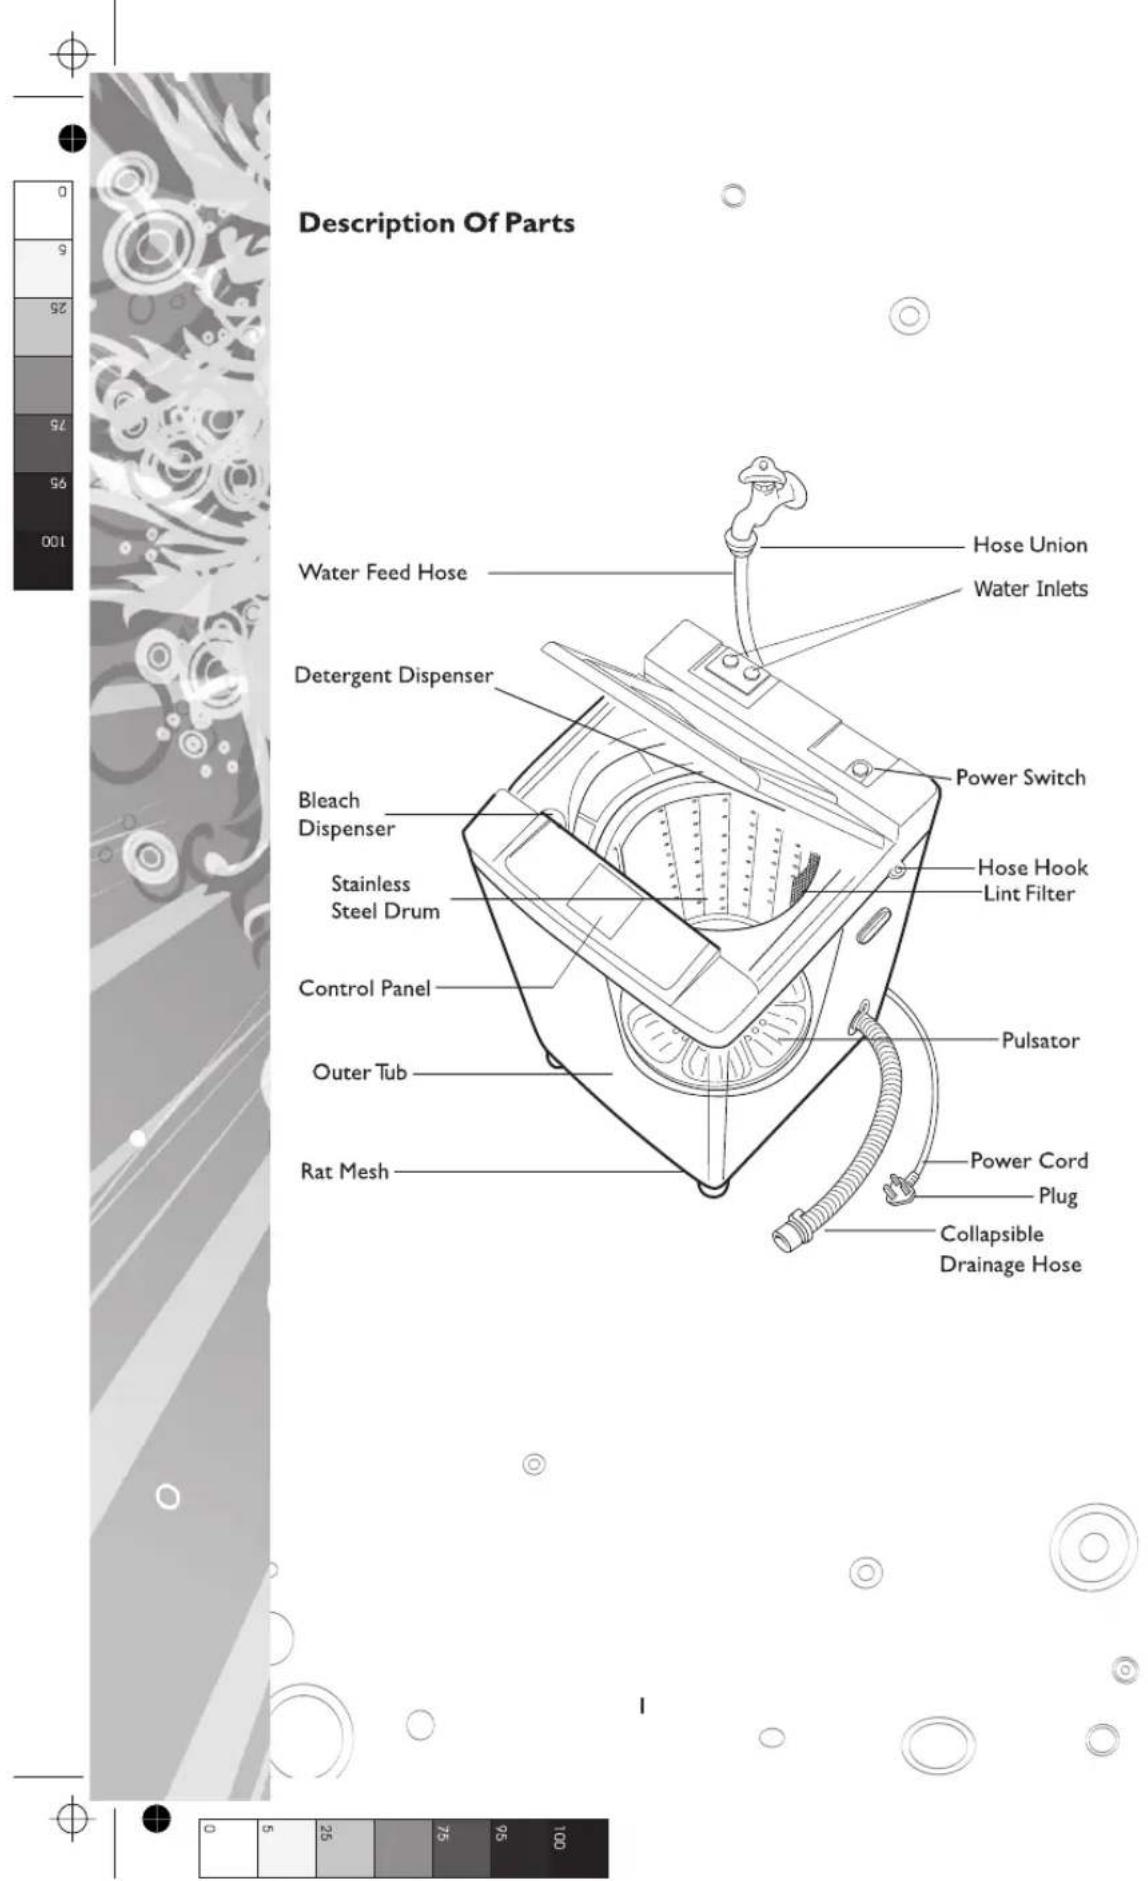
Description Of Parts
Specifications 2
Know Your Washing Machine 3
How To Install 4
Choosing The Right Location
Step-by-step Installation
Ensuring Proper Earthing
Installing The Drainage Hose
Collapsible Drainage Hose Extension
Moving The Drainage Hose
Attaching The Water Feed Hose To The Tap
Connecting The Water Feed Hose To Your Washing Machine
Description: Control Panel (Normal Operations) 9
Operation Of Functions II
The Washing Process 15
Program Cycles 17
Type Of Clothes That Can Be Washed 19
In Various Wash Programs
Description: DAC Operations 20
How To Select Water Level And Load Size 22
How To Measure Wash Load 23
How To Operate 24
When Washing Using The FUZZY Cycle
When Washing Woolens
Washing Tips 26
How To Use Bleach 27
Safety Instructions 28
How To Maintain 29
Water Inlet
Washing Machine Body
Lint Collector
When Do You Call The Service Person 30
Don't Worry When... 31
Trouble Shooting 32
Key Checklist 33
Environment Friendly Suggestions 34
Service Centres 35


| 100 |
| 95 |
| 75 |
| 25 |
| 5 |
| 0 |


Specifications
| Model | GWF 650 FDHP | GWF 650 FDH | GWF 650 FDC |
| Capacity | 6.5 kg | ||
| Temperature Options | Hot And Cold | Hot And Cold | Cold |
| Power Source | 200-240V, 50Hz, 5A | ||
| Power Consumption | 425 W | ||
| Water Consumption | Regular Cycle: 150 L at Max water level | ||
| Water Pressure | 0.3 - 10 kg/ cm ^2 | ||
| Outer Wash Tub Inner | Poly Propylene | ||
| Stainless Steel | |||
| Overall Dimensions | 560 mm (w) x 555 mm (d) x 920 mm (h) | ||
| Net weight | 32 kg | ||
In view of Godrej Policy of continuous development, specifications may change without notice.



Know Your Washing Machine
This washing machine has unique features to make your washing very convenient:
Dynamic Aqua-Power Control (DAC) Technology
DAC is a revolutionary concept that allows the machine to start operation as and when, both water and electricity/ power are available together. If there is water or power failure, the washing process is kept on hold, and the machine hibernates (waits) till the return of both water and electricity for washing to resume. This allows completion of wash without supervision and at the same time protects your washing machine. In absence of water, an ordinary machine would continuously keep open the inlet valve. Such operation can damage the machine.
Fuzzy Logic Controls
The intelligent micro-computer controls all operations precisely to ensure a perfect wash. The machine is equipped with fuzzy load and quality sensing to determine the water level and wash cycle appropriate for the wash load. Washing, rinsing and spin drying happens with a single selection on the control panel.
Save Settings
One can define and save his/ her own program using Save Settings function as Favourite Program. (Refer pg no. 14 to learn how to use this function)
Delay Start
One can set a delay for starting program operation using this function so that washing can take place even in one's absence.
Overflow Rinse
Taking extra care of your clothes and your delicate skin, this function allows you to keep adding water during the wash cycle thus removing as much detergent as possible. For washing baby clothes, one can choose this option to get hygienic wash. It is also useful for people who are allergic to extra small trace of detergent.
Soft Dry
This function offers intermediate spinning during final spin mode. This prevents wrinkles in clothes (for fabric more prone to form wrinkles) by retaining small trace of water in the clothes ensuring greater fabric care.
Spin Free
The Spin Free option stops the washing before the final drain and spin dry cycle. The Spin Free cycle helps prevent wrinkles and is of particular use if you are going away.
Child Lock
This feature allows machine keys to be locked during operation. This prevents unintended changes during a wash cycle.
Bleach Inlet
The bleach is dispensed between the outer and inner tub. Refer to page 27 for details.
Imbalance Load Corrector
The Godrej Eon washing machine automatically corrects a load imbalance that might occur during the Dry Cycle. This protects the machine from damages.
Rat Mesh
The rat mesh is provided to protect your machine from rodents. The cabinet of this Godrej EonWashing Machine is made from prime quality powder coated galvanised steel to ensure a long life.
| 0 | 5 | 25 | 75 | 95 | 100 |
How To Install
Choosing the right location
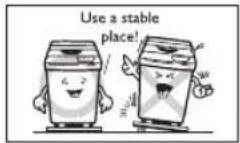
Install your Godrej Eon washing machine in an even, stable place. An unstable location
• Can create noise as your machine may vibrate
- Can be dangerous since vibrations may cause the machine to move
Keep a distance of at least 5 cm between the sides and rear of your machine to the nearest wall. This will prevent noise caused by the vibrations in your machine.
Do not place your machine in an area with high humidity or direct exposure to sunlight or rain.
This can
• Result in damaged insulation
- Cause deformation or discoloration of plastic parts
Step-by-step installation
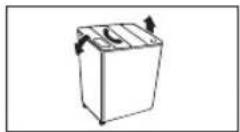
The front two legs can be adjusted so that the machine is on level with the ground.
• After loosening the adjusting nut, adjust the leg to the correct height by turning it. Then tighten the adjusting nut securely. Adjust the lock nut for adjusting the height.
- If the leg height is difficult to adjust because of an extremely uneven floor, place a board underneath and bring it to a level position.
- To check whether your machine is in level, use a weight attached to a string. The distance between the string and your machine should be the same from top to bottom.




Ensuring proper earthing
Your washing machine has a three-core 5A flexible cord. Make sure that electrical connections and earthing are done properly to avoid electrical shocks.

natural_image
Abstract grayscale pattern with swirling floral and diagonal stripes (no text or symbols)How To Install
Installing the drainage hose
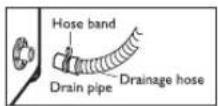
- Insert the drainage hose in as far as it will go, then secure it tightly with the hose clamp. An improperly secured hose may leak.
- While attaching the drainage hose to a wash pan, leave a gap between the end of the hose and the adjacent surface. If the flat end of the hose comes in contact with a flat surface, drainage will be affected.
Caution: If the drainage hose is not installed properly, your washing machine may not function well, and the overflow prevention mechanism may cause your machine to stop in mid-cycle.
- While inserting the drainage hose into a wash pan or drain pipe, move the hook for easier installation.
- Move the hook back to its initial position before placing it in the slot provided on the side of your machine.
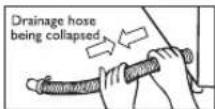
Collapsible drainage hose extension.
- This hose is specifically designed for the Automatic range of washing machines from Godrej. This special hose can be stretched to increase its length. The length can be extended up to 2 mts. long. This feature is provided for consumer convenience, whereby he/she can stretch the hose up to the drainage point, should it be far away from the machine. After completion of operation, the hose can be collapsed back to the original size and can be hooked on to the machine in an upright position.
Caution: Make sure the drainage hose is not too high otherwise it may not drain properly and may cause noise.




[NO TEXT]

How To Install
Moving the drainage hose
The drainage hose can be installed on either the right or the left side. The connector port found on the right side of your machine can be moved without disconnecting the internal hose from the drainage valve.
- Remove the back cover, then grip the stopper securing the internal hose with your fingers and pull it to detach it from the outer shell.
- Turn the nut for the drainage hose connector port anti-clockwise.
• To detach, pull the internal hose from inside the washing machine. - Remove the hose hole cap on the left-hand side, from inside the washing machine. Align the internal hose with the notch in the connector port and fit into place. Then put the nut in place and turn clockwise to secure from the outside.
- Insert the stopper into the securing hole on the left side of the outer shell and press down to secure the internal hose.


©


6
- Align the drainage hose with the edge of the stopper.
- Attach the back cover and fit the hose hole cap over the hose hole on the right-hand side.
• After moving the drainage hose, make sure you test-operate your machine. Check for any water leaks or unusual noises.



natural_image
Abstract grayscale illustration with circular and linear elements, no text or symbols presentHow To Install
Attaching the water feed hose to the tap
- The hose to be used for Hot water has the Red hose nut at both ends and the one to be used for Cold water has Blue hose nut at both ends.
- Pull the sleeve down with your fingers as you lower the entire hose to disconnect the union.
- Loosen the four screws on the hose union and then fit the union exactly over the mouth of the tap.
• Tighten the four screws evenly around the tap. - Remove the seal from the union and turn the nozzle to tighten securely. (If the tap is large, square or oddly shaped, remove the inside ring to facilitate attachment).
- Grip the ring with your hand and pull it down, and then insert the nozzle. Separate the sleeve until you hear a click, and then push it back.
• After installation, check to ensure that the union does not come off while pulling down. Next, confirm that the union is properly installed by turning the water on and checking for leakage. If you see any leakage, adjust the section where there is a leakage. - A secure water connection for your automatic will help you to use the Auto Start feature of your DAC washing machine.


Caution:
- Do not use a tap with a diagonal mouth or a movable tap since this may leak


| 0 | 5 | 25 | 75 | 95 | 100 |



⊕

How To Install
Connecting the water feed hose to your washing machine.
- The hose to be used for Hot water has the Red hose nut at both ends and the one to be used for Cold water has Blue hose nut at both ends.
- Turn the water feed nut clockwise and tighten it on the end of the water feed hose securing it to the water intake valve.
- Tighten further by turning the water feed hose and water intake valve in the direction of the arrow as shown.
- Hold the water feed nut firmly. Turn the water feed hose back again only in the direction of the arrow as shown.
- Repeat steps 2 and 3 above, and tighten until you find it difficult to turn the water feed hose further.

natural_image
Hand pressing a button on a mechanical component (no text or symbols visible)
natural_image
Illustration of a hand using a tool to press or install a component on a surface (no text or symbols visible)
8


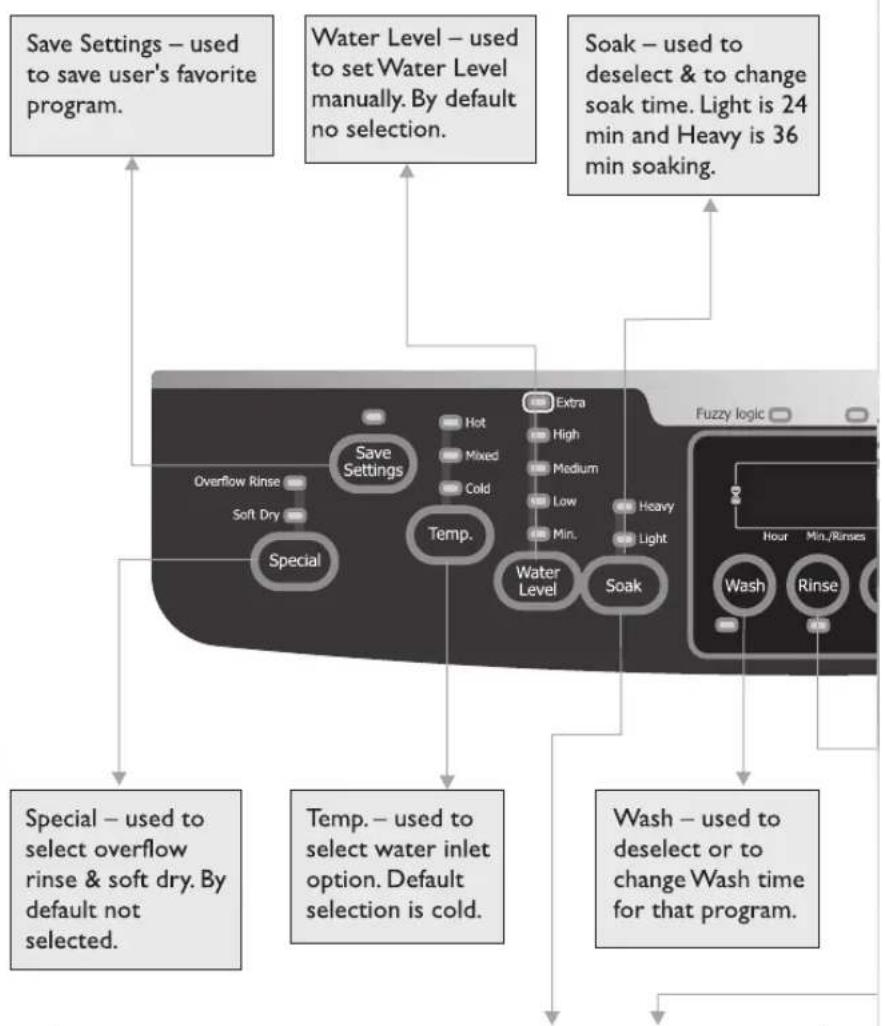
Description: Control Panel (Normal Operations)
The control panel may become slightly warm due to the heat given off by the electronics and does not indicate a malfunction.
flowchart
graph TD
    A["Save Settings"] --> B["Water Level"]
    B --> C["Soak"]
    C --> D["Fuzzy logic"]
    D --> E["Wash"]
    E --> F["Rinse"]
    F --> G["Water Level"]
    G --> H["Temp."]
    H --> I["Special"]
    I --> J["Overflow Rinse & Soft Dry"]
    J --> K["Soft Dry"]
    K --> L["Special"]
    L --> M["Hot"]
    M --> N["Extra"]
    N --> O["High"]
    O --> P["Mixed"]
    P --> Q["Medium"]
    Q --> R["Cold"]
    R --> S["Low"]
    S --> T["Min."]
    T --> U["Heavy"]
    U --> V["Light"]
    V --> W["Water Level"]
    W --> X["Soak"]
    X --> Y["Wash"]
    Y --> Z["Used to deselect or to change Wash time for that program."]
    Z --> AA["Special"]
    AA --> AB["Select overflow rinse & soft dry. By default not selected."]
    AB --> AC["Default selection is cold."]
    AC --> AD["Water Level manually. By default no selection."]
    AD --> AE["Water Level manually. By default no selection."]
    AE --> AF["Water Level manually. By default no selection."]
    AF --> AG["Water Level manually. By default no selection."]
    AG --> AH["Water Level manually. By default no selection."]
    AH --> AI["Water Level manually. By default no selection."]
    AI --> AJ["Water Level manually. By default no selection."]
    AJ --> AK["Water Level manually. By default no selection."]
    AK --> AL["Water Level manually. By default no selection."]
    AL --> AM["Water Level manually. By default no selection."]
    AM --> AN["Water Level manually. By default no selection."]
    AN --> AO["Water Level manually. By default no selection."]
    AO --> AP["Water Level manually. By default no selection."]
    AP --> AQ["Water Level manually. By default no selection."]
    AQ --> AR["Water Level manually. By default no selection."]
    AR --> AS["Water Level manually. By default no selection."]
    AS --> AT["Water Level manually. By default no selection."]
    AT --> AU["Water Level manually. By default no selection."]
    AU --> AV["Water Level manually. By default no selection."]
    AV --> AW["Water Level manually. By default no selection."]
    AW --> AX["Water Level manually. By default no selection."]
    AX --> AY["Water Level manually. By default no selection."]
Child Lock Mode – When Soak & Rinse buttons are pressed simultaneously during running of the machine, the machine goes into Child Lock mode. In this mode, Child Lock LED will glow and no keys are accepted in this mode. To come out of Child Lock mode press Soak & Rinse keys simultaneously during the running of the machine and Child Lock LED will go off. If the machine is in Hold mode, the machine will not go in Child Lock mode.
| 0 | 5 | 25 | 75 | 95 | 100 |



flowchart
graph TD
    A["Child Lock"] --> B["Spin Free"]
    B --> C["Saree"]
    C --> D["Program"]
    D --> E["Jeans"]
    E --> F["Select"]
    F --> G["DAC"]
    G --> H["Start Hold"]
    H --> I["Delay Start Button"]
    I --> J["Start/Hold"]
    J --> K["Start/Hold - Starts washing machine operation when pressed. Pressing this button a second time will cause the machine to pause."]
    K --> L["Delay Start Time: 01 hr to 23 hr. Delay Start can be cancelled only while doing selections, to cancel delay time, keep Delay Start Button pressed for 2 seconds."]
    L --> M["Rinse - used to deselect or to change no. of rinses for that program."]
    M --> N["Select"]
    N --> O["DAC"]
    O --> P["Start/Hold"]
    P --> Q["Start/Hold - Starts washing machine operation when pressed. Pressing this button a second time will cause the machine to pause."]
    Q --> R["Delay Start Button - Used to start the program operation after set delay time. The delay time can be set from "01" hr to "23" hr. Delay Start can be cancelled only while doing selections, to cancel delay time, keep Delay Start Button pressed for 2 seconds."]
    R --> S["10"]

natural_image
Abstract decorative pattern with swirling motifs and white dots on a gray background (no text or symbols)Operation Of The Functions
1. Special Button
Press this button to select "Overflow Rinse" and "Soft Dry".
The selection can be done as follows:
I. Press "Special Button" once to select Overflow Rinse.
2. Press "Special Button" twice to select Soft Dry.
3. Press "Special Button" thrice to select Overflow Rinse and Soft Dry both.
4. Press "Special Button" fourth time to deselect Overflow Rinse and Soft Dry.
2. Temp. Button- ^* (Optional)
Press this button to select water inlet option.
The selection can be done as follows:
- By default "Cold" is selected.
- Press "Temp.Button" once to select "Mixed" option.
- Press "Temp.Button" twice to select "Hot" option.
*This feature is not available in model - GWF 650 FDC
3. Water Level Button
Press this button to select "Water Levels" manually
The selection can be done as follows:
- By default no water level will be selected.
- Press this button once to manually select "High" water level.
- Press this button twice to manually select "Min." water level.
- Press this button thrice to manually select "Low" water level.
- Press this button four times to manually select "Medium" water level.
- To select "Extra" Water as per your needs keep this button pressed for more than 2 seconds to manually add more water than selected water level. Release the button to stop the extra water inflow.


Operation Of The Functions
4. Soak Button
Press this button to deselect or to change "Soak" time manually
I. Press Soak Button once to select "Light" which is 24 min soak.
2. Press Soak Button twice to select "Heavy" which is 36 min soak.
3. Press Soak Button thrice to deselect Soak option.
5. Wash Button
Press this button to deselect or to change wash time.
One can change the default wash time assigned for the selected program by pressing this button.
One can even deselect wash process using the same button.

| Once (default) | Second | Third | Fourth | Fifth | Sixth | Seventh | Eighth | Ninth | |
| Fuzzy | 12 | No wash | 8 | 9 | 10 | 11 | Back to default | - | - |
| Normal | 10 | 11 | 12 | 13 | No wash | 8 | 9 | Back to default | - |
| Gentle | 5 | 6 | 7 | 8 | 9 | 10 | 11 | No wash | Back to default |
| Saree | 6 | 7 | 8 | 9 | 10 | No wash | 4 | 5 | Back to default |
| Jeans | 12 | 13 | 14 | 15 | No wash | 10 | 11 | Back to default | - |
| Strong | 12 | 13 | 14 | 15 | No wash | Back to default | - | - | - |
| Wool | 3 | - | - | - | - | - | - | - | - |
| Favourite | 10 | - | - | - | - | - | - | - | - |
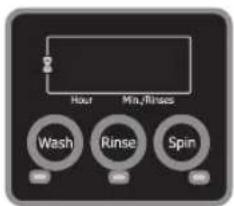
6. Rinse Button
Press this button to deselect or to change number of rinse times.
By default each program will have maximum 2 number of rinses.
One can change the default number of rinses assigned for the selected program by pressing this button.
- On pressing this button once, the default 2 number of rinses are displayed.
- On pressing this button twice, the number of rinses changes to one.
- On pressing this button thrice, one can deselect Rinse.
| 100 |
| 95 |
| 75 |
| 25 |
| 5 |
| 0 |


| 0 |
| 6 |
| 25 |
| 75 |
| 95 |
| 100 |

natural_image
Abstract decorative pattern with swirling floral and circular motifs, no text or symbols presentOperation Of The Functions
7. Spin Button
Press this button to deselect or to change spin time.
One can change the default spin time assigned for the selected program by pressing this button.
One can even deselect spin process using the same button.
| Once (default) | Second | Third | Fourth | Fifth | Sixth | Seventh | Eighth | |
| Fuzzy | 6 | No spin | 1 | 2 | 3 | 4 | 5 | Back to default |
| Normal | 3 | 4 | 5 | 6 | No spin | Back to default | - | |
| Gentle | 3 | No spin | 1 | 2 | Back to default | - | - | - |
| Saree | 3 | No spin | 2 | Back to default | - | - | - | - |
| Jeans | 6 | No spin | 2 | 3 | 4 | 5 | Back to default | - |
| Strong | 3 | No spin | 1 | 2 | Back to default | - | - | - |
| Wool | 1 | - | - | - | - | - | - | - |
| Favourite | 3 | - | - | - | - | - | - | - |
8. Spin free Button
Press this button to hold the machine from going into final spin process.
9. Select Button
Press this button to select the Program. With each press, one can select the program.
Fuzzy → Normal → Gentle → Saree → Jeans → Strong → Wool → Favourite
The remaining time for the program is displayed on seven segment display in hours & minutes.
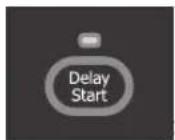
10. Delay Start Button
Press this button to set delay start time from 1 hour up to 23 hours with interval of 1 hour. Machine will start its selected processes after set delay time is over.
The delay time will be shown on seven segment display and all other LED's will go off till set delay start time is over.
Press Start/Pause button once to come out of delay mode.



[NO TEXT]

Operation Of The Functions
II. DAC Button
Press this button to select DAC function. DAC function once selected will remain active all the time unless it is deselected again.
When water supply to the machine is very low or not available during water intake, DAC LED keeps blinking slowly and machine waits for 5 minutes in hibernation mode for water to come with all other LEDs off.
12. Start/ Pause Button
Press this button either to start the selected process or to pause the process.
13. Save Settings Button
One can define & save his/ her own program using Save Settings function as Favourite Program.
Before starting any cycle using Start Button, press Save Settings button once. Machine will learn the selected cycle as it progresses. After completion of cycle, next time after power on, Save Settings LED starts blinking indicating learning of past cycle is complete. If user wishes to set past cycle as his/her cycle, he/she has to press Save Settings Button once. The user's favourite selections will get saved at Favourite Program location.
14. Child Lock
Press Soak & Rinse buttons simultaneously, to activate Child Lock. All the keys on control panel will get locked until these two are pressed again simultaneously. Child Lock LED will glow on Child Lock activation
15. Memory Backup
During program operation if there is a power cut, the machine memorizes the program operation. On restoration of power supply, the machine will resume the remaining process from exactly where it stopped due to power failure.






natural_image
Abstract grayscale illustration with flowing lines and circular patterns, no text or symbols presentThe Washing Process
| SELECT CYCLE | OPERATION | |
| 1 | Rinse only | * Press the Power button of the machine* Press Select button to choose suitable program. (ExceptWool & Favourite program)* Press Wash button twice to deselect Soak & Wash.* Press Spin button twice to deselect Spin.* Press Start button to start Rinse only. |
| 2 | Soak - Wash - Rinse | * Press the Power button of the machine* Press Select button to choose suitable program. (ExceptWool & Favourite program)* Press Spin button twice to deselect Spin.* Press Start button to start Soak + Wash + Rinse cycle. |
| 3 | Wash - Rinse | * Press the Power button of the machine* Press Select button to choose suitable program. (ExceptWool & Favourite program)* Deselect Soak by pressing Soak button.* Press Spin button twice to deselect Spin.* Press Start button to start Wash + Rinse cycle. |
| 4 | Rinse - Spin | * Press the Power button of the machine* Press Select button to choose suitable program. (ExceptWool & Favourite program)* Press Wash button twice to deselect Soak & Wash.* Press Start button to start Rinse + Spin cycle. |
| 5 | Spin only | * Press the Power button of the machine* Press Select button to choose suitable program. (ExceptWool & Favourite program)* Press Rinse button twice to deselect Soak, Wash & Rinse.* Press Start button to start only Spin cycle. |
| 100 |
| 95 |
| 75 |
| 25 |
| 5 |
| 0 |


| PROCESS | ||
| Begins with Drain cycle & Spin cycle - Rinse - Stops without draining | ||
| Soak - Wash - Rinse - Stops without draining | ||
| Wash - Rinse - Stops without draining | ||
| Begins with Drain cycle & Spin cycle - Rinse - Spin | ||
| Begins with Drain Cycle - Spin |


* For Wool & Favourite program user can not change cycle operations.


16


Program Cycles
| WASHING METHOD | PROCEDURE FOR SETTING WASH CYCLE | |
| 1 | Fuzzy Cycle | * Turn POWER on (Fuzzy Cycle gets selected automatically)* Press Start/Hold to start the machine.* Water level and wash speed is automatically selected by the machine if not selected manually. |
| 2 | Normal Cycle | * Turn POWER on (Fuzzy Cycle gets selected automatically)* Press Select (Program) Button once to select Normal Cycle.* Press Start/Hold to start the machine.* Water level is automatically selected by the machine if not selected manually. |
| 3 | Gentle Cycle | * Turn POWER on (Fuzzy Cycle gets selected automatically)* Press Select (Program) Button twice to select Gentle Cycle.* Press Start/Hold to start the machine.* Water level is automatically selected by the machine if not selected manually. |
| 4 | Saree Cycle | * Turn POWER on (Fuzzy Cycle gets selected automatically)* Press Select (Program) Button 3 times to select Saree Cycle.* Press Start/Hold to start the machine.* Water level is automatically selected by the machine if not selected manually. |
| 5 | Jeans Cycle | * Turn POWER on (Fuzzy Cycle gets selected automatically)* Press Select (Program) Button 4 times to select Jeans Cycle.* Press Start/Hold to start the machine.* Water level is automatically selected by the machine if not selected manually. |
| 6 | Strong Cycle | * Turn POWER on (Fuzzy Cycle gets selected automatically)* Press Select (Program) Button 5 times to select Strong Cycle.* Press Start/Hold to start the machine.* Water level is automatically selected by the machine if not selected manually. |
| 7 | Wool Cycle | * Turn POWER on (Fuzzy Cycle gets selected automatically)* Press Select (Program) Button 6 times to select Wool Cycle.* Press Start/Hold to start the machine.* By default High water is selected. |
| 8 | Favourite Cycle | * Turn POWER on (Fuzzy Cycle gets selected automatically)* Press Select (Program) Button 7 times to select Favorite Cycle.* Press Start/Hold to start the machine.* Water level is automatically selected by the machine if not selected manually. |
| 0 | 5 | 25 | 75 | 95 | 100 |

●

| PROCESS | APPROX. TIME | ||||
| SOAK | WASH | RINSE 1 | RINSE 2 | SPIN | |
| Default 24 min | Default 12 min | 2 min | 2 min | 6 min | 1 hr 14 min |
| 12 min Max. to 8 min Min. | 6 min Max. to 1 min Min. | ||||
| Default 24 min | Default 10 min | 2 min | 2 min | 3 min | 1 hr 14 min |
| 13 min Max. to 8 min Min. | 6 min Max. to 3 min Min. | ||||
| Default 5 min | 2 min | 2 min | 3 min | 45 min | |
| 11 min Max. to 5 min Min. | 3 min Max. to 1 min Min. | ||||
| Default 24 min | Default 6 min | 2 min | 2 min | 3 min | 1 hr 10 min |
| 10 min Max. to 4 min Min. | 3 min Max. to 2 min Min. | ||||
| Default 24 min | Default 12 min | 2 min | 2 min | 6 min | 1 hr 19 min |
| 15 min Max. to 10 min Min. | 6 min Max. to 2 min Min. | ||||
| Default 36 min | Default 12 min | 2 min | 2 min | 3 min | 1 hr 28 min |
| 15 min Max. to 12 min Min. | 3 min Max. to 1 min Min. | ||||
| Default 3 min | 2 min | 2 min | 1 min | 41 min | |
| Default 24 min | Default 10 min | 2 min | 2 min | 3 min | 1 hr 14 min |



natural_image
Abstract grayscale pattern with swirling floral and diagonal stripes (no text or symbols)Type Of Clothes That Can Be Washed In Various Wash Programs
| Program | Recommended type of clothing that can be washed |
| Fuzzy | Any type of clothing |
| Normal | Shirts, skirt, pyjama, petticoat, nightgown, pant, etc |
| Gentle | Vest, undergarment, blouse, handkerchief, sock, silk garments, etc |
| Saree | Saree, dhoti, curtains, single bed sheet, table cloth, etc |
| Jeans | Jeans, bath towel, etc |
| Strong | Double bed sheet, khaadi fabric, etc |
| Wool | All wool garments which are recommended for machine wash by the garment manufacturer |
| 0 |
| 5 |
| 25 |
| 75 |
| 95 |
| 100 |
Description: DAC Operations
The DAC capability of this machine allows the washing to be completed even for homes with irregular water and power supply.
There are two unique problems faced by homes in India that are solved by DAC:
(A) No power at the time when you want to set the machine to wash:
The machine is capable of Auto start after the power supply is available, provided:
o DAC switch has been pre-selected.
- To select the DAC mode, press it once and the LED glows. This button once selected will be retained in the memory.
- At anytime when power is available you can press the DAC switch to deselect the Auto Start option.
o Power switch is pressed to ON position.
- Once the power supply is sensed, the machine waits for a minute and then Auto Starts.
- In this mode, the machine operates in the Fuzzy mode automatically selecting the water level and wash cycle.
- This Auto Start option will not work if DAC switch was not ON beforehand.
- Once the power supply is sensed, the machine waits for a minute and then Auto Starts.
- In this mode, the machine operates in the Fuzzy mode automatically selecting the water level and wash cycle.
- This Auto Start option will not work if DAC switch was not ON beforehand.
(B) Water failure during the Wash:
o Sleep Mode gets activated in this case.
o This feature is not dependent on status of DAC switch (ON/OFF).
If there is water failure while the washing process is ON then operation is kept on hold, and the machine hibernates (waits) for return of water for washing to resume.
o It records the position where it stopped at the time of water failure. Only the DAC LED continues to blink at a low rate during hibernation.
o Machine checks for water once every few minutes; and fully resumes washing after water supply is verified.
Once the water supply resumes, the machine restarts in stages and it may take up to 15 minutes for wash/ rinse to resume.
If water supply rate is very slow (e.g. more than 45 minutes for filling the tub once) then it may take longer for machine to restart.
• No water at the start of washing:
o The machine operates similar to the case of water supply failure as described above.
• Power failure during the wash:
o Sleep Mode gets activated in this case.
The wash status is retained in the memory just prior to power failure. Machine restarts automatically from the same point once the power supply is available.



Description: DAC Operations
POWER SWITCH
(On rear panel)
- The DAC machine can wash unattended, and it switches off automatically after the wash is completed. The switch pops up, thus also providing a visual indication that the washing is complete.
SPIN FREE CYCLE
The selection of this feature allows user to disable the final drain and spin drying operation for specific wash cycle if user desires to do so.
o The washing is stopped before the final drain and spin cycle.
o The clothes will be washed and will remain floating in water in the tub. The water will not be drained.
o Power switch will turn OFF.
After returning home switch on power supply switch and the final spin drying step can be carried out to remove excessive moisture by pressing Start button. Spread the laundry as usual for complete removal of moisture.
The Spin Free Cycle once selected will remain ON even if power supply to the machine is turned OFF. It can be deselected manually.
o Select once when the power is there and it will be retained until the machine encounters a spin-free end of wash.
o You can select Spin Free beforehand if
• You have to use the Auto Start feature and also if
- The machine will remain unattended for a number of hours before you return home to attend to final drying.
The Spin Free cycle helps prevent wrinkles and is of particular use if you are going away for hours and machine is in Auto wash mode.
Preparing for Auto operation:
- Select DAC mode once while power supply is there. Do not turn it off unless you want to disable the Auto Start feature.
• Switch ON the power supply through external switch. - Press the machine's Power Switch ON (even while there is no power)
• Place the drain hose flat on the surface.
• Place laundry with right quantity of detergent.
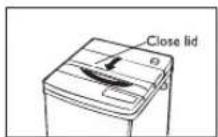
• Turn on the water tap. - Close the wash lid.
• User can pre-select spin free.
The machine will start automatically after power supply is received. This washing happens in the Fuzzy Mode. After the wash, the machine will switch off automatically.
| 0 | 5 | 25 | 75 | 95 | 100 |
How To Select Water Level And Load Size
Select the correct water level
Selecting the correct level will allow clothes to move freely in water and help you achieve the best washing results.
| How to use WATER LEVEL | ||
| Water Level Setting | Weight of clothes | Example of load |
| HIGH | 3.1 - 6.5 kg | 3 Trousers, 3 Shirts,2 Skirts, 2 Night gowns,2 Towels, 2 Vests,I Saree, I Dhoti andI Blouse |
| MEDIUM | 1.51 - 3 kg | I Trouser, I Shirt,I Skirt, I Night gown,I Towel, I Vest, I Saree,I Dhoti and I Blouse |
| LOW | 0.81 - 1.5 kg | I Trouser, I Shirt,I Vest, I Nightgown,2 Blouses and I Skirt |
| MIN. | 0 - 0.8 kg | I Trouser, I Shirt,I Vest, Undergarment |
While deciding the water requirement for the wash load, check the weight of the clothes and volume occupied by them.

How To Measure Wash Load
Here are some of the average weights of commonly used clothes, to help you estimate the weight of the load to be washed
| Approximate weight of clothes | |||
| Item of clothing | Weight (in gms.) | Item of clothing | Weight (in gms.) |
| Double bedsheet | 1000 | Single bedsheet | 500 |
| Bath towel | 500 | Table cloth | 650 |
| Trousers | 400 | Jeans | 600 |
| Shirt | 300 | Baggies | 500 |
| Saree | 500 | Petticoat | 400 |
| Skirt | 250 | Pyjamas | 400 |
| Dhoti | 200 | Skirt | 250 |
| Night gown | 250 | Lungi | 225 |
| Vest | 50 | Blouse | 100 |
| Undergarment | 50 | ||
While deciding the water requirement for the wash load, check the weight of the clothes and volume occupied by them.

⊕

How To Operate
When washing using the FUZZY cycle
Preparation
- Ensure that the electrical plug is properly connected.
- Ensure that the water supply and drainage hoses are correctly installed.
Put detergent and laundry in the basket.
Turn the power on
- Close the lid and turn the POWER switch ON.
Start the cycle
- Press the START/HOLD pad to start the machine.
- The machine will run through a full cycle, including RINSE and SPIN.
Cycle end
• A buzzer will signal the end of the cycle.
- Turn off the water tap.
• Machine will switch off after the completion of washing.




natural_image
Abstract grayscale pattern with swirling and curved shapes, no text or symbols presentHow To Operate
When washing woolens
100% wool garments, wool-polyester knit garments and other delicate fabrics like lingerie can be washed in your Godrej Eon washing machine.
How to wash
- Set Cycle to NORMAL, set the water level at MIN., add detergent and run the WASH cycle for about a minute to dissolve the detergent.
- Insert the article to be washed, soak thoroughly, and close the lid.
- Press START/ HOLD button and turn the POWER switch off to stop your machine.
- Set the cycle to WOOL, press MANUAL SELECT PAD 6 times. Press the START/ HOLD pad to start.
Caution:
- Articles be washed. Avoid washing articles made of animal fur, (e.g. cashmere, angora, mohair) or lace-knits etc.
- Articles to be washed should be fully soaked using the type of detergent specified on the garment label.
- Lukewarm water of 30^ C is ideal for washing wool knit articles.
• The water level is automatically set at HIGH.

[NO TEXT]

Washing Tips
- Follow the instructions on the garment labels while washing laundry items. Avoid washing of all natural woolens and delicate knits such as lace knits.
- Turn garments inside out when washing to avoid piling and lint.
- Strings and fasteners of aprons and pillow cases should be fastened or tied.
For hard-to-clean shirt collars and sleeves:
- Apply detergent to the soiled part of the garment and scrub by hand.
- If a garment is exceptionally soiled, soak it in liquid detergent for about 10 minutes before washing.


| 0 |
| 5 |
| 25 |
| 75 |
| 95 |
| 100 |

natural_image
Abstract grayscale decorative pattern with swirling motifs and circular elements (no text or symbols)How To Use Bleach
When using bleach
Pour bleach into the bleach dispenser a little at a time. Be careful not to spill it.
Then run some water through the bleach inlet to rinse it. When using powdered bleach, dissolve it completely in water, then add it directly to the basket.
Caution:
- Coloured and dyed fabrics may lose their colour if washed in bleach, so read the instructions on the label before washing.
- Do not apply bleach directly to laundry items.
- Do not allow bleach to spill on the control panel.


Safety Instructions
• Always use a proper power source.
- Do not use extension cords as these may not be properly earthed.
- Before connecting the power cord make sure to ground otherwise it may cause electric shock.
• Never use damaged electrical cords or plugs.
- This washing machine should be connected through a switch or a 5A MCB so that it can be disconnected from power supply.
- Use a secure tap connection to avoid leakage and wastage of water.
- Never place your hand in the basket while it is moving! Do not place your hand under the machine while it is operating. (Touching any of the machine's moving parts can be dangerous, even if it is moving slowly.)
- Do not press control panel pads with sharp objects. Using sharp objects to press the panel pads can result in electrical shocks or malfunctions.
- Do not pull the power cord with moist hands.
- Do not get the control panel wet. Getting the operation panel wet can result in shocks or malfunctions.
- Never wash or rinse articles of clothing treated with benzene, thinner, alcohol or other volatile or organic solvents. The presence of such chemicals can result in a fire.
- Do not use water with temperature over 55°C. Water that is too hot can cause malfunctions and deformation of the machine.*
- If it takes 15 seconds or more for the machine to stop moving completely after the lid is opened (during the dry cycle with laundry in the basket), the brake is malfunctioning. You should have the machine repaired immediately.
• Do not use this product for business purpose.
- Young children should be supervised to ensure that they do not play with the appliance.
- Remove coins and pins from the pockets etc. as these may damage clothes or the machine.


*This is applicable only for model GWF 650 FDC



natural_image
Abstract grayscale graphic with flowing lines and circular motifs, no text or symbols presentHow To Maintain
Water inlet
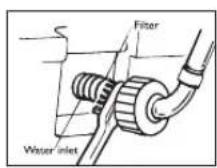
If the water fills into the basket too slowly...
Remove the water feed hose and clean the filter with a brush as shown alongside.
Caution: Do not remove the filter.
Washing machine body
Before carrying out any maintenance on your washing machine, be sure to remove the electrical plug from its power source.
Clean the main body and control panel with a soft cloth. Hard-to-remove dirt can be cleaned by wiping with a soft cloth soaked in a mild detergent.
Caution: Do not clean the body or control panel with benzene, thinner, cleanser or other chemical cleaners. This can discolour or damage your machine's finish.
The lint collector
Clean the lint collector after every use
- Remove the lint collector by pulling it out. If it is difficult to lift it out at the place where the machine has stopped, turn the basket by hand to a more convenient place and remove the lint collector.
- Remove the lint by turning the lint collector inside out.
- When the lint collector has been emptied and cleaned, push the net back in and replace the lint collector by inserting it in from above and pressing it down into place.
Caution: The net of the lint collector may sometimes be lifted up and may lie on top of the basket. Do not operate the washing machine with the net lying over the basket, as this may cause the net to rip or cause malfunction.
If the net is damaged, contact your nearest service centre.

| 100 |
| 95 |
| 75 |
| 25 |
| 5 |
| 0 |


When Do You Call The Service Person...
Before you call the service person, please check the following:
When your washing machine does not operate:
Check
- Has your machine's plug been inserted properly into the main power supply socket?
• Is the water tap turned on properly? - Has the drainage hose been placed down to allow drainage?
• Is the power switch ON? - Is the lid securely closed? (When beginning operation from the DRY cycle, your machine will not operate if the lid is open)
- Is the laundry load unbalanced? Is the warning light ON? If so, correct unbalanced load by manually rearranging the laundry evenly.
When your washing machine leaks:
Check
• Is the hose coupling loose?
• Is the nozzle loose?
• Is the water feed hose connector clogged?
• Is the water inlet nut loose?
When your washing machine makes an unusual noise:
Check
• Is your washing machine installed on an incline or uneven surface?
- Are there any match sticks, hairpins or metal objects being washed with the laundry?
- Has a foreign object got caught under the pulsator? Switch the power OFF and remove the centre screw, then lift the pulsator and look underneath.
• Is the load unbalanced, causing the basket to spin off-centre?
When your washing machine does not drain:
Check
• Has the WASH-RINSE cycle been selected?
• Is the drainage hose bent?
- Has the drainage hose been placed down to allow proper drainage?
• Is the drainage hose properly connected to your machine?
When your washing machine goes into hibernation (sleep): only DAC LED blinks:
Check
• Is there adequate water supply
• This is a design feature for the DAC washing machine.
When the washing cycle takes longer than usual:
Check
- Has the automatic load unbalance correction function (FILL - agitate for 1 min - DRAIN) been activated to correct a load unbalance?
- Is water supply available? Machine goes into hibernation mode and waits for water. This adds to the cycle time. End of wash is known through the Power Switch which moves up to OFF position.


natural_image
Abstract grayscale illustration with swirling lines and circular motifs, no text or symbols presentDon't Worry When...
- A small amount of water drains out of the drainage hose the first time you use your washing machine. This is merely the water left over from the performance inspection performed on your washing machine before it was shipped from the factory.
- Buzzing noises occur when the tub fills with water. They are caused by the operation of the water supply valve.
- The stop time of the WOOL cycle is long (4 seconds rest for 1 second operation). It does not indicate a malfunction.
- Sloshing sounds are made by your machine during the SPIN cycle. These are made by the water in the Liquid Balancing Ring which is meant to maintain balance of the Spin Tub and does not indicate a malfunction.
- When you restart your machine after opening the lid or pausing the machine during the SPIN cycle, there may be a small pause before the machine begins to spin as the drainage valve opens. Also, when you start your machine immediately after stopping it, there will be a short pause. This happens for safe operation.
- If you press the pads when the machine is operating or paused, the machine may return to the beginning of the cycle and lengthen operating time.
- Your machine automatically corrects a load unbalance that occurs during the SPIN cycle. If the unbalance is extremely bad, your machine will refill with water and agitate for a moment, and then the dry cycle will resume. This will happen twice. If the load becomes unbalanced a third time, a buzzer will sound 60 times.
- The machine has an inbuilt mechanism whereby it goes into hibernation mode if the water level shows no rise for 15 minutes. It monitors the flow of water every few minutes and once verified, the machine restarts.
- The machine has a user selected auto start (DAC) option. In this mode, the machine will automatically start after the power is made available.

[NO TEXT]

Trouble Shooting
- E2 error display
If water does not drain from machine, the display will show "E2" error along with beeps after 5 minutes of starting drain operation.
To correct the error, put the drain hose straight onto the ground or if it is clogged, please clean it.
On opening & closing the lid, machine will come out of error mode and will start draining again.
If the problem persists, please call service personnel.
- E3 error display
During spin operation if lid is open, machine will display "E3" error mode along with beeps. On closing the lid machine will come out of error mode and will start spinning. If the problem persists, please call service personnel.
• E4 error display
If there is a load unbalance, for two times, the machine will try to balance it out automatically. If machine goes into unbalance mode for the third time, "E4" error will be displayed on the control panel indicating manual balancing of load required. Balance the clothes evenly and close the lid to come out of error mode. If the problem persists, please call service personnel.


Key Checklist
Almost every district in the country has a Godrej dealer - who has service representatives. Should you need any assistance, please get in touch with the nearest service provider and he will send a dependable mechanic to you. Your feedback, suggestions and ideas about washing machine care will help us serve you better.
Please check with the dealer as to who would be your service provider. For your convenience, please note down the details below.
Whom to contact in case you need assistance:
Name:
Phone:
Address:
Always quote the following when you require assistance of a Godrej Dealer or Branch.
Washing Machine Model:
Date purchased on:
Bill No.:
Machine Sr. No.:
Purchased from:



Environment friendly suggestions
Disposal of Packaging Material
After installing the washing machine, recycle/ reuse the corrugated box.
Energy Conservation Tips for Washing Machine Use
You can help save limited natural resources like oil and coal by saving electricity.
Simply follow these guidelines.
I. Use the correct quantity of water depending on the quantity of clothes to be washed.
2. Use less foam making detergent for washing and use the correct quantity of detergent.
3. Use the correct cycle. This helps in saving electricity.
4. At the end of the cycle, please switch off the machine from the mains. If you are using Auto Start function in DAC mode do not switch off the power supply and the water tap.



natural_image
Abstract grayscale pattern with swirling circular motifs and floral-like shapes (no text or symbols)Service Centres
| Branch | Address | Telephone No. |
| Ahmedabad | 4th Floor,APM Shopping MallNear IOCL Petrol Pump, Shyamal-Karnavati100 Ft. Road, Satellite, Ahmedabad 380 015. | CallCentre : 6000 2030* /1-860-3000 2030Toll-free : 1-800-225511 |
| Bangalore | 3rd Floor,The Karnataka Film Chamber of Commerce Bldg.28, 1st Main, Cresent Road, High GroundsNr. Shivanand Circle, Bangalore 560 001. | |
| Bhopal | 217, Zone I, M.P. Nagar, Beh. Jyoti Talkies, Bhopal 462 011. | |
| Bhubaneshwar | Highway ComplexNH-5, Rudrapur, Bhubaneshwar 752 101. | |
| Chandigarh / Mohali | Piot No.A-40, Phase-VIII-A, Industrial Area, Mohali-160059 (Punjab.) | |
| Chennai | No.I, Sidco Industrial Estate.Ambattur,Chennai - 600 098 | |
| Coimbatore | 1st Floor, Gowtham ArcadeT.V.Samy Road EastR.S. Puram, Coimbatore 641 002. | |
| Delhi | Godrej Bhavan, 2nd Floor, Shershah Suri Marg,Okhla, New Delhi - 110 065. | |
| Faridabad | Godrej Bhavan, 2nd Floor, Shershah Suri Marg,Okhla, New Delhi - 110 065. | |
| Ghaziabad | Godrej Bhavan, 2nd Floor, Shershah Suri Marg,Okhla, New Delhi - 110 065. | |
| Goa Service Centre | Shed A-1, Corlim Industrial EstateOpp:Telephone ExchangeCorlim, Goa 403 110 | |
| Guwahati | Godrej Building, G.S.Road, Ulubarii, Flyover, Guwahati - 781 007. | |
| Hyderabad | 201 & 202, Lala-1 Land Mark, 5-4-94 to 97, 2nd Floor,Above Digital Shoppy, Ranigunj, M.G. Road, Secunderabad 500 003 | |
| Jaipur | 502-506, 5th Floor, Gaurav Towers,Maliya Nagar, Jaipur 302 017. | |
| Kochi | Near Info ParkEdachira, Thengode P.O.Kakkanad, Kochi 682 030. | |
| Kolkata | Block GN, Sector V, Salt lake,Kolkata - 700 091. | |
| Lucknow | C 3/3 & C3/4, Sanjay ComplexBehind Akashwani Bhawan, Vidhan Sabha MargLucknow. | |
| Mumbai | Appliance Divn., Plant 4, Pirojshanagar,Vikhroli, Mumbai - 400079. | |
| Patna | Jeevan Deep Bldg.Exhibition RoadPatna 800 001. | |
| Pune | Saraswāti Sadan, 229/230, M.G. Road,Pune 411 001. | |
| Ranchi | C/o. Surya MotorsPandra, Ranchi (Jharkhand). |
Website : www.godrejsmartcare.com & www.godrejappliances.com E-mail : smartcare@godrej.com Please note - Toll Free number could be accessed only from MTNL / BSNL Landlines. *Please prefix your city STD code.
| 0 | 5 | 25 | 75 | 95 | 100 |

Godrej
Godrej & Boyce Mfg. Co. Ltd. - Appliance Division,
Plant 11, Pirojshanagar, Vikhroli (W), Mumbai 400 079.


| 0 | 5 | 25 | 75 | 95 | 100 |
- Congratulations!
- Contents
- Know Your Washing Machine
- Dynamic Aqua-Power Control (DAC) Technology
- Fuzzy Logic Controls
- Save Settings
- Delay Start
- Overflow Rinse
- Soft Dry
- Spin Free
- Child Lock
- Bleach Inlet
- Imbalance Load Corrector
- Rat Mesh
- How To Install
- Choosing the right location
- This can
- Step-by-step installation
- Ensuring proper earthing
- Installing the drainage hose
- Collapsible drainage hose extension.
- Moving the drainage hose
- Attaching the water feed hose to the tap
- Caution:
- Description: Control Panel (Normal Operations)
- Operation Of The Functions
- Special Button
- Temp. Button- * (Optional)
- Water Level Button
- Soak Button
- Wash Button
- Rinse Button
- Spin Button
- Spin free Button
- Select Button
- Delay Start Button
- DAC Button
- Start/ Pause Button
- Save Settings Button
- Child Lock
- Memory Backup
- Description: DAC Operations
- POWER SWITCH
- SPIN FREE CYCLE
- Preparing for Auto operation:
- How To Select Water Level And Load Size
- Select the correct water level
- How To Measure Wash Load
- How To Operate
- When washing using the FUZZY cycle
- Preparation
- Put detergent and laundry in the basket.
- Turn the power on
- Start the cycle
- Cycle end
- When washing woolens
- How to wash
- Washing Tips
- For hard-to-clean shirt collars and sleeves:
- How To Use Bleach
- When using bleach
- Safety Instructions
- How To Maintain
- Water inlet
- Washing machine body
- The lint collector
- When Do You Call The Service Person...
- When your washing machine does not operate:
- Check
- When your washing machine leaks:
- When your washing machine makes an unusual noise:
- When your washing machine does not drain:
- When your washing machine goes into hibernation (sleep): only DAC LED blinks:
- When the washing cycle takes longer than usual:
- Don't Worry When...
- Trouble Shooting
- - E2 error display
- - E3 error display
- • E4 error display
- Key Checklist
- Environment friendly suggestions
- Disposal of Packaging Material
- Energy Conservation Tips for Washing Machine Use
- Godrej
Brand : Godrej
Model : GWF 650 FDHP
Category : Washing machine