WSEDGE PRO 85 5.0 PB3 M - Washing machine Godrej - Free user manual and instructions
Find the device manual for free WSEDGE PRO 85 5.0 PB3 M Godrej in PDF.

User questions about WSEDGE PRO 85 5.0 PB3 M Godrej
0 question about this device. Answer the ones you know or ask your own.
Ask a new question about this device
Download the instructions for your Washing machine in PDF format for free! Find your manual WSEDGE PRO 85 5.0 PB3 M - Godrej and take your electronic device back in hand. On this page are published all the documents necessary for the use of your device. WSEDGE PRO 85 5.0 PB3 M by Godrej.
USER MANUAL WSEDGE PRO 85 5.0 PB3 M Godrej
HOW TO GET THE BEST OUT OF YOUR GODREJ WASHING MACHINE...
natural_image
Line drawing of a washing machine with control panel and side compartments (no text or symbols)Congratulations!
You are now the proud owner of a new Godrej Washing Machine. You can look forward to years of smooth, trouble-free washing from your machine, as well as considerable savings in time, money and effort. Please read this manual carefully as it will tell you how to operate your machine optimally in order to get the best results. If you need any further clarifications, do contact your nearest Godrej dealer or any of our service centres/offices. We would be glad to help you. We wish you an easier, more convenient life with your new Godrej Washing Machine.
CONTENTS
- Description of parts & specification .... 1
- Know your control panel....3
- Safety instructions....4
3.1 Safety instruction 4
3.2 Recommendation 4
3.3 Environment & energy conservation suggestion.....4 - Features....5
4.1 Active soak 6 - How to install....7
5.1 Choosing the right location....7
5.2 Step-by-step installation....7
5.3 Ensuring Proper Earthing 8 - How to wash 9
6.1 Precaution before washing 9
6.2 Washing....9 - How to do intermediate spin....11
7.1 How to use the spin shower ..... 11 - How to rinse 12
8.1 Overflow rinse 12
8.2 Rinsing with fixed amount of water ..... 12 - How to spin....13
9.1 Ending the process 14
9.2 Caution 14 - How to measure wash load & washing guide....14
10.1 How to select wash cycle settings, wash time and water level. 15 - Caution 16
- How to maintain ..... 17
12.1 How to clean wash tub 17
12.2 Cleaning the lint filter.... 17
12.3 How to clean storage box....17 - Branch addresses/Service connect 18
- Warranty 19
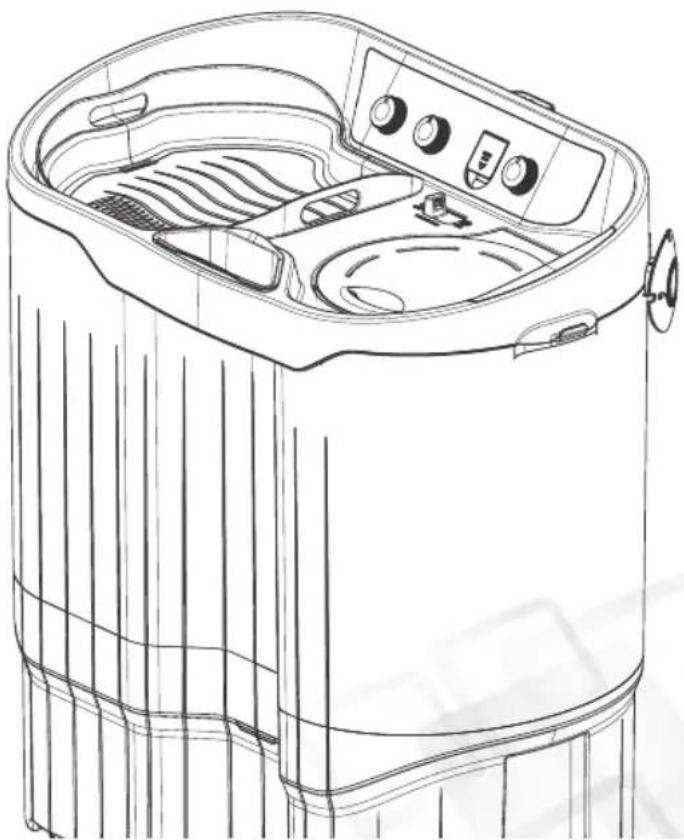
1. DESCRIPTION OF PARTS

text_image
Water Intake Water Selector Drain Lever Control Panel Lint Filter Wash Tray Pulsator Tub Cabinet Base Big Wheel Water Level Indication Cable Winding* Spin Lid Spin Inner Lid Spin Basket Soap Dish* Power Cord Drain HoseCONTROL PANEL
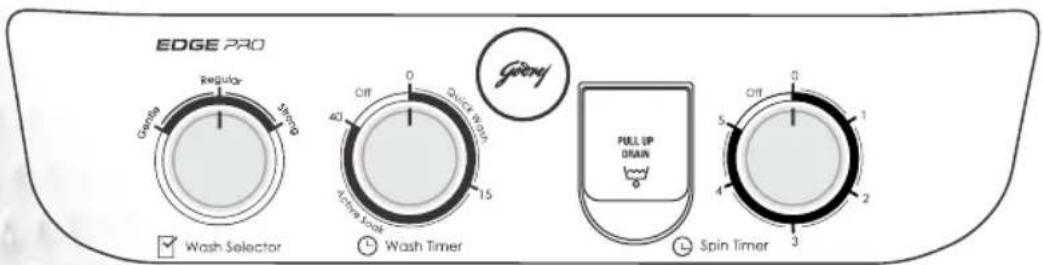
text_image
EDGE PRO Regular Simped Goody Quick Wound 15 Off 0 B Wash Selector Wash Timer FULL UP DRAIN Spin Timer*Features vary by models.
1. SPECIFICATIONS
| Model | WSEDGE PRO 85 5.0 PB3 M |
| Capacity 8.5 Kg | |
| Type Pulsator type | |
| Power source 230 V,AC,50 Hz | |
| Input wattage Wash | 460 W |
| Spin | 200 W |
| Water consumption High 78 Ltr | |
| Low 54 Ltr | |
| Net dimension (WxDxH) mm 910x540x960 | |
| Net weight 27.3 Kg |
In the view of Godrej policy of continuous development & improvement, specification may change without prior notice.
Image shown in the user manual are for illustration purpose only.
2. KNOW YOUR CONTROL PANEL
text_image
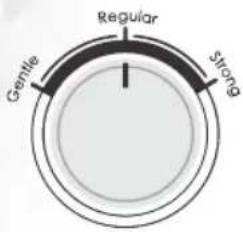
Gentle Regular Strong
Wash Selector
text_image
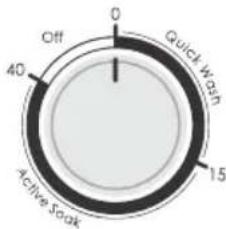
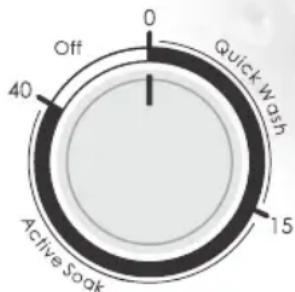
Off 0 Quick Wash 40 Active Sink 15
Wash Timer

text_image
Off 0 1 2 3 4 5
Spin Timer
- WASH SELECTOR: Program selector knob for selection of a suitable wash program out of Gentle, Regular & Strong as per requirement.
- WASH TIMER: Timer knob for setting wash time as per requirement.
- SPIN TIMER: Timer knob for setting spin time as per requirement between 0-5 min.
3. SAFETY INSTRUCTIONS
3.1 Safety instruction
- Ensure that the earthing connection in your electric supply is proper before connecting the power cord.
- Do not use extension cord as they may not be properly earthed.
- Connect the machine to socket having current & voltage rating specified on the power cord plug.
- Remove the power plug from Power socket before moving the machine.
- Only authorised personnel should repair the machine, warranty stands cancelled if if repairs are done by unauthorized personnel.
- Do not put washing machine in wet places or near water leakage.
- Check if drain hose is placed correctly so that water drains out smoothly.
- Kids are forbidden to play with washing machine. Keep pets away from the washing machine.
3.2 Recommendations
- Use a secure tap connection to avoid leakage & wastage of water.
- Do not use wet hands to insert or pull out the power cord.
- Pull out the plug when the machine operation is completed (or) not in use (or) under repair (or) during the cleaning process.
3.3 Environment & energy conservation suggestion
• After installing the machine, recycle/ reuse the corrugated box.
- Fitments and polythene cover/ straps: do not dispose them off as garbage. This helps to conserve natural resource and prevents pollution.
- Use correct quantity of water depending upon the quantity of clothes to be washed.
- Use less foam making detergent for washing and use correct quantity of detergent.
• Use correct wash & water This helps in saving electricity
- At the end of cycle, please switch off the machine from mains.
- Reuse the soapy water if possible.
4. FEATURES
Wash tray with scrubber: Multi-utility wash tray with scrubber helps user to scrub stubborn stains from cuffs, collars, socks & handkerchief. This tray helps you to sort & store cloths prior to washing & to conveniently carry washed cloths to drying area.
Soap dish: This feature helps user to store the washing accessories.
Cable winding*: Convenient & accessible cable winder for power cord winding, post usage to avoid power cord damage.
Big wheel: Big wheels for convenient portability of machine in and around the house.
Wash cycles:
3 Wash Cycle - Choose between Gentle, Regular and Strong wash programmes to suit your different Fabric type.
Water level indicator: Helps the User to set the desired water level to suit the cloth load.
Rinse option: This feature ensures effective removal of detergent with continuous stream of water so that no suds or detergent deposits are left behind on the fabric. Thus the fabric and your skin are remain safe.
Spin shower facility:
This facility in the spin drying tub ensures that all leftover detergent is removed effectively.
Liquid balancing ring on the spin tub: The ring distributes the washed load evenly in the tub to avoid excessive noise & vibrations in machine.
4.1 Active soak
Your Godrej washing machine provides you the flexibility of soaking your bed sheets or heavily soiled clothes in the wash tub itself to facilitate better detergent action. During Active soak, pulsator will rotate for 1 minute followed by a 8 minutes pause. This cycle will continue for the selected soak time.
To set the washing machine into soak mode, kindly follow the following steps:
- Put your wash load into the machine wash tub.
-
Add desired amount of detergent. Fill water to the desired level.
-
Choose the wash times from 15-40 min which has in-built predefined soak times, using the wash timer knob.

text_image
0 Quick Wash 40 Active Soak 15 Wash Timer| When you want to | Set wash timer to | Approx total time (min) | Approx soak time (min) | Approx wash time (min) |
| Soak and wash heavily soiled clothes | Long soak, set by turning knob fully | 40 | 25 | 15 |
| Soak and wash not so heavily soiled clothes | Midway of soak timer | 30 | 15 | 15 |
| Quick soak and full wash | Short position of soak timer | 20 | 5 | 15 |
5. HOW TO INSTALL
5.1 Choosing the right location
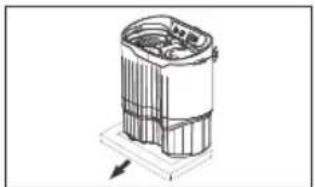
Removal of packaging materials
- Please ensure all packaging/bottom cushion to be removed from the machine before starting machine.
- Caution: Operating the machine with the packaging may cause movement/unbalanced condition and can damage the machine parts.
Install your Godrej washing machine in an even, stable & levelled surface.
An unstable location:
- Can be dangerous since vibrations may cause your machine to move
- Can create noise as your machine may vibrate
Keep a distance of at least 5 cm between the sides, the rear of your machine and the nearest wall. This will reduce noise & vibration while operating the machine as well as ensure proper ventilation.
Do not place your machine in an area with high humidity or direct exposure to sunlight or rain. This can:
• Result in damaged insulation & shock hazard.
- Cause deformation or discolouration of plastic parts.
The washing machine is provided with big wheels which gives you the flexibility to move the machine to a convenient location free from high humidity and direct sunlight.
5.2 Step-by-step installation
- Connect the drain hose to the machine outlet.
• Always lower the drain hose to the floor. Make sure that the drainage hose is not kept too high, else it may not drain the water properly. - Connect the water supply pipe to water inlet securely.
- Plug in the power cord into power supply socket. The machine requires a 230V, 50Hz AC supply.
- Ensure placement of your machine on level ground, if the floor is uneven, place a board underneath and bring it to a level position
- To check if your machine is on level ground, use a weight attached to a string. The distance between the string and your machine should be the same from top to bottom.
natural_image
Technical line drawing of a cylindrical mechanical component with internal ribs and mounting base (no text or symbols)
text_image
Use a stable place!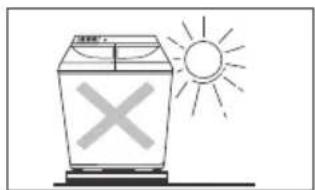
natural_image
Simple line drawing of a sun and a box with an 'X' symbol, no text or labels present.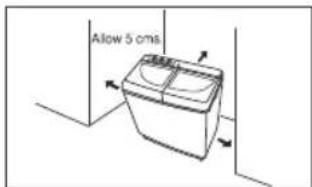
text_image
Allow 5 cms.
natural_image
Line drawing of a microwave oven with a downward arrow indicating cooling (no text or symbols)
natural_image
Diagram showing a pipe fitting and a faucet with an upward arrow (no text or symbols)
text_image
String Check the distance between the string and the machine.5.3 Ensuring Proper Earthing
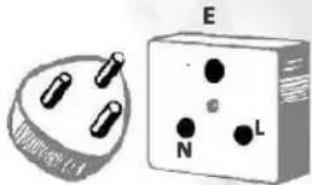
- Your washing machine has a three core power cord to connect the machine to the powerline.
- Make sure that electrical and earthing connections are done properly in the wall socket. Live and Neutral connections in socket should be as per standard.
- Connect the power cord to Indian standard 3 pin power socket. Never plug it into an ungounded power socket.
Grounding Method
- Earth wire must be connected in the wall socket. If the Earth wire is not connected then there is a potential hazard of electric shock caused by the current leakage.
• Note that AC power outlet configurations may differ from country to country. - If the external socket does not have grounding terminal, then a separate grounding is needed.
➢ Other Grounding Methods (any one to be followed)
• Burying copper plate:
- Connect the Ground Wire to a Ground Copper Plate and bury it more than 75cm in the ground. (by a qualified Engineer)
• Using a short-circuit breaker:
- If Grounding methods described above are not possible, a separate circuit breaker should be employed and installed by a qualified Engineer.
Never connect ground to:
- A Gas pipe, Telephone Wire, lightening rod, Neutral, Extension cords without ground terminals, plastic, etc.
Note: All electrical wirings & modifications must be done by a qualified Engineer only.
Above images are for representation purpose only.
text_image
Thermostel E N L
text_image
Ground wire 75cm Ground copper plate Short-circuit breaker6. HOW TO WASH
6.1 Precaution before washing
- Put your delicate clothes and undergarments in a washing net. This will prevent clothes from getting entangled during wash and protect them. The washing nets are easily available in the market.
- Strings of aprons, petticoats, pyjamas etc. should be tied as this will prevent clothes from getting entangled
- Close the fastener/ zippers of trousers and jeans as this will prevent scratching of wash tub
- Remove articles like match sticks, hair pins, coins etc. from pockets before washing
Note: The images are for representation purpose only. Do not match it with your machine.
6.2 Washing
- Ensure drain lever is in closed position and shift water selector to 'Wash' position.
- Maintain the water level depending upon the wash load. (Refer to page 14 on how to estimate wash load and refer to page 15 on how to select the water level.)
- Turn on the water supply and allow water to fill 2-3cm lower than water level selected.
- Add the detergent and mix properly, so that detergent dissolves fully in water.
- Now put the cloth load into wash tub and fill water up to water level selected.
- Select the cycle required for washing depending upon quantity of clothes to be washed, the type of fabric and the dirt levels of the clothes.
- Choose between Gentle, Regular & Strong by turning the wash selector knob.
- Select the wash time required. The time will vary depending on the number of clothes and type of fabric. (Refer to page 15 for guidelines on setting wash time.)
Above images are for representation purpose only.
- Set the wash time by turning the wash timer clockwise. The machine will starts working immediately on turning the knob. A buzzer will indicate the completion of wash cycle.
- After washing has stopped, pull up the drain lever to 'Drain' position to drain out the water from the wash tub

text_image
Gentle Regular Strong Wash Selector Off 40 Quick Wash 15 Active Soak Godrej Wash Timer PULL UP DRAIN7. HOW TO DO INTERMEDIATE SPINNING
After the wash cycle it is suggested that an intermediate spin cycle with the spin shower facility be carried out. This helps in removing the detergent solution from clothes and rinsing becomes more effective.
7.1 How to use the spin shower
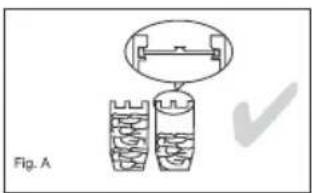
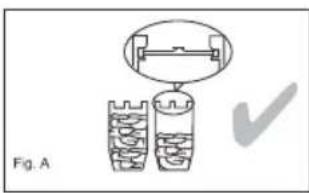
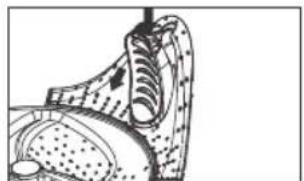
- Remove washed clothes from the wash tub and transfer them uniformly into the spin tub as shown in Fig. A
- The spin cap must be placed horizontally above clothes as shown in Fig A. Even in case of small quantity of clothes, spin cap should be placed above the clothes. This is a safety requirement.
- The clothes and spin cap should not be placed as shown in Fig B, as this could lead to vibrations and cause a rattling sound during spin cycle
- Shift the water selector to 'Spin' and allow water to flow for about 1 min.
- Turn off the water supply, close the spin inner lid and spin lid
text_image
Fig. A
text_image
Fig. B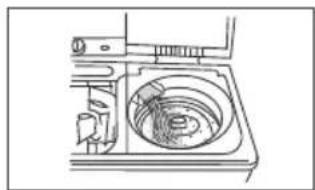
natural_image
Technical line drawing of a mechanical device with internal components (no text or symbols)Note: Spinning will not start till the spin lid closed properly. For safety reasons, this machine is provided with brake mechanism which gets activated as soon as the spin lid is opened. This safeguards against accidental opening of spin lid when the tub is spinning at high speed.
- Set the spin timer by turning the knob clockwise.
- Choose between 0-5 minutes depending upon type and no. of clothes. (For details refer to page 13.)

text_image
Off 0 1 5 4 2 3
Spin Timer
Note: It is recommended not to perform spin operation when tap is open. This will make sure that water reaches all the clothes inside the basket, before spinning begins.
Above images are for representation purpose only.
8. HOW TO RINSE
After the wash & intermediate spin cycle, use the rinse cycle. This helps to remove detergent from the clothes and makes them soap-free. Rinsing can be done in two ways,
8.1 Overflow Rinse
In this mode water is continuously supplied to wash tub during rinsing and the dirty water flows out through the drain hose. In this mode very efficient rinsing can be done since concentration of detergent in water is lowered significantly.
natural_image
Line drawing of a car interior with dashboard and air vent (no text or symbols)- Transfer the wash clothes from spin tub to wash tub after intermediate spin cycle.
- Shift the water selector knob to 'Wash' position
- Ensure drain lever is closed.
- Start the flow of water & set the wash timer to 5-10 minutes and rinse under continuous water flow.
- After rinsing cycle is over, pull up drain lever. This will drain out the water from wash tub.
- Transfer the clothes to spin tub for intermediate spin.
- It is recommended to repeat this process two or three times for best results.
text_image
Off 40 Quick Wash 15 Active SoakL
Wash Timer
Caution
- Adjust the water flow while looking at he water level or water may spill out (Refer Image A).
- Cover the wash tub with wash lid while rinsing using 'Overflow rinse' option as this will prevent water spilling / splashing.

Image A
8.2 Rinsing with fixed amount of water
- Transfer the washes clothes from the spin tub to the wash tub after intermediate spin cycle.
- Shift the water selector knob to 'Wash' position.
- Ensure drain lever is closed.
- Maintain the water level to 'High' (Refer Image A).
- Set the wash time to 5-10 minutes for rinsing.
- After rinsing cycle is over, pull up drain lever. This will drain out the water from wash tub.
- Transfer the clothes to spin tub for intermediate spin.
- It is recommended to repeat this process two or three times for best results.

natural_image
Line drawing of a washing machine with internal tubing and a handle (no text or symbols)9. HOW TO SPIN
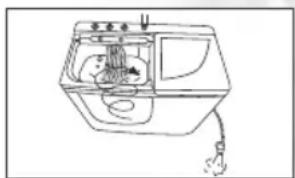
- Remove washed clothes from wash tub and transfer clothes uniformly into spin tub as shown in Fig A
- The spin cap must be placed horizontally above clothes as shown in Fig A. Even in case of small quantity of clothes spin cap must be placed above clothes. This is a safety requirement.
- The clothes and the spin cap should not be placed as shown in Fig B, as this could lead to vibrations and cause a rattling sound during spin cycle
- Close the spin inner lid and spin lid
text_image
Fig. A
text_image
Fig. BNote: Spinning will not start till the spin lid closed properly. For safety reasons, this machine is provided with brake mechanism which gets activated as soon as the spin lid is opened. This safeguards against accidental opening of spin lid when the tub is spinning at high speed.
- Set the spin time by turning the spin timer clockwise
- Choose between 0-5 minutes for spinning

text_image
Off 0 1 5 4 2 3 Spin TimerAbove images are for representation purpose only.
9. HOW TO SPIN
| SPINTIMESELECTIONGUIDET | Type OfFabric | Synthetic Clothes | Woollens | Shirts/Trousers | Bedsheets/Towels |
| SpinTime | 1 Minute 1-2 | Minute 2-3 | Minute 5 Minute |
Refer below table on guidelines for setting spin time
9.1 Ending the process
- Switch off main power supply and unplug the power cord
- Drain the water completely from drain pipe. Then hang the drain hose on the hook provided on the back side of the machine
- Close the drain lever
9.2 Caution
- If bleaching powder or starch is used for washing, rinse the wash tub and spin tub with water, and drain. This is required to remove any leftover bleach/ starch which may otherwise damage the Wash/ Spin tub.
- Close the water tap first then remove the water supply joint near tap first and then remove the water supply hose as this prevents water from spilling on to the controls of machine
10. HOW TO MEASURE WASH LOAD AND WASHING GUIDE
• Here are some of the average weights of commonly used clothes, to help you estimate the weight of the load to be washed
Approximate dry weight of clothes (grams)
| Item of clothing | Weight | Item of clothing | Weight |
| Double bed sheets | 1000 | Single bed sheets | 500 |
| Bath towels | 500 | Table cloth | 650 |
| Trousers | 400 | Jeans | 600 |
| Shirt | 300 | Baggies | 500 |
| Sari | 500 | Petticoat | 400 |
| Pyjamas | 400 | Dhoti | 200 |
| Skirt | 250 | Nightgown | 250 |
| Lungi | 225 | Banian | 50 |
| Blouse | 100 | Undergarment | 50 |
10.1 How to select wash cycle settings, wash time and water level.
| Washing Weight | Water level | Program | Fabric Material | Wash Time |
| Less than 2.6 Kg | Low | Gentle | Synthetic, Woollen | 5 min |
| Regular | Cotton hand spun | 5 min | ||
| 2.6-5.5 Kg | Medium | Regular | Soiled cotton, Hand spun, School uniforms | 10 min |
| Synthetic clothes | 10 min | |||
| 5.5-Max. | High | Strong | Cotton, Linen | 7-10 min |
| Soiled cotton, Bed Sheets, Pillow covers, Towels, School Uniforms | 10-15 min |
*For Energy saving course refer below instructions in Wash/Rinse/Spin function.
- Select "Gentle" wash program and fill water up to mark "High" in wash tub.
• Refer following function & time selection:

flowchart
graph LR
    A["Wash (15 min)<br>(Rated capacity load)"] --> B["Spin (5 min)<br>(Half capacity load)"]
    B --> C["Spin (5 min)<br>(Remaining Half capacity load)"]
    C --> D["Rinse (5 min)<br>(Rated capacity load) (in Wash Tub)"]
    D --> E["Spin (5 min)<br>(Half capacity load)"]
    E --> F["Spin (5 min)<br>(Remaining Half capacity load)"]
*Under test conditions, when tested in accordance with standard IEC 60456:2010 and BEE schedule-12 (Revision:03)
Actual performance of machine will depend on how the appliances is being used.
11. CAUTION
| The washing machine should be plugged into separate power socket. Do not take power supply for other appliance from the same source. |  | Avoid installation of the machine in the area exposed to high humidity, snow, rain or direct sunlight. It may cause electric shock, discolour deformation in the product. |  |
| Do not spill water on control panel, this may lead to electric shock. Do not rub the control panel with chemicals like benzene, thinner etc. This may deform parts or the colour may fade. |  | Never put organic chemicals like benzene, alcohol or thinner or even clothes stained with such chemicals in the washing machine as this may lead to fire hazard or damage to the machine. |  |
| It is necessary to use spin cap for the spinning operation. The cap holds the clothes in its place during spinning and prevents them from flying off. | 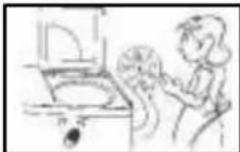 | Never put your hands in spin tub while it is rotating. |  |
| If the spin lid is open and rotations do not stop within 15 seconds, it indicates that self-acting brakes are malfunctioning. Call up the Godrej Service helpline number and get the machine repaired immediately by authorised service personnel. | Do not pour hot water of temperatures above 50 degrees into wash or spin tub as this may result in deformation & damage to plastic parts. |  | |
| Switch off the power supply immediately if the supply voltage drops abnormally. Low Voltage power supply may result in overheating of electric parts of the machine | Do not keep lit matches, cigarettes or candles near or on the machine as plastic parts in your machine may deform or catch fire. | ||
Above images are for representation purpose only.
12. HOW TO MAINTAIN
Before you start your washing machine, take the electrical plug out of the main power supply socket.
12.1 How to clean the wash tub
- If the wash tub becomes dirty, clean it with a mild soap and soft brush. Do not use a scrubber or hard brush as this could scratch the wash tub.
12.2 Cleaning of the lint filter
Clean the lint filter after every wash. Follow these steps:
- To remove the lint filter press the lock & pull it outside simultaneously
- Open the lint filter back as shown
- Clean the filter in running water
- When the lint filter has been emptied and cleaned, close the lint filter back. To assemble it in machine first locate bottom part of lint filter and then push it in the arrow direction as shown.
- A click sound of the catch will confirm lint filter is locked in the tub.
natural_image
Anatomical illustration of a human foot and foot with shaded areas indicating different body regions (no text or labels present)
text_image
LINT FILTER FRONT LINT FILTER BACK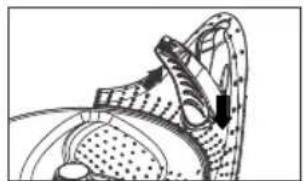
natural_image
Illustration of a mechanical device with textured surfaces and directional arrows (no text or symbols)Above images are for representation purpose only.
13. BRANCH ADDRESSES / SERVICE CONNECT
| Branch | Branch Addresses | Service Connect |
| Ahmedabad | 4th Floor, APM Shopping MallNear IOCL Petrol Pump, Shyamal-Karnavati,100 Ft. Road, Satellite, Ahmedabad 380 015. | Call1800-209-5511(Toll-Free) |
| Bangalore | 3rd Floor, The Karnataka Film Chamber of Commerce Building,28, 1st Main, Crescent Road, High GroundsNear Shivanand Circle, Bangalore 560 001. | |
| Bhopal | 217, Zone I, M.P. Nagar, Behind Jyoti Talkies, Bhopal 462 011. | |
| Bhubaneshwar | Highway Complex, NH-5, Rudrapur, Bhubaneshwar 752 101. | |
| Chandigarh / Mohali | Plot No. A-40, Phase-VIII-A, Industrial Area, Mohali 160 059 (Punjab). | |
| Chennai | No.1, Sidco Industrial Estate, Ambattur, Chennai 600 098. | |
| Coimbatore | 1st Floor, Gowtham Arcade, T.V. Samy Road East,R.S. Puram, Coimbatore 641 002. | |
| Delhi | Godrej Bhavan, 2nd Floor, Shershah Suri Marg, Okhla, New Delhi 110 065. | |
| Faridabad | Godrej Bhavan, 2nd Floor, Shershah Suri Marg, Okhla, New Delhi 110 065. | |
| Ghaziabad | Godrej Bhavan, 2nd Floor, Shershah Suri Marg, Okhla, New Delhi 110 065. | |
| Goa Service Centre | Shed A-1, Corlim Industrial Estate, Opp. Telephone Exchange,Corlim, Goa 403 110. | |
| Guwahati | Godrej Building, G.S.Road, Ulubarii, Flyover, Guwahati 781 007. | |
| Hyderabad | 201 & 202, Lala-1 Land Mark, 5-4-94 to 97, 2nd Floor,Above Digital Shoppy, Ranigunj, M.G. Road, Secunderabad 500 003. | |
| Jaipur | 502-506, 5th Floor, Gaurav Towers, Malviya Nagar, Jaipur 302 017. | |
| Kochi | Near Info Park, Edachira, Thengode P.O., Kakkanad, Kochi 682 030. | |
| Kolkata | Block GN, Sector V, Salt Lake, Kolkata 700 091. | |
| Lucknow | C 3/3 & C3/4, Sanjay Complex, Behind Akashwani Bhawan,Vidhan Sabha Marg, Lucknow. | |
| Mumbai | Appliance Division, Plant 4, Pirojshanagar, Vikhroli, Mumbai 400 079. | |
| Patna | Jeevan Deep Building, Exhibition Road, Patna 800 001. | |
| Pune | Apolo Square Building, Plot No. 60, Sr. No. 599,Sahane Sujan Park,Lullanagar- Bibwewadi Road, Lullanagar, Pune - 411 040 | |
| Ranchi | C/o. Surya Motors, Panda, Ranchi (Jharkhand). |
Website: www.godrejsmartcare.com & www.godrejappliances.com
E-mail: smartcare@godrej.com SMS:
14. WARRANTY
The GODREJ WASHING MACHINE comes with 5 Years warranty on wash motor & 2 Years warranty on the appliance from the date of purchase, against defective material or workmanship. In case of any such defect, Godrej & Boyce Mfg. Co. Ltd. - Appliance Division undertakes to get the appliance repaired free of charge during warranty period, subject to terms and conditions below.
INSTRUCTIONS FOR THE CUSTOMER
- Kindly ensure that the dealer fills the warranty card correctly and completely.
- You should retain the warranty card for record and produce the same in the event of any warranty repairs.
- In the event of a defect developing in the product, contact the nearest authorised Godrej & Boyce Service Centre for obtaining warranty service and provide the defect, Model details & Serial No.
- Product will function between +/- 5% of rated volts. For any fluctuation beyond specified limit, company shall not be responsible. In turn, warranty stands terminated.
- Earthing provision is necessary for the safety.
- Frequency must be between 5% variation of 50Hz. Beyond this, company shall not be liable for any unforeseen hazards like fire, shock etc. & in turn, warranty stands terminated.
- Appliance or any part thereof is subjected to neglect, abuse or misuse, tampering, alteration, accident, fire, floods or other act of God, or damage by rodents or insects, the COMPANY is not responsible for any damage caused to the appliances & shall not be liable for any consequential loss or compensation, not refund of purchase price or replacement of the appliances.
- In event of repair/replacement of any part/s of the unit, this warranty will thereafter continue and remain in force only for the unexpired period of warranty. Moreover, the time taken for repair/ replacement and in transit whether under the warranty or otherwise shall not be excluded from the warranty period.
- Any damage/defect arising due to entry of coin/foreign particle into the machine, and causes malfunctioning is not covered under warranty. These calls will be chargeable to customer during warranty period.
- House wiring related issues are not covered under warranty and such calls will be chargeable to customer.
- Calls related to lint filter or water inlet filter cleaning are not covered under warranty and are chargeable to customer.
TERMS AND CONDITIONS
- Repairs and replacement of parts will be carried out through the Authorised Customer Service Centre.
- All transportation and handling expenses incurred while repairing will be payable by the customer.
- For appliances installed beyond the municipal limits of the jurisdiction of the authorised service centre, charges towards technician's visit and other incidentals will be borne by the customer.
- While the company will make every effort to carry out the repairs at the earliest, it however is made expressly clear that the company is under no obligation to do so in a specified period of time.
- The company/its authorised service centre will collect any parts, components replaced.
- Warranty does not cover accessories to the appliance.
- The company's obligation under this warranty shall be limited to repair or providing replacement of part/s only. The maximum claims/s if entertained by the company will be subject to the maximum retail price of the product purchase price, whichever is lower.
- In the event of any unforeseen circumstances, and spares not being available, the company's prevailing depreciation rules will be binding on the purchaser to accept as a commercial solution in lieu of repairs.
- Warranty is not applicable incase the original number (serial no. sticker) is removed, obliterated or altered from the machine or cabinet.
Godrej & Boyce Mfg. Co. Ltd.- Appliance Division
CUSTOMER COPY
MODEL NO.
UNIT SR. NO.
CUSTOMER'S NAME & ADDRESS
TEL.
DATE OF PURCHASE
DEALER'S NAME & ADDRESS
TEL.
Customer's Signature:
This warranty is valid only if it is filled in and stamped by our authorised dealer stating the date of purchase. Warranty Voids If: 1. The warranty card is not completed properly at the time of purchase. 2. The completed warranty card is not presented to the authorised personnel at the time of service of the product. 3. The appliance is not operated according to instructions given in the 'User Guide'. 4. Defects are caused by improper use, which shall be determined by the company's authorised personnel. 5. Unauthorised persons carry out any repair work. 6. Defects are caused by reasons beyond control, like abnormal voltage, acts of God or while in transit to service centre or purchaser's residence. 7. The warranty is not valid in case the serial number is deleted, defaced or altered. 8. Damage to the appliance or any parts due to transportation or shifting is not covered by the warranty. 9. The warranty automatically expires after 2 years from the original date of purchase, even if the appliance may not have been in use for any time for whatever reasons during the warranty period.
NOTES
Protection of Environment:
Protection of environment" is one of the core values of Godrej and we seek your co-operation to make sure that the product, packaging and plastic material is not disposed as unsorted municipal waste.

This symbol is known as the "Crossed-out Wheelie Bin Symbol". It means that the product should not be disposed of with your general house-hold waste.
It should be disposed of only through the company's collection points with special treatment so as to prevent any damage to the environment. Please call: 1800 209 5511 for applicable buy back arrangement or visit: www.godrejappliances.com/green-think for details about Godrej Appliances authorised collection points.

APPLIANCES
Godrej & Boyce Mfg. Co. Ltd. - Appliance Division, Plant 11, Pirojshanagar, Vikhroli (W), Mumbai 400 079.