
GWS 700PS - Washing machine Godrej - Free user manual and instructions
Find the device manual for free GWS 700PS Godrej in PDF.


| Product Type | Top-Loading Washing Machine |
| Brand | Godrej |
| Model | GWS 700PS |
| Capacity | 7 kg |
| Dimensions (H x W x D) | 900 x 600 x 600 mm |
| Weight | 30 kg |
| Power Supply | 220-240 V, 50 Hz |
| Power Consumption | 500 W (wash), 400 W (spin) |
| Water Supply | Cold water only |
| Wash Programs | Normal, Delicate, Heavy, Quick, Soak, Rinse & Spin |
| Spin Speed | 700 rpm (max) |
| Noise Level | 60 dB (wash), 72 dB (spin) |
| Energy Efficiency | Class B (estimated) |
| Water Consumption | ~100 L per cycle |
| Safety Features | Child lock, unbalanced load detection, overflow protection |
| Maintenance | Clean lint filter regularly; drain pump filter monthly |
| Spare Parts Availability | Yes, through authorized service centers |
| Color | White |
| Warranty | 2 years (typical) |
Frequently Asked Questions - GWS 700PS Godrej
User questions about GWS 700PS Godrej
0 question about this device. Answer the ones you know or ask your own.
Ask a new question about this device
Download the instructions for your Washing machine in PDF format for free! Find your manual GWS 700PS - Godrej and take your electronic device back in hand. On this page are published all the documents necessary for the use of your device. GWS 700PS by Godrej.
USER MANUAL GWS 700PS Godrej
How to get the best out of your Godrej Compact 7 Washing Machine...
Godrej
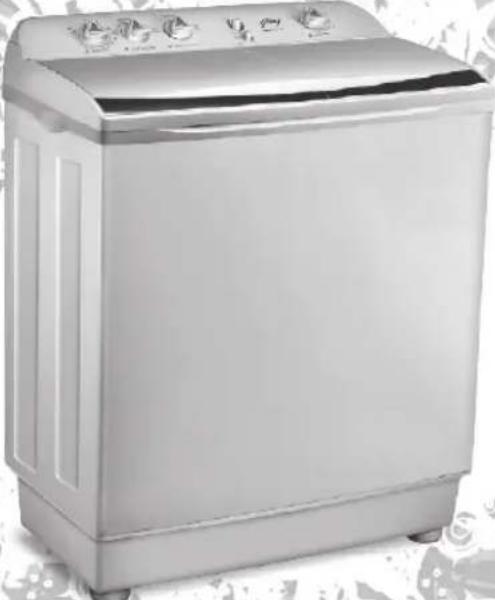
Contents
I. Description of parts & specifications
2. Features
3. How to install
4. How to wash
5. How to do intermediate spinning
6. How to rinse
7. How to spin
8. How to measure wash load & washing guide
9. Caution
10. How to maintain
User Manual
GWS 700PS 7 kg.
Semi automatic washing machine

I. Description of Parts & Specifications
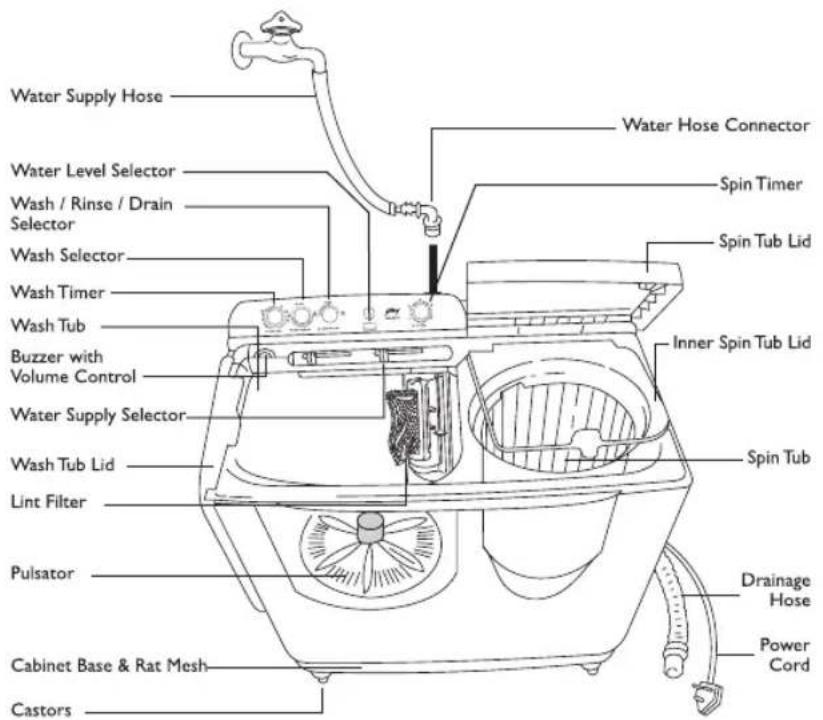
Specifications
| Model | GWS 700PS | |
| Capacity | 7 kg | |
| Type | Pulsator | |
| Input Wattage | Wash | 380 W Max |
| Spin | 180 W Max | |
| Revolution | Wash | 210 rpm |
| Spin | 1250 rpm | |
| Motor Type | Capacitor Type | |
| Water Consumption | High | 64 litres |
| Low | 46 litres | |
| Overall Dimensions | 761 mm (w) x 447mm (d) x 935mm (h) | |
| Net Weight | 24.8 Kgs | |
In view of Godrej Policy of continuous development, specifications may change without notice.
2. Features
3 Wash Cycles Choose between Gentle, Normal and Strong wash depending upon the kind of fabric you put in.
Water Level
Selector
Helps the machine select the level of water that suits the load of clothes being washed, ensuring a more effective wash and preventing wastage of water.
3 Rinse Options This feature ensures effective removal of detergent with a continuous stream of water so that no suds or detergent deposits are left behind on the fabric. Thus the fabric and your skin are safe.
Spin Shower facility This facility in the Spin Drying tub ensures that all leftover detergent is removed effectively.
Liquid Balancing Ring On Spin Tub This ring distributes the wash load evenly in the tub so that the machine does not shake during the rotation of the spin tub.
Separate Wash, Spin Timers This feature gives you the convenience of washing and spin drying clothes simultaneously.
Active Soak
Your Godrej Washing Machine provides you the flexibility of soaking your bedsheets or heavily soiled clothes in the Wash tub itself to facilitate better detergent action.
To set the washing into soak mode, kindly follow the following steps: Put your Wash Load into the machine wash tub. Add desired amount of detergent. Fill Water to the set level. Select one of the three cycle cycles using the Wash Selector.

| When you want to | Set wash timer knob to | Approximate Total time(min.) | Approximate Soak time(min.) | Approximate Wash time(min.) |
| Soak and wash heavily soiled clothes | Long soak, set by turning knob fully | 40 | 25 | 15 |
| Soak and wash not so heavily spoiled clothes | Midway of soak timer | 30 | 15 | 15 |
| Quick soak and full wash | Short position of soak timer | 20 | 5 | 15 |
3. How to Install
Choosing the right location
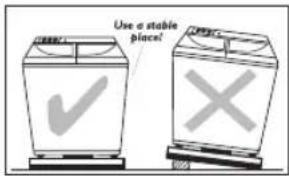
Install your Godrej Washing Machine in an even, stable place. An unstable location:
• can be dangerous since vibrations may cause your machine to move.
• can create noise as your machine may vibrate.
Keep a distance of at least 5 cm between the sides and rear of your machine and the nearest wall. This will reduce noise while operating the machine.
Do not place your machine in an area with high humidity or direct exposure to sunlight or rain. This can:
• result in damaged insulation.
- cause deformation or discoloration of plastic parts.
The washing machine is provided with castors which gives you the flexibility to move the machine to a convenient location. After washing keep your washing machine at a location free from high humidity and direct sunlight.
Step-by-step installation
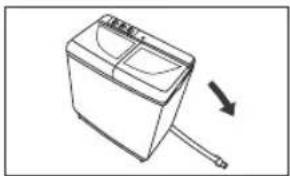
- Lower the drainage hose to the floor. Make sure that the drainage hose is not kept too high, else it may not drain properly.
- Connect the water supply pipe to the water inlet. Insert the hose connector onto the water inlet till you hear a click.
- Plug in the power cord into the power supply socket. The machine requires a 220 V, 50 Hz 5 AC electrical supply.
- Place your machine on a level ground, if the floor is uneven, place a board underneath and bring it to a level position.
- To check if your machine is on a level ground, use a weight attached to a string. The distance between the string and your machine should be the same from top to bottom.




4. How to Wash
Precaution before washing
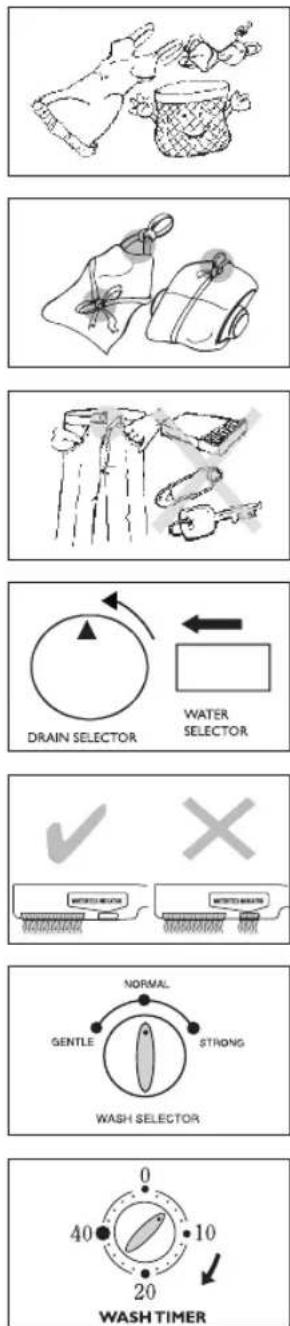
- Put your delicate clothes and undergarments in a washing net. This will prevent clothes from getting entangled during wash and protect your clothes. The washing nets are available in the market.
- Strings of aprons, petticoats, pyjamas etc. should be tied as this will prevent clothes from getting entangled.
- Close fasteners/zippers of trousers and jeans as this will prevent scratching of the wash tub.
- Remove articles like match sticks, hair pins etc. from pockets before washing.
Washing
- Shift the selector knob to 'Wash/Rinse' position and the water supply knob to 'Wash Tub' position.
- Adjust the water level selector depending on the wash load. (Refer to page 8 on how to estimate the wash load and select water level.)
- Turn on the water supply and allow water to fill 2-3 cms lower than the water level selected. Add the detergent and mix properly, so that the detergent dissolves fully in water.
Note: If water flows out of the water feed indicator outlet, located in the Wash Tub it indicates that water is flowing at a high speed which could cause water to spill over into the Spin Tub. Reduce the water flow till water stops flowing out of the water feed indicator outlet as shown in the illustration.
- Now put the wash load into the Wash Tub and fill water upto the water level selected.
- Select the cycle required for washing depending on the quantity of clothes to be washed, the type of fabric and the dirt levels of the clothes. Refer to page 8 for guidelines on selecting Wash Cycle.
Choose between Gentle, Normal & Strong by turning the wash selector knob.
- Select the wash time required. The time will vary depending on the number of clothes and type of fabric. (Refer to page 8 for guidelines on setting wash time.)
- Set the wash time by turning the Wash Timer clockwise. The machine starts working immediately on turning the knob.
• A buzzer will indicate the completion of the wash cycle. - After washing has stopped, shift the Selector knob to 'Drain' position to drain out the water from the Wash Tub.
5. How to do Intermediate Spinning
After the wash cycle, it is suggested that an Intermediate spin cycle with the Spin Shower facility be carried out. This helps remove the detergent solution from clothes and rinsing becomes more effective.
How to use the Spin Shower
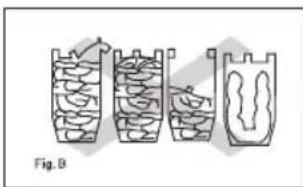
- Remove washed clothes from the Wash Tub and transfer them uniformly into the Spin Tub as shown in Fig A.
- The Spin Cap needs to be placed horizontally above the clothes as shown in Fig A. Even in case of a small lot of clothes, the Spin Cap should be placed above the clothes. This is a safety requirement.
The clothes and the Spin Cap should not be placed as shown in Fig B as this could lead to vibrations and cause a rattling sound during the Spin Cycle.
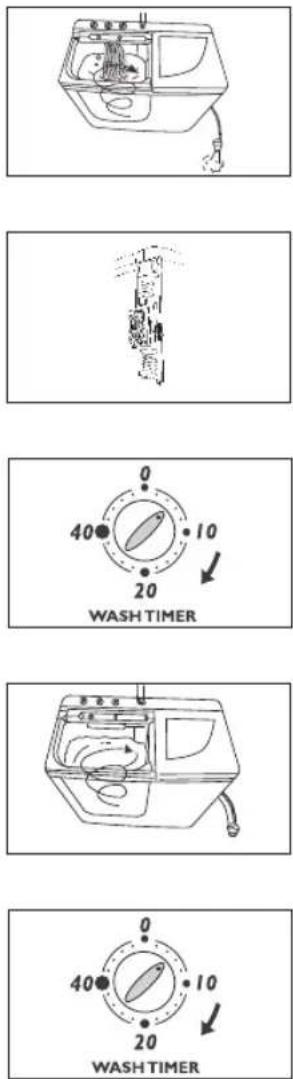
- Shift the Water Supply Selector knob to 'Spin Tub' and allow the water to flow for about 1 minute.
• Turn off the water supply, close the Inner Spin Tub lid and the Spin Tub lid.
Note: Spinning will not start till the Spin Tub lid is shut. For safety reasons, the machine is provided with a brake mechanism which gets activated as the spin tub lid is opened. This safe guards against accidental opening of the Spin Tub lid when the tub is in spinning at a high speed.
- Set the Spin timer by turning the knob clockwise. Choose between 1-5 minutes depending upon type and no. of clothes. For details refer to page 7.



6. How to Rinse
After the wash and Intermediate Spin cycle, use the Rinse cycle. This helps remove detergent from the clothes and makes them soap-free. Rinsing can be done in two ways:
I. Overflow Rinse
In this mode, water is continuously supplied to the Wash Tub during rinsing and the dirty water flows out through the overflow hose. In this mode very efficient rinsing can be done since the concentration of detergent in the water is lowered significantly.
- Transfer the washed clothes from the Spin Tub into the Wash Tub after the intermediate Spin cycle.
- Shift the Water Selector knob to 'Wash/Rinse' position.
- Shift the water supply knob to 'Wash Tub' position.
- Adjust the water level. (For guidelines refer to page 8.)
- Start the flow of water, and set the Wash Timer between 6 - 8 minutes and rinse under continuous water flow.
• For best results repeat the process twice.
Caution
- Adjust the water flow while looking at the water level or water may spill out.
- Cover the Wash Tub with the Wash Tub lid while rinsing using "Overflow Rinse" option as this will prevent water spilling.
2. Rinsing with fixed amount of water
- Transfer the washed clothes from the Spin Tub into the Wash Tub after the Intermediate spin cycle.
- Shift the water selector knob to 'Wash/Rinse' position.
- Adjust the water level to 'High' and fill water upto the level.
• Set the wash timer to 2 - 3 minutes.
• After the rinsing cycle is over, shift the Water Selector knob to 'Drain' position. This will drain out the water from the Wash Tub.
• Transfer the clothes to the Spin Tub for intermediate spinning. - Repeat this process two to three times for best results.
7. How to Spin
- Remove washed clothes from the Wash Tub and transfer clothes uniformly into the Spin Tub as shown in Fig A.
The Spin Cap needs to be placed horizontally above the clothes as shown in Fig A. Even in case of a small lot of clothes, the Spin Cap should be placed above the clothes. This is a safety requirement.
The clothes and the Spin Cap should not be placed as shown in Fig B as this could lead to vibrations and cause a rattling sound during the Spin cycle.
• Shut the Inner Spin Tub lid and the Spin Tub lid.
Note: The Spinning will not start till the Spin Tub lid is shut. For safety reasons, the machine is provided with a brake mechanism which gets activated as the Spin Tub lid is opened. This safe guards against accidental opening of the Spin Tub lid when the tub is spinning at a high speed.
- Set the Spin time by turning the Spin Timer clockwise. Refer to table on guidelines for setting Spin time.
- Once the set spin time is over, the timer returns to its original position and the spinning activity stops.
Ending the process
- Switch off the main power supply and unplug the power cord.
- Drain the water completely from the drain pipe. Then hang the drainage hose on the hook provided on the side of the machine.
- Shift the water selector knob to 'Wash/Rinse' position.
Caution
- If bleaching powder or starch is used for washing, rinse the Wash Tub and Spin Tub with water and drain. This is required to remove any left over bleach/starch which may otherwise damage the Wash/Spin Tub.
- Remove the water supply joint first and then remove the water supply hose as this prevents water from spilling on to the controls of the machine.


| Type of Fabric | Spin Time |
| Synthetic clothes | 1 minute |
| Woolens | 1-2 minutes |
| Shirts/Trousers | 2-3 minutes |
| Bedsheets/Towels | 5 minutes |
8. How to Measure Wash Load and Washing Guide
Here are some of the average weights of commonly used clothes, to help you estimate the weight of the load to be washed.
| Approximate dry weight of clothes | |||
| Item of clothing | Weight | Item of clothing | Weight |
| Double bedsheet | 1000 | Single bedsheet | 500 |
| Bath towel | 500 | Table cloth | 650 |
| Trousers | 400 | Jeans | 600 |
| Shirt | 300 | Baggies | 500 |
| Saree | 500 | Petticoat | 400 |
| Pyjamas | 400 | Dhoti | 200 |
| Skirt | 250 | Nightgown | 250 |
| Lungi | 225 | Banian | 50 |
| Blouse | 100 | Undergarment | 50 |
How to select wash cycle settings, wash time and water level.
| Washing(Weight) | WaterLevel | CycleSetting | FabricMaterial | WashTime |
| Less then 1.6 Kgs | Low | Gentle | Synthetic, Woolen | 5 mins |
| Normal | Cotton Hand Spun | 7 mins | ||
| 1.6 - 3.5 Kgs | Medium | Normal | Spoiled cotton, HandSpun, SchoolUniforms etc. | 10 mins |
| Synthetic Clothes | 10 mins | |||
| 3.5 - 7 Kgs | High | Strong | Cotton, Linen | 7-10 mins |
| Soiled cotton, Bedsheets, Pillow covers,Towels, SchoolUniforms | 10-15 mins |
9. Caution
- Never put organic chemicals like benzene, alcohol or thinner, or even clothes stained with such material in the washing machine as this may lead to fire hazards.
• Never put your hands in the Spin Tub while it is moving. - The washing machine should be plugged into a separate power socket. Do not take power supply for other appliances from the same source.
• Do not get the control panel wet as this may lead to an electric shock. - If the Spin Lid is open and the rotations do not stop completely within 15 seconds, it indicates that the self acting brakes are malfunctioning. Get them repaired immediately by an authorised service personnel.
- Switch off the power supply immediately if the supply voltage drops abnormally. Low voltage power supply may result in overheating of the electrical parts of your machine.
- It is necessary to use the Spin Cap for the spinning operation. The cap holds the clothes in place during spinning and prevents them from flying off.
- Do not rub the control panel with chemicals like benzene, thinner, etc. This may deform the parts or the colour may fade.
- Do not keep lit match sticks, cigarettes or candles near the machine as the plastic parts in your machine may deform or catch fire.
- Do not pour hot water of temperatures above 50°C into the Wash or Spin Tub as this may result in deformation or damage to the plastic parts.

10. How to Maintain
Before you start cleaning your washing machine, take the electrical plug out of the main power supply socket.
How to clean the Wash Tub
- If the Wash Tub becomes dirty, clean it with a mild soap and soft brush. Do not use a scourer or a hard brush as this could scratch the Wash Tub.
How to clean Overflow Outlet
• Hold the top of the overflow strainer and pull it towards you.
- Remove the water hose from the water level adjustment knob.
• Clean the overflow filter from inside, under running water.
• After cleaning, insert the water hose into the water level adjustment knob.
- Insert the lower part of the overflow strainer in the groove of the Wash Tub.
- Push the upper part of the overflow strainer till you hear a click.
How to clean the Lint Filter
- Place your finger on top of the Lint Filter, press it and pull it towards you.
• Turn the filter inside out and clean under flowing water.
• To re-insert the Lint Filter, place the bottom part into the groove of the overflow strainer and push the upper part in place till you hear a click.

Service Centres
| Branch/ Service Centre | Address | Telephone No. |
| Ahmedabad | 1st Floor, M. Chandulal Estate, Near Alfa Hotel, Aslali-Jetalpur N.H. National Highway No.8, Aslali, Ahmedabad - 382 425. | Call Centre: 60002030Toll Free: 1-800-225511 |
| Bangalore | 5th Floor, Chandra Kiran Building, 10A, Kasturba Road, Bangalore - 560 001. | Call Centre: 60002030 / 3989-8916Toll Free: 1-800-225511 |
| Bhopal | 217, Zone I, M.P. Nagar, Behind Jyoti Talkies, Bhopal - 462 011. | 60002030 |
| Bhubaneshwar | 181 - 183, Rasulgarh, Kalaraput,National Highway, Bhubaneshwar - 751 010. | 60002030 |
| Chandigarh / Mohali | Plot No. A-40, Phase-VIII-A, Industrial Area, Mohali -160 059 (Pb.) | 60002030 |
| Chennai | No.1, Sidco Industrial Estate.Ambattur, Chennai - 600 098. | Call Centre: 60002030 / 26521272Toll Free: 1-800-225511 |
| Coimbatore | 1st Floor, Gowtham Arcade, T.V. Samy Road East, R.S. Puram, Coimbatore - 641 002. | 60002030 / 0422 - 2545175 / 2545185 |
| Delhi | Godrej Bhavan, 2nd Floor, Shershah Suri Marg, Okhla, New Delhi - 110 065. | Call Centre: 60002030 / 26935544Toll Free: 1-800-225511 |
| Faridabad | Godrej Bhavan, 2nd Floor, Shershah Suri Marg, Okhla, New Delhi - 110 065. | 60002030Toll Free: 1-800-225511 |
| Ghaziabad | Godrej Bhavan, 2nd Floor, Shershah Suri Marg, Okhla, New Delhi - 110 065. | 60002030Toll Free: 1-800-225511 |
| Goa Service Centre | Shed A-1, Corlim Industrial Estate Opp. Telephone Exchange, Corlim, Goa - 403 110. | 60002030 / 2285670 / 2284787 / 324 / 386 |
| Guwahati | Godrej Building, G.S. Road, Ulubarii, Flyover, Guwahati - 781 007. | 2730530 / 539 |
| Hyderabad | 201 & 202, Lala-1 Land Mark, 5-4-94 to 97, 2nd Floor, Above Digital Shoppy, Ranigunj, M.G. Road, Secunderabad - 500 003. | Call Centre: 60002030 / 27537710Toll Free: 1-800-225511 |
| Jaipur | 502-506, 5th Floor, Gaurav Towers, Malviya Nagar, Jaipur - 302 017. | 60002030 |
| Kochi | Near Info Park, Edachira,Thengode P.O., Kakkanad, Kochi - 682 030. | 60002030 |
| Kolkata | Block GN, Sector V, Salt Lake, Kolkata - 700 091. | Call Centre: 60002030 / 23576066 - 69 / 23576075-76Toll Free: 1-800-225511 |
| Lucknow | C 3/3 & C3/4, Sanjay Complex, Behind Akashwani Bhawan, Vidhan Sabha Marg, Lucknow. | Call Centre: 60002030 / 0512-2584911 / 3949108Toll Free: 1-800-225511 |
| Mumbai | Appliance Divn., Plant 4, Pirojshanagar, Vikhroli, Mumbai - 400 079. | Call Centre: 25302233 / 60002030Toll Free: 1-800-225511 |
| Patna | Jeevan Deep Bldg., Exhibition Road, Patna - 800 001. | 60002030 |
| Pune | Saraswati Sadan, 229/230, M.G. Road, Pune - 411 001. | 60002030Call Centre: 9522-25302233Toll Free: 1-800-225511 |
| Ranchi | C/o. Surya Motors, Pandora, Ranchi (Jharkhand). | 60002030 / 2510738 / 2513230 |
Website: www.godrejsmartcare.com & www.godrejappliances.com E-mail: smartcare@godrej.com Please note: Toll free number can be accessed only from MTNL / BSNL Lines.
- CONTENTS
- FEATURES
- ACTIVE SOAK
- HOW TO INSTALL
- CHOOSING THE RIGHT LOCATION
- STEP-BY-STEP INSTALLATION
- HOW TO WASH
- PRECAUTION BEFORE WASHING
- WASHING
- HOW TO DO INTERMEDIATE SPINNING
- HOW TO USE THE SPIN SHOWER
- HOW TO RINSE
- OVERFLOW RINSE
- CAUTION
- RINSING WITH FIXED AMOUNT OF WATER
- HOW TO SPIN
- ENDING THE PROCESS
- HOW TO MEASURE WASH LOAD AND WASHING GUIDE
- HOW TO MAINTAIN
- HOW TO CLEAN THE WASH TUB
- HOW TO CLEAN OVERFLOW OUTLET
- HOW TO CLEAN THE LINT FILTER
Brand : Godrej
Model : GWS 700PS
Category : Washing machine