
GDC-AC9RW - Air conditioner DIMPLEX - Free user manual and instructions
Find the device manual for free GDC-AC9RW DIMPLEX in PDF.


| Product Type | Portable Air Conditioner |
| Brand | Dimplex |
| Model | GDC-AC9RW |
| Cooling Capacity | 9000 BTU/h (approx. 2.6 kW) |
| Power Supply | 115 V / 60 Hz |
| Current Draw | 7.5 A |
| Dimensions (W x D x H) | 18.5 x 15.4 x 30.3 inches (47 x 39 x 77 cm) |
| Weight | 66 lbs (30 kg) |
| Refrigerant | R410A |
| Noise Level | 52 dB (high speed) |
| Air Flow | 250 CFM (high speed) |
| Modes | Cool, Fan, Dehumidify |
| Fan Speeds | 3 (Low, Medium, High) |
| Thermostat Range | 60°F – 86°F (16°C – 30°C) |
| Timer | 24-hour programmable |
| Remote Control | Included |
| Filter | Washable mesh filter |
| Maintenance | Clean filter every 2 weeks; drain condensate manually or via hose |
| Safety Features | Overheat protection, tip-over switch, auto restart |
| Spare Parts Availability | Filters, remote control, window kit (contact Dimplex support) |
Frequently Asked Questions - GDC-AC9RW DIMPLEX
User questions about GDC-AC9RW DIMPLEX
0 question about this device. Answer the ones you know or ask your own.
Ask a new question about this device
Download the instructions for your Air conditioner in PDF format for free! Find your manual GDC-AC9RW - DIMPLEX and take your electronic device back in hand. On this page are published all the documents necessary for the use of your device. GDC-AC9RW by DIMPLEX.
USER MANUAL GDC-AC9RW DIMPLEX
natural_image
Line drawing of a portable electronic device with wheels and a lid (no text or symbols)PORTABLE AIR CONDITIONER
VERY IMPORTANT!
Do not install and use your portable air conditioner unit before carefully reading this instruction manual. Please retain this manual for product warranty and future reference
CAUTION!
1." DO NOT BLOCK VENTILATION "! Please make sure the inlet and outlet ventilation is not blocked at all times.
-
Operate this unit on a horizontal surface to avoid water leakage.
-
Do not operate this unit in an explosive or corrosive atmosphere.
-
Operate this unit in an ambient of 32 degree centigrade or less when the unit is in the cooling function. Contrarily, when the unit is in the heating function, the ambient temperature is less 23 degree centigrade
-
Clean the air filter periodically to enjoy the most efficient cooling.
-
When the unit is turned off, please wait at least 3 minutes before restarting it. This is to prevent the compressor from being damaged.
-
This unit needs at least 10 Amps of electricity to have its compressor operational. Please do not use any extension cords with this unit.
-
This unit is for indoor operation only.
-
Make sure the adjustable air vent is open, and also the exhaust pipe and drain pipe are removed and extended to the closest window before using.
-
When the supply cord is damaged, it must be replaced by the manufacturer, its service agent or similarly qualified persons in order to avoid hazard.
-
The batteries must be removed from the appliance before it is scrapped and that they are disposed of safely.
-
This appliance is not intended for use by persons (including children) with reduced physical, sensory or mental capabilities, or lack experience and knowledge, unless
appliances online the free citizen supervision or instruction concerning use of the appliance by a person responsible for their safety.
- Children should be supervised to ensure that they do not play with the appliance.
CONGRATULATIONS ON YOUR SELECTION OF A QUALITY PORTABLE AIR CONDITIONER
PORTABLE AIR CONDITIONER
Your Air Conditioner has been designed and manufactured to the highest standards of modern engineering.
One of its many features is a remote control device which allows you to control all functions conveniently.
- Moves easily from room to room on easy glide castors
- No installation required-just plug into any household 10 Amp power outlet
- Refrigerated air system designed to cool instantly whenever you want it
- Heated air system design heats instantly whenever you want it
- Dehumidified filtered air cycle for improved breathing conditions due to the powerful dehumidification process
-If the remote control function is not required, your one touch electronic pad provides easy to identify manual operation
-24 hour programmable timer that can be used with either the air conditioning or dehumidification setting
-Unique sleep control function
-220-240 Volt 50Hz operation
-1.6 meter cord with plug
UNPACKING INSTRUCTIONS
- Place the unit in the correct upright position before unpacking.
- Cut the two packing straps.
- Slide the carton in an upwards motion and it will release from the base.
- Grip the carry handles located on either side of the unit and carefully lift until it slides out of the foam base.
CONTENTS
1 / Air control unit
2 / 1-remote control unit
3/ Window kit

appliances online .com.au
Australia's largest online appliance retailer
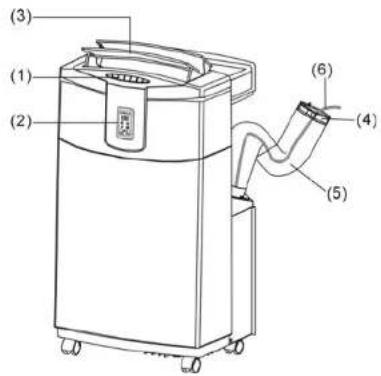
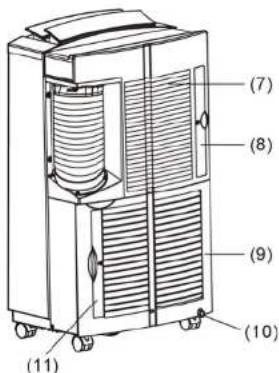
NAMES OF THE PARTS
- Tack switch
- Display screen
- Adjustable air vent
- Joint tube
- Exhaust tube
- Drain hose
- Cool inlet
- Cool Air filter
- Hot inlet
- Drain pipe
- Hot air filter
TACK SWITCH & DESCRIPTION OF FUNCTION
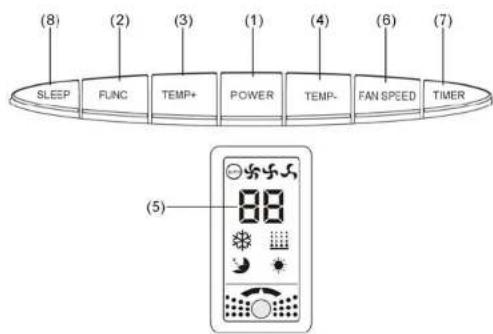
- POWER KEY
Press to turn unit "ON" or "OFF".
- FUNCTION
Press this key to select refrigeration, heat or dehumidification.
( heating function just for model number GDC-AC9RCS/ GDC-AC9RCW/ GDC-AC12RCB/ GDC-AC12RCW)
- TEMPERATURE REGULATION KEY (UP)
This key raises the preset temperature by 1°C each time it is pressed to a maximum of 30°C.
- TEMPERATURE REGULATION KEY (DOWN)
This key lowers the preset temperature by 1°C each time it is pressed to a minimum of 15°C or 17°C (For GDC-AC9RW/GDC-AC12RW/GDC-AC12RB, the minimum is 15°C, for GDC-AC9RCS/GDC-AC9RCW/GDC-AC12RCB/GDC-AC12RCW, the minimum is 17°C)
※ In normal conditions, the temperature data which appears on the panel is the ambient temperature, not the temperature which is set by the user. When the user has adjusted and set the temperature to his requirement, the data on the panel will return to the ambient temperature 5 seconds later.
The ambient temperature will descend or change according to the temperature which is set by the user, but the temperature descendant time and speed will depend on the environment and space where the model is.
For example, if the ambient temperature is too hot or the room is too large, the speed for the temperature descent is absolutely slow, and the cooling efficiency will be poor as well.
- L.E.D. DISPLAY Indicates the temperature or the time setting. After any time set the display will return to the preset temperature automatically.
Error Display
E1: Indicates open circuit or short circuit in room temperature sensor.
E2: Indicates open circuit or short circuit in pipe temperature sensor.
E7: Indicates the water is full inside.
Please contact a authorized service centre if any of the above error messages are shown.
6. SPEED
Press to select either LOW, MEDIUM, HIGH or AUTO fan speed.
If "AUTO" is selected, the unit operates at maximum cooling capacity when the room temperature less the set temperature is above 2°C.
When the room temperature less the set temperature is below
2°C, the unit operates at middle cooling capacity.
When the room temperature equal the set temperature, the unit operates at minimum capacity.
If "HIGH" is selected, the unit operates at maximum cooling capacity no matter what the setting temperature is. The "MEDIUM" OR "LOW" comes to the same.
- PROGRAMMABLE Programmable timer ON/OFF key.
TIMER
TIMER-ON: The timer-on is used to turn on the unit automatically after the set time is over.
(Timer-on key is correspond to the functional indicator light)
- Press the "TIMER" key at stand-by status to set the time. Choose the function desired(refrigeration, heat or dehumidification.)
- Once the set hour has come to an end, the unit will turn on automatically.
- Press the "POWER" key before time out, the setting time will be cancelled and the unit will turn on. TIMER-OFF: The timer-off is used to turn off the unit automatically after the setting time is over.
8. SLEEP CONTROL
FUNCTION
When setting the "sleep comfort" mode please ensure that you then set the number of hours required and press the timer button till those hours are indicated on the L.E.D display. After setting the hours the L.E.D. display will automatically return to the current pre-set temperature. To increase this setting press the "UP" button for each press, the temperature will be increased by 1°C. Likewise to set for a lower temperature, press the button indicating "DOWN", and for each press the temperature will be decreased by 1°C.
During the course of this cycle, to ensure maximum sleep comfort. the micro-processor memory will raise the pre-set temperature 0.5^ C each half hour to a maximum of 2^ C over two hours and then maintain that temperature for the balance of the time set.
The portable air conditioner is fitted with a 3 minutes compressor delay protection circuit which simply means that the compressor requires 3 minutes to start. From either being switched on, or when changing from "dehumidify" to any air conditioning cycle chosen.
9."E7"
When the unit warns of full water, please unplug the water stopper at the back of the unit and then lean the unit to drain the water out. Then the unit can be restarted. If the E7 is presented again, please find a specialized person to repair.
Note: Heating function does not operate if the ambient temperature is over 23°C.

GDC-AC9RCS/GDC-AC9RCW/GDC-AC12RCB/GDC-AC12RCW with heating appliances.com.au function Australia's largest online appliance retailer
REMOTE CONTROL FUNCTION
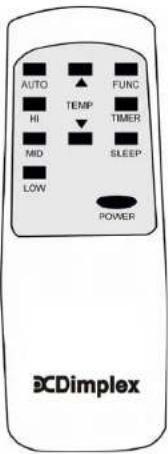
- POWER
- FUNC
- TIMER
- AUTO
- HI
- MID
- LOW
- SLEEP
- TEMP.
Stop/Start switch
Function "MODE" selector
Hourly programming
Automatic fan speed
High fan speed
Medium fan speed
Low fan speed
Night operation selector
Temperature selector
INSTALLATION
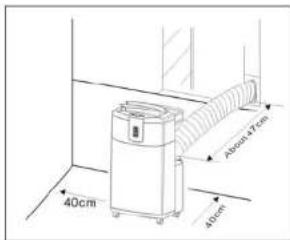
Install the portable air conditioner in a flat and spacious location where the air inlets and outlets will not be blocked. A minimum clearance of 40cm from a wall or other obstacles should be kept (as below picture). The appliance should not be used in the laundry.
NOTICE
This unit can evaporate the condensation and flow out through the exhaust hose automatically when the unit is in the cooling function. Contrarily when the unit is in heating function and the water level reaches the detected level, it will begin to pump for sixty seconds. After sixty seconds of pump function, if the water level is still on the detected level, the unit will stop working and present "E7" warning. Then after three seconds of relieving malfunction, the unit will rework automatically. Please make sure that the rubber cap is locked on the drain hose, and also the exhaust pipe and the drain pipe to be extended to the closest window when the unit is running.

appliances online .com.au
Australia's largest online appliance retailer
natural_image
Architectural line drawing of two vertical structural panels with internal grid lines and a small boat on the right (no text or symbols)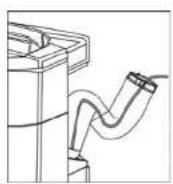
MAINTENANCE
PLEASE DISCONNECT THE POWER CORD BEFORE.
AIR FILTER
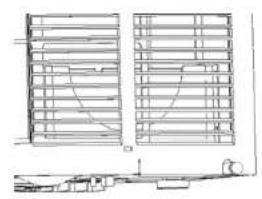
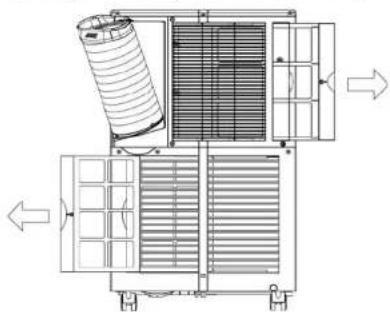
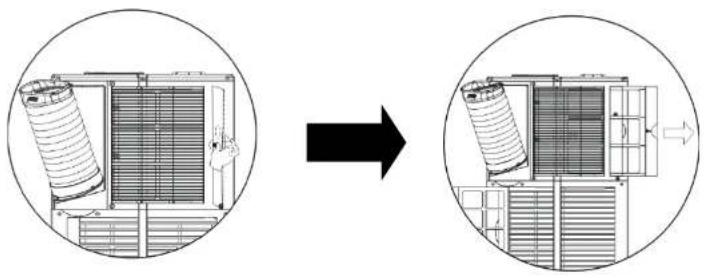
The air filter located on both sides of the unit can be removed, simply by pulling the frame in an upward motion.
CONDENSER/EVAPORATOR
Use a brush attachment with a vacuum cleaner.
CABINET
Wipe with a damp cloth and polish with a soft cloth.
natural_image
Technical line drawing of a mechanical device with internal components and directional arrows (no text or symbols)10
To remove the air filter, please follow the arrow direction and push the filter lightly. Then take out the filter for cleaning.
natural_image
Diagram showing a structural change from a cylindrical component to an air duct system, with no visible text or symbols.POWER SUPPLY
(1) Confirm the correct power.
(2) Insert the plug into the outlet firmly.
In case of a dangerous leak, prevent the AC cord from scarring.
(3) Don't pull the power wire by force because it will cause damage to the power wire.
PLACE FOR USE
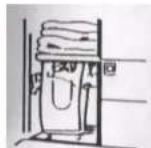
(1) Because the machine exerts hot air, please don't operate it in a narrow place.
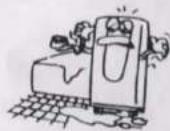
(2) In case of dangerous leak, don't work the machine in a humid place.
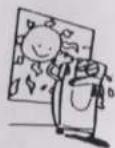
(3) Don't place the machine in a sunlit corner otherwise the colors soon fade out of the machine.
appliances@llllc.com.au
Australia's largest online appliance retailer
HELPFUL HINTS
The unit is fitted with a special thermal cut off device.
When selecting the refrigerating function, The unit should operate in room temperatures between 17-32°C, and when selecting heating function, the room temperature must less than 23°C and above 7°C.
Please ensure the unit is not placed against objects which will obstruct air intake e.g. furniture or curtains as this will affect it's performance drastically.
Do not place the unit in direct sunlight, as this may cause the unit to overheat and turn off.
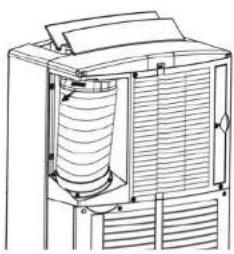
EXHAUST PIPE AND DRAIN PIPE
- To remove exhaust pipe, press slightly and pull away from the unit.
● Picture indicates the removal of the exhaust pipe. - Made sure the exhaust pipe and the drain pipe to be extended to the closest window.
natural_image
Technical line drawing of a mechanical device with internal components and ventilation duct (no text or symbols)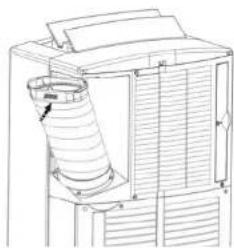
natural_image
Technical line drawing of a mechanical device with a coiled spring and ventilation duct (no text or symbols)TROUBLE SHOOTING
| Never try to repair or dismantle the air conditioner unit yourself. Incompetent repairs result in loss of warranty and can endanger the user and the property. | ||
| Problem | Cause | Solution |
| The air conditioner does not function. | No power supply. Connect to a functioning outlet and switch on. | |
| The alarm light is on. Empty the internal water container. | ||
| Timer function is active. Deactivate TIMER function. | ||
| The air conditioner does not seem to perform. | In direct sunlight. Close curtains. | |
| Windows or doors open, many people or a heat source in the room. | Close doors and windows, place an extra air conditioner. | |
| Dirty filter Clean the filter(s). | ||
| Air inlet or air outlet blocked. Remove the blockage. | ||
| Room temperature lower than the selected value. | Change temperature selection. | |
| The unit is noisy. | Unit is not level. | Place on an even, solid surface (less vibrations.) |
| The compressor does not work. | The overheat protection is probably activated. | Wait 30 minutes until the temperature has decreased, then turn the unit on again. |
| The remote control does not function. | Distance too long. | Make sure the remote control is correctly aimed at the control panel. |
| Remote control signal not detected by the control panel. | ||
| The batteries are drained Replace the batteries. | ||
| To correct problems not mentioned in the table and/or if the recommended solutions fail to solve the problem, please contact an authorized service centre. | ||

appliances online .com.au
Australia's largest online appliance retailer
SPECIFICATIONS
Model No. GDC-AC9RW GDC-AC12RW / GDC-AC12RB
Power Source 220-240V\~50Hz AC 220-240V\~50Hz AC
Power Consumption 1080W 1452W
Max Power 1250W 1480W
Cooling Capacity 2600W 3500W
| Air Flow 400 M | ^3/H | 420 ^3/H | M |
| De-humidifier(30°C,80%) | 1.6L/hr | 2.5L/hr | |
| Refrigerant | R410A | R410A | |
| For room size up to 20 m | ^2 | 25 ^2 | m |
| Dimensions (mm) | 476Wx358Dx840H | 476Wx358Dx840H | |
| Net Weight | 28.5KG | 29.5KG |
Model No. GDC-AC9RCW/GDC-AC9RCS GDC-AC12RCW/GDC-AC12RCB
Power Source 220-240V\~50Hz AC 220-240V\~50Hz AC
Power Consumption
Cooling / Heating 1080W / 1245W 1452W / 1500W
Max Power
Cooling / Heating 1250W / 1350W 1480W / 1530W
Cooling Capacity 2600W 3500W
Heating Capacity 3000W 3700W
Air Flow 400 M ^3/H 420 ^3/H M
De-humidifier 1.6L/hr 2.5L/hr
(30°C,80%)
Refrigerant R410A R410A
For room size up to 20 m ^2 25 ^2
Dimensions (mm) 476Wx358Dx840H 476Wx358Dx840H
Net Weight 29.5KG 30.5KG
Glen Dimplex Australasia Ltd
38 Harris Road, East Tamaki,
Manukau, Auckland 2013
New Zealand
Ph: 0800 666 2824
appliances online .com.au
Australia's largest online appliance retailer
Glen Dimplex Australia Pty Ltd
2/205 Abbotts Road,
Dandenong sth 3175, Victoria,
Australia
Ph: 1300 556 816
Fx: 1800 058 900
- VERY IMPORTANT!
- CAUTION!
- CONGRATULATIONS ON YOUR SELECTION OF A QUALITY PORTABLE AIR CONDITIONER
- PORTABLE AIR CONDITIONER
- UNPACKING INSTRUCTIONS
- CONTENTS
- NAMES OF THE PARTS
- TACK SWITCH & DESCRIPTION OF FUNCTION
- SPEED
- TIMER
- (Timer-on key is correspond to the functional indicator light)
- SLEEP CONTROL
- FUNCTION
- 9."E7"
- REMOTE CONTROL FUNCTION
- INSTALLATION
- NOTICE
- MAINTENANCE
- AIR FILTER
- CONDENSER/EVAPORATOR
- CABINET
- POWER SUPPLY
- PLACE FOR USE
- HELPFUL HINTS
- EXHAUST PIPE AND DRAIN PIPE
- SPECIFICATIONS
Brand : DIMPLEX
Model : GDC-AC9RW
Category : Air conditioner