
PHST90ICW - Home Theater Pyle - Free user manual and instructions
Find the device manual for free PHST90ICW Pyle in PDF.


| Product Type | 2.1 Channel Music Center / Home Theater System |
| Model | PHST90ICW |
| Number of Channels | 2.1 (Left/Right + Subwoofer) |
| Output Power (RMS) | L/R: 150W x 1, Subwoofer: 300W x 1 |
| Frequency Response | L/R: 150 Hz – 20 kHz, Subwoofer: 50 Hz – 280 Hz |
| Drivers | L/R: 3.5" x 2 + dome tweeter, Subwoofer: 8" |
| Signal-to-Noise Ratio (S/N) | 85 dB |
| Total Harmonic Distortion (THD) | 0.1% |
| Dimensions (D x W x H) | 460 mm × 150 mm × 1000 mm |
| Power Supply | AC Adapter (included) |
| Inputs | AUX (3.5mm), FM Antenna, iPod/iPhone Dock |
| Built-in Tuner | FM with 10 presets |
| Display | LCD Display |
| Remote Control | Included (button battery installed) |
| Additional Features | Sleep Timer, Alarm Clock, Touch Key Controls |
| Cleaning Instructions | Use only glass cleaner; do not use chemical cleaners |
| Safety Precautions | Do not remove back cover; refer servicing to qualified personnel |
Frequently Asked Questions - PHST90ICW Pyle
User questions about PHST90ICW Pyle
0 question about this device. Answer the ones you know or ask your own.
Ask a new question about this device
Download the instructions for your Home Theater in PDF format for free! Find your manual PHST90ICW - Pyle and take your electronic device back in hand. On this page are published all the documents necessary for the use of your device. PHST90ICW by Pyle.
USER MANUAL PHST90ICW Pyle
natural_image
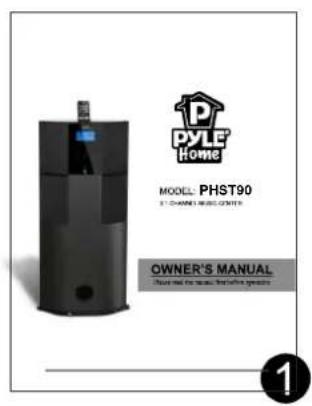
Black cylindrical electronic device labeled PHST90 with a digital display and control buttons (no readable text beyond branding)
MODEL: PHST90
2.1 CHANNEL MUSIC CENTER
OWNER'S MANUAL
Please read the manual first before operation
Table of Contents
Table of Contents....1
Package Contents. 1
Safety Information. 2
Specifications 2
System Connection 3
Remote Control 4
LCD Display System 4
Operation Instructions....6
How to Open the System....6
How to Play Stereo Audio 6
How to Use Sleep Mode 6
(1) Operations of the Remote Control 6
Multi-Function Control Area
FM Control Area
iPod/iPhone Control Area
(2) Operations of Touch Key Control System. 7
How to Setup Clock and Alarm
How to Play FM Tuner
Installing Battery in the Remote Control 8
Notes about the Remote Control....8
Trouble Shooting....8
Caution 9
Package Contents
- Owner's manual
- Remote control
- AC adapter
- Main unit
natural_image
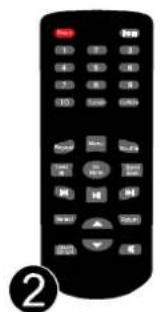
Black remote control with control buttons and a red start button (no text or symbols visible)
natural_image
Illustration of a battery pack with three connected cables and a numbered label (3), no text or symbols present.
natural_image
Line drawing of a modern water heater with control panel and circular vent (no text or symbols)Operating Instruction
Dear Customer:
Thank you for purchasing 2.1 channel music center system. We strongly recommend that you carefully study the operating instructions before attempting to operate the unit and that you note the listed safety information.
Safety Information
- This unit can be used only where the power supply is in accordance with the notes on the rear panel of the speaker system. It can't be used elsewhere.
- To reduce the risk of fire or electric shock, do not expose this unit to rain or moisture.
- When the unit is not being used, turn the unit off.
- Do not open covers and repair by yourself. Refer all servicing to qualified personnel.
- After turning off the unit, if you don't start the unit again in 24 hours, the time would return to the factory reset. When the unit is on, you can adjust the time, please take the operation instruction in the owner's manual for reference.
- Remote Control Battery: The button battery has been installed in the remote control. When using it for the first time, just pull out the insulation layer and the remote control will be ready to use.
Specifications
- Output Power:
L/R (150W x 1), Subwoofer (300W x 1)
2.Frequency:
L/R 150Hz-20kHz, Subwoofer 50Hz-280Hz
3.Drive Unit:
L/R channel 3.5 inch x 2 + dome tweeter
Subwoofer 8 inch
4.S/N:
85dB
5.THD:
0.1%
- Size(DxWxH):
460mm × 150mm × 1000mm
System Connection

flowchart
graph TD
    A["iPod"] --> B["TV"]
    C["Model: PHST90"] --> D["FM ANT"]
    D --> E["AUX INPUT"]
    E --> F["RoHS CE FC"]
    G["Power"] --> H["Line 1"]
    I["Radio Input"] --> J["Line 2"]
    K["Audio Input"] --> L["Line 3"]
    M["Display"] --> N["Monitor"]
    O["Camera"] --> P["Analog/Amplifier"]
    Q["Monitor"] --> R["Analog/Amplifier"]
    S["Display"] --> T["Monitor"]
    U["Camera"] --> V["Analog/Amplifier"]
    W["Monitor"] --> X["Analog/Amplifier"]
    Y["Display"] --> Z["Monitor"]
Remote Control

A: FM Control Area
B: iPod/iPhone Control Area
C: Multi-function Control Area
- "Sleep mode" control selector
- Select the input source
(iPod. AUX. FM.)
3.Tuner number selector
4.iPod/iPhone-toggle repeat selector
5.iPod/iPhone-ok menu selector
6.iPod/iPhone-scroll up/down selector
7.iPod/iPhone -skip selector
8. Select control selector
9. Adjust increase/decrease selector
10. Alarm on/off control selector
11.Tuner band control selector
12.iPod/iPhone-menu selector
13.iPod/iPhone-toggle shuffle selector
14.iPod/iPhone play/pause selector
15. Return to the previous menu
16."Mute mode" control selector
LCD Display System
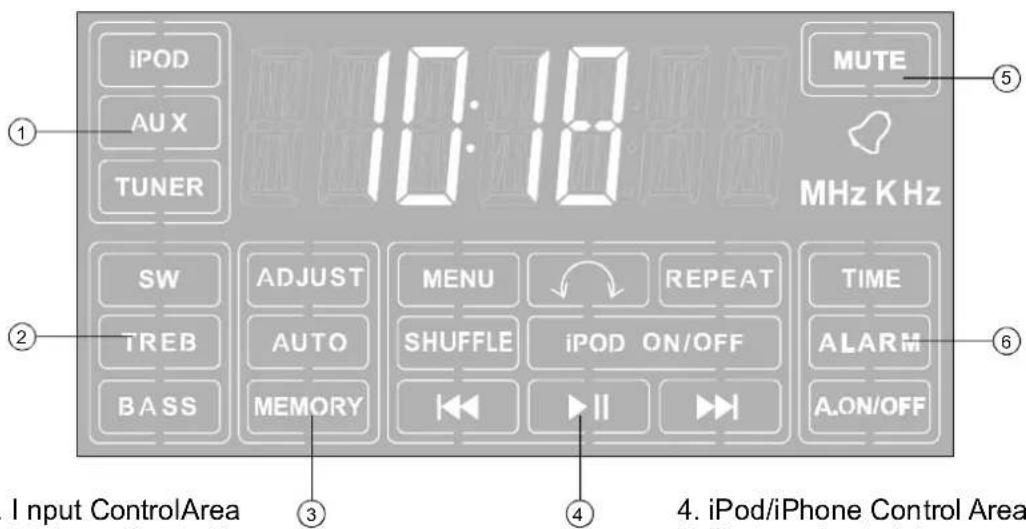
- Input ControlArea
- Volume ControlArea
-
Tuner Control Area
-
iPod/iPhone Control Area
-
System Control Area
-
Time and Alarm Control Area
Main Interface
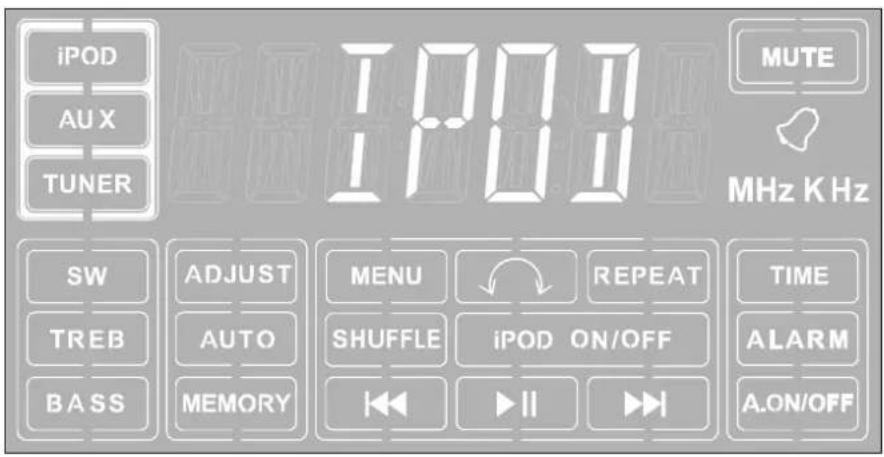
First-level Subpage

Second-levelSubpage

Third-level Subpage
Operation Instructions
• How to Open the System
When the "POWER" in the back panel is on, "WELCOME" will appear on the LCD, when it disappears, it suggests the system has opened.
• How to Play Stereo Audio
Press the "Input" key on the remote control to choose the input mode "iPod, AUX, FM".
• How to Use Sleep Mode
Sleep mode lets you sleep to your system at the selected time.
- Press "Sleep" or touch "⑦" to select an amount of time before the system shuts off: 5; 15; 30 minutes; sleep on or off.
- Wake up the system by pressing any key when the system in the sleep mode.
(1) Operations of the Remote Control
• Multi-function Control Area

flowchart
graph TD
    A["Source"] --> B["tone"]
    A --> C["time"]
    A --> D["alarm"]
    A --> E["source"]
    B --> F["SW"]
    B --> G["Treb"]
    B --> H["Bass"]
    F --> I["SW 10db"]
    G --> J["T+06db"]
    H --> K["B-06db"]
    C --> L["2345"]
    C --> M["2345"]
    C --> N["2345"]
    C --> O["2345"]
    D --> P["2345"]
    D --> Q["2345"]
    D --> R["2345"]
    E --> S["BUZZER"]
    E --> T["iPod.S"]
    E --> U["FM.S"]
    S --> V["BUZZER"]
    T --> W["iPod.S"]
    U --> X["FM.S"]
- "Select": Select the following four submenu:
, - "Return": Return to the previous menu.
- " △▼": Adjust settings.
For example:
a. When you want to set the time, press the "Select" key and scroll to the
choose
- FM Control Area
a. Press "Input" and select FM mode, the LCD will display the last tuned channel, for example: 87.50MHz.
b. Use "Tuner-, Tuner+" to adjust radio frequency.
c. The number keys (1-10) are used to save up to 10 channels. Tune to your desired FM channel and hold one of the number keys for 2 seconds to assign that number key to that channel. Anytime you want to listen to the saved channel, just press on the assigned key number.
- iPod/iPhone Control Area
a. Place the iPod/iPhone onto the iPod socket of the unit. The system will turn to the "iPod" input mode automatically.
b. The middle area of the remote control (B) is especially designed for iPod/iPhone player.
" : Controls the play and pause function of the iPod/iPhone player.
"K, K": Press and hold for 2 seconds to Fast Forward or Fast Reverse.
" " : Controls the iPod/iPhone player to play the previous or the next song.
" Scroll " : Selects the previous file of the iPod/iPhone player.
" Scroll down " : Selects the next file of the iPod/iPhone Player.
"Menu": Selects the iPod/iPhone player to return to the previous submenu.
"Ok Menu": Controls the iPod/iPhone player to enter next submenu.
" Repeat " : Selects the repeat mode on the iPod/iPhone.
" Shuffle " : Selects the random mode on the iPod/iPhone.
(2) Operations of Touch Key Control System

natural_image
Five white circular icons arranged in a 2x2 grid on a black background, no text or symbols present.“返回”: Return to the previous menu.
“◀”: Enter to the menu and the operation key of the submenu.
“∨∧”: Scroll up or down to different function interfaces.
“Z”: Select the sleep mode.
a. The main interface of this system shows the clock. Use "☑, ∧" touch keys to increase or decrease the master volume. Use "◀" touch key to enter the first level subpage (control panel). On the control panel interface, use "☑, ∧" keys to select different control partitions.
b. When cursor points to the first level subpage (control panel), use the "◀" key again to enter the second level subpage or use "∨, ∧" keys to select different options. Touching the "◀" key again, takes you to third level subpage which you can select different options by using the "∨, ∧" keys.
c. If you want to return to the previous subpage use the "k") key. If no operation is done within 5 seconds, the system will return to the main interface page.
• How to Setup Clock and Alarm by Touch Key Control System
a. Take the above operation instruction "(2)a" for reference. When cursor points to the clock and alarm control interface, touch "◀" key enter the options interface of clock, alarm and alarm on/off, which is the second-level subpage. Then, touch "∨, ∧" for needed operation or touch "◀" again to enter the third-level subpage. At this moment, you can touch "∨, ∧" to adjust the figures of hour or minute. After adjustment, touch "◀" again, the clock icon on the LCD will flicker continuously for 6 times to show the success of time setup.
b. When setup alarm, choose alarm option on the second-level subpage, the operation is similar to the clock setup. After finish the alarm setup, touch "💡" key to return the third-level subpage for the on/off option of alarm.
• How to Play FM Tuner by Touch Key Control System
Take the above operation instruction "(2)a" for reference. When the cursor points to the "tuner control area", touch "◀" key to enter "ADJUST" option, you can change the needed option through "∨, ∧" key, then touch the "◀" key to enter "ADJUST" status, then touch "∨, ∧" to up or to down and the tuner will search manually; choose and enter "AUTO" status, and then touch "∨, ∧" to up or down once( to up, the FM frequency will decrease, otherwise opposite), the tuner will search automatically. If you want to save the program, just enter the "MEMORY" status, then Press "∨, ∧" to choose the channel you want to save. At last, press the "◀" once again.
Installing Battery in the Remote Control
Since the remote control will be used for many units to control operations, you should begin by installing the supplied battery:
- Turn the remote control over and pull out the battery compartment cover.
- Insert the battery according to the battery compartment.
- Close the battery compartment cover.
Notes about the Remote Control
- If you find that the remote control can not be used at a normal distance to the main unit, then the battery could be weak, so you need to replace the battery with a new one.
- Remove the battery if the remote control is not used for an extended period of time.
- If battery leak, remove it immediately, and properly dispose it. Avoid touching the leaked material and splashing it to clothing, etc. Clean the battery compartment thoroughly before installing new battery.
Trouble Shooting
| Problem | Possible Reasons/solutions |
| The system has no power. | The plug is not inserted properly.The socket has no power.The fuse is broken."POWER" button has not been pressed. |
| No sound at all. | Incorrect selection of input signal.If mute state is turned on.Sound source machine is not powered. |
| Either of the main channels has no sound. | The signal plug is connected incorrectly or lines are short-circuited. |
| LCD screen displays abnormally. | It may be effected by exterior strong disturbance, turn off first and then turn on again.Avoid direct sunlight/heat. |

CAUTION DO NOT REMOVE BACK COVER TO PREVENT ELECTRIC SHOCK

CAUTION: DO NOT REMOVE BACK COVER OF UNIT DUE TO THE POSSIBILITY OF ELECTRICAL SHOCK. THERE ARE NO SERVICEABLE PARTS INSIDE THIS SECTION. PLEASE REFER SERVICING TO QUALIFIED SERVICE PERSONNEL.
The lightning flash with an equilateral triangle, "Dangerous Voltage", is intended to alert the user to the presence of uninsulated parts within the product's enclosure that may be of sufficient magnitude to constitute risk of electric shock to persons.
The exclamation point within an equilateral triangle is intended to alert the user to the presence of important operating and maintenance (servicing) instructions in the literature accompanying the appliance.
WARNING: TO REDUCE THE RISK OF FIRE OR ELECTRIC SHOCK DO NOT EXPOSE THIS APPLIANCE TO RAIN OR MOISTURE
- READ INSTRUCTIONS-All safety and operating instructions should be read before the appliance is operated.
- RETAIN INSTRUCTIONS-Safety and operating instructions should be retained for future reference.
- NOTE WARNINGS-All warnings on the appliance and in the operating instructions should be followed.
-
FOLLOW INSTRUCTIONS-All operating and user instructions should be followed.
-
WATER AND MOISTURE-The appliance should not be used near water; e.g., bathtubs, kitchen sinks, laundry tubs, damp basements, swimming pools, etc.
-
CARTS AND STANDS-Do not place this product on an unstable cart, stand, tripod, bracket, table, etc.
-
VENTILATION-The appliance should be situated so that its location and position does not interfere with proper ventilation. The appliance should not be situated on a bed, sofa, rug, or any surface that may obstruct cabinet openings.
-
HEAT-The appliance should be situated away from heat sources such as radiators, heat registers, stoves or other devices (including amplifiers) that produce heat.
-
POWER SOURCES-The appliance should be connected only to a power supply of the type described in the operating instructions or on the appliance. Do not overload wall outlets, extension cords, or integral convenience outlets as this can result in a risk of fire or electric shock.
-
POWER CORD PROTECTION-Power supply cords should be routed so that they are not likely to be walked upon or pinched by items placed upon or against them, paying particular attention to cords at plugs, convenience receptacles, and the point where they exit from the appliance.
-
CLEANING-The appliance should be cleaned only with glass cleaner. Do not use chemical cleaners.
-
LIGHTNING STORMS & NO USE PERIODS-The power cord should be unplugged from the outlet during lightning storms or during long periods of non-use.
-
OBJECT AND LIQUID ENTRY-Care should be taken that objects do not fall onto and liquids are not spilled on the amplifier or speaker.
-
DAMAGE REQUIRING SERVICE-The appliance should be serviced by qualified service personnel when:
A. The power supply cord or plug has been damaged; or
B. Objects have fallen on or liquid has been spilled into the appliance; or
C. The appliance has been exposed to rain; or
D. The appliance does not appear to operate normally or exhibits a marked change in performance; or
E. The appliance has been dropped or the enclosure damaged.
- SERVICING-The user should not attempt to service the appliance. If parts are replaced during service, be sure the parts meet factory specification. Inappropriate substitution can result in fire or a risk of electric shock. Upon completion of service, ask the technician to perform safety checks on the product. For service and warranty information please check Warranty Card.

- Table of Contents
- Package Contents
- Operating Instruction
- Dear Customer:
- Safety Information
- Specifications
- Operation Instructions
- • How to Open the System
- • How to Play Stereo Audio
- • How to Use Sleep Mode
- Operations of the Remote Control
- • Multi-function Control Area
- - FM Control Area
- - iPod/iPhone Control Area
- Operations of Touch Key Control System
- • How to Setup Clock and Alarm by Touch Key Control System
- • How to Play FM Tuner by Touch Key Control System
- Installing Battery in the Remote Control
- Notes about the Remote Control
- Trouble Shooting
- CAUTION DO NOT REMOVE BACK COVER TO PREVENT ELECTRIC SHOCK
- CAUTION: DO NOT REMOVE BACK COVER OF UNIT DUE TO THE POSSIBILITY OF ELECTRICAL SHOCK. THERE ARE NO SERVICEABLE PARTS INSIDE THIS SECTION. PLEASE REFER SERVICING TO QUALIFIED SERVICE PERSONNEL.
- WARNING: TO REDUCE THE RISK OF FIRE OR ELECTRIC SHOCK DO NOT EXPOSE THIS APPLIANCE TO RAIN OR MOISTURE
Brand : Pyle
Model : PHST90ICW
Category : Home Theater