
218089 - Projection screen Draper - Free user manual and instructions
Find the device manual for free 218089 Draper in PDF.


| Product Type | Manual Pull-Down Projection Screen |
| Screen Material | Matte White Fiberglass |
| Aspect Ratio | 16:9 |
| Diagonal Size | 100 inches (254 cm) |
| Gain | 1.1 |
| Viewing Angle | 160 degrees |
| Screen Dimensions (W x H) | 2214 x 1245 mm |
| Overall Dimensions (with case) | 2400 x 150 x 150 mm |
| Weight | 12 kg |
| Mounting Type | Ceiling or Wall Mount |
| Operation | Manual pull-down with locking mechanism |
| Black Masking Borders | Top and bottom black borders |
| Case Color | White |
| Recommended Projector Brightness | 2000-3000 lumens |
| Cleaning Instructions | Use a soft dry cloth to remove dust. For stains, use a damp cloth with mild soap. Do not use solvents. |
| Safety Features | Automatic retraction lock to prevent snap-back |
| Warranty | 2 years |
Frequently Asked Questions - 218089 Draper
User questions about 218089 Draper
0 question about this device. Answer the ones you know or ask your own.
Ask a new question about this device
Download the instructions for your Projection screen in PDF format for free! Find your manual 218089 - Draper and take your electronic device back in hand. On this page are published all the documents necessary for the use of your device. 218089 by Draper.
USER MANUAL 218089 Draper
Assembly Instructions
Cinefold Portable Projection Screen by Draper
Caution
① Read instructions through completely before proceeding; retain for future reference.
② Handle viewing surface with care; do not allow it to come in contact with sharp or dirty objects.
③ Use Handy Cranks provided; failure to do so may lead to screen damage.
④ Make sure screen is level.
⑤ Do not write on viewing surface.
⑥ The ideal temperature range for assembling folding screens to prevent damaging the surface is 68^-78^ F ( 20^-26^ C). Assembling below recommended temperatures may damage surface and void warranty.
Frame/Screen Assembly
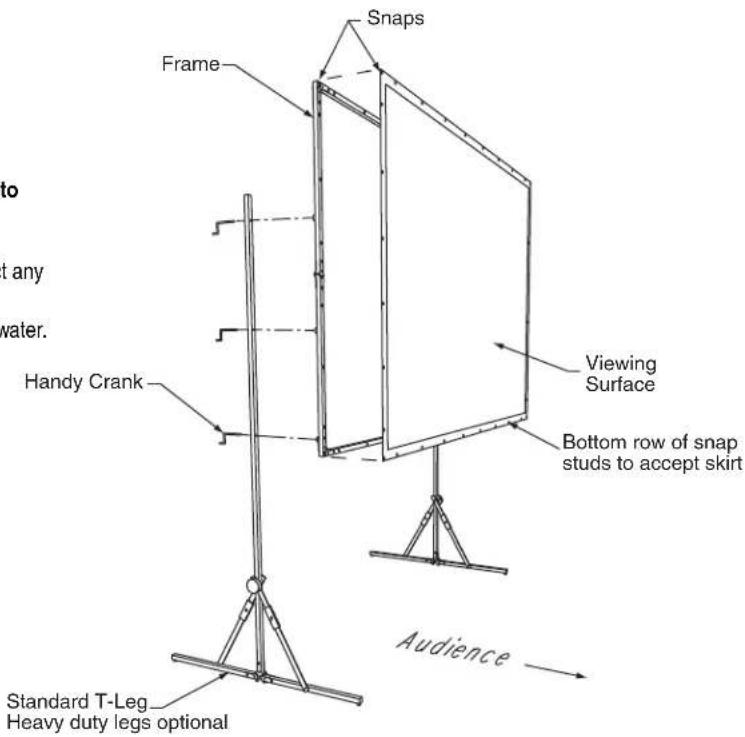
① Open carrying case and remove pouch containing screen surface, and three aluminum assemblies. The largest package is the frame. Unwrap and unfold it completely in one direction only, locking all hinges. Frame should lie with snaps facing up.
① Remove surface from its envelope. With male snaps at bottom, snap surface to frame. For easier surface attachment, start in one corner, then work your way around the frame. Make sure snaps are secure.
Please note: For steps 3-5, screen should remain on floor or table, with surface facing up. Carefully lift screen from floor or table to complete each step.
③ Lock corner braces.
④ Unfold leg assemblies and lock hinges. Check that ad just ment knob is in the hole desired (upper for vertical screen position, lower for keystone elimination). DO NOT unfold feet at this time.
⑤ Attach legs to back side of vertical frame sections, as indicated by the color coded markings, using Handy Cranks. For standard screen height, match colored tapes exactly. Height is adjustable in 6" increments.
⑥ Raise Cinefold to a vertical position and unfold feet. Tighten ad just ment knobs to maintain legs at desired angle. If your screen includes Heavy-Duty Legs, unfold and lock the extensions on the backs of the feet, hinge up to the backs of the leg, and attach with Handy Crank.
⑦ If Anti-Sway stabilizers are supplied with your screen, refer to illustration and attach with Handy Cranks.
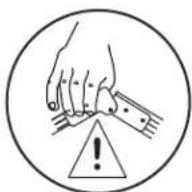
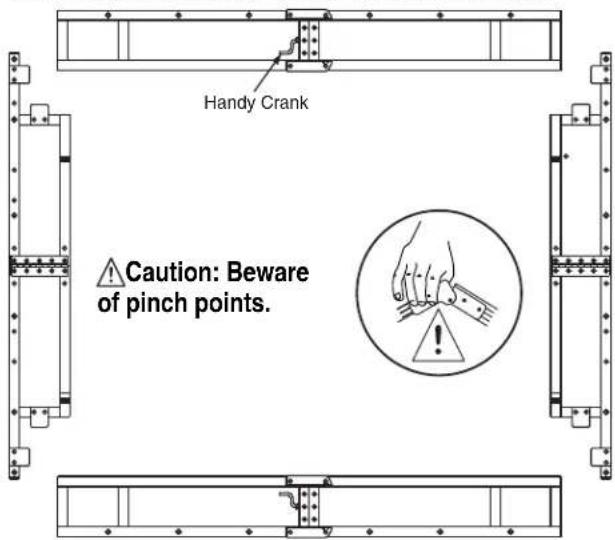
Caution: Beware of pinch points.
A Note About Surfaces
① Always fold with snaps face-to-face. Do not permit screen fabric to contact border material or snaps when folded. Store in pouch provided.
② Take care at all times not to permit Cinefold viewing surface to contact any dusty or dirty area, nor any varnished or painted object.
③ When necessary, clean Cinefold viewing surface with mild soap and water. USE NO SOLVENTS! Surface must be completely dry before folding.
DRAPER®
411 S. Pearl St., Spiceland, IN 47385 USA ■ 765-987-7999
www.draperinc.com ■ fax 765-987-7142
Copyright © 2011 Draper Inc. Form Cinefold_Inst11 Printed in U.S.A.
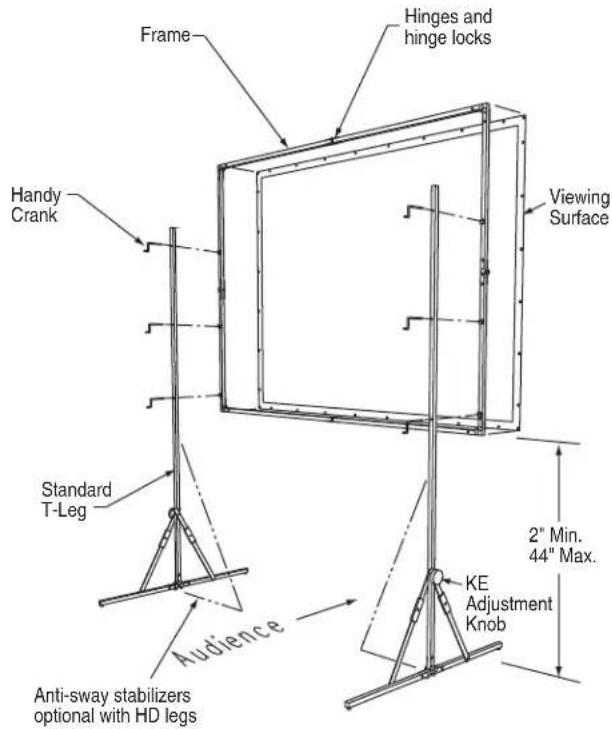
Caution: Make sure all hinges and joints are locked before raising screen to standing position.
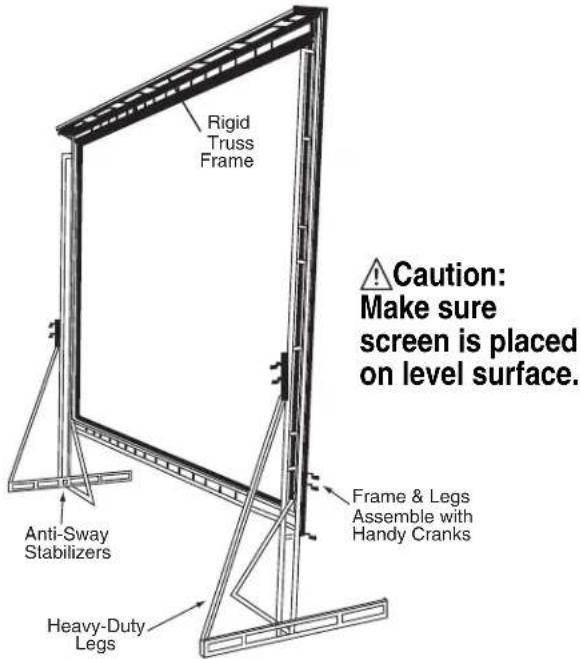
Caution: Make sure screen is placed on level surface.
Assembly Instructions
Truss-Style Cinefold Portable Projection Screen by Draper
Caution
① Read instructions through completely before proceeding; retain for future reference.
② Handle viewing surface with care; do not allow it to come in contact with sharp or dirty objects.
③ Use Handy Cranks provided; failure to do so may lead to screen damage
④ Make sure screen is level.
⑤ Do not write on viewing surface.
⑥ The ideal temperature range for assembling folding screens to prevent damaging the surface is 68^-78^ F ( 20^-26^ C). Assembling below recommended temperatures may damage surface and void warranty.
Truss Assembly
① Remove pouch containing viewing surface from case and set aside. Remove all aluminum assemblies.
② Unfold all folded aluminum assemblies completely, noting labels and color-coded marks. Lock all hinges. Position Stage Right and Stage Left sections in appropriate positions with snaps facing up. Top and Bottom sections should be set with snaps facing down.
③ To increase frame rigidity, hinges on top and bottom frame sections have rivnuts marked with red and green. Insert a Handy Crank through the threadless rivnut (red) and tighten into the threaded rivnut (green).
④ Apply small sections marked "Stiffener Bars" to back of Bottom frame section, using eight Handy Cranks each. Failure to use all Handy Cranks may result in damage to screen frame. Turn Bottom frame section over so snaps face up.
⑤ If your screen frame is less than 25' wide, repeat step 4 for Top frame section. Frames 25' wide and over are equipped with a special full-width Stiffener for the top frame section. To attach it, place Stiffener fl at with green rivnuts face down. Place top frame section on top of and at right angles to Stiffener, over the green rivnuts. Insert and tighten standard Handy Cranks. Install 45° angle braces to the Top frame section and Stiffener with short Handy Cranks. Turn Top frame so snaps face up.
Caution: Make sure all hinges and joints are locked before raising screen to standing position.
DRAPER®
411 S. Pearl St., Spiceland, IN 47385 USA ■ 765-987-7999
www.draperinc.com ■ fax 765-987-7142
Copyright © 2010 Draper Inc. Form Cinefold_Inst11 Printed in U.S.A.
⑥ Join Top and Bottom to Stage Right and Stage Left, using two Handy Cranks on each of the four corners. Match numbers on white labels, and keep in mind that no Handy Crank should protrude outside screen frame.
⑦ Remove surface from pouch. With the row of male snaps at bottom, position screen surface over frame. Snap each of the four corners, then snap across bottom, up sides, and across top.
⑧ Attach feet to inner side of legs with Handy Cranks, matching color-coded markings. Attach legs to Stage Right and Stage Left with Handy Cranks, matching colored tapes.
⑨ Raise screen to a vertical position. Add Heavy-Duty Legs and Anti-Sway Stabilizers with Handy Cranks in the positions indicated below.
A Note About Surfaces
① Always fold with snaps face-to-face. Do not permit screen fabric to contact border material or snaps when folded. Store in pouch provided.
② Take care at all times not to permit Cinefold viewing surface to contact any dusty or dirty area, nor any varnished or painted object.
③ When necessary, clean Cinefold viewing surface with mild soap and water. USE NO SOLVENTS! Surface must be completely dry before folding.
Dress-Up Kit Assembly
PLEASE NOTE: All components are labeled and color coded to facilitate assembly.
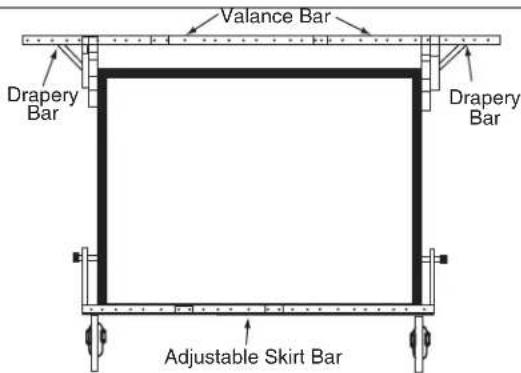
A. Valance Bar attaches to frame with simple bayonet-style mounting.
B. Draper Bars mount to Valance Bar, bayonet-style.
C. Optional adjustable Skirt Bar is secured to frame at desired level with positive-locking plunger mechanism. If Skirt Bar is not used, Skirt may be snapped to bottom of viewing surface.
D. Valance, Drapes, and Skirt snap onto Mounting Bars.
E. Gaps between the frame and the valance can be easily removed by pulling the bottom edge of the valance to close the gap.
F. Pulling and smoothing the edges of the panels will remove any wrinkles or puckers that might be present when product is unfolded.
- Assembly Instructions
- Cinefold Portable Projection Screen by Draper
- Caution
- Frame/Screen Assembly
- A Note About Surfaces
- Truss-Style Cinefold Portable Projection Screen by Draper
- Truss Assembly
- Caution: Make sure all hinges and joints are locked before raising screen to standing position.
- DRAPER®
- Dress-Up Kit Assembly
Brand : Draper
Model : 218089
Category : Projection screen