
Star - Projection screen Draper - Free user manual and instructions
Find the device manual for free Star Draper in PDF.


| Product Type | Manual Pull-Down Projection Screen |
| Brand | Draper |
| Model | Star |
| Screen Diagonal | 80 inches (16:9 aspect ratio) |
| Viewing Area | 39.8 x 70.8 inches (101 x 180 cm) |
| Screen Material | Matte White Vinyl with black borders |
| Gain | 1.0 |
| Mounting | Ceiling or wall mount (brackets included) |
| Retraction Mechanism | Manual pull-down with latch system |
| Case Color | White, black end caps |
| Dimensions (Case) | 76.2 x 3.5 x 3.5 inches (193.5 x 8.9 x 8.9 cm) |
| Weight | 11.5 lbs (5.2 kg) |
| Power Supply | None (manual operation) |
| Warranty | 1 year limited |
| Cleaning | Wipe with dry or slightly damp cloth; avoid solvents |
| Safety | Complies with UL 962, FCC Class B |
| Spare Parts | Replacement screen material available; contact Draper |
Frequently Asked Questions - Star Draper
User questions about Star Draper
0 question about this device. Answer the ones you know or ask your own.
Ask a new question about this device
Download the instructions for your Projection screen in PDF format for free! Find your manual Star - Draper and take your electronic device back in hand. On this page are published all the documents necessary for the use of your device. Star by Draper.
USER MANUAL Star Draper
Installation/Operating Instructions
Luma and Star Spring Roller Operated Projection Screens by Draper
Caution
① Read and understand these instructions; keep them for future reference. Follow instructions carefully.
② Care in both mounting and correct operation will mean long and satisfactory service from your Draper screen.
③ Locate the screen where the audience can best see it, and where other room furnish ings permit.
④ Mount the screen so that the bottom of the picture, when screen is fully extended, will be above the heads of viewers.
⑤ When raising screen, pull down and, while holding, allow for slow retraction into the case to reduce risk of injury from falling screen.
⑥ Screen should be installed level (using a carpenter's level).
⑦ Nothing should be fastened to screen dowel or viewing surface.
NOTE: Screen has been thoroughly inspected and tested at factory and found to be operating prior to shipment.
Installation
Your Draper screen can be mounted on a wall or suspended from the ceiling or extension brackets. It must be mounted level and with the fl at back parallel to the wall.
The screen (or extension brackets) should be mounted into studs or blocking in the wall/ceiling, or in drywall (minimum thickness 12 ") with specified anchors. For any other type of installation, follow all local building and safety codes.
Steel studs, concrete or cinder block walls and all other types of non-wood frame construction require the use of special screws or anchors.
The selection of ap pro pri ate mounting hardware should be made by a qualifi ed professional installer.
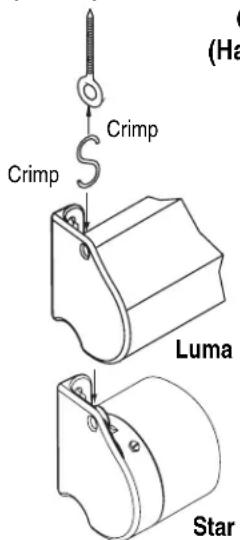
Ceiling Suspended (Hardware not Included)
Use the holes at the front of the endcap/mount ing brack et for sus pend ed mount ing. Po si tion and prop er ly an chor screw eyes or oth er fasteners (not included) into ceil ing joists or oth er sol id sur face. Sus pend "S" hooks (not included) from fas ten ers (not included) and hook through holes in the front of the mount ing brack et. For added safe ty, crimp both ends of the "S" hooks so the screen can not come off.
Recommended hardware (not included): For mounting into wood or ceiling joist, use two ^3/16 " x 1 ^1/4 " screw eyes and ^3/16 " di am e ter "S" hooks; for mounting into dry wall (min i mum/2" thick), use ^3/16 " tog gle or molly bolts with ^3/_16 " "S" hooks.
Wall Mounting (Hardware not Included)
Use the upper portion of the holes at the back of the endcap/mounting bracket for flush wall mounting. Recommended hardware (not included): For mounting into wood or wall stud, use #10 x 1¼" wood screws; for mounting into dry wall (minimum ½" thick), use 216 " tog gle bolts or 216 " molly bolts. DO NOT USE FLAT HEAD SCREWS. DO NOT OVERTIGHTEN.
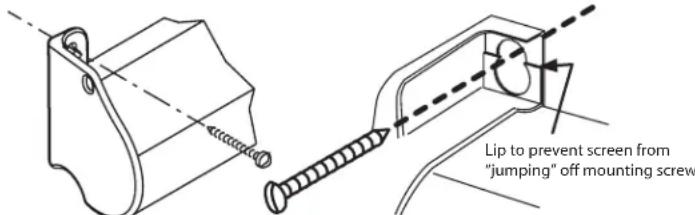
Luma pictured
411 S. Pearl St., Spiceland, IN 47385 USA ■ 765-987-7999
www.draperinc.com ■ fax 765-987-7142
Copyright © 2010 Draper Inc. Form Luma-Star_Inst10 Printed in U.S.A.
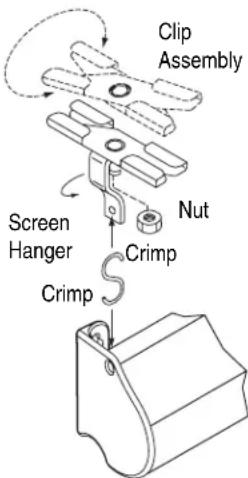
Luma pictured
T-Bar Twist Clips (Optional Equipment)
① Loosen the clip assembly by turning the formed steel hanger counterclockwise.
② Spread the clip assembly apart, place over the T-irons, and firmly squeeze the clip assembly back to get her, making sure the clip is firmly seated around the T-iron. Retighten by using pliers to turn the formed steel hanger clockwise. Make sure it is fully tightened.
③ Se cure with the nut. Tighten with pliers.
Please Note: Make sure the clip is fully tightened around the T-iron, and that the formed steel hanger and the lock nut are fully tightened. Poorly tightened clip assemblies, hangers or nuts allow the T-Bar Twist Clip to work loose.
④ Test by trying to pull the twist clip open and by pulling down on the hanger. The clip should not pull open.
⑤ Suspend "S" hooks (not included) from the holes in the clips and hook through holes in the front of the screen mounting brack et. For added safe ty, crimp both ends of the "S" hooks so the screen can not come off.
Please Note: T-Bar Twist Clips are not rec om mend ed for screens larg er than 70" x 70" unless T-irons are reinforced.
Extension Brackets (Optional Equipment)
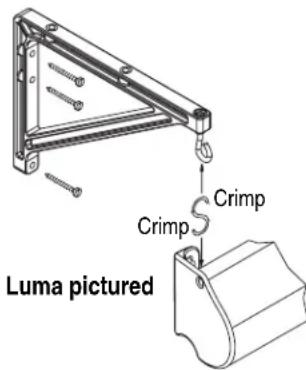
Wall mount the brackets (not in clud ed with screen) using hard ware recommended for "Wall Mounting" (above, not included). Then, sus pend the screen from the front holes with "S" hooks. For added safe ty, crimp both ends of the "S" hooks so the screen can not come off. DO NOT OVERTIGHTEN.
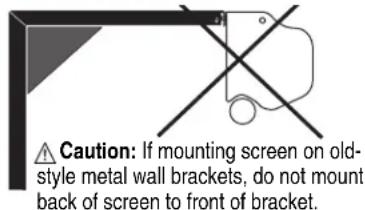
Please note: When installing wall brackets, fl exible driver bit extensions may make it easier to accurately drive the fasteners into the mounting surface.
Operating Instructions—Standard
To lower picture surface, pull screen down. Hesitate—then allow screen to retract very slowly until it locks in place.
To raise picture surface, pull screen down and, while holding, allow for slow retraction into the case to reduce risk of injury from falling screen.
Operating Instructions—AutoReturn (Available with Luma)
To lower picture surface, pull screen down. Hesitate—then allow screen to retract very slowly until it locks in place.
To raise picture surface, pull screen down gently until it stops, then release.
Viewing Surface Care & Maintenance Matt White & High Contrast Grey
Clean surface with a solution of mild dishwashing liquid diluted with warm water. Sponge the surface, rinse with clear water and blot dry. Do not use cleaning solvents or abrasives.
Glass Beaded
Clean with a very soft brush or cloth and care fully dust the surface. DO NOT USE SOAP, WATER, SOLVENTS OR ABRASIVES. These substances will damage a glass beaded viewing surface.
If you encounter any difficulties installing or servicing your screen, call your dealer or Draper, Inc., Spiceland, Indiana, (765) 987-7999, or fax (765) 987-7142.
- Installation/Operating Instructions
- Luma and Star Spring Roller Operated Projection Screens by Draper
- Caution
- Installation
- Ceiling Suspended (Hardware not Included)
- Wall Mounting (Hardware not Included)
- T-Bar Twist Clips (Optional Equipment)
- Extension Brackets (Optional Equipment)
- Operating Instructions—Standard
- Operating Instructions—AutoReturn (Available with Luma)
- Viewing Surface Care & Maintenance Matt White & High Contrast Grey
- Glass Beaded
Brand : Draper
Model : Star
Category : Projection screen