KTD55W - Tumble dryer KELVINATOR - Free user manual and instructions
Find the device manual for free KTD55W KELVINATOR in PDF.


| Product Type | Tumble Dryer |
| Brand | Kelvinator |
| Model | KTD55W |
| Capacity (Dry Load) | 5.5 kg |
| Drum Volume | 55 Liters |
| Dimensions (H x W x D) | 85 x 60 x 55 cm |
| Weight | 35 kg |
| Power Supply | 220-240 V ~ 50 Hz |
| Power Consumption | 2000 W |
| Energy Efficiency Class | A+ |
| Drying System | Condenser |
| Drying Programs | Cotton, Synthetics, Delicates, Time Dry, Iron Dry |
| Control Type | Electronic with LED Display |
| Delay Start | Up to 24 Hours |
| Anti-Crease Function | Yes |
| Filter Cleaning Indicator | Yes |
| Water Tank Capacity | 3.5 L |
| Noise Level | 65 dB(A) |
| Child Lock | Yes |
| Overheating Protection | Yes |
| Reversible Door | No |
Frequently Asked Questions - KTD55W KELVINATOR
User questions about KTD55W KELVINATOR
0 question about this device. Answer the ones you know or ask your own.
Ask a new question about this device
Download the instructions for your Tumble dryer in PDF format for free! Find your manual KTD55W - KELVINATOR and take your electronic device back in hand. On this page are published all the documents necessary for the use of your device. KTD55W by KELVINATOR.
USER MANUAL KTD55W KELVINATOR
natural_image
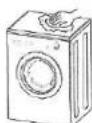
Line drawing of a silver front-loading washing machine with a circular vent and control panel (no text or symbols)Contents

Features 2
Parts identifications of the dryer 3
Installation before use 3
Simple Installation 4-6
Preparation before drying 7
Loading clothes 7
Introduction to functions of control 8
Drying guideline 9
Maintenance filter and dryer 10
Identify and solve normal faults of dryer 11
Packing List 12
Specifications 12
Install direction of knob 13
Features

Features
-
Unique and luxury design: Designed to compliment and match front loader washing machine.
-
Back Vent : The dryer will release the hot air from the back of the machine.
3.Time Control:The timer can accurtely control the drying time of your clothes.
- Big Door Window: to keep a watchful eye on clothes while drying
5.180 Door Opening: easier loading and unloading clothes
-
Compact Design : Convenient capacity with unique design and easy to operate.
-
Design Type : KTD55W Back venting with reversible tumble action
Parts Identification

Part name

KTD55W Back Venting
-
Top Cover 2. Control Panel 3. Large Porthole 4. Cabinet 5. Filter 6. Flex Tube
-
Power Lead 8. Door Switch 9. Tumbling Drum
Notice before use
The first step: Power source and grounding.
The dryer employs an alternative current with rated voltage. When the voltage fluctuates between 6% of rated voltage, the dryer functions normally. For convenience and safety, a separate power socket must be set aside for the dryer. The figure below illustrates the method of connection.

Notices:
The socket and the grounding wire must be installed by an electrician to prevent incorrect installation or use of the socket and to guarantee the safety of use of electricity. The power wire of the dryer employs Y connection, if the supply cord is damaged, it must be replaced by the manufacturer, its service agent or similarly qualified persons in order to avoid a hazard. To avoid electric shock, do not connect the grounding wire simultaneously with the neutral wire.
Installation before use

Step2:Precautions
Do not store or install the dryer where it will be exposed to water or the weather.

Spin dry clothes before tumble drying.
Install dryer in a good ventilated space for good air circulation and to avoid damage in hidden areas
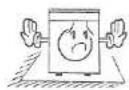
Make sure the combustible sprayer is not located near the dryer. Once the gas leaks, keep the dryer securely turned off.

It is not recommended to dry clothes that contains combustible cleanser, gasoline etc.

The back of the dryer will heat up while the dryer is working. To avoid any risk, the dryer must not be operated by young children or infirm persons without adult supervision.

Do not operate the dryer if it is damaged, malfunctioning, partially disassembled or has missing or broken parts.

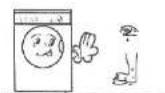
Do not operate the machine when your hands or feet are wet.

Installation before use · Simple installation

Do not place any hot or heavy items on top of the dryer of dryer to avoid deformation of control panel.
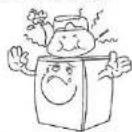
Do not attempt to cry any items of clothing which contains rubber or elasticity materials, such as raincoats.

To avoid dust and smoke entering the dryer, do not connect the flex tube directly to the flue.
To avoid scalding, do not open the door before the cycle is finished.

This product belongs to type I electronic products and please take note of safety problem accordingly:
-
It is rule to use power which is buried in the earth and will not touch any social equipments such as gas pipe or water pipe etc. Make sure that the different power lines are securely separated.
-
Please use special socket which is according to National Standard and will endure 10A current.
To be safe, please make improvements as soon as possible according to the rules and suggestions mentioned above.
Check care labels inside the garments.

Do not tumble dry

Hang for dry

Drip dry

Flat dry

Dry automatically
Simple installation · Operation explanation

Simple Installation
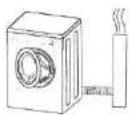
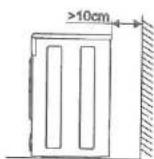
Step 1: Dryer should be placed in a ventilated area with not less than 10 cm distance from the wall. If the dryer is placed in a bathroom for instance, make sure that there are no obstacles placed within 1.5m of the dryer and that it is kept ventilated.
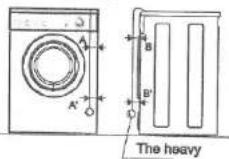
Step 2: The horizontal adjustment:
Tie a heavy object to the string on the front and two sides of the dryer, as indicated on the figure below., and if A=A, B=B, this means the dryer is placed horizontally. While the opposite, you could place something on the ground.
Notice:
If dryer could not be placed horizontally (the lean angle is no more than 2), the dryer will work unbalanced or stop working sometimes.
Notice when installing:
- Do not install dryer in open areas where it can be damaged by rain.
- Do not place the back of the dryer close to curtains.
- Do not place the dryer near gas or in a flammable area.
Step 3: Regarding the fixing of flex tube:
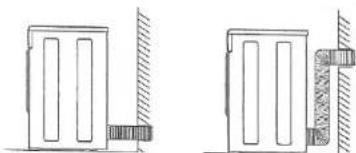
- Connect the side of the flex tube with the whorl on to the back vent, then fix it securely until light.
- Extend the other end of the flex tube outdoors, as is indicated in the figure below.

natural_image
Technical line drawing of two mechanical components with hatched areas, no text or symbols presentPreparation before drying

Operation explanation
- Preparation before drying
● Clothes have to be washed and spun before placed in the dryer. - Dry items of clothing of the same kind together.
- Sort your clothes into loads that take a similar time to dry e.g. Heavier items from light items, It is suggested to turn clothes inside-out before placing them in the dryer.
- Make sure the clothes are well protected and that all decorations or buttons are safe for the high temperature and will not damage the inner drum.
- It is better to turn out all pockets for drying.
- Check all clothes for stains or marks after washing. Once clothing items has been tumble dried, marks and stains on clothing cannot be removed.
-
Please make sure the power socket are well connected and will not touch conduit of water supply and gas supply etc.
-
Clean the filter regularly and make sure the filter has been fitted in the right position.
-
Load clothes loosely into drum.
-
Do not overload the dryer or dry large bulky items such as duvets or sleeping bags as it is important that the airflow through the dryer is not obstructed.
• It is better to dry small and large items together - Place delicate articles e.g. scarves, inside a pillowcase.
- We suggest a fabric conditioner to be used to reduce static electricity.
Operation explanation

The reference weight of dry clothes
-
Close the door
-
Instruction on control panel

The Timer
② Heat Switch : Full heat and half heat selection bottom
Note:
1) Check that the timer is in the "O" position. Plug in the machine.
2) The timer: Select the required drying time based on the recommendations on the control panel.
3) Heat switch
Select the required heat setting, full heat or half heat setting.
4) There is an automatic 15 minute cool down period at the end of every cycle, during which the heater is switched off. This helps to minimize creasing.
Drying guideline

Drying Clothes instruction
| Clothes type | Volume of dry clothes | Dry programme | |
| Cotton | Full 5.5kg | No iron | 100~125 min |
| Iron | 85~110 min | ||
| Half3kg | No iron | 80~100 min | |
| Iron | 65~80 min | ||
| Cotton fiber | Full 3.5kg | No iron | 90~100 min |
| Iron | 75~90 min | ||
| Half 2kg | No iron | 65~80 min | |
| Iron | 45~65 min | ||
| Fiber | 2.5 kg | No iron | 95~115 min |
| 2.5 kg | Iron | 70~95 min | |
| Wollen | Do not tumble dry woolen or wool mixture articles due to a possibility of shrinkage. | ||
Note:
- At the last 15 minutes of the cycle, cool air replaces the heat in the dryer. This helps to minimize creasing.
- The inside temperature and humidity will not affect drying time;
- Check care labels inside the garments for instructions.
Maintenance of dryer

- End of Program
A buzzer rings to indicate the end of the program and to remind one to remove the load from the dryer.
7. Remove the plug
To be safe, always remove the plug after usage.
-
Clear filter, cabinet and inner drum.
-
Always clean the filter: failure to clean the filter will extend drying times and could cause the safety cut-out to operate.
• Unplug dryer before cleaning.
Filter Clean
1) Remove filter :
The filter is located in the door opening.
Pull the filter upwards and away from the appliance.
2)Cleaning filter
Remove any threads or fluff by hand or
with a soft brush. Wash the filter
occasionally in detergent solution and
with a soft brush to remove small particles
3) Install filter
grip middle piece of filter with fingers.
Slide the filter into the space below the
door in a right angle position.

Cleaning cabinet and inner drum
Remove any dust by wiping the drum
and door with a damp cloth.
1. Do not rinse with water.
2. Do not use neutral scour wipe
3. Do not use gasoline and alcohol wipe

Identify and solve normal faults of dryer

| Trouble | Cause | Solution |
| Will not start | ● Power cut ● The power plug is not plugged in ● Dry clothes exceed ● The temperature use is out | ● Check that there is a supply of electricity. ● Check the plug internal connections. ● Check that the door has been properly closed and the machine is switched on. |
| External hot or hot colour | ● The int filter is dirty. ● The uptake or exhaust duct is dirty. | ● After removing the dried clothes, ALWAYS CLEAN THE FILTER. ● Clean out the atom |
| Clothes too dry | ● machine is too full of clothes ● Did not remove clothes in time. ● The clothes did not assert properly ● The temperature is too high | ● Load clothes loosely into drum. ● Remove the clothes immediately when finished ● See page 7. ● Check care labels on all garments. |
| Clothes shrink | ● Too dry | ● Check care labels on garments. |
| Hairball on clothes | ● It is normal for synthetic and permanent-press fibres to create "hairbells", due to a specific rub-action. | ● Use fabric conditioner to reduce static electricity and turn garments inside-out. |
Packing list

Packing list
| Packing list | ||
| Amount | 1 set | |
| Accessory | Name | Amount |
| Instruction Manual | 1 | |
| Guarantee voucher | 1 | |
| Lser return receipt | 1 | |
| Flex tube | 1 | |
| Dry shoerack | 1(option) | |
Specifications
| Dimension | 595x540x840(mm) | Weight of product | 33kg |
| Rated input power | 2060W | Rated volume of dryer | 5.5kg(Dry clothes) |
| Rated voltage | 220-240V | Rated frequency | 50Hz |

- Contents
- Features
- Parts Identification
- Notice before use
- Installation before use
- Step2:Precautions
- Installation before use · Simple installation
- Simple installation · Operation explanation
- Simple Installation
- Step 2: The horizontal adjustment:
- Notice:
- Preparation before drying
- Operation explanation
- Drying guideline
- Note:
- Maintenance of dryer
- Filter Clean
- Cleaning cabinet and inner drum
- Identify and solve normal faults of dryer
- Packing list
Brand : KELVINATOR
Model : KTD55W
Category : Tumble dryer