Rocpro 900 - External hard drive Rocstor - Free user manual and instructions
Find the device manual for free Rocpro 900 Rocstor in PDF.


| Product Type | External Hard Drive |
| Brand | Rocstor |
| Model | Rocpro 900 |
| Capacity | 1 TB (2 TB optional) |
| Interface | USB 3.0 (backward compatible with USB 2.0) |
| Data Transfer Rate | Up to 5 Gbps |
| Form Factor | Portable; 2.5-inch HDD |
| Dimensions (W x H x D) | 150 x 100 x 30 mm |
| Weight | 500 g |
| Enclosure Material | Aluminum with rubber bumpers |
| Power Supply | Bus-powered via USB |
| Key Features | Shock-resistant, dust-proof, water-resistant |
| Operating Temperature | 0°C to 45°C |
| Storage Temperature | -20°C to 60°C |
| Compatible Operating Systems | Windows, macOS, Linux (no driver needed) |
| Formatted File System | exFAT (compatible with Windows and macOS) |
| Spare Parts & Repairability | Not user-serviceable; contact Rocstor support |
| Maintenance & Cleaning | Wipe with a soft, dry cloth; avoid liquids |
| Safety | CE, FCC, RoHS certified |
| Warranty | 2 years limited warranty |
Frequently Asked Questions - Rocpro 900 Rocstor
User questions about Rocpro 900 Rocstor
0 question about this device. Answer the ones you know or ask your own.
Ask a new question about this device
Download the instructions for your External hard drive in PDF format for free! Find your manual Rocpro 900 - Rocstor and take your electronic device back in hand. On this page are published all the documents necessary for the use of your device. Rocpro 900 by Rocstor.
USER MANUAL Rocpro 900 Rocstor
- Introduction 6
- Box Contents 6
• Minimum System Requirements 6 - Connectors and Rocpro rear view 6
QUICK INSTALLATION 8
• How to Connect the Interface Cables - Connecting the Drive 8
• Cable Types: FireWire 800, FireWire 400, and USB 9
INSTALLING YOUR DRIVE 10
- Rocpro as a bootable device 10
• Disconnecting Your Drive 10
○ PC 10
○ Mac 11
• Reformatting Your Drive 11
○ Reformatting via PC (Window based computers) 11
○ Reformatting via Mac 11
• Important Note 11
• How to Daisy-Chain through FireWire ports to your Rocpro Drive at one time ____ 12
PARTITIONING AND FORMATTING THE ROCPRO DRIVE ON A MAC OS 13
- Warning 13
• Important Notes 13
• Instructions for Partitioning and Formatting from FAT 32 to HFS+ 13
PARTITIONING & FORMATTING the ROCPRO Drive on WINDOWS 2000, XP and VISTA 20
- Warning 20
• Important Notes 20
• Different ways to get to the Control Panel 21
• Instructions upon reaching the Control Panel 23
• Instructions for Partitioning and Formatting from FAT 32 to NTFS 24
TROUBLESHOOTING 31
- Troubleshooting for Macintosh computers 31
- Troubleshooting for PC Windows based computers 33
KNOWLEDGE BASE 35
- Rocpro 900 Unique Features 35
- Specifications 36
• Introduction to Interfaces (ports) and Cables 37
○ FireWire (IEEE 1394) 37
USB (Universal Serial Bus) 39
○ Comparison Chart 40
• Introduction to Formatting 41
File Allocation Table (FAT) and FAT 32 41
○ HFS Plus or HFS+ 42
LIMITED WARRANTY 43
TECHNICAL SUPPORT 46
ACKNOWLEDGEMENTS 47
• Trademarks 47
• Copyrights 47
CONTACT INFORMATION 48
• Corporate Headquarters 48
• Technical Support / Return Authorization "RMA" 48
• Sales Info 48
IMPORTANT NOTICES
Safety Notices
- The warranty is void if an unauthorized person attempts and/or repairs the hard disk drive.
- Read all Manuals and instructions carefully before using the device.
- Do not spill any liquid or insert any object into the device.
- Use the device within the specifications indicated, including but not limited to: power requirements, temperature, humidity, sunlight and magnetism from other devices such as computers and televisions.
- Please visit the Rocstor website, www.rocstor.com for further information concerning specifications and use of the device.
General Notices
- Consistently make multiple backup copies of your data for your protection. Hard disk drives are subject to failure at any time.
- Rocstorage, Inc. shall not be held liable for loss of data or the restoration or recovery of data on the device. Please view complete Limited Warranty Information in this manual or on the Rocstor website (www.rocstor.com) for further details.
Capacity Disclaimer
Actual accessible hard drive capacity will indicate up to 10% lower than stated under different Operating Systems and formatting.
The storage volume is measured in total bytes before formatting. References to round numbers of gigabytes or terabytes are an approximation only. For example, a disk drive labeled as having 500GB (gigabytes) has space for approximately 500,000,000,000 bytes before formatting. After formatting, the drive capacity is reduced by about 5% to 10% depending on the operating system and formatting used.
Care and Handling
The following instructions concern the proper care and handling of Rocpro 850 Drives. Please take a moment to review these instructions.
• As with any storage solution, it is recommended that all data be backed up regularly.
- Ensure that you follow the proper removal procedure to disconnect the Rocpro drive.
- Do not move or disconnect this device from your computer while it is reading or writing data. This may cause damage to the Rocpro drive.
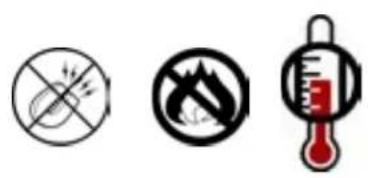
- Do not place this device near a heat source or expose it to direct flame.
- Do not place the device near any equipment generating strong electromagnetic fields. Exposure to strong electromagnetic fields may cause the device to malfunction or data to be corrupted.
- Do not drop or cause shock to your Rocpro drive.
- Do not spill any liquid or insert any object into the device.
- Do not attempt to disassemble and service the Rocpro drive during the warranty period.
- Please read the Safety Notices and Limited Warranty information in this Manual and on the Rocstor website (www.rocstor.com) for further details.
GENERAL
Introduction
ROCPRO 900 - 2x FireWire 800 and 1x USB3 (2.0)
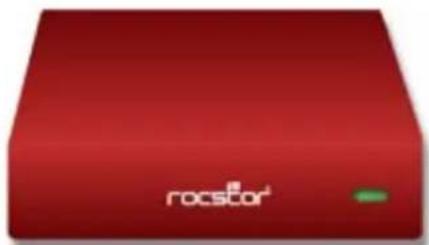
The new generation of Rocpro external SATA Hard Drives delivers extraordinary performance and reliability for both Mac and PC users. Specifically designed for demanding audio/video professionals, the new Rocpro 900 contains a fast SATA high capacity 3.5" drive in a stylish and unique aluminum case that can be stacked or mounted vertically.
natural_image
Red rectangular electronic device with 'roscstor' branding and a green indicator light (no readable text beyond branding)With its built-in power supply, fan-less and quiet operation, the Rocpro 900 can be easily moved from one desktop environment to another using the provided carrying case.
Choose Rocstor drives and store your future.
Box Contents
• External hard disk drive
- Stand for vertical mounting
- USB 3 cable
• 9-pin to 9-pin FireWire 800 (1394b) cable
- AC power cord
• Installation user Guide
- Carrying case
ROCPRO 900
FireWire 800 (9 to 9 pin) Cable
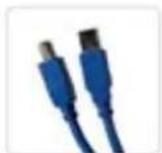
USB Cable
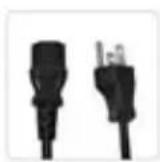
Power Cord
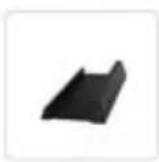
Stand
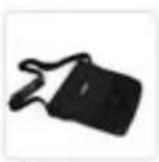
Carrying Case
Quick Installation Guide
Minimum System Requirements
Mac Users:
Hardware: FireWire* (400 or 800) or USB 3 (2.0) port(s.)
Mac: PowerPC or Intel processor running Mac OS 9, X, (Snow) Leopard
Recommended memory: 512 MB RAM
Window Users:
Hardware: FireWire* (400 or 800) or USB 3 (2.0) port(s.)
Operating Systems: Microsoft Windows 2000, Me, XP, Vista, or Windows 7
Recommended memory: 512 MB RAM
* Many computers do not come with factory installed FireWire 800 or eSATA ports. Therefore, you may need to purchase a PCI, PCI-X or PCI-Express card to use these ports. Rocstor offers a variety of accessories to work with PC Windows or Mac based Computers. Please visit us at www.ROCSTOR.com
Connectors
- FireWire 800 (IEEE 1394b) port x2
(You may connect FireWire 800 to a FireWire 400 port via a special cable {also read page 12})
• Standard AC power input connection
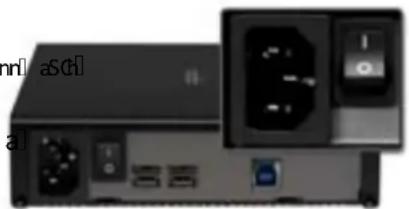
• ON/OFF power switch - USB 3 port x1
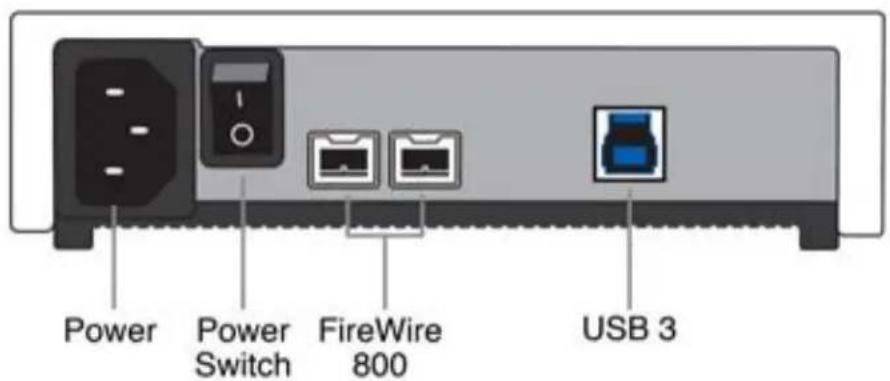
QUCIK INSTALLATION
How to Connect the Interface Cables - Connecting the Drive
-
Turn ON your computer and wait until it fully boots up to load all programs.
-
Connect one end of the power cord directly to the Rocpro 900 and the other end to an AC outlet, surge protector or battery Backup (UPS).
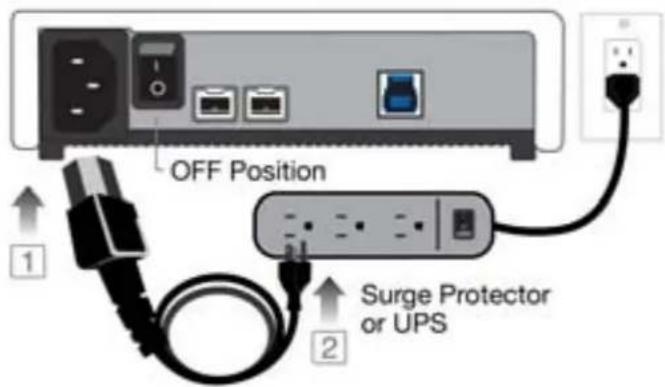
- Using only one interface cable at a time, select the interface port you wish to use on your computer. Connect one end of the cable to the Rocpro 900 and the other end to the computer. Please review cable types on the next page:
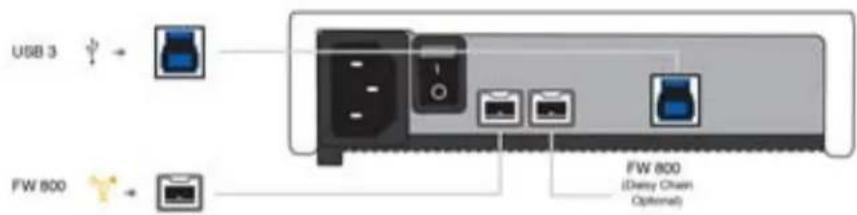
- Turn the Rocpro 900 Hard Drive switch ON.
- The Hard drive is preformatted for Plug-and-Play operation. After a few seconds a Rocstor HD icon will show on the "My Computer" folder under the Windows OS. Under the Mac OS, the Rocport HD will appear on the "Desktop."
- Click (double click) on the Rocstor HD icon to access the drive.
□□□P□□□aS□5□
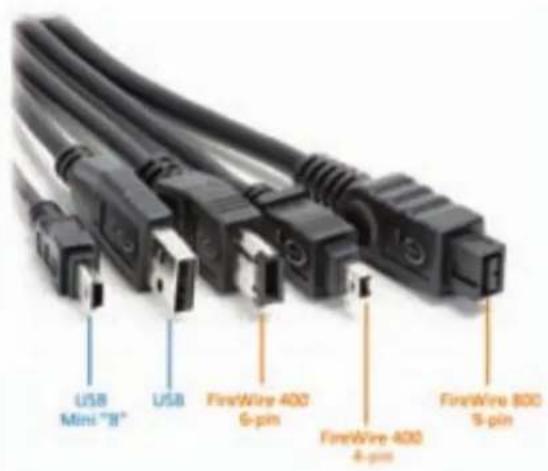
□ □ □ □ Y66□ N □ □ □ QK3Y□ I□/x□ tu□ ta □ ta □ EAA□ fuu □ If a□
- ta ta EAA u lau n1 a l l l lg u P t n l EAA t h n
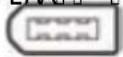
□ 8 □ 9 □ H66 □ N □ □ □ QK3Y □ "x tu ta ta "AA fuu If a
- ta ta EAA u lau n1 a l l lg u P t n l "AA" t n l n
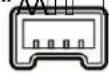
All Rocstor hard drives are formatted as blank FAT32 (32-bit file allocation table) volumes {unless otherwise stated on the box} that are compatible with most modern Windows and Macintosh operating systems. To begin using your Rocstor drive, simply connect a data cable and power cord. There's no need to shut down your computer because your Rocstor drive is hot-pluggable. Just plug it in and it's ready to use.
The first choice you have to make is which of the provided data cables to use. The drive can connect directly to any available FireWire or USB port on your computer, or it can be Daisy-Chained to your computer through another compatible device with an available FireWire port. The ability to Daisy-Chain allows you to have multiple drives connected simultaneously, greatly increasing your available storage capacity. Daisy-Chain is only available through FireWire ports.
If you intend to use the drive for additional storage only—not as a startup device (bootable) use the cable that provides the maximum throughput rate for the buses available on your computer: Up to 800 Mbits/sec via FireWire 800, 480 Mbits/sec via USB 2.0, 400 Mbits/sec via FireWire 400, or 12 Mbits/sec via USB 1.1. To avoid damaging your hardware and losing data, never simultaneously connect the drive to the computer using more than one data cable.
Rocpro as a bootable device
If you intend to use the drive as a startup device, check the documentation that came with your computer to confirm compatibility with the various interfaces. PowerPC-based Macs require FireWire connections for startup disks, whereas Intel-based Macs can use either FireWire or USB connections.
Furthermore, using the drive as a startup device requires installing an authorized copy of the Windows or Mac operating system (available separately from Microsoft and Apple, respectively). To install the Mac OS 9 or OS X, you must reformat the drive as a Mac OS Extended volume with Disk Utility. An Intel-based Mac cannot start from a device formatted on a PowerPC-based Mac or vice versa.
Disconnecting Your Drive
Never disconnect or turn off an external drive when its activity light is ON. External drives must be properly unmounted (or disconnected) to avoid data loss and possible damage to the hard disk drive or computer.
PC
The easiest ways to safely unmount an external hard drive on your PC is to right-click the device removal icon next to the clock in the system tray. Then choose Safely Remove Hardware.
Choose the external device you want to remove, and then click Stop. An alert will notify you if the drive is in use by an application. If in use close any open documents or applications on the drive and try again. Windows will display an alert when you can safely disconnect or turn off the drive.
Mac
The easiest way to safely unmount an external hard drive is to drag its Finder icon to the Trash. An alert will notify you if the drive is in use by an application. Close any open documents or applications on the drive and try again. When the drive's icon no longer appears on the Finder's Desktop and the drive's activity light is green, you can safely disconnect or turn off the drive.
Reformatting Your Drive
As mentioned previously, all Rocstor hard drives are formatted as blank FAT32 volumes (otherwise noted on the retail packaging) that are compatible with most modern Windows and Macintosh operating systems. However, you can use your normal disk management tools to erase or reformat the drive if needed. For example, Windows users may want to reformat the drive as an NTFS (new technology file system) volume, or Mac OS X users may wish to reformat the drive as a Mac OS Extended (Journal) or UFS (Unix file system) volume.
Please note that all of your data will be lost if the volume (Hard Drive) is formatted or reformatted.
Reformatting via PC (Window based computers)
Right-click the Rocpro drive in the "My Computer" folder, then choose Format. In the dialog window that appears, choose the desired capacity, file system and allocation unit size and then click Start.
Reformatting via Mac
Open Disk Utility (/Applications/Utilities). Select the drive in the list at the left, then click the Erase tab. Choose the desired volume format, specify a name, then click Erase.
Important Note
Any cable (FireWire800, or USB 2.0) inserted before the drive is powered on has priority over the other cables and will be the primary connection method, e.g. if the drive is connected via FireWire 800 before powering on the drive, data will be transferred via FireWire 800.
The drive should only be connected to a computer via one interface at a time. Connection of the drive to a computer via two or more interfaces is not recommended and may potentially damage your Rocpro drive and data.
How to Daisy-Chain through FireWire ports to your Rocpro Drive at one time
Daisy-Chain (Connecting Multiple Devices) means that device A is connected to device B and device B is connected to device C and so forth. All connections are made only through FireWire ports.
- Do not mix interfaces. Select FireWire ports only. For example, do not use USB and FireWire to Daisy-Chain.
- Mixing FireWire 400 and 800 connectors to Daisy- Chain will reduce the transfer speed to FireWire 400.
- Daisy-Chain allows you to connect multiple devices, such as cameras, external read/write drives and other external devices such as hard disk drive to your computer via FireWire ports.
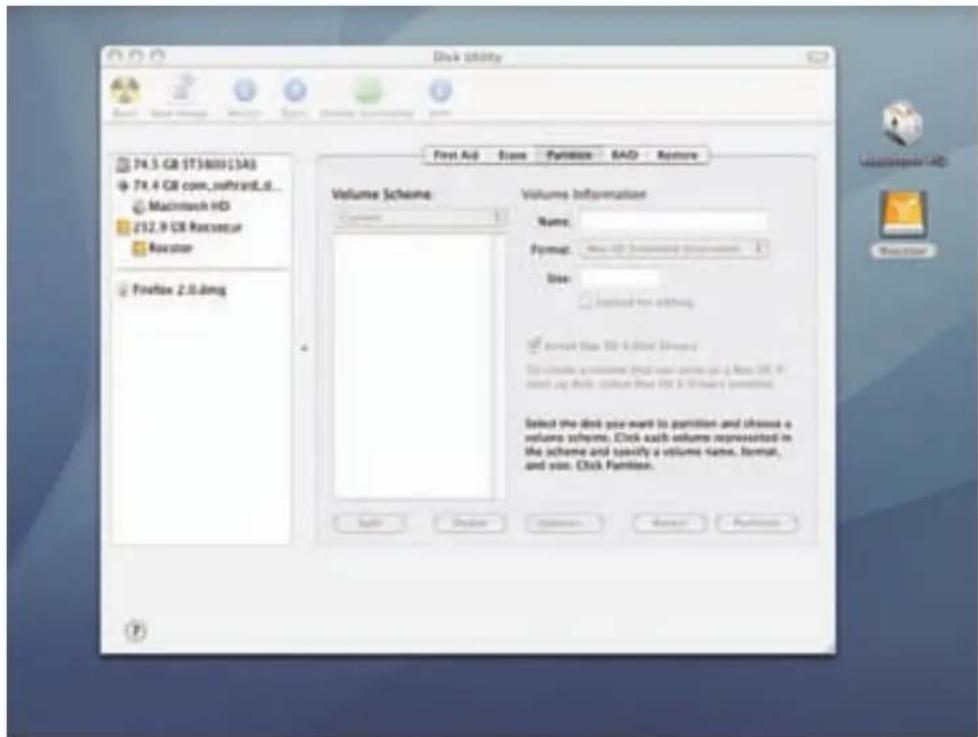
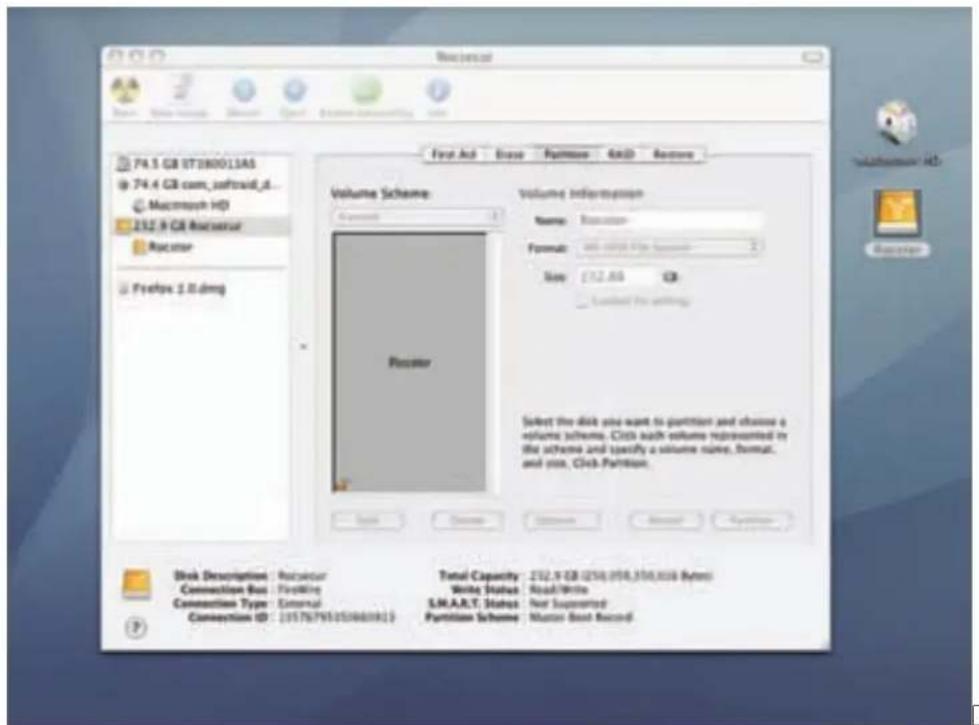
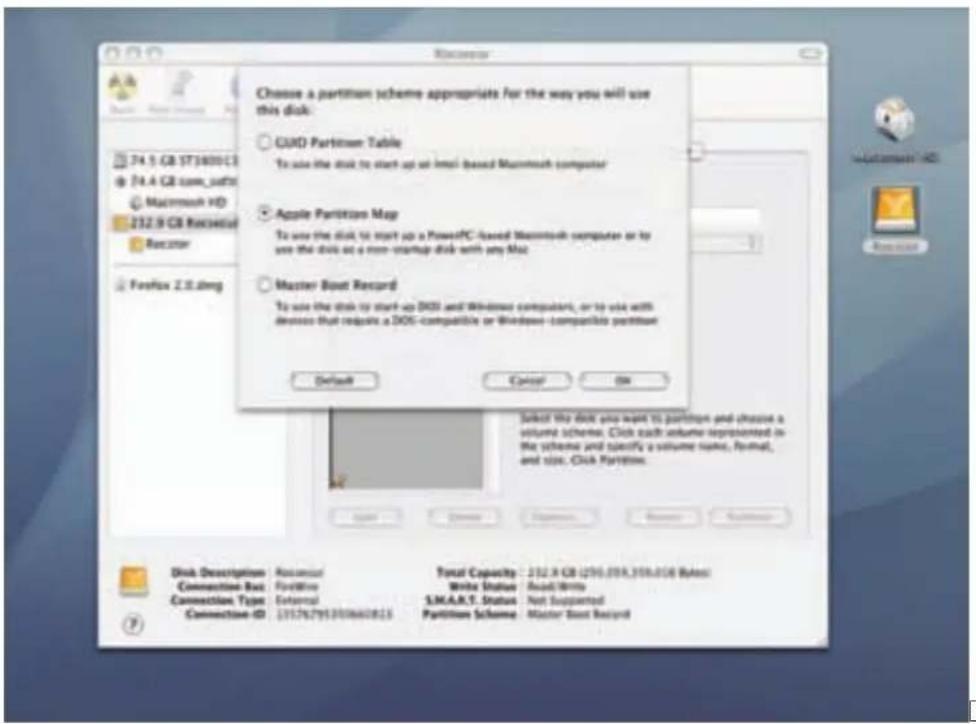
PARTITIONING AND FORMATTING THE ROCPRO DRIVE ON A MAC OS
All Rocstor drives are factory formatted with FAT32, unless otherwise stated on the retail box.
WARNING: Formatting and Partitioning the Rocpro Drive will destroy all of its data. To protect your data, back it up before formatting or partitioning this device.
IMPORTANT NOTES:
- All programs should be closed before beginning.
- Connect the Rocstor hard disk drive to your computer using the appropriate cables.
- Turn ON the Rocstor hard disk drive. Some Rocstor HDs are bus-powered and turn ON automatically. Look for a Blue or Green light.
- "Click" means left click. "Right Click" will be so labeled.
- Some computers are set so a single "click" will perform the task, such as opening a window. Depending on your mouse setting, you may have to double click to get to the next window. If a single click does not open the next window, please double click.
KU u0 □ □ &A
+C □ fuu □ l□ls □□ f□ nlfa□ atP □lf□ls □□ fy U|l a□Pt□ □□ Uf al□
5C s atP g te U U a n u t f u l l s n r l f u l l s y t e a t s l n d C s t a U a n u l l s y l s f f f u u l f u w t a t a u h

natural_image
Blue background with abstract curved shapes and two small icons (no text or symbols)f|G|1|ls a|a|atP|tn|fuu|l|Pt|nrfuf|ls|tu|t|l|ls| d|tulfns|H|tfuC\s|ny|Uaf|la n|g|e|enf|UUs|lf|ls|lfefgtu|nlUnO
7C □ u□ □ ls □ t□ f u□ □ U □ a n□ f u□ ls □ d□ n r□ f U□ □ e□ r□ f u□ ls □ d□ □ □ t u l f r s□ □ □ H□ t□ f u□
zC || u||s ||e ||n|| ||f ||ls ||d ||tnr|| |t|SH|y u||tn|| ||en|| f ||P ||t e|| e ||| atP nC ||u ||g tæ|| || f ||n|f a|| atP C ||e ||r ||fu||s ||t ||fu|nsfg tu ||ls || ||tnr|| ||U || t|SC
"C f|a ufg tuls f nfa y u|C r f u ls d a ltfuH l u l s u r l d |aa ulH l l |u a d f e y s y CH a af U f g u d a ltfuH y u |g t e U U a
"C □u□ls □d□ □alttfuH□y u|□Sf|□y □S □n e□ l□□u S□u|y □ a□f□U□a lt|tfur□P □t e□ e□|u□ a□ d□ f□y □□□s y □H□"
+AC 1 Sf | a | ntu | u ls a Uaf | If (+7g
++C 1 Sf | a | ntu t a r f u Ulf ur f u ls e g a ul af l ls g tu fg c e ll a ld tu s y 1 fa Sf | a f nl f a at P C | nl Sf | n e l d Ue a ld tf u U d r r
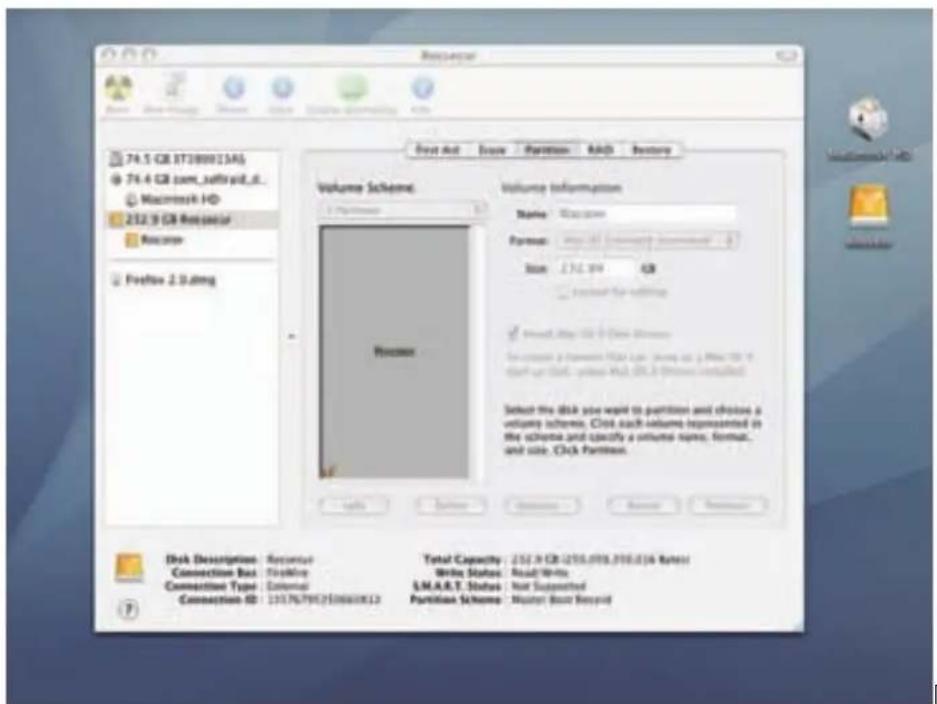
+7C □ fay □ |G □ □ e□ r□ f u□ tls a□ ls □ d□ fay □| H□ a □□ fails □□ e| □| UI□ fg u□ □a afg n□ □□ e □ l□ [2l u□ □ □ vo| lau□ e h□
+EC 1 a n e l t u l s l S U f 1 f ay l _ d r l s d a l t f u H l l l t u l s d g a at s l f 1 l s n a u C u l s u 2 l n a u l l a l t f u t r r d r d a l t f u H t t u C
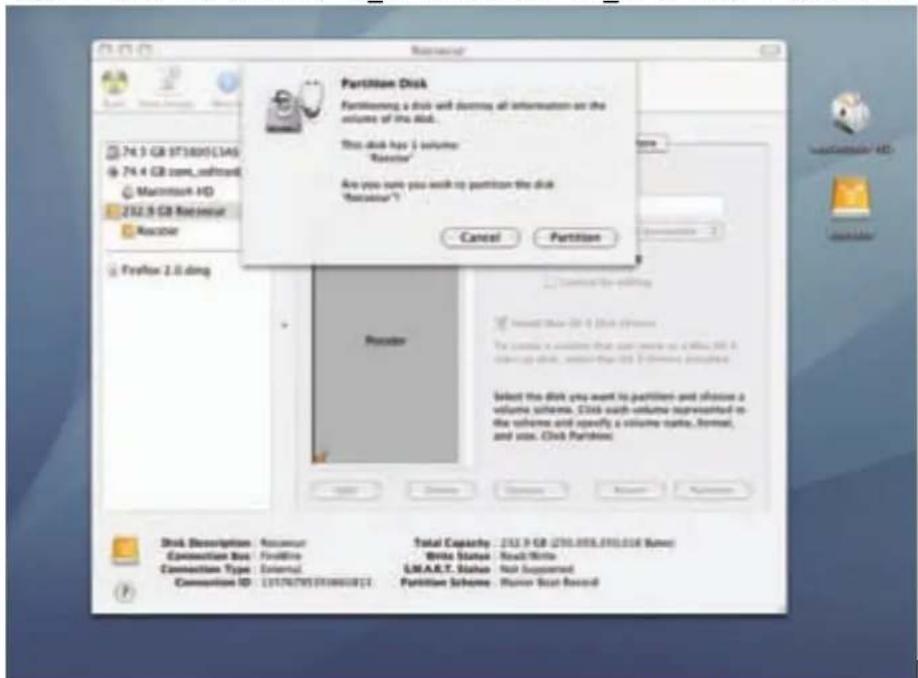
+kC s atP g te t u If If ay U | Uf u f y Ue ltf u4 ls r ly t f u l s I I tan U U ls nrlf U g te a UU a g tls Sf | a nt u u y f u l s nrlf U
+/C f|uufg 2dfaefnlfa1|auIfls nrlfUC
PARTITIONING AND FORMATTING THE ROCPRO DRIVE ON WINDOWS 2000, XP AND VISTA
All Rocstor drives are factory formatted with FAT32, unless otherwise stated on the retail box.
WARNING: Formatting and Partitioning the Rocpro Drive will destroy all of its data. To protect your data, back it up before formatting or partitioning this device.
IMPORTANT NOTES:
- All programs should be closed before beginning.
- Connect the Rocstor hard disk drive to your computer using the appropriate cables.
- Turn ON the Rocstor hard disk drive.
- The initial goal is to reach the Control Panel. If you know how to get there, skip this section and go directly to Instruction 1 (Instructions for Partitioning and Formatting from FAT 32 to NTFS.) A fast way of reaching “Disk Management” is to right click “My Computer” icon and click on “Manage” in the drop down menu. The next window is “Computer Management.” In the left menu, click “Disk Management.”
- The ultimate goal is to reach Disk Management. If you know how to get there, skip this section and go directly to Instruction 4 (Instructions for Partitioning and Formatting from FAT 32 to NTFS).
- Due to different views that are possible on Windows operating systems (2000, XP, Vista), we will provide various ways of reaching the Control Panel.
- "Click" means left click. "Right Click" will be so labeled.
- Some computers are set so a single "click" will perform the task, such as opening a window. Depending on your mouse setting, you may have to double click to get to the next window. If a single click does not open the next window, please double click.
DIFFERENT WAYS TO GET TO THE CONTROL PANEL:
(You may use any one of the following methods)
- If the icon "My Computer" shows on your desktop, click or double click on the icon. Under "Other Places" click on "Control Panel."
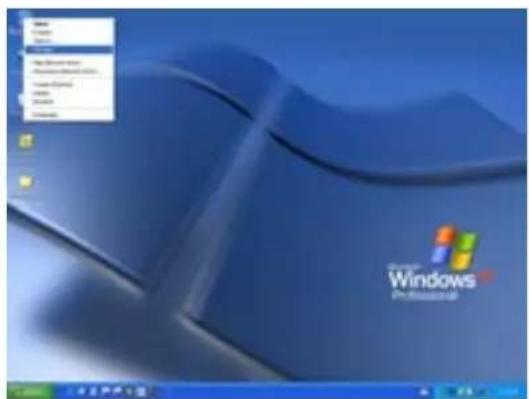
Under Windows XP
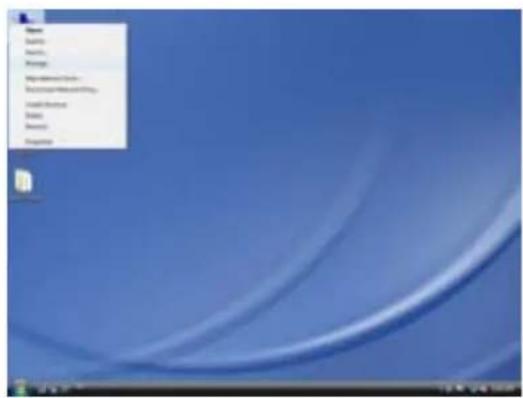
under Vista OS
- If the icon "My Computer" does not show on your desktop, click on the Start icon on the lower left of your screen. If the Control Panel link is displayed, click on the Control Panel link.
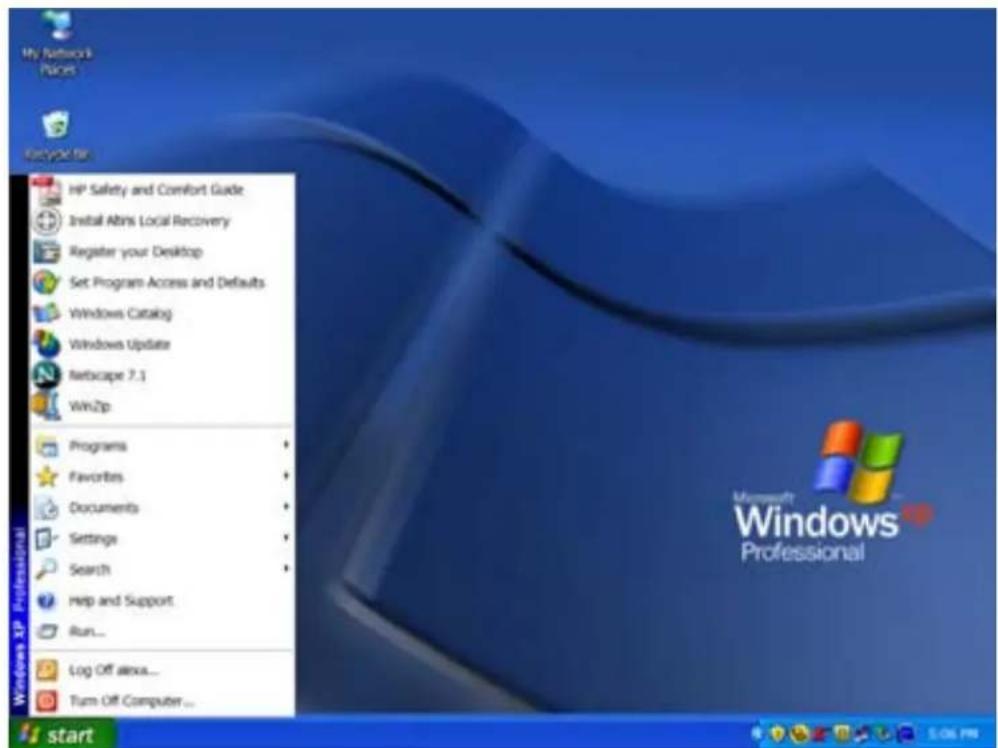
-
If the icon "My Computer" does not show on your desktop, click on the Start icon on the lower left of your screen. If the Control Panel link is not displayed, click on the Settings link and then click on the Control Panel link.
-
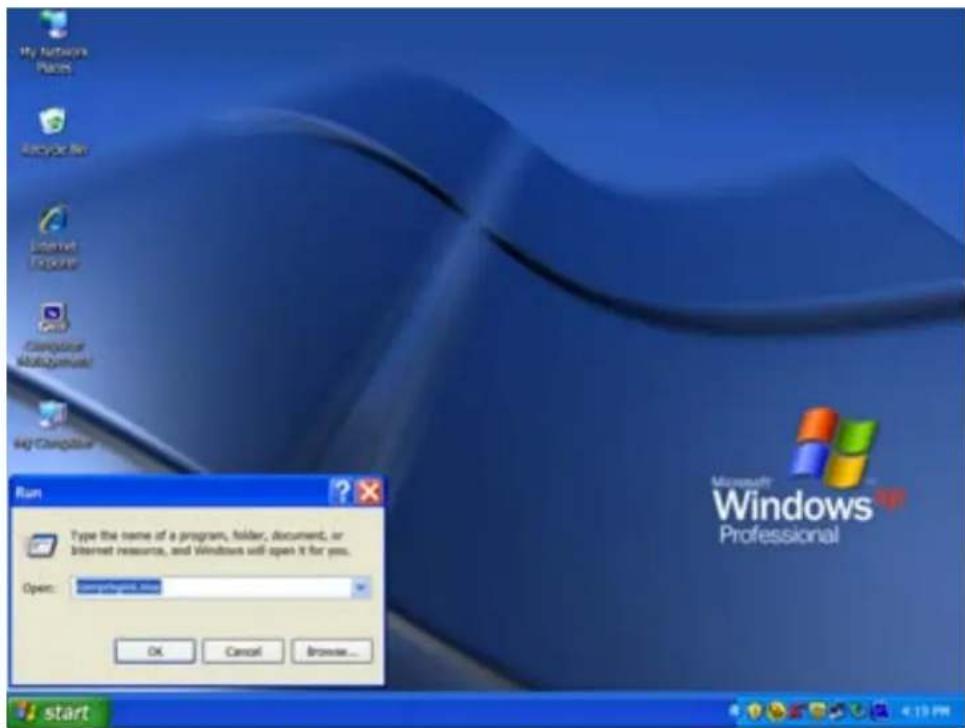
Click on the Start icon on the lower left of your screen. Click on Run. Delete anything listed in the Open window. Type the following: compmgmt.msc and then click OK. Skip to INSTRUCTION # 4 (Instructions for Partitioning and Formatting from FAT 32 to NTFS {page 24}).
INSTRUCTIONS UPON REACHING CONTROL PANEL
a. After reaching the Control Panel, click on Administrative Tools.
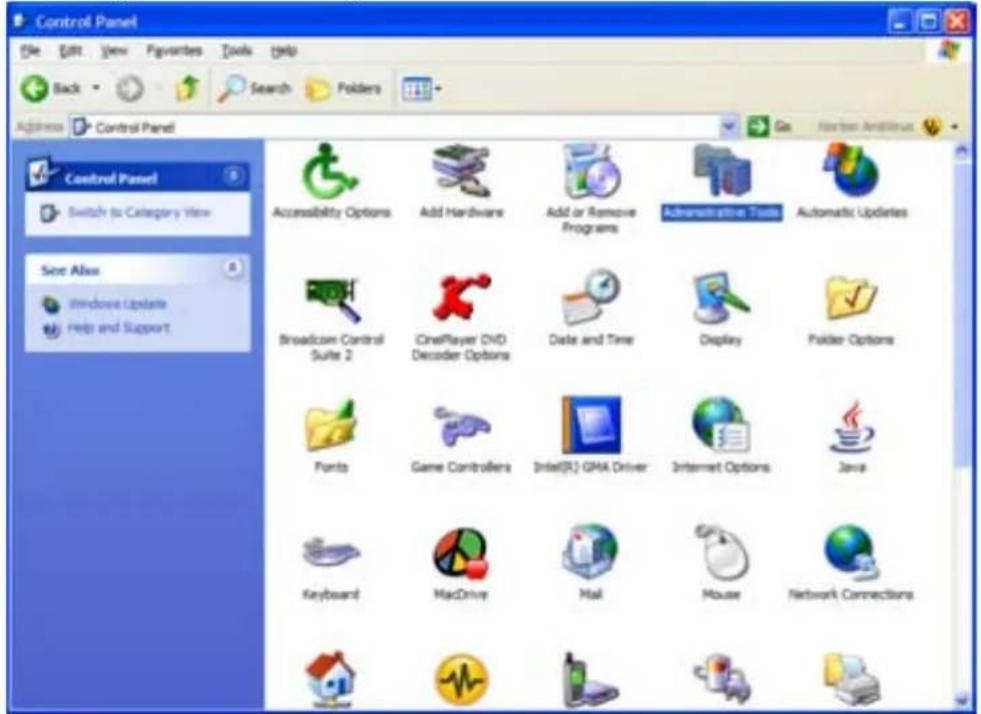
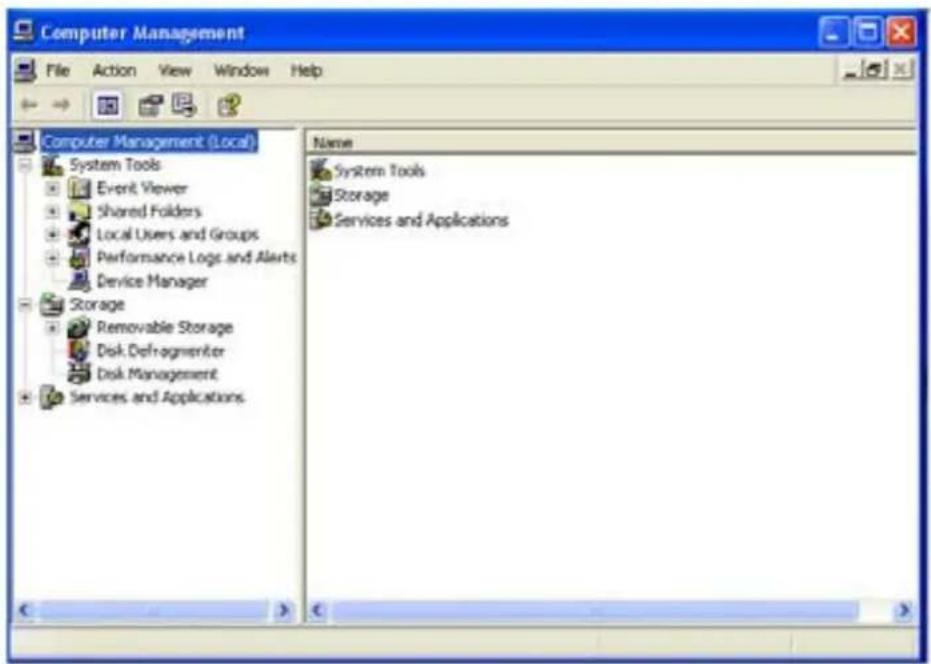
b. After reaching Administrative Tools, click on Computer Management.
c. After reaching Computer Management, click on Disk Management.
INSTRUCTIONS FOR PARTITIONING AND FORMATING FROM FAT32 to NTFS
- In the "Disk Management" window, right click the Rocstor drive in the upper portion of the menu to highlight it. In the drop down menu, select "Delete Partition."
WARNING: Formatting and Partitioning the Rocpro Drive will destroy all of its data. To protect your data, back it up before formatting or partitioning this device.
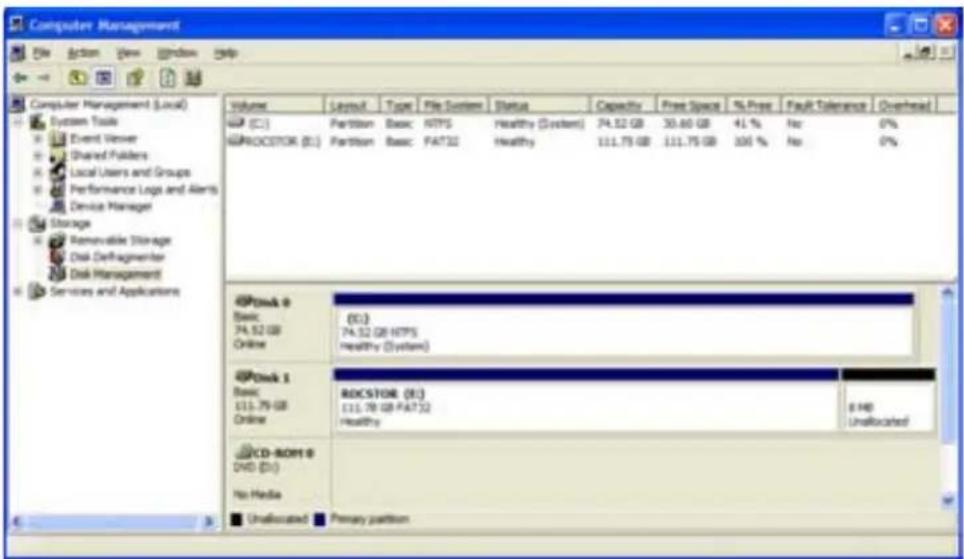
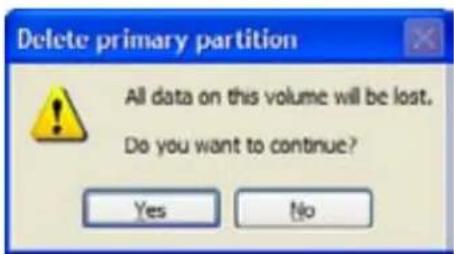
- The next window is "Delete primary partition." Click on Yes.
-
At this point the Rocstor drive will not show up on the "Disk Management Volume" window in the upper menu.
-
The Rocstor drive will show up in the lower menu as an "Unallocated" disk.
![Computer Management File Edit View Window Tools Computer Management (Local) System Tools Event Viewer Shared Posters Local Users and Groups Performance Logs and Alerts Device Manager Storage Removable Storage Disk Defragmenter Disk Management Services and Applications Volume Layout Type File System Status Capacity Free Space % Free Fault Tolerance Overhead C: Partition Basic NTPS healthy [System] 74.52 GB 30.60 GB 41% No 0% Disk 0 Basic 74.52 GB NTPS healthy [System] Disk 1 Basic 111.79 GB Unallocated Disk Adders 0 DVD (D:) No Media Unallocated Primary partition](/content/2026/05/988116/images/d573092e8109793b5f3519d9734166fcb858575478316f73855236e00c7775e6.jpg)
- Right click anywhere in the "Unallocated" disk area in the lower menu.
- Click on "New Partition."
- You are taken to "Welcome to the New Partition Wizard." Click "Next".
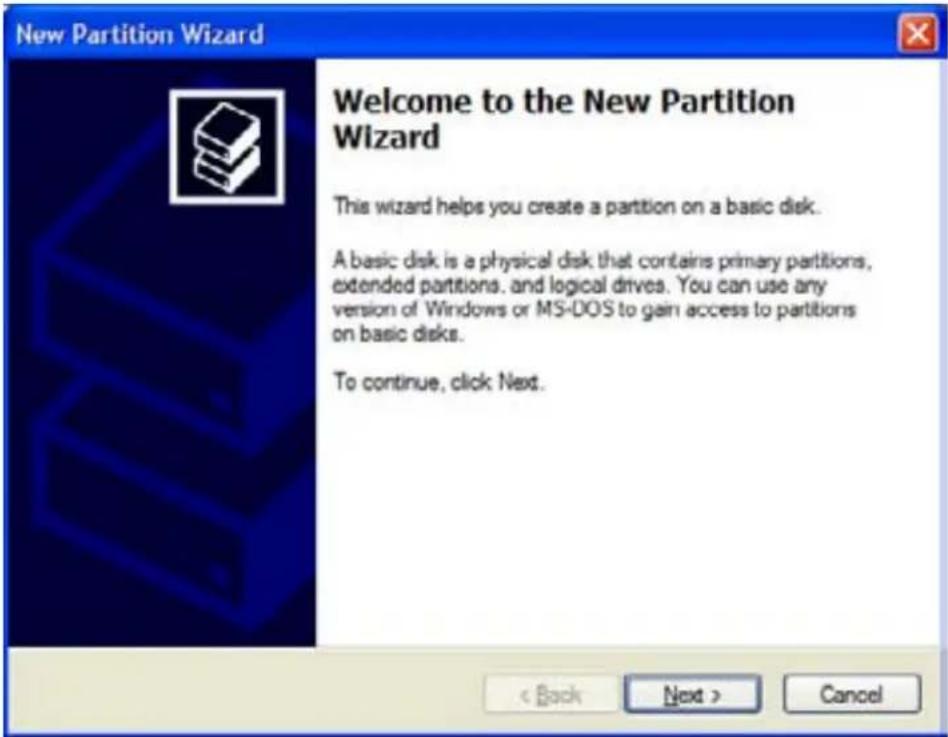
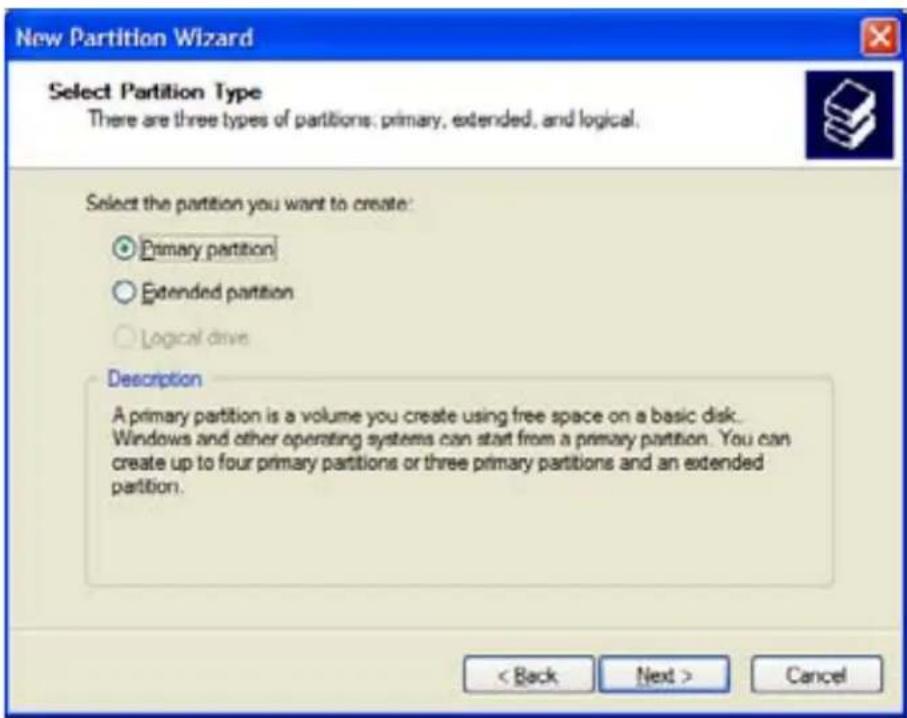
- Click on "Primary partition" (it should be selected as the default partition). Click "Next".
- Under "Specific Partition Size," click Next to accept the default setting, which is the maximum size allowed.
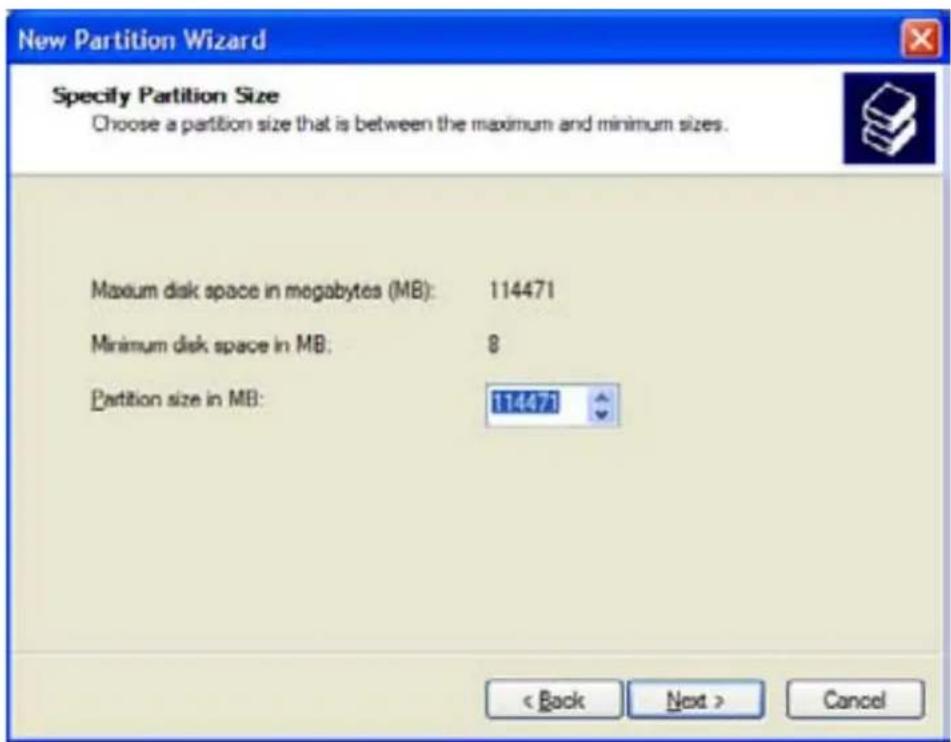
- Under "Assign Drive Letter or Path," accept the default letter and click "Next".
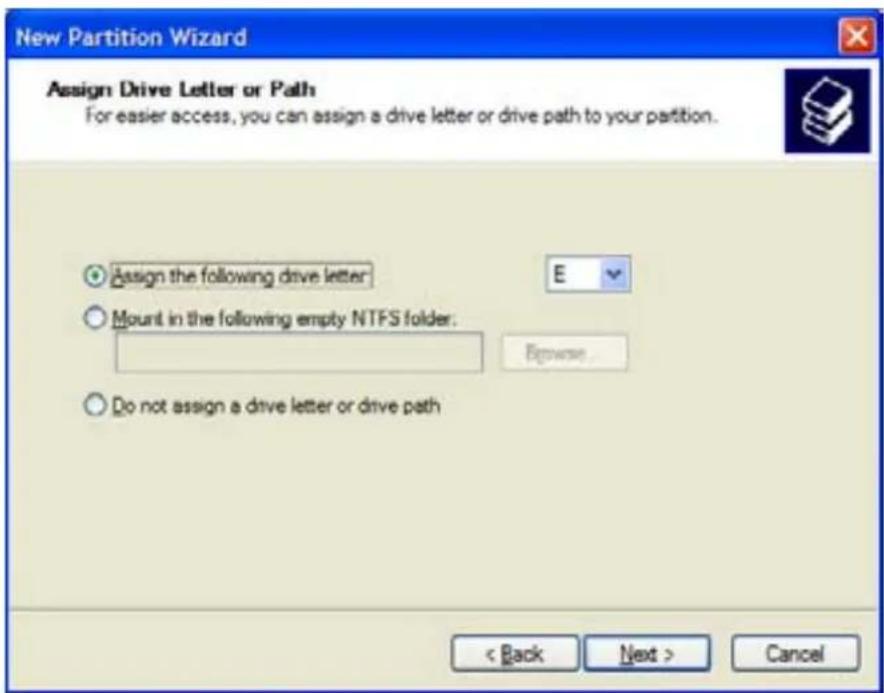
- In the "Format Partition," accept the default setting.
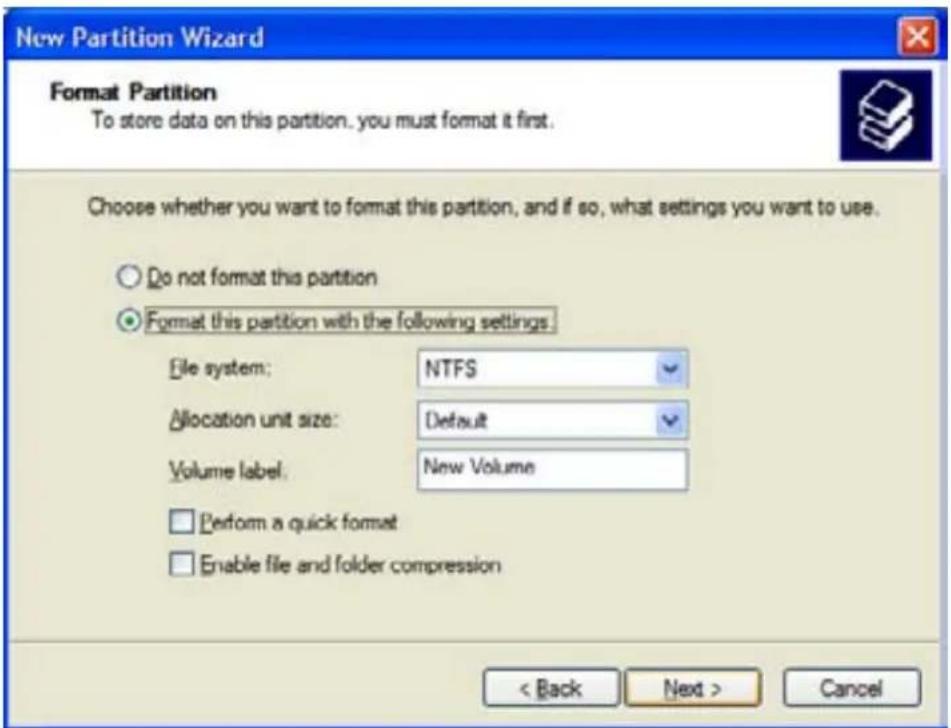
- The "Volume label" can be changed to any name up to 11 characters.
-
Suggest that "Quick Format" be selected and then click "Next".
-
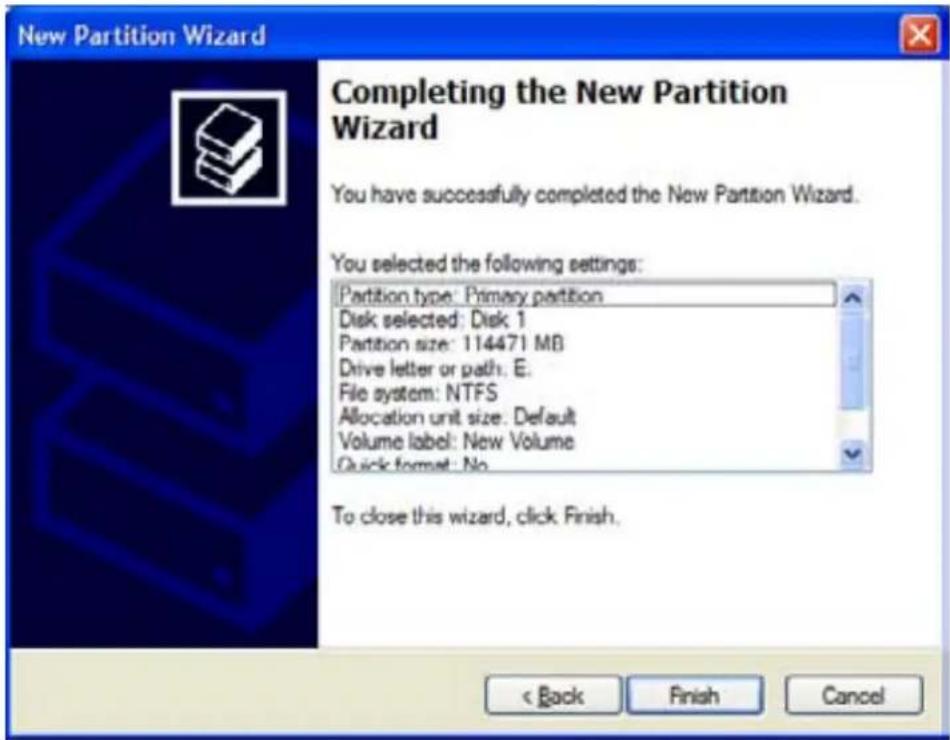
You now reached the "Completing the New Partition Wizard" screen. It displays the various settings you previously selected. If you are satisfied with your selections, click "Finish" to complete the new formatting. At this time the Rocstor disk drive is being formatted, which may take a few minutes.
![Computer Management File Action View Window Help Volume Layout Type File System Status Capacity Free Space % Free Fault Tolerance Overhead UP (C:) Partition Basic NTPS healthy [System] 74.52 GB 30.60 GB 41 % No 0% UP (E:) Partition Basic Formatting 111.79 GB 111.79 GB 100 % No 0% 40Disk 0 Basic 74.52 GB Online (XC) 74.52 GB NTPS Healthy [System] 40Disk 1 Basic 111.79 GB Online (RC) 111.79 GB Formatting CD-ROM 8 (DVD) (D:) No Media Primary partition](/content/2026/05/988116/images/2a2c5d75b56f0a5a2e8c6f2ea41aeaa88455c5da37c69d7b5ef7dd058d2d6f79.jpg)
- You will return automatically to the "Disk Management" window and will see the newly formatted Rocstor disk on the screen with the name you selected. If no new name was
entered in the “Volume label,” the Rocstor drive will show up as “New Volume.” To rename the volume at this time, right click “New Volume” and click “Properties.” You can now change the volume name up to 11 characters. Click OK.
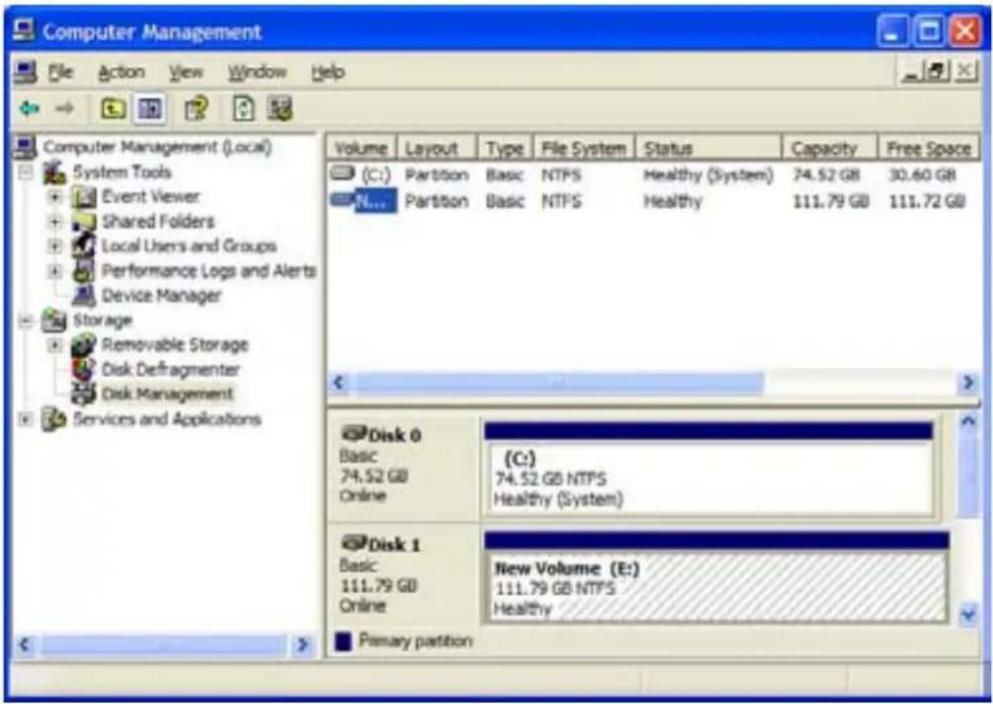
- You can also change the name at any time in the future by reaching the "Properties" menu of the Rocstor drive.
- You can now Exit or close to return to the desktop.
Troubleshooting
Rocstor data storage products are subjected to several quality control tests before leaving our factory. However, from time to time, the product may not work after shipment or would experience intermittent problems under certain criteria and/or situations. Should you experience a problem with your Rocpro HD, please review the Manual and read the possible solutions that fit your problem. (The User Manual is updated regularly so check the Rocstor website for an updated Manual). Please contact Rocstor technical support listed under contact information at the end of this Manual.
Troubleshooting for MACINTOSH computers
Problem: The computer does not recognize the drive
Solutions:
- Is the Rocpro green light ON and is the cable connected from the HD device to the computer. Rocpro HD icon should appear on the desktop. Continue to review this guide to find the solution.
- Your computer's Minimum requirements may not meet the minimum system requirements as indicated in this Manual. Page 7
- Confirm that the outlet is providing the correct voltage and the electrical power cord is securely attached to both the outlet and the Rocpro drive. Poor or loose connections can result in loss of power and possible damage to the drive. Ensure that the ON/OFF switch is turned to the ON position.
- If the Rocpro drive is connected to an outlet via an Undisrupted Power Supply (battery Backup) or a surge protector, be sure that they provide the correct voltage and they are all switched “ON” and receiving electricity.
- Please review this Manual's installation procedure for the operating system and interface you are using.
Read the Manual's installation procedure to ensure it was properly followed.
- Please check the cable connections as the cables must be properly and securely attached to the computer and hard drive. Ensure that there is a firm connection. It is suggested that the cables be detached and reattached, and that the computer be shut off for 20 seconds and then restarted.
• Ensure that the Rocpro drive has been properly reformatted by reviewing the User Manual.
- Have you checked to confirm that the computer's operating system works with the file system?
- Review the manual that came with your computer to ensure that the file system is compatible with the operating system.
Problem: The Rocpro drive is not working fast enough.
Solution:
- You may have too many devices connected to your computer (such as Laptop computers.) Disconnect some devices and observe if there is an improvement in performance.
Problem: There is a decrease in performance when the Rocpro drive is connected via the USB cable to a USB 2.0 port.
Solution:
- Ensure that the USB 2.0 drivers for the host bus and device have been properly and securely installed. You may reinstall to assure proper installation.
Notes:
- When connecting the device to USB 2.0 port in your computer, please be sure that the connection at the host computer is High Speed USB 2.0 and drivers (if required) are installed; otherwise you may experience slower transfer speed between the host computer and the Rocpro device.
Notes - Mac OS 10x:
- Rocpro drives are designed to save electricity and subsequently the wear and tear of the internal hard drive by having the hard drive stop spinning when the Rocpro is not accessed for a certain amount of time (sleeping mode). Under Mac OS 10 you it might cause an error please ignore the error message as it might take few seconds to start spinning at the designated speed (wake up.)
- You may require upgrading to a higher version of Mac OS if your host computer does not recognize the Rocpro device when connected via FireWire.
- You must avoid particular characters similar to ^!?\< when coping to FAT 32 volume section.
Troubleshooting for PC WINDOWS based computers
Problem: The computer does not appear to recognize the drive.
Solutions:
- A window should appear, notifying you that a device is connected and/or the Rocpro HD icon should appear on the "My Computer" folder.
- Your computer's Minimum requirements may not meet the minimum system requirements as indicated in this Manual. Page 7
- Confirm that the outlet is providing the correct voltage and the electrical power cord is securely attached to both the outlet and the Rocpro drive. Poor or loose connections can result in loss of power and possible damage to the drive. Ensure that the ON/OFF switch is turned to the ON position.
- If the Rocpro drive is connected to an outlet via an Undisrupted Power Supply (battery Backup) or a surge protector, be sure that they provide the correct voltage and they are all switched “ON” and receiving electricity.
- Please review the Manual's installation procedure in reference to Formatting, Operating Systems and Interfaces you are using to ensure they were properly followed.
- Please check the cable connections as the cables must be properly and securely attached to the computer and hard drive. Ensure that there is a firm connection. It is suggested that the cables be detached and reattached, and that the computer be shut off for 20 seconds and then restarted.
- If a conflict with drivers or extensions exists, contact Rocstor for assistance; email tech support at _support@rocstor.com or call technical support department at 888.877.7716.
Problem: The FireWire ports would not mount (work) with Windows 2000
Solution:
- You may require installing Windows 2000 Service pack 4. You may download the Service Pack 4 update for free from the Microsoft website.
http://www.microsoft.com/Downloads/details.aspx?familyid=1001AAF1-749F-49F4-8010-297BD6CA33A0&displaylang=en
Problem: The Rocpro drive is not working fast enough
Solution:
- You may have too many devices connected to your computer (in particular in case of Laptops.) Disconnect some devices and observe if there is an improvement in performance.
Problem: The performance and/or transfer speeds are slow when the Rocpro drive is connected to my USB port.
Solution:
- USB ports come in different speeds from 12Mbits/s to 480MBits/s. USB 2.0 is a High-Speed connection. If the Rocpro HD is connected to a USB 1.1 port (low speed) or hub, the drive will work slower than if connected to a USB 2.0 port or hub.
Problem: There is no increase in performance when the Rocpro drive is connected via the USB cable to a USB 2.0 port.
Solution:
- Ensure that the USB 2.0 drivers for the host bus and device have been properly and securely installed. You may reinstall to assure proper installation.
Problem: The drive is working slow when connected directly to a USB 2.0 port on your computer
Solution:
- Review the minimum system requirements for your computer to ensure it supports High Speed USB 2.0.
General Notes:
- When connecting the device to USB 2.0 port in your computer please be sure that the connection at the host computer is High Speed USB 2.0 and drivers (if required) are installed, otherwise you may experience slower transfer speed between the host comport and the Rocpro device.
Front Lights:
Problem: The front Light does not come ON.
Solutions:
• The Rocpro device may not be connected to electricity.
• The device switch is in the OFF position.
• The Built-in Power Supply does not work. Contact Rocstor technical support.
Situation: The light is green but it also flickers in Red.
Solutions:
- The Light is OFF when the drive is Reading/Writing; do not turn the device OFF in this situation as you may lose the data being transferred in R/W.
• The light remains Green at normal operation or idle operation.
0 S80 366 90s us8 5
- | textu Uf g a| n| UUeS w f | eS | | | | | | | | | | | | | | | | | | | | | | | | | | | | | | | | | | | | | | | | | | | | | | | | | | | | | | | | | | | | | | | | | | | | | | | | | | | | | | | | | | | | | | | | | | | | | | | | | | | | | - ta I I u f u l t f u l f u l e l l t l S C - C C C u l u l u l u l t f u l e l l l f x g t s f g - UUeS C
• a a a aStu n
- s Piu y tu y a e u e n | a U alf ay r n n s ll ntur a f | u l s s s nl | f ls a l l n tu tr n t u u u u u tu a ll f y 2 ty t N s l l t n t U l tf
natural_image
Front view of a black electronic device with ports and an inset showing a power switch (no visible text or symbols)
natural_image
Black and white photo of a black and white electronic device (no visible text or symbols)
natural_image
Exterior view of a white electronic device with ventilation slots and a circular inset showing internal striped pattern (no text or symbols)• s u x e n u e n a n t u t u u l e a | n u f tn u P t a l t f u C
- s n nsf | e tu u f U u uPtaf uy ul If U ay tl t a If 1g a f | u l s at P C l tn uf ay e Ifalls n If f y s a y g s u tltn tu |nC
- s f Uaf n at r tr nt u 1f a nl r e sf at full e u P alt e |n
• □ u□ e□ n□ □ e□ u □ m□ a S□ □ □ e n□ u □ □ nf 1g □ a □
• In Si Uel xu xUeS tunl e el tf u wJa xf ay l l l l l a l atP h
• af nnxUel 1f ay □ □ f y U□ t□ tel S□
- 『『tnSx』s』tuìy |ètUe『『atP n』n『Sf |a』nlf a』 『u 『n』afg
- n t u 1f a s f at N u l e f a P a l t e | n
• y e1f f | Uatul
5 S a ety tl g aa ul S
5 S a | uety tl | If exla | I e Usfu | I s n| UUf al
Specifications
- Dimensions: 5.8 × 8.7 × 1.6 inches 14.7 × 22.0 × 4.1 cm
• Weight: 2.9 pounds (1.3 kilograms)
• Transfer rates: FireWire up to 800 MB/s; USB 3 up to 5 Gbits/s; or USB 2.0 up to 480 Mbits/s.
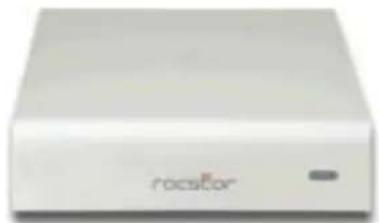
natural_image
Exterior view of a white electronic device labeled 'rocstor' (no additional text or symbols visible)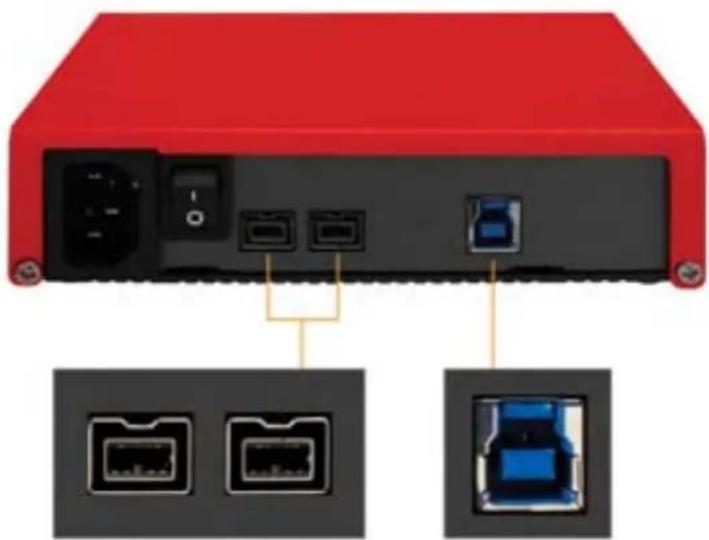
natural_image
Red electronic device rear panel with ports and connectors, shown with two inset images of internal components (no text or symbols visible)2x FireWire
800 (1934b)
USB 3
(2.0 Compatible)
9u80 s u095A 9u 8 5 N086I 9 1 1 P 5
Pt n+AA 5AA fa EAA tlns e 1 | Ue 2 | l a ll n ws l | e
la un1 a a l n a " " 7AE + "/A" " " 7C5+ / " " tln n tC C + 5C5" "
5E0kz/□□u □□E"G-k5□y □□Sl n□U a□n □fu□□anU □ltP eSh□□s n□□t11a ull
la un1 a y f n a f y y f u S a 1 aa l f n + AA 5AA u EAA
e e u ls tr ay tl [If +EC" 1] veCk y | anh[ ]elsf | s| | Ulf +/ | | | enl | |u | | | | tnSx
|ntu 111 |tP a U l an 2l au e s | n f a tul au e s | n f 1l u Ua n ul tul ta ta M tUy ul
s EAA nl u a a dy tln u S f u lt | all tf u W y 2ty | y e u ls If 57A l w 5 y l ai
/xUtu□ fuu □ If a tr□ f y y fuS□ If | u□ □ fu□ □ nrlf U□ f y U| l an□ u □ □ □ u □ n| UUS□ ls □ f uu □ l □
Pt g tls Ufg aC
s /xUtu Ufg a fuu Ifa n Ufg af |U|If n|UUf al 2l au e Ptn SUe e
□ □ u□ U| e■ □ f |l□ z□ If □ "□ g □ ln□ 1af y □ ls □ Uf a□ □ fg P a□ ls □ Pf d□ □ P□a t n□ nt ut1□ □ u l£□ 1af y □
t11 a ull Ptn f e tn nU t1t | ua | el | u ns f | uf y tu e S | f l
vu 5E If 7Ah Ue W ty Ue y ul If u f u eU If Un tr ISUt [e e] a el If I a Uf g a
□ □ u□ □ □n □ ef g □ n □ "□ □ □ | l□ y fa □ er □ S□ □ f | l□ +5□ □ C
natural_image
Two schematic diagrams of electronic components: a rectangular device with internal slots and a multi-pin connector (no text or symbols)Introductions: Formatting
File Allocation Table (FAT)
FAT is a file system developed by Microsoft for MS-DOS and is the primary file system for consumer versions of Microsoft Windows.
The FAT file system is relatively uncomplicated and is supported by virtually all existing operating systems for personal computers. This makes it an ideal format for hard drives and other storage devices and a convenient way of sharing data between disparate operating systems installed on the same computer (a dual boot environment).
FAT 32 is a disk formatting scheme which allows a maximum file size of 4 GB. Larger files require another formatting type such as HFS+ or NTFS.
Microsoft's Scan-Disk utility, included with Windows 95/98, places a volume limit of 127.53 gigabytes.
FAT 32 was introduced with Windows 95 OSR2. Windows 98 introduced a utility to convert existing hard disks from FAT16 to FAT32 without loss of data. In the NT line, native support for FAT32 arrived in Windows 2000.
Windows 2000 and Windows XP can read and write to FAT32 file systems of any size, but the format program included in Windows 2000 and higher can only create FAT32 file systems of 32 GB or less. This limitation is by design and was imposed because many tasks on very large FAT32 files become slow and inefficient when file systems exceed
32GB.http://en.wikipedia.org/wiki/File_Allocation_Table_-_note-TechNet_on_FAT32 This limitation can be bypassed when using the Windows command line Format utility or by using third-party formatting utilities.
The maximum possible size for a file on a FAT32 volume is 4 GB minus 1 byte. Video capture and editing applications and some other software can easily exceed this limit.
Until mid-2006, those who run dual boot systems or who move external data drives between computers with different operating systems had little choice but to stick with FAT32. Since then, full support for NTFS has become available in Linux and many other operating systems, by installing the FUSE library (on Linux) together with the NTFS-3G application. Data exchange is also possible between Windows and Linux by using the Linux-native ext2 or ext3 file systems through the use of external drivers for Windows, such as ext2 IFS. However, Windows cannot boot from ext2 or ext3 partitions.
HFS Plus or HFS+
This is a file system developed by Apple Inc. to replace their Hierarchical File System (HFS) as the primary file system used in Macintosh computers (or other systems running Mac OS). It is also one of the formats used by the iPod digital music player. HFS Plus is also referred to as Mac OS Extended (or, erroneously, "HFS Extended"), where its predecessor, HFS is also referred to as Mac OS Standard (or, erroneously, as "HFS Standard"). During development, Apple referred to this file system with the codename Sequoia.
HFS Plus is an improved version of HFS, supporting much larger files (block addresses are 32-bit length instead of 16-bit) and using Unicode (instead of Mac OS Roman or any of several other character sets) for naming the items (files, folders). Names were normalized to a form very nearly the same as NFD (there are some minor differences derived from the fact that the HFS Plus format was finalized before Unicode had standardized the NFD format). HFS Plus permits filenames up to 255 UTF-16 characters in length, and n-forked files similar to NTFS, though almost no software takes advantage of forks other than the data fork and resource fork. HFS Plus also uses a full 32-bit allocation mapping table, rather than HFS's 16 bits. This was a serious limitation of HFS, meaning that no disk could support more than 65,536 allocation blocks under HFS. When disks were small, this was of little consequence, but as larger-capacity drives became available, it meant that the smallest amount of space that any file could occupy (a single allocation block) became excessively large, wasting significant amounts of space. For example, on a 1 GB disk, the allocation block size under HFS is 16 KB, so even a 1 byte file would take up 16 KB of disk space.
HFS Plus volumes are divided into sectors (called logical blocks in HFS), that are usually 512 bytes in size. These sectors are then grouped together into allocation blocks which can contain one or more sectors. The number of allocation blocks depends on the total size of the volume. HFS Plus uses a larger value to address allocation blocks than HFS, 32 bits rather than 16 bits. This means it can access 4,294,967,296 (=2 ^32 ) allocation blocks rather than the 65,536 (=2 ^16 ) allocation blocks available to HFS.
LIMITED WARRANTY
This Limited Warranty is provided by Rocstorage, Inc. (hereinafter: Rocstor) for all lines of products.
General Terms
EXCEPT AS EXPRESSLY SET FORTH IN THIS LIMITED WARRANTY, ROCSTOR MAKES NO OTHER WARRANTIES OR CONDITIONS, EXPRESS OR IMPLIED, INCLUDING ANY IMPLIED WARRANTIES OF MERCHANTABILITY AND FITNESS FOR A PARTICULAR PURPOSE. ROCSTOR EXPRESSLY DISCLAIMS ALL WARRANTIES AND CONDITIONS NOT STATED IN THIS LIMITED WARRANTY. ANY IMPLIED WARRANTIES THAT MAY BE IMPOSED BY LAW ARE LIMITED IN DURATION TO THE LIMITED WARRANTY PERIOD. SOME STATES OR COUNTRIES DO NOT ALLOW A LIMITATION ON HOW LONG AN IMPLIED WARRANTY LASTS OR THE EXCLUSION OR LIMITATION OF INCIDENTAL OR CONSEQUENTIAL DAMAGES FOR CONSUMER PRODUCTS. IN SUCH STATES OR COUNTRIES, SOME EXCLUSIONS OR LIMITATIONS OF THIS LIMITED WARRANTY MAY NOT APPLY TO YOU.
This Limited Warranty applies to the Rocstor branded hardware products sold by or leased from Rocstorage, Inc., its worldwide subsidiaries, affiliates, authorized resellers, or country distributors (collectively referred to in this Limited Warranty as "Rocstor") with this Limited Warranty. This Limited Warranty is applicable in all countries and may be enforced in any country where Rocstor or its authorized service providers offer warranty service subject to the terms and conditions set forth in this Limited Warranty. However, warranty service availability and response times may vary from country to country and may also be subject to registration requirements in the country of purchase.
Rocstor warrants that the Rocstor hardware product and all the internal components of the product that you have purchased or leased from Rocstor are free from defects in materials or workmanship under normal use during the Limited Warranty Period. The Limited Warranty Period starts on the date of purchase or lease from Rocstor. Your dated sales or delivery receipt, showing the date of purchase or lease of the product, is your proof of the purchase or lease date. You may be required to provide proof of purchase or lease as a condition of receiving warranty service. You are entitled to warranty service according to the terms and conditions of this document if a repair to your Rocstor branded hardware is required within the Limited Warranty Period. This Limited Warranty extends only to the original purchaser or lessee of this Rocstor branded product and is not transferable to anyone who obtains ownership of the Rocstor branded product from the original purchaser or lessee.
Rocstor products are manufactured using new materials or new and used materials equivalent to new in performance and reliability. Spare parts may be new or equivalent to new. Spare parts are warranted to be free from defects in material or workmanship for thirty (30) days or for the remainder of the Limited Warranty Period of the Rocstor hardware product in which they are installed, whichever is longer.
Rocstor's Obligation under the Limited Warranty
During the Limited Warranty Period, Rocstor will repair or replace the defective component parts or the hardware product. All component parts or hardware products removed under this Limited Warranty become the property of Rocstor. The replacement part or product takes on either the Limited Warranty status of the removed part or product or the thirty (30) day limited warranty of the spare part. In the unlikely event that your Rocstor product has a recurring failure, Rocstor, at its discretion, may elect to provide you with a replacement unit of Rocstor's choosing that is at least equivalent to your Rocstor branded product in hardware performance. Rocstor reserves the right to elect, at its sole discretion, to give you a refund of your purchase price or lease payments (less interest) instead of a replacement. This is your exclusive remedy for defective products. The original Limited Warranty is not extended when the product, or a part of the product, is repaired or replaced during the Limited Warranty period. Rocstor shall not be responsible or liable for backing up any data that is on a drive being returned for service
YOU SHOULD MAKE PERIODIC BACKUP COPIES OF THE DATA STORED ON YOUR HARD DRIVE OR OTHER STORAGE DEVICES AS A PRECAUTION AGAINST POSSIBLE FAILURES, ALTERATION, OR LOSS OF THE DATA. BEFORE RETURNING ANY UNIT FOR SERVICE, BE SURE TO BACK UP DATA AND REMOVE ANY CONFIDENTIAL, PROPRIETARY, OR PERSONAL INFORMATION. ROCSTOR IS NOT RESPONSIBLE FOR DAMAGE TO OR LOSS OF ANY PROGRAMS, DATA, OR REMOVABLE STORAGE MEDIA. ROCSTOR IS NOT RESPONSIBLE FOR THE RESTORATION OR REINSTALLATION OF ANY PROGRAMS OR DATA OTHER THAN SOFTWARE INSTALLED BY ROCSTOR WHEN THE PRODUCT WAS MANUFACTURED.
Rocstor does not warrant that the operation of this product will be uninterrupted or error-free. Rocstor is not responsible for damage that occurs as a result of your failure to follow the instructions that came with the Rocstor branded product.
This Limited Warranty does not apply to expendable parts. This Limited Warranty does not extend to any product from which the serial number has been removed or that has been damaged or rendered defective (a) as a result of accident, misuse, abuse, or other external causes; (b) by operation outside the usage parameters stated in the user documentation that shipped with the product and/or posted on the Rocstor website; (c) by the use of parts not manufactured or sold by Rocstor; (d) as a result of normal wear; or (e) by modification or service by anyone other than (i) Rocstor, (ii) a Rocstor authorized service provider, or (iii) your own installation of end-user replaceable Rocstor or Rocstor approved parts if available for your product in the servicing country.
These terms and conditions constitute the complete and exclusive limited warranty agreement between Rocstor and you regarding the Rocstor branded product you have purchased or leased. These terms and conditions supersede any prior agreements or representations including representations made in Rocstor sales literature or advice given to you by Rocstor or an agent or employee of Rocstor-that may have been made in connection with your purchase or lease of the Rocstor branded product. No change to the conditions of this Limited Warranty is valid unless it is made in writing and signed by an authorized representative of Rocstor.
Buyer's Obligation under the Warranty
The person requesting coverage under this warranty shall prove that he or she is the original purchaser and declares that the product has not been sold, leased, bartered or otherwise changed possession. The purchaser shall frequently backup the Rocpro hard drive and backup the data immediately prior to returning the drive for warranty service.
The buyer must notify Rocstor and show proof of notification, through any reasonable means of communication. See full street address email address and toll free phone numbers below or updated contact information are available on Rocstor.com website. The notification shall identify any defect, malfunction, or nonconformity promptly upon discovery. Rocstor will acknowledge receipt of the communication and issue a Return Merchandise Authorization (RMA) code. The buyer is obligated to securely and safely package(s) the product, preferably in the original packing materials, WITH THE RMA number, and deliver it together with a copy of the original purchase receipt and a description of the problem to the Rocstor home office. Buyer is responsible for the product until it is received by Rocstor. It is recommended that the product be insured during transportation by the sender. You must prepay any shipping charges, taxes, or duties associated with transportation of the product. In addition, you are responsible for insuring any product shipped or returned for service. You assume risk of loss during shipping.
Limitation of damages (Liability)
IF YOUR ROCSTOR BRANDED HARDWARE PRODUCT FAILS TO WORK AS WARRANTED ABOVE, THE ORIGINAL PURCHASER'S SOLE AND EXCLUSIVE REMEDY SHALL BE REPAIR OR REPLACEMENT. ROCSTOR'S MAXIMUM LIABILITY UNDER THIS LIMITED WARRANTY IS EXPRESSLY LIMITED TO THE LESSER OF THE PRICE YOU HAVE PAID
FOR THE PRODUCT OR THE COST OF REPAIR OR REPLACEMENT OF ANY ROCSTOR HARDWARE COMPONENTS THAT MALFUNCTION IN CONDITIONS OF NORMAL USE. ROCSTOR IS NOT LIABLE FOR ANY DAMAGE TO ANY OTHER PRODUCT CONNECTED TO A ROCSTOR PRODUCT.
Limitation on Consequential Damages
ROCSTOR IS NOT LIABLE FOR ANY DAMAGES CAUSED BY THE PRODUCT OR THE FAILURE OF THE PRODUCT TO PERFORM, INCLUDING ANY LOST PROFITS OR SAVINGS OR SPECIAL, INCIDENTAL OR CONSEQUENTIAL DAMAGES. ROCSTOR IS NOT LIABLE FOR ANY CLAIM MADE BY A THIRD PARTY OR MADE BY YOU FOR A THIRD PARTY. THIS LIMITATION OF LIABILITY ALSO APPLIES WHETHER DAMAGES ARE SOUGHT OR A CLAIM IS MADE UNDER THIS LIMITED WARRANTY OR AS A TORT CLAIM (INCLUDING NEGLIGENCE AND STRICT PRODUCT LIABILITY), A CONTRACT CLAIM OR ANY OTHER CLAIM. THIS LIMITATION OF LIABILITY CANNOT BE WAIVED OR AMENDED BY ANY PERSON. THIS LIMITATION OF LIABILITY WILL BE EFFECTIVE EVEN IF YOU HAVE ADVISED ROCSTOR OR AN AUTHORIZED REPRESENTATIVE OF ROCSTOR OF THE POSSIBILITY OF ANY SUCH DAMAGES.
THIS LIMITED WARRANTY GIVES YOU SPECIFIC LEGAL RIGHTS. YOU MAY ALSO HAVE OTHER RIGHTS THAT MAY VARY FROM STATE TO STATE OR FROM COUNTRY TO COUNTRY. YOU ARE ADVISED TO CONSULT APPLICABLE STATE OR COUNTRY LAWS FOR A FULL DETERMINATION OF YOUR RIGHTS.
Disclaimer
We accept no liability for any loss of data, damages and the inability of Rocstor products to work with any third party equipment. Nor can Rocstor accept any liability or responsibility for software or third party hardware products.
Limited Warranty Period
The limited warranty period for Rocpro 850 is two (2) Years Parts and Labor. This Limited Warranty extends only to the original purchaser or lessee of this Rocstor branded product and is not transferable to anyone who obtains ownership of the Rocstor branded product from the original purchaser or lessee.
Types of Limited Warranty Service
Your Rocstor Limited Warranty consists of repair or replacement of defective parts, including hard drives identified by Rocstor Support Organization as “pre-failure.”
Carry-in Limited Warranty Service Available Monday - Friday
Under the terms of carry-in service, you may be required to deliver your Rocstor product to the Rocstor Service Center or an authorized service location for warranty repair. You must prepay any shipping charges, taxes or duties associated with transportation of the product. In addition, you are responsible for insuring any product shipped or returned for service. You assume risk of loss during shipping.
YOU SHOULD MAKE PERIODIC BACKUP COPIES OF THE DATA STORED ON YOUR HARD DRIVE OR OTHER STORAGE DEVICES AS A PRECAUTION AGAINST POSSIBLE FAILURES, ALTERATION OR LOSS OF THE DATA. BEFORE RETURNING ANY UNIT FOR SERVICE, BE SURE TO BACK UP DATA AND REMOVE ANY CONFIDENTIAL, PROPRIETARY OR PERSONAL INFORMATION. ROCSTORAGE IS NOT RESPONSIBLE FOR DAMAGE TO OR LOSS OF ANY PROGRAMS, DATA OR REMOVABLE STORAGE MEDIA. ROCSTORAGE IS NOT RESPONSIBLE FOR THE RESTORATION OR REINSTALLATION OF ANY PROGRAMS OR DATA OTHER THAN SOFTWARE INSTALLED BY ROCSTORAGE WHEN THE PRODUCT WAS MANUFACTURED.
Rocstorage shall not be responsible or liable for backing up any data that is on a drive being returned for service. Expect that all data on the drive will be destroyed and not retrievable when returned for warranty service.
Rocstor Replaceable Parts Program
Where available, the Rocstor Replaceable Parts program ships approved replacement parts directly to you to fulfill your warranty. This will save considerable repair time. After you call the Rocstor Technical Support Center at 888.877.8777 a replaceable part can be sent directly to you. Once the part arrives, call the Rocstor Technical Support Center. A technician will assist you over the phone to ensure that the installation is quick and easy.
Service Upgrades
Rocstor offers extra coverage for your product. For information on service upgrades, visit www.rocstor.com. Service upgrades purchased in one country are not transferable to another country.
Capacity Disclaimer
Actual accessible hard drive capacity will indicate up to 10% lower than stated under different Operating Systems and formatting.
The storage volume is measured in total bytes before formatting. References to round numbers of gigabytes or terabytes are an approximation only. For example, a disk drive labeled as having 500GB (Gigabytes) has space for approximately 500,000,000 bytes before formatting. After formatting, the drive capacity is reduced by about 5% to 10% depending on the operating system and formatting used or "1GB = 1,000,000,000 bytes.
Options and Software
The Limited Warranty terms and conditions for Rocstor options are as indicated in the Limited Warranty applicable to Rocstor options. ROCSTOR DOES NOT WARRANTY SOFTWARE PRODUCTS, INCLUDING ANY SOFTWARE PRODUCTS OR THE OPERATING SYSTEM PREINSTALLED BY ROCSTOR. Rocstor's only obligations with respect to software distributed by Rocstor under the Rocstor brand name are set forth in the applicable end-user license or program license agreement. Non-Rocstor hardware and software products are provided "AS IS" and without any Warranty. However, non-Rocstor manufacturers, suppliers or publishers may provide their own warranties directly to you.
The data stored in Rocstor and Rocsecure storage product lines are not guaranteed by Rocstor (or the hard disk manufacturer.) We are not responsible for any loss of data. Always back up data regularly
TECHNICAL SUPPORT
Software Technical Support
Software technical support is defined as assistance with questions and issues about the software that was either preinstalled by Rocstor on the Rocstor branded product or that was included with the Rocstor branded product at the time of your purchase or lease of the product. Technical support for software is available for the first ninety (90) days from date of product purchase or lease. Your dated sales or delivery receipt, showing the date of purchase or lease of the product, is your proof of the purchase or lease date. You may be required to provide proof of purchase or lease as a condition of receiving software technical support. After the first ninety (90) days, technical support for software that was either preinstalled by Rocstor on the Rocstor branded product or included with the Rocstor branded product at the time of your purchase or lease of the product is available for a fee.
WARNING: The individual user should take care to determine prior to use whether this device is suitable, adequate or safe for the use intended. Since individual applications are subject to great variation, the manufacturer
d f nlf aH y r ruf a Ua n ul ltf u l f a g a a ul S n l f l s n | t l t tel S fa 11u mn f 10 ls n P t n l f a l uS nU l UUet l tf uC
Corporate Headquarters
8130 Remmet Avenue
Canoga Park, CA 91304-4129
Office: +1 (818) 449-2000
Email: info@Rocstor.com
Technical Support / RMA
Tel: (888) 877-7716 (USA and Canada)
Tel: +1 (818) 449-2000 (Domestic and Internationals)
Hours: 9:00 am - 5:00 pm PST
Mon - Fri (excluding holidays)
Email: support@Rocstor.com
Sales Info
Hours: 8:00 am - 5:00 pm PST
Mon - Fri (excluding holidays)
Email: sales@Rocstor.com
Tel: (888) 877-7716
Fax: (818) 884-8777
Corporate, Government and Academic Customers
Our Corporate Sales Team's goal is to help our U.S.A. and Canadian customers find a storage solution that best serves their needs. We will help you determine your best purchasing options. For more information please contact the appropriate department below or call us at +1 (888) 877-7716
General sales information: sales@Rocstor.com
Corporate sales information: corporate_sales@Rocstor.com
Educational sales information: academic_sales@Rocstor.com
Federal, State & Local government sales information: government_sales@Rocstor.com
Resellers/Business Development/OEM Partners
All Channel National and International Resellers, VARs, Consultants ... contact Rocstor Channel Sales:
In U.S., call: 888.877.7716
Out of USA call +1.818.449.2000
Email: reseller_info@Rocstor.com

natural_image
Exterior view of a black and red RoStar device with a green indicator light (no text or symbols on body)Available in Silver, Red, White, and Black
Thank you for purchasing Rocpro 850.
Rocstor
Ver.0426I
- QUICK INSTALLATION 8
- INSTALLING YOUR DRIVE 10
- PARTITIONING AND FORMATTING THE ROCPRO DRIVE ON A MAC OS 13
- PARTITIONING & FORMATTING the ROCPRO Drive on WINDOWS 2000, XP and VISTA 20
- TROUBLESHOOTING 31
- KNOWLEDGE BASE 35
- LIMITED WARRANTY 43
- TECHNICAL SUPPORT 46
- ACKNOWLEDGEMENTS 47
- CONTACT INFORMATION 48
- IMPORTANT NOTICES
- Safety Notices
- General Notices
- Capacity Disclaimer
- Care and Handling
- GENERAL
- Introduction
- Box Contents
- Minimum System Requirements
- Mac Users:
- Window Users:
- Connectors
- QUCIK INSTALLATION
- How to Connect the Interface Cables - Connecting the Drive
- Rocpro as a bootable device
- Disconnecting Your Drive
- PC
- Mac
- Reformatting Your Drive
- Reformatting via PC (Window based computers)
- Reformatting via Mac
- Important Note
- How to Daisy-Chain through FireWire ports to your Rocpro Drive at one time
- PARTITIONING AND FORMATTING THE ROCPRO DRIVE ON A MAC OS
- IMPORTANT NOTES:
- PARTITIONING AND FORMATTING THE ROCPRO DRIVE ON WINDOWS 2000, XP AND VISTA
- DIFFERENT WAYS TO GET TO THE CONTROL PANEL:
- INSTRUCTIONS UPON REACHING CONTROL PANEL
- INSTRUCTIONS FOR PARTITIONING AND FORMATING FROM FAT32 to NTFS
- Troubleshooting
- Troubleshooting for MACINTOSH computers
- Solutions:
- Solution:
- Notes:
- Notes - Mac OS 10x:
- Troubleshooting for PC WINDOWS based computers
- General Notes:
- Front Lights:
- Specifications
- Introductions: Formatting
- File Allocation Table (FAT)
- HFS Plus or HFS+
- LIMITED WARRANTY
- General Terms
- Rocstor's Obligation under the Limited Warranty
- Buyer's Obligation under the Warranty
- Limitation of damages (Liability)
- Limitation on Consequential Damages
- Disclaimer
- Limited Warranty Period
- Types of Limited Warranty Service
- Carry-in Limited Warranty Service Available Monday - Friday
- Rocstor Replaceable Parts Program
- Service Upgrades
- Options and Software
- TECHNICAL SUPPORT
- Software Technical Support
- Corporate Headquarters
- Technical Support / RMA
- Sales Info
- Corporate, Government and Academic Customers
- Resellers/Business Development/OEM Partners
Brand : Rocstor
Model : Rocpro 900
Category : External hard drive