
IC-1510 - Security Camera Edimax - Free user manual and instructions
Find the device manual for free IC-1510 Edimax in PDF.


| Product Type | Security Camera |
| Brand | Edimax |
| Model | IC-1510 |
| Resolution | 640 x 480 pixels |
| Night Vision | Yes, up to 5 meters |
| Connectivity | Wi-Fi 802.11b/g/n |
| Power Supply | DC 5V / 2A |
| Dimensions (W x H x D) | 100 x 80 x 50 mm |
| Weight | 200 g |
| Motion Detection | Yes |
| Two-way Audio | Yes |
| Storage | microSD up to 32 GB |
| Indoor/Outdoor | Indoor |
| Operating Temperature | 0°C to 40°C |
| Cleaning | Wipe with a soft dry cloth |
| Safety Instructions | Use only the provided power adapter |
| Spare Parts Availability | Contact Edimax support |
| Repairability | Not user-serviceable; contact qualified service |
Frequently Asked Questions - IC-1510 Edimax
User questions about IC-1510 Edimax
0 question about this device. Answer the ones you know or ask your own.
Ask a new question about this device
Download the instructions for your Security Camera in PDF format for free! Find your manual IC-1510 - Edimax and take your electronic device back in hand. On this page are published all the documents necessary for the use of your device. IC-1510 by Edimax.
USER MANUAL IC-1510 Edimax
Fast Ethernet / Wireless 11b/g Internet Camera
IC-1510 / IC-1510Wg
Quick Installation Guide
Version 1.0 / June, 2008
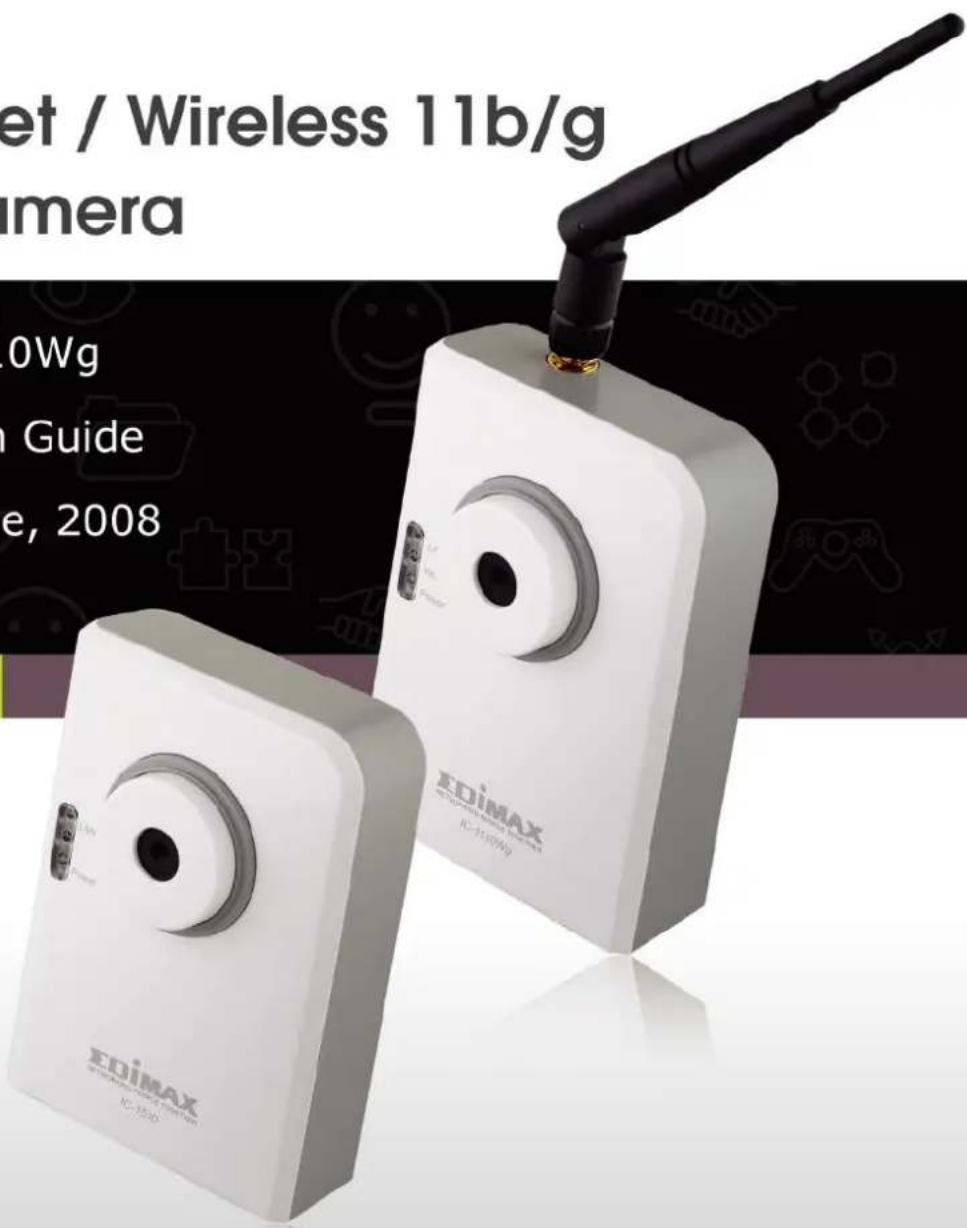
Multi-Languages QIG in Driver CD
EDIMAX NETWORKING PEOPLE TOGETHER
Copyright© by Edimax Technology Co, LTD. all rights reserved. No part of this publication may be reproduced, transmitted, transcribed, stored in a retrieval system, or translated into any language or computer language, in any form or by any means, electronic, mechanical, magnetic, optical, chemical, manual or otherwise, without the prior written permission of this Company.
This company makes no representations or warranties, either expressed or implied, with respect to the contents hereof and specifically disclaims any warranties, merchantability or fitness for any particular purpose. Any software described in this manual is sold or licensed "as is". Should the programs prove defective following their purchase, the buyer (and not this company, its distributor, or its dealer) assumes the entire cost of all necessary servicing, repair, and any incidental or consequential damages resulting from any defect in the software. Further, this company reserves the right to revise this publication and to make changes from time to time in the contents hereof without obligation to notify any person of such revision or changes.
The product you have purchased and the setup screen may appear slightly different from those shown in this QIG. For more detailed information about this product, please refer to the User's Manual on the CD-ROM. The software and specifications could be subjected to change without notice. Please visit our web site www.edimax.com for the update. All right reserved including all brand and product names mentioned in this manual are trademarks and/or registered trademarks of their respective holders.
Linux Open Source Code
Certain Edimax products include software code developed by third parties, including software code subject to the GNU General Public License ("GPL") or GNU Lesser General Public License ("LGPL"). Please see the GNU (www.gnu.org) and LPGL (www.gnu.org) Websites to view the terms of each license.
The GPL Code and LGPL Code used in Edimax products are distributed without any warranty and are subject to the copyrights of their authors. For details, see the GPL Code and LGPL Code licenses. You can download the firmware-files at http://www.edimax.com under "Download" page.
Content
- Product Information .... 1
- Check your package contents.... 1
- System Requirement.... 1
- Hardware Installation.... 2
4.1. LED and Focusing.... 2
4.2. Camera Ports 3
4.3. Installation Procedure 4 - Locate the IP Address.... 5
- Web Management Interface....9
- Software Installation 12
- Network Configuration 18
8.1.1. Network Setting 19
8.1.2. Wireless Settings (IC-1510Wg Only) 21 - Firmware Upgrade.... 24
1. Product Information
■ Complies with IEEE802.3, 802.3u standards
■ Complies with Wireless 802.11b/g standards with WEP, WPA and WPA2 encryption (IC-1510Wg only)
■ Supports high speed hardware-based Motion-JPEG compression
■ Supports video resolution :640x480 (VGA), 320x240 (CIF) and 160x120(QCIF)
■ Supports Snapshot-to-Email on events and predetermined schedule recordings in AVI format
■ Supports Auto Brightness/Contrast/Hue Control
■ Built-in manual focus lens
2. Check your package contents
■ One Internet Camera
■ One Power Adapter
■ One Camera Stand
■ One 100cm Category 5 Ethernet Cable
■ One Quick Installation Guide
■ One CD (Including User's Manual/ Multi-Language QIG/ Utility & Viewer)
■ One Antenna(* IC-1510Wg Only)
If any of the above items are missing, please contact your supplier.
3. System Requirement
System requirement for PC, MAC or Notebook PC to access the Internet Camera as following:
■ OS System: Windows 98, ME, 2000, XP + SP2, Server 2003
■ CPU: Intel Pentium III 750MHz above or Intel Celeron 1GHz above
■ Memory Size: 128MB (256MB recommended)
■ VGA Card Resolution: 800 x 600 or above
4. Hardware Installation
4.1. LED and Focusing
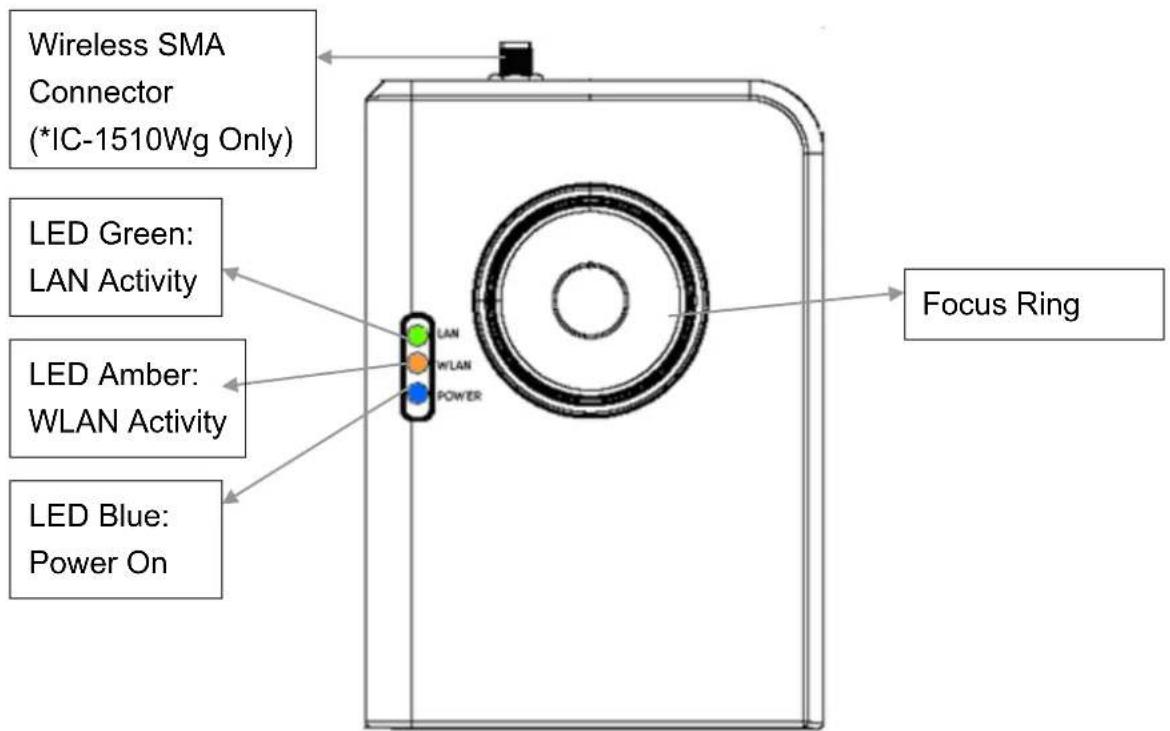
The Camera head and its focus ring allow you to modify the aim and focus of the Camera. To adjust the Camera's focus, rotate the dark focus ring.
There are three LEDs indicating the camera status and networking status.
- Power
When the camera is power on and ready for access, the LED will light.
• LAN
When the Internet Camera is linking to wired network, the LED is lighting. The LED is flashing when video is transmitted or received through wired network.
• WLAN
When the Internet Camera is linking to wireless network, the LED is lighting. The LED is flashing when video is transmitted or received through wireless network.
4.2. Camera Ports
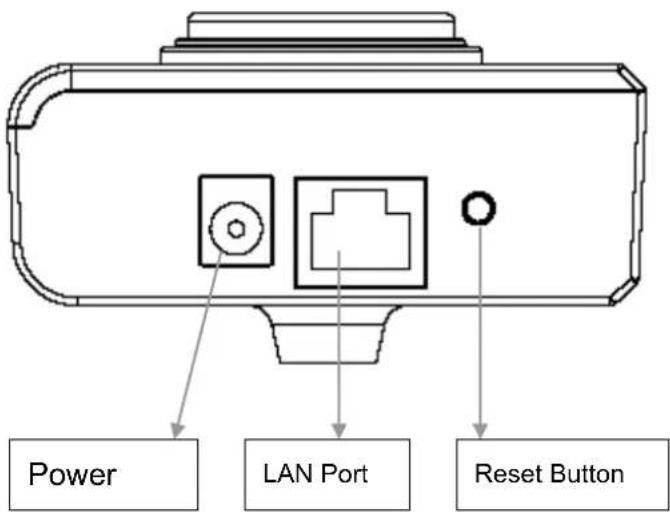
The Camera features two ports and a Reset button.
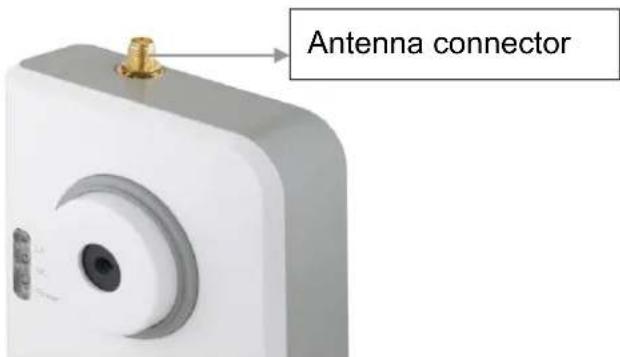
- Antenna connector
The Standard reverse SMA connector is for any antennas with reverse SMA connector can connect to the Internet Camera.
- Power
The Power port is where you can connect the power adapter.
• LAN
The LAN port is where you can connect the Ethernet network cable.
- Reset
-
If problems occur with your Internet Camera, press the reset button with a pencil tip (for less than 2 seconds) and the Internet Camera will reboot itself with your configurations.
-
If problems persist or you experience extreme problems or you forgot your password, press the reset button for longer than 5 seconds. The Internet Camera will reset itself to the factory default settings (warning: your original configurations will be replaced with the factory default settings).
4.3. Installation Procedure
- Unpack the Internet Camera package and verify that all the items listed in the Chapter 1 are provided.
- Connect the Internet Camera to your network by attached the network cable from the switch/router to the LAN port of the Internet Camera.
- Connect the power adapter to the Internet Camera and plug the power adapter to power outlet. The Internet Camera will be powered on. When the Internet Camera is ready, the Ready LED will light.
Note: It is highly recommended to use the power adapter shipped with the Internet Camera, do NOT use any other power adapter from any sources.
5. Locate the IP Address
Default IP address of this IP camera is 192.168.2.3. If you wish to assign another IP address to this IP camera, you have to log onto the web configuration interface of the camera first.
If the left three fields of the IP address of your computer is not 192.168.2.XXX, you'll have to change the IP address of your computer first:
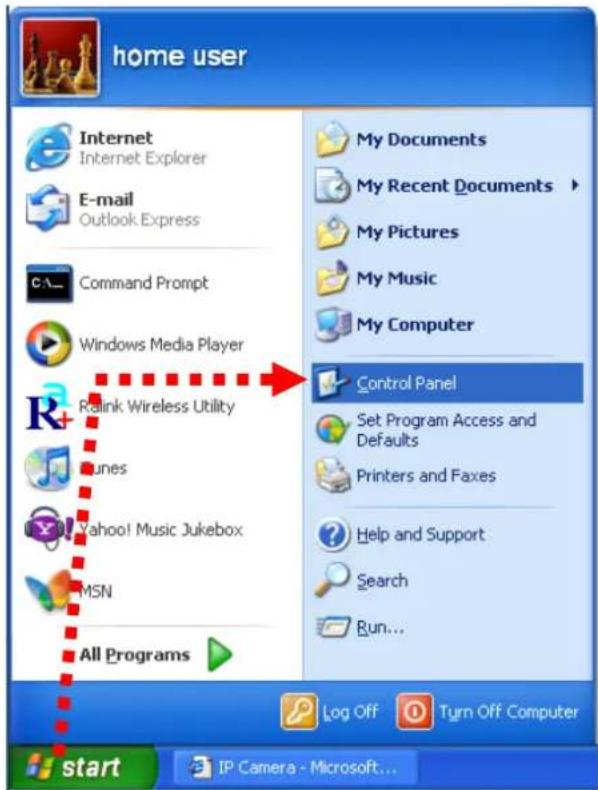
1. Click 'Start' -> 'Control Panel'
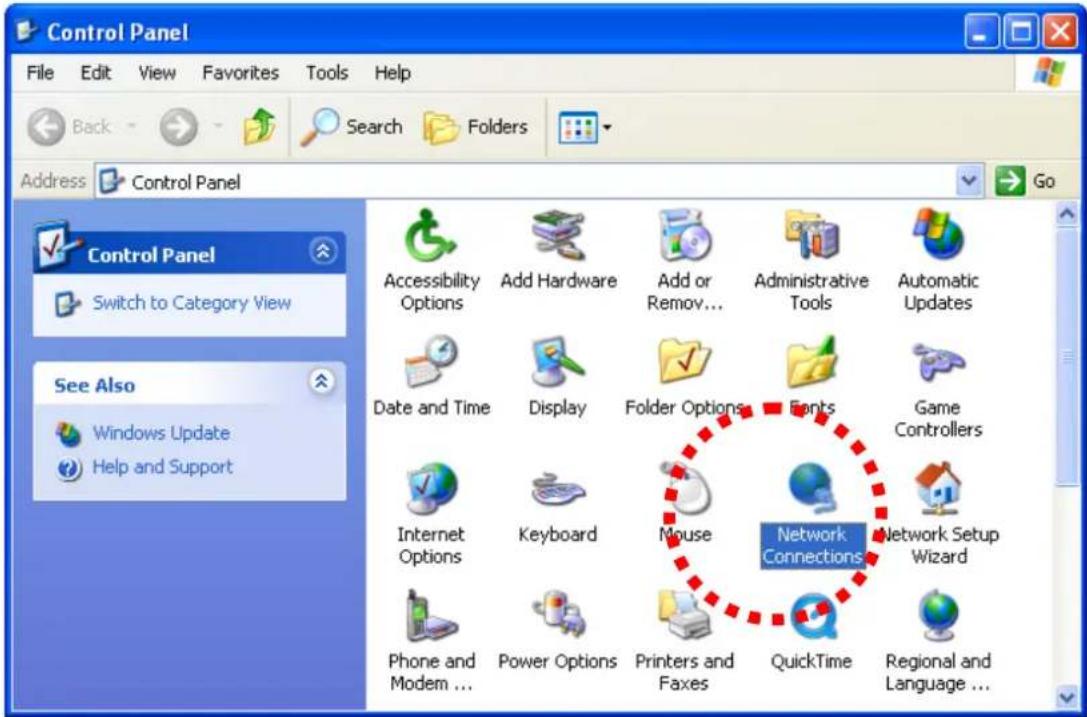
2. Double-click 'Network Connections' icon.
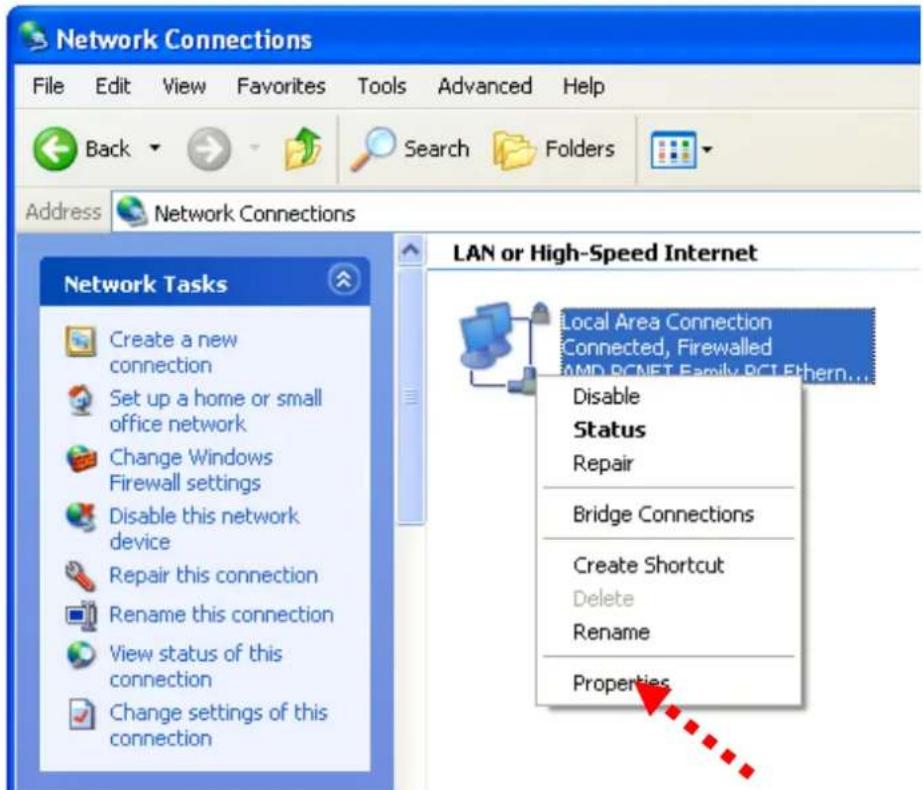
3. Right-click 'Local Area Connection', and click 'Properties'.
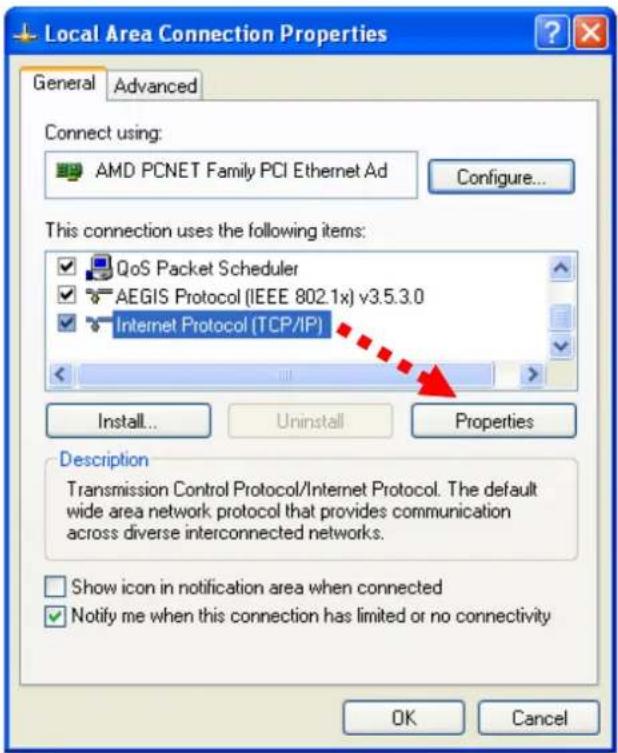
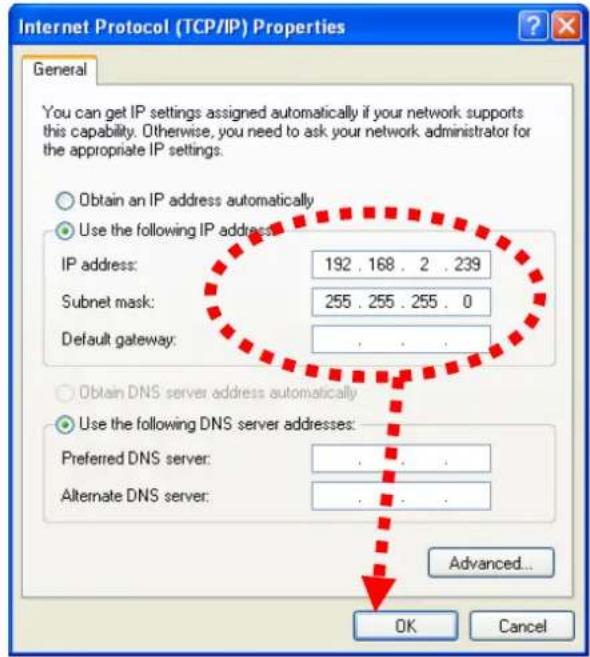
- Select 'Internet Protocol (TCP/IP)', and then click 'Properties'.
- In 'IP address' field, please fill in any IP address begins with '192.168.2', and ends with a value greater than 2 and less than 254 (You can use the example in the picture '192.168.2.239'). In Subnet mask field, please fill '255.255.255.0'. Please keep all other fields empty, and click 'OK'.
If you changed the IP address of this IP camera and you forget it, there're 2 methods to recover it:
a. Press and hold the 'Reset' button located at the bottom of this IP camera, to clear all settings of the IP camera and reset the IP address back to 192.168.2.3. You'll lose all settings in the IP camera.
b. Ask network administrator to check the DHCP release table, if the camera was set to obtain the IP address by DHCP, a new record will be added to DHCP release table on DHCP server when the IP camera is connected to the local area network
6. Web Management Interface
Make sure the IP camera is correctly powered (Power LED is on), and then launch Internet Explorer and type the IP address of the IP camera in address bar of Internet Explorer. You should be prompted to input the user name and password:
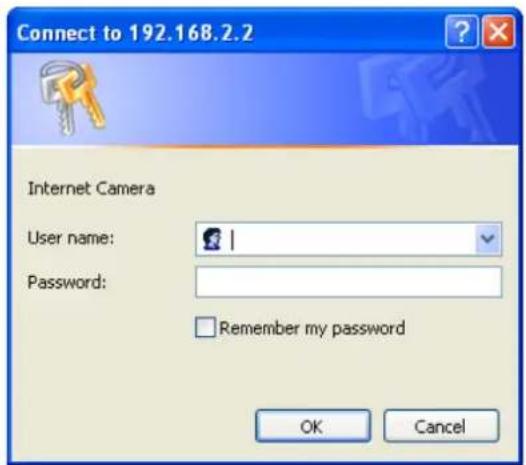
Default user name is 'admin' (in lower case) and password is '1234'. Click 'OK' to continue after user name and password has entered.
If you're rejected, maybe the password has been modified previously. This should not happen if this is a newly-purchased camera, however, if you get the camera from someone else, the password would be changed. Please try to obtain the correct user name / password, or you'll have to reset the camera.
After logged on, you should see the following messages at the top of Internet Explorer:
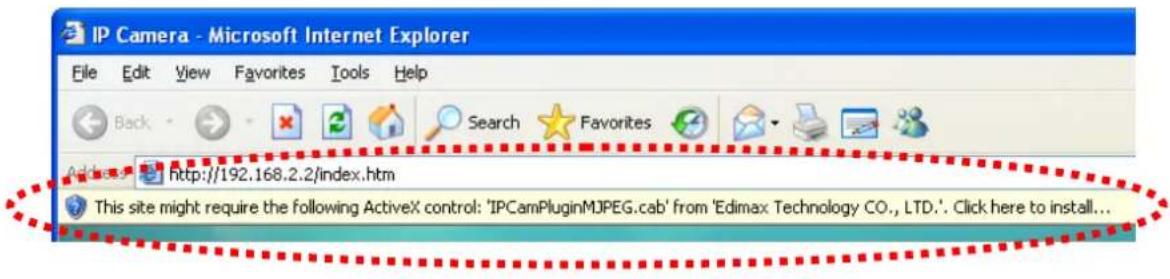
This IP camera requires a special ActiveX control (A.K.A. 'Plugin') to work. Please click on the message, and select 'Install ActiveX Control...':
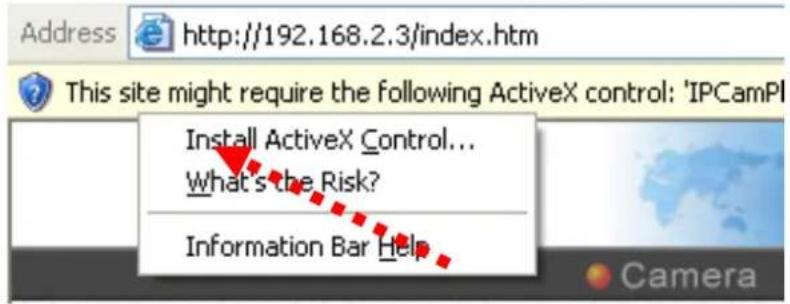
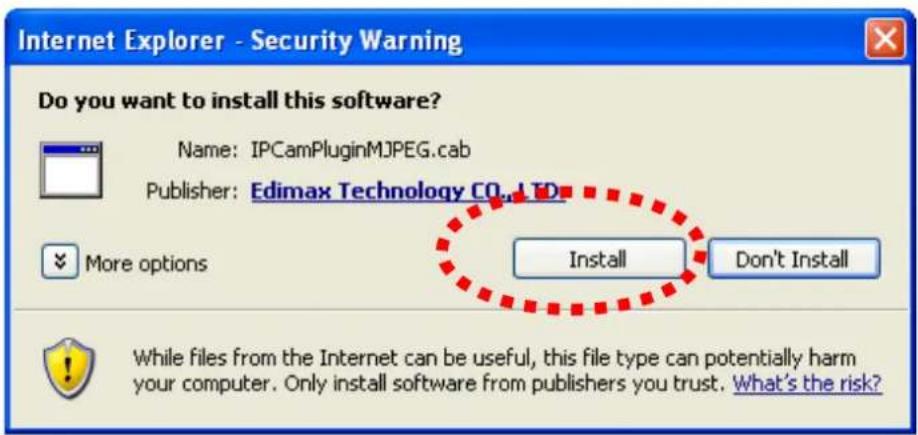
When you're prompted, click 'Install' to continue.
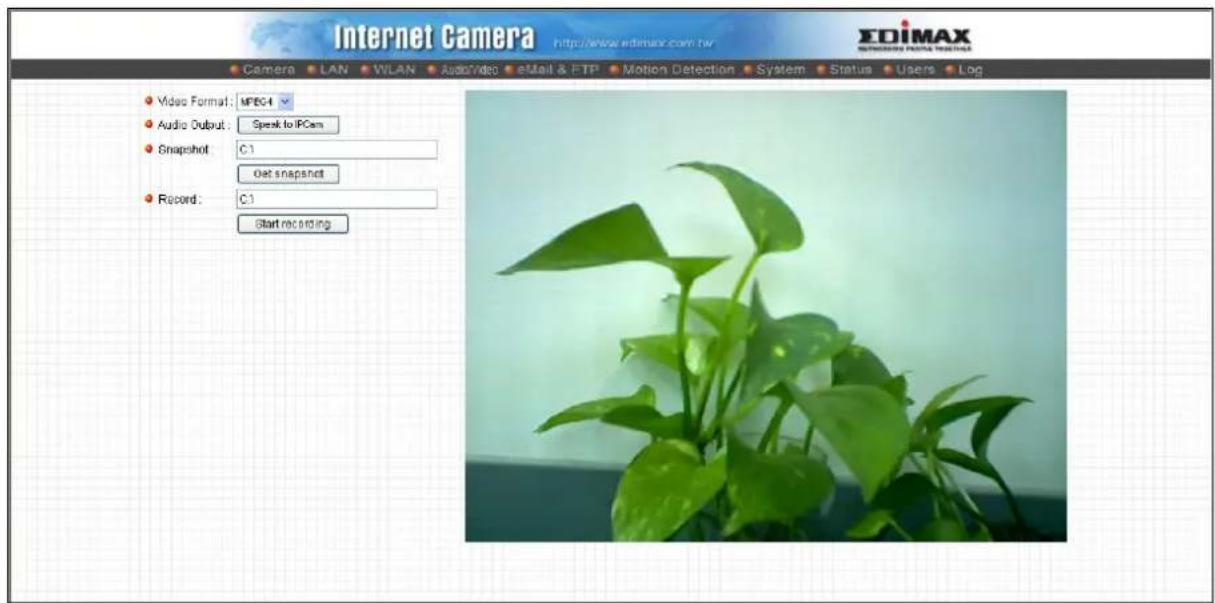
You should be able to see the image from camera now:
Note: If you see one of these messages (or both):
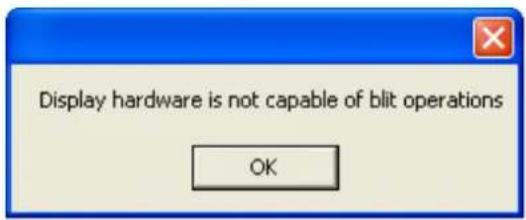
OR
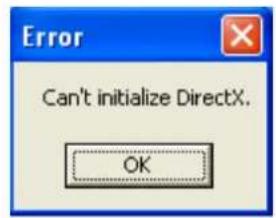
Your computer may not have the display capability that this IP camera requires, or you don't have Microsoft DirectX® installed. Please download Microsoft DirectX® from Microsoft's website (http://www.microsoft.com), and try again.
In some cases, your computer is able to display the image from IP camera correctly, but you'll still see these messages. If this happens, just ignore them.
7. Software Installation
Follow the simple steps below to run the Install Wizard to guide you quickly through the Installation process. The following installation is implemented in Windows XP. The installation procedures in Windows 2000/XP/Server 2003/Vista are similar.
- Insert the CD shipped along with the Internet Camera into your CD-ROM drive. The "Autorun.exe" program should be executed automatically. If not, run "Autorun.exe" manually from "Autorun" folder in the CD.
- The Install Wizard will show four selections, select the program you want to install or click "Exit" to install the program later. The following installation steps are the demonstration of "Setup Utility"
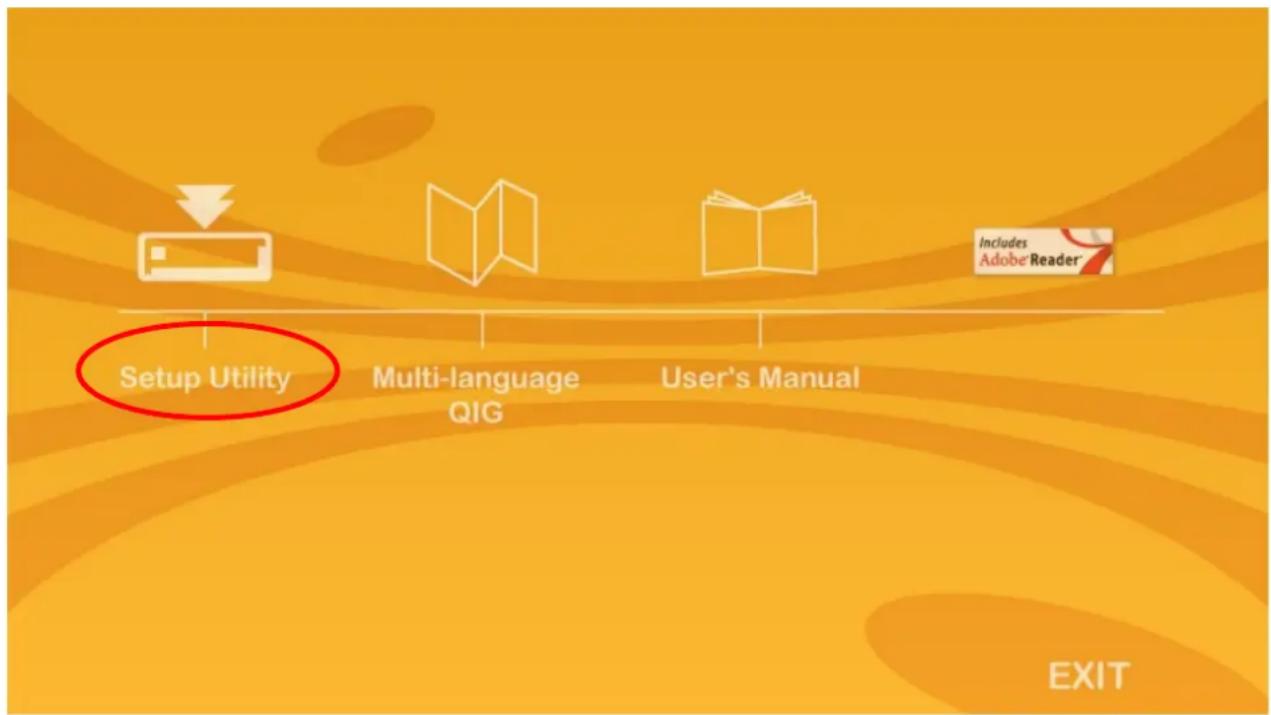
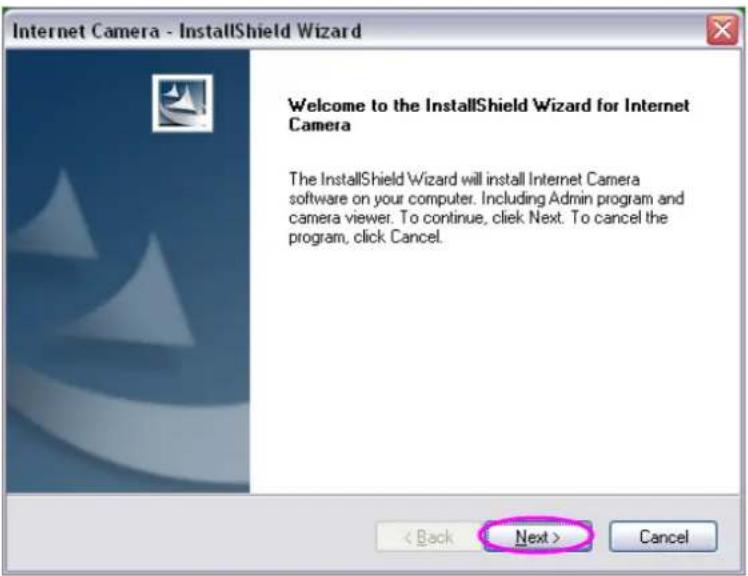
- The system will start the installation procedures. Click "Next" to continue installation.
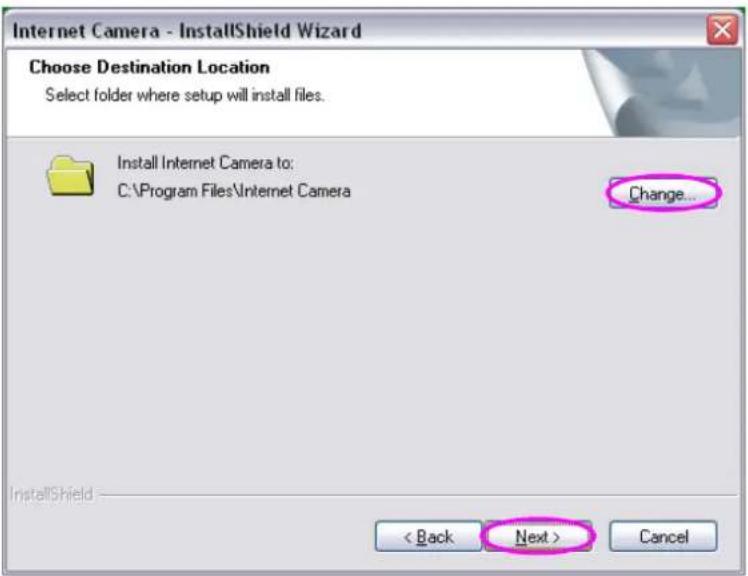
- If you wish to install the software program in an alternate location, click "Change"; otherwise click "Next" to move on to the next step.
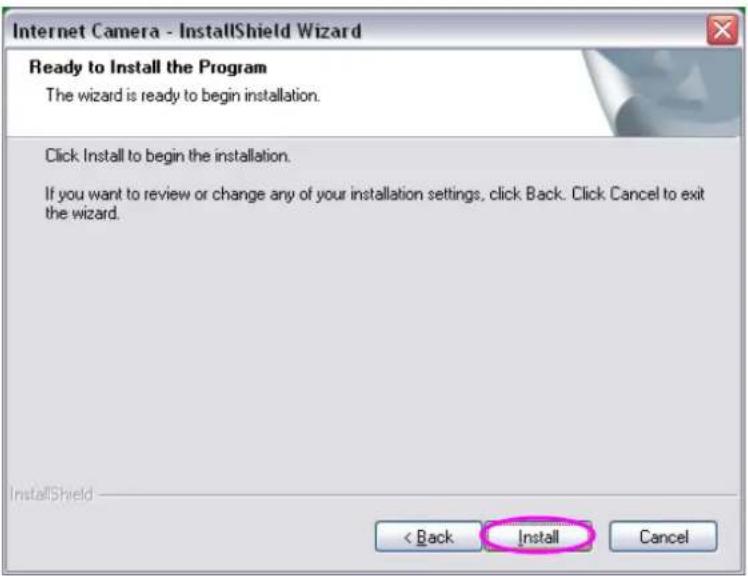
- Click "Install" to start installing the program.
- The system will install the program automatically.
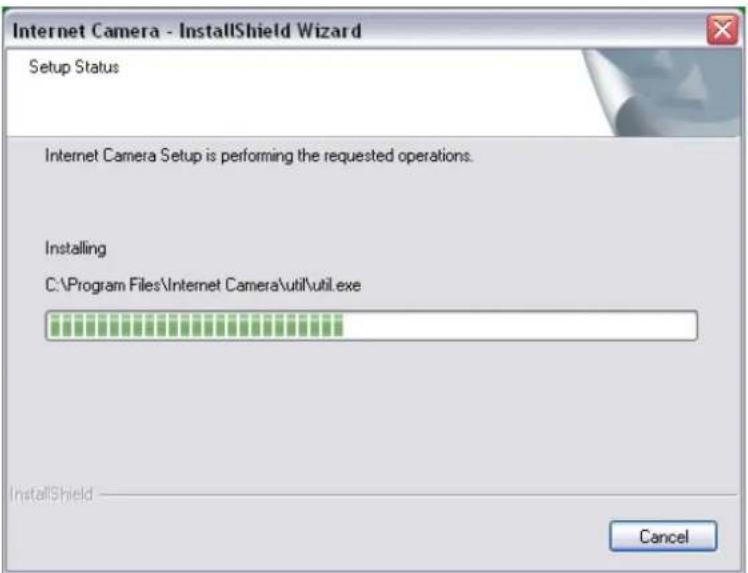
- Click "Finish" to complete the software installation.
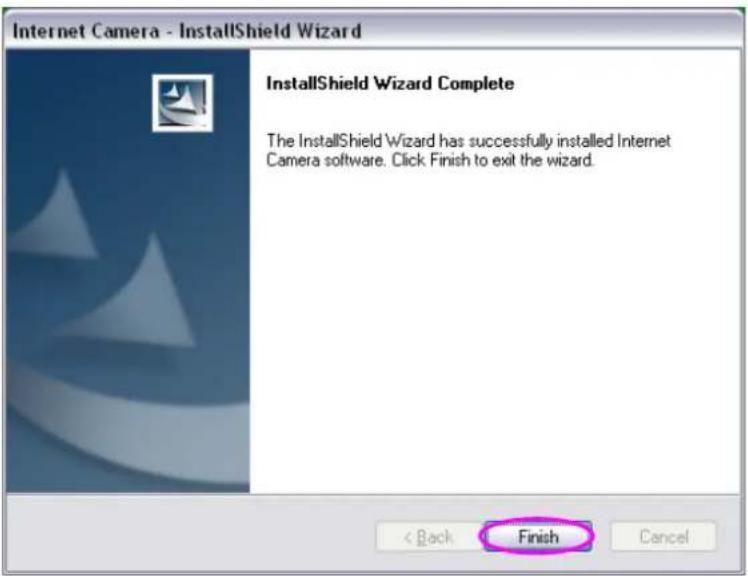
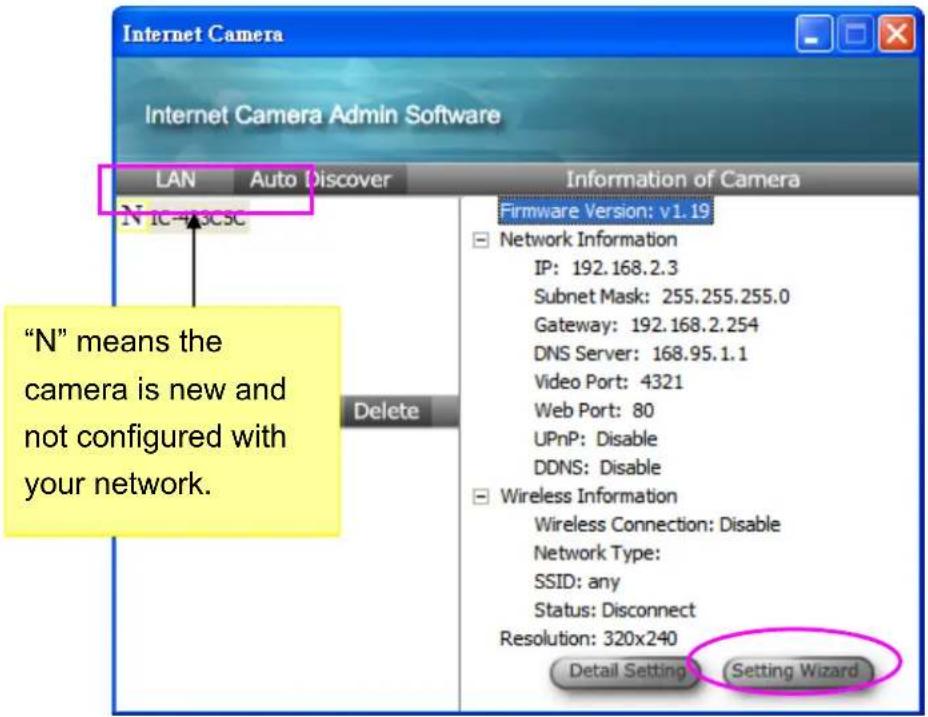
- When the installation is completed. The system will auto run "Administrator Utility". On the Internet Camera first page, the cameras found in the network are listed in the left window. Choose the one you want to configure and click "Setting Wizard" to precede.
If the camera is new and is not configured with your network, please go to next section "8 Network configurations" to set up the configuration
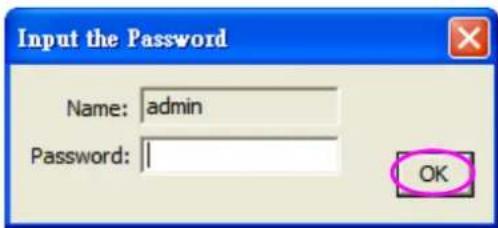
- Please enter the default password "1234" and click "OK" to login to the IP setup page.
- Internet Camera is working through the network (TCP/IP Protocol). The IP address setting must be correct, or you cannot access to the camera. The wizard program will detect the IP address status of your network automatically and suggest a free IP address for the Camera. You can accept the suggested value or enter the value manually. If you enter the value manually, please be aware that the “Subnet Mask” must be the same for both the camera and the PC. Click “Finish” to apply the configuration.
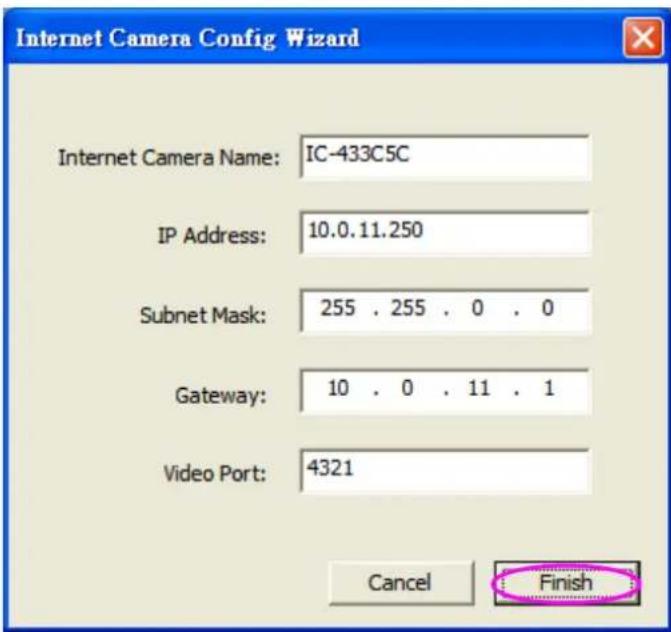
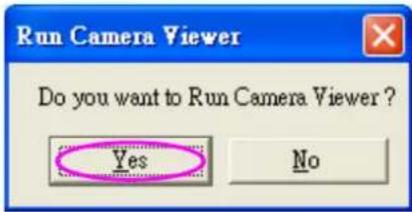
- This wizard will pop up a window to ask you if you want to run the "Camera Viewer" and see the video of the Camera immediately. Select "OK" to run "Camera Viewer".
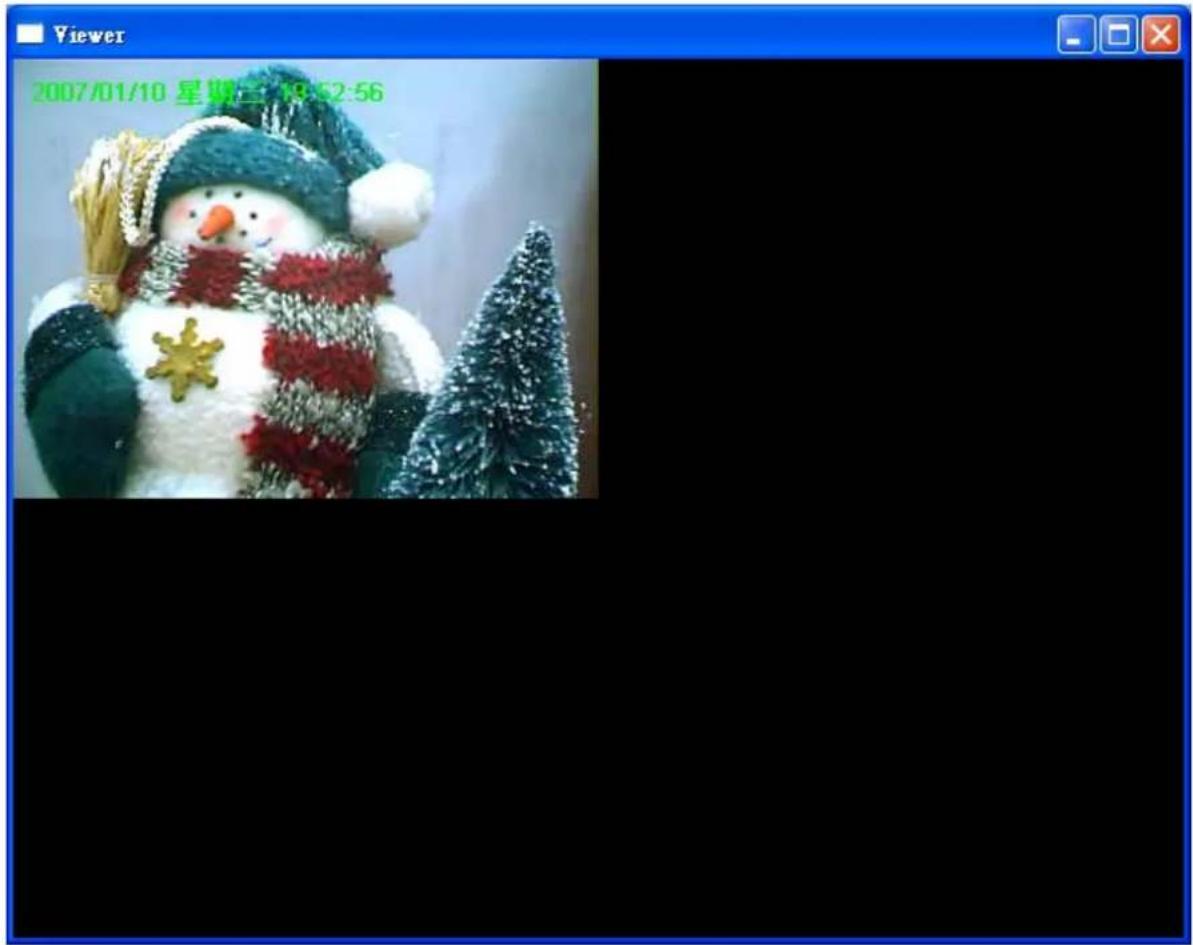
- The “Camera Viewer” will show the video automatically. Congratulations, you can use the camera through the network to view the video from now on.
When you click the "Detail Setting", a screen will pop up for you to enter the "Administrator Name" and "Password". The default value is as follows.
Name: "Admin"
Password: "1234"
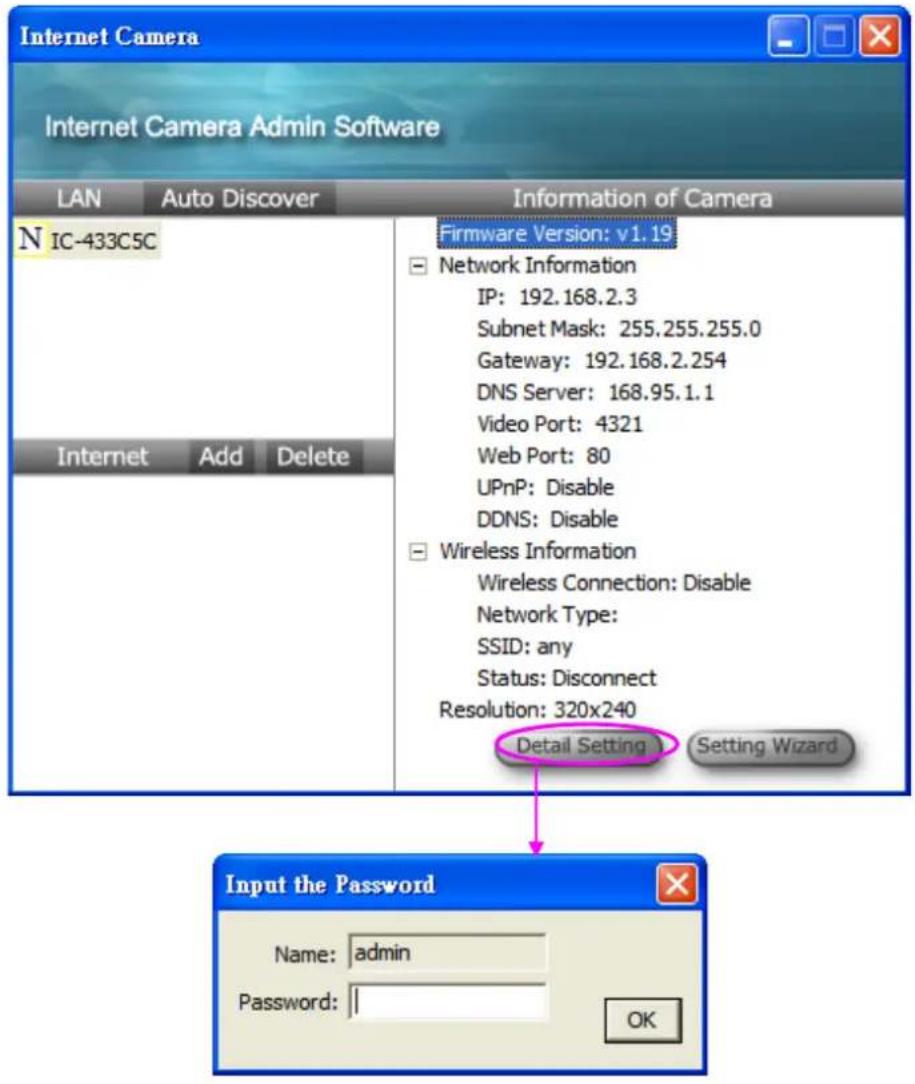
If the name and password you enter are correct, you can start to setup the network configuration of this IP camera.
8.1.1. Network Setting
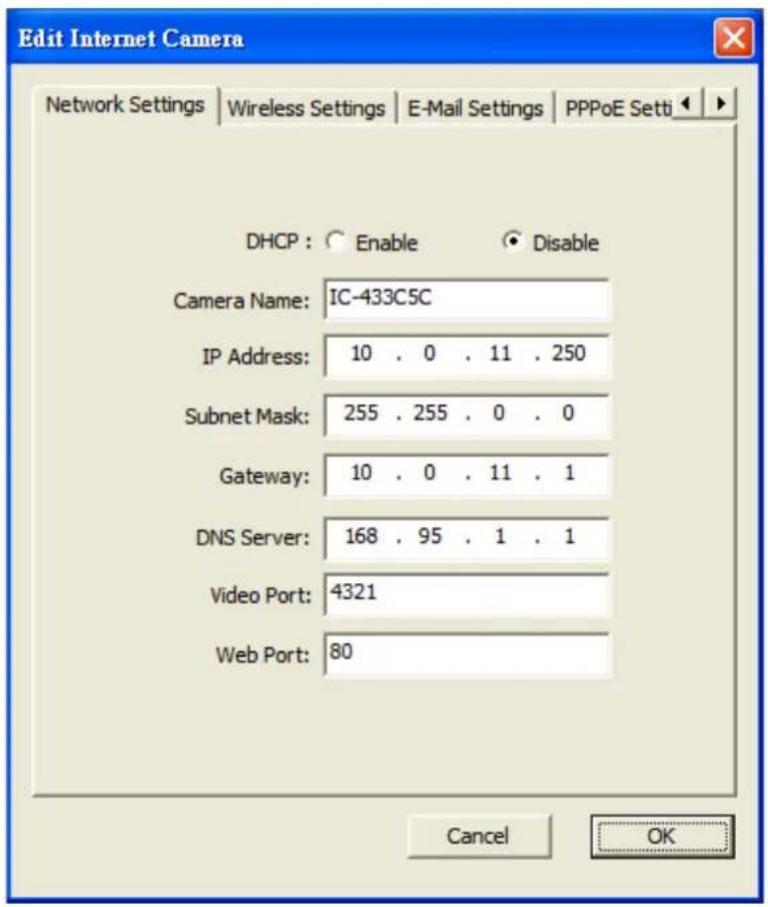
Network Setting
| Internet Camera Name | The default camera name is “IC1500WG”. It is recommended to name a meaningful name for the camera. |
| IP Address | Enter an unused IP Address within the IP address range used on your LAN. If the IP Address of your LAN is from the 192.168.2.1 to 192.168.2.254, you can set an unused IP Address from the range for the camera, for example: 192.168.2.250. |
| Subnet Mask | The Subnet Mask field must match the subnet setting on your LAN. For example: 255.255.255.0. |
| Gateway | The Gateway is used to forward frames to destinations in a different subnet on the Internet. The Gateway setting must be the same with the gateway used by the PCs on your LAN. |
| DNS Server | DNS Server (Domain Name Server) that translates names to IP addresses. Set the same DNS Server as the PCs on your LAN. |
Network Setting
| Video Port | The Video Port is used to transmit or receive the video streaming in the network. The default port setting is “4321”. If you want to view the video from the camera, the port setting should be correct. |
| Web Port | This camera support web connection, the default web port is 80. Since the web server may use port 80, you can use a different port for the camera. If you change the web port from 80 to 8080, you must type http://192.168.2.3:8080 to connect the camera through the web browser. |
8.1.2. Wireless Settings (IC-1510Wg Only)
You must configure the wireless settings from wired environment. Then you can remove the wired cable and start wireless connection.
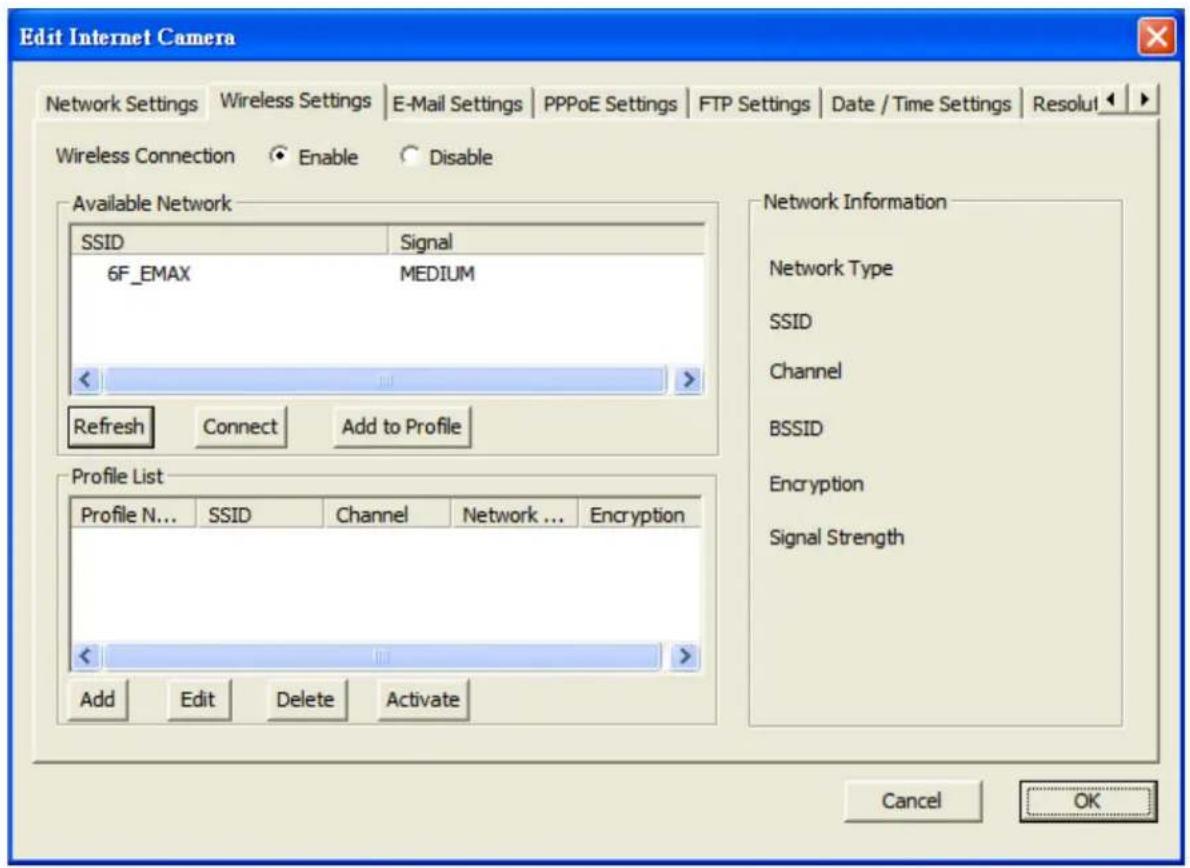
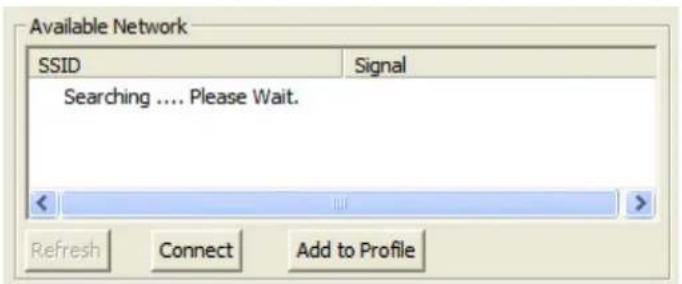
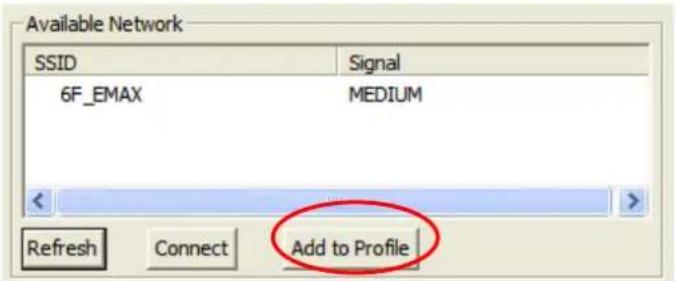
Utility will site survey automatically or you can press "Refresh" button to survey the AP router manually.
After site survey procedure, there will show existing AP SSID.
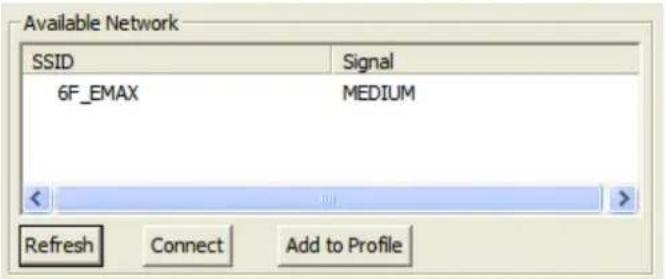
Then press "Connect" to connect AP router or press "Add to Profile" to configure the Wireless WEP and WPA encryption.
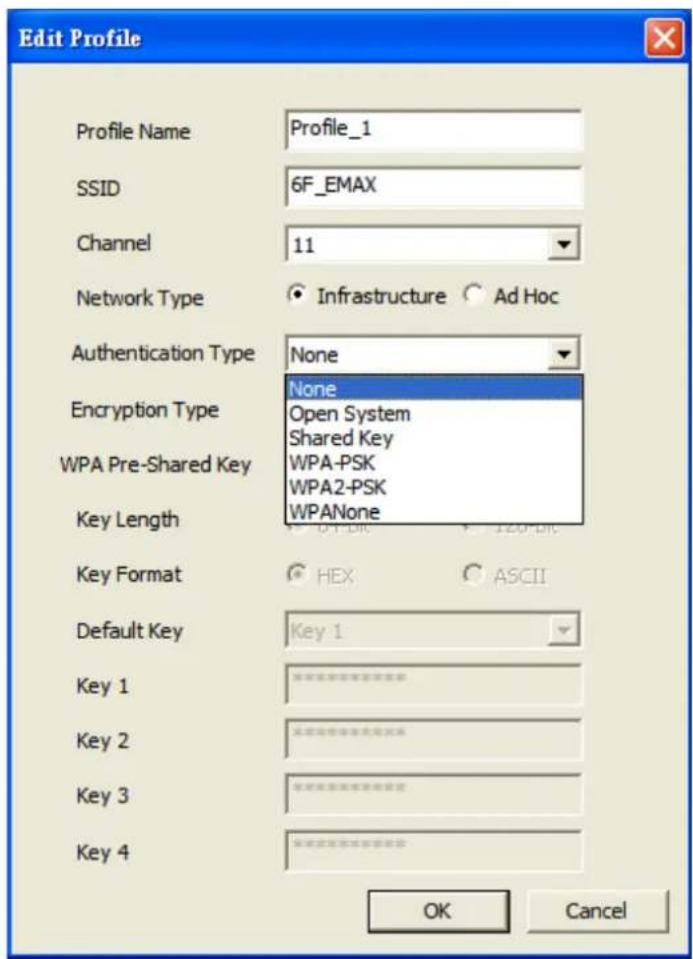
There are WEP (Open System/Shared Key), WPA-PSK, WPA2-PSK and WPANone encryption settings. You can choose one to match AP router wireless settings.
After set the profile, Please remove the LAN cable then IP Camera will connect to AP router automatically.
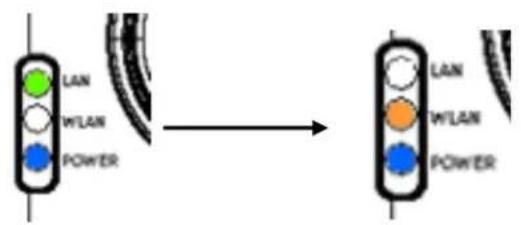
flowchart
graph LR
    A["LAN"] --> B["WLAN"]
    B --> C["POWER"]
    D["LAN"] --> E["WLAN"]
    E --> F["POWER"]
LED Status Diagram
Internet
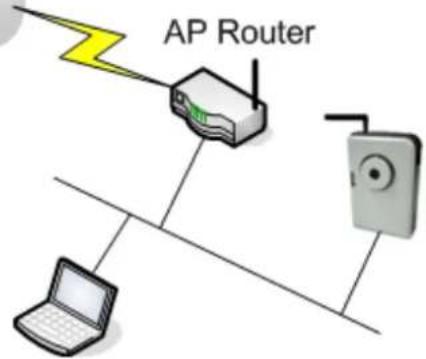
Wired Setting Environment
Internet
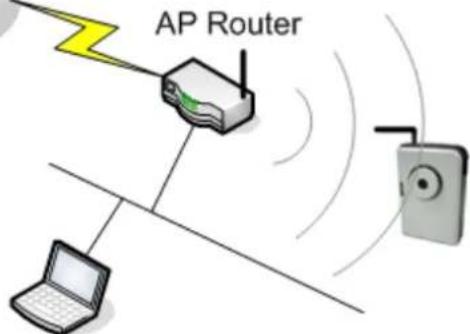
Wireless Setting Environment
9. Firmware Upgrade
Here provides several tools to upgrade the firmware of this IP camera, clear all settings, or switch LED notification off.
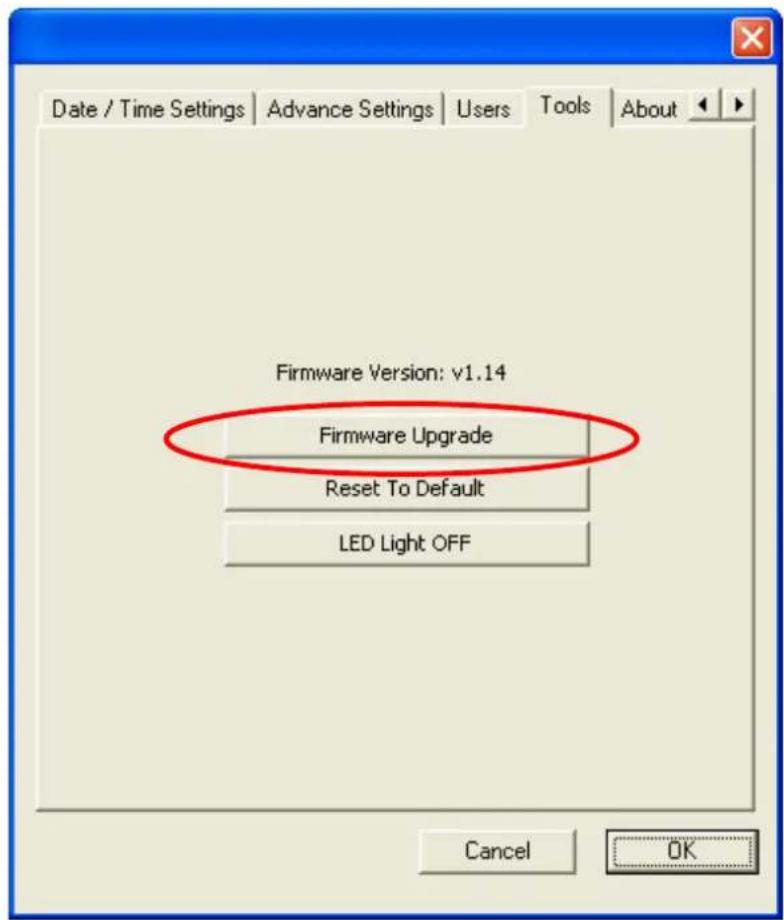
The descriptions of every setting in this menu will be given below:
| Item | Description |
| Upgrade Firmware | If you downloaded latest firmware file from our website, you can click this button to start to upload the firmware file to the IP camera, and you'll be prompted to provide the location of firmware file.Click ‘Open’ to start uploading new firmware and IP camera will start upgrading, please be patient. The IP camera will reboot after the upgrade procedure is done. |
| Reset to Default | Clear all settings in the camera. Please think again before you do this, and then click this button to reset all settings.NOTE: IP address will be reset to default value ‘192.168.2.3’ also. You'll need to change the IP address setting of your computer if the IP address of your computer does not begin with ‘192.168.2’, and subnet mask is not ‘255.255.255.0’, or you'll not be able to connect to this IP camera again. |
| LED Light OFF | Switch the LED light of this IP camera off, so ‘LAN’ and ‘WLAN’ LED on the IP camera will stop working, in case you don't want other people know the camera is transferring data.You can click this button again to switch LED lights on again. |
After all settings are completed, click 'OK' to save settings, or click 'Cancel' to abort and discard changes.
R&TTE Compliance Statement
This equipment complies with all the requirements of DIRECTIVE 1999/5/EC OF THE EUROPEAN PARLIAMENT AND THE COUNCIL of March 9, 1999 on radio equipment and telecommunication terminal Equipment and the mutual recognition of their conformity (R&TTE)
The R&TTE Directive repeals and replaces in the directive 98/13/EEC (Telecommunications Terminal Equipment and Satellite Earth Station Equipment) As of April 8, 2000.
Safety
This equipment is designed with the utmost care for the safety of those who install and use it. However, special attention must be paid to the dangers of electric shock and static electricity when working with electrical equipment. All guidelines of this and of the computer manufacture must therefore be allowed at all times to ensure the safe use of the equipment.
EU Countries Intended for Use
The ETSI version of this device is intended for home and office use in Austria, Belgium, Denmark, Finland, France, Germany, Greece, Ireland, Italy, Luxembourg, Bulgaria, Cyprus, Czech Republic, Estonia, Hungary, Latvia, Lithuania, Malta, Poland, Romania, Slovakia, Slovenia, the Netherlands, Portugal, Spain, Sweden, and the United Kingdom.
The ETSI version of this device is also authorized for use in EFTA member states: Iceland, Liechtenstein, Norway, and Switzerland.
EU Countries not intended for use None
Please check the declaration of conformity on www.edimax.com


N20379

АЯ46
ΣDIMAX NETWORKING PEOPLE TOGETHER
EDIMAX Technology Co., Ltd.
www.edimax.com
- Fast Ethernet / Wireless 11b/g Internet Camera
- Multi-Languages QIG in Driver CD
- EDIMAX NETWORKING PEOPLE TOGETHER
- Linux Open Source Code
- Content
- Product Information
- Check your package contents
- System Requirement
- Hardware Installation
- LED and Focusing
- - Power
- • LAN
- • WLAN
- Camera Ports
- - Antenna connector
- - Reset
- Installation Procedure
- Locate the IP Address
- Click 'Start' -> 'Control Panel'
- Double-click 'Network Connections' icon.
- Right-click 'Local Area Connection', and click 'Properties'.
- Web Management Interface
- Software Installation
- Network Setting
- Wireless Settings (IC-1510Wg Only)
- Firmware Upgrade
- R&TTE Compliance Statement
- Safety
- EU Countries Intended for Use
- EU Countries not intended for use None
- ΣDIMAX NETWORKING PEOPLE TOGETHER
Brand : Edimax
Model : IC-1510
Category : Security Camera