
CAD-496 - Car radio DENVER - Free user manual and instructions
Find the device manual for free CAD-496 DENVER in PDF.


| Product Type | Car Stereo |
| Brand | Denver |
| Model | CAD-496 |
| Form Factor | Single DIN (approx. 178x50 mm) |
| Weight | Approx. 0.5 kg |
| Power Supply | 12V DC (negative ground) |
| Radio Tuner | FM/AM with presets |
| Playback Sources | USB, Aux-in, Radio |
| Audio Output | 4x 50W max (or similar) |
| Display | LCD with white/blue backlight |
| Supported Audio Formats | MP3, WMA |
| Remote Control | Not included (manual operation) |
| Bluetooth | Not available (basic model) |
| Steering Wheel Control | Not supported |
| Installation | Standard ISO/DIN mounting |
| Cleaning | Wipe with dry, soft cloth |
| Safety | Disconnect car battery before installation |
| Spare Parts | Contact Denver customer service |
Frequently Asked Questions - CAD-496 DENVER
User questions about CAD-496 DENVER
0 question about this device. Answer the ones you know or ask your own.
Ask a new question about this device
Download the instructions for your Car radio in PDF format for free! Find your manual CAD-496 - DENVER and take your electronic device back in hand. On this page are published all the documents necessary for the use of your device. CAD-496 by DENVER.
USER MANUAL CAD-496 DENVER
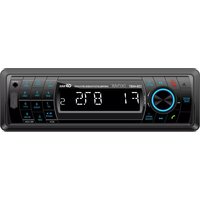
Press the button to turn the power "ON" or "OFF".
- BAND SELECTOR / PAUSE
a) Each time this button is pressed, the radio band is changed.
b) Press this button to pause the track during playback.
- AUTO-STORE/PRE-SCAN BUTTON / REPEAT
a) Press this button more than 2 seconds, it searches all station frequencies upward and memorize automatically to the 6 preset stations by catching the frequency. Press this button shortly, it re-calls the memorized station frequencies (1-6) automatically every 5 seconds. b) Press this button to repeat the track during playback.
4. DISC SLOT
5. LCD DIGITAL DISPLAY
- DISPLAY BUTTON
Press this button serves to show the available information.
SETTING CLOCK TIME MANUALLY
a) Press the button and hold it until the display flash and release.
b) Rotate "VOL/SEL" button clockwise to set HOUR and anti-clockwise to set MINUTE.
7. SCAN
Press this button to scan the receivable FM / MW stations. When receivable stations are tuned in, they are monitored for approximately 5 seconds before advancing to the next receivable station. Press this button again to stop scanning.
8. EJECT
Press the button to elect the disc inside disc slot.
- PANEL RELEASE
This button is used to release the panel from the unit.
10. MODE / MUTE
a) Briefly press it to select Radio (TUNER), CD (S-CDP), USB (USB-DRIV), SD (MEM-CARD) or AUX (AUX). b) Press this button more than 2 seconds to mute the volume.
11. RDS (RADIO DATA SYSTEM)
You can enjoy RDS advantage on FM radio as follows:
Program Service Name (PS): When RDS station is received, station's name will appear on the display. Traffic Program (TP): When station with traffic program is received, "TP" indicator will appear on the display. Alternative Frequencies (AF): The unit will continue checking the signal of alternative frequencies from time to time. If the new alternative frequency is stronger than current on, it automatically switch to the new frequency. Press this button shortly, the state of AF switching mode will appear on the display as follows: a) RDS is on : AF is on and RDS signal is received. b) RDS is off : AF is off. C) RDS is flashing : AF is searching but RDS signal is not received
Enhanced Other Networks (EON): When tune to a station which is linked to others by EON, the radio is capable of receiving Traffic Announcement from the linked stations.
12. TA (TRAFFIC ANNOUNCEMENT)
Press this button to select TA mode. When TA mode is on, it is able to receive traffic announcements or stations with Traffic Program (TP). It works as follows: a) If the volume is low, it will be raised temporarily and will back to original volume level after traffic announcement. b) If the radio is mute, it will be de-muted during traffic announcement.
13. PTY (PROGRAMME TYPE NAME)
Press this button to select PTY mode. Press any preset station (1-6) until the desired PTY code is found. The radio will stop on station transmitting the selected PTY code. During program type is searching, it can stop searching and the radio will back to the original station. "PTY NONE" will appear if selected PTY code is not receivable.
14. VOLUME/SELECTION ("VOL/SEL")
a) Rotate this button clockwise to increase volume level and vice versa.
b)Press this button shortly to show Volume/Bass/Treble/Balance/Fader control. Then, rotate clockwise to
increase setting level and vise versa.
c)Press this button more than 2 seconds, it activates the selection mode in cyclical position. Remark: "MULT OFF/ MULT ON" and "BEEP ON/ BEEP OFF" are not available for this model.
15/16. MANUAL UP/DOWN TUNING / TRACK SEEK UP/DOWN
On radio mode, pressing this button more than 2 seconds, it will tune one frequency step higher or lower. On CD/USB/SD mode, pressing this button shortly will move to the one track higher or lower. Pressing more than 2 seconds, it will move fast forward or backward to a specific position.
17. STATION PRESET BUTTON (1-6)
a) Each station preset can be stored in FM1, FM2, FM3, MW1 and MW2. Press the button shortly recalls the station frequency which was memorized.
b) It can be memorized the frequency stations manually on specific preset stations by holding the desired specific preset station in 2 seconds.
c) Press the preset 2 to scan the first 10 seconds of all the tracks during CD/USB/SD mode. d) Press the preset 4 to play the tracks in random order during CD/USB/SD mode.
e) Press the preset 5/6 to search -10/+10 track during USB/SD mode.
18. RESET
The reset button is located on the front of main panel. This reset circuitry is provided to protect the unit's microprocessor. Whenever the reset button is activated, all preset memories content will be erased. It should only be activated under the below conditions: a) Initial installation after all wires are completed. b) Abnormal operation.
19. AUXILIARY INPUT
Press MODE button (10) until the "AUX" mode is shown on display. The unit is ready to play files from the external audio device.
20. SD CARD SLOT
20. SD CARD SLOT
Press MODE button (10) until the "MEM-CARD" mode is shown on display. The unit is ready to play files from the SD card.
21. USB HOST
Press MODE button (10) until the "USB-DRIV" mode is shown on display. The unit is ready to play files from the USB device.
MP3 OPERATION
TRACK SEARCH
Press “AMS” button more than 2 seconds, “TRK SCH” will be shown on the display and “TRK O” will appear on the display for you to enter. Rotate the volume button to shift number 0-9 in loop. Then, press it shortly for the first digit selected. Repeat the same procedure for the rest of the digits if require. Once all digits are entered, press the volume button more than 2 seconds to start playing the selected track.
FILE SEARCH
Press “AMS” button more than 2 seconds and press one more, the “FILE SCH” will be shown on the display. Press “AMS” button and rotate the volume button to find the desired directory. Press the volume button to enter the desired directory. Rotate the volume button to select the file. Then, press the volume button more than 2 seconds to start playing.
CHARACTER SEARCH
Press “AMS” button more than 2 seconds and press twice, the “CHAR SCH” will be shown on the display for you to enter. Rotate the volume button to shift “A-Z”, “0-9” & * (space) in loop. Then, press it shortly for the first character selected. Repeat the same procedure for the rest of the character if require. Once the whole name is entered, press the volume button more than 2 seconds to start playing.
Remark :
a) The media must contain files name in order to use in searching.
b) If only partial letters are entered for searching, you might not get it correctly.
c) If the above search can not be completed within 10 seconds, the unit will continue play back the current file.
d) Do not attempt to play a media containing non-MP3 files. Otherwise, the radio may not work properly.
WIRE CONNECTION

P2 P3
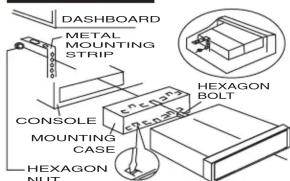
INSTALLATION
END OF LIFE DISPOSAL
UNIT REMOVAL
- Remove Front Panel and Frame.
- Insert the removal keys into the slot and gently to remove mounting case.
- Keep removal keys in a safe place for future removal of unit.


Electric and electronic equipment contains materials, components and substances that can be hazardous to your health and the environment, if the waste material (discarded electric and electronic equipment) is not handled correctly. Electric and electronic equipment is marked with the crossed out trash can symbol, seen left. This symbol signifies that electric and electronic equipment should not be disposed of with other household workers in the department or department, but it is not allowed for any such use of electronic equipment can either be submitted free of charge at recycling stations and other collection sites, or be collected from the households. Additional information is available at the technical department of your city.
- DISC SLOT
- LCD DIGITAL DISPLAY
- SETTING CLOCK TIME MANUALLY
- SCAN
- EJECT
- MODE / MUTE
- RDS (RADIO DATA SYSTEM)
- TA (TRAFFIC ANNOUNCEMENT)
- PTY (PROGRAMME TYPE NAME)
- VOLUME/SELECTION ("VOL/SEL")
- 15/16. MANUAL UP/DOWN TUNING / TRACK SEEK UP/DOWN
- STATION PRESET BUTTON (1-6)
- RESET
- AUXILIARY INPUT
- USB HOST
- MP3 OPERATION
- TRACK SEARCH
- FILE SEARCH
- CHARACTER SEARCH
- Remark :
Brand : DENVER
Model : CAD-496
Category : Car radio