
MK-G28PR - Chopper PANASONIC - Free user manual and instructions
Find the device manual for free MK-G28PR PANASONIC in PDF.


| Product Type | Meat Grinder (Mincer) |
| Brand | Panasonic |
| Model | MK-G28PR |
| Power Consumption | 400 W |
| Voltage | 220-240 V, 50/60 Hz |
| Weight | 2.5 kg |
| Dimensions (L x W x H) | 20 x 18 x 28 cm |
| Housing Material | Plastic |
| Blade Material | Stainless Steel |
| Grinding Plate Diameter | 6 cm |
| Included Accessories | Cutting blade, 3 grinding plates (fine, medium, coarse), sausage stuffing tube, food pusher |
| Functions | Meat grinding, sausage stuffing |
| Reverse Function | Yes, to clear jams |
| Safety Features | Overload protection, non-slip feet, safety switch (requires proper assembly) |
| Cleaning | Removable parts are dishwasher-safe; motor base wipe with damp cloth |
| Spare Parts Availability | Blades and plates are replaceable; contact Panasonic service |
| Repairability | Modular design; user-replaceable parts (blade, plate) and professional repair for motor |
| Warranty | 2 years (varies by region) |
Frequently Asked Questions - MK-G28PR PANASONIC
User questions about MK-G28PR PANASONIC
0 question about this device. Answer the ones you know or ask your own.
Ask a new question about this device
Download the instructions for your Chopper in PDF format for free! Find your manual MK-G28PR - PANASONIC and take your electronic device back in hand. On this page are published all the documents necessary for the use of your device. MK-G28PR by PANASONIC.
USER MANUAL MK-G28PR PANASONIC
Before operating this unit, please read instructions completely.
Внимание
Увага
Caution
- Close supervision is necessary when any appliance is used near children.
- When carrying the unit, be sure to hold the motor housing with both hands; do not hold only the hopper plate.
•Never feed food with hands. Use the food pusher.
•Do not grind hard foods such as bones and nuts. (They may cause jamming.)
•Do not grind ginger and other materials with hard fiber. (They will not be ground.)
• To avoid jamming, do not force to operate the unit with excessive pressure.
If the unit jams due to hard materials lodged onto the feed screw or the cutting blade, switch off immediately and clean the unit.
When the circuit breaker activates, do not switch on. (See "Caution on Jamming" on page 7.)
When switching from ON to OFF/REVERSE or vice versa, wait about 6 seconds to assure that the motor has stopped completely.
•Never try to disassemble or repair the unit by yourself.
•This product is intended for household use only.
- If the supply cord is damaged, it must be replaced by the manufacturer or its service agent or a similarly qualified person in order to avoid a hazard.
- Never remove or attach the hopper plate, the head or cap when the motor is operating.
- Do not disassemble the grinder or place anything (especially finger, spoon, fork, etc.) in the grinder during operation.
• Do not operate more than 15 minutes at one time.
Содержание
| Caution | 1-2 |
| Parts Identification | 3-4 |
| How to Use | 5-7 |
| How to Clean | 8-9 |
| Specifications | 10 |
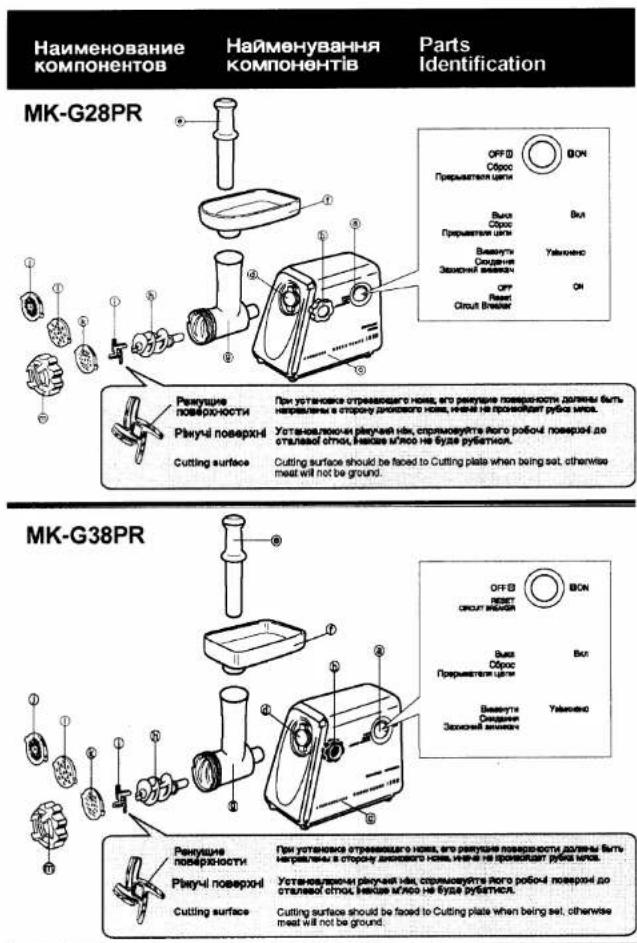
Switch(es)
b Locking knob
© Motor housing
d Opening
Food pusher
① Hopper plate
⑨ Head
h Feed screw
①Cutting blade
①-① Attachm
①Cutting plate (fine)
① Cutting plate (medium)
①Cutting plate (coarse)
Cap
© Cutters compartment
© Cord compartment
Как пользоваться
Make sure that the voltage and frequency indicated on the bottom are the same as your local supply.
Wash all the parts (except those that do not touch foods a, b, c, d, n and o) in warm soapy water.
Before plugging in, ensure the switch is off.
To Grind Meat
(Assembling)
1 Place the head onto the opening of the motor housing. Holding the head with one hand, place the locking knob into the hole on the side of the motor housing and tighten it clockwise.
2 Place the feed screw into the head, long end first, by turning the feed screw slightly until it is set into the motor housing
3 Place the cutting blade onto the feed screw shaft with the blade facing the front as illustrated. • If it is not fitted properly, meat will not be ground.
4 Place the desired cutting plate next to the cutting blade, fitting protrusions in the slots.
5 Screw the cap into place until tight. • Do not over tighten. Place the hopper plate on the head and fix into position. Set the unit on a firm surface. • The air passage at the bottom and the side of the motor housing should be kept free and not blocked.
Cut all foods into pieces so that they fit easily into the hopper opening. Plug in, then switch on.
6 Feed foods into the hopper plate. • Use the food pusher. After use, switch off and unplug Note:
•The grinder head may rotate slightly during use, but it is normal. Do not over tighten the knob to stop this movement. It may cause damage.
(Caution on Jamming)
When the circuit breaker automatically stops the motor or when the motor continues to function but no meat comes out of the cutting plate due to jamming of bones or other materials, switch off.
• Do not switch on
Unplug and clean the unit. (See "How to Clean".)
Press "OFF/Pesepc" to clear jamming of bones or other materials.
-Reverse operation will continue for as long as "OFF/Posepc" is pressed.
Unplug and clean the unit. (See "How to Clean".)
Разборка
Make sure that the motor has stopped completely. Disconnect the plug from the power outlet. Disassemble by reversing the steps from 5 - 1 of P.5 - P.6 (Assembling).
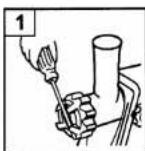
1 To remove the cap easily, place a screwdriver between the protrusions and unscrew.
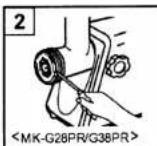
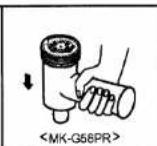
2 To remove the cutting plate easily,
Очистка
Очищення апарату
How to Clean
Очистка
Удаляют мясо и др.
Remove meat and other food.
Wash each part in warm soapy water.
A little salad oil on ⓗ, ⓘ after washing and drying will keep them lubricated.
Note:
•A bleaching solution containing chlorine will discolor the aluminum surface.
- Do not immerse the motor housing in water; simply wipe it with a damp cloth.
•Thinners and benzines will crack or change the color of the unit.
- Do not wash any parts in a dishwasher. (It may discolor the aluminum surface.)
+Leaving the parts ①-① and ④, ⑨ and ⑬ wet after cleaning may cause corrosion. Wipe off thoroughly with a dry cloth
after cleaning. Diping or rubbing some said oil on ①-① immediately after drying them will help prevent them from rusting.
| MK-G28PR | MK-G38PR | MK-G58PR | |
| Power supply | 220 B 50 - 60 Γ4 | ||
| Dimensions (Hx WxD) (approx.) | 38.6 × 16.6 × 31.0 cm | 38.6 × 16.6 × 34.2 cm | 43.0 × 18.0 × 41.8 cm |
| Weight (approx.) | 3.2 kg | 3.7 kg | 5.9 kg |
| Attachments | Cutting plates | ||
Brand : PANASONIC
Model : MK-G28PR
Category : Chopper