BHMI621302 - Cooker Hansa - Free user manual and instructions
Find the device manual for free BHMI621302 Hansa in PDF.


| Product Type | Freestanding Cooker |
| Energy Source | Gas Hobs, Electric Oven & Grill |
| Height | 85 cm |
| Width | 60 cm |
| Depth | 60 cm |
| Weight | 52 kg |
| Power Supply Hobs | Gas (Butane/Propane) |
| Power Supply Oven | 220-240 V ~ 50 Hz |
| Number of Gas Burners | 4 |
| Oven Type | Electric Fan-Assisted Oven |
| Oven Capacity | 70 L |
| Grill Function | Yes |
| Timer | Mechanical Timer with Alarm |
| Ignition | Automatic Electronic Ignition |
| Safety Features | Flame Failure Device on Hobs, Oven Thermostat, Cool Touch Door |
| Cleaning | Easy-Clean Enamel Cavity, Removable Oven Door |
| Spare Parts Availability | At least 10 years after purchase |
| Accessories Included | Oven Rack, Baking Tray, Grill Rack |
| Brand | Hansa |
| Model | BHMI621302 |
Frequently Asked Questions - BHMI621302 Hansa
User questions about BHMI621302 Hansa
0 question about this device. Answer the ones you know or ask your own.
Ask a new question about this device
Download the instructions for your Cooker in PDF format for free! Find your manual BHMI621302 - Hansa and take your electronic device back in hand. On this page are published all the documents necessary for the use of your device. BHMI621302 by Hansa.
USER MANUAL BHMI621302 Hansa
natural_image
Line drawing of a four-g Windowed gas stove with four fans and three circular gauges, no text or symbols present.natural_image
Simple black-and-white line drawing of a tree with cloud-like canopy and two wavy lines at base (no text or symbols)natural_image
Recycling symbol composed of three chasing arrows forming a triangle (no text or labels)natural_image
Pure diagram of a mechanical component with no text, numbers, or symbolsnatural_image
Pure mechanical part diagram with no text, numbers, or symbolsnatural_image
Simple line drawing of a cooking pot on a heating element (no text or symbols)ПЛОХО
natural_image
Simple line drawing of a cooking pot on a stove (no text or symbols)ХОРОШО
Крышка кастрюли:
natural_image
Technical line drawing of a mechanical component with two arrows pointing to features (no text or symbols)natural_image
Simple circular diagram with a central horizontal bar and two curved arrows pointing outward (no text or symbols)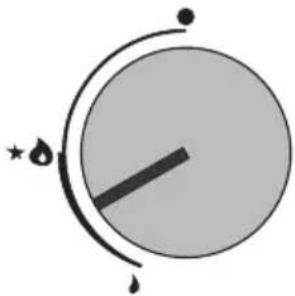
natural_image
Simple diagram of a circular object with a horizontal line and two curved arrows, no text or symbols present.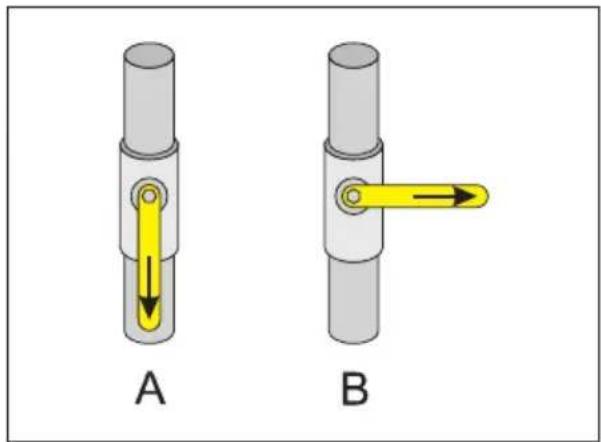
natural_image
Two mechanical components labeled A and B, showing directional arrows indicating movement or force (no text or symbols beyond labels)natural_image
Diagram of a mechanical component with a circular top and internal components, no visible text or symbols
Your hob is exceptionally easy to use and extremely efficient. After reading these Operating Instructions, operating the appliance will be easy.
Before being packaged and leaving the manufacturer, the appliance was thoroughly checked with regard to safety and functionality.
Before using the appliance, please read these Operating Instructions carefully
By following these instructions carefully you will be able to avoid any problems in using the appliance.
It is important to keep these Operating Instructions and store them in a safe place so that they can be consulted at any time.
Follow these instructions carefully in order to avoid possible accidents.
Important!
The appliance may only be operated when you have read and understood this manual thoroughly.
The appliance can be only used for the purpose for which it was designed. Any other use (eg. heating rooms) is improper and can be dangerous.
The manufacturer reserves the right to introduce changes which do not affect the operation of the appliance.
Manufacturer's Declaration
The manufacturer hereby declares that this product meets the requirements of the following European directives and regulations:
• Low Voltage Directive 2014/35/EC
• Electromagnetic Compatibility (EMC) Directive 2014/30/EC
• ErP Directive 2009/125/EC
• Directive 2009/142/EC (to 20.04.2018)
• Regulation (EU) 2016/426 of the European Parliament and of the Council (from 21.04.2018)
and has thus been marked with the symbol and been issued with a declaration of compliance made available to market regulators.
TABLE OF CONTENTS
Basic Information......25
Safety instructions....27
Description of the appliance....32,33
Specification....32,33
Installation (instructions for the installer)....34
Operation....41
Cleaning and maintenance....46
Troubleshooting....47
Note. The appliance and its accessible parts become hot during use. Care should be taken to avoid touching heating elements. Children less than 8 years of age shall be kept away unless continuously supervised.
This appliance can be used by children aged from 8 years and above and persons with reduced physical, sensory or mental capabilities or lack of experience and knowledge if they have been given supervision or instruction concerning use of the appliance in a safe way and understand the hazards involved. Children shall not play with the appliance. Cleaning and user maintenance shall not be performed by children without supervision.
Note. Unattended cooking on a hob with fat or oil can be dangerous and may result in fire.
NEVER attempt to extinguish fire with water. Unplug the appliance and cover flame with lid or non-combustible blanket.
Note. Risk of fire: do not store anything on the cooking surface.
The appliance is not intended to be operated by means of an external timer or separate remote-control system.
Do not use steam cleaning equipment to clean the hob.
Note. Use only hob covers designed or indicated by the appliance manufacturer as suitable or hob covers supplied with the appliance.
Use of inappropriate covers can cause accidents.
Note. Do not use unsuitable hob guards that prevent children from accessing hob. Use of unsuitable hob guards can cause accidents.
Caution: The cooking process has to be supervised. A short term cooking process has to be supervised continuously.
Warning: Use only hob guards designed by manufacturer of the cooking appliance or indicated by the manufacturer of the appliance in the instructions for use as suitable or hob guards incorporated in the appliance. The use of inappropriate guards can cause accidents.
- This appliance must be installed in accordance with the applicable regulations and used only in a well-ventilated room. Before you install and use the appliance, carefully read the operating instructions.
- Children shall not play with the appliance.
Hot burners, grids, pots with hot liquids may cause burns to children.
- Make sure that the power cords of other equipment do not touch any hot surfaces of the appliance.
- The power cord wall plug should be accessible after appliance has been installed.
- Do not install the appliance near the cooling equipment.
- Do not leave the appliance unattended while cooking. Oils and fats may catch fire due to overheating.
- Make sure that liquids do not boil over onto the burners.
- If there is damage to the appliance it can be reused after the defect is repaired by a trained professional.
- Do not open the valve on the gas connection or the valve on the gas cylinder before you make sure that all valves are closed.
- Do not allow liquids to boil over onto the burners and avoid burner contamination. Soiled burners must be cleaned and dried immediately after cooling.
- Do not place pots directly on the burners.
- Do not place pots weighing more than 5 kg on the grid over one burner or more than 25 kg on the entire grid. Do not place one pot on two burners.
- Do not hit the knobs or burners.
- Persons without proper qualifications and training must not make any alterations or repair the appliance.
- Do not open the gas valves if you do not have a lighted match or an igniter in your hand.
- Do not extinguish the flame by blowing.
-
Do not alter the appliance to allow it to be used with a different type of gas, or move the appliance to another place nor make any modifications in the gas supply system. These must be carried out by a qualified installer only.
-
Do not allow young children and persons who have not read the operating instructions to use the appliance.
• IF YOU SUSPECT A GAS LEAK, DO NOT:
light matches, smoke, turn on or off any electrical devices (door bell, light switch, etc.) and use other electrical or mechanical equipment that can produce an electrical or impact spark. In such a case, immediately close the valve on the gas cylinder or the gas system shut-off valve, ventilate the room and call a qualified person to remove the cause of the leak. - In the event of any technical fault, immediately unplug the appliance (following the above rule) and report the fault to the service centre to be repaired.
- Do not connect any antenna cables, e.g. radio receivers to the gas system
- In the event of ignition of gas escaping from a leaking system, immediately shut off the gas supply using the shut-off valve.
- In the event of ignition of gas escaping from a leaking gas cylinder valve: cover the cylinder with a wet blanket to cool it and close the valve on the cylinder. Once cooled, move the gas cylinder out to the open air. Do not reuse the damaged gas cylinder.
- If you do not use the appliance for a few days, close the gas system main valve, and after each use in case of a gas cylinder.
- Important! If the power cord is damaged, it should be replaced by the manufacturer or specialist repair centre or a qualified person in order to avoid danger.
- Using the appliance for cooking and baking results in the emission of heat and moisture in the room in which it is installed. Make sure that kitchen is well ventilated. Natural ventilation openings or forced mechanical ventilation (exhaust hood) should be available.
- Prolonged intensive use of the appliance may require additional ventilation, for example, opening a window or a more effective ventilation, such as increasing efficiency of mechanical ventilation, if applicable.

natural_image
Simple line drawing of a tree with cloud-like canopy and two wavy lines at base (no text or symbols)Using energy responsibly not only saves money but also helps the environment. So let's save energy! And this is how you can do it:
• Use proper pans for cooking.
Pans with thick, flat bases can save up to 1/3 on electric energy. Remember to cover pans if possible otherwise you will use four times as much energy!
- Match the size of the saucepan to the surface of the heating zone.
Cookware base should never be smaller than cooking zone.
- Ensure that heating zones and pan bases are clean.
Soils can prevent heat transfer – and repeatedly burnt-on spillages can often only be removed by products which cause damage to the environment.
- Do not uncover the pan too often (a watched pot never boils!)
- Turn off the appliance in time and use the residual heat.
For long cooking times, turn off heating zones 5 to 10 minutes before finishing cooking. This saves up to 20% on energy.
- Do not install the hob in the immediate vicinity of refrigerator / freezer.
Otherwise energy consumption increases unnecessarily.

natural_image
Recycling symbol composed of three chasing arrows forming a triangle (no text or labels)The appliance was packed to protected it from damage during of transport. After unpacking, please dispose of all elements of packaging in a way that will not cause damage to the environment.
All materials used for packaging the appliance are environmentally friendly; they are 100% recyclable and are marked with the appropriate symbol.
Important! During unpacking, keep the packaging material (polyethylene bags, polystyrene pieces, etc.) out of reach of children.
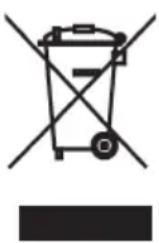
In accordance with European Directive 2012/19/UE and Polish legislation regarding used electrical and electronic goods, this appliance is marked with the symbol of the crossed-out waste container.
This marking indicates that the appliance must not be disposed of together with other household waste after it has been used. The user is obliged to hand it over to waste collection centre collecting used electrical and electronic goods. The collectors, including local collection points, shops and local authority departments provide recycling schemes.
Proper handling of used electrical and electronic goods helps avoid environmental and health hazards resulting from the presence of dangerous components and the inappropriate storage and processing of such goods.
Gas hob
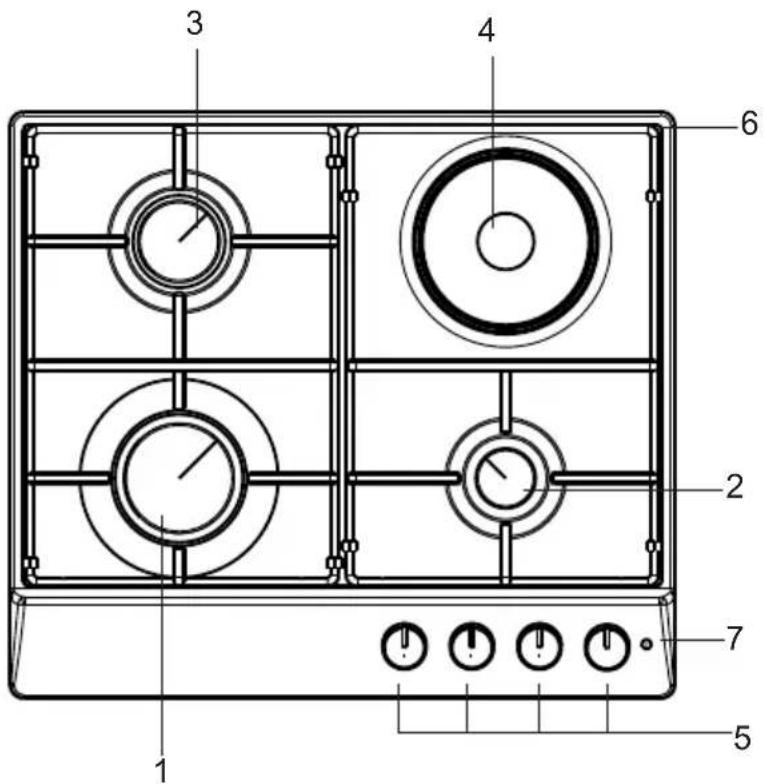
1,2,3 - burners
4 - electric cook zone
5 - burner knobs
6 - grids
7 - light indicator
SPECIFICATION
- height 103 mm
- depth 520 mm
- width 590 mm
- weight of the appliance 9,8 kg
The appliance is equipped with burners:
1 - large burners, heat load - 2,8 kW
2 - medium burners, heat load - 1,8 kW
3 - small burner, heat load - 1,0 kW
4 - cooking zone - ∅ 140 - 1,0 kW
Gas category: HU II 2HS3B/P
BG, HR II2H3B/P
SI II2H3+
The appliance has a pipe connection - G 1/2"
Gas hob
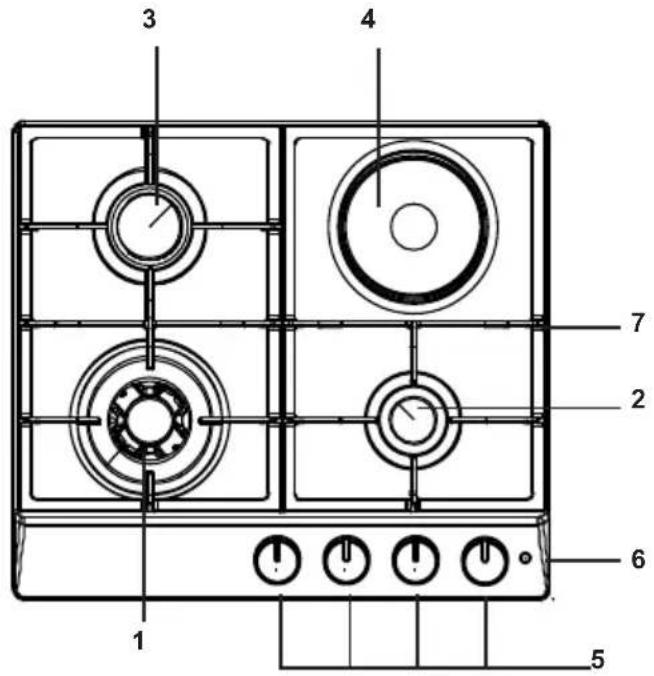
1,2,3 - burners
4 - electric cook zone
5 - burner knobs
6 - grids
7 - light indicator
SPECIFICATION
- height 103 mm
- depth 520 mm
- width 590 mm
- weight of the appliance 9,8 kg
The appliance is equipped with burners:
1 - wok burners, heat load - PG*4.7* 2,8 kBt / PG*4.71* kBt 3,5
2 - medium burners, heat load - 1,8 kW
3 - small burner, heat load - 1,0 kW
4 - cooking zone - ∅ 145 - 1000 W
Gas category: HU II 2HS3B/P
BG, HR II2H3B/P
SI II2H3+
The appliance has a pipe connection - G 1/2"
The following instructions are intended for a qualified professional installer. These instructions are intended to provide the most professional installation and maintenance of the appliance.

- Before you install the appliance, make sure that the local distribution conditions (gas type and pressure) and the appliance configuration is appropriate.
- Configuration details are given on the appliance nameplate.
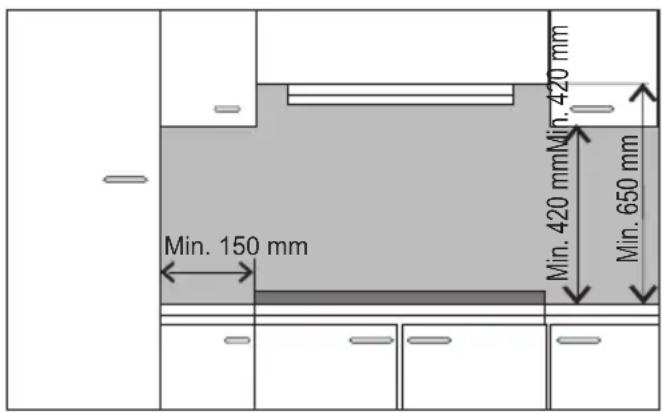
- This appliance is not connected to flues. The appliance must be installed and connected in accordance with the current regulations. In particular, consideration must be given to the applicable requirements for ventilation.

Requirements for the place of installation
- Kitchen should be dry, airy and well ventilated according to the applicable technical regulations.
- The room should be equipped with a ventilation system to extract the combustion gases outside the room. The ventilation system must include a ventilation grille or a hood. Hoods must be installed in accordance with the accompanying operating instructions.
- The room should also allow air supply which is necessary for the correct combustion of gas. The air supply should be not less than 2 m^3/h per 1 kW of the burners power. Natural airflow from the outside may be provided or through a duct with a cross-section of at least 100 cm^2 , or indirectly from the adjacent rooms that have ventilation ducts leading outside.

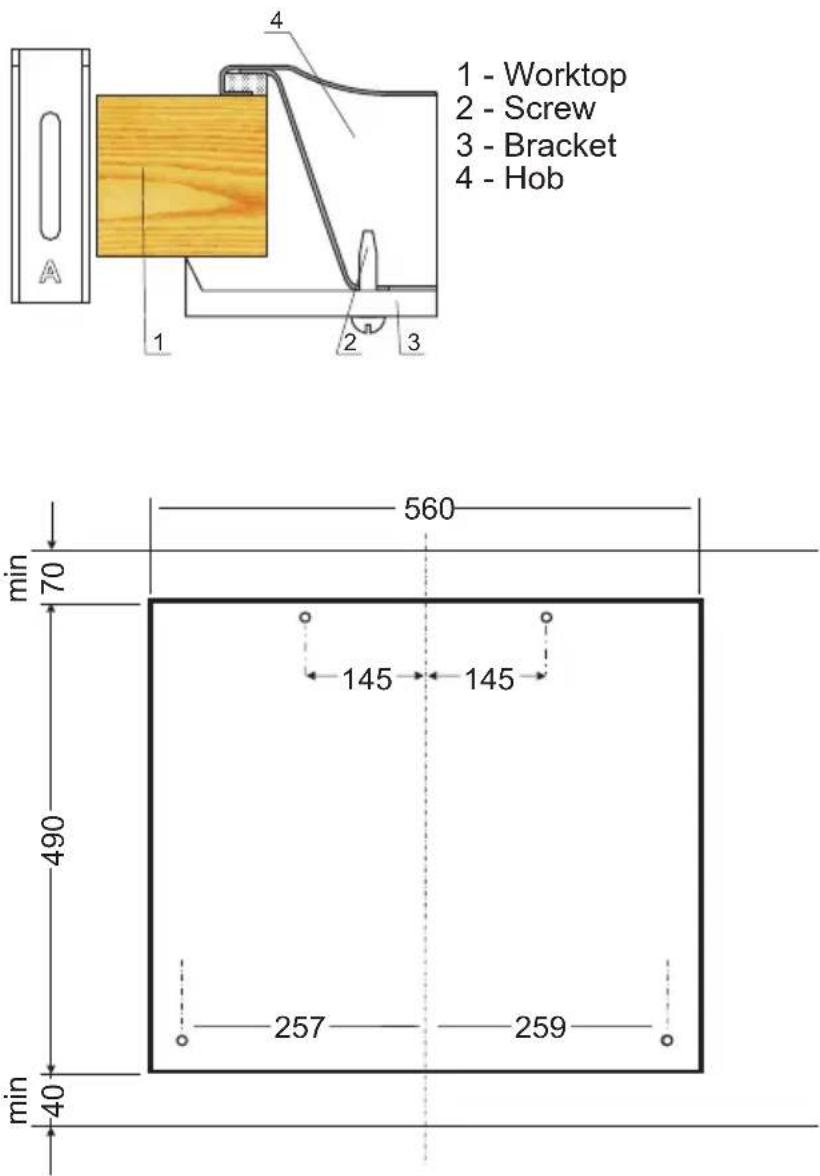
Install gas hob
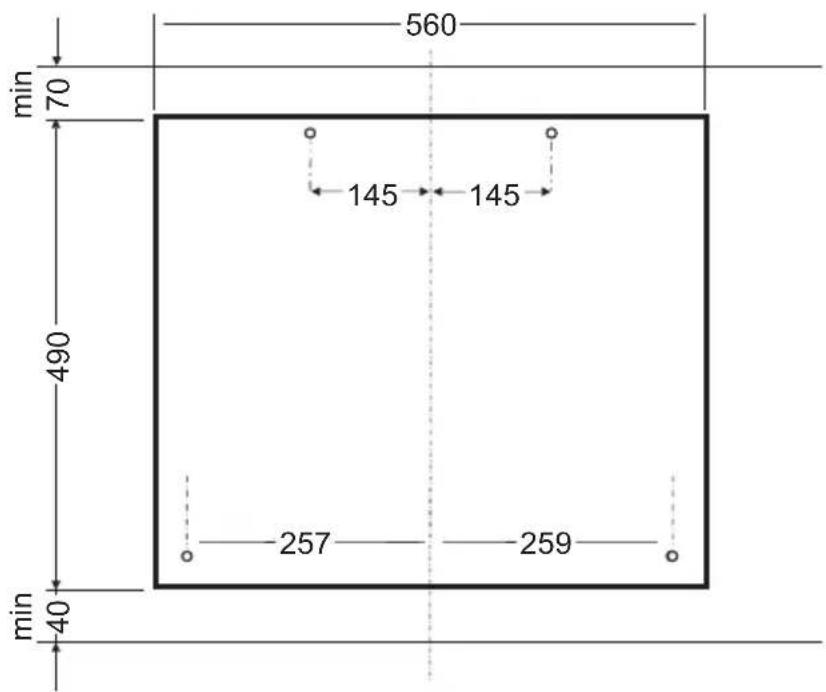
- prepare an opening in the worktop of a kitchen cabinet, as per the installation drawing
- connect the hob to a gas and electrical system in accordance with the instructions supplied,
- loosely attach fixing brackets to the bottom of the hob,
- remove dust from the worktop, insert hob into the opening and press in firmly,
- position fixing brackets (Fig.) perpendicularly to the hob's edge and tighten firmly,
- once you install the hob in the worktop, check if it operates, especially the flame failure cut-off and igniter.
The hob has a fixed-mounted cable with a neutral contact and may only be connected to a 230 V \~ 50 Hz socket with grounding pin. Socket power circuit should be protected with a 16 A fuse.
Tips for the installer
The installer must:
- Have appropriate qualification
- Read the information on the nameplate or information sticker concerning the type of gas, for which the appliance is intended. This information must be compared with the gas supply specification at the place of installation.
- Check
- effectiveness of ventilation, i.e. exchange of air in the room.
- tightness of gas fittings.
- proper operation all the functional components.
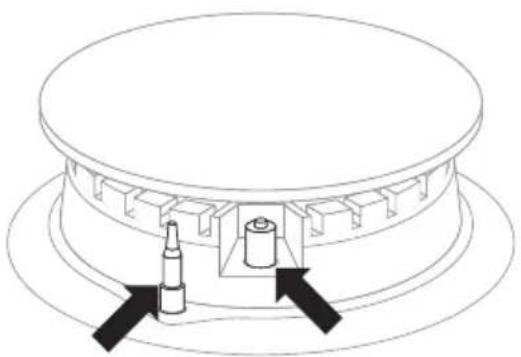
- For proper operation of igniters and flame failure cut-off device, adjust the position of the gas knobs with the supplied washers,
- check the operation of igniters and flame failure cut-off device,
- In the event of faulty operation, remove the knob, make adjustments by inserting a washer (washers) on the valve pin,
- once adjusted, protect the system with a clamping washer and replace the knob.
- Provide the user with the gas hob installation certificate and give instructions on the appliance operation.
The appliance has an G 1/2" threaded pipe connector to connect it to the gas system.
The LPG (propane-butane) hob version has the connector terminated with a hose tip ∅ 8 x 1 mm.
Gas supply hose should not touch the metal parts of the cover.

ENSURE the connections are tight.
Once you install the appliance, check all connections for leaks, for example using soapy water.
Do not use fire to check the connections.

Carefully read the operating instructions supplied and follow all guidelines.
CAUTION!
You are dealing with gas. The appliance must be supplied with the type of gas specified by the manufacturer.
Only a qualified person must install the appliance.
Information on the type of gas for which the appliance is designed is given on the nameplate.

CAUTION!
Only a qualified person must connect the appliance to a liquid gas cylinder or an existing system, following all safety regulations.

Adapt the hob to a particular type of gas
This may be performed by an installer with the appropriate qualifications only.
If the gas, which the hob will be supplied with is different from the gas type specified by the manufacturer, i.e. G20 20 mbar, replace the burner nozzles and adjust the flame.
CAUTION!
Hobs supplied by the manufacturer are fitted with burners designed for the gas specified on the nameplate and in the warranty. Nameplate is located on the bottom of the housing and lists information on the type of gas the appliance is intended for.
In order to adapt the hob to another gas type:
- replace the nozzles (see table),
- adjust the valves for a reduced flow.
Somipress burner. (indicated "Somipress" on the burner body)
| Type of gas | Burner | |||
| auxiliary medium large wok | ||||
| G20 2H 20 mbar | 0,72 0,98 1,17 0,55 | + 2 x 0,75 | ||
| G30 3B/P 30 mbar 0,52 | 0,67 0,83 0,37 + 2 x 0,55 | |||

Once converted, place a sticker indicating the gas type for which the appliance is intended.
natural_image
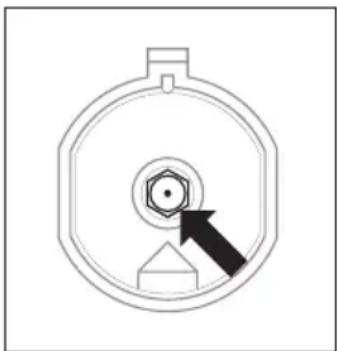
Pure diagram of a mechanical component with no text or symbolsReplace burner nozzle: unscrew the nozzle using a special wrench no. 7 and replace with a new one suitable for the new gas type (see table above).

Adjust the valves for a reduced flow.
| Burners | Flame | Convert the appliance from LPG to natural gas | Convert the appliance from natural gas to LPG |
| Top burners | Full flame | Replace burner nozzle with the appropriate nozzle according to the table. | Replace burner nozzle with the appropriate nozzle according to the table. |
| Economic flame | Gently loosen the adjusting screw and adjust the flame. | Slightly tighten the adjusting screw, check the flame stability and size. |

Adjust the valves
To adjust the valves turn the burner knob to "economic flame" position and ignite the flame.
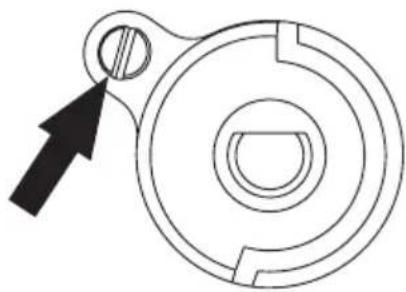
For COPRECI valves, remove the hob and adjust the size of an economic flame with a screwdriver.
natural_image
Pure mechanical component diagram without any text, numbers, or symbolsIn order to check the flame, heat up the burner on a full flame for about 10 min., and then turn the burner knob to an economic flame position. The flame should not go out or jump on the nozzle. However, if it does, readjust of the valves.
Conversion of the appliance to a different gas type than specified by the manufacturer on the nameplate or purchasing an appliance that is intended for a different gas type than provided in the building, is entirely up to the user and installer.
Burner operation
To achieve significant energy savings, use the appliance as instructed in these operating instructions, make the appropriate adjustments and use suitable pots.
Potential energy savings:
- up to 60%, when using appropriate pots,
- up to 60%, when using the appliance according to the instructions and correctly adjusting the flame when cooking.
Keeping the burners clean is crucial to an efficient energy consumption by the appliance (especially the flame outlets and nozzles).
Choice of cookware
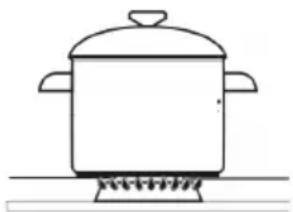
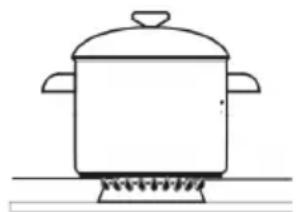
Make sure that the diameter of the bottom of the pot is always slightly larger than the crown of the burner flame, and the pot itself is covered with a lid. It is recommended that the pot diameter is approximately 2.5 - 3 times larger than the burner:
- small burner — pot diameter of 100 to 140 mm,
- medium burner — pot diameter of 140 to 220 mm,
- large burner — pot diameter of 200 to 240 mm
- wok burner — pot diameter of 220 to 260 mm
- the pot height should not be greater than its diameter
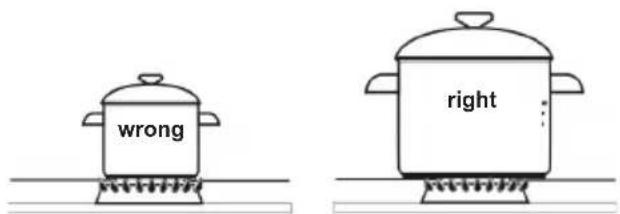
Cookware lid:
Lid prevents heat from escaping and thus reduces heating time.
Do not use cookware that protrude over the edges of the hob.
Burner control knob
"burner off" position
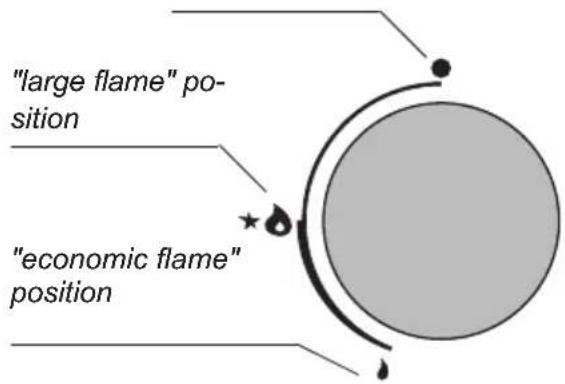
Using the hob equipped with igniter knobs ("Zp" model)
- push down the knob of a selected burner until you feel resistance and turn left to the "large flame" position
• hold the knob until gas ignites - once flame ignites, release the knob and adjust flame size.
Using the hob equipped with a flame-failure cut-off device ("Zt" model)
natural_image
Technical line drawing of a mechanical component with two inserted pins and arrows indicating assembly or alignment (no text or symbols)In hobs equipped with a flame-failure cut-off device, hold the pushed down knob in the "large flame" position for approximately 10 seconds to activate the a flame-failure device.

Repeat the above step if flame does not ignite.
If flame is extinguished, the flame-failure device will cut off gas supply within about 60 seconds.
You can open and control the gas supply to the burners using knobs with flame-failure cut-off device (Zt models).
Adjust flame
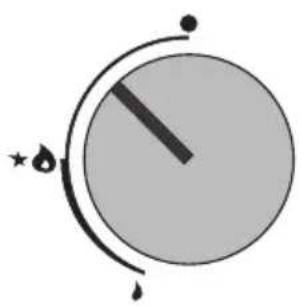
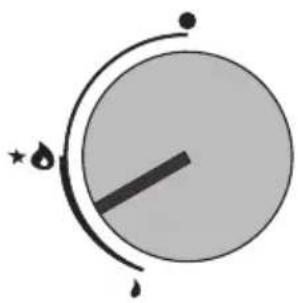
Flame from a properly adjusted burner is pale blue with a clearly outlined inner cone. You can adjust flame by setting the knob to different positions.
large flame
small flame ("economic")
●burner off (no gas supply)
natural_image
Simple circular diagram with a central horizontal bar and curved arrows, no text or symbols present.Wrong
natural_image
Simple diagram of a circular object with a horizontal line and two curved arrows, no text or symbols present.Right
This example shows you and to operate the knob and adjust flame size. To optimise cooking set the knob to "large flame" initially to boil your food, then set it to "small flame" to continue the cooking process. Adjust the flame size depending on your needs.

Do not place the knob between the ● burner off and large ⚙ flame position.
OPERATION
Switch on the appliance:
By turning the correct knob (4) activate the selected cooking zone (5). Pilot light (7) will come on. You can now set the heat setting by turning the knob in the desired position. The heating elements are controlled by knobs allowing you to set the appropriate heat setting. The system uses the power effectively according to your needs, without causing a loss.
Before using the appliance for the first time
Before first use, heat up the cooking zones for 4 minutes without cookware.
Switch on the ventilation in the room or open a window, as the appliance could emit an unpleasant smell during first use.
Operating cooking zones. How to save energy?
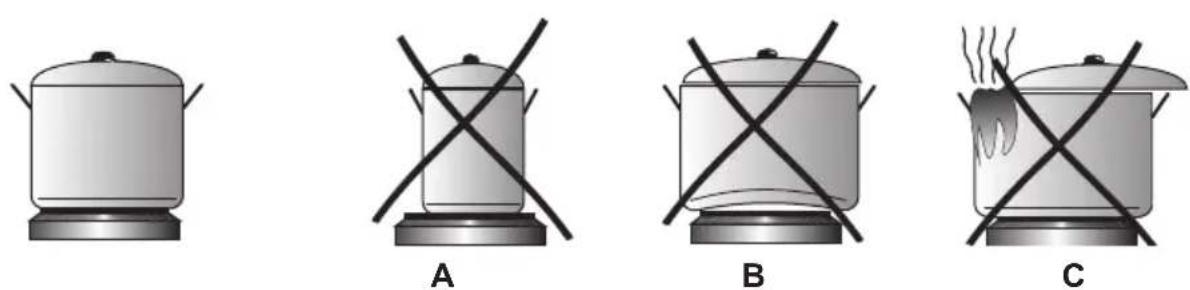
Fig. 4 Fig. 5
Using cookware of correct size saves energy. Bases of cookware of correct size should be thick and have roughly the same diameter as the cooking zone to achieve optimum heat transfer. (Fig. 4).
How is energy lost?
Fig. 5A The pot is too small for the selected cooking zone.
Fig. 5B The pot base is not flat (it is convex).
Fig. 5C The lid is not properly aligned.
Please kindly note the following:
• do not operate a cooking zone without cookware,
• use only the cookware with clean and dry base,
- never cook food in plastic cookware,
• do not put plastic items (spoons, forks, etc.) on a hot cooking zone
- always use cookware with a lid, and make sure that lid does not protrude outside the pot's rim and condensation does not leak on the hob,
- protect cooking zones against corrosion,
- turn off the cooking zones 5 - 10 minutes before removing cookware.
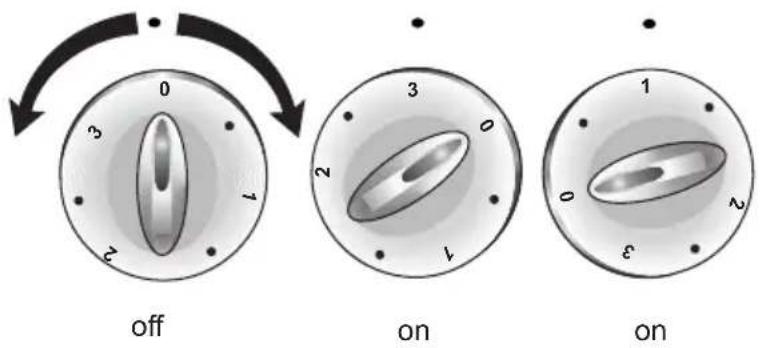
Fig.6
Symbols on the knobs correspond to cooking zones which they control. The cooking zone is off if:
- "0" on the knob is aligned with the vertical line marked on the control panel.
- marking on the knob is aligned with „0“ on the control panel.
The heat setting can be adjusted by turning the knob left or right. When cooking zone operates, a pilot light is on.
| Knob setting | Examples of cooking application |
| 3 | rapid heating, cooking, frying |
| • | frying meat and fish |
| 2 | simmering or frying |
| • | cooking soups and large quantity of food |
| 1 | cooking potatoes |
| • | stewing vegetables |
| 0 | off |
Remarks on the use of cooking zones
Depending on the type, the hob may be fitted with standard or fast cooking zones. Cooking and frying on the standard and fast cooking zones
Fast cooking zone has greater power than standard cooking zone. For easy distinction its is marked with a red ring. The ring could gradually burn out.
Cooking
Set the knob to position 3 at the beginning of the cooking, then to maintain the boil set it to position 1. Heat setting can be changed as required (see table).
Frying
Set the knob to position 3 to heat up the fat, then to add the meat and reduce the setting to position 2. Heat setting can be changed as required (see table).
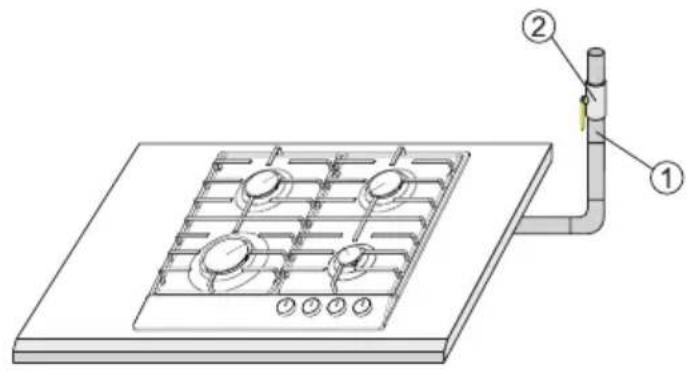
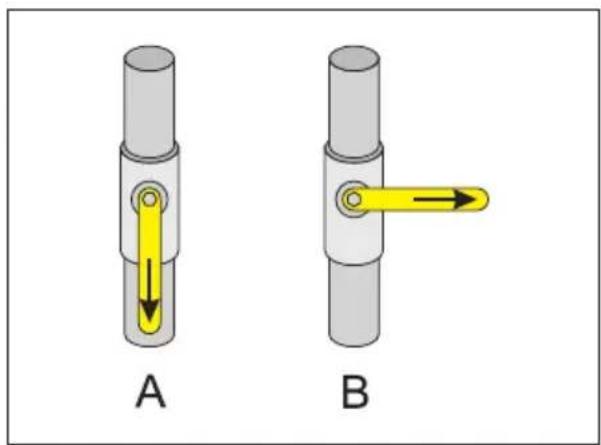
In the event a gas leak risk
1 gas system
2 gas system shut-off valve
A valve "open"
B valve "closed"
natural_image
Two mechanical components labeled A and B, showing directional arrows indicating movement or force (no text or symbols beyond labels)In the event of a fault

- turn off the burners
- close the gas system shut-off valve
- Ventilate the kitchen
• report the fault to a service centre or a qualified gas fitter to have it repaired - do not use your gas hob until the fault has been repaired.

Some minor faults may be repaired by the user, according to the instructions supplied.
BURNER does not ignite, I can smell leaking gas
- close the burner valves
- close the gas system shut-off valve
- Ventilate the room
- remove the burner
- clean and purge the flame outlets
- replace the burner
- retry to ignite the burner
NO FLAME? HAVE THE APPLIANCE REPAIRED!
Proper routine maintenance and cleaning of the appliance can significantly extend its trouble-free operation.

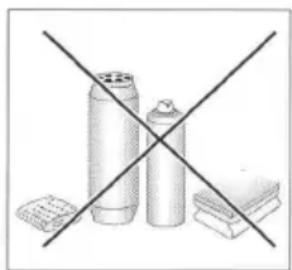
Before cleaning or other maintenance work, always unplug the appliance or use the main electrical system circuit breaker to cut off power. Do not begin cleaning until the hob has cooled. Do not use abrasive scouring powders. Do not use steam cleaning equipment for cleaning.
Cooking zones
- Contamination (ie, burnt food residue) should be removed from the cooking zone surface using a soft cloth (never wash or scrub the black surface of the cooking zones). Cleaned the decorative stainless steel rings with a detergent or mildly abrasive cleaner, then wipe dry.
Regularly rub the cooking zone surface with white mineral oil or silicone. Do not use animal or vegetable fats, butter, lard, oil, etc.
Hob surface
- Use mild detergents to wash enamel surfaces. When cleaning do not use abrasive cleaners such as scouring powders, pastes, abrasive stones, pumice, metal scrubbers, etc.
- Thoroughly clean the stainless steel hob before use. Especially make sure to remove any adhesive residue or self-adhesive tape applied when the appliance was packaged.
- Clean the hob after each use. Do not allow the hob to get heavily stained; particularly from burnt-on spillages from boiled over liquids.
Regular inspections
In addition to normal cleaning and maintenance:
- carry out periodic checks of touch controls and other elements. After the warranty
expires, have authorised service inspect the appliance every two years,
• repair any operational faults,
- carry out periodic maintenance of the hob,
natural_image
Simple line drawing of three cylindrical objects crossed by a diagonal line, no text or symbols presentBurners, hob grid
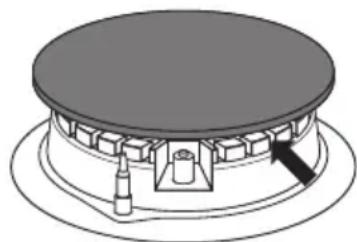
- If the burners and grid become soiled, remove them from the hob and wash in warm water with some dishwashing liquid. Wipe dry. Once the grid is removed, thoroughly clean the area under the burner and wipe it dry with a soft cloth. Flame outlets and burner head must be clean at all times, see figure below. Clean the gas nozzles using a thin copper wire. Do not use steel wire or ream the holes.
natural_image
Diagram of a mechanical component with a circular top and central base, showing internal components and a black arrow indicating direction (no text or symbols)
All burner parts must be always dry. Water droplets may block the gas flow and cause the burner to operate incorrectly.

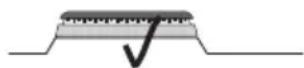
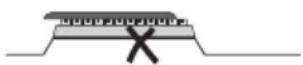
Make sure that burner is correctly re-assembled after cleaning.
CORRECT

INCORRECT
In the event of any fault:
• turn off the appliance
- disconnect the power supply
• have the appliance repaired
- based on the instructions given in the table below, some minor issues can be corrected by the user. Please check the consecutive points in the table before you refer the repair to customer service.
| PROBLEM POSSIBLE CAUSE REMEDY | ||
| 1.The appliance does not work | - no power | - check the fuse, replace if blown |
| 2.Burner does not ignite | - soiled flame outlet | - close the gas shut-off valve, close the burners valves, ventilate the room, remove the burner, clean and clear out the flame outlets |
| 3.Igniter does not work - no power | - check the fuse, replace | if blown |
| - no power - open the gas supply valve | ||
| - soiled (greasy) igniter - clean the igniter | ||
| - burner knob pushed down not long enough | - hold down the knob until you see a full flame around the burner crown | |
| 4.The flame goes out when igniting the burner | - burner knob released too soon | - hold the knob down for longer in a "large flame" position |
natural_image
Simple black-and-white line drawing of a tree with cloud-like canopy and two wavy lines at base (no text or symbols)natural_image
Simple line drawing of a recycling symbol with three chasing arrows (no text or labels)1 - Blat
2 - Holt-şurub
3 - Mâner de fixare
4 - Plita
natural_image
Pure diagram of a mechanical component with no text, numbers, or symbolsnatural_image
Pure mechanical part diagram without any text, numbers, or symbolsnatural_image
Simple line drawing of a cooking pot on a stove (no text or symbols)GREŞIT
natural_image
Simple line drawing of a cooking pot on a stove (no text or symbols)BINE
Capacul cratiței:
natural_image
Technical line drawing of a mechanical component with two arrows pointing to features (no text or symbols)Supapa siguranta
arzato
Aprindere
piezoelectrica
natural_image
Simple circular diagram with a central vertical line and two curved arrows pointing outward (no text or symbols)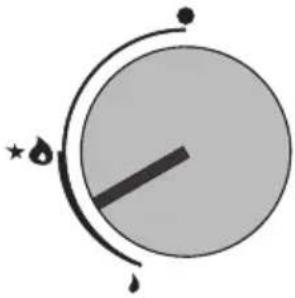
natural_image
Simple diagram of a circular object with a horizontal line and two curved arrows, no text or symbols present.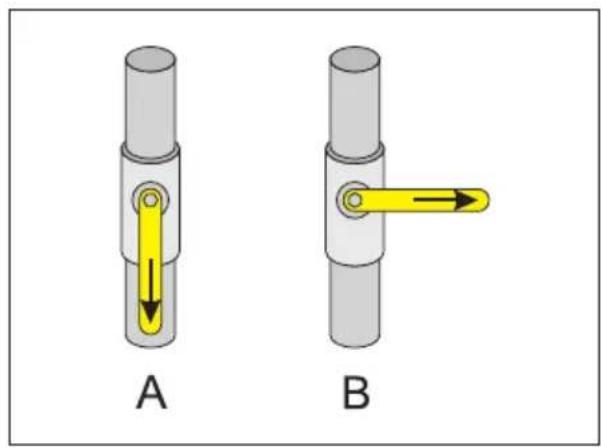
natural_image
Two mechanical components labeled A and B, showing directional arrows indicating movement or force (no text or symbols beyond labels)natural_image
Diagram of a mechanical component with a circular top and base, showing internal components and a black arrow pointing to a specific part (no text or symbols present)
- Крышка кастрюли:
- Important!
- Manufacturer's Declaration
- TABLE OF CONTENTS
- SPECIFICATION
- Requirements for the place of installation
- Tips for the installer
- The installer must:
- ENSURE the connections are tight.
- CAUTION!
- Adapt the hob to a particular type of gas
- Adjust the valves
- Burner operation
- Choice of cookware
- Cookware lid:
- Burner control knob
- Using the hob equipped with igniter knobs ("Zp" model)
- Using the hob equipped with a flame-failure cut-off device ("Zt" model)
- Repeat the above step if flame does not ignite.
- Adjust flame
- large flame
- OPERATION
- Switch on the appliance:
- Before using the appliance for the first time
- How is energy lost?
- Please kindly note the following:
- Remarks on the use of cooking zones
- Cooking
- Frying
- In the event a gas leak risk
- In the event of a fault
- Cooking zones
- Hob surface
- Regular inspections
- Burners, hob grid
- Capacul cratiței:
Brand : Hansa
Model : BHMI621302
Category : Cooker