BOES69871 - Oven Hansa - Free user manual and instructions
Find the device manual for free BOES69871 Hansa in PDF.


| Type de produit | Four encastrable |
| Marque | Hansa |
| Modèle | BOES69871 |
| Dimensions (L x H x P) | 59.5 x 59.5 x 55 cm |
| Poids net | 30 kg |
| Volume intérieur | 65 L |
| Alimentation | 230 V / 50 Hz |
| Puissance totale | 3000 W |
| Type de cuisson | Chaleur tournante, convection naturelle, grill, sole, voûte |
| Nettoyage | Par pyrolyse |
| Porte | Vitre froide, démontable |
| Éclairage | Lampe intérieure |
| Minuterie | Programmable jusqu'à 24 h |
| Thermostat | 30 °C à 275 °C |
| Sécurité enfants | Verrouillage des touches |
| Arrêt automatique | Oui |
| Réparabilité | Indice de réparabilité 8.5/10 |
| Pièces détachées | Disponibles sur le site Hansa |
| Garantie | 2 ans |
| Classe énergétique | A+ |
| Couleur | Noir |
Frequently Asked Questions - BOES69871 Hansa
User questions about BOES69871 Hansa
0 question about this device. Answer the ones you know or ask your own.
Ask a new question about this device
Download the instructions for your Oven in PDF format for free! Find your manual BOES69871 - Hansa and take your electronic device back in hand. On this page are published all the documents necessary for the use of your device. BOES69871 by Hansa.
USER MANUAL BOES69871 Hansa
natural_image
Simple line drawing of a cabinet or enclosure with no text, numbers, or symbols present.NAUDOJIMO INSTRUKCIJA / MONTUOJAMOJI ORKAITĖ
KASUTUSJUHEND / INTEGREERITAV AHI
LIETOŠANAS INSTRUKCIJA / CEPEŠKRĀSNS IEBŪVĒJAMA LV
UPUTE ZA UPORABU
INSTRUCTION MANUAL
LT ET
RU
SAUGOS NURODYMAI 5
KAIP TAUPYTI ELEKTROS ENERGIJA 7
GAMINIO APRAŠYMAS 9
IRENGIMAS 11
APTARNAVIMAS
KEPIMAS ORKAITĖJE – PRAKTIŠKI PATARIMAI 26
ORKAITĖS VALYMAS IR PRIEŽIŪRA 31
TECHNINIAI DUOMENYS 37
13
EST
OHUTUSJUHISED
ELEKTRIENERGIA KOKKUHOID 41
SEADME KIRJELDUS 43
PAIGALDAMINE
KASUTAMINE
TOIDUVALMISTAMINE PLIIDIL - PRAKTILISED NÕUANDED 60
AHJU PUHASTAMINE JA HOOLDUS 65
TEHNILISED ANDMED 71
39
45
47
LV
NORĀDĪJUMI PAR LIETOŠANAS DROŠĪBU 73
KĀ TAUPĪT ENERĞIJU 76
JÜSU IERİCE 78
UZSTĀDĪŠANA
CEPEŠKRĀSNS LIETOŠANA
CEPŠANA CEPEŠKRĀSNĪ – PRAKTISKI PADOMI
TEHNISKIE PARAMETRI
80
82
95
106
HR
INFORMACIJE O SIGURNOSTI
KAKO ŠTEDJETI ENERGIJU
OPIS PROIZVODA
INSTALACIJA
UPORABA
PEČENJE U PEĆNICI – PRAKTIČNI SAVJETI
ČIŠĆENJE I ODRŽAVANJE PEĆNICE
TEHNIČKI PODACI
108
110
112
114
116
130
135
141
EN
SAFETY INSTRUCTIONS 143
HOW TO SAVE ENERGY 145
DESCRIPTION OF THE APPLIANCE 147
INSTALLATION
OPERATION
BAKING IN THE OVEN – PRACTICAL HINTS 165
CLEANING AND MAINTENANCE 170
TECHNICAL DATA 176
149
151
GERBIAMAS PIRKĖJAU,
natural_image
Simple black-and-white line drawing of a tree with two roots and wavy lines at the base (no text or symbols)natural_image
Simple line drawing of a recycling symbol (three chasing arrows), no text or labels present.natural_image
Isometric line drawing of a square frame with rounded corners and a small circular cutout on top (no text or symbols)Padéklas kondit. gaminiams kepti
natural_image
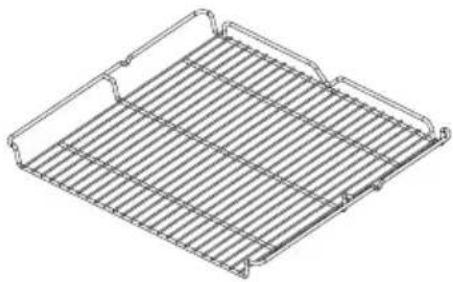
Isometric line drawing of a rectangular metal grate or rack structure (no text or symbols)Grotelès griliui
natural_image
Line drawing of a square container with rounded corners and a flat top (no text or symbols)Kepimo padėklas
natural_image
Line drawing of a rectangular metal tray with internal grid structure (no text or symbols)Grotelès („Airfry“ kopėčios)
natural_image
Top-down schematic of a rectangular device with internal grid pattern and directional arrows (no text or symbols)natural_image
Technical diagram of a mechanical component with an inset close-up showing a threaded fastener inserted into a housing (no text or symbols present)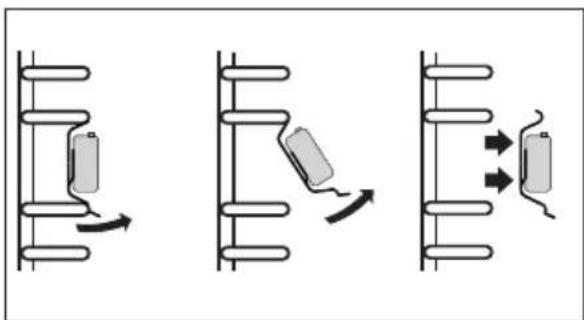
natural_image
Diagram showing three sequential mechanical or electrical assembly steps with no visible text or symbols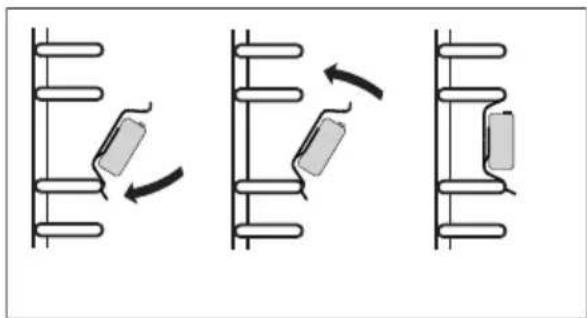
natural_image
Diagram showing three sequential mechanical or electrical assembly steps with no visible text or symbols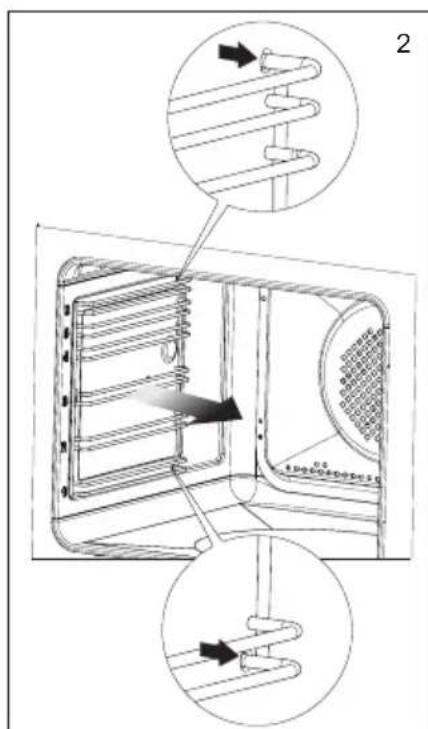
natural_image
Diagram of a microwave oven with airflow direction arrows (no text or symbols)Svarbu!
Orkaitès lemputè
Durelių nuėmimas
natural_image
Technical line drawing of a mechanical assembly with an inset magnified view of a component (no text or symbols)natural_image
Technical line drawing of a mechanical assembly with a rectangular component and a cylindrical component, no text or symbols present.ORKAITĖS VALYMAS IR PRIEŽIŪRA
natural_image
Simple black-and-white line drawing of a tree with cloud-like canopy and two wavy lines at base (no text or symbols)natural_image
Simple line drawing of a recycling symbol (three chasing arrows), no text or labels present.natural_image
Isometric line drawing of a square frame with rounded corners and a small circular cutout on top (no text or symbols)Ahjuplaat*
natural_image
Isometric line drawing of a rectangular metal rack or grid structure (no text or symbols)natural_image
Line drawing of a square container with rounded corners and a flat top (no text or symbols)Küpsetusplaat*
natural_image
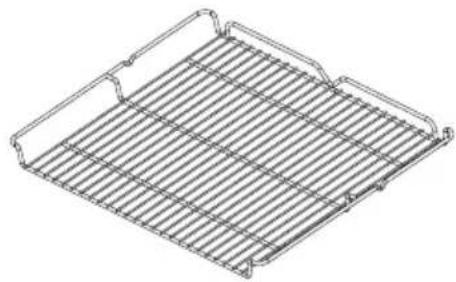
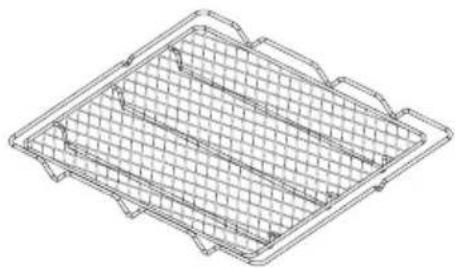
Isometric line drawing of a rectangular metal tray with grid pattern (no text or symbols)Võre (redel Airfry)
*Mõned mudelid
Ahju paigaldamine
natural_image
Top-down schematic of a rectangular device with internal grid pattern and directional arrows (no text or symbols)Tähelepanu!
flowchart
graph TD
    A["Step 1: Internal components with a battery and curved arrow"] --> B["Step 2: Internal component with a rectangular block and curved arrow"]
    B --> C["Step 3: External component with a resistor and curved arrow"]
natural_image
Three sequential diagrams showing mechanical or electrical components with curved arrows indicating motion (no text or symbols)Tähelepanu!
Ahju valgustus
natural_image
Technical line drawing of a device with a central panel and fan, showing directional arrows (no text or symbols)Tähtis!
natural_image
Technical line drawing of a mechanical assembly with an inset showing a component detail (no text or symbols)natural_image
Technical line drawing of a mechanical assembly with a rectangular component and a separate cylindrical component (no text or symbols)natural_image
Simple black-and-white line drawing of a tree with two roots and wavy lines at the base (no text or symbols)natural_image
Line drawing of a square frame with rounded corners and a small corner, no text or symbols present.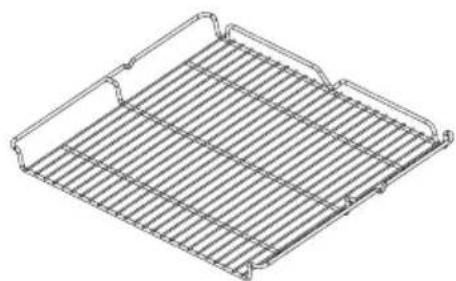
natural_image
Isometric line drawing of a metal rack with grid lines (no text or symbols)natural_image
Line drawing of a square tray or container with rounded corners and a flat top (no text or symbols)natural_image
Isometric line drawing of a rectangular metal tray with grid pattern (no text or symbols)Režgis (Airfry redele)
*daži modeli
Cepeškrāsns montāža
natural_image
Top-down schematic of a rectangular device with internal grid pattern and directional arrows (no text or symbols)CEPEŠKRĀSNS LIETOŠANA
natural_image
Technical diagram of a mechanical device with an inset close-up showing a threaded component (no text or symbols present)CEPEŠKRĀSNS LIETOŠANA
CEPEŠKRĀSNS LIETOŠANA
CEPEŠKRĀSNS LIETOŠANA
CEPEŠKRĀSNS LIETOŠANA
Funkcija Soft Steam
natural_image
Three diagrams showing mechanical or electrical components with directional arrows, no text or symbols present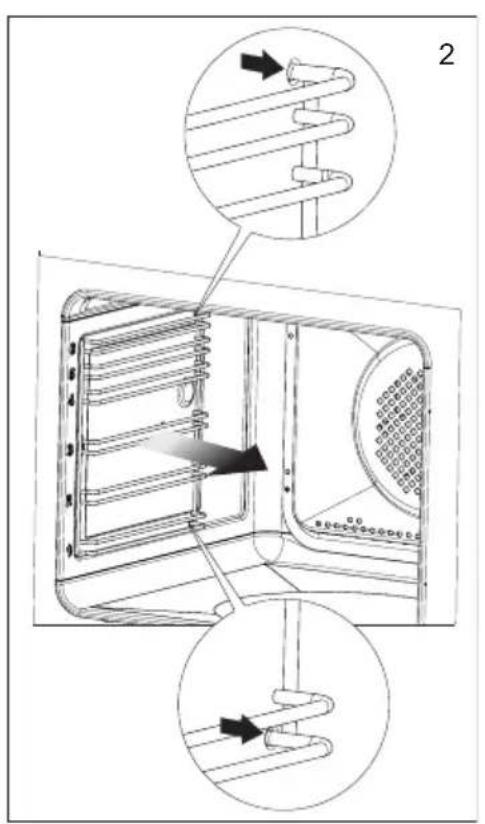
natural_image
Three sequential diagrams showing mechanical or electrical components with arrows indicating motion (no text or symbols)CEPEŠKRĀSNS TĪRĪŠANA UN KOPŠANA
Durvju noņemšana
natural_image
Technical line drawing of a mechanical assembly with an inset showing a close-up of a component (no text or symbols present)natural_image
Technical line drawing of a mechanical assembly with a rectangular frame and a separate cylindrical component (no text or symbols)CEPEŠKRĀSNS TĪRĪŠANA UN KOPŠANA
natural_image
Diagram of a device interior showing a door with a panel and fan, no text or symbols presentnatural_image
Simple black-and-white line drawing of a tree with cloud-like canopy and two wavy lines at base (no text or symbols)natural_image
Simple line drawing of a recycling symbol (three chasing arrows), no text or labels present.Uređaj je za vrijeme transporta zaštićen od oštećenja. Nakon vađenja uređaja iz pakiranja molimo Vas da elemente ambalaže uklonite na način koji ne ugrožava okoliš. Svi materijali korišteni za pakiranje nisu štetni za okoliš, 100% materijala je prikladno za recikliranje, stoga su označeni odgovarajućim simbolom.
Pozor! Elemente pakiranja (polietilenske vrećice, komadići stiropora itd.) prilikom uklanjanja ambalaže držati daleko od djece.
Ovaj uređaj je označen u skladu s europskom uredbom 2012/19/EU i poljskim zakonom o potrošenom električnom i elektroničkom otpadu. Ujedno je označen simbolom prekriženog spremnika za otpatke.
natural_image
Isometric line drawing of a square frame with rounded corners and a small circular cutout at the top (no text or symbols)Pekač za pecivo Ražanj za gril
natural_image
Isometric line drawing of a metal rack or grid structure (no text or symbols)(rešetka sa štitnikom)
natural_image
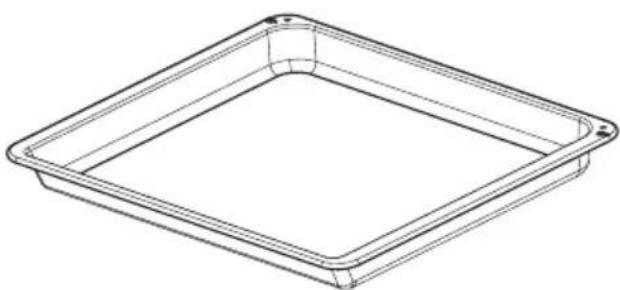
Line drawing of a square tray or container with rounded corners and a flat top (no text or symbols)Plítica za pečenje*
natural_image
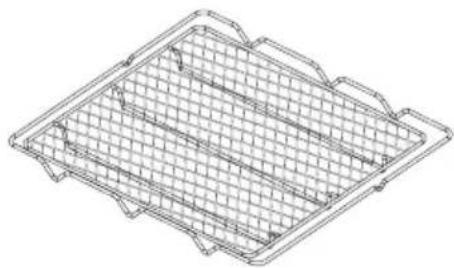
Isometric line drawing of a rectangular metal tray with grid pattern (no text or symbols)Rešetka (Airfry)
natural_image
Top-down schematic of a rectangular device with internal grid pattern and directional arrows (no text or symbols)Pozor:
Montažu obavljamo kad je isključeno električno napajanje.
Priključivanje pećnice na električnu mrežu
Prije priključivanja pećnice na električnu instalaciju upoznati se s informacijama na natpisnoj pločici.
- Pećnica je tvornički prilagođena za jednofaznu izmjeničnu struju (230V 1N\~50 Hz) i opremljena priključnim kabelom 3 x 1,5 mm² dužine oko 1,5 m s utikačem sa zaštitnim kontaktom.
- Priključna utičnica mora biti opremljena zaštitnim kontaktom. Nakon postavljanja pećnice korisnici moraju imati slobodan pristup priključnoj utičnici.
- Prije priključivanja pećnice u utičnicu provjeriti da:
-osigurač i električna instalacija izdržavaju opterećenje štednjaka, električni krug koji napaja utičnicu trebao bi biti zaštićen osiguračem min. 16A,
- električna instalacija je opremljena učinkovitim sustavom uzemljenja koji ispunjava uvjete trenutnih normi i propisa,
Nakon instalacije pećnice korisnici moraju imati slobodan pristup utikaču.
Upravljačka ploča je opremljena LED zaslonom i dodirnim senzorima (senzori su osvijetljeni):
Senzor Opis Senzor Opis
Konvencionalno grijanje Glavni prekidač (standby)
natural_image
Technical line drawing of a mechanical device with an inset close-up showing a component inserted into a housing (no text or symbols present)U standby i aktivnom modusu to uzrokuje samo paljenje simbola sonde za meso, bez utjecaja na djelovanje pećnice.
U modusu rada (pri podešenoj funkciji i temperaturi) umetanje sonde za meso uzrokuje prikazivanje simbola ⓗ i dvije temperature: s lijeve strane je trenutna temperatura sonde, s desne strane je vidljiva podešena temperatura (tvornički 75 °C).
Senzorima ∧ i možemo neposredno mijenjati podešenu temperaturu sonde za meso, potvrđivanje senzorom OK uzroku-je memoriranje novih postavki, a 5 sekundi neaktivnosti povratak na prethodno zapam-ćenu vrijednost.
Nakon potvrđivanja temperature sonde za meso, pećnica održava zadanu temperaturu do trenutka kad senzor pokaže predviđenu temperaturu sonde. Nakon toga je isključeno zagrijavanje i oglašava se zvučni signal. Alarm sonde za meso možemo poništiti pritiskanjem bilo kojeg senzora (osim^) ili otvaranjem vrata. Ovakvo isključivanje alarma uzrokuje i poništavanje postavki funkcije i temperature, a nakon 60 sekundi neaktivnosti pećnica prelazi u standby.
Kad je alarm poništen senzorom ^∧ , to znači da korisnik
opet podešava vrijednost temperature sonde za meso. Nakon potvrđivanja nove temperature senzorom OK, program se nastavlja na zapisanim parametrima funkcije i temperature komore.
Ako korisnik izvadi sondu za meso tijekom rada (nakon potvrde temperature sonde), to je tretirano kao greška (moguće je oštećenje sonde) i program je prekinut.
Uporaba sonde za meso blokira mogućnost automatskog uključivanja i isključivanja pećnice. Umetanje sonde za meso uzrokuje poništavanje prethodno postavljenih vremena rada, a funkcija senzora je ograničena samo na brojač minuta. Uporaba sonde za meso nema utjecaja na modifikaciju upotrjebljene funkcije i temperaturu komore pećnice – ovi elementi su modificirani na isti način bez sonde za meso.
Temperature sonde za meso
| Vrsta mesa Temperatura [°C] | |
| Svinjetina 85 - 90 | |
| Govedina 80 - 85 | |
| Teletina 75 - 80 | |
| Janjetina 80 - 85 | |
| Divljač 80 - 85 | |
Pozor: Koristiti isključivo tu sondu koja je isporučena s pećnicom.
Gotovi programi
To je grupa programa s određenim postavkama funkcija, temperatura i vremena pečenja koji su najprikladniji za određeno jelo.
U aktivnom stanju dodirnuti senzor 📄, uključuje se izbornik gotovih programa – na zaslonu se pojavljuje program označen kao „P01”. Koristeći senzore ∧ i √ izabrati odgovarajući program iz niže tablice. Nakon toga potvrditi izbor programa senzorom , pećnica počinje raditi.
| Program | Opis Elementi pećnice | Temperatura | Brzo predgrijavanje | Funkcija grijanja | |
| P01 | Meso (govedina, janjetina, svinjetina) | Kružno grijanje – razina odoz-do 2 - 120 minuta | 180°C |  | |
| P02 | Cijelo pile (cca 1,5 kg) | Gril + ventilator – razina odoz-do 2 - 85 minuta | 190°C |  | |
| P03 | Cijela patka (cca 2 kg) | Gril + ventilator – razina odoz-do 2 - 120 minuta | 180°C |  | |
| P04 | Guska (cca 3 kg) | Gril + ventilator – razina odoz-do 1 - 130 minuta | 170°C |  | |
| P05 | Purica (cca 2.5 kg) | Gril + ventilator – razina odoz-do 1 - 155 minuta | 170°C |  | |
| P06 | Perad (krilca, bataci) | Gornji grijač + donji grijač razina odozdo 2 60 minuta, brzo predgrijavanje | 180°C DA |  | |
| P07 | Pizza, pita, tortilla, Sendviči | Gornji grijač + donji grijač razi-na odozdo 1 – 10 minuta, brzo predgrijavanje | 230°C DA |  | |
| P08 | Lazanje, korijensko povrće, gotova zamrznu-ta jela | Gornji grijač + donji grijač razi-na odozdo 2 – 30 minuta, brzo predgrijavanje | 230°C DA |  | |
| P09 Focaccia | Gornji grijač + donji grijač razi-na odozdo 2 – 15 minuta, brzo predgrijavanje | 220°C DA |  | ||
| P10 | Musaka sa mesom i povrćem | Gornji grijač + donji grijač razi-na odozdo 2 – 25 minuta brzo predgrijavanje | 180°C DA |  | |
| P11 Biskvit | Gornji grijač + donji grijač razina odozdo 2 – 45 minuta, zagrijana pećnica | 160°C |  | ||
| P12 Muffini, brioche | Kružno grijanje – razina odoz-do 3 – 35 minuta | 160°C |  | ||
| P13 | Kaša, zobena kaša, žitni kolačići | Kružno grijanje – razina odoz-do 3 – 15 minuta | 180°C |  | |
| P14 Voćni kolač | Gornji grijač + donji grijač razi-na odozdo 2 – 60 minuta brzo predgrijavanje | 180°C DA |  | ||
| P15 Kruh | Gornji grijač + donji grijač razi-na odozdo 2 – 60 minuta | 210°C |  | ||
| P16 Dizanje tijesta | Gornji grijač + donji grijač razi-na odozdo 2 – 20 minuta | 30°C |  | ||
| P17 Sušenje | Kružno grijanje – razina odoz-do 2 – 3,4,5 sati | 50°C |  | ||
| P18 Pomfrit | Gornji grijač + donji grijač razi-na odozdo 2 – 20 minuta brzo predgrijavanje | 220°C DA |  | ||
| P19 | Gotova jela (vege, pečenje, riba, falafel, hamburgeri) | Kružno grijanje – razina odoz-do 2 – 10 minuta. brzo predgrijavanje | 230°C DA |  | |
Rasvjeta pećnice
Pozor! Paziti da montiranu halogenu žarulju neposredno ne dodirujemo prstima.
- Štednjaci označeni slovom K opremljeni su oblogama pokrivenim specijalnim samočistećim emajlom. Emajl uzrokuje da nečistoće od masnoće ili ostataka hrane mogu biti samostalno uklonjene pod uvjetom da nisu isušene ili zapečene (ostatke jela i masnoće što brže ukloniti dok se ne isuše ili zapeku, jer izbjegavamo dugo samočišćenje pećnice). Samočišćenje se odvija kad uključimo pećnicu na 1 sat i podesimo temp. 250°C. Ako su ostaci jela mali, proces može biti kraći.
Važno!
natural_image
Diagram of a microwave oven with a screen showing internal components and a rotating arrow indicating rotation (no text or symbols)ČIŠĆENJE I ODRŽAVANJE PEĆNICE
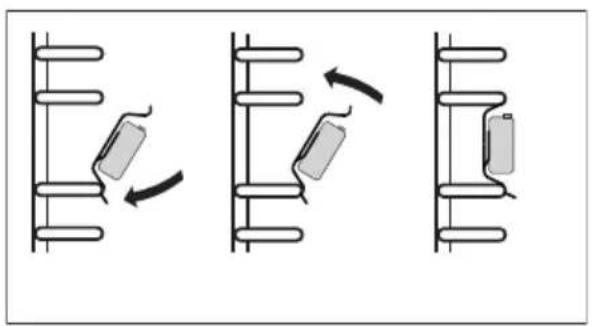
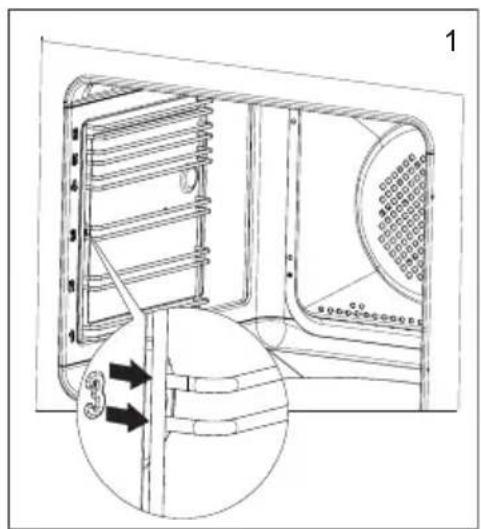
- Pećnice označene slovom D su opremljene lako izvlačivim žičanim vodilicama (rešetkama) za plitice pećnice. Vadimo ih tako da povučemo krajeve iz prednjih utora, nakon toga odvojimo vodilicu i izvadimo krajeve iz stražnjih utora.
natural_image
Technical line drawing of a mechanical device with internal components and a magnified inset showing a close-up of a component (no text or symbols)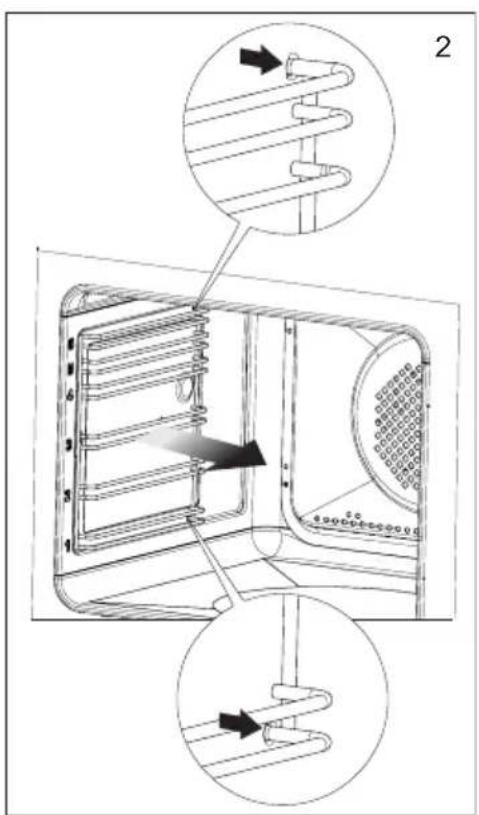
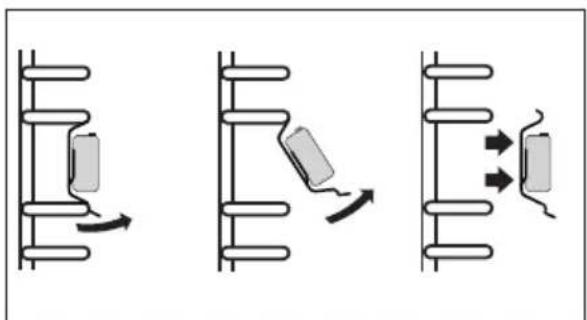
- Pećnice sa slovima Dp posjeduju nehrđajuće izvlačive vodilice plitica koje su pričvršćene na žičane vodilice. Vodilice izvlačiti i prati zajedno sa žičanim vodili-cama. Prije postavljanja plitica, vodilice izvući (ako je pećnica zagrijana vodilice izvući tako da zakačimo stražnji rub plitice na odbojnike na prednjem dijelu izvlačivih vodilica) i nakon toga ugurati zajedno s pliticom.
Pozor!
Teleskopske vodilice ne prati u perilicama za posuđe.
natural_image
Three diagrams showing mechanical or electrical components with directional arrows, no text or symbols present.natural_image
Diagram showing three sequential mechanical or electrical assembly steps with no visible text or symbolsnatural_image
Technical line drawing of a mechanical assembly with an inset showing a close-up of a component (no text or symbols present)Pomicanje zaštite šarki
natural_image
Technical diagram of a mechanical assembly with a rectangular frame and a separate cylindrical component (no text or symbols)ČIŠĆENJE I ODRŽAVANJE ŠTEDNJAKA
- Unutrašnje staklo izvaditi iz ležišta (u do-njem dijelu vrata). Crt. D.,D1
Pozor! Opasnost od oštećenja ležišta stakala. Staklo treba izvući, a ne podizati.
- Stakla oprati toplom vodom i malom količinom sredstva za čišćenje.
Za ponovnu ugradnju stakala postupite na isti način, ali obrnutim redom. Glatki dio stakla trebao bi se nalaziti gore, a srezani rubovi dolje.
The oven is exceptionally easy to use and extremely efficient. After reading the instruction manual, operating the oven will be easy.
Before being packaged and leaving the manufacturer, the oven was thoroughly checked with regard to safety and functionality.
Before using the appliance, please read the instruction manual carefully.
By following these instructions carefully you will be able to avoid any problems in using the appliance.
It is important to keep the instruction manual and store it in a safe place so that it can be consulted at any time.
It is necessary to follow the instructions in the manual carefully in order to avoid possible accidents.
Caution!
Do not use the oven until you have read this instruction manual.
The oven is intended for household use only.
The manufacturer reserves the right to introduce changes which do not affect the operation of the appliance.
Warning: The appliance and its accessible parts become hot during use. Care should be taken to avoid touching heating elements. Children less than 8 years of age shall be kept away unless continuously supervised.
This appliance can be used by children aged from 8 years and above and persons with reduced physical, sensory or mental capabilities or lack of experience and knowledge if they have been given supervision or instruction concerning use of the appliance in a safe way and understand the hazards involved. Children shall not play with the appliance.
Cleaning and user maintenance shall not be made by children without supervision.
During use the appliance becomes hot. Care should be taken to avoid touching heating elements inside the oven.
Accessible parts may become hot during use. Young children should be kept away.
Warning: Do not use harsh abrasive cleaners or sharp metal scrapers to clean the oven door glass since they can scratch the surface, which may result in shattering of the glass.
Warning: Ensure that the appliance is switched off before replacing the lamp to avoid the possibility of electric shock.
You should not use steam cleaning devices to clean the appliance.
Danger of burns! Hot steam may escape when you open the oven door. Be careful when you open the oven door during or after cooking. Do NOT lean over the door when you open it. Please note that depending on the temperature the steam can be invisible.
- Ensure that small items of household equipment, including connection leads, do not touch the hot oven as the insulation material of this equipment is usually not resistant to high temperatures.
- Do not leave the oven unattended when frying. Oils and fats may catch fire due to overheating or boiling over.
- Do not put pans weighing over 15 kg on the opened door of the oven.
- Do not use harsh cleaning agents or sharp metal objects to clean the door as they can scratch the surface, which could then result in the glass cracking.
- Do not use the oven in the event of a technical fault. Any faults must be fixed by an appropriately qualified and authorised person.
- In the event of any incident caused by a technical fault, disconnect the power and report the fault to the service centre to be repaired.
- The rules and provisions contained in this instruction manual should be strictly observed. Do not allow anybody who is not familiar with the contents of this instruction manual to operate the oven.
- The appliance has been designed only for cooking. Any other use (for example for heating) does not comply with its operating profile and may cause danger.

natural_image
Simple black-and-white line drawing of a tree with cloud-like canopy and two wavy lines at base (no text or symbols)Using energy in a responsible way not only saves money but also helps the environment. So let's save energy! And this is how you can do it:
- Do not uncover the pan too often (a watched pot never boils!).
Do not open the oven door unnecessarily often. - Only use the oven when cooking larger dishes.
Meat of up to 1 kg can be prepared more economically in a pan on the cooker hob.
- Make use of residual heat from the oven.
If the cooking time is greater than 40 minutes switch off the oven 10 minutes before the end time.
Important! When using the timer, set appropriately shorter cooking times according to the dish being prepared.
- Make sure the oven door is properly closed.
Heat can leak through spillages on the door seals. Clean up any spillages immediately.
- Do not install the cooker in the direct vicinity of refrigerators/freezers.
Otherwise energy consumption increases unnecessarily.

natural_image
Simple line drawing of a recycling symbol (three chasing arrows), no text or labels present.During transportation, protective packaging was used to protect the appliance against any damage. After unpacking, please dispose of all elements of packaging in a way that will not cause damage to the environment.
All materials used for packaging the appliance are environmentally friendly; they are 100% recyclable and are marked with the appropriate symbol.
Caution! During unpacking, the packaging materials (polythene bags, polystyrene pieces, etc.) should be kept out of reach of children.
Old appliances should not simply be disposed of with normal household waste, but should be delivered to a collection and recycling centre for electric and electronic equipment. A symbol shown on the product, the instruction manual or the packaging shows that it is suitable for recycling.
Materials used inside the appliance are recyclable and are labelled with information concerning this. By recycling materials or other parts from used devices you are making a significant contribution to the protection of our environment.
Information on appropriate disposal centres for used devices can be provided by your local authority.
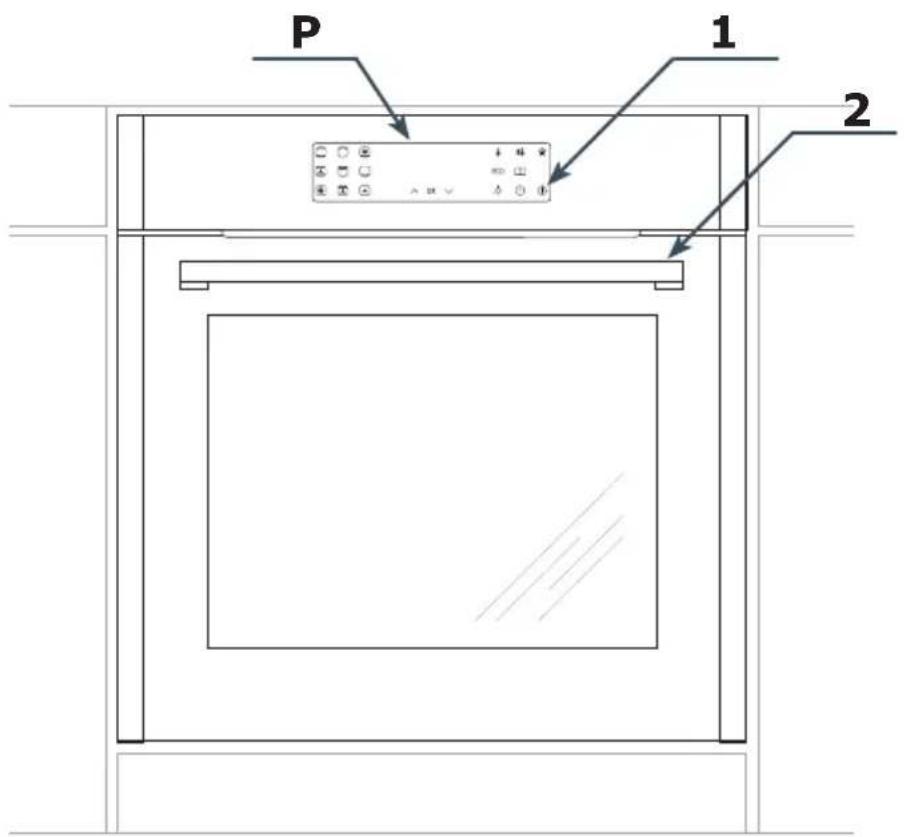
P Control panel
- On/off switch
- Door Handle
Cooker fittings:
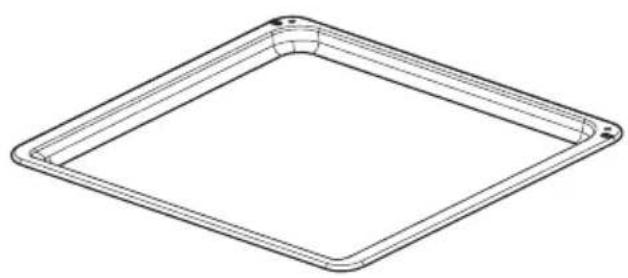
natural_image
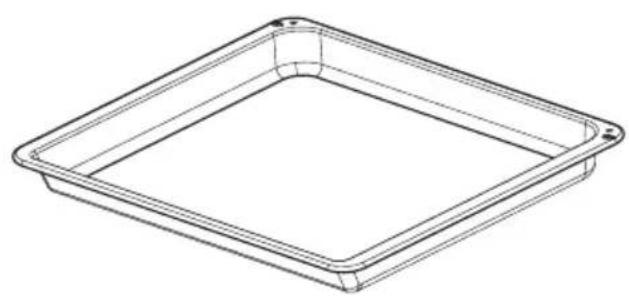
Line drawing of a square frame with rounded corners and a small circular hole at the top (no text or symbols)Baking tray*
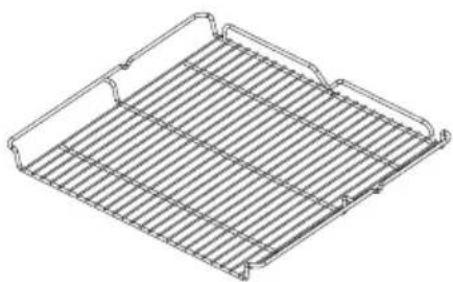
natural_image
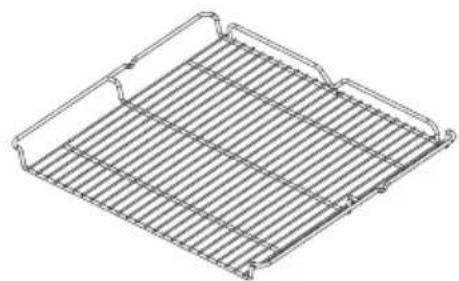
Isometric line drawing of a metal rack or grid structure (no text or symbols)Grill grate (drying rack)
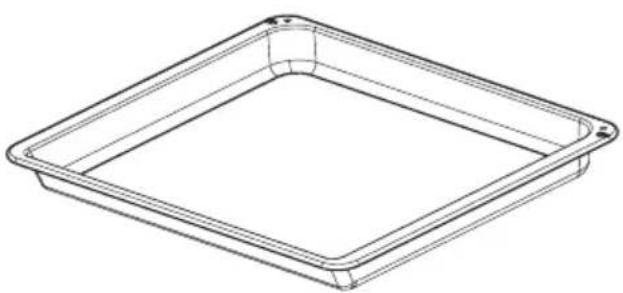
natural_image
Line drawing of a square tray or container with rounded corners and a flat top (no text or symbols)Roasting tray*
natural_image
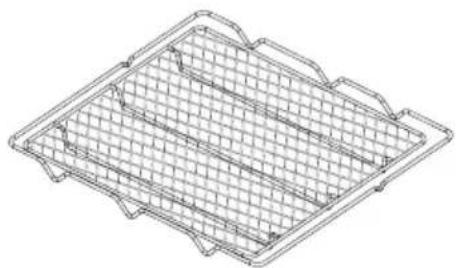
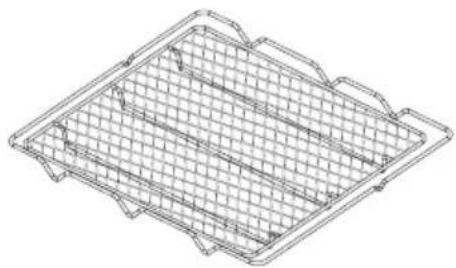
Isometric line drawing of a rectangular metal tray with internal grid pattern (no text or symbols)Aifry wire shelf
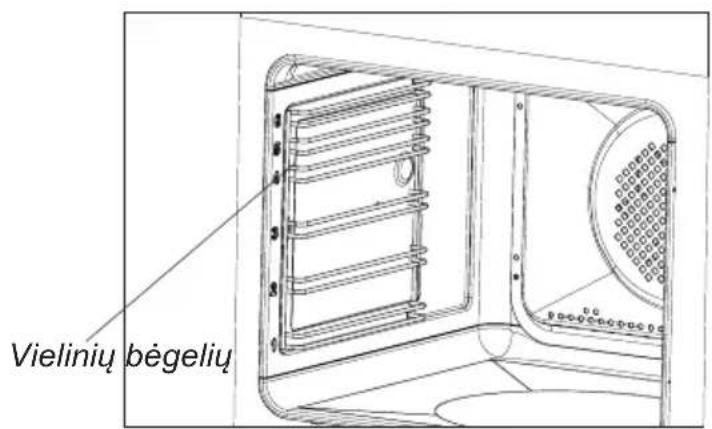
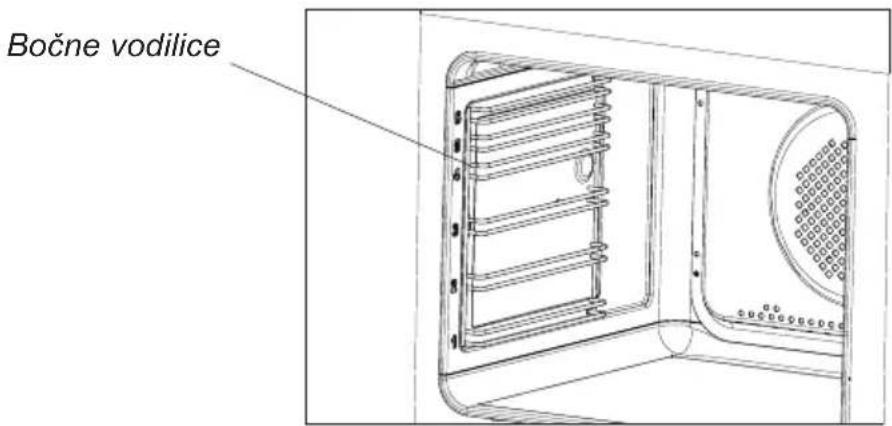
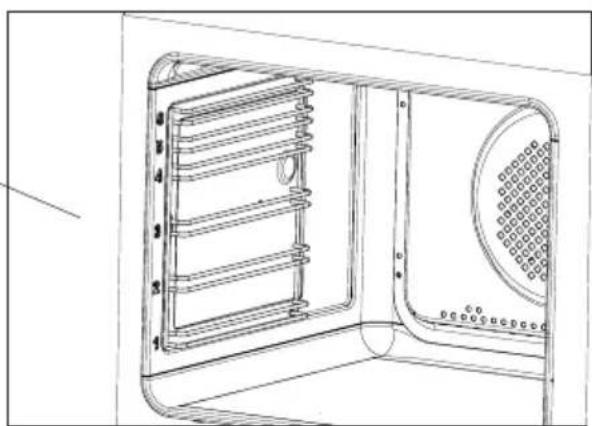
Sideracks
natural_image
Technical line drawing of a door with internal compartments and ventilation slots (no text or symbols)*optional
Installing the oven
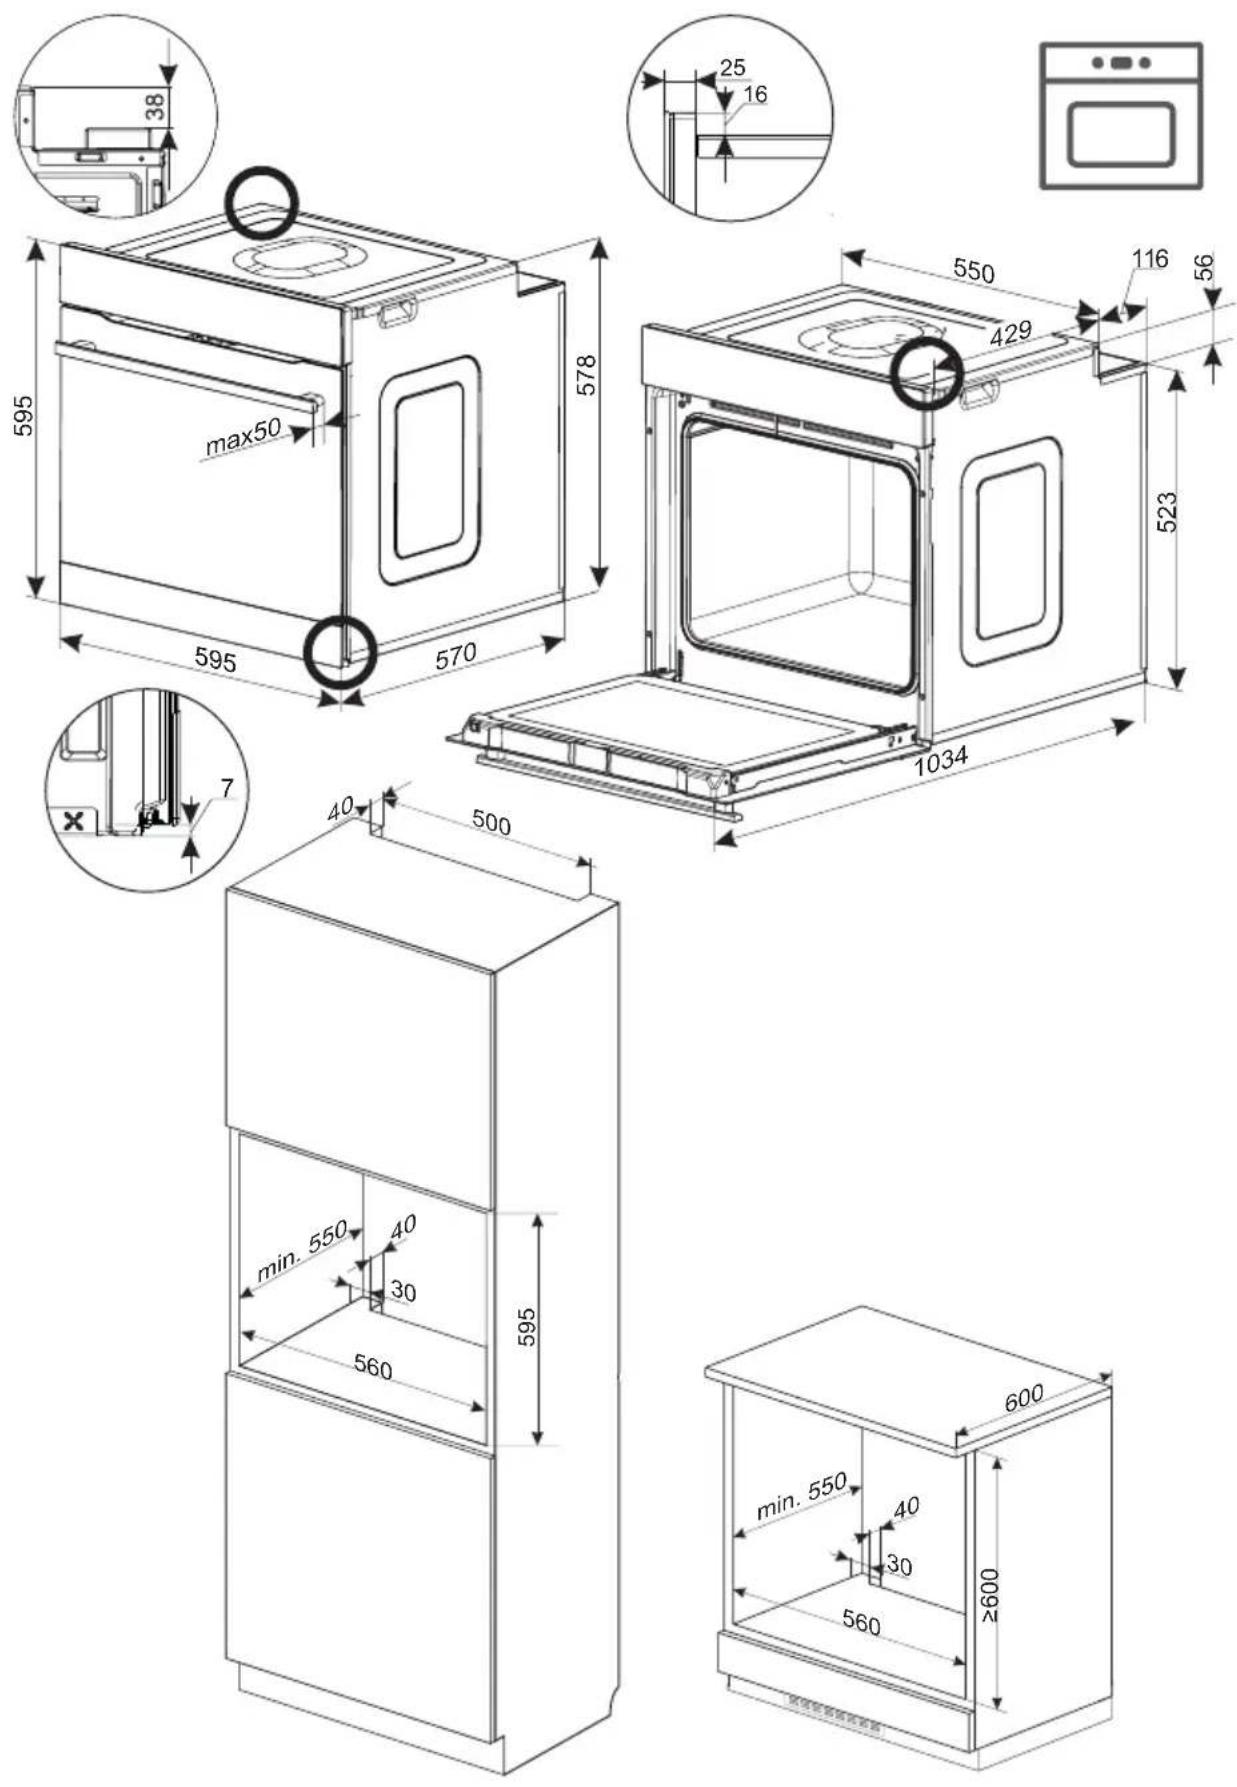
- The kitchen area should be dry and aired and equipped with efficient ventilation. When installing the oven, easy access to all control elements should be ensured.
- This is a Y-type design built-in oven, which means that its back wall and one side wall can be placed next to a high piece of furniture or a wall. Coating or veneer used on fitted furniture must be applied with a heat-resistant adhesive (100°C). This prevents surface deformation or detachment of the coating.
- Hoods should be installed according to the manufacturer's instructions.
- Make an opening with the dimensions given in the diagram for the oven to be fitted.
- Make sure the mains plug is disconnected and then connect the oven to the mains supply.
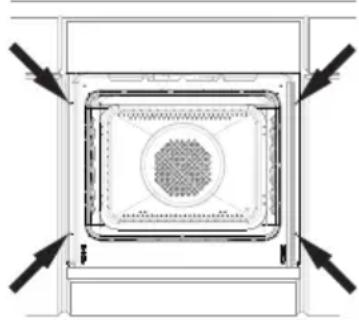
- Insert the oven completely into the opening without allowing the four screws in the places shown in the diagram to fall out.
natural_image
Technical diagram of a rectangular device with internal grid pattern and directional arrows (no text or symbols)Electrical connection
- The oven is manufactured to work with a one-phase alternating current (230V 1N\~50 Hz) and is equipped with a 3 x 1,5 mm ^2 connection lead of 1,5 m length with a plug including a protection contact.
- A connection socket for electricity supply should be equipped with a protection pin and may not be located above the cooker. After the cooker is positioned, it is necessary to make the connection socket accessible to the user.
-
Before connecting the oven to the socket, check if:
-
the fuse and electricity supply are able to withstand the cooker load,
- the electricity supply is equipped with an efficacious ground system which meets the requirements of current standards and provisions,
- the plug is within easy reach.
Important!
If the fixed power supply cable is damaged, it should be replaced at the manufacturer or at an authorized servicing outlet, or by a qualified person to avoid danger.
Before first use
- Remove all packaging elements, particularly those protecting the interior of the oven cavity during transport.
- Remove all the accessories from inside of the oven and wash them thoroughly in warm water with gentle washing up liquid.
- Remove the protective foil from the surfaces of the telescopic runners.
- Use warm water with the addition of mild detergent to wash the inside of the chamber. Do not use hard brushes or sponges. They could damage the coating of the inside of the chamber.
Warm up the oven cavity
- Turn on the ventilation in the room or open a window.
- Select conventional heating □ or fan assisted heating 🔒 (a detailed description of these functions can be found below in this manual).
The oven should operate for a minimum of 30 minutes; while it is operating the oven produces a smell, which is only present at the beginning but will eventually go away as the appliance is used. This is perfectly normal and is part of the process of warming up the oven cavity.
Control Panel
On/off switch ① is on the right side of the display. To activate the on/off switch, touch the glass in the place indicated by a pictogram. You will hear a beep. (See section: Control panel).
Touch sensor surfaces must be kept clean.
Control panel
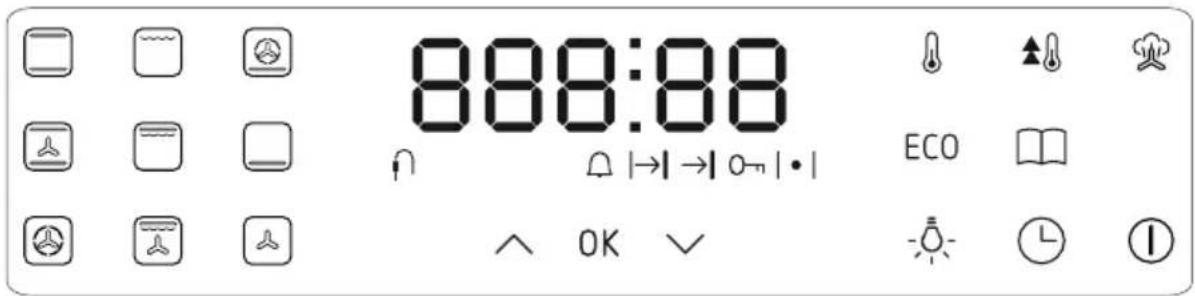
The control panel is equipped with an LED display and backlit touch sensors:
Sensor Description Sensor Description
Conventional heating Main switch (standby)
Pastry Clock, minute minder
Fan cooking Lighting
Super grill Pre-set programmes
Turbo grill Eco programme ECO
Pizza Steam programmes
Roasting Quick oven pre-heat
Defrosting Set temperature
^ Plus / up [+]
Minus / down [-]
OK Confirm
Note: You will hear a beep each time the sensor is used. It is not possible to turn off the acoustic beeps.
Each of the sensors can be backlit at the following brightness levels:
- 100% full brightness (active sensor);
- 50% reduced brightness (a sensor can be activated);
- 50% night brightness (reduced brightness for 22:00 – 6:00), switched off.
Function indicator symbols on the display
Meat probe connected*
Minute Minder active
|→| Duration
→| Programme end
Child Lock Active
| • | Oven pre-heat active
* availability depending on the model
Connect the power supply
When you connect the appliance to power (or when power is restored after an outage), the display will show 00:00 and you will need to set the current time. You must set the current time to use the appliance.
Note: In the event of a power outage, all settings such as Duration, Temperature and Heating Function will be lost. You will need to re-enter the settings to continue cooking. If the pyrolytic cleaning is interrupted (or the door is locked for any other reason), the oven will start the cooling and door opening procedure before you can set the time. A power outage does not release the Child Lock, but it becomes active only after setting the current time and when the appliance is in standby.
Set the current time
When you connect the appliance to the power supply, the hours 00: flash on the display. (minute digits are illuminated permanently). Use and to set the hour. Touch to confirm the setting. . The minutes :00 flash on the display.(the hour
is illuminated permanently). Use ∧ and √ to set the minutes. Touch OK to confirm the setting. The appliance enters standby mode. You will hear a beep when the current time is stored in the appliance. To change the current time when the appliance is on, touch and hold. The symbol will be shown on the display. Touch the sensor once again and the digits will start to flash. Now you can proceed to set the current time.
The display brightness.
The LED display brightness varies depending on the time of day. The display is dimmed during 22:00 to 06:00 and its brightness is normal during 06:00 to 22:00. Also, the display is brighter when active than when the appliance is in Standby mode.
Standby mode
Switch the appliance to standby mode to reset all function settings, times, temperature and automatic programmes. All heating elements are disconnected. The display is dimmed except for the clock. In this mode, only the bn/off sensor is available on the display. The sensor has reduced brightness. The display is dimmed in this mode.
If the temperature in the chamber exceeds 80^ C, the temperature and current time are displayed alternately.
When Child Lock is on and you touch the LOC message and symbols will be displayed for 5 seconds instead of current time/temperature.
To turn off the appliance and put it in standby.
when you touch and hold ⏻ for 3 seconds at any time (you can turn OFF the appliance even when Child Lock is on), you will hear a beep;
after a power outage and when you set the current time;
when you touch and hold ⏻ for 3 seconds during a pyrolytic cleaning cycle, the appliance activates cooling fan to unlock the door, and enters standby only after the appliance has cooled down and the door is unlocked.
To activate the appliance:
touch and hold for 3 seconds to activate the appliance – you will hear a beep.
Operation
In this mode you can select the desired functions, programmes and adjust settings.
You can use function, programme and minute minder sensors as well as activate Child Lock and adjust settings which requires touching 2 sensors. Other touch sensors are enabled when necessary.
Auto-off: When all programmes complete and you do nothing for 30 seconds, the appliance turns off automatically.
When you use the appliance display backlight brightness is normal. The current time is shown on the display. If a meat probe is inserted in the oven cavity, the meat probe symbol is displayed. If a Child Lock is set, the lock symbol is displayed.
Child Lock
Child Lock is intended to prevent changes to the oven settings and the oven being turned on.
When the appliance is on, simultaneously touch and hold the ⏻ and -sensors for
3 seconds to activate the Child Lock. The symbol will be shown on the display.
Simultaneously touch and hold the same sensors for 3 seconds to deactivate the Child Lock. The Ⓞ symbol will go off on the display.
When Child Lock is active you cannot adjust any settings but you can turn off the appliance.
Lighting
The lighting turns on each time you open the oven door. The lighting also turns on when the oven is in active mode. This lighting is off in Standby mode. If the oven door remains open for a long time, the lighting will automatically turn off after about 5 minutes.
For details on lighting in ECO heating functions, please refer to the description of the heating functions.
The Sensor sensor operates independently and using it does not affect other functions and settings. Sensor is inactive in a standby mode.
Touch [] to turn on oven light for 30 seconds.

Touch and hold during cooking to turn the light on. Touch and hold again to turn the light off. The light turns off when cooking programme completes.
Touch 🔍 to turn off the light at any time.
Cooling fan
Cooling fan operates independently of the set functions and the appliance mode of operation. The cooling fan activates automatically when any function is activated. The cooling fan operates as long as the oven cavity temperature exceeds 100^ C. Below this temperature, the cooling fan turns off. For steam and pyrolytic programs, the cooling is two-speed and operates as described in the pre-set programmes section.
Oven pre-heat (thermostat symbol)
The pictogram indicates that at least one of the heaters in the oven operates. This pictogram goes out when the set temperature in the oven cavity is reached. Then the pictogram will be on and off periodically. This indicates that the set temperature is maintained. If you lower the set temperature, the pictogram will only light up when the oven cavity cools below the newly set temperature.
Oven door
Oven door must be closed during operation. When you open the door you will interrupt the active oven function. If the door remains open for more than 90 seconds, you will hear a beep to prompt you to close the oven door. Touch any sensor or close the oven door to mute the beeping. If you open the door for less than 5 minutes the active settings are unaffected. For safety reasons, after this time, the oven enters the standby mode (all settings are cleared).
Limit the operating time
If the oven operates any heating function for a long time, heating elements are disconnected to ensure safety as shown on
the example below. The appliance switches to standby when programme is completed. Example: If oven cavity temperature is 200^ C, heating elements are turned off after about 3 hours. At a temperature of 100^ C after about 10 hours. This prevents overheating.
Minute Minder
You can set the timer in active mode. Touch briefly to display and the current progress of the minute minder countdown.
Touch and hold ⏻ to enter the Minute Minder setting mode and the 🔒 indicator will blink.
Then touch ∧ / ∨ to adjust the setting and OK to confirm. Touch and hold ∧ ∨ simultaneously to clear the minute minder setting.
When the minute minder is counting down, the ⏰ indicator lights up on the display.
You can set the minute minder for a maximum of 120 minutes.
The Minute Minder operates independently of any active oven functions. When the set time has elapsed, you will hear beeping.
Touch any sensor to mute the beeping.
Activate a heating function
When the appliance is on touch the desired heating function symbol on the left side of the display. The backlight of the selected function is at full brightness while backlight of other functions will be reduced to half brightness. The symbols on the right side of the display that are not available for a given heating function go our and their sensors become inactive.
When the heating function is selected now you need to set the temperature. The temperature and the °C symbol are displayed at full brightness. The default temperature for the heating function is displayed. Use ∧ / ∨ to adjust temperature in steps of 5°C in a loop. The minimum, maximum and default temperature is individually defined for each heating function. The --- symbol means that the heaters are off.
Touch OK to confirm the set temperature. The temperature display brightness is reduced to normal level, the current time appears on the display and the oven starts the selected heating function at the set temperature.
Heating functions and additional functions
| Function Description | Oven elements Temperature [°C] | Default temperature [°C] | ||||||||
| Lighting | Top heater | Roaster heater | Fan heater | Bottom heater | Fan | min. max | ||||
| Heating functions | ||||||||||
| Conventional √√√30 280 200 | ||||||||||
| Pastry √√√√30 280 180 | ||||||||||
| Fan cooking √√√30 280 180 | ||||||||||
| Grill √√30 280 250 | ||||||||||
| Super grill √√√30 280 250 | ||||||||||
| Turbo grill | √√√√30280200 | |||||||||
| Pizza | √√√√30280220 | |||||||||
| Roasting | √ | √30 240 200 | ||||||||
| Defrosting | √ | √ | - | - | - | |||||
| Additional functions | ||||||||||
| Temperature | see manual for details | |||||||||
| ECO | ECO baking | see manual for details | 30 280 200 | |||||||
| Lighting | √ | - | - | - | ||||||
| Quick oven pre-heat √√√30 280 | - | |||||||||
| Pre-set programmes | see manual for details | |||||||||
| Steam programmes* | see manual for details | |||||||||
* availability depending on the model
Preview and modify settings during oven operation
Touch ⚙ briefly to display the temperature inside the oven cavity. Touch ⚙ again to display the set temperature. Touch again to displaying the current time.
To adjust the set temperature, touch and hold ⚠ and the currently set temperature will be displayed. Use ∧ and ∨ to adjust it as needed. Touch OK to confirm the new temperature. The new value is not set until confirmed.
You can check the set times much the same as temperature. Touch briefly to display the minute minder setting. Touch again to display the Duration. Touch again to display the End Time. Touch again to displaying the current time.
To adjust the set time, touch and hold ⏻ and the currently set time will be displayed. Use /and to adjust it as needed. Touch OK to confirm the setting. The new value is not set until confirmed.
To change the heating function during oven operation simply select a new function. The newly selected function indicator starts flashing while the currently running function does not change. Touch OK to confirm the selection of a new function. The new function indicator stops flashing and remains on while the previous function indicator goes off. If you do not confirm the new selection, the previous function will continue.
When you change a function, the set temperature remains the same.
End a heating function
Touch and hold ⓘ to end a heating function. By default the oven functions operate indefinitely, but you can set the oven to turn off using a timed operation function or delayed timed operation function. The only exception is the pyrolytic cleaning function, which cannot be modified.
Duration (automatic off)
In this mode the oven will turn off after a set duration has elapsed. You can set the duration from 1 minute to 10 hours. To set timed operation for any oven function, touch and hold the ⏻ sensor, and the ⏱ minute minder symbol will flash on the display. Touch 📁 again, the ⬇ symbol will appear on the display. Now touch ∧ to set the
Duration and touch OK to confirm. Touch ✗ to adjust Duration as needed. Touch OK to confirm the adjusted setting.
To clear the Duration touch \ until you reach 0:00 and touch OK to confirm.
Turning off the oven interrupts the active oven function. When the set Duration has elapsed, you will hear beeping. Touch any sensor except to mute the beeping. The beeping stops, the function settings and temperature are cleared and lighting will turn on for 30 s. The symbol will go out. The appliance will turn off after another 60 seconds.
Note: When you use the sensor to mute the beeping, the appliance will allow you to adjust the delayed start time.
Delayed start (automatic on and off)
You can set the oven to start at a specific time and operate for a set Duration. You can delay the oven start from 1 minute to 10 hours, and set the Duration for up to 10 hours. You first need to set the Duration. The display will show I. Then touch and hold the sensor again and the minute minder symbol will flash on the display. Touch twice and the symbol will flash on the display, now use to set the start time and touch to confirm.
Once Start Time is confirmed the and indicators light up steadily and the Current Time is shown again.
Use /ʌ to adjust the Start Time. Touch OK to confirm the adjusted setting.
To cancel timed operation use to adjust duration down to the lowest possible value and touch OK to confirm.
When the oven is turns on automatically, the symbol will go out.
When the Duration has elapsed, you will hear beeping. Touch any sensor to mute the beeping. The beeping stops, the function settings and temperature are cleared and lighting will turn on for 30 s. The symbol will go out. The appliance will turn off after another 60 seconds.
Meat probe\*
You can plug in the meat probe at any time.
Note. The meat probe socket is protected with a cap. Remove the protective cap from the socket to be able to plug in the meat probe.
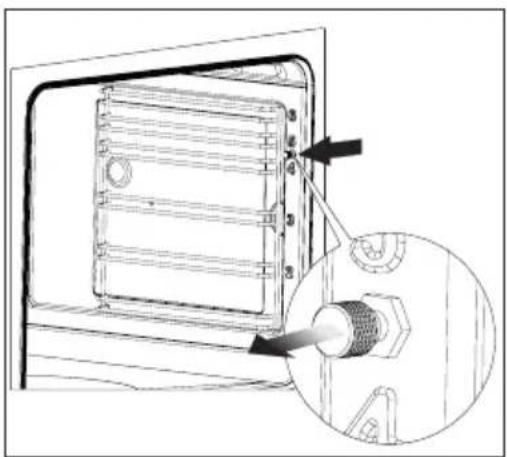
natural_image
Technical line drawing of a mechanical component with an inset close-up showing a threaded fastener (no text or symbols)When the appliance is off or on and you plug in the meat probe, the symbol is displayed with no effect on appliance operation.
When you plug in the meat probe when the appliance operates (the function and temperature are set), the Ⓞ symbol will be displayed along with the measured meat probe temperature on the left and the set target meat probe temperature on the right (default 75°C).
Use ↗ to adjust the target meat probe temperature and touch OK to confirm or wait 5 seconds to abort and restore the previous setting.
When you confirm meat probe setting, the oven will keep the set temperature until the desired meat probe temperature is reached. Then heaters are turned off and you will hear beeping.
Touch any sensor (except ∧) or open the door to mute the meat probe alarm. The beeping stops, the function settings and temperature are cleared, and the appliance will turn off after 60 seconds.
* availability depending on the model
If you touch to mute the alarm you will set the new meat probe temperature.
Touch OK to confirm the new temperature and the programme is continued with the new settings.
Unplugging the meat probe during operation (after you confirm the meat probe temperature) will cause an error (meat probe might be damaged), you will hear a beep and the programme will be terminated.
When you use the meat probe the appliance will not turn on and off automatically. When you insert the meat probe, the previously set Duration is cleared, and you can use to access minute minder. Using the meat probe does not affect a heating function or set oven temperature - you can adjust them same way as when the meat probe is unplugged.
Recommended meat probe temperature settings
| Type of meat Temperature [°C] | |
| Pork 85 - 90 | |
| Beef 80 - 85 | |
| Veal 75 - 80 | |
| Lamb 80 - 85 | |
| Venison | 80 - 85 |
Note: Only use the meat probe provided with your appliance.
These are programmes with specific settings of function, temperature and duration that are most suitable for a given dish.
When the appliance is on, touch to access the pre-set programmes menu – the pre-set programme "P01" will be shown on the display. Use the / and sensors to select the pre-set programme from the table below. Then touch to confirm your selection and the appliance will start to operate.
| Programme | Description Oven functions | Temperature | Quick oven pre-heat | Heating function | |
| P01 | Meat (beef, lamb, pork) | Fan heater - level 2 - 120 minutes | 180 °C |  | |
| P02 | Whole chicken (approx 1.5 kg) | Grill + fan - bottom level 2 - 85 minutes | 190 °C |  | |
| P03 | Whole duck (approx. 2 kg) | Grill + fan - bottom level 2 - 120 minutes | 180 °C |  | |
| P04 Goose | (approx. 3 kg) | Grill + fan - bottom level 1 - 130 minutes | 170 °C |  | |
| P05 Turkey | (approx 2.5 kg) | Grill + fan - bottom level 1 - 155 minutes | 170 °C |  | |
| P06 | Poultry (wings, thighs) | Top heater + bottom heater, level 260 minutes, quick oven pre-heat | 180 °C | YES |  |
| P07 | Pizza, pita, tortilla, sandwiches | Top heater + bottom heater level 1 - 10 minutes, quick oven pre-heat | 230 °C | YES |  |
| P08 | Lasagne, root vegetables, frozen ready meals | Top heater + bottom heater level 2 - 30 minutes, quick oven pre-heat | 230 °C | YES |  |
| P09 Focaccia | Top heater + bottom heater level 2 - 15 minutes, quick oven pre-heat | 220 °C | YES |  | |
| P10 | Casserole with vegeta-bles and meat | Top heater + bottom heater, level 2 - 25 minutes Quick oven pre-heat | 180 °C | YES |  |
| P11 Sponge cake | Top heater + bottom heater level 2 - 45 minutes, oven pre-heated | 160 °C |  | ||
| P12 Muffins, butter buns | Fan heater - level 3 - 35 minutes | 160 °C |  | ||
| P13 | Groats, porridge, cereal cookies | Fan heater - level 3 - 15 minutes | 180 °C |  | |
| P14 Fruitcake | Top heater + bottom heater, level 2 - 60 minutes Quick oven pre-heat | 180 °C | YES |  | |
| P15 Bread | Top heater + bottom heater, level 2 - 60 minutes | 210 °C |  | ||
| P16 Dough proving | Top heater + bottom heater, level 2 - 20 minutes | 30 °C |  | ||
| P17 Dry | Fan heater - level 2 - 3, 4, 5 hours | 50 °C |  | ||
| P18 Chips | Top heater + bottom heater, level 2 - 20 minutes Quick oven pre-heat | 220 °C | YES |  | |
| P19 | Read-made dishes (vegetables, roast meat, fish, falafel, burgers) | Fan heater - level 2 - 10 minutes Quick oven pre-heat | 230 °C | YES |  |
All pre-set programmes can be freely modified – you can adjust temperature or duration. To do this, follow the relevant instructions ("Preview and modify settings during oven operation" and "Timed operation"). When you make any adjustments, the stored pre-set programme is not affected and the original settings will be restored the next time you select a pre-set programme.
Pre-set programmes with quick pre-heat
Some pre-set programmes require the oven to be pre-heated. They are marked accordingly in the above table. When you select a pre-set programme with pre-heating and touch OK to confirm, the current oven cavity temperature will be displayed. When the set temperature is reached, you will hear beeping, which will turn off when you open the oven door. Place the food in the oven and close the door, at which point the actual pre-set programme will start.
Note: It is inadvisable to modify a pre-set programme during the quick pre-heat phase as this will cancel the pre-set programme and the appliance will operate with the currently set function, duration and temperature.
End a pre-set programme.
When a pre-set programme ends, you will hear beeping.
ECO function
When you select the ECO programme, the ECO indicator is on. During ECO operation, the oven lighting is switched off by default, but you can touch -to-turn lighting on for 10 seconds. It is not possible to turn on the lighting permanently.
Quick pre-heat
You can use the quick pre-heat function to quickly pre-heat the oven. Touch ▲ when the appliance is on. When quick pre-heat is on, the heating function sensors and the ▲ sensor are illuminated. The oven heats at its maximum power. The quick pre-heat function is available with all heating functions except the Defrost and Cleaning functions — for these functions, you will only hear a beep.
When the set temperature is reached, you will hear a beep. The temperature will be maintained according to the selected function.
Touch ▲ to deactivate the function at any time.
The Soft Steam function
The appliance has the Soft Steam feature ( ). Steam is produced at the beginning of the baking process, which enhances some of the dishes prepared in the oven. There is a cavity in the bottom of the oven to be filled with 150 ml of clean cold water before heating the oven. Do not add spices to the water. When the appliance is on, touch to active the Soft Steam function. When the oven
is preheated (after about 5 minutes), place the dish inside the oven and close the door. Note: Do not leave any water in the oven cavity. When the oven has cooled down, soak up the water with a cloth.
Make sure that the oven has cooled before removing water.
Due to the presence of steam in the oven cavity, water may condense on the inside of the oven door and walls when baking. Wipe off excess water each time after you have finished cooking.
Table of example oven settings
Baking cakes
| Type of food Accessories Level | Heating function | Temperature (°C) | Time (min) | ||
| Cakes in baking moulds and pans | Sponge cake | Black, round shape baking pan for baking on a wire grid | 1-2 170 - 200 | 1) | 38 - 502) |
| Bundt cake (yeast dough)/ Sand cake | Commercially available black round or rectangular baking pan for baking on a wire grid | 1-2 160 - 170 | 1) | 25 - 402) | |
| Bundt cake (yeast dough)/ Sand cake | Commercially available black round or rectangular baking pan for baking on a wire grid | 3 150 - 16025 - 40 | |||
| Fat-free sponge | Black coated round or rectangular baking pan for baking on a wire grid | 1-2 | 170-1801) | 38 - 452) | |
| Apple pie | Black round or rectangular baking pan for baking on a wire grid | 1-2 190-200 | 1) | 50 - 652) | |
| Cakes on a baking tray | Small cakes Muffins | 4.8 cm paper cup for baking on a bread baking tray | 3 | 155-1601) | 37 - 452) |
| 4.8 cm paper cup for baking on a bread baking tray | 3 150-160 | 1) | 34 - 382) | ||
| 4.8 cm paper cup for baking on a bread baking tray | 3 150-160 | 1) | 34 - 382) | ||
| 4.8 cm paper cup 2-Bread or roasting tray 4-Bread baking tray | 2 + 4 150-160 | 1) | 34 - 402) | ||
| Shortcake | Bread baking tray 2 | ☐ | 150-1601) | 30 - 402) | |
| Bread baking tray 2 150-170 | ☐ | 1) | 25 - 352) | ||
| Bread baking tray 2 150-170 | ☐ | 1) | 25 - 352) | ||
| 2-Bread or roasting tray 4-Bread baking tray | 2 + 4 | 160-1751) | 25 - 352) | ||
1) Pre-heat the empty oven for 5 minutes, do not use the quick pre-heat function.
2) Unless stated otherwise, duration given for a cold oven cavity.
Important!
Settings given in the table are reference only and may be adapted based on your own experience and cooking preferences.
- Try to use the baking tray supplied along with your appliance.
- If you use your own trays and moulds, place them on the wire grid. We recommend you use black trays, they conduct heat best and reduce the baking time.
- We do not recommend using trays with light coloured or glossy surfaces, as this could result in the underside of cakes being undercooked when using the upper heater +
Baking
- we recommend using the baking trays which were provided with your cooker;
- it is also possible to bake in cake tins and trays bought elsewhere which should be put on the drying rack; for baking it is better to use black trays which conduct heat better and shorten the baking time;
- shapes and trays with bright or shiny surfaces are not recommended when using the conventional heating method (top and bottom heaters), use of such tins can result in undercooking the base of cakes;
- when using the ultra-fan function it is not necessary to initially heat up the oven chamber, for other types of heating you should warm up the oven chamber before the cake is inserted;
- before the cake is taken out of the oven, check if it is ready using a wooden stick (if the cake is ready the stick should come out dry and clean after being inserted into the cake);
- after switching off the oven it is advisable to leave the cake inside for about 5 min.;
- temperatures for baking with the ultra-fan function are usually around 20 – 30 degrees lower than in normal baking (using top and bottom heaters);
- the baking parameters given in Table are approximate and can be corrected based on your own experience and cooking preferences;
- if information given in recipe books is significantly different from the values included in this instruction manual, please apply the instructions from the manual.
Roasting meat
- cook meat weighing over 1 kg in the oven, but smaller pieces should be cooked on the gas burners.
- use heatproof ovenware for roasting, with handles that are also resistant to high temperatures;
- when roasting on the drying rack or the grate we recommend that you place a baking tray with a small amount of water on the lowest level of the oven;
- it is advisable to turn the meat over at least once during the roasting time and during roasting you should also baste the meat with its juices or with hot salty water – do not pour cold water over the meat.
- For baking and reheating fat-free dishes such as fries, vegetables, fish fingers, etc. Airfry is also suitable for baking in a baking sleeve. When baking, place the Airfry wire shelf on level 3 and select the fan heater function. It is recommended to place a baking tray under the Aifry wire shelf. To obtain the best result, stir or turn over the food during baking.
ECO Heating
- ECO Heating an optimised heating function designed to save energy when preparing food.
- You cannot reduce the cooking time by setting a higher temperature; preheating the oven is not recommended.
- Do not change the temperature setting and do not open the oven door during cooking.
Recommended setting for ECO Heating
| Type of dish | Oven functions | Temperature (°C) | Level Time | in minutes |
| Sponge cake |  | 180 - 200 2 - 3 | 50 - 70 | |
| Sponge cake |  | 180 - 200 2 50 | - 70 | |
| Fish |  | 190 - 210 2 - 3 | 45 - 60 | |
| Beef |  | 200 - 220 2 90 | - 120 | |
| Pork |  | 200 - 220 2 90 | - 160 | |
| Chicken |  | 180 - 200 2 80 | - 100 |
Oven with automatic air circulation (including a fan and ring heater)
| Type of dish | Type of heating | Temperature (°C) | Level Time | (min.) |
| Sponge cake |  | 160 - 200 2 - 3 | 30 - 50 | |
| Muffins 160 - | 170 [ZX6] | 1) | 3 25 - 40 | 2) |
| Muffins 155 - | 170  | 1) | 3 25 - 40 | 2) |
| Pizza 200 - 2 | 30  | 1) | 2 - 3 15 - 25 | |
| Fish 210 - 2 | 20 2 45 -  | |||
| Fish |  | 160 - 180 2 - 3 | 45 - 60 | |
| Fish |  | 190 2 - 3 60 | - 70 | |
| Sausages | [SCKT] | 230 - 250 4 14 | - 18 | |
| Beef 225 - 2 | 50 2 120  50 50 | |||
| Beef |  | 160 - 180 2 120 | - 160 | |
| Pork | [ADBY] | 160 - 230 2 90 | - 120 | |
| Pork |  | 160 - 190 2 90 | - 120 | |
| Chicken |  | 180 - 190 2 70 | - 90 | |
| Chicken |  | 160 - 180 2 45 | - 60 | |
| Chicken |  | 175 - 190 2 60 | - 70 | |
| Vegetables |  | 190 - 210 2 40 | - 50 | |
| Vegetables |  | 170 - 190 3 40 | - 50 |
The times are apply to dish that is placed into a cold oven. For the preheated oven, the times should be reduced by about 5-10 minutes.
^1) Preheat
2) Baking smaller items
Note: The figures given in Tables are approximate and can be adapted based on your own experience and cooking preferences.
Baking
| Type of dish Accessory Level Type | of heating | Temperature (°C) | Baking time 2)(min.) | ||
| Small cakes | Baking tray 4 |  | 160 1) | 28 - 32 2) | |
| Baking tray 3 155 | [KAZH] | 1) | 23 - 26 2) | ||
| Baking tray 3 150 |  | 1) | 26 - 30 2) | ||
| Baking tray Roasting tray | 2 + 42 - baking tray or roasting tray4 - baking tray |  | 150 1) | 27 - 30 2) | |
| Shortbread | Baking tray 3 |  | 150 - 160 1) | 30 - 40 2) | |
| Baking tray 3 150 - 170 |  | 1) | 25 - 35 2) | ||
| Baking tray 3 150 - 170 |  | 1) | 25 - 35 2) | ||
| Baking tray Roasting tray | 2 + 42 - baking tray or roasting tray4 - baking tray |  | 160 - 175 1) | 25 - 35 2) | |
| Fatless sponge cake | Wire rack + black baking tin diameter 26cm | 3 |  | 170 - 180 1) | 38 - 46 2) |
| Apple pie | Wire rack + 2 black baking tins diameter 20cm | 2black baking tins placed after the diagonal, back right, front left | [C2x7] | 180 - 200 1) | 50 - 65 2) |
^1) Preheat, do not use Rapid preheat function.
^2) The times are apply to dish that is placed into a cold oven. For the preheated oven, the times should be reduced by about 5-10 minutes.
TEST DISHES. According to standard EN 60350-1.
Grilling
| Type of dish | Accessory Level | Type | of heating | Temperature (°C) | Time (min.) |
| White bread toast | Wire rack 4 |  | 2201) | 3-7 | |
| Beef burgers | Wire rack + roasting tray (to gather drops) | 4 - wire rack 3 - roasting tray | [6CZS] | 2201) | 1st side 13 - 18 2nd side 10 - 15 |
^1) Preheat for 8 minutes, do not use Rapid preheat function.
Roasting
| Type of dish | Accessory Level | Type | of heating | Temperature (°C) | Time (min.) |
| Whole chicken | Wire rack + roasting tray (to gather drops) | 2 - wire rack1 - roasting tray |  | 180 - 190 70 | -90 |
| Wire rack + roasting tray (to gather drops) | 2 - wire rack1 - roasting tray |  | 180 - 190 80 | -100 |
The times are apply to dish that is placed into a cold oven. For the preheated oven, the times should be reduced by about 5-10 minutes.
By ensuring proper cleaning and maintenance of your oven you can have a significant influence on the continuing fault-free operation of your appliance.
Before you start cleaning, the oven must be switched off and you should ensure that all knobs are set to the position off. Do not start cleaning until the oven has completely cooled.
Oven
- The oven should be cleaned after every use. When cleaning the oven the lighting should be switched on to enable you to see the surfaces better.
- The oven chamber should only be washed with warm water and a small amount of washing-up liquid.
- After cleaning the oven chamber wipe it dry.
Important!
Do not use any abrasive agents, harsh detergents or abrasive objects for cleaning.
Only use warm water with a small amount of dishwashing liquid to clean the front of the appliance. Do not use washing powders or creams.
Descale the oven cavity after using the Soft Steam function:
• pour about 250 ml of pure 6% vinegar into the recessed bottom of the oven cavity,
- leave the vinegar at room temperature for 30 minutes to dissolve the scale,
- wipe the recessed bottom with a warm, damp, soft cloth.
Note: It is recommended to descale the recessed bottom every 5-10 uses of the Soft Steam function.
CLEANING AND MAINTENANCE
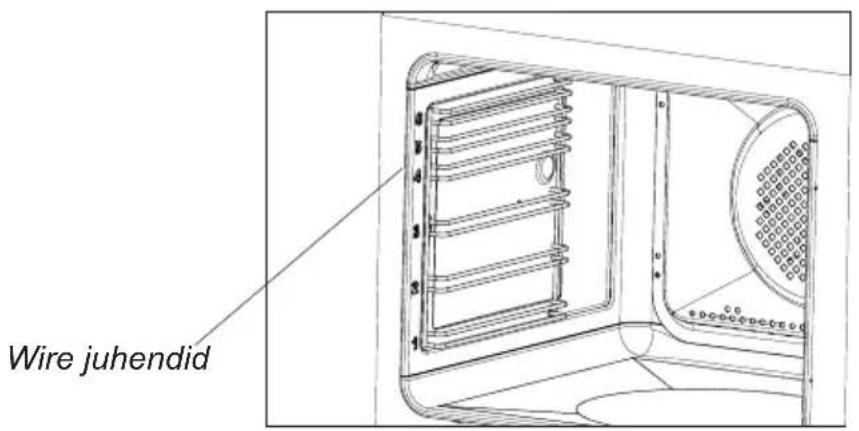
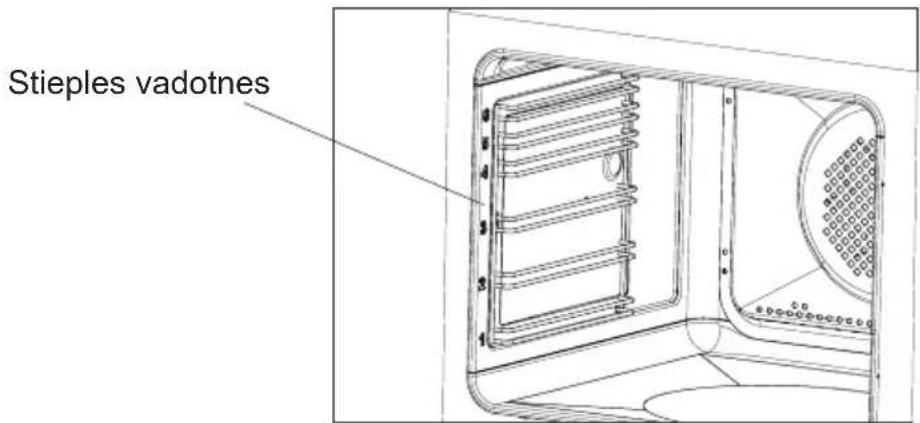
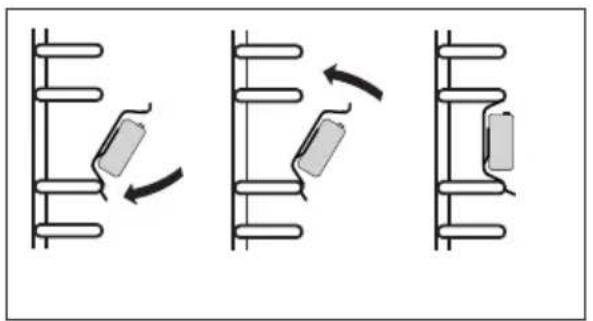
- Ovens in cookers marked with the letter D are equipped with easily removable wire shelf supports. To remove them for washing, pull the front catch, then tilt the support and remove from the rear catch.
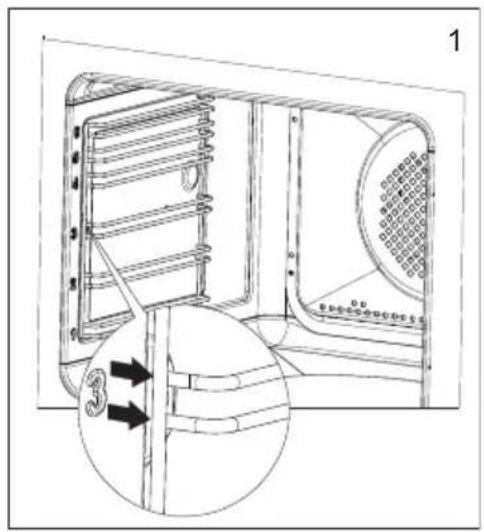
- Ovens in cookers marked with the letters Dp have stainless steel sliding telescopic runners attached to the wire shelf supports. The telescopic runners should be removed and cleaned together with the wire shelf supports. Before you put the baking tray on the telescopic runners, they should be pulled out (if the oven is hot, pull out the telescopic runners by hooking the back edge of the baking tray on the bumpers in the front part of the telescopic runners) and then insert them together with the tray.
Important!
Do not wash telescopic runners in a dishwasher.
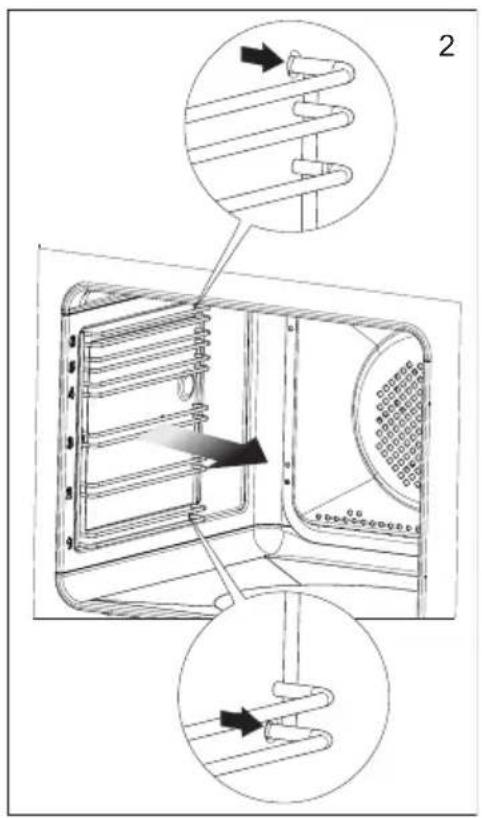
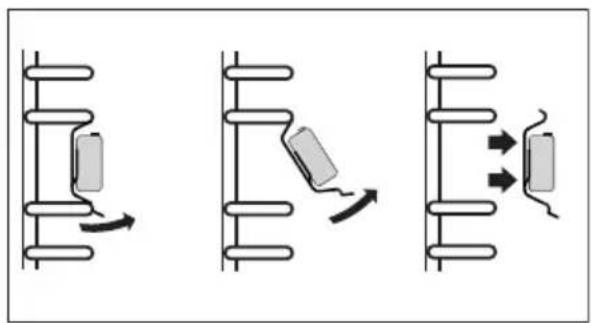
natural_image
Three diagrams showing mechanical or electrical components with directional arrows, no text or symbols presentRemoving telescopic runners
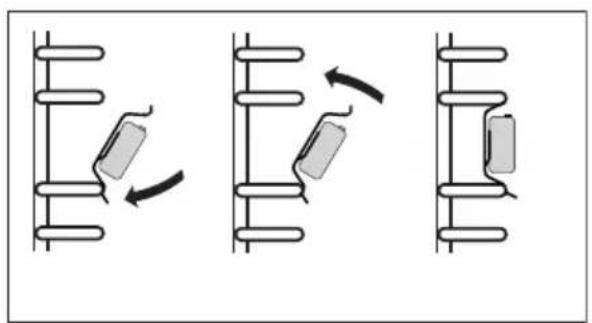
natural_image
Three sequential diagrams showing mechanical or electrical components with arrows indicating motion (no text or symbols)Installing telescopic runners
Replacing the halogen bulb in the oven
Before replacing the halogen bulb, make sure the appliance is disconnected from the electric mains to avoid a possible electric shock.
- Unplug the appliance
- Remove shelves and trays from the oven.
- If the oven has telescopic runners, remove them also.
- Use a flat screwdriver to pry the lamp cover loose, remove it, wash and carefully wipe it dry.
-
Pull the halogen bulb out by sliding it down using a cloth or paper. If necessary, replace the halogen bulb with a new one.
-
type G9
- voltage 230V
- power 25W
- Replace the halogen bulb in its socket.
- Replace the lamp cover
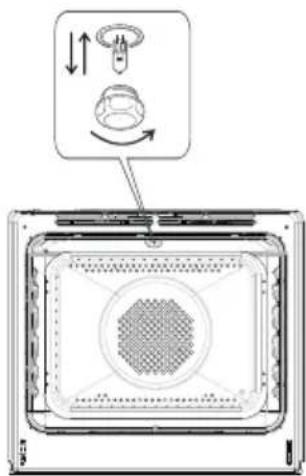
Oven lighting
- Oven is equipped with liners covered with special self-cleaning enamel. The enamel removes fat stains or leftover food automatically, providing they are not dried on and burnt (food and fat remnants should be removed when they are not dried on and burnt to avoid a long self-cleaning process). To activate self-cleaning switch on the oven for 1 hour, setting the temperature to 250^ . If remnants of food are small the process can be shortened.
If the self-cleaning per for mance is noticeably reduced, replace the liners with new ones: take out the wire rails from the in side and unscrew the catalytic enamel screw from the center of the liner. New liners can be obtained at service outlets.
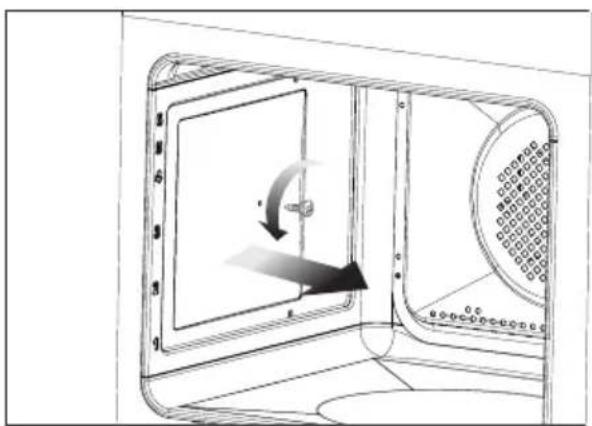
natural_image
Technical line drawing of a device interior with a curved arrow indicating rotation or movement (no text or symbols)Removal of catalytic liners
Door removal
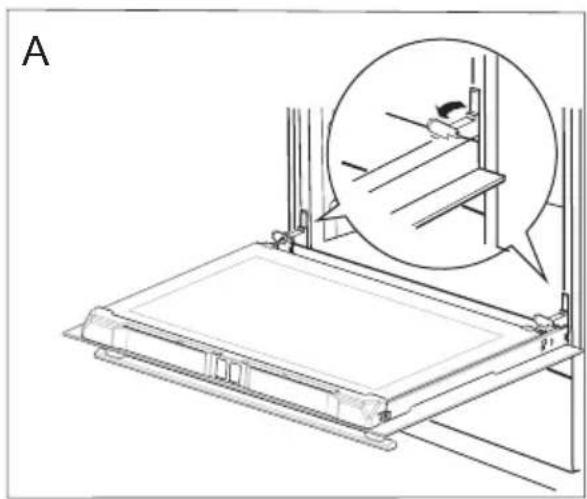
In order to obtain easier access to the oven chamber for cleaning, it is possible to remove the door. To do this, tilt the safety catch part of the hinge upwards (fig. A). Close the door lightly, lift and pull it out towards you. In order to fit the door back on to the cooker, do the inverse. When fitting, ensure that the notch of the hinge is correctly placed on the protrusion of the hinge holder. After the door is fitted to the oven, the safety catch should be carefully lowered down again. If the safety catch is not set it may cause damage to the hinge when closing the door.
natural_image
Technical line drawing of a mechanical assembly with an inset showing a close-up of a component (no text or symbols present)Tilting the hinge safety catches
Removing the inner panel
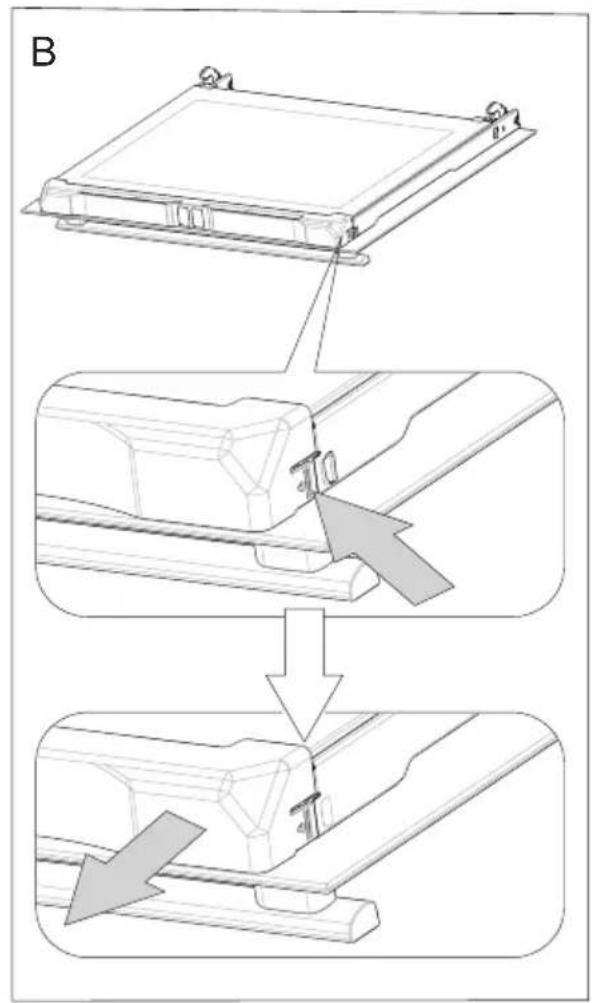
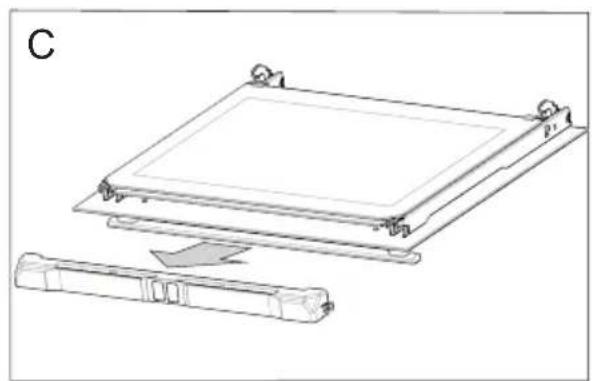
- Pull the upper door slat loose. (fig. B, C)
natural_image
Technical diagram showing a mechanical assembly with a rectangular component and a separate cylindrical component (no text or symbols)- Pull the inner glass panel from its seat (in the lower section of the door). Remove the inner panel (fig. D).
- Clean the panel with warm water with some cleaning agent added.
Carry out the same in reverse order to reassemble the inner glass panel. Its smooth surface shall be pointed upwards.
Important! Do not force the upper strip in on both sides of the door at the same time. In order to correctly fit the top door strip, first put the left end of the strip on the door and then press the right end in until you hear a "click". Then press the left end in until you hear a "click".
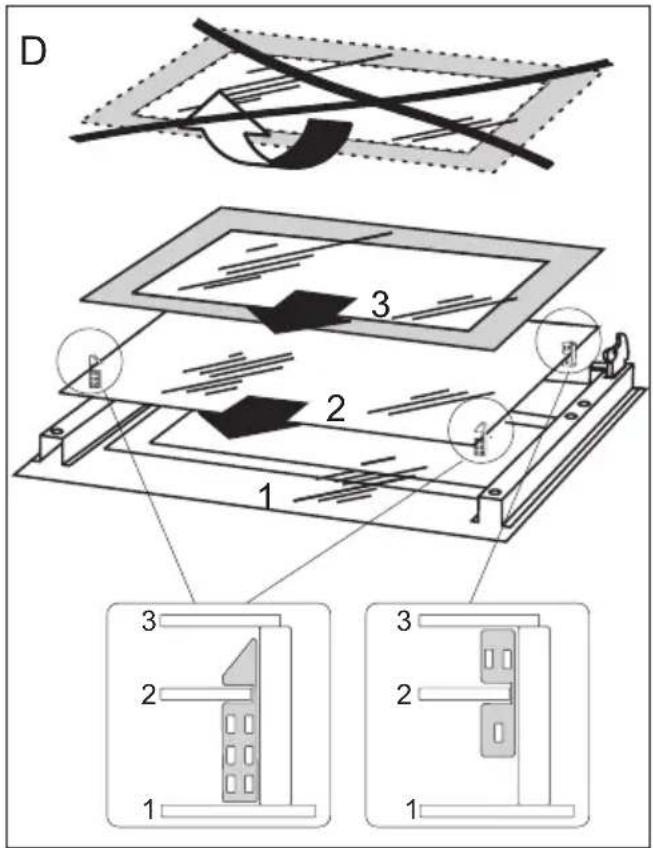
Removal of the internal glass panel
Regular inspections
Besides keeping the oven clean, you should:
- carry out periodic inspections of the control elements and cooking units of the cooker. After the guarantee has expired you should have a technical inspection of the cooker carried out at a service centre at least once every two years,
- fix any operational faults,
- carry out periodical maintenance of the cooking units of the oven.
Caution!
All repairs and regulatory activities should be carried out by the appropriate service centre or by an appropriately authorised fitter.
OPERATION IN CASE OF EMERGENCY
In the event of any fault:
- Turn off the appliance,
- Disconnect the power supply
- By following the instructions given in the table below, the user can correct some minor issues. Please check the consecutive points in the table before you refer the repair to customer service.
Problem Reason Remedy
| 1. The appliance does not work | no power check the fuse, replace if blown | |
| 2. Oven lighting does not work | loose or damaged bulb Replace the blown bulb (see Cleaning and maintenance) | |
| 3. Display shows blinking time "0.00" | The appliance was unplugged or there was a power outage. | Set the current time (see section "Programmer operation") |
| 4. Fan does not work Risk of overheating! Immediately unplug the appliance or switch off the main circuit breaker. Refer the repair to the nearest service centre. | ||
| 5. E1 Error on the display Meat probe failure you can use the oven without the meat probe | ||
| 6. E0 Error on the display oven chamber sensor error disconnect the appliance from wall socket (fuse) and contact the nearest service centre | ||
If the problem is not solved, disconnect the power supply and report the fault to the nearest service centre. Note! All repairs must be performed by qualified service technicians.
Voltage rating 230V\~50 Hz
Power rating max. 3,6 kW
Cooker dimensions H/W/D 59,5 / 59,5 / 57,5 cm
The product meets the requirements of European standards EN 60335-1; EN60335-2-6.
The data on the energy labels of electric ovens is given according to standard EN 60350-1 / IEC 60350-1. These values are defined with a standard workload a with the functions active: bottom and top heaters (conventional heating) and fan assisted heating (forced air heating), if these functions are available.
The energy efficiency class was assigned depending on the function available in the product in accordance with the priority below:
| Forced air circulation ECO (ring heater + fan) | |
 | |
| Forced air circulation ECO (bottom heater + top + roaster + fan) |  |
| Conventional mode ECO (bottom heater + top) | |
 | |
During energy consumption test, remove the telescopic runners (if the product is fitted with any).
Certificate of compliance CE
The Manufacturer hereby declares that this product complies with the general requirements pursuant to the following European Directives:
● The Low Voltage Directive 2014/35/EC,
● Electromagnetic Compatibility Directive 2014/30/EC,
- ErP Directive 2009/125/EC,
and therefore the product has been marked with the symbol and the Declaration of Conformity has been issued to the manufacturer and is available to the competent authorities regulating the market.
Компанія виробник
- GERBIAMAS PIRKĖJAU,
- Svarbu!
- Durelių nuėmimas
- ORKAITĖS VALYMAS IR PRIEŽIŪRA
- Ahju paigaldamine
- Tähelepanu!
- Tähtis!
- Cepeškrāsns montāža
- CEPEŠKRĀSNS LIETOŠANA
- Funkcija Soft Steam
- CEPEŠKRĀSNS TĪRĪŠANA UN KOPŠANA
- Durvju noņemšana
- Pozor:
- Priključivanje pećnice na električnu mrežu
- Nakon instalacije pećnice korisnici moraju imati slobodan pristup utikaču.
- Senzor Opis Senzor Opis
- Gotovi programi
- Važno!
- ČIŠĆENJE I ODRŽAVANJE PEĆNICE
- Pozor!
- ČIŠĆENJE I ODRŽAVANJE ŠTEDNJAKA
- Caution!
- Installing the oven
- Electrical connection
- Important!
- Before first use
- Warm up the oven cavity
- Control Panel
- Operation
- Child Lock
- Lighting
- Cooling fan
- Oven pre-heat (thermostat symbol)
- Oven door
- Limit the operating time
- Minute Minder
- Activate a heating function
- Meat probe\*
- Baking
- Roasting meat
- ECO Heating
- TEST DISHES. According to standard EN 60350-1.
- Oven
- Descale the oven cavity after using the Soft Steam function:
- CLEANING AND MAINTENANCE
- Replacing the halogen bulb in the oven
- Before replacing the halogen bulb, make sure the appliance is disconnected from the electric mains to avoid a possible electric shock.
- Door removal
- Removing the inner panel
- Regular inspections
- OPERATION IN CASE OF EMERGENCY
- Certificate of compliance CE
Brand : Hansa
Model : BOES69871
Category : Oven