
Navigator Lite Double - Stroller Baby Trend - Free user manual and instructions
Find the device manual for free Navigator Lite Double Baby Trend in PDF.


| Product Type | Double Stroller |
| Brand | Baby Trend |
| Model | Navigator Lite Double |
| Weight | Approximately 31 lbs (14 kg) |
| Dimensions (Open) | 30.5 x 31 x 43 inches (77 x 79 x 109 cm) |
| Dimensions (Folded) | 14 x 31 x 43 inches (36 x 79 x 109 cm) |
| Seat Capacity | Up to 50 lbs (22.7 kg) per seat |
| Recommended Age | 6 months to 4 years |
| Canopy | Multi-position, extendable sun canopy with peek-a-boo window |
| Recline | Multiple recline positions for each seat |
| Brake | Rear wheel step-on brake |
| Wheels | Front swivel wheels with lock; rear wheels with suspension |
| Storage | Large under-seat basket, parent tray with cup holders |
| Harness | 5-point adjustable harness per seat |
| Fold | One-hand compact fold with auto-lock |
| Weight Limit (Total) | 100 lbs (45.4 kg) |
| Material | Aluminum frame, polyester fabric |
| Cleaning | Wipe frame with damp cloth; removable seat pad machine washable cold |
| Safety Standards | ASTM F833, JPMA certified |
| Warranty | 1 year limited warranty (parts and labor) |
Frequently Asked Questions - Navigator Lite Double Baby Trend
User questions about Navigator Lite Double Baby Trend
0 question about this device. Answer the ones you know or ask your own.
Ask a new question about this device
Download the instructions for your Stroller in PDF format for free! Find your manual Navigator Lite Double - Baby Trend and take your electronic device back in hand. On this page are published all the documents necessary for the use of your device. Navigator Lite Double by Baby Trend.
USER MANUAL Navigator Lite Double Baby Trend
natural_image
Line drawing of a two-wheeled stroller with wheels and seat compartments (no text or symbols)Instruction Manual Manual de Instrucciones
DJ86xxxB
Baby Trend, Inc. 13048 Valley Blvd. Fontana CA 92335
1-800-328-7363 (8:00 a.m. \~ 4:30 p.m. PST) www.babytrend.com

babytrend®
Quality·Comfort·Style
babytrend®
WARRANTY
DO NOT RETURN YOUR PRODUCT TO THE STORE. PLEASE CONTACT BABY TREND® FOR REPLACEMENT PARTS, SERVICE AND REPAIR.
The Baby Trend® warranty covers workmanship defects within 1 year of purchase. Any product which has been subjected to misuse, abuse, abnormal use, excessive wear and tear, improper assembly, negligence, environmental exposure, alteration or accident, or has had its serial number altered or removed invalidates all claims against the manufacturer. Any damage to property during installation is the sole responsibility of the end user.
Customer Service Department can be contacted at 1 (800) 328-7363 Monday through Friday between 8:00 a.m. and 4:30 p.m. (PST). Return Authorizations are required prior to returning product(s) to Baby Trend®. Please visit http://babytrend.com/pages/limited-warranty for complete warranty details.
GARANTIA
NO DEVUELVA SU PRODUCTO A LA TIENDA. POR FAVOR CONTACTE A BABY TREND® PARA PIEZAS DE REPUESTO, SERVICIO Y REPARACION.
Baby Trend, Inc. 13048 Valley Blvd. Fontana CA 92335
1-800-328-7363 • (8:00am \~ 4:30pm PST)
www.babytrend.com
PARTS
WARNING
Check that you have all the parts for this model before assembly.
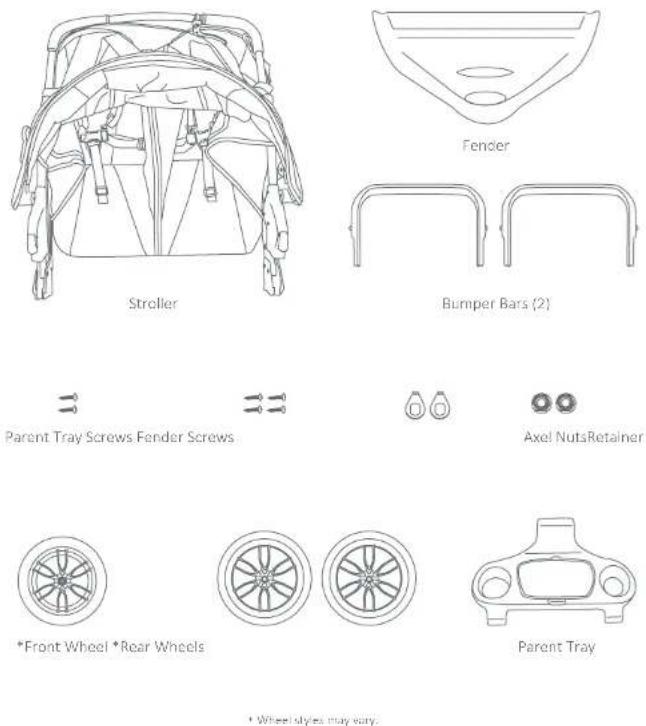
Axel NutsRetainer plates
**Compatible with the Baby Trend Infant Car Seats:
Flex-Loc 30, EZ-Flex Loc 30/32, and Secure.
Not compatible with: Ally, EZ-Lift, EZ-Lift PLUS, EZ-Lift PRO, Secure-Lift Infant Car Seats.
Copyright © 2013, Baby Trend Inc., All Rights Reserved. Todos los derechos reservados.
WARNING: Please follow all of these instructions to ensure the safety of your child. Keep these instructions for future reference.
WARNING: Failure to follow these instructions could result in serious injury or death. Avoid serious injury from falling or sliding out. Always use the safety harness and ensure that the children are properly positioned according to these instructions.
⚠ WARNING: Never leave children unattended.
WARNING: Wheel can detach and cause the Jogger/Stroller to tip over. Pull on the wheel to assure it is securely attached.
- CAUTION: This double jogger is designed for two children of equal/close weights. Use with one child may cause the unbalance condition which can injure/ harm your child.
- Purses, shopping bags, parcels, diaper bags or accessory items may change the balance of the stroller and cause hazardous unstable conditions.
• Always lock the front swivel wheel in STRAIGHT position before placing or removing your children from the stroller and when walking fast or jogging.
- The maximum weight that can be carried in the basket is 5 lbs (2.26 kg), child tray and parent tray are 3 lbs (1.36 kg) each. The maximum weight can be carried in the side pockets (2) is 3 lbs (1.36 kg), back pockets (2) is 3 lbs (1.36 kg) and canopy pockets is (2) 1 lb (0.45 kg). Excessive weight may cause a hazardous unstable condition to exist.
- Be certain the stroller is fully erect and latched in the open position before allowing children near the stroller.
- Use of the stroller with children weighing more than 50 pounds (22.62 kg) each (no more than 50 pounds (22.62 kg) per seat), or more than 100 pounds (45.25 kg) in total, or over 42 inches (106.7 cm) tail, will cause excessive wear and stress on the stroller and may cause a hazardous unstable condition to exist.
- NEVER use the stroller on stairways or escalators.
- NEVER use the stroller with roller skates, in-line skates, skateboards or bicycles.
• We recommend that the child occupant be at least 6 months of age prior to use of the stroller for jogging. Because children develop at different rates, please discuss the use of a jogging stroller with your health care provider prior to jogging with your child.
• NEVER allow your stroller to be used as a toy.
- To clean use only mild household soap or detergent and warm water on a sponge or clean cloth.
Copyright © 2023, Baby Texas Inc., All Rights Reserved. Todos los derechos reservados.

WARNING
ASSEMBLY
- Check your stroller for loose screws, worn parts, torn material or stitching on a regular basis. Replace or repair parts as needed.
- Discontinue use of stroller should it malfunction or become damaged. Please contact our customer service Parts Hotline to arrange for repair or obtain replacement parts.
- Door way needs to be 36" or more to fit through when open.
IMPORTANT! To ensure safe operation of your stroller, please follow these instructions carefully. Please keep these instructions for future reference.
IMPORTANT! Before assembly and each use, inspect this product for damaged hardware, loose joints, missing parts or sharp edges. NEVER use if any parts are missing or broken.
IMPORTANT! Adult assembly is required. Keep child away during unpacking and assembly.
Remove stroller from box. The front wheel and rear wheels MUST be installed prior to use.
FENDER
If assembly is necessary
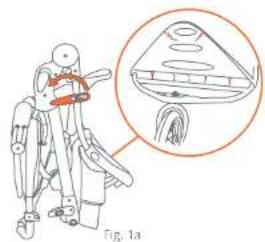
(Fig. 1a), see Fender page 20.
FRONT WHEEL
To attach the front wheel, unfold stroller as described in the section following:
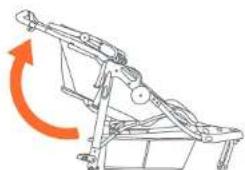
1) Unlock the release lever (Fig. 1a) and unfold stroller frame by pulling upward on the stroller handle until the frame locks (Fig. 1b).
2) • Slide the front wheel onto the front fork (Fig. 2).
3) • Slide the retainer plate onto the front wheel. Be sure that the raised lip is pointing toward the fork and insert it into the slot on the fork. The tab on the retainer plate must be lined up with the slot before tightening the wheel (Fig. 3).
natural_image
Line drawing of a robot with a device and a magnified inset showing the interior structure (no text or symbols)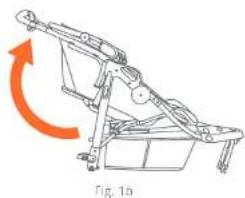
natural_image
Mechanical assembly diagram showing a lever mechanism with an orange arrow indicating rotational motion (no text or symbols)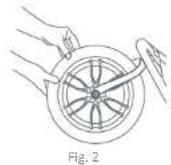
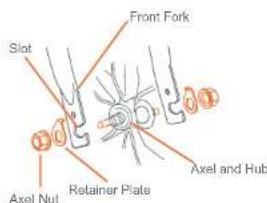
Fig. 3
ASSEMBLYASSEMBLY
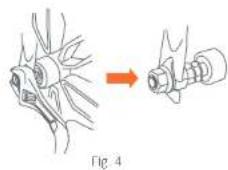
4) • With the wheel in position, tighten the axel nuts and tighten with standard crescent, box, or open end wrench. You should feel significant resistance and the wheel should be held tightly in place (Fig. 4).
REAR WHEELS
5) • Rest the stroller upside down, on the handle.
- Press the rear wheel posts into the rear frame hub until it clicks into place (Fig. 5a).
NOTE: Pull on the rear wheel to ensure that it is securely attached to the stroller.
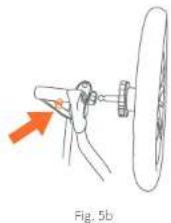
• To remove the rear wheels, press the wheel release button (Fig. 5b) on the rear tube and pull the wheel from the hub.
TIRES
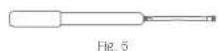
6) • Tires are shipped un-inflated. The tires should be inflated on a regular basis to the P.S.I. specified on each tire. Always use a bicycle style hand air pump to inflate the tires. *Not included (Fig. 6).
natural_image
Diagram showing a mechanical assembly with an arrow indicating transformation (no text or symbols present)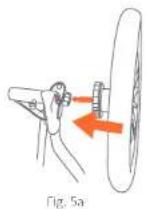
PARENT TRAY
WARNING: Do not place hot liquids or more than 3 pounds in the parent tray. Serious burns or unstable conditions could result.
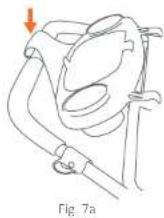
7) To attach parent tray: Snap the upper portion of the tray over the handle (Fig 7a).
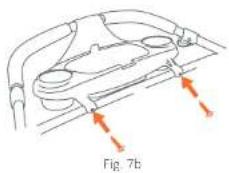
- Attach the lower portion of the parent tray to the cross tube, with the screws provided (Fig. 7b).
NOTE: Check to make sure the parent tray is secure before using.
CANOPY
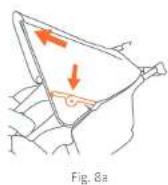
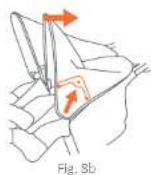
8) To open the canopy: push forward on the front edge of the canopy. Push downward on the tensioners to secure (Fig. 8a).
• To fold the canopy: pull upwards on the tensioners and then pull backwards on the front edge (Fig. 8b).
8) To open the canopy: push forward on the front edge of the canopy. Push downward on the tensioners to secure (Fig. 8a).
ASSEMBLY
SAFETY
SEATBACK POSITIONING
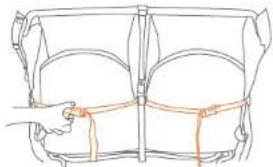
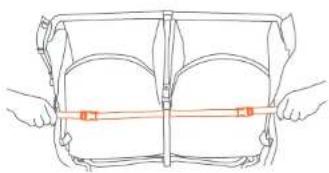
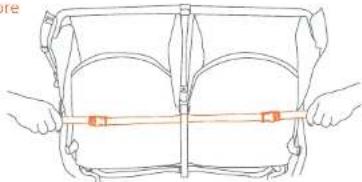
9) • To recline the seat: loosen the strap through the buckle and adjust to the required recline position (Fig. 9a). To place the seat back in a more upright position, press upward on the seat back with one hand while pulling the strap through the buckle with the other (Fig. 9b). NOTE: The upright position should be used only for a child that is at least 6 months old. Always re-adjust the safety harness, including the shoulder belts, when repositioning the seat back.
natural_image
Line drawing of a car body frame with a hand holding the seat (no text or symbols)Fig. 9a
natural_image
Line drawing of a person holding a device with measurement tape (no text or symbols)Fig.9b
BUMPER BAR
WARNING: Do not use bumper bar to carry seat with child inside. The bumper bar is not a carrying handle.
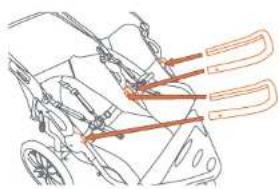
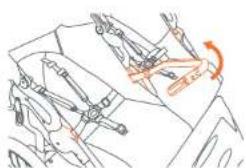
10) Attach the bumper bar by lining up anchors with the slots on the seat. Push until it locks into place (Fig. 10a). NOTE: The bumper bar must be securely attached before using this product.
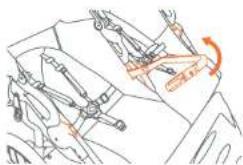
• To detach bumper bar, press the release button on the bottom of the bar and pull bar out of the anchor. Swing the bar out to access the seat (Fig. 10b).
natural_image
Line drawing of a stroller with three orange tool tips (no text or symbols)Fig. 10a
natural_image
Line drawing of mechanical components with no visible text or symbolsFig. 10b
BRAKES
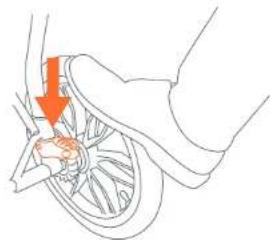
WARNING: Always set brakes when the stroller is not being pushed so that the stroller will not roll away. NEVER leave stroller unattended on a hill or incline as the stroller may slide down the hill.
11) To engage brakes, apply downward pressure to the brake levers located on the rear axle. The stroller may require forward or rearward movement in order to engage the brake (Fig. 11). Check that the stroller will not move once the brakes are properly applied. To release, gently lift up on the brake levers.
natural_image
Anatomical illustration of a human foot and wheel with a red arrow indicating a specific point (no text or labels present)Fig. 11
FRONT WHEEL LOCK
WARNING: Always lock the front swivel wheel in STRAIGHT position before placing or removing your children from the stroller and when walking fast or jogging.
⚠️ FALL HAZARD: Prevent tipping over, before running, jogging or walking fast, LOCK the front wheel from swiveling.
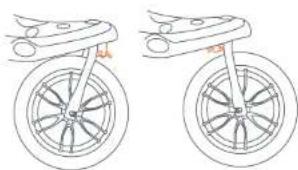
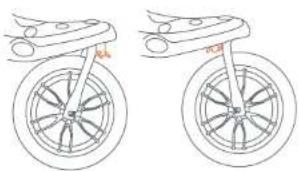
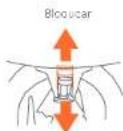
12) • The front wheel is equipped with a swivel locking device and can lock the wheel in the front or back position (Fig. 12a). • Push the button on the wheel upward to engage the locks and push downward to disengage the locking device (Fig. 12b).
natural_image
Two bicycle frame diagrams showing wheel and wheel rim configurations (no text or symbols)Fig. 12a
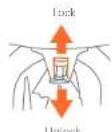
Fig. 12b
Copyright © 2023, Bay Taco Inc., All Rights Reserved. Todos los derechos reservados.
SAFETYSAFETY
TO SECURE THE CHILD
WARNING: Avoid serious injury from falling or sliding out. Always use the safety harness.
STRANGULATION
HAZARD: Child can strangle in loose straps. Never leave child in seat when straps are loose or undone.
Type 1 and 2
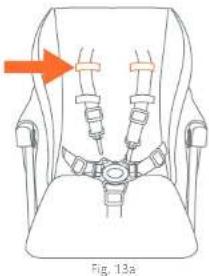
13) • The shoulder straps of the 5-point harness have 3 attachment positions (Fig. 13a). Select the position that places the shoulder strap level with, or below, the top of the child's shoulder (Fig. 13b).
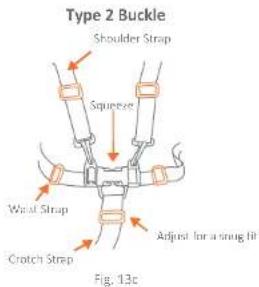
- Carefully place the child in the stroller seat and bring the safety harness around the child's waist and over the shoulders. Place the crotch strap between the child's legs. Insert the male end of each shoulder/waist belt into the buckle on the crotch strap. Tighten the harness to be snug around the child's waist and over the child's shoulders (Fig. 13c).
natural_image
Line drawing of a seatbelt device with orange arrow indicating direction (no text or symbols)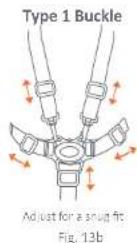
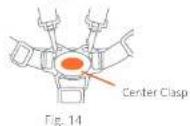
14) • To release, push Button on Center Clasp, the two Harness Buckles will pop free (Fig. 14).
Type 2
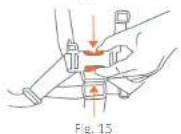
15) To release, apply pressure to both sides of each male clip until the clip is released (Fig. 15).
Type 1
Type 2
SAFETY
INFANT CAR SEAT
WARNING: Never jog or run with your newborn in the car seat position. Use for strolling only.
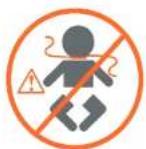
STRANGULATION
HAZARD! Children have strangled when straps have wrapped around their neck. When not in use hook the tether strap onto the stroller handle. Keep this stroller tether strap out of the reach of children.
- When you are jogging with your child, use the following safety features:
16) • LOCK THE FRONT SWIVEL WHEEL IN STRAIGHT POSITION (Step 12)
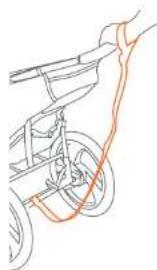
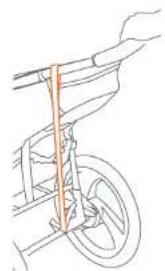
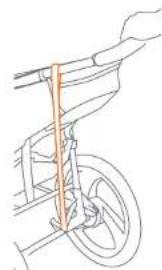
- SAFETY WRIST STRAP: Always connect the safety strap to either wrist when jogging. This strap will keep the stroller from rolling away in the event that you trip while running (Fig. 16a). The safety strap must remain connected to the rear lower frame cross member at all times. This location is intended to prevent the stroller being tipped backward in the event that you do fall to the ground. The safety strap includes a hook and loop attachment for storage, on the left side of the stroller, when not in use (Fig. 16b).
natural_image
Line drawing of a bicycle with a curved orange line indicating motion or cable (no text or symbols)Fig. 15a
natural_image
Line drawing of a hand holding a bicycle frame with a vertical orange line indicating a rope or cable (no text or symbols)Fig. 16b
COMPATIBLE CAR SEATS
Compatible with the Baby Trend Infant Car Seats: Flex-Loc 30, EZ-Flex Loc 30/32, and Secure. Not compatible with: Ally, EZ-Lift, EZ-Lift PLUS, EZ-Lift PRO, Secure-Lift Infant Car Seats.
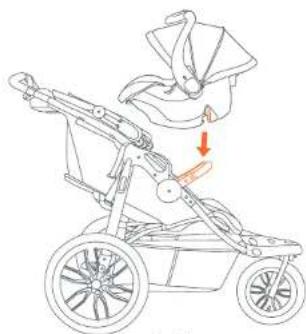
17) • Position the infant car seat so that it faces toward the rear of the stroller and the car seat base hooks lock onto the bumper bar (Fig. 17a). NOTE: Check that the bum per bar is firmly attached to the stroller.
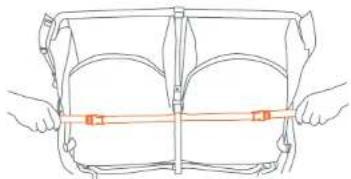
- Adjust the seat back to its most upright position (Fig. 17b).
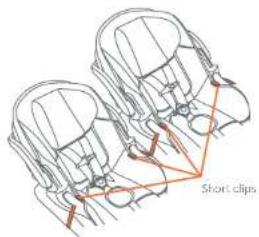
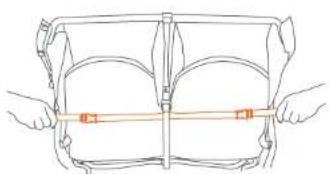
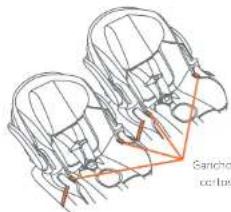
- Strap both short clips over the infant car seat, through both seat belt slots (Fig. 17c).
NOTE: Make sure both short clips are tightly fastened to the infant car seat before use.
natural_image
Line drawing of a stroller with a decorative fan above it, showing motion direction (no text or symbols)Fig. 17a
natural_image
Line drawing of a person holding a device with a red measurement bar (no text or symbols)Fig. 170 Fig. 17c
INFANT CAR SEAT
FOLD / UNFOLD
TO REMOVE INFANT CAR SEAT
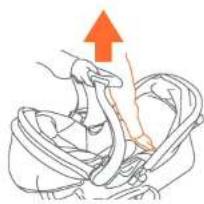
18) • To remove the Infant Car Seat, unstrap the short clips from each belt slot and squeeze the release handle located at the foot-end of the seat and carefully lift upward on the seat (Fig. 18). NOTE: Raise the support tabs when the car seat is not in use.
natural_image
Illustration of a hand holding a rope with an upward arrow indicating motion (no text or symbols)Fig.18
TO FOLD STROLLER
WARNING: Care must be taken when folding and unfolding the stroller to prevent finger entrapment. CAUTION: Do not allow children near stroller while folding.
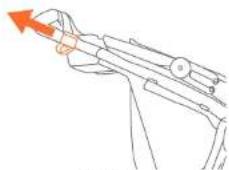
19) • Close the canopy as described in the canopy section (step 8). Place the seat in the furthest recline position. • Fold the stroller by pulling both release triggers (Fig. 19a). Press downward on the stroller handle until the stroller is completely folded. Lock the release lever on the right side of the stroller (Fig. 19b).
natural_image
Line drawing of a mechanical tool with an orange arrow indicating direction (no text or symbols)Fig. 19a
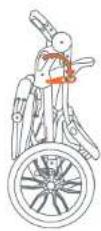
Fig. 19b
TO UNFOLD STROLLER
CAUTION: Do not allow children near stroller while unfolding.
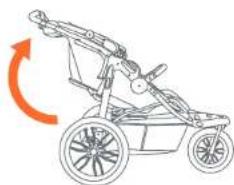
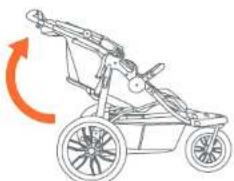
20) • Unlock the release lever (Fig. 20a) and unfold stroller frame by pulling backward on the stroller handle until the frame locks (Fig. 20b).
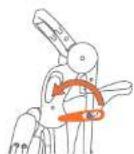
Fig. 20a
natural_image
Line drawing of a stroller with wheels and a curved arrow indicating rotation (no text or symbols)Fig. 20b
Copyright © 2023, Baby Texas Inc., All Rights Reserved. Todos los derechos reservados.
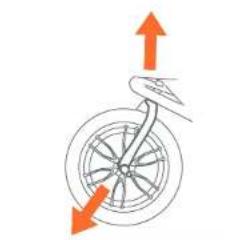
WARNING: ALWAYS check the double nut locking system before each use to ensure that the front wheel is securely fastened to the frame.
21) Lift front end of the stroller up and pull down on wheel to ensure its attached (Fig. 21).
NOTE: The wheel must not detach.
If you experience front wheel wobble that is beyond what is normal for use while walking or jogging you may have to adjust the front wheel housing nut.
22) • Reverse (Fig. 23a). Remove fender to access nut. You can use a standard crescent wrench to tighten the nut (Fig. 22).
DO NOT OVER TIGHTEN this can cause the front wheel to not swivel properly and will result in damage to the wheel housing. When tightened correctly, the front fork will have only a slight drag when manually rotated. Wheel and fork should not rotate freely. When adjusting the front wheel, always test the fork for a slight drag.
natural_image
Diagram of a car wheel with directional arrows indicating rotation or motion (no text or symbols)Fig. 21
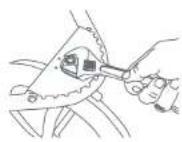
Fig. 22
FENDER
If adjustment or replacement is necessary:
23) • Line up the front fender and press onto the front frame assembly (Fig. 23a).
- Insert the 4 screws through the underside of the front frame assembly into the front fender's plastic tubes. Tighten the screws only until snug (Fig. 23b).
DO NOT OVER TIGHTEN.
SEAT PAD
• To clean the seat pad, use only mild household soap or detergent and warm water on a sponge or clean cloth.
OTHER
- Check your stroller for loose screws, worn parts, torn material or stitching on a regular basis. Replace or repair parts as needed.
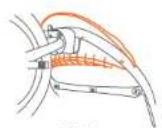
Fig. 23a
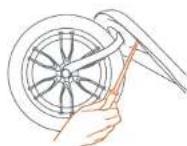
Fig. 24b
PIEZAS
ADVERTENCIA
natural_image
Line drawing of a backpack with straps and straps (no text or symbols)Carrito
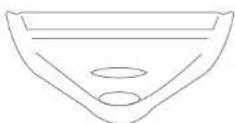
Guardabarros
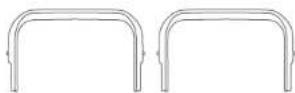
Barra frontal (2)
Fig. 1a
natural_image
Mechanical assembly diagram showing a lever mechanism with an orange rotation arrow (no text or labels)Fig. 1b
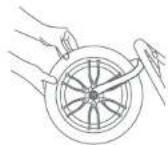
Fig. 2
natural_image
Diagram of a mechanical assembly with a red arrow pointing to a component, labeled Fig. 5b (no text or symbols on the diagram itself)
Fig. 6
ENSAMBLARENSAMBLAR
BANDEJA PARA PADRES
natural_image
Line drawing of a hand holding a belt over a basket (no text or symbols)Fig. 9a
natural_image
Line drawing of a bicycle seat with hands holding the frame (no text or symbols)Fig. 9b
LA BARRA FRONTAL
ADVERTENCIA:
natural_image
Line drawing of a stroller with three orange tool tips (no text or symbols)Fig. 10a
natural_image
Technical line drawing of mechanical components with no visible text or symbolsFig. 10b
SEGURIDAD SEGURIDAD
FRENOS
ADVERTENCIA:
natural_image
Anatomical illustration of a human hip joint with an arrow indicating a specific area (no text or labels present)Fig. 11
natural_image
Two bicycle frame diagrams showing wheel and wheel assembly (no text or symbols)Fig. 12a
Desoloquacar
Fig. 12b
natural_image
Line drawing of a seatbelt device with two connectors and a central hub (no text or symbols)Fig. 13a
natural_image
Line drawing of a bicycle with a curved orange line indicating motion or trajectory (no text or symbols)Fig. 16a
natural_image
Line drawing of a bicycle wheel with a hand operating the side rim (no text or symbols)Fig. 16b
Copyright © 2023, Bay Taco Inc., All Rights Reserved. Todos los derechos reservados.
SILLITA PARA EL AUTOMÓVIL SILLITA PARA EL AUTOMÓVIL
ASIENTOS DE COCHE COMPATIBLES
natural_image
Line drawing of a stroller with a decorative fan and arrow indicating motion (no text or symbols)Fig. 17a
natural_image
Line drawing of a person holding a rectangular object with a ruler, no text or symbols presentFig. 17b Fig. 17c
PARA QUITAR EL ASIENTO INFANTIL
natural_image
Illustration of a hand lifting a rope with an upward arrow (no text or symbols)Fig. 18
PLEGAR / DESPLEGAR
MANTENIMIENTO
PARA PLEGAR EL CARRITO
natural_image
Line drawing of a mechanical tool or device with an orange arrow indicating direction (no text or symbols)Fig. 20a
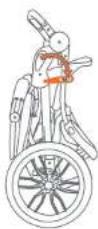
Fig. 20b
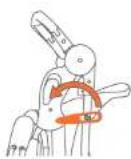
Fig. 201a
natural_image
Line drawing of a baby stroller with a curved arrow indicating rotation (no text or symbols)Fig. 21b
natural_image
Diagram showing a hand holding a bicycle with an arrow indicating upward and downward motion (no text or symbols)Fig. 22
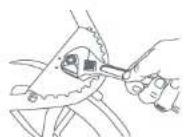
Fig. 23
MANTENIMIENTO
GUARDABARROS
The Customer Service Department can be contacted at 1 (800) 328-7363 Monday through Friday between 8:00 a.m. and 4:30 p.m. (PST). Return Authorizations are required prior to returning product(s) to Baby Trend®.
BABY TREND® SERVICIO AL CLIENTE
- babytrend®
- WARRANTY
- GARANTIA
- PARTS
- WARNING
- ASSEMBLY
- IMPORTANT! To ensure safe operation of your stroller, please follow these instructions carefully. Please keep these instructions for future reference.
- IMPORTANT! Before assembly and each use, inspect this product for damaged hardware, loose joints, missing parts or sharp edges. NEVER use if any parts are missing or broken.
- IMPORTANT! Adult assembly is required. Keep child away during unpacking and assembly.
- FENDER
- FRONT WHEEL
- ASSEMBLYASSEMBLY
- REAR WHEELS
- TIRES
- PARENT TRAY
- CANOPY
- SAFETY
- SEATBACK POSITIONING
- BUMPER BAR
- BRAKES
- FRONT WHEEL LOCK
- SAFETYSAFETY
- TO SECURE THE CHILD
- STRANGULATION
- Type 1 and 2
- Type 2
- INFANT CAR SEAT
- COMPATIBLE CAR SEATS
- FOLD / UNFOLD
- TO REMOVE INFANT CAR SEAT
- TO FOLD STROLLER
- TO UNFOLD STROLLER
- SEAT PAD
- OTHER
- PIEZAS
- ADVERTENCIA
- ENSAMBLARENSAMBLAR
- BANDEJA PARA PADRES
- LA BARRA FRONTAL
- ADVERTENCIA:
- SEGURIDAD SEGURIDAD
- FRENOS
- SILLITA PARA EL AUTOMÓVIL SILLITA PARA EL AUTOMÓVIL
- ASIENTOS DE COCHE COMPATIBLES
- PARA QUITAR EL ASIENTO INFANTIL
- PLEGAR / DESPLEGAR
- MANTENIMIENTO
- PARA PLEGAR EL CARRITO
- GUARDABARROS
- BABY TREND® SERVICIO AL CLIENTE
Brand : Baby Trend
Model : Navigator Lite Double
Category : Stroller