
Persee 2 - 3D Printer Orbbec - Free user manual and instructions
Find the device manual for free Persee 2 Orbbec in PDF.


| Product Type | FDM 3D Printer |
| Brand | Orbbec |
| Model | Persee 2 |
| Build Volume | 220 x 220 x 250 mm |
| Layer Resolution | 0.05 - 0.3 mm |
| Nozzle Diameter | 0.4 mm |
| Filament Diameter | 1.75 mm |
| Supported Materials | PLA, ABS, PETG, TPU |
| Print Speed | Up to 150 mm/s |
| Heated Bed | Yes, up to 100°C |
| Auto Leveling | Yes |
| Display | 4.3-inch Touch Screen |
| Connectivity | USB, SD Card, Wi-Fi |
| Power Supply | 24V DC, 3A |
| Power Consumption | 72 W |
| Dimensions (W x D x H) | 440 x 410 x 490 mm |
| Weight | 8.5 kg |
| Frame | Aluminum alloy, semi-enclosed |
| Print Resume | Yes, power loss recovery |
| Filament Sensor | Yes, runout detection |
| Noise Level | < 50 dB |
| Operating Temperature | 15 - 35°C |
| Safety Features | Thermal runaway protection, overheat shutdown |
| Maintenance | Clean nozzle with needle, lubricate linear rails, tighten belts |
| Spare Parts Available | Nozzle kit, hotend assembly, build plate, extruder gear |
Frequently Asked Questions - Persee 2 Orbbec
User questions about Persee 2 Orbbec
0 question about this device. Answer the ones you know or ask your own.
Ask a new question about this device
Download the instructions for your 3D Printer in PDF format for free! Find your manual Persee 2 - Orbbec and take your electronic device back in hand. On this page are published all the documents necessary for the use of your device. Persee 2 by Orbbec.
USER MANUAL Persee 2 Orbbec
With System Installation Guide
| Product Information | 02 |
| Preparation for System Installation | 04 |
| System Download | 05 |
| Accessing Android Storage from Computer | 05 |
| Packing List | 06 |
| Product Certifications | 06 |

natural_image
Front view of a black rectangular device with three circular buttons and a white base (no visible text or symbols)1. Product Information
1.1 Front View

natural_image
Front view of a black rectangular electronic device with three circular lens indicators (no text or symbols visible)1.2 Rear View
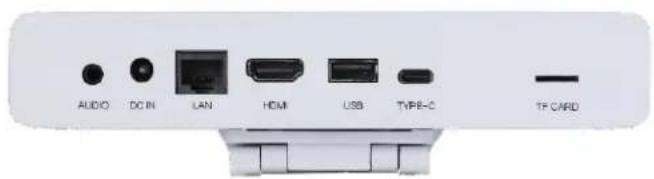
1.3 Bottom View (with Stand)

natural_image
Close-up of a white electronic device with a black rectangular component and three metallic pins (no visible text or symbols)1.4 Bottom View (without Stand)

natural_image
Simple diagram with a central gold coin and vertical striped pattern, no text or symbols present1.5 Specifications
| Parameter Specifications | |
| Range 0.2-10m | |
| Depth Resolution Framerate | Up to 1280x800@30FPS: 640x400@60fps |
| RGB Resolution Framerate | Up to 1280x800@30FPS; 1280x720@60fps |
| Depth FOV H91°, V66° | |
| RGB FOV | 16:10: H93°, V68°16:9: H93°, V61° |
| USB | USB 2.0 Type-C, USB 2.0 Type-A |
| Operating System Android 9.0/ Ubuntu 18.04 | |
| Power Power Adapter (12V/2A) | |
| Operating Temperature | *0°C ~ 35°C*Metal shell of the ports on the back of the camera should not exceed 55 °C |
| Rating Class 1 Laser Product | |
| SDK Orbbec SDK | |
| Processor Amlogic A31D | Quad Core A73+ Dual Core A53 with NPU |
| RAM 4GB | |
| Storage 32GB eMMC | |
| Micro SD | Up to 128GB |
| HDMI | HDMI 2.0 |
| Wifi/BT | 802.11a/b/g/n/ac, Bluetooth 5.0 |
| Ethernet | RJ45 Gigabit Ethernet |
| Microphone | 4 Microphone Linear Microphone Array |
| Remote Infrared | |
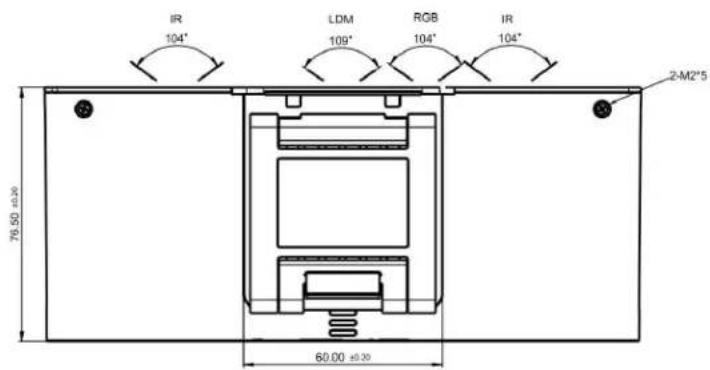
| Dimensions (W*H*D) | 180mm x 45mm x 76.5mm |
| Weight | 352g |
1.6 Hardware Interfaces 1.7 Product Dimensions


| 1 | Orbbec Gemini 2 L |
| 2 Air Vents | |
| 3 Microphone Array | |
| 4 3.5mm Audio Output (with Update Buttons) | |
| 5 DC-IN (12V Input) | |
| 6 Gigabit Ethernet | |
| 7 HDMI Out | |
| 8 USB 2.0 | |
| 9 USB 2.0 Type C (Debug and Firmware Update) | |
| 10 Removable Mount | |
| 11 MicroSD Expansion Slot | |
2. Preparation for System Installation
2.1 Installation Guide for Android/Ubuntu System
Configuration Requirements for Computers
a. Windows operating system
b. Turning off antivirus software may be required
c. High-speed USB 2.0 or USB 3.0 interface
d. USB Burn Tool installed
Click to Download USB Burning Tool
2.2 Installation Procedure
a. Open the software "USB Burn Tool V2.2.x"
b. Long press the update button (inside the 3.5mm headphone jack)
c. While holding the button, use a USB cable to connect the camera to the computer

d. USB Burning Tool successfully connected to camera

e. Import System Image (x.img)
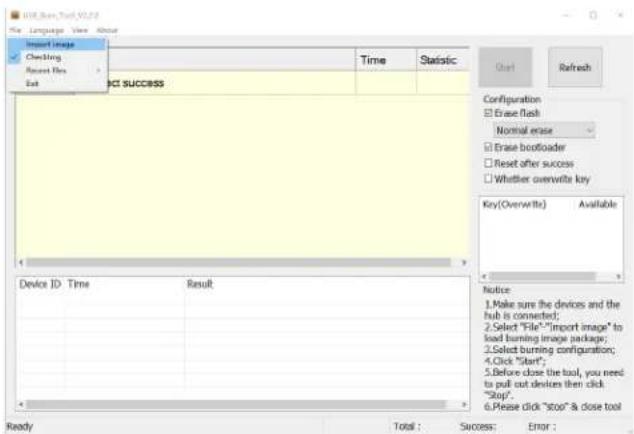
f. Click the start button to start the update process

g. Complete system installation, click the stop button then close the software
![USB Bus Tool V3.20 File Language View About Device ID Status Time Statistic HUB1-11 100% Burning successfully 3:25 0/1 Device ID Time Result HUB1-11 2020-03-06 10:11:00 971 [6x0000000] Burning successfully Stop Refresh Configuration • Erase flash Normal case • Erase bootloader Reset after success • Whether overwrite key Key(Overwrite) Available Notice: 1. Make sure the devices and the hub is connected; 2. Select "File" "Import Image" to load burning image package; 3. Select burning configuration; 4. Click "Start"; 5. Before close the tool, you need to pull out devices then click "Stop"; 6. Please click "stop" & dose tool E:\10_奥比中光\08 开关锁项目\03_A31ID_文档\02_A31ID 开关锁帮助字: L,990,157 KB Total: 1 Success: 1 Error: 0](/content/2026/05/986566/images/333c31d1ba1e80772d2193811260475204b3ce4913a2850b2a25d194d87f2792.jpg)
h. Ubuntu 18.04 Login Information
The default username of the system is 'orbbec', default password: 'orbbec'
3. System Download
Android:
Click to Download Latest Android System Image
Ubuntu
Click to Download Latest Ubuntu System Image
4. Accessing Android Storage from Computer
On Persee 2:
- Connect to the computer via USB Type-C
- Go to Settings, 'Device Preferences' – 'About' – 'Build'
- Click on 'Build' multiple times until a message indicates the 'Developer Options' setting is available
- Go back to 'Device Preferences' and select 'Developer Options'
- Scroll down to find 'USB Configuration' under 'Networking'
- Select MTP (media transfer protocol)
On Computer:
- Go to Device Manager
- Right click on the device if driver is not already installed and select Update Driver
- Click on 'Browse my computer for drivers', then 'Let me pick from a list of available drivers on my computer'
- Select 'Portable Devices' as shown below
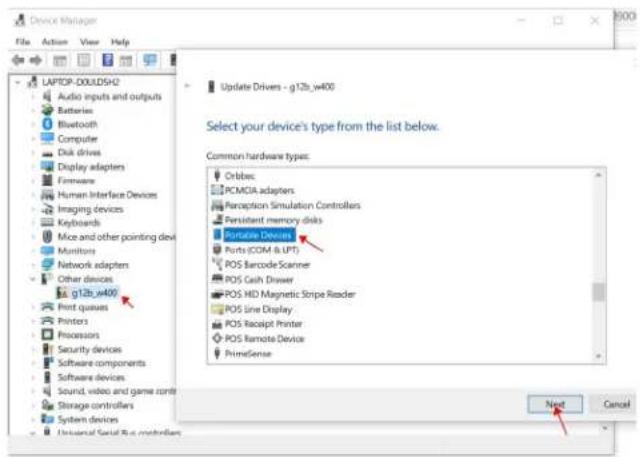
- Select 'MTP USB Device, and click next to install
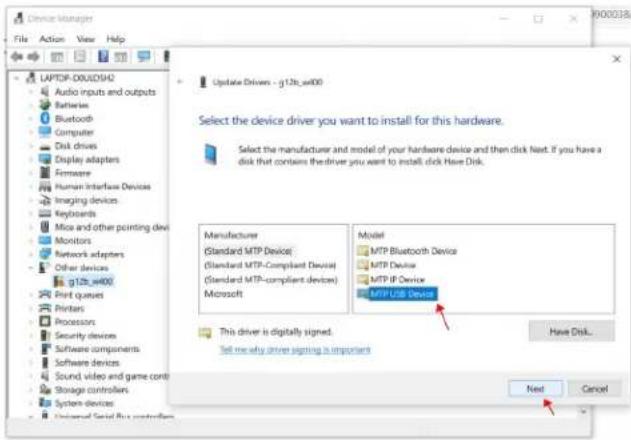
• The Persee 2 drive should now be visible in File Explorer
5. Packing List
- Persee 2 × 1
- Infrared Remote x 1
- Power Adapter x 1
- HDMI Cable x 1
6. Product Certifications
| Certifications | Availability | Comments | |
| FCC ID YES | |||
| TELEC YES | |||
| CE YES | |||
| PSE YES | |||
| RoHS YES | |||
| Laser Safety YES Class 1 | |||

natural_image
Abstract pattern of blue circles arranged in a symmetrical radial shape (no text or symbols)ORBBEC
Copyright 2023 Orbbec Inc. All rights reserved. The product described may contain defects or errors or deviation from published specifications. Contact your sales representative to obtain the latest Orbbec 3D product specifications. Orbbec is not responsible for any users infringing on third party copyright or other rights in use of Orbbec products. In addition, Orbbec does not assume any liability for damages or any losses resulting from the use of this product. All information provided here is subject to change without notice.

- With System Installation Guide
- Product Information
- Preparation for System Installation
- Installation Guide for Android/Ubuntu System
- Configuration Requirements for Computers
- Installation Procedure
- System Download
- Android:
- Ubuntu
- Accessing Android Storage from Computer
- On Persee 2:
- On Computer:
- Packing List
- Product Certifications
- ORBBEC
Brand : Orbbec
Model : Persee 2
Category : 3D Printer