
Elvis 15.2XLA - Loudspeaker ALTO - Free user manual and instructions
Find the device manual for free Elvis 15.2XLA ALTO in PDF.


| Product Type | Powered PA Speaker System |
| Model | Elvis 15.2XLA |
| Brand | Alto |
| Woofer Size | 15 inches |
| System Type | 2-way active |
| Amplifier Class | Class-D |
| Power Output (Peak) | 800 W |
| Power Output (RMS) | 400 W |
| Frequency Response | 45 Hz – 20 kHz |
| Maximum SPL | 126 dB |
| Inputs | 2x XLR combo, 1x 1/4" TRS, 1x RCA |
| Outputs | 1x XLR link output |
| Controls | Volume, EQ (bass/treble), ground lift |
| Power Supply | AC 100-240V, 50/60 Hz |
| Dimensions (H x W x D) | 28.3 x 18.5 x 16.3 inches (72 x 47 x 41 cm) |
| Weight | 74.5 lbs (33.8 kg) |
| Enclosure Material | Plywood with black carpet |
| Mounting | Stand mount socket (1.38" / 35 mm) |
| Protection Features | Overload, thermal, limiter |
| Included Accessories | Power cord, user manual |
Frequently Asked Questions - Elvis 15.2XLA ALTO
User questions about Elvis 15.2XLA ALTO
0 question about this device. Answer the ones you know or ask your own.
Ask a new question about this device
Download the instructions for your Loudspeaker in PDF format for free! Find your manual Elvis 15.2XLA - ALTO and take your electronic device back in hand. On this page are published all the documents necessary for the use of your device. Elvis 15.2XLA by ALTO.
USER MANUAL Elvis 15.2XLA ALTO
ELVIS 15.2XL/15.2XLA SPEAKER ENCLOSURES PASSIVE AND ACTIVE MODELS

natural_image
Close-up of a speaker tower with three speakers and two speakers, no visible text or symbols
CAUTION
RISK OF ELECTRIC SHOCK DO NOT OPEN

TO REDUCE THE RISK OF ELECTRIC SHOCK PLEASE DO NOT REMOVE THE COVER OR THE BACK PANEL OF THIS EQUIPMENT. THERE ARE NO PARTS NEEDED BY USER INSIDE THE EQUIPMENT. FOR SERVICE, PLEASE CONTACT QUALIFIED SERVICE CENTERS.

This symbol, wherever used, alerts you to the presence of un-insulated and dangerous voltages in the product enclosure. These are voltages that be sufficient to constitute the risk of electric risk or death.

This symbol, wherever used, alerts you to important operating and maintenance instructions.
Please read.
⊕ Protective Ground Terminal
\~ AC mains (Alternating Current)
Hazardous Live Terminal
ON: Denotes the product is turned on.
OFF: Denotes the product is turned off.
CAUTION
Describes precautions that should be observed to prevent damage to the product.
-
Read this Manual carefully before operation.
-
Keep this Manual in a safe place.
-
Be aware of all warnings reported with this symbol.
-
Keep this Equipment away from water and moisture.
-
Clean it only with dry cloth. Do not use solvent or other chemicals.
-
Do not damp or cover any cooling opening. Install the equipment only in accordance with the Manufacturer's instructions.
-
Power Cords are designed for your safety. Do not remove Ground connections! If the plug does not fit your AC outlet, seek advice from a qualified electrician. Protect the power cord and plug from any physical stress to avoid risk of electric shock. Do not place heavy objects on the power cord. This could cause electric shock or fire.
-
Unplug this equipment when unused for long periods of time or during a storm.
-
Refer all service to qualified service personnel only. Do not perform any servicing other than those instructions contained within the User's Manual.
-
To prevent fire and damage to the product, use only the recommended fuse type as indicated in this manual. Do not short-circuit the fuse holder. Before replacing the fuse, make sure that the product is OFF and disconnected from the AC outlet.
WARNING
To reduce the risk of electric shock and fire, do not expose this equipment to moisture or rain.

Dispose of this product should not be placed in municipal and should be separate collection.
- Move this Equipment only with a cart, stand, tripod, or bracket,
specified by the manufacturer, or sold with the Equipment. When a cart is used, use caution when moving the cart / equipment combination to avoid possible injury from tip-over

natural_image
Symbolic icon of a person pushing a large rectangular block, enclosed in a circular frame with no text or symbols.- Permanent hearing loss may be caused by exposure to \ extremely high noise levels. The US. Government's Occupational Safety and Health Administration (OSHA) has specified the permissible exposure to noise level.
These are shown in the following chart:
| HOURS X DAY | SPL | EXAMPLE |
| 8 | 90 | Small gig |
| 6 | 92 | train |
| 4 | 95 | Subway train |
| 3 | 97 | High level desktop monitors |
| 2 | 100 | Classic music concert |
| 1,5 | 102 | |
| 1 | 105 | |
| 0,5 | 110 |
0,25 or less 115 Rock concert
According to OSHA, an exposure to high SPL in excess of these limits may result in the loss of heat. To avoid the potential damage of heat, it is recommended that Personnel exposed to equipment capable of generating high SPL use hearing protection while such equipment is under operation.
The apparatus shall be connected to a mains socket outlet with a protective earthing connection.
The mains plug or an appliance coupler is used as the disconnect device, the disconnect device shall remain readily operable.
IN THIS MANUAL:
- INTRODUCTION....1
- QUICK START - PASSIVE/ACTIVE SPEAKER CABINET ....2
-. PASSIVE FULL-RANGE Speaker for ELVIS 15.2XL
-. Active FULL-RANGE Speaker for ELVIS15.2XLA
-
CONNECTION PLATE 9
-
PASSIVE FULL-RANGE Speaker for ELVIS 15.2XL
-. Active FULL-RANGE Speaker for ELVIS15.2XLA -
WIRE CONNECTIONS....10
- TECHNICAL SPECIFICATION....12
- WARRANTY....13
1. INTRODUCTION
Thank you for your purchasing one of our ELVIS speaker enclosures. It is just one of the many Alto products that a talented, multinational Team of Audio Engineers and Musicians have developed with their great passion for music. We design all our transducers and cabinets in Emilia-Romagna of Italy, a lowland famous for music and fast cars. In fact, Lamborghini, Maserati and Ferrari are made just a few miles away from our design centers. The same area has a long tradition in designing and manufacturing some of the world's best professional transducers. Your ELVIS speaker cabinet is capable of very high sound pressure level and it has been created to give you a performance that is better than any loudspeaker in this range. They are flexible in their passive and active configurations and can be used with single and multiple subwoofers.
Enjoy your ELVIS speaker and make sure to read this Manual carefully before operation!
Passive, Full-range, two speakers. This is the simplest set-up. You just need a mixer and a stereo amplifier. It is good for small club gigs, disco, etc.
Make all initial connections with all the equipment powered off, and ensure that all the main volume controls are turned down completely.
1). Connect one side of the speaker cable to the Output CHA/CHB or Binding Post of your stereo power amplifier and the other side to the Input socket of your Elvis speaker cabinet.
2). Complete other connections as illustrated.
3). Turn on your mixer first, then the stereo power amplifier.
4). Turn up the volume controls of your amplifier to about 70%.
5). Use PFL function to get the proper input level for the mixer, and adjust the Main Mix Level control to manipulate the output level.
6). After use, turn off your stereo power amplifier first, then the mixer.

flowchart
graph TD
    A["Speaker Tower 1"] --> B["STEREO AMPLIFIER"]
    C["Speaker Tower 2"] --> B
    B --> D["Mixer"]
    B --> E["Mixer"]

2. QUICK START - PASSIVE SPEAKER CABINET
If you use a powered mixer for the passive speakers, it is no need to use an amplifier. make sure all the main volume controls of your power mixer are turned down completely.
1). Connect one side of the speaker cable to the SPEAKER OUT of your powered mixer and the other side to the Input socket of your Elvis speaker cabinet.
2). Use PFL function to get the proper input level for the mixer, and adjust the Main Mix Level control to manipulate the output level.
3). After use, turn down of the Main Mix Level control first, then turn off the powered mixer.
Passive, Full-range, four speakers. It is similar to the first set-up but four speakers are connected instead of two.
1). Follow the same steps as described above.
2). Connect the THROUGH socket of the first Elvis cabinet to the INPUT socket of the second Elvis cabinet.
NOTE: Every time you connect Elvis cabinets this way your parallel them to the output of the amplifier that will read half of the impedance of one speaker.

flowchart
graph TD
    A["Speaker 1"] -->|INPUT| B["STEREO AMPLIFIER"]
    C["Speaker 2"] -->|INPUT| B
    D["Speaker 3"] -->|INPUT| B
    E["Speaker 4"] -->|INPUT| B
    F["Speaker 5"] -->|INPUT| B
    G["Mixer"] -->|OUTPUT| B
    style A fill:#f9f,stroke:#333
    style C fill:#f9f,stroke:#333
    style D fill:#f9f,stroke:#333
    style E fill:#f9f,stroke:#333
    style F fill:#f9f,stroke:#333
    style G fill:#ccf,stroke:#333
Passive two subwoofers and two satellite speakers. With this example, the stereo amplifier drives both the subwoofers and the satellites. In this case we do not call them full-range anymore because they receive a signal from the subwoofer that is already xovered at 125 Hz. In this way, the high energetic content of the low frequencies is limited to the subwoofer and the satellite's woofer act like a mid-woofer.
1). Connect one side of speaker cable to the Output CHA/CHB or Binding Post of your stereo power amplifier and the other side to the Input socket of your subwoofer, with the second speaker cable connect the Output of the sub-woofer to the Input of satellite.
2). Complete other connections as illustrated.
3). Turn on your mixer first, then the stereo power amplifier.
4). Turn up the volume controls of your amplifier to about 70%.
5). Use PFL function to get the proper input level for the mixer, and adjust the Main Mix Level control to manipulate the output level.
6). After use, turn off your stereo power amplifier first, then the mixer.

flowchart
graph TD
    A["ELVIS SUBWOOFER"] -->|INPUT| B["STEREO AMPLIFIER"]
    C["ELVIS SUBWOOFER"] -->|OUTPUT| B
    B -->|INPUT| D["MIXER"]
    B -->|OUTPUT| E["ELVIS SUBWOOFER"]
    style A fill:#f9f,stroke:#333
    style C fill:#f9f,stroke:#333
    style B fill:#ccf,stroke:#333
    style D fill:#ccf,stroke:#333
    style E fill:#ccf,stroke:#333
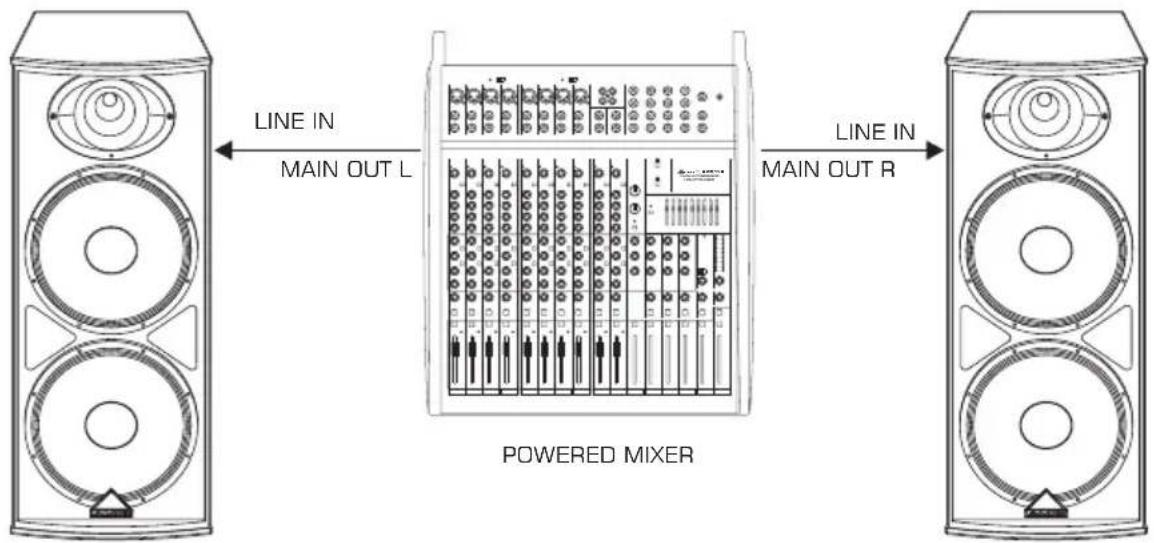
Active, Full-range, two speakers. It is similar to the passive example but you do not need a power amplifier in between the mixer and the 2 ELVIS speakers. Make all initial connections with all the equipment powered off, and ensure that all the main volume controls are turned down completely.
1). Connect one side of the signal cable at your mixer into the Main Output Left / Right (with 1/4"Jack or XLR) and the other side of the cable in to the Line Input (COMBO) of your ELVIS active speaker cabinet (with 1/4"Jack or XLR).
2). Connect the power cord to mains.
3). Turn ON your mixer first, then the ELVIS cabinets.
4). Turn up the volume control of the ELVIS cabinets.
5). Use PFL function to get the proper input level for the mixer, and adjust the Main Mix Level control to reach the desired output level.
6). After use, turn off your active speaker cabinets first, then the mixer.

flowchart
graph LR
    A["Speaker Tower 1"] -->|LINE IN MAIN OUT L| B["Mixer"]
    B -->|LINE IN MAIN OUT R| C["Speaker Tower 2"]
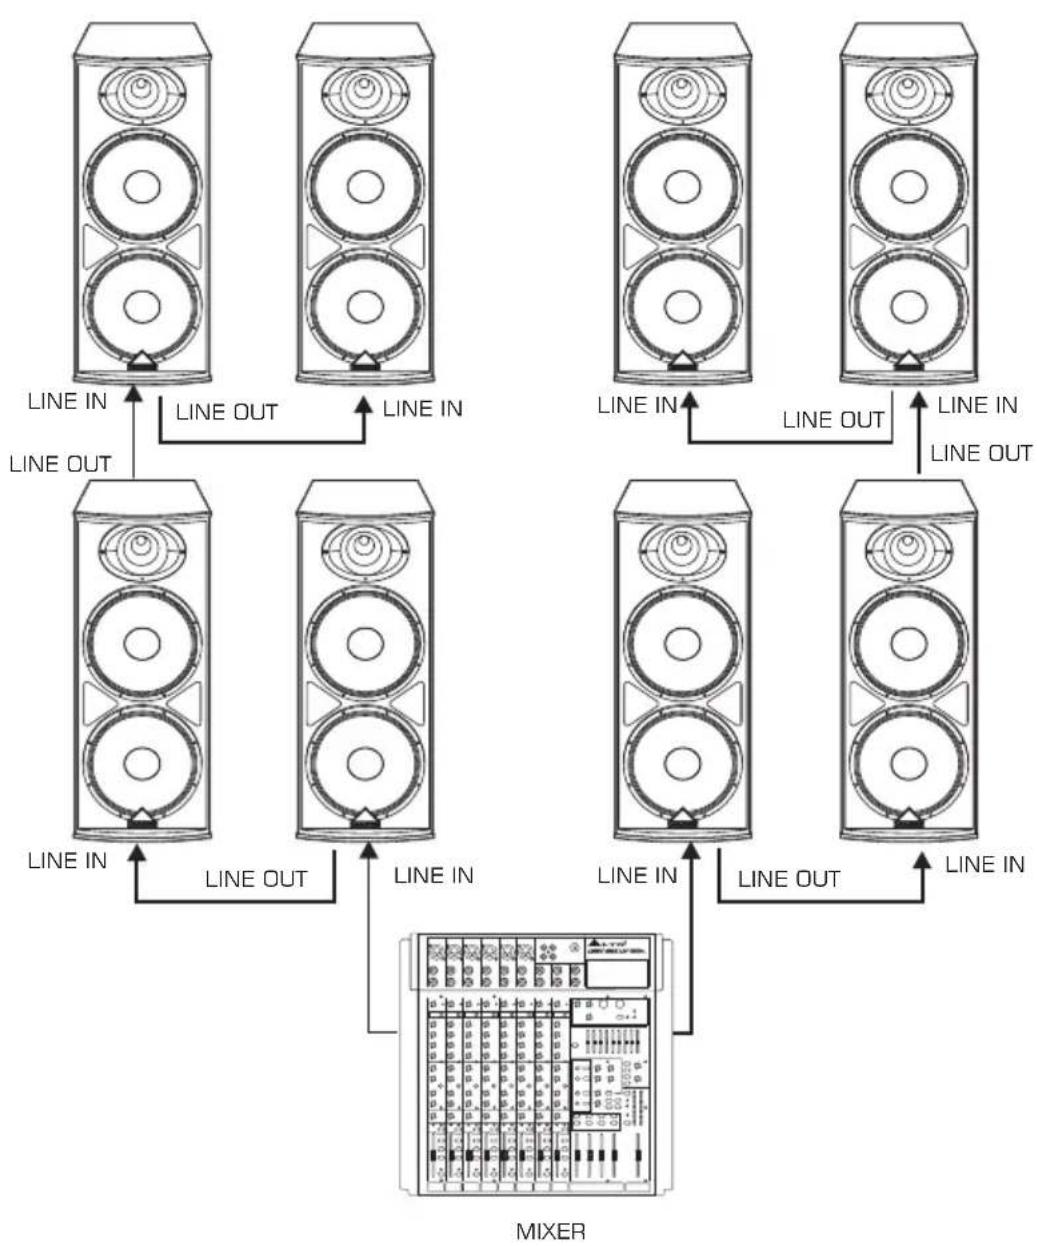
Active, Full-range, multiple speakers. This solution is particularly flexible when you have a large stage and for fixed installations where you want to send the same signal to different zones like in a Bar, Pub, Restaurant, Church, etc. Each ELVIS cabinet has its own volume control so you can adjust different volumes in different zones.
1). Follow the above steps connecting the MAIN OUTPUTS of the mixer to the LINE INPUTS of 2 Elvis active cabinets.
2). Connect the LINE OUT socket of the first ELVIS cabinet to the LINE IN socket of the subsequent piece. You can connect as many speakers as you wish in this way.
flowchart
graph TD
    A["Speaker Tower 1"] -->|LINE IN| B["Mixer"]
    C["Speaker Tower 2"] -->|LINE OUT| B
    D["Speaker Tower 3"] -->|LINE IN| B
    E["Speaker Tower 4"] -->|LINE OUT| B
    F["Speaker Tower 5"] -->|LINE IN| B
    G["Speaker Tower 6"] -->|LINE OUT| B
    H["Speaker Tower 7"] -->|LINE IN| B
    I["Speaker Tower 8"] -->|LINE OUT| B
    J["Speaker Tower 9"] -->|LINE IN| B
    K["Speaker Tower 10"] -->|LINE OUT| B
    L["Speaker Tower 11"] -->|LINE IN| B
    M["Speaker Tower 12"] -->|LINE OUT| B
    N["Speaker Tower 13"] -->|LINE IN| B
    O["Speaker Tower 14"] -->|LINE OUT| B
    P["Speaker Tower 15"] -->|LINE IN| B
    Q["Speaker Tower 16"] -->|LINE OUT| B
    R["Speaker Tower 17"] -->|LINE IN| B
    S["Speaker Tower 18"] -->|LINE OUT| B
    T["Speaker Tower 19"] -->|LINE IN| B
    U["Speaker Tower 20"] -->|LINE OUT| B
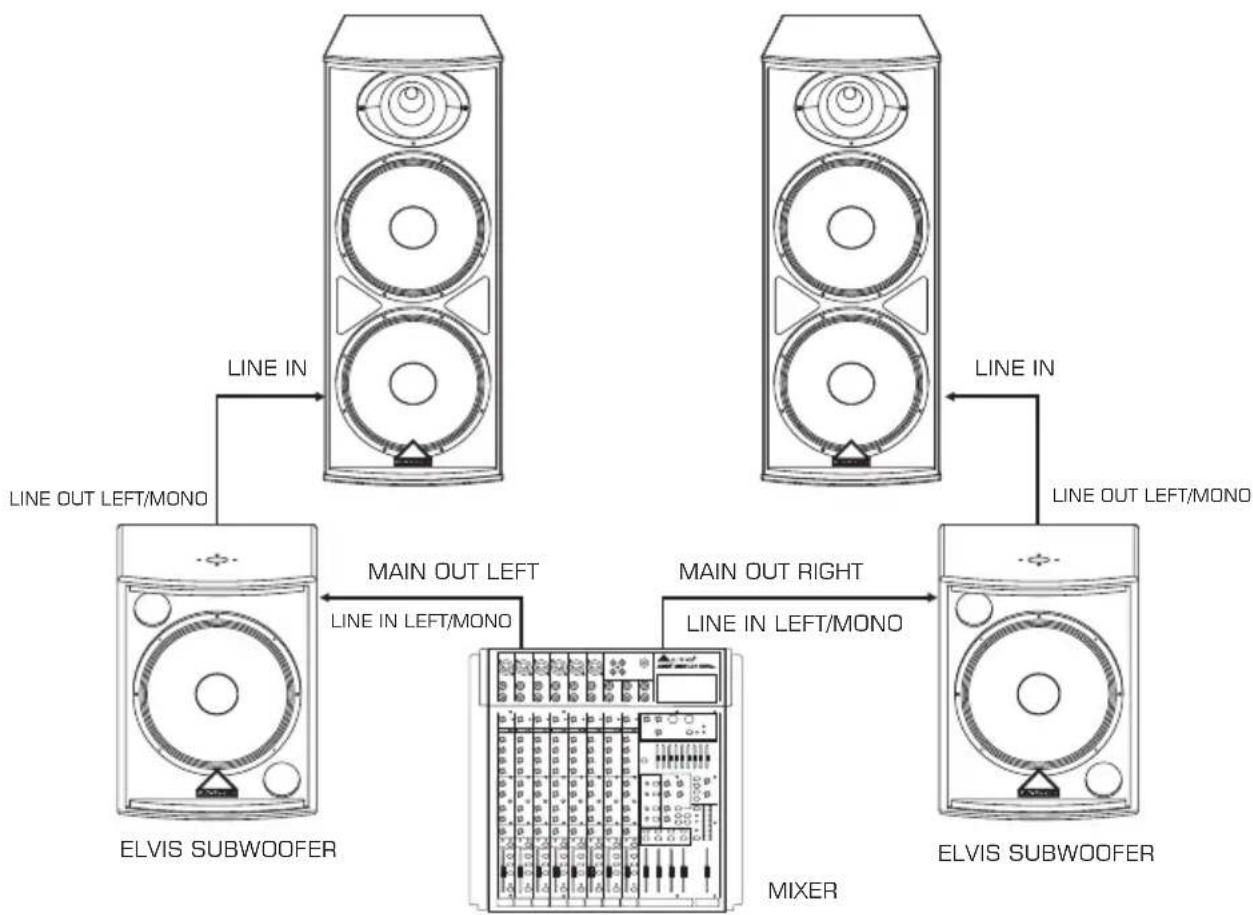
Active, two satellite speakers & two subwoofers. In this example, the mixer is connected to the ELVIS subwoofers and then a 125 Hz xovered line signal is sent to the respective satellites. In this way, the high energetic content of the low frequencies is limited to the subwoofer and the satellite's woofer act like a mid-woofer. As a consequence the satellites built-in amplifier is not stressed by low frequency content.
1). Connect one side of signal cable at your mixer into Main Output Left / Right (with 1/4" Jack or XLR) and the other side of the cable into the Left / Mono Input (COMBO) of the ELVIS active subwoofers; with the second signal cable connect the Left/Mono Line Output of the subwoofer (Stereo / Mono-Jack or XLR) to the Line input (COMBO) of the active satellite (with Stereo - Jack or XLR).
2). Connect the power cord to mains.
3). Turn on your mixer first, then the active speaker cabinets.
4). Turn up the volume control of the active speaker cabinets.
5). Use PFL function to get the proper input level for the mixer, and adjust the Main Mix Level control to manipulate the output level.
6). After use, turn off your active speaker cabinets first, then the mixer.
flowchart
graph TD
    A["ELVIS SUBWOOFER"] -->|LINE IN| B["ELVIS SubWOOFER"]
    B -->|LINE OUT LEFT/MONO| A
    B -->|LINE IN| C["MIXER"]
    C -->|MAIN OUT LEFT LINE IN LEFT/MONO| A
    C -->|MAIN OUT RIGHT LINE IN LEFT/MONO| B
    B -->|LINE OUT LEFT/MONO| A
-. PASSIVE FULL-RANGE: ELVIS15.2XL
1). INPUT: Receive the signal coming from an external power amplifier. (SPK +1/-1 connected; +2/-2 not connected).
2). THRU: Direct LINK to connect in parallel a second speaker cabinet (SPK +1/-1 connected; +2/-2 not connected).
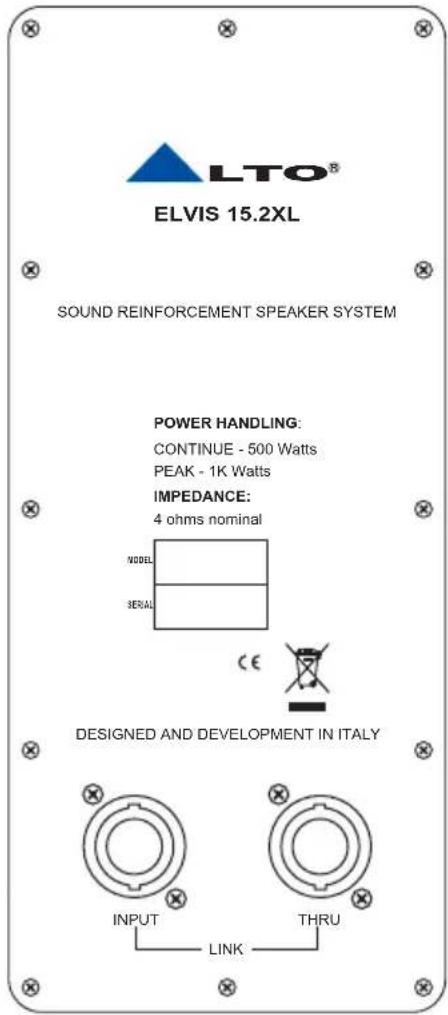
ACTIVE FULL- RANGE: ELVIS15.2XLA
1). ON/OFF switch.
2). Input AC power socket
3). VOLUMEver amplifier control.
4). LINE OUT at + 4dB on XLR connector
5). LINE IN at + 4dB on COMBO connector.
6). Groutal lift
7). POWER, green LED, indicate ON status.
8). SIGN/COMP, signal/compressor, Green / red LED

-. For Passive Speaker Cabinets
Please only use the power connectors to make connections with other signal source equipment for the passive speaker cabinets. The power connector has four terminals: 1+, 1-, 2+, 2-.

In our cabinets, only 1+/1- are used to connect the Speaker+/Speaker-, and 2+/2- are not used.
-. For Active Speaker Cabinets
As to these circumstances, audio connections is mostly intended for the signal flow, so, determine the wire configuration according to your real application system and its connecting facility. Normally, you have the following choices:
- Balanced


flowchart
graph TD
    A["Tip"] --> B["Ring"]
    C["Sleeve"] --> D["1"]
    C --> E["2"]
    C --> F["3"]
    G["Tip"] --> H["Ring"]
    I["Sleeve"] --> J["1"]
    I --> K["2"]
    I --> L["3"]
    M["Tip"] --> N["Ring"]
    O["Sleeve"] --> P["1"]
    O --> Q["2"]
    O --> R["3"]
- Unbalanced

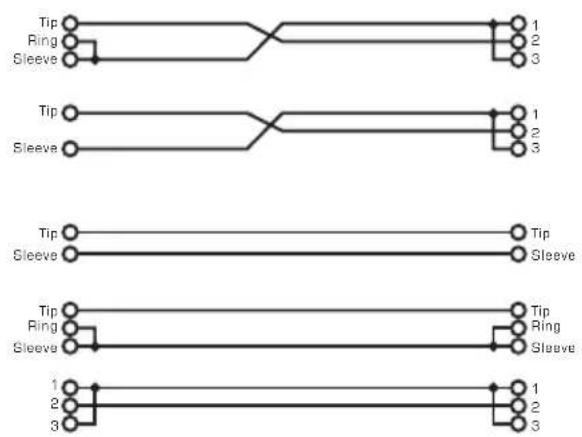
flowchart
graph TD
    A["Tip"] --> B["Ring"]
    A --> C["Sleeve"]
    D["Tip"] --> E["Ring"]
    D --> F["Sleeve"]
    G["Tip"] --> H["Ring"]
    G --> I["Sleeve"]
    J["1"] --> K["2"]
    J --> L["3"]
    M["1"] --> N["2"]
    M --> O["3"]
    P["1"] --> Q["2"]
    P --> R["3"]
5. TECHNICAL SPECIFICATION
| Model No. | ELVIS15.2XL |
| System Type | 3-Way Vented Box |
| Continuous Power | 500 W AES Standard |
| Peak Power Rating | 1000 W Peak |
| Sensitivity (1W, 1m) | 101 dB/122 dB Max |
| Frequency Response | 55 Hz /20 kHz +/-6 dB |
| Impedance | 4 Nominal |
| Crossover Frequency | 2200 Hz 12 dB/oct |
| Protection | Electronics High Frequencies Protection |
| Low-Frequency | 2*15"/385 mm Woofer |
| High-Frequency | 1" Compression Driver |
| Spherical Wave Guide | Custom Horn with Polypropilene Reinforced |
| Horn Coverage | 80 H 80xV |
| Connectors (+1/-1) | 2 x SPK4 Input/Link @+1/-1 Connected - +2/-2 not connected |
| Enclosure | Trapezoidal Cabinet in 18 mm Particle Board P.B. -Covered with Resistant Carpet -Black Metal Grille Protection |
| Dimensions (H x W x D) | 1114 452 449 mm |
| Net Weight (lbs/kg) | 93.92 lbs/42.60 kg |
| Volume | 11.91CFT |
| Model No. | ELVIS15.2XLA |
| Active System Type | 2-Way Bi-Amp |
| Low Output Power | 350 Watt EIAJ |
| High Output Power | 65 Watt EIAJ |
| Max SPL 1mt | 122 dB SPL Calculated |
| Frequency Response | 55 Hz-20 kHz at -10 dB |
| Protection Low - High | Analog Limiter |
| Low Frequency Device | 2 x 15" woofer/2.5" Voice Coil |
| High Frequency Device | 1" Driver/1" Voice Coil |
| Coverage (H"x V) | 80 ° H x 80 ° V Spherical Wave Guide |
| Input Sensitivity | Line +4 dB |
| Input Impedance | 30 kohms Balanced/15 kohms Unbalanced |
| Connectors | Input with Combo/Link with XLR |
| Enclosure | Trapezoidal Shape/Particle Board/Plastic Handle/Gray Carpet Finishing |
| External Control | Line Volume/Clipping LED indicator/Ground Switch |
| Dimensions (H x W x D) | 1114 x 452 x 449 (mm) |
| Net Weight (lbs/kg) | 97.89 lbs/44.4 kg |
| Power Section | |
| Output Power | 350 WATT EIAJ (300WATT RMS) |
| Impedance | 4 Load |
| S/N ratio | >110 dB/A |
| Distortion | <0.05% (THD, DIM, SMPTE) |
| Gain | 32 dB |
| Bandwidth | 10 Hz to 50 kHz |
| Protections | Overload/Short Circuit/Soft Clip Limiter/Thermal Protection/Fan Cooling |
6. WARRANTY
1. WARRANTY REGISTRATION CARD
To obtain Warranty Service, the buyer should first fill out and return the enclosed Warranty Registration Card within 10 days of the Purchase Date.
All the information presented in this Warranty Registration Card gives the manufacturer a better understanding of the sales status, so as to provide a more effective and efficient after-sales warranty service. Please fill out all the information carefully and genuinely, miswriting or absence of this card will void your warranty service.
2. RETURN NOTICE
2.1 In case of return for any warranty service, please make sure that the product is well packed in its original shipping carton, and it can protect your unit from any other extra damage.
2.2 Please provide a copy of your sales receipt or other proof of purchase with the returned machine, and give detail information about your return address and contact telephone number.
2.3 A brief description of the defect will be appreciated.
2.4 Please prepay all the costs involved in the return shipping, handling and insurance.
3. TERMS AND CONDITIONS
3.1 warrants that this product will be free from any defects in materials and/or workmanship for a period of 1 year from the purchase date if you have completed the Warranty Registration Card in time.
3.2 The warranty service is only available to the original consumer, who purchased this product directly from the retail dealer, and it can not be transferred.
3.3 During the warranty service, may repair or replace this product at its own option at no charge to you for parts or for labor in accordance with the right side of this limited warranty.
3.4 This warranty does not apply to the damages to this product that occurred as the following conditions:
- Instead of operating in accordance with the user's manual thoroughly, any abuse or misuse of this product.
• Normal tear and wear. - The product has been altered or modified in any way.
- Damage which may have been caused either directly or indirectly by another product / force / etc.
- Abnormal service or repairing by anyone other than the qualified personnel or technician.
And in such cases, all the expenses will be charged to the buyer.
3.5 In no event shall be liable for any incidental or consequential damages. Some states do not allow the exclusion or limitation of incidental or consequential damages, so the above exclusion or limitation may not apply to you.
3.6 This warranty gives you the specific rights, and these rights are compatible with the state laws, you may also have other statutory rights that may vary from state to state.
SEIKAKU TECHNICAL GROUP LIMITED
NO. 1, Lane 17, Sec. 2, Han Shi West Road, Taichung 40151, Taiwan
http://www.altoproaudio.com Tel: 886-4-22313737
email: alto@altoproaudio.com Fax: 886-4-22346757
All rights reserved to ALTO. All features and content might be changed without prior notice. Any photocopy, translation, or reproduction of part of this manual without written permission is forbidden. Copyright 2007 Seikaku Group
- ELVIS 15.2XL/15.2XLA SPEAKER ENCLOSURES PASSIVE AND ACTIVE MODELS
- CAUTION
- WARNING
- IN THIS MANUAL:
- INTRODUCTION
- QUICK START - PASSIVE SPEAKER CABINET
- -. PASSIVE FULL-RANGE: ELVIS15.2XL
- ACTIVE FULL- RANGE: ELVIS15.2XLA
- -. For Passive Speaker Cabinets
- -. For Active Speaker Cabinets
- TECHNICAL SPECIFICATION
- WARRANTY
- WARRANTY REGISTRATION CARD
- RETURN NOTICE
- TERMS AND CONDITIONS
- SEIKAKU TECHNICAL GROUP LIMITED
Brand : ALTO
Model : Elvis 15.2XLA
Category : Loudspeaker