
HDI-TX-301-C-2G-E - AV Extender Crestron - Free user manual and instructions
Find the device manual for free HDI-TX-301-C-2G-E Crestron in PDF.


| Product Type | HDBaseT AV Extender Transmitter |
| Model | HDI-TX-301-C-2G-E |
| Brand | Crestron |
| Video Input | 3x HDMI (with one supporting USB and IR) |
| Video Output | 1x HDBaseT (RJ45) |
| Max Video Resolution | 4K@60Hz 4:4:4 (up to 18Gbps) |
| HDBaseT Distance | Up to 100m (328 ft) over CAT6a |
| HDCP Support | HDCP 2.3 |
| Audio Support | Pass-through up to 7.1 LPCM, Dolby TrueHD, DTS-HD MA |
| USB Extension | 1x USB HID (for keyboard/mouse) and 1x USB 2.0 for data |
| Control | IR, RS-232, and Ethernet pass-through |
| Power Supply | External 24V DC, 2.7A (included) |
| Power Consumption | 30W (typical) |
| Dimensions (W x D x H) | 8.1 x 5.3 x 1.7 in (206 x 135 x 43 mm) |
| Weight | 1.2 lbs (0.55 kg) |
| Mounting | Desk or under-table mount (brackets included) |
| Operating Temperature | 32°F to 104°F (0°C to 40°C) |
| Humidity | 10% to 90% (non-condensing) |
| Front Panel LEDs | Power, Link, Video, USB, IR |
| Care Instructions | Clean with a dry, soft cloth. Avoid solvents. |
| Safety Certifications | CE, FCC, UL |
| Included Accessories | Power supply, mounting brackets, IR emitter, 1x HDMI cable |
| Spare Parts Availability | Power supply and mounting kits available from Crestron |
Frequently Asked Questions - HDI-TX-301-C-2G-E Crestron
User questions about HDI-TX-301-C-2G-E Crestron
0 question about this device. Answer the ones you know or ask your own.
Ask a new question about this device
Download the instructions for your AV Extender in PDF format for free! Find your manual HDI-TX-301-C-2G-E - Crestron and take your electronic device back in hand. On this page are published all the documents necessary for the use of your device. HDI-TX-301-C-2G-E by Crestron.
USER MANUAL HDI-TX-301-C-2G-E Crestron
DM Lite Multiformat Switch and Transmitter, International
DO Install the Device
Install the device in a 2-gang European or UK electrical box (not included). A minimum mounting depth of 45 mm is required.
To install the device:
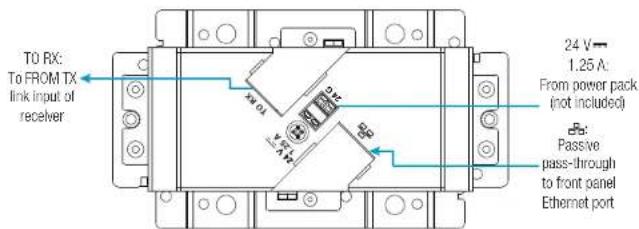
- On the rear of the device, make connections to the TO RX and Ethernet ports.
NOTES:
- For the 24 Vdc power connection, connect a power pack to either the transmitter or a compatible receiver. Do not connect a power pack to both devices simultaneously. Power is transmitted over the cable that connects the TO RX port on the transmitter to the FROM RX port on the receiver.
A power pack is not included with the transmitter. When the transmitter is used with a DM Lite surface-mount receiver, the transmitter receives power from the power pack that ships with and connects to the receiver. - Cabling that connects the TO RX port to the FROM TX port is designed for intrabuilding use only.
Rear View
-
Using a Phillips screwdriver, do either of the following:
-
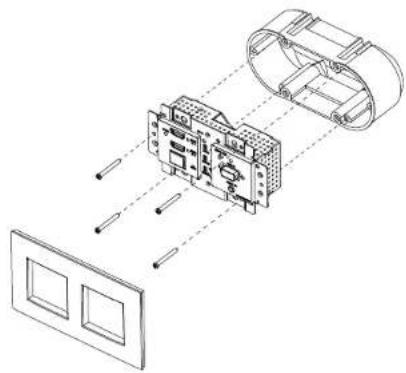
Attach the transmitter to a European electrical box using the four included M3 x 15 mm Phillips flat head screws.
-
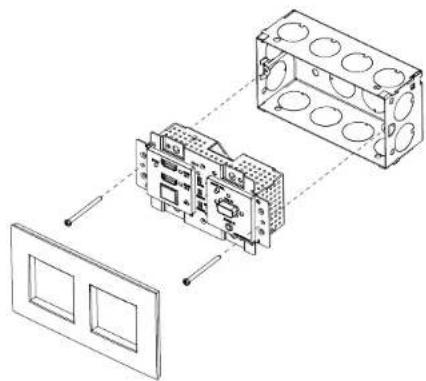
Attach the transmitter to a UK electrical box using the two included M3.5 x 30 mm Phillips flat head screws.
-
Position a Crestron decorator-style faceplate (sold separately) over the front panel of the transmitter, and then gently press down on the faceplate until it snaps into place.


Check the Box
QTY ITEM PART NUM.
| 4 Screw, M3 x 15 mm, Flat Head, Phillips* 2052287 | |
| 2 Screw, M3.5 x 30 mm, Flat Head, Phillips ↑ | 2052288 |
| *For installation into a European electrical box | |
| *For installation into a UK electrical box | |
Installation into a European Electrical Box
natural_image
Technical line drawing of a mechanical assembly with components and alignment lines (no text or symbols)Installation into a UK Electrical Box
natural_image
Isometric line drawing of a device assembly with housing, panel, and mounting bracket (no text or symbols)DO Connect the Device
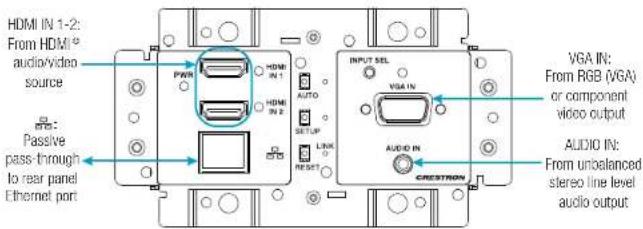
Connect the front of the device as required for the application.
Front View
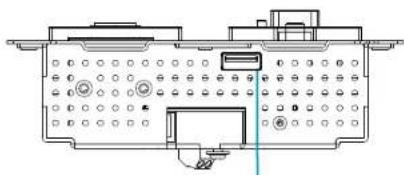
The SERVICE port, which is located on the bottom of the transmitter, is for factory use only.
Bottom View
natural_image
Technical line drawing of a mechanical or electronic component with no visible text, numbers, or symbols.SERVICE:
For factory
use only
DO Configure the Device
To configure the device, do either of the following:
- If the transmitter connects to an HD-RX-201-C-E, configure the transmitter using the web interface of the HD-RX-201-C-E. The HD-RX-201-C-E hosts the configuration of the transmitter.
To access the web interface, open a web browser and then go to the IP address of the HD-RX-201-C-E. By default, DHCP is enabled. To display the IP address on the connected HDMI ^4 display, press the SETUP button on the front panel of the HD-RX-201-C-E. Pressing the SETUP button on the transmitter will also display the IP address of the HD-RX-201-C-E.
To log in to the web interface, enter the user name and password. The default user name and password are both admin.
- If the transmitter does not connect to an HD-RX-201-C-E, refer to Answer ID 1000168 in the Online Help section of the Crestron website (www.crestron.com/onlinehelp) for configuration information.
NOTE: When the transmitter does not connect to the HD-RX-201-C-E, pressing the SETUP button on the transmitter has no effect.
DO Learn More
Visit the website for additional information and the latest firmware updates. To learn more about this product, use a QR reader application on your mobile device to scan the QR image.
Crestron Electronics
15 Volvo Drive, Rockleigh, NJ 07647
888.CRESTRON | www.crestron.com
HDMI

CE As of the date of manufacture, the product has been tested and found to comply with specifications for CE marking.
Federal Communications Commission (FCC) Compliance Statement
This device complies with part 15 of the FCC Rules. Operation is subject to the following two conditions:
(1) This device may not cause harmful interference, and (2) this device must accept any interference received, including interference that may cause undesired operation.
CAUTION: Changes or modifications not expressly approved by the manufacturer responsible for compliance could void the user's authority to operate the equipment.
NOTE: This equipment has been tested and found to comply with the limits for a Class B digital device, pursuant to part 15 of the FCC Rules. These limits are designed to provide reasonable protection against harmful interference in a residential installation. This equipment generates, uses and can radiate radio frequency energy and, if not installed and used in accordance with the instructions, may cause harmful interference to radio communications. However, there is no guarantee that interference will not occur in a particular installation.
If this equipment does cause harmful interference to radio or television reception, which can be determined by turning the equipment off and on, the user is encouraged to try to correct the interference by one or more of the following measures.
• Reorient or relocate the receiving antenna.
- Increase the separation between the equipment and receiver.
- Connect the equipment into an outlet on a circuit different from that to which the receiver is connected.
- Consult the dealer or an experienced radio/TV technician for help.
Industry Canada (IC) Compliance Statement
CAN ICES-3(B)/NMB-3(B)
The specific patients that never Cresiron products are listed at www.cresiron.com/legal/patients.
The product warranty can be found at www.credion.com/delegate-ex-laws-conlible-no-warranties.
Certain Crestman products contain open-source software. For specific information, visit www.crestman.com/spl@east-south-software
Crestron and the Crestron logo are either trademarks or registered trademarks of Crestron Electronics, Inc. in the United States and/or other countries. HDMI and the HDMI logo are either trademarks or registered trademarks of HDMI Licensing LLC in the United States and/or other countries. Other trademarks, registered trademarks, and trade names may be used in this document to refer to either the entities claiming the marks and names or their products. Crestron is a responsible for errors in typography or photography.
This document was written by the Technical Publication department at Creation
©2018 Creccan Electronics, Inc.
Brand : Crestron
Model : HDI-TX-301-C-2G-E
Category : AV Extender