B1 Basic - Binoculars Rexing - Free user manual and instructions
Find the device manual for free B1 Basic Rexing in PDF.


| Product Type | Binoculars |
| Brand | Rexing |
| Model | B1 Basic |
| Magnification | 10x |
| Objective Lens Diameter | 42 mm |
| Prism Type | Porro |
| Lens Coating | Fully multi-coated |
| Focus System | Central focus wheel |
| Field of View | 305 ft @ 1000 yds |
| Exit Pupil | 4.2 mm |
| Eye Relief | 17 mm |
| Interpupillary Distance | 56-74 mm |
| Near Focus | 13 ft |
| Dimensions (LxWxH) | 6.1 x 5.1 x 2.2 in (155 x 130 x 56 mm) |
| Weight | 22.9 oz (650 g) |
| Waterproof/Fogproof | Waterproof and fogproof |
| Power Source | None (optical) |
| Body Material | Rubber armored polycarbonate |
| Included Accessories | Carry case, neck strap, lens caps, cleaning cloth |
| Maintenance | Clean lenses with soft brush and microfiber cloth; store in dry place |
| Safety Precautions | Never look directly at the sun; keep away from children |
| Spare Parts Availability | Contact manufacturer or authorized dealer |
Frequently Asked Questions - B1 Basic Rexing
User questions about B1 Basic Rexing
0 question about this device. Answer the ones you know or ask your own.
Ask a new question about this device
Download the instructions for your Binoculars in PDF format for free! Find your manual B1 Basic - Rexing and take your electronic device back in hand. On this page are published all the documents necessary for the use of your device. B1 Basic by Rexing.
USER MANUAL B1 Basic Rexing
The information in this manual is subject to change without notice.
Rexing All Rights Reserved
www.rexingusa.com
Overview
Thank you for choosing REXING!
We hope you love your new products as much as we do. If you need assistance, or have any suggestions to improve it, please contact us.

care@rexingusa.com

(877) 740-8004
Our support team will respond you as soon as possible. Always a surprise in Rexing.
Check us out here.
- https://www.facebook.com/rexingusa/
- https://www.instagram.com/rexingdashcam/
- https://www.rexingusa.com/support/registration/

Facebook Instagram Site Product Support

Product Support



Table of contents
I. Product Overview...... 1
II. Specification 1
III. Insert or replace batteries 2
IV. Insert Micro SD card 2
Basic operation....3
I. Starting up.... 3
II. Changing the Modes 3
III. Taking pictures 4
IV. Recording Video 4
IR – LED (Night vision function) 6
I. Settings in Photo and Video Mode 6
II. Playback 7
Download files to PC 8
I. Connecting the device to a PC through the USB cable....8
Care and maintenance 8
I. Product Overview
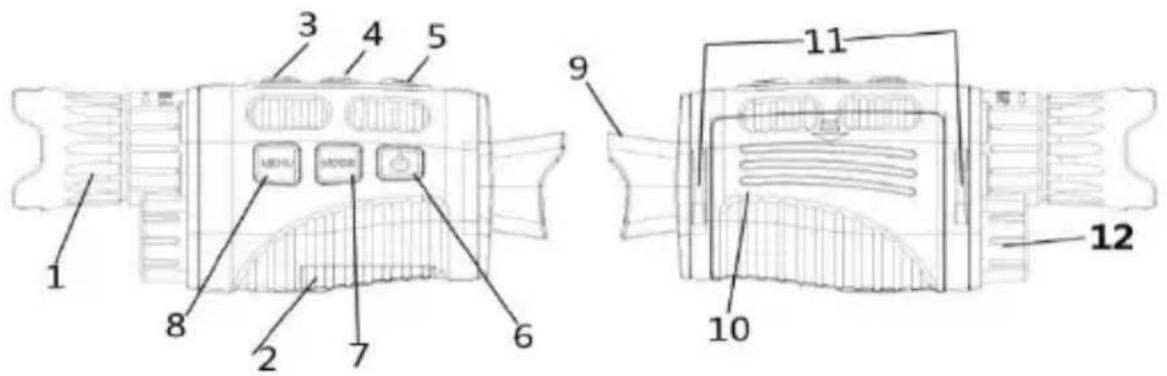
-
Lens with manual focus
-
USB port/Micro SD card slot Cover
-
IR Up/Zoom in/Up Button
4.IR Down/Zoom out/Down Button
5.Shot Button
6.Power Button
- Mode Button
8.Menu Button
- Display Screen
10.Battery Cover
11.Strap Hole
- Infrared filter cap
II. Specification
• Photo Resolution: 1M(1280x960) by interpolation / VGA(640x480)
• Video Size: 960P(1280x960@30FPS) by interpolation / VGA(640x480@30FPS)
- Aperture: F 1.2 f=25mm
- Lens Angle: FOV=10°, diameter is 24mm
- Display Screen: Inner screen is 1.5" TFT LCD, Outer screen is 40x30mm with 3X large window magnifier
- Digital Zoom: 4X
• Storage Media: Micro SD card, up to 32GB
- Viewing Distance in all dark: 150-200M
- Viewing Distance in weak light or day time: 3M\~infinity
- IR LED: 3W,850nm strong infrared spotlight,7 grades infrared adjustment
• Operation Buttons:6 buttons
• USB Port: Micro USB 2.0
• Power Source: 7.5V, 5xAA - Operating Temperature: -20^ to +60^
• Storage Temperature: -30°C to +70°C
• Dimension: approx.149*63*49mm
• Net Weight: approx.170g
III. Insert or replace batteries
Remove the battery cover on the right side of the device. Slide it gently down to open the compartment. Insert five AA (1.5V LR6) batteries.
Observing the correct polarity indication. Close the battery compartment with the battery cover.
IV. Insert Micro SD card
Please prepare a Micro SD card (up to 32GB) in advance. Open the card slot cover. Insert the Micro SD card into the slot (2). Make sure the direction is right. Never insert the card forcibly. Format the Micro
SD card, this can improve the battery life and shutter speed. To remove the
card from the memory card slot of the device, press the edge of the memory card in gently, the card will pop out. Then remove the card.
- Basic operation •
I. Starting up
Keep pressing the power button (6) for 3 seconds to turn on the device.
Keep pressing the power button (6) for 3 seconds again to turn off the device.
II. Changing The Modes
The night version has 3 different modes: photo mode, video mode and playback mode. Press the mode button (7) to change modes.

Photo Mode
For taking still photos.

Video Mode
For recording video.

Playback Mode
For playing the recorded
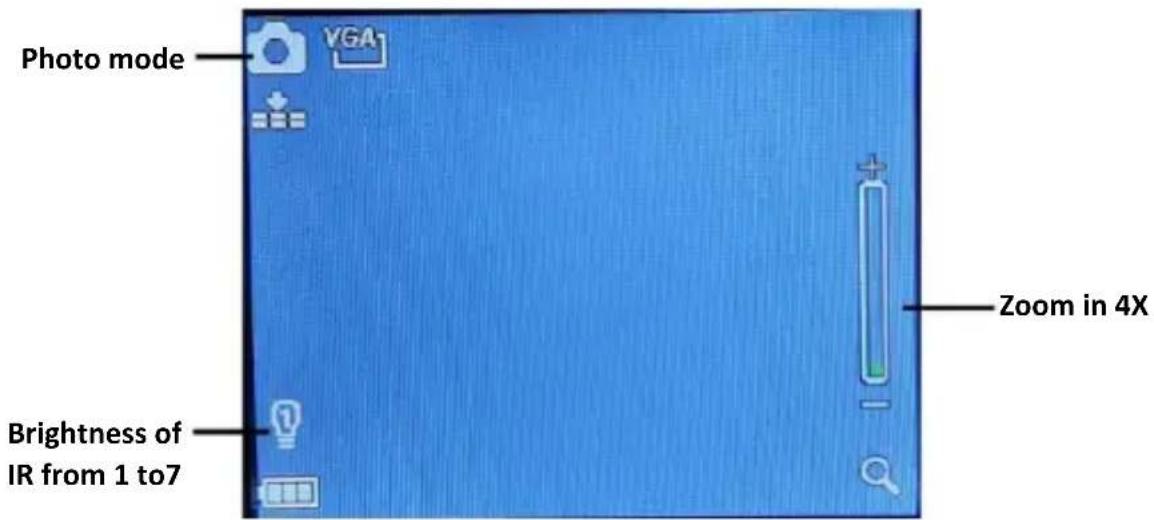
III. Taking pictures
-
Turn on the device, the default is Video mode, press the mode button (7) to switch to photo mode.
-
Zooming:
Keep pressing the or button (3 / 4) to zoom in or zoom out.
The value of magnification level appears on the LCD screen.
-
Take a still photo.
-
View your subject via the LCD screen.
- Press the shot button (5) to take a photo.
IV. Recording Video
-
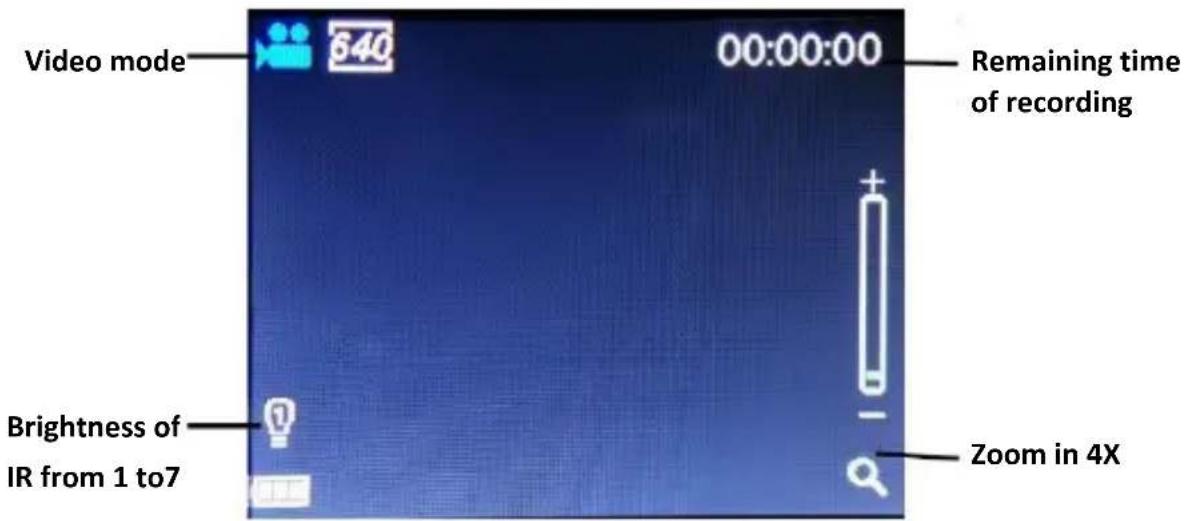
Turn on the device, the default is Video mode. If not, press the mode button (7) to switch to video mode.
-
Zooming:
Keep pressing the or button (3 / 4) to zoom in or zoom out the image.
The value of magnification level appears on the LCD screen.
-
Start to record video.
-
View your subject via the LCD screen.
-
Press the shot button (5) to start to record. The record duration will be shown on the LCD screen.
-
Finish recording.
-
Press the shot button again to stop recording.
- The device will stop recording automatically once capacity of the memory card is full.
Note: If you are too close or too far from the target, the quality of the photos or videos will not be optimal. Rotate the lens to the left or the right to focus the observation object.
There is no sound in the video files. Because the observation distance is far, the sound cannot be transmitted.
- IR – LED (Night vision function) •
In photo/video mode, if you have to view the darkness environment, please short press IR UP button to activate the IR LED, the image will change to black and white. The IR LED have seven levels, short press IR UP button to up the level, short press IR DOWN button to down the level.
Note: If the battery voltage is not enough, the IR LED level will down automatically. IR level can up to 7 levels when the battery power is full.
If only left half power, the level just can up to 5. If only left 25% power, the level just can up to 3. If the battery power is lower than 25%, IR LED cannot be activated.
I. Settings in Photo and Video Mode
Press Menu button in photo or video mode, can change the settings.
| Menu | Function |
| Photo | Set the photo resolution. |
| Resolution | Options:[1M 1280x960] / [VGA 640x480] |
| Video Size | Set the video resolution. Options:[960 1280x960]/[640 640x480]. |
| Night vision sensitivity | Choose the night vision sensitivity. Options:[Low]/[Middle]/[High]. |
| Power Frequency | Set the light source frequency to match frequency of electricity supply in local region to prevent interference. Options:[50Hz]/[60Hz]. |
| Power Save | Set the time to shut down the device for power saving if the device is idle. Options:[3min]/[5min]/[10min]/[OFF]. |
| Date&Time | Set the date and time of device. |
| Date Stamp | Add the date stamp on the photo or video files. Options:[Off]/[Date]/[Date&Time]. |
| Language | Set OSD (on-screen) language. Options:[English]/[Simplified Chinese/ [TraditionalChinese]/[French]/ [Nederlands] / [Espanol]/[Italiano]/ [Portugues] / [Deutsch]/[Russian]/ [Japanese]/[Korean]. |
| Format | Format your TF card. Format TF card will delete all files including the protected files. Please copy the important files before confirm. Options:[Yes]/[No]. |
| Reset All | Restore the setup to factory default settings. Options:[Yes]/[No]. |
| FW Version | User can see the firmware version information. |
II. Playback
- Turn on the device, press the Mode button to switch to playback mode.
- Press Up/Down button to view photos and video files.
-
Playback the video
-
Press the Shot button to start playing the video files.
- Press the Shot button again to have a pause.
- Press Menu button to stop the current video playing. Press Menu button in playback mode, the screen will display the playback menu. Press Up/Down button to scan lock or delete. And press Shot button to select one to enter the sub-menu.
Playback menu list :
| Menu | Function |
| Lock | Lock or unlock the current one file or all files in memory card. Options:[Lock/Unlock onel]/[Lock All]/ [Unlock All]. |
| Delete | Delete the current one file or delete all files in memory card.Options:[One]/[All]. |
- Download files to PC •
I. Connecting the device to a PC through the USB cable
- Turn on the night vision. Connect it to a computer through the supplied USB cable.
- When connecting to the computer, it will appear "MSDC" on the screen.
- Open [My Computer] or [Windows Explorer]. A "Removable Disk" appears in the drive list. Double-click the "Removable Disk" icon to view its contents. Files stored on the camera are located in the folder named "DCIM".
- Copy the photos or files to your computer.
- Care and maintenance •
Clean the device only with a dry or slightly damp, lint-free cloth.
Do not use abrasive cleaners to clean the device. This device is a high-precision optical instrument, so in order to avoid damage, please avoid the following practice:
- Use the device in ultra-high or ultra-low temperature.
- Keep it or use it in moist environment for long.
• Use it in rainfalls or in water. - Deliver or use it in strongly shocking environment.
Remove the batteries from the device if it is not used for a longer time.
This device complies with part 15 of the FCC Rules. Operation is subject to the following two conditions: (1) This device may not cause harmful interference, and (2) this device must accept any interference received, including interference that may cause undesired operation.
Changes or modifications not expressly approved by the party responsible for compliance could void the user's authority to operate this equipment.
REXING®




MADE IN CHINA
- Overview
- Thank you for choosing REXING!
- Check us out here.
- Table of contents
- Basic operation....3
- IR – LED (Night vision function) 6
- Download files to PC 8
- Care and maintenance 8
- Product Overview
- Specification
- Insert or replace batteries
- Insert Micro SD card
- - Basic operation •
- Starting up
- Changing The Modes
- Taking pictures
- Recording Video
- - IR – LED (Night vision function) •
- Settings in Photo and Video Mode
- Playback
- - Download files to PC •
- Connecting the device to a PC through the USB cable
- - Care and maintenance •
Brand : Rexing
Model : B1 Basic
Category : Binoculars