
J-Rak 4 - Audio accessory Radial Engineering - Free user manual and instructions
Find the device manual for free J-Rak 4 Radial Engineering in PDF.


| Product Type | Rack Mount Audio Accessory |
| Brand | Radial Engineering |
| Model | J-Rak 4 |
| Rack Size | 1U |
| Width | 19 inches (standard rack width) |
| Depth | 6.5 inches (165 mm) |
| Height | 1.75 inches (44.5 mm) |
| Weight | 2.2 lbs (1.0 kg) |
| Material | Steel chassis with black powder coat finish |
| Compatibility | Accepts up to 4 Radial single-slot modules (e.g., JDI, J48, JDV) |
| Mounting Hardware | Includes rack screws and module securing screws |
| Power Supply | Passive (no external power required) |
| Warranty | 3 years limited warranty |
| Intended Use | Organize and mount Radial DI boxes or other compatible modules in a standard 19-inch rack |
| Installation | Simple drop-in installation; no soldering or special tools required |
| Cleaning | Wipe with dry cloth; avoid solvents |
| Repairability | Replaceable screws and parts; contact Radial for service |
| Compliance | RoHS compliant |
Frequently Asked Questions - J-Rak 4 Radial Engineering
User questions about J-Rak 4 Radial Engineering
0 question about this device. Answer the ones you know or ask your own.
Ask a new question about this device
Download the instructions for your Audio accessory in PDF format for free! Find your manual J-Rak 4 - Radial Engineering and take your electronic device back in hand. On this page are published all the documents necessary for the use of your device. J-Rak 4 by Radial Engineering.
USER MANUAL J-Rak 4 Radial Engineering
natural_image
Front view of a black industrial rack unit with metal grating and mounting holes (no visible text or symbols)Order No. R800 1018


natural_image
Exterior view of a black industrial rack unit with mounting holes and a visible brand logo (RAK4, Radial)Order No. R800 1016
User Guide
Rackmount for Radial Direct Boxes
JRAK ^TM 8
Congratulations and thank you for purchasing the Radial J•Rak 8. The J•Rak 8 is a 19" rack adapter that has been designed to work with products like the Radial JDI, Radial J48 and the many other Radial products that employ the same bookend designed enclosure.
Although the J-Rak 8 is a straightforward device, we invite you to take a few moments to read through this manual and familiarize yourself with this versatile product. Should you have any questions or comments, please feel free to contact us by sending an email to info@radialeng.com or browse our web site at www.radialeng.com for the latest updates and applications.
Enjoy!
PRODUCT DESCRIPTION
The Radial J·Rak 8 requires two rack spaces (3 ½") and allows up to eight Radial products to be rack-mounted in a standard 19" rack.
The J•Rak 8 is designed to allow touring companies to make better use of their DI box inventory by allowing stand-alone units to be converted to rackmounted DIs for applications like keyboards. A wide range of Radial interface and mic-splitter products are compatible with the J•Rak 8 making it possible to quickly create a custom rack.
A strong advantage for the J-Rak 8 is that you get to choose what connectors face front. Before you start loading up DIs take a minute to consider how you will connect to them. Depending on your situation you may prefer to have the inputs face front. This would be best for studio applications where instruments are often connected and disconnected during a session.
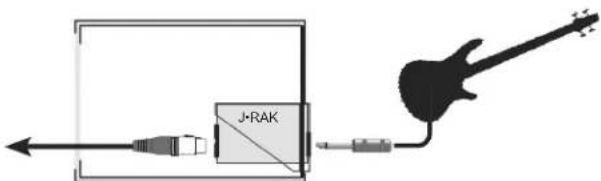
GUITARS AND BASS The 1/4" inputs face front allowing easy connection for instruments.
If you're using the J•Rak 8 in a concert touring situation then you may want the outputs to face front for quick connection to a microphone snake. The J•Rak 8 lets you choose the orientation for each slot so you may want to think about which arrangement is best for your setup.

flowchart
graph TD
    A["SYNTH 1"] --> B["J-RAK"]
    C["SYNTH 2"] --> B
    D["..."] --> B
    E["..."] --> B
    F["..."] --> B
    G["..."] --> B
    H["..."] --> B
    I["..."] --> B
    J["..."] --> B
    K["..."] --> B
    L["..."] --> B
    M["..."] --> B
    N["..."] --> B
    O["..."] --> B
    P["..."] --> B
    Q["..."] --> B
    R["..."] --> B
    S["..."] --> B
    T["..."] --> B
    U["..."] --> B
    V["..."] --> B
    W["..."] --> B
    X["..."] --> B
    Y["..."] --> B
    Z["..."] --> B
    AA["..."] --> B
    AB["..."] --> B
    AC["..."] --> B
    AD["..."] --> B
    AE["..."] --> B
    AF["..."] --> B
    AG["..."] --> B
    AH["..."] --> B
    AI["..."] --> B
    AJ["..."] --> B
    AK["..."] --> B
    AL["..."] --> B
    AM["..."] --> B
    AN["..."] --> B
    AO["..."] --> B
    AP["..."] --> B
    AQ["..."] --> B
    AR["..."] --> B
    AS["..."] --> B
    AT["..."] --> B
    AU["..."] --> B
    AV["..."] --> B
    AW["..."] --> B
    AX["..."] --> B
    AY["SYNTH 1"] --> AZ["J-RAK"]
    CYN["SYNTH 2"] --> AZ
    BJ["J-RAK"] --> AZ
KEYBOARD RACKS The XLR outputs face front for connection to mic snakes and mixing consoles.
As with all Radial products, the J-Rak 8 features heavy-duty construction and a baked enamel ✉nish for years of trouble-free performance. The J-Rak is also supported by the Radial 3-year transferable warranty to protect against manufacturing defects.
SETTING UP THE J·RAK 8
Step One: Remove the Shell
To begin, remove the protective outer 'book-end' shell from the Radial product by unscrewing the four (4) hex #6/32 screws. A hex allen key is provided for these screws. Do not discard the screws or shells. Store them in a safe place in case you want to restore the product to its original con ^☒ guration.

natural_image
Two electronic devices with visible internal components and a hand adjusting a component (no text or symbols)Step Two: Load into Slot
With the outer shell removed, slide the enclosure into the front of the J•Rak 8 slot. Ensure the open side is facing up as pictured below.

natural_image
Hand inserting a JRAK device into an electronic control box (no visible text or symbols)Step Three: Rear Screws
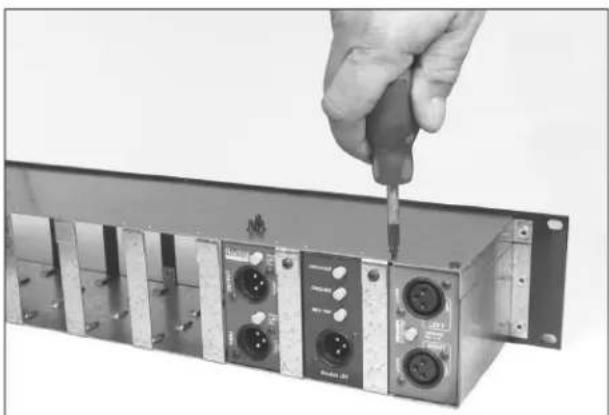
Once the enclosure is seated in the J•Rak 8 locate the two screw holes for the slot on the top near the rear edge. Sixteen Philips head screws are provided to secure enclosures in place. Insert two screws per slot. Repeat the procedure for the other slots. The J•Rak 8 is now ready to mount in your 19" rack.
natural_image
Hand using a screwdriver to adjust or install an electronic device rack (no visible text or symbols)JRAK4
Congratulations and thank you for purchasing the Radial J•Rak 4. The J•Rak 4 is a 19" rack adapter that has been designed to work with products like the Radial JDI, Radial J48 and the many other Radial products that employ the same bookend designed enclosure.
Although the J-Rak 4 is a straightforward device, we invite you to take a few moments to read through this manual and familiarize yourself with this versatile product. Should you have any questions or comments, please feel free to contact us by sending an email to info@radialeng.com or browse our web site at www.radialeng.com for the latest updates and applications.
Enjoy!
PRODUCT DESCRIPTION
The Radial J·Rak 4 requires one rack space (1.75") and allows up to four Radial products to be rack-mounted in a standard 19" rack.
The J•Rak 4 is designed to allow touring companies to make better use of their DI box inventory by allowing stand-alone units to be converted to rackmounted DIs for applications like keyboards. A wide range of Radial interface and mic-splitter products are compatible with the J•Rak 4 making it possible to quickly create a custom rack.
A strong advantage for the J-Rak 4 is that you get to choose what connectors face front. Before you start loading up DIs take a minute to consider how you will connect to them. Depending on your situation you may prefer to have the input panel face front. This would be best for studio applications where instruments are often connected and disconnected during a session.

GUITARS AND BASS The 1/4" inputs face front allowing easy connection for instruments.
If you're using the J•Rak 4 in a concert touring situation then you may want the XLR outputs to face front for quick connection to a microphone snake. The J•Rak lets you choose the orientation for each slot so you may want to think about which arrangement is best for your setup.

flowchart
graph LR
    A["SYNTH 1"] --> B["J-RAK"]
    C["SYNTH 2"] --> B
    D["..."] --> B
    E["..."] --> B
    F["..."] --> B
    G["..."] --> B
    H["..."] --> B
    I["..."] --> B
    J["..."] --> B
    K["..."] --> B
    L["..."] --> B
    M["..."] --> B
    N["..."] --> B
    O["..."] --> B
    P["..."] --> B
    Q["..."] --> B
    R["..."] --> B
    S["..."] --> B
    T["..."] --> B
    U["..."] --> B
    V["..."] --> B
    W["..."] --> B
    X["..."] --> B
    Y["..."] --> B
    Z["..."] --> B
    AA["..."] --> B
    AB["..."] --> B
    AC["..."] --> B
    AD["..."] --> B
    AE["..."] --> B
    AF["..."] --> B
    AG["..."] --> B
    AH["..."] --> B
    AI["..."] --> B
    AJ["..."] --> B
    AK["..."] --> B
    AL["..."] --> B
    AM["..."] --> B
    AN["..."] --> B
    AO["..."] --> B
    AP["..."] --> B
    AQ["..."] --> B
    AR["..."] --> B
    AS["..."] --> B
    AT["..."] --> B
    AU["..."] --> B
    AV["..."] --> B
    AW["..."] --> B
    AX["..."] --> B
    AY["SYNTH 1"] --> AZ["J-RAK"]
KEYBOARD RACKS The 1/4" inputs face toward the rear for connection to rackmounted modules.
As with all Radial products, the J•Rak 4 features heavy-duty construction and a baked enamel ☑nish for years of trouble-free performance. The J•Rak 4 is supported by the Radial 3-year transferable warranty to protect against manufacturing defects.
SETTING UP THE J·RAK 4
Step One: Remove the Shell
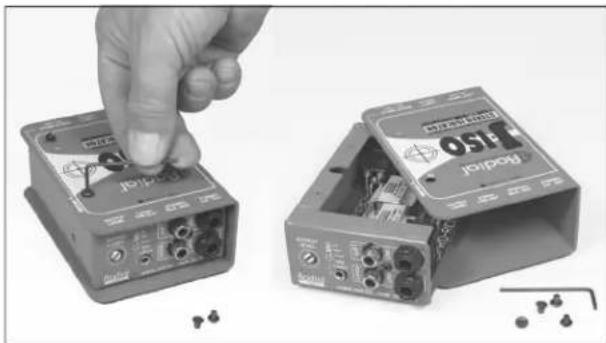
To begin, remove the protective outer 'book-end' shell from the Radial product by unscrewing the four (4) hex #6/32 screws. A hex allen key is provided for these screws. Do not discard the screws or shells. Store them in a safe place in case you want to restore the product to its original con ^® guration.
natural_image
Two electronic devices with visible internal components and a hand adjusting their top component (no text or symbols)Step Two: Load into Slot
With the outer shell removed, slide the enclosure into the rear of the J•Rak 4 slot.

natural_image
Close-up of hands installing or adjusting a mechanical component with a connector (no visible text or symbols)Step Three: Rear Screws
Once the enclosure is seated in the J•Rak 4 locate the two screw holes for the slot on the top. Sixteen Philips head screws are provided to secure enclosures in place. Insert two screws per slot. Repeat the procedure for the other slots. The J•Rak 4 is now ready to mount in your 19" rack.

natural_image
Close-up of a hand using a screwdriver to adjust a component on an electronic device (no visible text or symbols)THREE YEAR TRANSFERABLE LIMITED WARRANTY
RADIAL ENGINEERING LTD. ("Radial") warrants this product to be free from defects in material and workmanship and will remedy any such defects free of charge according to the terms of this warranty. Radial will repair or replace (at its option) any defective component(s) of this product (excluding ☑ish and wear and tear on components under normal use) for a period of three (3) years from the original date of purchase. In the event that a particular product is no longer available, Radial reserves the right to replace the product with a similar product of equal or greater value. In the unlikely event that a defect is uncovered, please call 604-942-1001 or email service@radialeng.com to obtain an RA number (Return Authorization number) before the 3 year warranty period expires. The product must be returned prepaid in the original shipping container (or equivalent) to Radial or to an authorized Radial repair center and you must assume the risk of loss or damage. A copy of the original invoice showing date of purchase and the dealer name must accompany any request for work to be performed under this limited and transferable warranty. This warranty shall not apply if the product has been damaged due to abuse, misuse, misapplication, accident or as a result of service or modification by any other than an authorized Radial repair center.
THERE ARE NO EXPRESSED WARRANTIES OTHER THAN THOSE ON THE FACE HEREOF AND DESCRIBED ABOVE. NO WARRANTIES WHETHER EXPRESSED OR IMPLIED, INCLUDING BUT NOT LIMITED TO, ANY IMPLIED WARRANTIES OF MERCHANTABILITY OR FITNESS FOR A PARTICULAR PURPOSE SHALL EXTEND BEYOND THE RESPECTIVE WARRANTY PERIOD DESCRIBED ABOVE OF THREE YEARS. RADIAL SHALL NOT BE RESPONSIBLE OR LIABLE FOR ANY SPECIAL, INCIDENTAL OR CONSEQUENTIAL DAMAGES OR LOSS ARISING FROM THE USE OF THIS PRODUCT. THIS WARRANTY GIVES YOU SPECIFIC LEGAL RIGHTS, AND YOU MAY ALSO HAVE OTHER RIGHTS, WHICH MAY VARY DEPENDING ON WHERE YOU LIVE AND WHERE THE PRODUCT WAS PURCHASED.
For product compatibility information refer to www.radialeng.com



Brand : Radial Engineering
Model : J-Rak 4
Category : Audio accessory