
LX7 M - Tripod Libec - Free user manual and instructions
Find the device manual for free LX7 M Libec in PDF.


| Product Type | Video Tripod |
| Brand | Libec |
| Model | LX7 M |
| Head Type | Fluid Head |
| Payload Capacity | 8 kg |
| Leg Material | Aluminum |
| Number of Leg Sections | 3 |
| Leg Lock Type | Twist Lock |
| Minimum Height | 80 cm |
| Maximum Height | 180 cm |
| Weight | 5 kg |
| Bubble Level | Yes |
| Spreader | Mid-Level Spreader |
| Attachment Thread | 1/4" and 3/8" Screws |
| Warranty | 2 Years |
Frequently Asked Questions - LX7 M Libec
User questions about LX7 M Libec
0 question about this device. Answer the ones you know or ask your own.
Ask a new question about this device
Download the instructions for your Tripod in PDF format for free! Find your manual LX7 M - Libec and take your electronic device back in hand. On this page are published all the documents necessary for the use of your device. LX7 M by Libec.
USER MANUAL LX7 M Libec
natural_image
Technical line drawing of a tripod-mounted device with attached legs and base, shown from two different angles (no text or symbols present)アフターサービス
Libec Sales of America, Inc - U.S. Sales office
20695 S. Western Ave., #242, Torrance, CA 90501 USA
TEL:+1 310 787 9400
FAX:+1 310 787 9422
www.libecsales.com
(No.: D82010)
J: 日本語
This equipment may cause harm, if not installed and used in accordance with this manual. Operating procedures and Cautions to operate this product were written to prevent accident from occurring. For your own safety, read and follow these instructions before operating it. With adequate understanding, proper and safe operating manner can then be achieved. Please retain this manual for future references. This product has been designed with due consideration for safety. However, incorrect operation may cause camera to collapse, damaging of equipment and human injury.
- Please read all the cautions and procedures before use.
- Please follow all the cautions and safety contents that were written.
Caution
Injury may happen if the guidelines are not followed.
- Do not exceed the maximum capacity.
Exceeding the load capacity may cause damage to equipment and unexpected accidents.
• Firmly tighten all lock knobs. Failing to do so may cause damage to the camera or injury to others.
- Mounting of camera on a proper positioned tripod.
Mounting the camera on a improperly setup tripod may results in damages and injuries.
- Ensure the tripod is correctly and securely setup.
Ensure that the leg support accessories are correctly attached to the tripod. Improper manner may cause damage to equipment and unexpected accidents. - Do not use solvents such as paint thinner.
- Do not use this product for anything other than its intended purpose.
- Do not dismantle or modify. Dismantling and modifying the equipment may inflict injury to self and others, also are usually the root cause of accident.
Do not operate when the equipment is out of order, contact the dealer or our customer service for repairing.
Precaution before use
- Attached the floor spreader or mid-level spreader to the tripod first before proceeding other setup.
- With the head mounted on the tripod, pull out the hidden pan handle before spreading apart the legs of tripod.
- To transport the tripod, use the strap assembly to bind the three legs.
- Use of spikes may damage the floor surfaces.
C: 中文

警告
natural_image
Technical diagram of a mechanical assembly with no visible text or symbols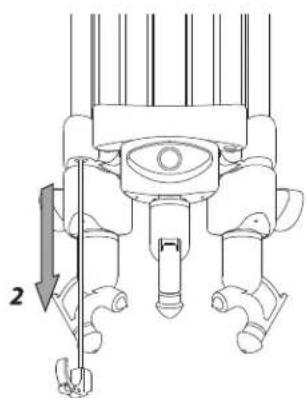
natural_image
Mechanical assembly diagram showing a piston and crankshaft mechanism (no text or labels)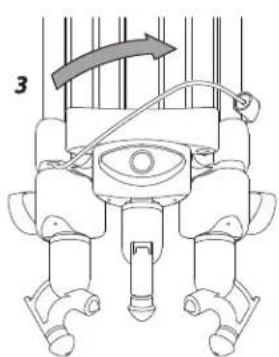
natural_image
Diagram of a mechanical device with a curved arrow indicating motion or force, no text or symbols presentJ
B: 脚ホルダーの使い方
B: Using of binding strap
1 Undo: To spread out the tripod, first undo the hook that binds the legs, the strap will automatically retract back to its position.
2 Pull the binding strap: To bind the legs, hold the hook and pull out the strap.
3 Bundle the 3 legs: Loop around the legs and strap in.
C
B: 如何利用脚架绑腿绳来折叠脚架腿
natural_image
Diagram of a mechanical component with two curved arrows indicating rotational motion (no text or symbols)
natural_image
Diagram of a mechanical or fluidic component with two curved arrows indicating rotational flow (no text or symbols)C: 脚伸縮のロックの仕方
C: Method of Locking the extended legs
- Loosen the upper lock knob, pull to extend the legs.
- Adjust the legs to about the same desired length and tighten all the upper lock knob.
- If more height is required, loosen the lower lock knob and pull to extend the lower portion of the legs, adjust to the same desired length and tighten all the lower lock knob.
-
When the indicator of the lock knob is aligned at the top, the leg is properly secured.
-
Trying to turn the lock knob by force beyond this limit position will result in damages.
- Ensure all of the lock knobs are in the fully locked position, before mounting the camera.
- If any of these lock knobs is not in the locked position, the tripod will collapses and accident occurred.
1 Loosen
2 Tighten
C
C: 如何锁定伸缩脚
D: Using of spike and spike cap
• A mid-level spreader must be attached first before using the spike and spike cap.
- Spike can cause scratches to the flooring, and under normal situation please operate with the spike cap on it.
•To use the spikes, twist and pull off the spike cap.
1 Remove
2 Spike
3 Spike cap
D: 如何调整橡皮脚和脚钉
E: How to use the grip
• The grip is attached to RT40RB, RT50B and RT50C.
• Make sure to fold the legs when carrying the tripod.
• Make sure to remove the camera.
1 Hold the grip
E
E: 握柄的使用方法

- アフターサービス
- Libec Sales of America, Inc - U.S. Sales office
- J: 日本語
- Caution
- Precaution before use
- C: 中文
- 警告
- J
- B: 脚ホルダーの使い方
- B: Using of binding strap
- C
- B: 如何利用脚架绑腿绳来折叠脚架腿
- C: 脚伸縮のロックの仕方
- C: Method of Locking the extended legs
- C: 如何锁定伸缩脚
- D: Using of spike and spike cap
- D: 如何调整橡皮脚和脚钉
- E: How to use the grip
- E
- E: 握柄的使用方法
Brand : Libec
Model : LX7 M
Category : Tripod