
CR131 - Car stereo HARMAN KARDON - Free user manual and instructions
Find the device manual for free CR131 HARMAN KARDON in PDF.


| Product Type | Car Stereo |
| Brand | Harman Kardon |
| Model | CR131 |
| Category | Car Audio |
| Color | Black |
| Mounting Size | 1 DIN |
| Dimensions (W x H x D) | 178 x 50 x 150 mm |
| Weight | 1.2 kg |
| Power Supply | 12V DC (vehicle battery) |
| Maximum Power Output | 4 x 50 Watts |
| Audio Formats Supported | CD, CD-R, CD-RW, MP3 |
| Tuner Frequency Range | FM: 87.5 - 108 MHz, AM: 530 - 1710 kHz |
| RDS Radio Data System | Yes |
| Display Type | LCD with white illumination |
| Remote Control | Included |
| Audio Controls | Bass, Treble, Fader, Balance |
| Preamp Outputs | 2-channel line outputs (front/rear) |
| Subwoofer Output | Yes (mono) |
| Security | Detachable faceplate |
| Installation Connectors | ISO standard |
| Manual Languages | English |
Frequently Asked Questions - CR131 HARMAN KARDON
User questions about CR131 HARMAN KARDON
0 question about this device. Answer the ones you know or ask your own.
Ask a new question about this device
Download the instructions for your Car stereo in PDF format for free! Find your manual CR131 - HARMAN KARDON and take your electronic device back in hand. On this page are published all the documents necessary for the use of your device. CR131 by HARMAN KARDON.
USER MANUAL CR131 HARMAN KARDON
High Fidelity Receiver/Deck Instruction Manual
harman/kardon
Features
Congratulations on your purchase of a Harman Kardon CR151/CR131 High Fidelity Receiver/Deck.
To fully understand the CR151/CR131's capability, please read this manual carefully and follow all of the instructions regarding its use and installation.
Tuner Section
■ Digital Synthesized Tuning
Digital Synthesized Tuning accuracy eliminates drifting and mistuning, thereby guaranteeing optimum sound quality.
■ Six AM and eighteen FM stations can be simultaneously stored in the memory.
■ Preset Scan Tuning
■ Auto Separation & Soft Muting Control
Adjusts stereo separation and soft muting automatically during FM stereo reception for optimum reception and sound quality.
■ Hi-Q Function (CR151)
Provides additional FM interference rejection.
Cassette Deck Section
■ Playback Frequency Characteristics 20-18,000Hz (±3dB)
■ Dolby* B and C Noise Reduction
The CR151 is capable of providing the standard Dolby B NR, as well as the new Dolby C noise reduction. Dolby C NR has twice the noise reduction effect of Dolby B NR, and also improves high level, high frequency response.
CR131 is equipped with the Dolby B noise reduction.
■ Music Search
■ Mechanically Assisted Tape Loading
New improved mechanism literally pulls the cassette into the play position.
■ Auto Tuner Monitor Function
■ Precision Dual Azimuth Transport Mechanism
For auto reverse convenience without compromising performance, both the CR131 and the CR151 feature dual azimuth tape head positioning. Unlike conventional designs, this unique built-in feature provides optimum azimuth alignment for both forward and reverse playback. It ensures full frequency response in either direction without any loss of sonic integrity.
Audio Section
■ Fader Control
■ Illumination Control
■ CD/Ext. Loop Function (CR151)
*Dolby noise reduction manufactured under license from Dolby Laboratories Licensing Corporation. "Dolby" and the double-D symbol □□ are trademarks of Dolby Laboratories Licensing Corporation.
Precautions
● This unit is for use in cars with 12 volt negative ground systems only. Never install this unit in a car using a 24V battery or a 12V battery with positive ground.
● To prevent discharge of the car battery, do not use your car stereo system for long periods of time when the engine is not running.
- Should the fuse blow, first check that the connections are correct and that the wires are not damaged, then replace the fuse with one of the same type as the used one.
- Be careful not to let metal fasteners or other objects enter the unit, as they may cause malfunctions.
- If the car is left in direct sunlight for a long period of time, so that the temperature inside the car rises, do not operate this unit until the temperature has returned to normal.
● C-120 type cassette tapes are not recommended for use in any automobile tape players.
- If your unit behaves abnormally, turn it off immediately and consult an authorized Harman Kardon Service Station.
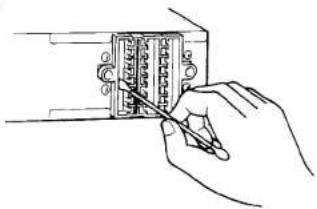
● The connector at the rear may make poor connection when the unit is detached frequently. Periodically wipe the connector with a cloth moistened with alcohol, etc., to improve electrical contact.
natural_image
Hand holding a small electronic component with a pen, no visible text or symbols- When a tape is not in use, store it in the case provided by the tape manufacturer.
● To protect your cassette tapes, store them in a cool place away from dust, dirt and strong magnetic sources such as electric motors and TV sets.
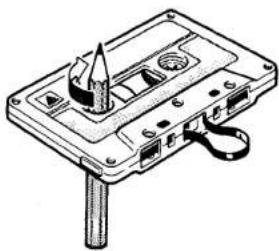
- Check and make sure any slack in the tape is taken up before inserting the tape into the unit. A loose tape could cause damage to the unit and the tape itself. Tighten the cassette by inserting a pencil or a similar instrument into the spindle hole and turn until all the slack has been taken up.
natural_image
Technical line drawing of a cassette tape device with a handle and screw (no text or symbols)Remove tape slackness by winding the tape reels with a pencil.
CAUTION - HIGH TEMPERATURE:
After operating this unit at high power level for more than 30 minutes, it may become too hot to touch or to place on a delicate surface. Please allow 5 minutes for it to cool off.
installation
Install the unit using the accessory installation parts.
Installation Parts
Sleeve (1 pc.)
Installation Fixture (1 pc.)
Hexagon Bolt with Washer (1 pc.)
Countersunk Screw (4 pcs.)
Hexagon Bolt (1 pc.)
Hexagon Nut (3 pcs.)
Tapping Screw with Washer (1 pc.)
If you are not familiar with this type of installation, consult a Harman Kardon Dealer or Service Station.
Installing to The Dashboard
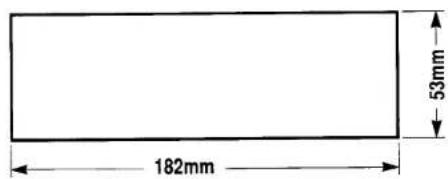
First, make sure that the installing space in the dashboard is the DIN size shown below. If the space is not big enough, increase it to the size indicated below.
Installation
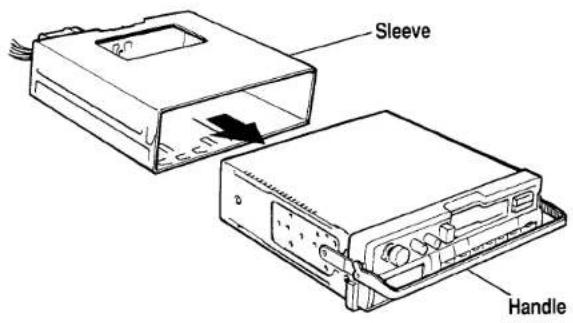
- Remove the main unit from the sleeve.
- Install on the sleeve the hexagon bolt and nut for installing the rear section fastening fixture.
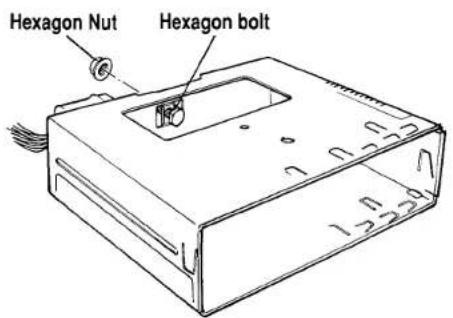
- Insert the sleeve into the installation space (DIN size) of the dashboard with the connector at the rear of the sleeve toward the left.
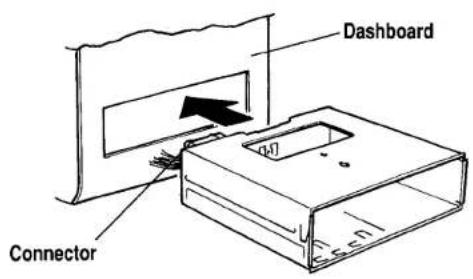
- Use a screwdriver to bend all the flanges on the sleeve to the outside to fasten the front surface of the sleeve.
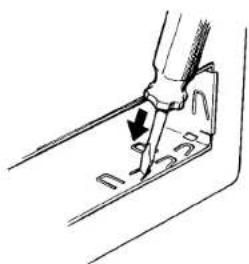
natural_image
Technical line drawing of a mechanical component with a tool and arrow indicating a feature (no text or symbols present)- Secure the rear section of the sleeve with the installation fixture.
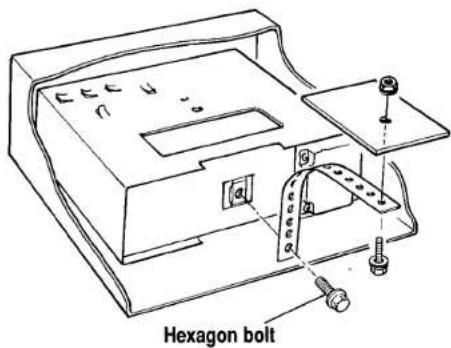
① Use the nut to secure the edge of the installation fixture to the bolt on the rear of the sleeve.
② Install the other edge of the installation fixture to the wall using a hexagon bolt with washer and nut, or a tapping screw with washer.
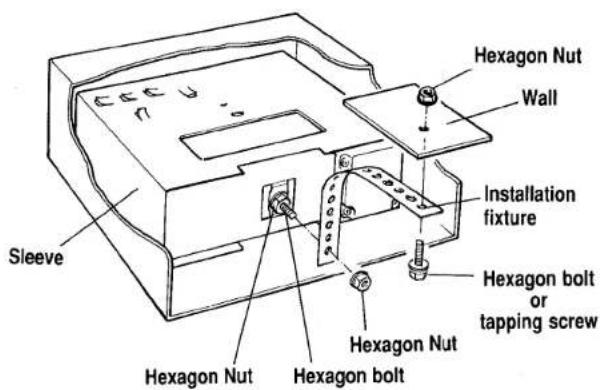
- Install the main unit in the sleeve.
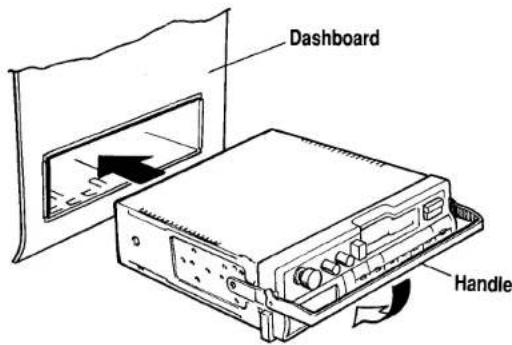
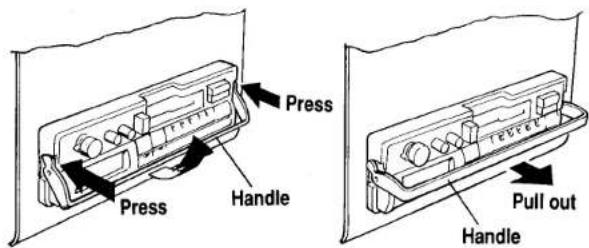
- To remove the main unit, first press the left and right handle levers to raise the handle, then pull the main unit out with the handle.
NOTE: When the main unit will not be removed from the dashboard, after inserting the main unit into the sleeve, secure it to the main unit with a hexagon bolt (and skip Step 2).
Example of Installation in a TOYOTA
Removing the car radio installed in the car and installing this unit.
- Pull the main unit out of the sleeve.
- Remove the four countersunk screws on the left and right, then remove the handle and the trim frame from the main unit.
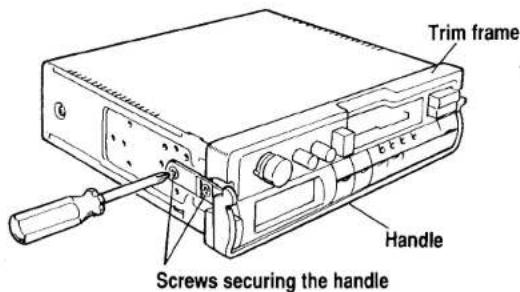
- Remove the three screws shown below, then remove the connector with leads from the rear of the sleeve.
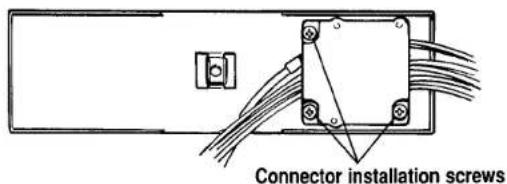
- Fit the above connector into the connector on the main unit.
- Remove the factory car radio, and the pocket under the radio (if provided), from the car.
- Remove the factory radio from the bracket.
- Secures the CR151/CR131 to the bracket with the four countersunk screws, then install it in the car with the pocket (if provided).
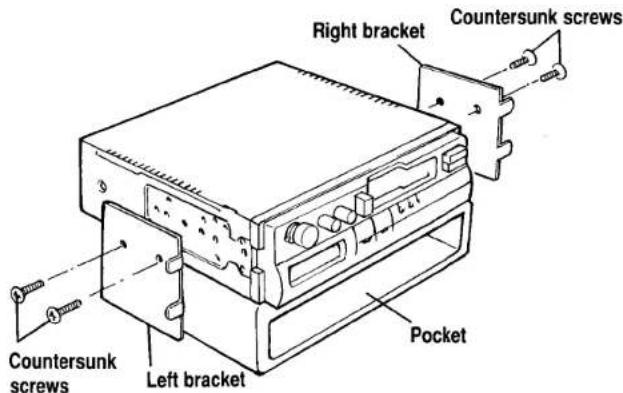
Connections
After installing the unit, connect wires according to the diagram on the 8 page.
During the connecting operation, make sure that the negative terminal (−) of the battery is disconnected to prevent accidents caused by short circuit.
The entire memory may be deleted when the negative terminal (−) of the battery is disconnected for cars equipped with a drive computer or navigation computer. For this type of car, connect the power to the amplifier after connecting operations without disconnecting the negative terminal.
Be sure to keep all wires away from hot or moving parts that may damage them.
① POWER AMP REMOTE wire
Connect the POWER AMP REMOTE wire (yellow) to the remote terminal on amplifier or graphic equalizer.
② POWER ANTENNA wire
Connect the POWER ANTENNA wire (blue) to the power antenna relay or the antenna booster.
For some models with a window antenna, it is necessary to supply power to the antenna booster. In this case, connect the POWER ANTENNA lead to the antenna booster, or supply power from the accessory circuit.
A power antenna without a relay cannot be used.
③ MEMORY Back Up wire
The +12V MEMORY wire (orange) is a positive power input. It should be connected to a circuit which is always on in order to retain the tuner memory.
4 ILLUMINATION wire
This is the power supply wire (white) for lighting the front panel. It can be connected to the dash dimmer control, so that the front panel illumination will be similar to the dash lights. Or, it can be connected to the “+12V SWITCHED” lead, in which case the illumination will be uncontrollable.
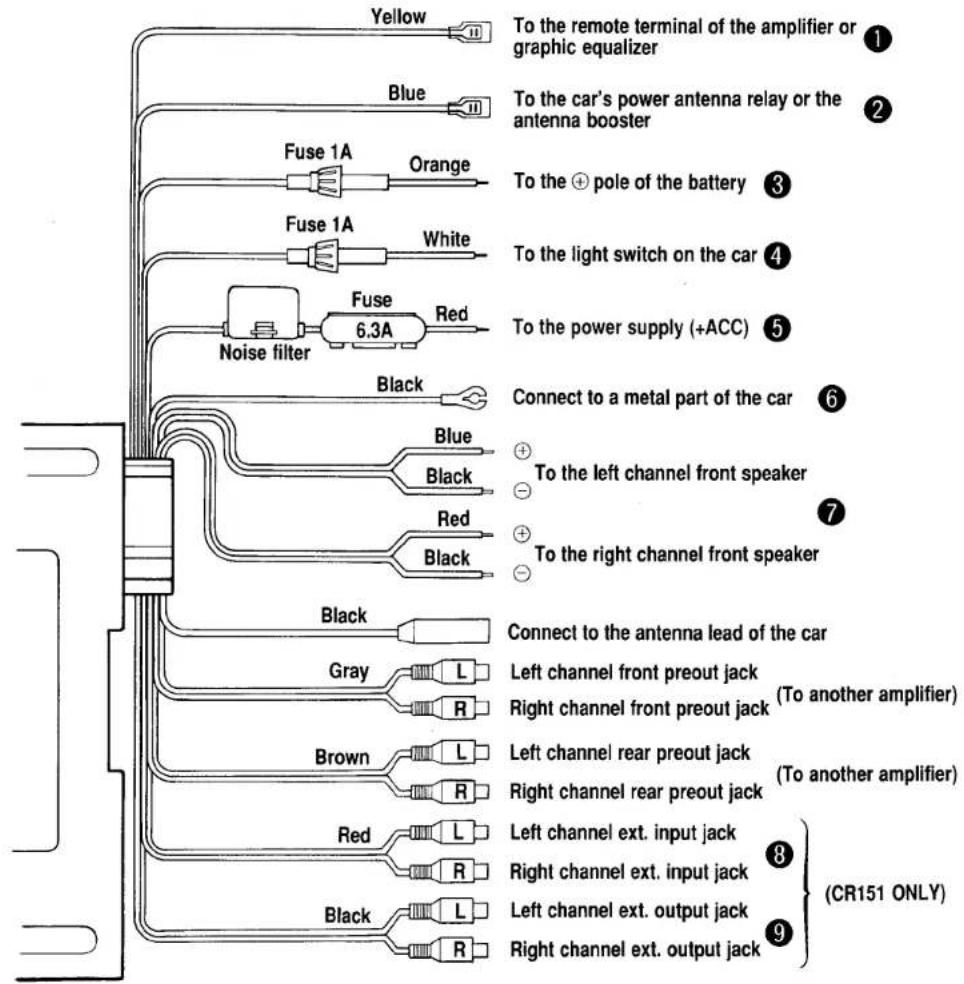
⑤ +12V SWITCHED (+ACC) wire
The +12V SWITCHED wire (red) is a positive power input. It should be connected to a circuit which is turned on when the IGNITION SWITCH is in the "ACC" position.
6 GROUND wire
This is the negative power input wire (black). It should be connected securely to the car chassis.
⑦ Speaker System wires
Connect the speaker systems to these wires. Be careful to connect the positive speaker to the positive wires of the receiver/deck. Do not connect the negative speaker wires to the car chassis.
NOTE:
●Some cars are provided with speaker wires which often include a negative wire common to both left and right channels. This wire should not be used with the receiver/deck. Be sure to connect the negative speaker wires from left and right channels to their respective wires on the receiver/deck.
- If other cables are used instead of these speaker leads, insulate the speaker leads to prevent short circuiting.
⑧ EXT. INPUT jacks (CR151 ONLY)
These input jacks are for connection to the output jacks of a CD player, or graphic equalizer or surround processor. It is recommended that high quality shielded coaxial cables with tight-fitting RCA plugs be used for this connection.
⑨ EXT. OUTPUT jacks (CR151 ONLY)
These output jacks are for connection to the input jacks on a graphic equalizer or surround processor.
Front Panel Description
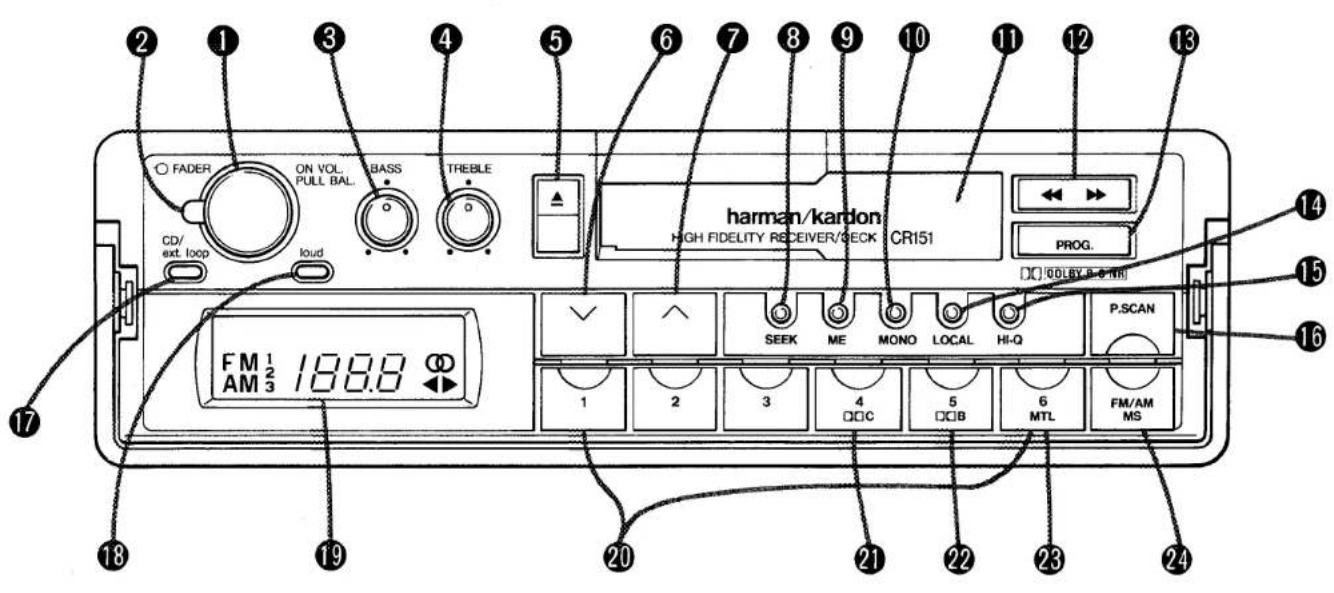
Illustration: CR151 Front Panel
① ON-OFF switch/VOLUME control/BALANCE control
Push this knob to turn on the tuner. Push again to turn it off. This knob controls the sound level. Turning clockwise increases the sound volume and turning counterclockwise
decreases it. This also controls the balance of the left and right channels. Pull it out and turn it clockwise or counterclockwise to balance the sound. It has center click to indicate the balance of the left and right channels.
② FADER control
This control adjusts the balance of front and rear level when using a four-speaker system. Turn this control down ward to increase the front level or upward to increase the rear level. Master volume can be adjusted using the VOLUME control knob. Set it to the center click position when using a control two-speaker system.
③ BASS control
This knob controls the low frequency sounds. Access the knob by pushing it, then turn it clockwise to boost or counterclockwise to reduce the low frequency sound level. It has center click to indicate flat frequency response.
④ TREBLE control
This knob controls the high frequency sounds. Access the knob by pushing it, then turn it clockwise to boost or counterclockwise to reduce the high frequency sound level. It has center click to indicate flat frequency response.
⑤ △ (eject) button
Push this button to eject the cassette.
6 √(tuning down) button
When this is pressed, the tuner frequency decreases. In FM mode, frequency display moves in 0.2MHz steps. In AM, the display moves in 10kHz steps. If this button is pressed continuously, the frequencies are displayed in backwards order.
⑦ ∧ (tuning up) button
When this is pressed, the tuner frequency increases. If this button is pressed continuously, the frequencies are displayed in forwards order.
⑧ SEEK button
Press this button to search for a broadcast station. When this is pressed, the button illuminates, and activates the automatic seek function. Press the ^ or ∨ button while the indicator is lit, to activate automatic scan. Once the broadcast signal is found, scanning stops automatically. To cancel the automatic seek mode, press this button once again.
⑨ ME (memory) button
This button is used to enter the preset stations. When this button is pressed, it illuminates for 5 seconds. This indicates that the memory standby state is activated.
10 MONO button
When an FM stereo signal is received poorly, press this button. The button will light and the signal will be received as a monaural broadcast.
⑪ Cassette loading slot
Insert a cassette here with the tape side to the right.
12 ◀◀ ▶▶ (rewind, fast forward) button (CR151)
Press the ▶▶ side of the button to advance the tape at fast speed. Press the ◀◀ side of the button to rewind the tape.
12 ◀◀ and ▶▶ buttons (CR131)
Press these buttons to advance or rewind the tape. When the ◀ indicator is shown on the LCD display, press the ◀◀ button to advance the tape fast and press the ▶▶ button to rewind the tape. When the ▶ indicator is shown on the LCD display, operations are reversed. Press both of them at the same time to switch the play of the A side of the cassette to that of the B side or vice versa. The indicator ◀ or ▶ on the LCD display indicates that the A side or B side is being played.
⑬ PROG. button (CR151 ONLY)
This is the switch for switching between the A and B sides of the cassette tape. Every time this button is pressed, the LCD display changes the indicator ◀ or ▶.
14 LOCAL button
This feature allows the seek function to only stop at strong broadcasts.
⑮ HI-Q button (CR151 ONLY)
Press this button when the station you want to receive is being interfered with by a powerful nearby station. The button lights up and the signal from the powerful nearby station is eliminated, so you can receive the desired station.
16 P. SCAN button
This button is used to briefly sample the six stations that have been preset in the selected band. Refer to the "Preset Memory Scan" section on page 16.
⑰ CD/ext. loop button (CR151 ONLY)
Press this button when using a CD player connected to the EXT. INPUT jacks or a graphic equalizer or surround processor connected to the EXT. INPUT and EXT. OUTPUT jacks.
While using CD input, operation of tape or tuner functions may cause muting circuits to activate. This is normal operation.
18 loud button
When listening at a low level, the loudness switch will create a more natural sound by emphasizing the low and high frequency ranges.
19 LCD display
When a broadcast is being received, the band (FM1, FM2, FM3, AM) and the frequency will be displayed. The ① indicator will illuminate when an FM stereo broadcast is received. During playback, the ◀ or ▶ indicator will light and indicate the playback direction.
20 Preset memory button (1–6)
Press preset memory buttons to memorize a station, or to select the same station after it has been memorized. A total of 18 FM stations and 6 AM stations can be memorized.
②1 Dolby C NR button (CR151 ONLY)
This button is used to play back a tape which has been recorded with Dolby C NR. When this button is pressed, the indicator lights up. If you are not using Dolby C NR, press this button once again.
22 Dolby B NR button
This button is used to play back a tape that has been recorded with Dolby B NR. When this button is pressed, the indicator lights up. If you are not using Dolby B NR, press this button once again.
23 MTL button
Press when using metal or CrO_2 tape. The indicator illuminates.
24 FM/AM (band)/MS (music search) button
In the tuner mode, press this button to select FM1, FM2, FM3 or AM. Each of these bands has six memory presets. The P.SCAN button will only scan the preset in the band selected.
In the tape playback mode, press this button to activate the music search mode. The indicator will light up. During this mode, pressing ▶▶ or ◀◀ button will advance the tape to the beginning of the next song, or the beginning of the current song, respectively. See "Music Search System" for more detail.
Operation
Tape Playback
- With the cassette tape side to the right, insert the cassette into the loading slot halfway. Even if the radio is on, the cassette will be loaded automatically, and the tape will begin playing.
- If the tape is a metal or CrO_2 type cassette, press the MTL button. The indicator will illuminate.
- Press the Dolby NR button that relates to the type of Dolby NR in which the tape is encoded. The indicator illuminates.
- Adjust the VOLUME, BASS, TREBLE, BALANCE and FADER controls to suit your listening preference.
- To stop tape play, press the ▲ button.
Fast-Forwarding and Rewinding the Tape
Press the ▶▶ or ◀◀ button. The tape will run rapidly in the designated direction. The unit automatically changes over to the tuner mode when the tuner has been switched on during fast winding. To release the tape forward or reverse mode, press the PROG. button (CR151) or the other ▶▶ or ◀◀ button (CR131).
Once rapid forwarding is finished, the reversed side will start to play automatically. Once rewinding is finished, the same side of the top will start to play automatically.
Music Search System
The song presently being played or the next song will be played from the being automatically.
To search for the beginning of the song following the one being played.
- Press the MS button. The indicator illuminates.
- Press the ▶ button. The tape is fast forwarded to the beginning of the following song, and the playback operation is automatically started.
To repeat the song which is presently being played
- Press the MS button. The indicator illuminates.
-
Press the ◀ button. The tape is rewound to the beginning of the song, and the playback operation is automatically started.
-
For the CR131, press the ▶▶ or ◀◀ button according to the indicator on the LCD display. (Please refer to 12 ◀◀ and ▶▶ buttons (CR131) on page 12.)
● The music search function does not necessarily work in the following cases. - When the music is very soft, e.g., classical music which is mainly pianissimo.
- When there is sustained silence of 4 seconds or more.
- When the interval between songs is very short or contains audible noise.
- When the recording was made at a very low recording level.
Tuner Operation
Eject the cassette tape by pressing the ▲ button whenever you listen to the radio.
Seek Tuning
- Turn the tuner on by pushing the ON VOL. knob.
- Select AM or FM reception by pressing the FM/AM button. The selected AM or FM reception will be displayed.
- Press the SEEK button and the button illuminates. To search for a broadcast signal with a higher frequency, press the ∧ button. To search for a broadcast signal with a lower frequency, press the ∨ button. When a broadcast signal is tuned in, the automatic seek stops. If the tuned frequency is not the desired broadcast station, press the ∧ or ∨ button to resume automatic seeking. To stop seeking, press the SEEK button and the button light is turned off.
- The Ⓐ indicator will illuminate only when an FM stereo broadcast is being received.
-
Adjust the VOLUME, BASS, TREBLE, BALANCE and FADER controls to suit your favorite volume and sound quality.
-
Press the MONO button when the FM station is too noisy. The stereo broadcasting will be switched to monaural but it is more comfortable to listen to.
- Press the LOCAL button to avoid the seek mode stopping at weak signals.
Manual Tuning
You can manually select a broadcasting station if a broadcast signal is not strong enough to find by seek tuning or you know the station's frequency.
- Turn the tuner on by pushing the ON VOL. knob. The frequency received will be displayed.
- Select AM or FM reception by pressing the FM/AM button. The selected reception will be displayed.
- Select the desired station by pressing the ∧ or ∨ button while checking the frequency on the LCD display.
- Adjust the VOLUME, BASS, TREBLE, BALANCE and FADER controls to suit your favorite volume and sound quality.
Preset Memory – Programming and Tuning
There are 3 FM bands (FM1, FM2, FM3) and an AM band, each with 6 memory presets, for a total of 18 FM and 6 AM presets. The 6 preset buttons are used in each band. To enter stations into the preset memory, follow this procedure:
- Enter the desired band (FM1, FM2, FM3, AM) by pressing the FM/AM button.
- Tune to the desired station by using Seek or Manual Tuning.
- Press the ME button. It will illuminate for 5 seconds.
- During this 5 second period, press the preset button with which you want to store the station.
- Repeat above 4 steps to load other preset memories, if desired.
To tune in those stations, enter the desired band and press the corresponding preset button.
- If a new station on the same band is memorized for preset memory button already assigned, the station previously memorized for that button is erased, and the new station is memorized.
- When the ME button is pressed, the button illuminates in green for about 5 seconds. The memory function will only work while the ME button is illuminated.
Last Station Memory Function
This function "remembers" the frequency last received before changing bands (FM/AM).
- When changing the band from FM1 to FM2, FM3, AM and again to FM1, the last received FM station will be tuned in.
This function also "remembers" the frequency of the station last received before turning off the power or before changing to the cassette mode. - When the power is turned on, the frequency of the station last received is displayed by the LCD display, regardless of whether or not the station is a preset one.
Preset Memory Scan
This function scans the six preset stations of the band in order automatically.
Pressing the P. SCAN button will scan the preset stations which are already memorized in the preset memory buttons from 1 to 6 in order, and the preset memory button indicator will blink for approximately 5 seconds. Press the P. SCAN button again to stop scanning.
Head Cleaning
If magnetic or ordinary dust collects on the playback head, capstan, or roller, the frequency response and wow flutter deteriorate. Use a head-cleaning cassette to remove the dust and restore high-performance sound.
The head-cleaning cassette should be used only for 2~3 minutes, as longer usage may possibly lead to damage of the head or other components.
Troubleshooting Checklist
Most of the problems experienced by customers are due to incorrect operation of the units. If this unit does not work as you intended, first check the items in the checklist. Also check other related components such as the speakers,
amplifier and other electrical equipment you use with this unit. If you still have difficulties in normal operation, please contact a Harman Kardon service center.
| Problem | Cause | Remedy |
| Cassette tape cannot be inserted. | • Cassette tape faces the opposite direction. | • Insert the tape by facing the tape side to the right. |
| Sound quality is poor. | • Incorrect setting of MTL button.• Incorrect setting of Dolby NR button. | • Press the MTL button if the tape is metal or CrO_2 type. (The indicator illuminates.) If not, press the button once again, and the indicator will go off.• Press the Dolby NR button if the music was recorded with Dolby NR on. |
| Sound is weak.Sound quality is no good.Sound is interrupted. | • Tape head is dirty. | • Clean the dirty part with a cleaning tape. |
| When using a two-speaker system, no sound is produced from either speaker. | • The FADER controller is not placed in the center. | • Place it at the center click. |
| Broadcast station cannot be selected by automatic seek tuning. | • The signal is weak.• The LOCAL button is lit (CR151). | • Use manual tuning.• Press the LOCAL button to turn off the light. |
| Ⓤ (stereo) indicator blinks. | • Stereo reception is difficult due to a weak signal. | • Press the MONO button and receive in monaural. |
Specifications
| MODEL | CR131 | CR151 |
| TAPE DECK SECTION | ||
| Frequency Response: | 20Hz-18kHz ±3dB | 20Hz-18kHz ±3dB |
| Wow-and-Flutter: | 0.09% | 0.09% |
| Signal-to-Noise Ratio - | ||
| Dolby NR Off: | 54dB | 54dB |
| Dolby B NR: | 64dB | 64dB |
| Dolby C NR: | — | 72dB |
| FM SECTION | ||
| Type of Tuning: | Digital Synthesized | Digital Synthesized |
| Usable Sensitivity: | 14.8dBf | 14.8dBf |
| 50dB Quieting (mono): | 18dBf | 18dBf |
| Signal-to-Noise Ratio - Mono/Stereo: | 72/68dB | 72/68dB |
| Harmonic Distortion - | ||
| Mono: | 0.2% | 0.2% |
| Stereo: | 0.4% | 0.4% |
| Capture Ratio: | 1.5dB | 1.5dB |
| Selectivity: | 70dB | 70dB |
| IF Rejection: | 80dB | 80dB |
| Image Rejection: | 55dB | 55dB |
| Stereo Separation: | 40dB | 40dB |
| Frequency Response: | 30Hz-15kHz ±3dB | 30Hz-15kHz ±3dB |
| AM SECTION | ||
| Sensitivity: | 30μV | 30μV |
| Selectivity: | 50dB | 50dB |
| AMPLIFIER SECTION | ||
| Line Output Level/Load: | 0.8V/10k Ohms | 0.8V/10k Ohms |
| Power Output (Continuous power per channel, into 4 Ohms, at 1% THD):20Hz to 20kHz | 12 Watts | 12 Watts |
| Tone Control Range: | ±10dB | ±10dB |
| Loudness Contour: | +10dB | +10dB |
| GENERAL | ||
| Chassis Dimensions (W x H x D): | 7" x 2" x 5-7/8"(178 x 50 x 150 mm) | 7" x 2" x 5-7/8"(178 x 50 x 150 mm) |
| Dimensions (W x H x D): | 7-7/16" x 2-5/16" x 6-11/16"(188 x 58 x 169 mm) | 7-7/16" x 2-5/16" x 6-11/16"(188 x 58 x 169 mm) |
| Weight | 3.2lbs. (1.4kg) | 3.4lbs. (1.5kg) |
| Voltage Requirement: | 11-16V | 11-16V |
| Current Consumption: | 4.5 Amps | 4.5 Amps |
All specifications and features subject to change without notice.
harman/kardon
A Harman International Company
240 Crossways Park West
Woodbury, NY 11797
Printed in Japan
1111-J30291 8806-:
- Features
- Tuner Section
- Cassette Deck Section
- Audio Section
- Precautions
- CAUTION - HIGH TEMPERATURE:
- installation
- Installation Parts
- Installing to The Dashboard
- Example of Installation in a TOYOTA
- Connections
- ① POWER AMP REMOTE wire
- ② POWER ANTENNA wire
- ③ MEMORY Back Up wire
- ILLUMINATION wire
- ⑤ +12V SWITCHED (+ACC) wire
- GROUND wire
- ⑦ Speaker System wires
- NOTE:
- ⑧ EXT. INPUT jacks (CR151 ONLY)
- ⑨ EXT. OUTPUT jacks (CR151 ONLY)
- ① ON-OFF switch/VOLUME control/BALANCE control
- ② FADER control
- ③ BASS control
- ④ TREBLE control
- ⑤ △ (eject) button
- √(tuning down) button
- ⑦ ∧ (tuning up) button
- ⑧ SEEK button
- ⑨ ME (memory) button
- MONO button
- ⑪ Cassette loading slot
- ◀◀ ▶▶ (rewind, fast forward) button (CR151)
- ◀◀ and ▶▶ buttons (CR131)
- ⑬ PROG. button (CR151 ONLY)
- LOCAL button
- ⑮ HI-Q button (CR151 ONLY)
- P. SCAN button
- ⑰ CD/ext. loop button (CR151 ONLY)
- loud button
- LCD display
- Preset memory button (1–6)
- ②1 Dolby C NR button (CR151 ONLY)
- Dolby B NR button
- MTL button
- FM/AM (band)/MS (music search) button
- Operation
- Tape Playback
- Fast-Forwarding and Rewinding the Tape
- Music Search System
- Tuner Operation
- Seek Tuning
- Manual Tuning
- Preset Memory – Programming and Tuning
- Last Station Memory Function
- Preset Memory Scan
- Head Cleaning
- Troubleshooting Checklist
Brand : HARMAN KARDON
Model : CR131
Category : Car stereo