
CH140 - Car radio HARMAN KARDON - Free user manual and instructions
Find the device manual for free CH140 HARMAN KARDON in PDF.


| Type | Car stereo |
| Brand | Harman Kardon |
| Model | CH140 |
| Form Factor | 1-DIN |
| Dimensions (W x H x D) | 178 x 52 x 150 mm |
| Weight | 1.0 kg |
| Power Supply | 12V DC (negative ground) |
| Maximum Power Output | 4 x 50 Watts |
| RMS Power Output | 4 x 22 Watts |
| Radio Bands | AM / FM |
| Preset Stations | 30 (18 FM, 12 AM) |
| CD Player | Yes |
| Audio Inputs | Front AUX (3.5 mm) |
| Audio Outputs | Front, Rear (RCA pre-out) |
| Equalizer | 3-band (Bass, Treble, Balance) |
| Display | LCD with white backlight |
| Steering Wheel Control Compatible | Yes (requires adapter) |
| Remote Control | Included |
| Safety Features | Disconnect battery before installation; built-in fuse protection |
| Cleaning Instructions | Wipe gently with a dry, soft cloth |
| Repairability | Contact authorized service center for repairs |
Frequently Asked Questions - CH140 HARMAN KARDON
User questions about CH140 HARMAN KARDON
0 question about this device. Answer the ones you know or ask your own.
Ask a new question about this device
Download the instructions for your Car radio in PDF format for free! Find your manual CH140 - HARMAN KARDON and take your electronic device back in hand. On this page are published all the documents necessary for the use of your device. CH140 by HARMAN KARDON.
USER MANUAL CH140 HARMAN KARDON
Congratulations on your purchase of a Harman Kardon CH140 High Fidelity Cassette Deck/Tuner.
To fully understand the CH140's capability, please read this manual carefully and follow all of the instructions regarding its use and installation.
Superior autosound performance is now available in a small 7" chassis that will fit nearly any car made. The CH140 houses a complete full-featured unit.
CASSETTE DECK SECTION
■ Playback Frequency Response 20 — 20,000 Hz (±3dB)
■ Discrete Playback Amplifier Circuit
■ Dolby B Noise Reduction
This model is capable of providing the standard Dolby B noise reduction. This improves high level, high frequency response.
■ Music Search
■ Equalizer (Tape Selector) Switch
Adjusts for normal or metal/CrO2 tapes in tape mode.
■ Mechanically Assisted Tape Loading
New improved mechanism literally pulls cassette into play position.
■ Locking Fast Forward and Rewind
Locking mechanism allows hands-off F.F. and REW operation.
■ Auto Replay at End of Rewind
■ Key Off Eject/Tape End Eject
Automatically ejects the cassette when the ignition key is turned off or the tape reaches at the tape end.
FEATURES
TUNER SECTION
■ Digital Synthesized Tuning Digital Synthesized Tuning accuracy eliminates drifting and mistuning, thereby guarantying optimum sound quality.
Six AM and six FM stations can be simultaneously stored in the memory.
- Seek Tuning Function
■ High Fidelity Performance (Low Harmonic Distortion, Low Noise, Wide Stereo Separation)
■ Auto Tuner Monitor
Allows monitoring tuner automatically during the fast forward or rewind modes.
■ Auto Separation & Soft Muting Control
Adjusts stereo separation and soft muting automatically during FM stereo reception for optimum reception and sound quality.
■ Pulse Noise Suppressor
Pulse Noise Suppressor Circuit is included to reduce noise caused by the automobile electrical system.
PREAMP SECTION
■ All Discrete Circuitry
■ Separate Bass and Treble Controls
■ Fader Control
■ Amplifier Remote Turn-on, Power Antenna and Memory Back Up Leads
ACCESSORIES
Metal Mounting Strap
Spring Washer (1 pc.)
Bolt (2 pcs.)
Boss (10 mm) (1pc.)
Connector Assembly
Tab for removing Front Trim Cover
Flat Washer (4 pcs.)
Hex. Nut (4 pcs.)
Plastic Washer (2 pcs.)
Spacer (1pc.)
Tapping Screw (1 pc.)
Front Trim Plate
Spare Fuse (1 pc.)
Dolby noise reduction manufactured under license from Dolby Laboratories Licensing Corporation. "Dolby" and the double-D symbol are trademarks of Dolby Laboratories Licensing Corporation.
SPECIFICATIONS
CASSETTE DECK SECTION
| Frequency Response(Harman/Kardon Test Tape,±3 dB, Dolby NR off) | : 20 — 20,000 Hz |
| Wow and Flutter (WRMS) | : 0.09% |
| Signal to Noise Ratio (CrO2) | |
| Dolby NR off | : 54 dB |
| Dolby B NR | : 64 dB |
TUNER SECTION
| Antenna Terminal Impedance: 75 Ohms |
—FM—
| Usable Sensitivity (Mono) | : 14.8 dBf(1.5μV—75 Ohms) |
| 50dB Quieting Sensitivity(Mono) | : 18 dBf(2.2μV—75 Ohms) |
| Signal to Noise Ratio(65 dBf, Mono) | : 70 dB |
| Alternate Channel Selectivity | : 70 dB |
| Stereo Separation (1 kHz,65 dBf, 100% Modulation) | : 40 dB |
| THD (1 kHz, 65 dBf) | |
| Mono | : 0.2% |
| Stereo | : 0.4% |
—AM—
| Sensitivity | : 30μV |
| Alternate Channel Selectivity | : 50 dB |
AUDIO SECTION
| Tone Control | |
| BASS (at 50 Hz) | : ±10 dB |
| TREBLE (at 10 kHz) | : ±10 dB |
| Preout Output Level(10 k Ohms Load) | : 775 mV |
| Preout Output Impedance | : 500 Ohms |
GENERAL
| Dimensions | |
| Chassis (WXHXD) | : 7"×2"×5-7/8"(178×50×150mm) |
| Nose Piece (WXHXD) | : 4-1/8"×1-3/4"×1-3/8"(105×44×35mm) |
| Shaft Spacing | : 5-1/8", 5-5/8",5-13/16"(130, 142, 148mm) |
| Weight | : 3.5 lbs. (1.6 kg) |
| Power Supply | : DC13.8 V(11—16 V Usable),Negative Ground |
| Current Consumption | : 0.6 A |
All specification and features subject to change without notice.
INSTALLATION
Your CH140 comes with a complete kit that includes a mounting strap, bolts, washers, front trim plate and control knobs. Fig. 2 shows the proper step procedure. Look at the diagram and make sure that you have all the necessary parts. Then, begin this procedure.
SHAFT SPAN AND NOSE PIECE OPENING DIMENSIONS
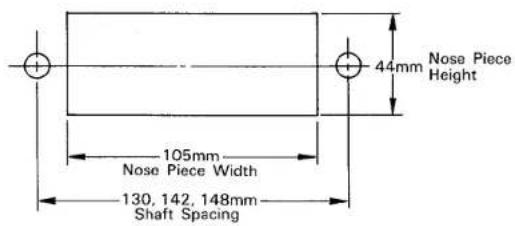
Fig. 1
The shaft span has been preset to 148mm, but this can be reset to 130mm or 142mm by loosening the shaft nuts and moving the shaft adjustment washers.
- Secure one end of the mounting strap to the rear of the unit using the enclosed bolts (Fig. 2-1). Then secure the other end of the strap to the wall using the self-tapping screw (Fig. 2-2).
- Place nuts and flat washers on the control shafts as illustrated. Then, after fitting the front trim plate, mount the washers and nuts on the control shafts to attach the front trim plate securely to the dashboard.
- Remove the paper on the back of spacer B, and stick it on the front trim plate as shown in Fig. 2.
- Attach the covers and install the control knobs on the shafts, while taking care not to bite lead wires, installing first the "A" knob, "B" knob and then "C" knob.
NOTE: When the intalling space does not have sufficient depth, replace the boss on the right side with a boss (10mm long, included in the set) for proper installation. (Refer to Fig. A.)
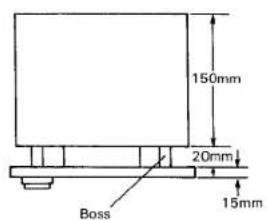
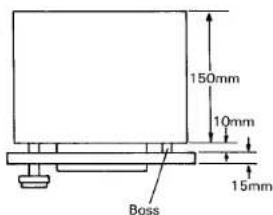
Fig. A
How to remove front trim covers
- Insert the tab firmly but softly into the holes under the front trim plate so as not to break the lugs on the panel. (Fig. B)
- Bend the tab back and the trim cover will release.
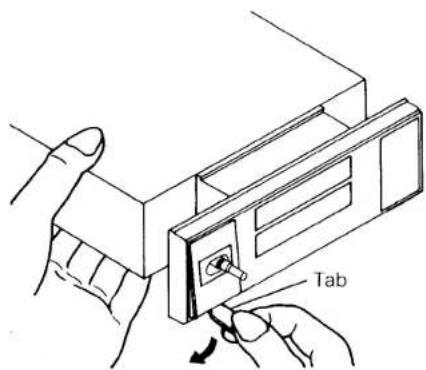
Fig. B
This unit is designed to operate with any NEGATIVE GROUND 12 V (11—16 V usable) DC electrical system.
INSTALLATION
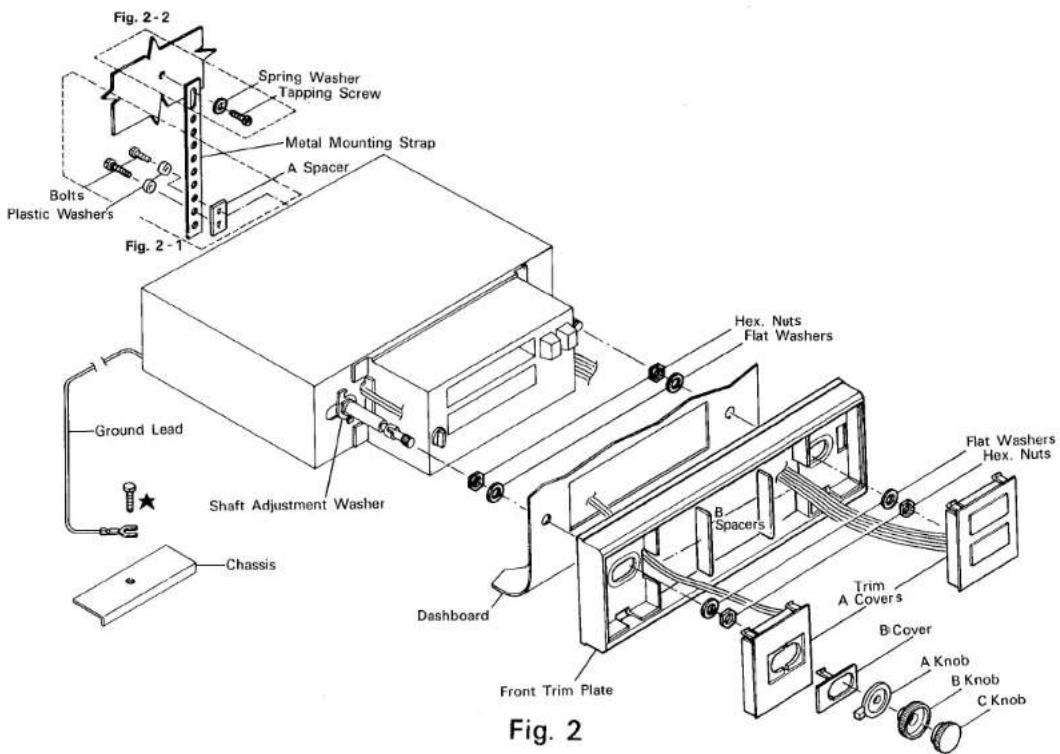
NOTE : Secure the ground lead of the unit by using a screw (★) already attached to the chassis of the car. Be sure that this chassis point is a good electrical ground, as it may otherwise add engine noise to the audio signals.
CONNECTIONS
After installing all components, connect the wiring according to Fig. 3.
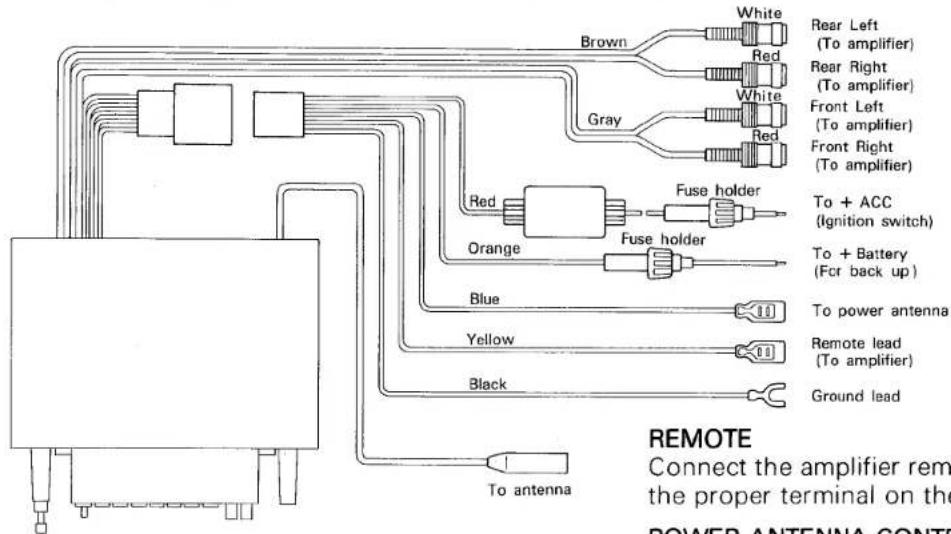
Fig. 3
+ACC
The +ACC lead is a positive power input. It should be connected to a circuit which is turned on when the IGNITION SWITCH is in the "ACC" position.
MEMORY BACK UP
The +Battery lead is a positive power input. It should be connected to a circuit which is always on in order to retain the tuner memory.
REMOTE
Connect the amplifier remote turn-on lead (yellow) to the proper terminal on the amplifier, if provided.
Connect the power antenna control lead (blue) to the connector of a fully automatic power antenna. Power antenna control does not work with a semi-automatic or manually operated antenna.
GROUND
This is the negative power input. It should be connected directly to the car chassis.
NOTE : Be sure to secure the ground lead to a good electrical ground. Poor grounding is likely to add engine noise to the audio signals.
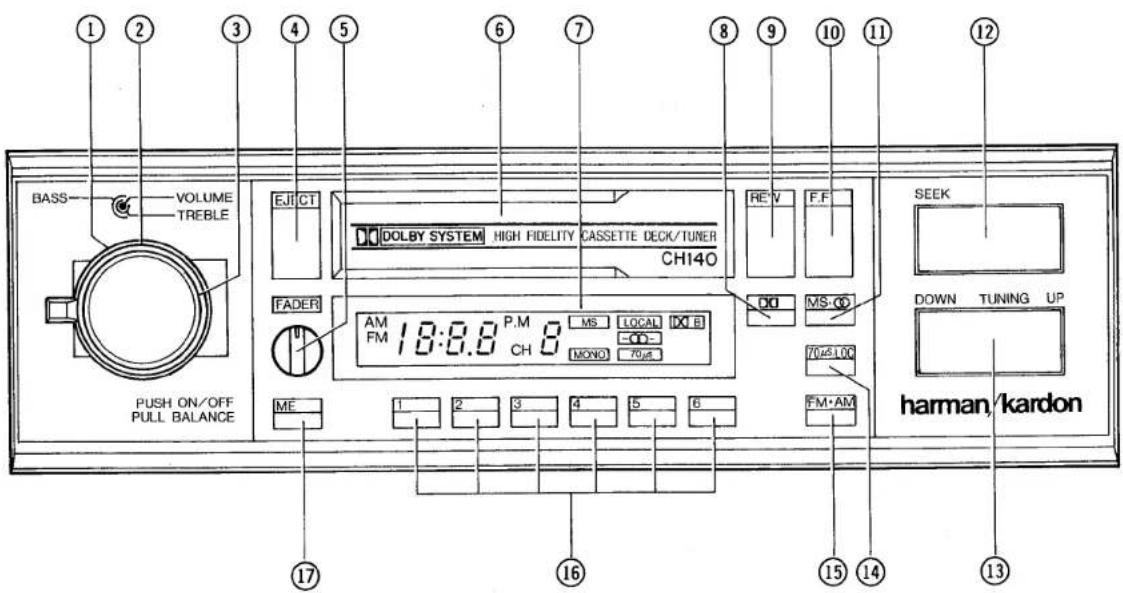
Fig. 4
- BASS Control
This knob controls the low frequency sounds. Turn it clockwise to boost or counterclockwise to cut them. It has center click to indicate flat frequency response.
- TREBLE Control
This controls the high frequency sounds. Turn it clockwise to boost or counterclockwise to cut them. It has center click to indicate flat frequency response.
Push this knob to turn on the Tuner. Push again to turn it off. This knob controls the sound level. Turning clockwise increases the sound volume and turning counterclockwise decreases it. This also controls the balance of the left and right channels while pulling out on this knob. Turn it to clockwise or counterclockwise to balance the sound. It has center click to indicate the balance of the left and right channels.
- EJECT Button/Display Mode Selector
Push this button to eject the cassette when playing it. This also selects the display mode during tuner operation; Tuner Frequency or Clock. When the unit is first turned on, it will automatically display the tuner frequency. Pushing the eject button changes the display from tuner frequency to clock for 8 seconds.
- FADER Control
This control adjusts the balance of front and rear level. Turn this control clockwise to decrease the front level or counterclockwise to decrease the rear level. It has center click to indicate the balance of the front and rear channels.
-
Cassette Loading Slot
-
Display
This includes tuner frequency, clock, memory channel display, MS (Music Search), Mono, local, ○○ (Stereo), 70μS (Metal/CrO₂) or Dolby B NR indicator.
- DOLBY NR Switch
Push this switch to play a tape recorded with Dolby NR.
- REW (Rewind) Button
Press this button to rewind the tape. To operate the Music Search function, first press the Music Search button and then this button.
- F.F. (Fast Forward) Button
Press this button to advance the tape at fast speed. To operate the Music Search function, first press Music Search button and then this button.
- MS (Music Search) Switch/MONO Switch
When playing a tape, push this button to operate the Music Search function before pressing F.F. or REW button. This is also the Mono switch during the Tuner mode.
CONTROLS & INDICATORS
Mono Mode : All FM broadcasts will be received as monaural broadcasts, regardless of whether or not they are in stereo. This mode may provide quieter, more listenable sound quality under poor reception conditions.
Auto Mode : FM stereo reception is automatically selected when received at medium or high signal strength. When an FM monaural signal or a weak FM stereo signal is received, it automatically switches to the FM monaural mode.
- SEEK Button
Push left side of this button to operate SEEK function. (Refer to the "TUNER" section.)
- TUNING (DOWN/UP)/CLOCK (Minutes/Hours) Button
Use this button for manual tuning.
UP : When this side is pressed, the tuner frequency increases.
DOWN : When this side is pressed, the tuner frequency decreases.
In FM mode, frequency display moves in 200* kHz steps. In AM, the display moves in 10* kHz steps. If this button is pressed for more than a second, the display moves quickly and continuously until released. This button also controls the hours and minutes displayed on the clock. To set the clock time hold down the memory button an simultaneously push the up and down buttons. The up button sets hours, the down button minutes.
- 70 μSEC (Tape Selector) Switch/LOCAL—DX Selector
Press when using metal or CrO2 tape.
This is also the LOCAL—DX Selector during tuner operation. Press this button to change the mode.
-
FM/AM Band Select Switch
-
PRESET MEMORY Buttons
Press any one of the six Preset Memory buttons while the channel indicator blinks, and the frequency displayed is memorized at that Preset Memory button. Each position can memorize one frequency in both FM and AM bands. Once a station frequency is memorized, it can be recalled any time the same button is pressed.
- MEMORY Button
This button is used to enter or change the preset broadcast stations. When this switch is pressed, the channel indicator blinks for 8 seconds. This indicates the preset memory standby state.
This button is also used to change the display mode from FREQUENCY to CLOCK in the TUNER operation.
NOTE : Figures indicated with * are changed except in North America to 100 kHz and 9 kHz respectively.
CLOCK
- Turn this unit on by pushing the VOLUME control knob.
- Press the EJECT button to change the DISPLAY mode from TUNER to CLOCK.
- Press and hold the MEMORY button.
- To set the correct Hour, press TUNING UP while still pressing the MEMORY button. Each press of the TUNING UP button will advance the clock one hour. If the button is pressed and held, the hours will advance rapidly.
- To set the minutes, press the TUNING DOWN button while still pressing the MEMORY button. Each press of the button will advance the clock one minute. If the button is pressed and held the minutes will advance rapidly.
- When the MEMORY button is released the clock will begin counting.
NOTE: In the TUNER mode, the display can be changed to CLOCK for 8 seconds by pressing the EJECT button.
In the TUNER mode, the display can be changed to CLOCK by pressing the EJECT button while pressing the MEMORY button. By pressing the EJECT button in CLOCK mode, frequency is displayed for 8 seconds.
CASSETTE
- With the cassette tape opening to the right, insert the cassette into the loading slot as far as it will go. The unit is then turned ON even if the tuner is off, and the tape will begin playing.
- If the tape is a Metal/CrO _2 type cassette, push the 70 SEC (Tape Selector) switch. "70 S" indicator illuminates.
- Push the DOLBY NR switch for a tape recorded with Dolby NR.
□□ B indicator illuminates. - Adjust the VOLUME, BASS, TREBLE, BALANCE and FADER controls to suit your listening preference.
- To stop tape play, depress the EJECT button. The cassette will eject and the player will automatically change over to the Tuner mode (when the tuner is switched on).
- The cassette will be ejected automatically when the tape reaches the end during play or F.F. mode.
NOTE : Cassette will be ejected automatically whenever you turn the ignition switch to the "OFF" position while a cassette is playing.
OPERATIONS
Winding the Tape Rapidly in Forward or Reverse Direction
-
Depress the F.F. or REW button until it locks and the tape will run rapidly in the designated direction. The player automatically changes over to the Tuner mode (when the tuner has been switched on) during fast winding.
-
Lightly depress the other button (F.F. or REW) to stop the fast winding mode. The tape will start playing again.
NOTE : The tape will be replayed automatically after the tape is rewound.
MS (Music Search) system
The Music Search is a system whereby the tape is fast forwarded or rewound to the beginning of a song, and the playback operation is automatically started. However, only one song can be searched with one operation; therefore, in order to bypass any number of songs in the forward or reverse direction, repeat the operation as many times as necessary.
NOTE: The following describes those instances in which the tape that is fast forwarded or rewound does not stop at the beginning or stops in the middle of a song:
-
When the music is very soft, e.g., classical music which is mainly pianissimo.
-
When there is sustained silence of 4 seconds or more within the recording (e.g., of a conversation or a lecture).
- When parts of a conversation, etc., are recorded onto the tape in between songs.
- When the interval between songs is very short or contains audible noise.
- When the recording was made at a very low recording level.
To Search the song immediately following the one being played back
- Press the MUSIC SEARCH switch. Music Search indicator illuminates.
- Then press the F.F. button. (The tape is fast forwarded to the beginning of the following song, and the playback operation is automatically started.)
To Repeat the song which is being played back
- Press the MUSIC SEARCH switch. Music Search inindicator illuminates.
- Then press the REW button. (The tape is rewound to the beginning of the song, and the playback operation is automatically started.)
TUNER
The tuner will not operate if a tape is inserted. Remove the tape by depressing the EJECT button.
Automatic Tuning
- Turn the tuner on by pushing the VOLUME control knob.
- Select AM or FM reception by pressing FM/AM Band Selector.
- Press SEEK button (left side). The frequency changes until a broadcasted signal is tuned in, and the automatic tuning stops and holds that station.
- Note that this unit can seek both up and down in frequency. The last manual (UP/DOWN) operation determines the seek direction. To change direction, press the UP or DOWN button and then press SEEK.
- When in the auto mode (MONO indicator does not illuminate.), the stereo indicator will illuminate only when an FM stereo broadcast is being received.
- Adjust the VOLUME, BASS, TREBLE, BALANCE and FADER controls to suit your listening pleasure.
Manual Tuning
- Turn the tuner on by pushing the VOLUME control knob. The frequency received will be displayed.
- Select AM or FM reception by pressing the FM/AM Band selector.
- Select the desired station by pressing the UP or DOWN side of the TUNING button.
- When in the auto mode (MONO indicator does not illuminate.), the stereo indicator will illuminate when an FM stereo broadcast is being received.
- Adjust the VOLUME, BASS, TREBLE, BALANCE and FADER controls to suit your listening pleasure.
OPERATIONS
Preset Memory Tuning
This feature enables the selection of one of six AM and six FM broadcasts by simply pressing a PRESET button. This eliminates the need for auto or manual tuning. In order to use this feature, broadcast frequencies must first be entered into the PRESET memory as follows;
- Tune to the station to be memorized by using Auto or Manual Tuning.
- Press the MEMORY button. The CHANNEL display will blink for 8 seconds. During this period, press one of the PRESET MEMORY buttons numbered 1 through 6. The button's number will be displayed and presetting of the station is completed.
- To cancel a memorized station and memorize a new station at that number, tune to the frequency of the new station and follow step 2 above. The old station is automatically cleared, and the new station is memorized.
Last Station Memory Function
This function "remembers" the frequency last received before changing bands (FM/AM). When changing the band from FM to AM and again to FM, the last received FM station will be tuned in. This function also "remembers" the frequency of the station last received. When the power is turned on, the frequency of the station last received is displayed by the FREQUENCY Display, regardless of whether or not the station is a preset one.
PRECAUTIONS
- Always remove the cassette tape from the unit when not in use.
- When replacing fuse(s), the replacement must be of the same amperage as shown on the fuse holder. If the fuse(s) blow more than once, carefully check all electrical connections for shorted circuitry. Have your car's voltage regulator checked also. Do not attempt to repair the unit yourself; consult Harman Kardon or your nearest Harman Kardon Service Station for servicing.
- In order to ensure proper performance, be sure the temperature in your car is within the range of 14°F (-10°C) to 140°C (60°C) before turning your player on. Good air circulation is essential, especially in hot weather, to prevent internal heat build-up in the unit.
- C-120 type cassette tapes are not recommended for use in any automobile tape players.
- Prevent any foreign objects from entering the cassette opening as the precision mechanism and tape head could be damaged.
- When your tape is not in use, store in the case provided by tape manufacturer.
-
To protect your cassette tapes, store them in a cool place away from dust, dirt and strong magnetic sources such as electric motors and TV sets.
-
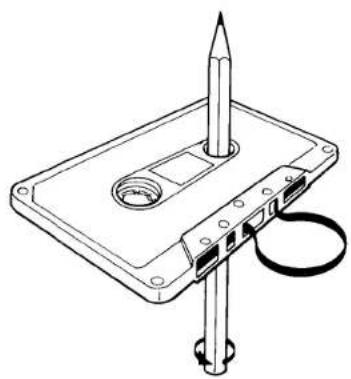
Check and make sure any slack in the tape is taken up before inserting the tape into the unit. A loose tape could cause damage to the unit and the tape itself. Tighten the cassette by inserting a pencil or a similar instrument into the spindle hole and turn until all the slack has been taken up. (Fig. 5)
natural_image
Line drawing of a cassette tape with a pencil inserted into the top case and a cable attached (no text or symbols)Fig. 5
CLEANING
It is recommended that the tape head be cleaned after every 10 hours of use. To do so, insert a special head cleaning cassette into the tape loading slot and allow it to run for a few minutes.
TROUBLESHOOTING CHECKLIST
Most of the problems experienced by customers are due to incorrect operation of their units. If this unit does not operate as you intended, first check the items
in the checklist. Also check other related components such as the speakers, amplifier and other electrical equipment you use with this unit.
| Problem | Cause | Remedy |
| The tape does not run. | ● Tape has too much slack. | ● Eject the cassette and remove tape slack.(See Fig. 5) |
| Sound flutters. | ● Tape head, capstan or pinch roller is dirty.● Cassette tape is bad. | ● Clean those parts using a special cleaning cassette.● Use new cassette. |
| Unit does not play back. | ● Incorrect connection.● Sound is not recorded on the tape.● Tape head is dirty. | ● Be sure all connections.● Exchange with a recorded tape.● Clean the tape head. |
| Sound is distorted. | ● Tape head is dirty.● Incorrect setting of the 70 μSEC SWITCH. | ● Clean the tape head.● Set 70 μSEC SWITCH according to the type of tape. |
| High frequency sound is not clear. | ● Tape head is dirty.● Incorrect operation of DOLBY NR or 70 μSEC SWITCH. | ● Clean the tape head.● Set the switch correctly. |
| Broadcast cannot be heard. | ● The tape is running.● Incorrect connection of the antenna. | ● Eject the cassette.● Check the antenna connection wire. |
| AM sound is noisey. | ● The unit is effected by the amplifier. | ● Move the amplifier to a location farther away from the antenna. |
| Sound has ignition noise. | ● Poor connection of ground.● Poor power line filtering. | ● Be sure to secure ground lead.● Add a power line filter to the + Battery wire. |
- CASSETTE DECK SECTION
- FEATURES
- TUNER SECTION
- PREAMP SECTION
- ACCESSORIES
- SPECIFICATIONS
- INSTALLATION
- How to remove front trim covers
- CONNECTIONS
- +ACC
- MEMORY BACK UP
- REMOTE
- GROUND
- CONTROLS & INDICATORS
- CLOCK
- CASSETTE
- OPERATIONS
- Winding the Tape Rapidly in Forward or Reverse Direction
- MS (Music Search) system
- To Search the song immediately following the one being played back
- To Repeat the song which is being played back
- TUNER
- Automatic Tuning
- Manual Tuning
- Preset Memory Tuning
- Last Station Memory Function
- PRECAUTIONS
- CLEANING
- TROUBLESHOOTING CHECKLIST
Brand : HARMAN KARDON
Model : CH140
Category : Car radio