
HP4 - Video projector AAXA Technologies - Free user manual and instructions
Find the device manual for free HP4 AAXA Technologies in PDF.


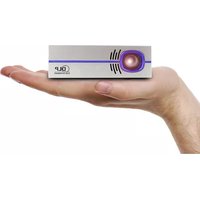
| Product Type | Pico Video Projector |
| Model | HP4 |
| Brightness | 100 Lumens |
| Native Resolution | 854 x 480 (WVGA) |
| Contrast Ratio | 1000:1 |
| Light Source | LED (up to 20,000 hours) |
| Display Technology | DLP |
| Dimensions (W x H x D) | 4.7 x 3.2 x 1.1 inches (12 x 8.1 x 2.8 cm) |
| Weight | 0.5 lbs (0.23 kg) |
| Power Consumption | 30W max |
| Power Source | Rechargeable lithium-ion battery (up to 2 hours) |
| Inputs | HDMI, USB, Micro SD, 3.5mm AV |
| Built-in Speaker | 1W mono |
| Supported Media | Images, video, audio; up to 1080p HD compatibility |
| Focus | Manual |
| Projection Distance | 0.5 to 3 m (20 to 120 inches diagonal) |
| Keystone Correction | ±15° |
| Package Contents | Projector, remote control, power adapter, USB cable, AV cable, tripod, user manual |
| Usage Environment | Indoor / outdoor (low ambient light recommended) |
| Maintenance | Clean lens with soft cloth; keep ventilation free of dust |
| Safety | Avoid staring at lens; do not disassemble; keep away from water |
| Repair and Spare Parts | Contact AAXA customer support for battery replacement or other repairs |
| General Information | User manual available in PDF on notice-facile.com |
Frequently Asked Questions - HP4 AAXA Technologies
User questions about HP4 AAXA Technologies
0 question about this device. Answer the ones you know or ask your own.
Ask a new question about this device
Download the instructions for your Video projector in PDF format for free! Find your manual HP4 - AAXA Technologies and take your electronic device back in hand. On this page are published all the documents necessary for the use of your device. HP4 by AAXA Technologies.
USER MANUAL HP4 AAXA Technologies
natural_image
Orange projector with a circular lens and 'aoxa' branding (no additional text or symbols visible)CAUTION!
WARNING: Please use this product as instructed. Misuse may cause injury or death.
• DO NOT use while driving
- DO NOT expose to water or wet surfaces. Electric shock may occur
- DO NOT expose the projected LED image to your eyes or the eyes of others
- DO NOT block or restrict airflow from ventilation holes as this may cause the projector to overheat
- Keep the projector, battery, or charger away from any heat sources
Table of Contents
Chapter 1: HP4 at a Glance
HP4 Introduction 1
Remote & Keypad 2
Accessories 3
Chapter 2: Getting Started
Powering On / Off 4
Focus Adjustment / Throw Distance 6
Connecting to Speakers / Headphones ...... 7
Loading External Content 8
Keystone Adjustment 11
Chapter 3: Menu Screens
Main Menu 13
Halloween Effects Menu 14
AutoPlay 15
Files Menu 17
Connecting to Device via Digital Input 19
Mirroring Menu 22
Chapter 4: Settings Menu
Picture Menu 28
Sound Menu 29
Options Menu 30
Bluetooth Menu 31
Timer Menu 32
Chapter 5: Technical Details
Troubleshooting 33
Specifications 36
Notes 37
Chapter 1: HP4 at a Glance
Main Unit
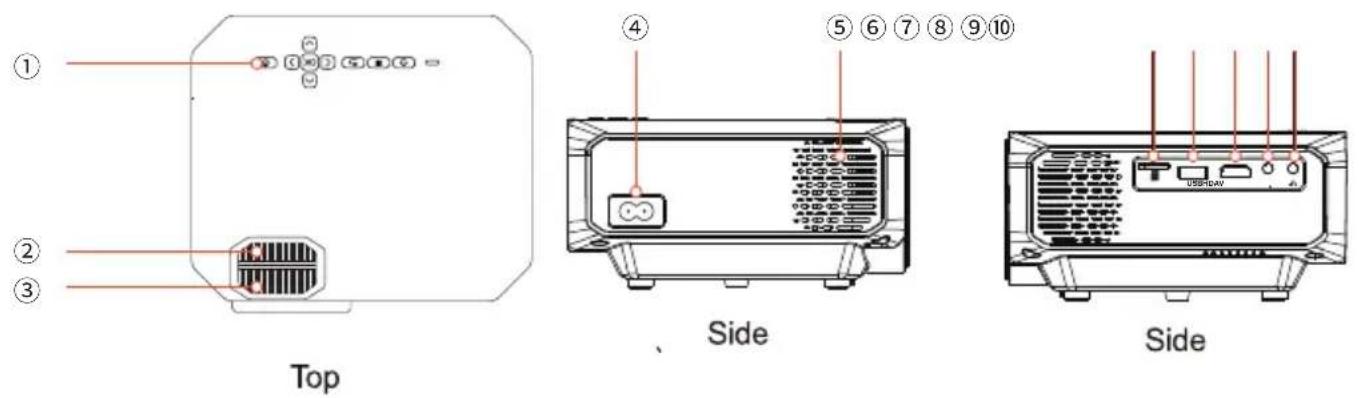
① Power Button
② Keystone Adjustment
③ Focus Adjustment
④ D/C Power
⑤ Vent Fan
⑥ TF Card
⑦ Standard USB 2.0 Compatible
⑧ Digital AV (HDMI Compatible)
⑨ Composite AV
⑩ Headphone Out
Remote & Keypad
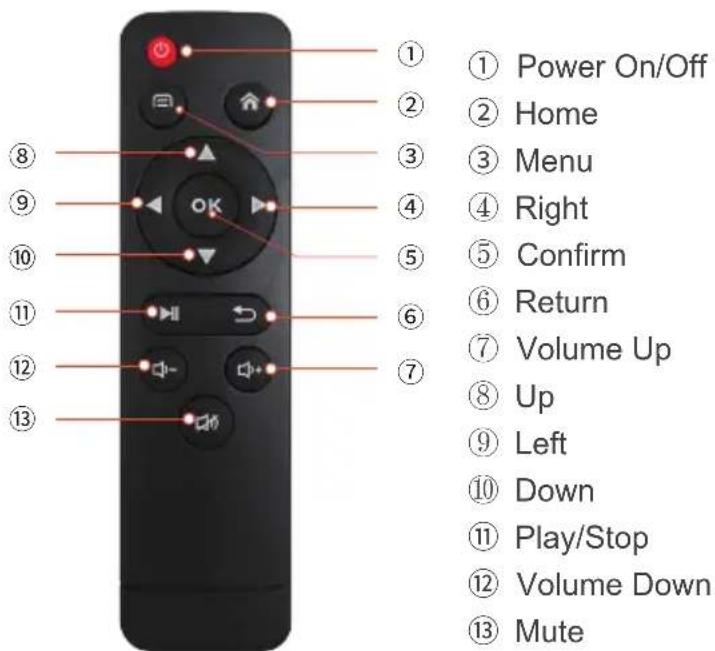

⑭ Home
⑲ Right
⑮ Menu
⑳ Power On/Off
⑯ Return
⑳ Up
⑰ Left
22 Confirm
⑱ Down
Both the keypad and remote can be used to navigate through the menus. The Main Menu Navigation on the remote functions exactly the same as the directional pad on the HP4 unit.
Accessories

natural_image
Simple line drawing of a card inside a circle (no text or symbols)TF Card
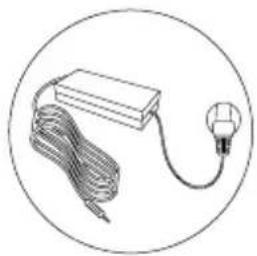
natural_image
Simple line drawing of a light bulb connected to a box of wires, enclosed in a circle (no text or symbols)Power Adapter

natural_image
Simple line drawing of a remote control with buttons and playback buttons (no text or symbols)Remote Control

natural_image
Simple line drawing of three overlapping documents inside a circle (no text or symbols)User Manual
*Under various circumstances, the actual accessories may be different from those shown in the pictures above. Additional accessories are available for purchase at www.aaxatech.com
Chapter 2: Getting Started
Powering ON the projector
- Connect the power cord to the HP4.
- Connect the other end of the power cord into the wall power source.
- Press the On/Off button at the top of the HP4 for about 3 seconds, wait shortly and the projector should automatically boot up and turn on. You can also press the Power On/Off button on the Remote Control to power on the projector.
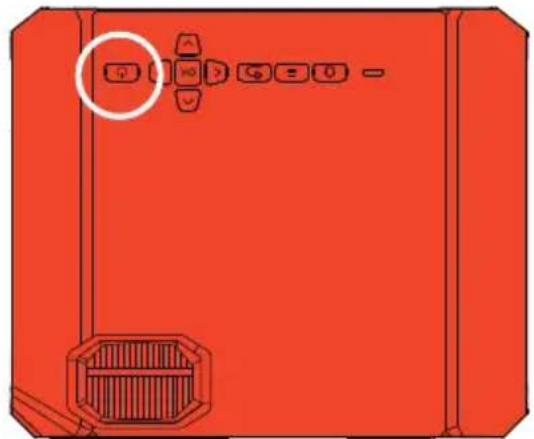
natural_image
Red device front panel with control buttons and a ventilation grille (no text or symbols)
natural_image
Black remote control with playback buttons and playback controls (no text or symbols visible)Getting Started
Standby Mode
- To transition to "STANDBY" mode, press the power button twice on the remote control.
- The optical engine should power off and the fan should stop spinning. The projector is now in "STANDBY" mode and can be turned on using the remote control.
*Note: Standby mode will still consume a small amount of power.
Powering OFF the projector
- To turn off the projector, press the "On/Off" button on the navigation pad on top of the projector or the remote control. This will fully turn off the projector.
- Unplug and disconnect the HP4 from the power source
■ Focus Adjustment / Throw Distance
Focus Adjustment
- Spin the focus wheel until the image becomes clear.
Throw Distance Chart
| Throw Distance | Diagonal Screen |
| Units: Inches | Units: Inches |
| 25 | 20 |
| 30 | 25 |
| 40 | 33 |
| 50 | 41 |
| 60 | 49 |
| 70 | 57 |
| 80 | 66 |
| 90 | 74 |

natural_image
Red and black projector with lens (no visible text or symbols)DIAGONAL SCREEN SIZE
Throw Ratio: 1.33:1
Projection Angle: 0 % Offset
*minimum throw distance: 18 inches
■ Connecting Speakers / Headphones
Step 1: Connect your speakers/headphones to the projector's audio port.
Step 2: Ensure that the projector and/or the headphones are powered on.
Step 3: Place the headphones on and enjoy!
*CAUTION: Prolonged use of headphones at a high volume may impair hearing.

natural_image
Red portable projector with front panel, two desktop monitors, a microphone, and a pair of headphones (no text or symbols visible)Loading External Content
The HP4 Projector can read files directly from both a TF Card and USB Drive. Supported file types include: MP3 / WMA / OGG / WAV / AVI / MP4 / JPG / GIF / PDF / DOC / XLS / PPT

natural_image
Red portable electronic device with ventilation slots and ports, connected to a black USB flash drive labeled (Up to 64 GB) (no text or symbols on device body)- Loading External Content Cont.
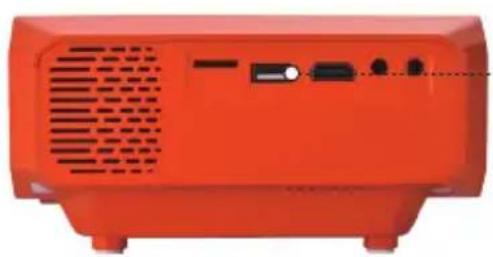
How to insert your TF Card
- Slide in your TF card into the TF card slot on the side of the HP4
• Gently slide the TF card until it clicks into place.
natural_image
Red portable projector with ventilation grille and control buttons (no visible text or symbols)
(Up to 64 GB)
- Loading External Content Cont.
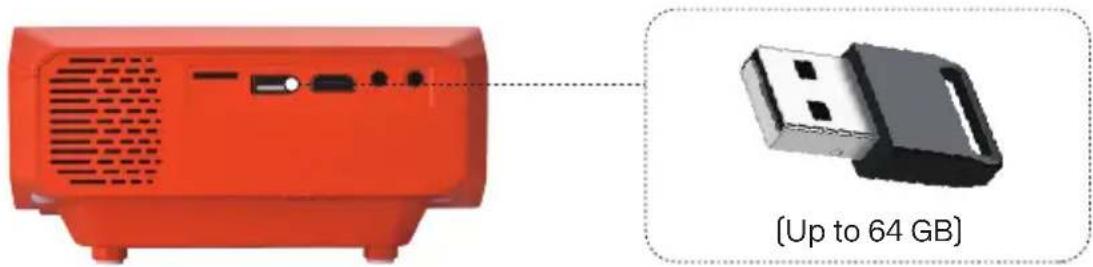
How to insert your USB Drive
- Slide your USB Drive into the USB port.
• Gently slide the drive until it cannot go in any further
natural_image
Red portable electronic device with ventilation slots and ports, connected to a USB flash drive labeled (Up to 64 GB) (no text or symbols on device body)Keystone Adjustment

natural_image
Two action shots of a muscular man in combat gear, showing before and after motion (no text or symbols visible)What is Keystone?
"Keystoning" occurs when a projector is aligned non-perpendicularly to a screen, or when the projection screen has an angled surface. The image that results from one of these misalignments will look trapezoidal rather than square.
Keystone Adjustments
By adding a special, selectable algorithm to the scaling, some new projectors are able to alter the image before it reaches the projection lens. The result is a squared image, even at an angle.
Keystone Adjustment
How to Correct Keystone
If the image looks trapezoidal with the base or the top larger, use the Keystone Adjustment wheel on the top of the HP4 projector to adjust the image until the projection screen is a squared image.

natural_image
Red and black photo of a red and black projector with a lens (no visible text or symbols)
natural_image
Four-panel image showing a man in action, with no visible text or symbols.Chapter 3: Menu Screens
Main Menu
The HP4 features an Onboard Media Player. To play videos, pictures, and music files directly from your connected devices, go to the "Projector Functions" in the Main Menu.


- Press the left and right directional buttons to choose an icon from the main menu.
- To select a menu option, press the "OK" button in the navigation pad.
- To go back to the previous screen, press the "Return" button.
- To return to the main menu, press the "Home" button.
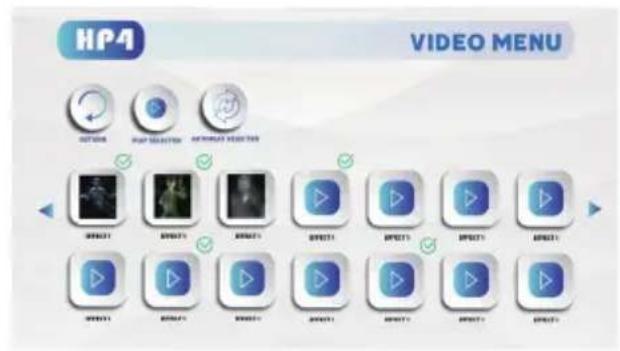
Halloween Effects Menu
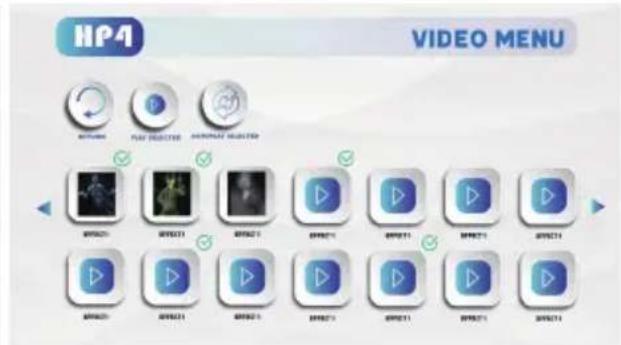
To play special Halloween effects:
- Select the "Halloween Video Player" icon in the Main Menu then choose the your preferred effects in the "Video Menu".
- Select effect(s) you want to play and press the "Play Selected" icon, The effects will be played in a loop.
- Select "Reset" icon if you wish to Deselect all effects.
- To go back to the previous screen, select the "Return" icon.

AutoPlay
What is the HP4 AutoPlay™ feature? The AutoPlay function enables the HP4 projector to directly boot and play video(s) the user selects when the projector is turned on. This allows a specific video to be played directly upon projector startup without the user needing to select the video each time. The AutoPlay™ function works in conjunction with the onboard Timer system – which can be set to turn on and off the projector each time.
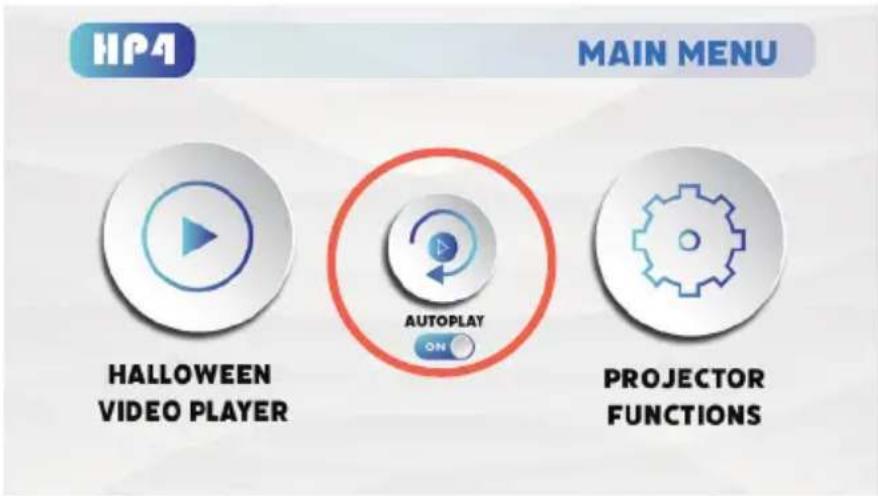
AutoPlay
Selecting a Single or some Videos for Playback:
- Turn on the "AutoPlay" function in the main menu
- Go to the Halloween Videos Menu
- Choose the video(s) that you want to play and select the "Play Selected" icon
- The AutoPlay™ function works in conjunction with the onboard Timer system – which can be set to turn on and off the projector each time (See page 32).

- Select the "Projector Function" icon in the Main Menu
- In the "Functions Menu", select the "Video" or "Photo" icon


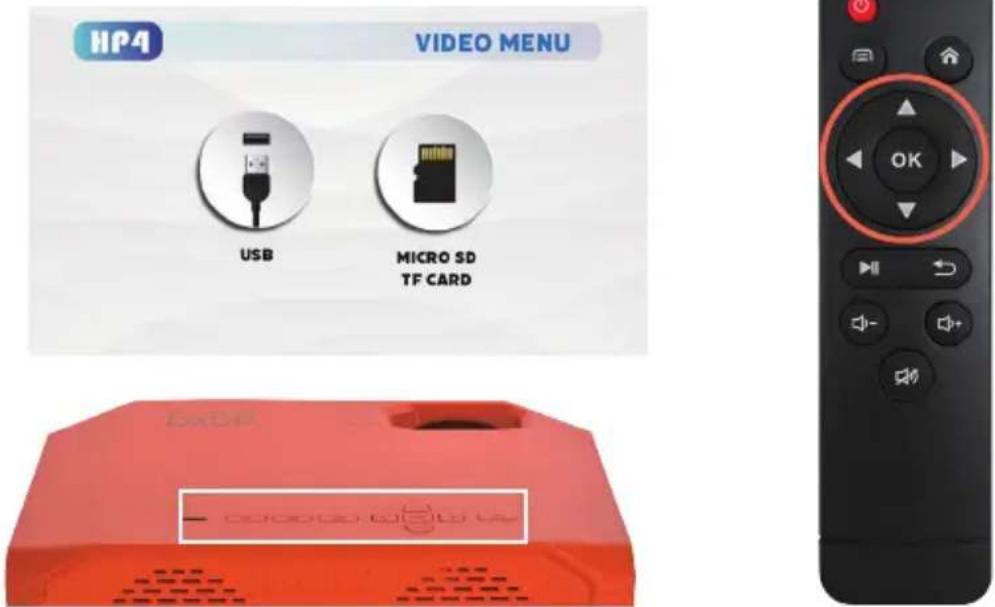
Files Menu
The HP4 will show all folders and files you have on your USB or TF Card drive. Use the navigation buttons on the navigation pad or the remote control to select folders or files.
■ Connecting to Device via Digital Input
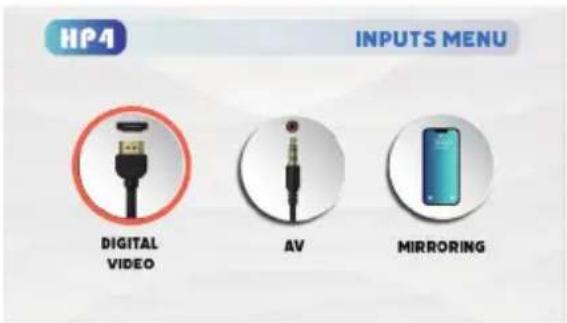
- First, a digital input cable is required from your HP4 to your other device.
- In the Functions Menu, Select the "Inputs" Icon, Then select the "Digital Video" Icon

Connectivity to Multimedia Devices
The HP4 can connect to many media devices including: computers, laptops, iPhones, iPads, DVD players, smart phones, cameras, video game consoles and other peripherals with ease. The HP4's digital input is compatible with HDMI interface. The connection type is "full sized".
*Some smartphones require video out capabilities to be displayed with the HP4. Check with your phone manufacturer.
Connecting to Digital Input Video Devices
Step 1: Connect one end of the Digital Input Cable to your device's Digital Input port.
Step 2: Connect the other end of the Digital Input Cable to your HP4's Digital Input port.
Step 3: In the Input Menu, select the "Digital Video" Icon. Your HP4 should now be mirroring the content from your device.

Note: If you're connecting to a computer or laptop and the projector does not automatically mirror it, read onto the next page for more information.
Step 4: After connecting your projector to your computer or laptop via a digital input cable, you may need to enable Digital Video output on your computer. To enable Digital Video output on your computer most computers require “turning on” the video output feature. Each computer is different. Please consult your owner’s manual for instructions to enable Digital Video output. Below are standard instructions for a Windows 10 computer – not all systems are the same.
■ Connecting to a Computer via Digital Input
Step 5: Press Windows+P to toggle through display settings. Select either "Duplicate" or "Extend" depending on your viewing option.
*NOTE: Different operating systems may differ
Step 6: • Right click on computer desktop and select "Screen Resolution."
- Display Properties window will pop up and select the Advance Display Settings.
- Please make sure the "Multiple displays" has the "Duplicate these displays" option selected and the Resolution is 1920 x 1080 or below as pictured in the red box.
- If the image is blurry or the text is not legible, adjust the screen resolution.


■ Mirroring Menu
In the Main Menu, choose "Projector Functions" icon, In the Functions Menu, choose "Inputs" icon, then choose "Mirroring" icon.

■ Mirroring Menu
Wireless screen
- Choose "Wireless screen" icon, you can see the projector screen as below
- Please connect your mobile phone to the projector's SSID "Hccast-***** or set the mobile phone and projector connected to the Same WiFi.
- Use built-in AirPlay, AirPinCast, AirPinPCSender to screen mirror from your iOS devices, Android portable devices or Windows PC.

To screen mirror, your devices and the HP4 have to be connected to the same WiFi network. DMCA (copyright) content cannot be wirelessly mirrored. This includes content from streaming services such as Netflix, Hulu, Disney+, etc.
Mirroring Menu
To screen mirror Android device
• After connecting the HP4 and your device to the same WiFi network, please use "Smart View"
To screen mirror iOS device
- After connecting the HP4 and your device to the same WiFi network, please select "AAXA HP4" in the Screen Mirroring menu.

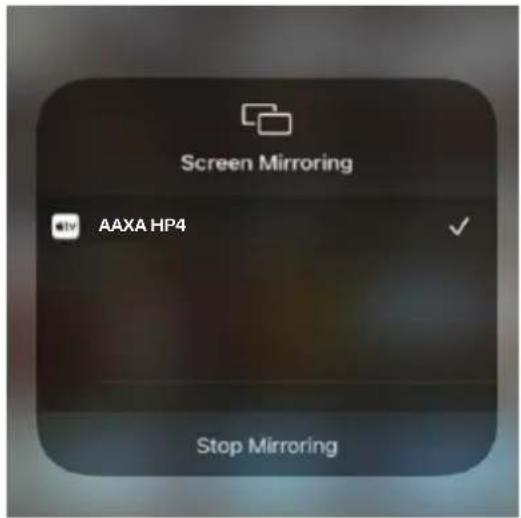
Mirroring Menu
Wired Mirror
- Choose "Wired Mirror" icon, you can see the projector screen as below

Mirroring Menu
To screen mirror Android device
- Connect the smart-phone to projector by data cable
- Scan the code of Android device to install software, "elfcast"
- Then your mobile phone mirror to the projector
To screen mirror iOS device
- Connect your iPhone to projector by data cable
- Press the "trust" in the pop up window.
- Wait a while, your iPhone will mirror to projector
Note: The first connection may take about 20 seconds

natural_image
Red portable projector rear panel with ventilation grille and control buttons (no visible text or symbols)
natural_image
Smartphone displaying a blue abstract background with glowing pink and purple light patterns (no text or symbols visible)
Chapter 4: Settings Menu
The Settings Menu can be accessed by selecting "Settings" icon in the "Fuctions Menu".
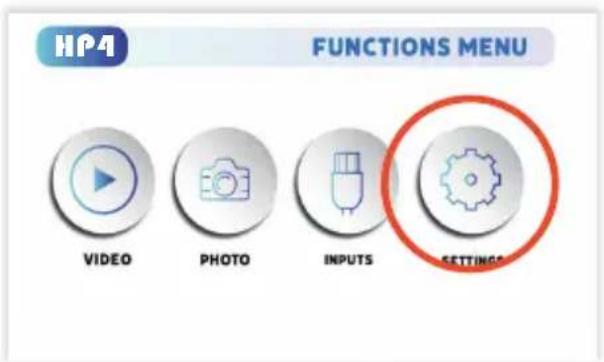

Picture
- Picture Mode
• Color Temperature - Aspect Ratio
- Noise Reduction
- Projection Direction
Sound
- Sound Mode
• Balance - Auto Volume
Options
- OSD Language
- Restore Factory Default
- Slideshow Time
- Software Version
Bluetooth
Timer
- Projector Time
- Automatic Timer
- Projector On Time
- Projector Off time
Picture Menu
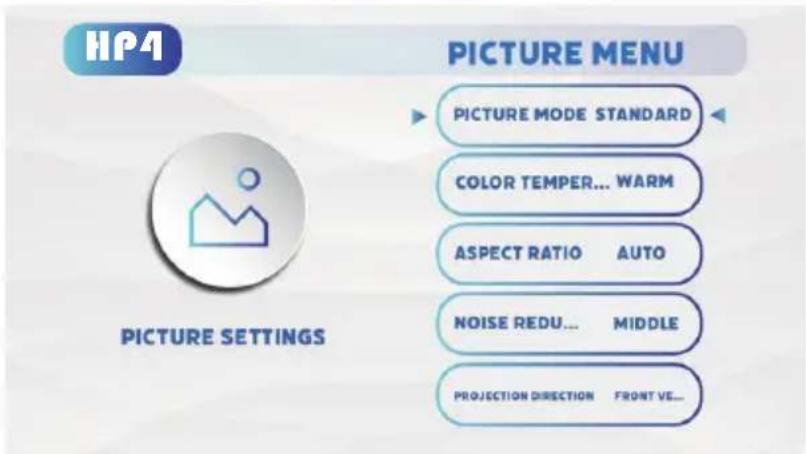
In the Picture menu, you can set up:
• Picture Mode: Standard, Soft, Vivid, User
• Color Temperature: Cool, Medium, Warm, User
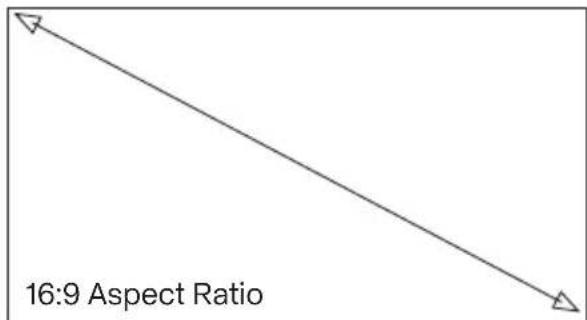
• Aspect Ratio: 16:9, 4:3, Auto
- Noise Reduction: High, Middle, Low, Default, Off
• Projection Direction (Rotate)
Sound Menu

In the Sound menu, you can set up:
• Sound Mode: Standard, Sports, Movie, Music, User
• Balance: Increase or decrease sound balance
• Auto Volume: Turn Auto Volume On or Off
Options Menu

In the Options Menu, you can set up:
• OSD Language: Change the OSD Language
- Restore Factory Default
• Slideshow Time: 5sec, 10sec, 15sec, OFF
- Software Version: Check Software Version
Bluetooth Menu
需替换
In the Bluetooth Menu, you can set up:
• BT Model: On, Off
- Bluetooth Speaker Set: Bluetooth Speaker Name, Bluetooth Speaker Mode
- Search Bluetooth
- Other device
Timer Menu

In the Timer Menu, you can set up:
- Projector Time: set the Projector Time
• Automatic Timer: Toggle Timer to "On" to have the projector automatically turn On and Off - Projector On Time: Set the time for the projector to automatically turn on
- Projector Off Time: Set the time for the projector to automatically turn off
Chapter 5: Technical Details
Troubleshooting
1. IMAGE IS BLURRED
| Possible Causes Solution | |
| The Projector is not in focus. | Adjust the focus wheel on the top of the projector until the image the crisp and clear. Make sure that the projector is placed at least 2 feet away from the screen. (check page 6) |
| The Projector is offset from plane / angle of operation. | Move the projector so that it is both 180 degrees and on an evern plane with the screen or adjust the keystone using the keystone adjustment wheel. (check page 11) |
| Possible Causes Solution | |
| The pre-loaded Halloween videos are corrupted. | Please contact our customer support via emailinfo@aaxatech.com, we will help you download new Halloween effects. |
| The TF card is corrupted Please contact | our customer support via email info@aaxatech.com, we will helpyou with a replacement. |
Technical Details
Troubleshooting
- Be sure to setup the computer to enable a video signal output. On some laptops this is done by pressing and holding Function F5 key. If using the HP4 as an external monitor on Windows based systems, this can be done by selecting “extend my desktop to this monitor”.
- Depending on the video driver different resolutions may need to be selected for proper output.
4. THE PROJECTOR DOES NOT TURN ON
| Possible Causes Solution | |
| There is no power. | Check to ensure the power outlet source is good. Check the power adapter to ensure a proper connection with the wall outlet as well as the projector. |
| Cannot power on the projector from the remote control. | To power on the projector, press and hold the “On/Off” button on the top of the projector. Next, if the projector is not powered on, press the Power button on the remote control. |
Technical Details
Troubleshooting
5. NO PICTURE / FILE NOT SUPPORTED
| Possible Causes Solution | |
| The video source is not properly connected or selected | Check the video source signal to ensure that it is properly connected. Select the current input source by choosing the input desired from the main menu |
| Incorrect file extension / Video is encoded with incorrect codec | Please refer to “Specifications” page to see which file types and codex are supported. Verify that the file was encoded properly. |
Specifications
| Brightness: | 250 LED Lumens |
| Maximum Resolution: | 1080P |
| Native Resolution: | 1920x1080 (1080p) |
| Contrast Ratio: | 2000:1 |
| Aspect Ratio: | 16:9 |
| Projection Lens: | Manual Focus |
| Image Size: | 18~200 inches |
| Video in: | HDMI, AV (3.5mm), Wireless Mirroring |
| File Play Back: | USB Memory Stick reader (up to 64GB), Micro SD/TF Card Reader (up to 64GB) |
| Audio Output: | 3W High-Low Frequency Speaker, Stereo speaker / headphone mini-jack |
| Menu Language: | Czech, Danish, German, English, Spanish, Greek, French, Croatian, Italian, Hungarian, Dutch, Norwegian, Polish, Portuguese, Russian, Romanian, Slovenian, Serbian, Finnish, Japanese, Korean, Traditional Chinese, Simplified Chinese |
| USB: | Full Sized USB 2.0 |
| Power Consumption: | 50 Watts |
| Dimensions: | 7.7in x 6.8in x 3.2in |
| Weight: | 2.1lbs |
| Supported File Formats: | MP3 / WMA / OGG / WAV / AVI / MP4 / JPG / GIF / PDF / DOC / XLS / PPT |
| Wireless Mirroring: | Supports iOS, Android |
| Bluetooth Output: | 5.0 Supported |
Notes
aaxa
TECHNOLOGIES
Please direct all customer service inquiries to:
AAXA Technologies, Inc.
17781 Sky Park Circle, Suite #F, Irvine, CA 92614
Tel: +1 (714) 957-1999 | Email: info@aaxatech.com
- CAUTION!
- Table of Contents
- Chapter 1: HP4 at a Glance
- Chapter 2: Getting Started
- Chapter 3: Menu Screens
- Chapter 4: Settings Menu
- Chapter 5: Technical Details
- Remote & Keypad
- Accessories
- Powering ON the projector
- Getting Started
- Standby Mode
- Powering OFF the projector
- ■ Focus Adjustment / Throw Distance
- Focus Adjustment
- ■ Connecting Speakers / Headphones
- Loading External Content
- - Loading External Content Cont.
- How to insert your TF Card
- How to insert your USB Drive
- Keystone Adjustment
- What is Keystone?
- Keystone Adjustments
- How to Correct Keystone
- Main Menu
- Halloween Effects Menu
- To play special Halloween effects:
- AutoPlay
- Selecting a Single or some Videos for Playback:
- Files Menu
- ■ Connecting to Device via Digital Input
- Connectivity to Multimedia Devices
- Connecting to Digital Input Video Devices
- ■ Connecting to a Computer via Digital Input
- ■ Mirroring Menu
- Wireless screen
- Mirroring Menu
- To screen mirror Android device
- To screen mirror iOS device
- Wired Mirror
- Picture
- Sound
- Options
- Bluetooth
- Timer
- Picture Menu
- In the Picture menu, you can set up:
- Sound Menu
- In the Sound menu, you can set up:
- Options Menu
- In the Options Menu, you can set up:
- Bluetooth Menu
- 需替换
- In the Bluetooth Menu, you can set up:
- Timer Menu
- Troubleshooting
- IMAGE IS BLURRED
- Technical Details
- THE PROJECTOR DOES NOT TURN ON
- NO PICTURE / FILE NOT SUPPORTED
- Specifications
- Notes
- aaxa
- TECHNOLOGIES
Brand : AAXA Technologies
Model : HP4
Category : Video projector